
Do you want to create a registration form with PayPal payment fields or a custom PayPal payment form in WordPress?
PayPal makes it easy for users to choose their preferred mode of payment. At the same time, it makes it convenient for you to receive the amount in your connected bank account. It is one of the simplest ways of accepting money online while upholding your site’s security.
At IsItWP, we always prioritize finding the best, most convenient, and easy-to-use ways to help our readers. We know that WordPress payments and gateways are sensitive areas when running an online store. Because of this, we have tried and tested several ways to receive and send money in WordPress so that you don’t have to.
In this article, we will walk you through creating a registration form with PayPal fields and a custom payment form using a tool we not only tested but use ourselves: WPForms.
We will show you how to customize your PayPal registration or payment form so that you can give your users the best checkout experience.
What is the Difference: A Registration Form with PayPal Payment Vs. Custom PayPal Payment Form?
While these 2 form types sound like they do the same thing, they are slightly different. A registration form with PayPal fields primarily focuses on 2 things.
First, with fields like name, email, address, and more, you can use this form to allow users to sign up for your site. Second, the same form is used to collect PayPal payments. This type of form can also allow users to select different pricing tiers or membership options.
This means it is best for situations where sign-up and payments need to be combined. This is why registration forms with PayPal fields are often used to register for events, webinars, memberships, subscription services, online course enrollments, and more.
On the other hand, a custom PayPal payment form is designed to collect WordPress payments without users needing to register first. You can use it to collect user information, but its main function is facilitating payment transactions.
As a result, it is suitable for collecting payments for products, eCommerce checkout, freelance services, or donations without necessarily linking them to a registration process.
Why Choose a Registration or Custom Payment Form with PayPal Fields?
As mentioned, PayPal is one of the most popular online payment apps because it allows you to receive money conveniently from different WordPress gateways. They can choose to pay using PayPal, credit or debit cards, and any other regional payment gateway.
To add to this, you can receive the money in different currencies, allowing you to accept payments from across the globe. You can also set up a personal or business account according to your needs. The best part is that a PayPal registration form lets you collect payments without setting up an eCommerce store. This is because it comes with a simple setup and is easy to manage as well.
Now, since we will be discussing two types of WordPress forms with PayPal payment, we have divided the article into sections. To help you easily navigate this post, select a link below to jump to the section of the article you want to read.
- How to Create a Registration Form with PayPal Payment Fields
- How to Create a Custom PayPal Payment Form For WordPress
With that said, let us show you how to build these WordPress PayPal forms.
How to Create a Registration Form with PayPal Payment Fields
To create the PayPal registration form, you’ll need to sign up for a PayPal account. Don’t worry, this is a straightforward process and takes you only a couple of minutes. You have the option to create either a PayPal business or personal account, so make sure you select one that meets your needs.
As mentioned, we will use WPForms, WordPress’s #1 form builder, to create the registration form with PayPal payments.
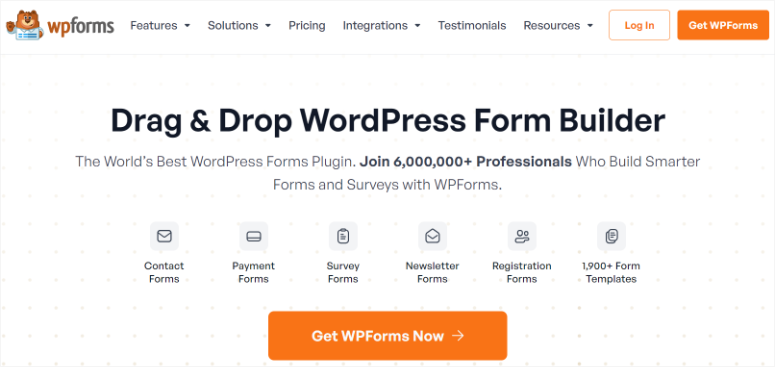
WPForms is the best form builder because it has all the features you need to sell products without an online store or complex setups. You can quickly connect PayPal or other popular payment gateways with a few clicks, making creating a registration form with purchase options easy.
It has a drag and drop form builder and 1,900+ premade templates. As a result, all you have to do is choose the right template, make a few easy edits with the visual form builder, and sync the form to your PayPal account.
From start to finish, you can be done in under 5 minutes! This makes WPForms the best payment plugin for WordPress sites.
With WPForms, you’ll enjoy:
- PayPal Addon: A built-in addon lets you connect your PayPal account with WordPress to collect payments online.
- Zero Coding: Create a fully functional registration form with PayPal payments without writing any code.
- Responsive Templates: Hundreds of readymade templates to launch a website form quickly. All templates are mobile-friendly and look great on any screen size or device.
- Payment Records: View all signup form entries with payment records within your WordPress dashboard.
- Spam Protection and Security: Built-in spam protection and CAPTCHA integration. It blocks fraud form submissions automatically.
After you create the form, WPForms makes it easy to add it anywhere on your site with just a click. As users start registering, the payments go straight to your PayPal account. Isn’t that easy?
For more details, we recommend you check out our latest WPForms review.
Now, let’s look at the step-by-step process of creating a registration form with PayPal payment fields in WordPress.
Step 1. Install and Activate WPForms Plugin
The first thing you need to do is sign up for a WPForms account. WPForms has a free version of the plugin. But, you’ll need to sign up for the WPForms Pro or higher plan to access the PayPal addon.
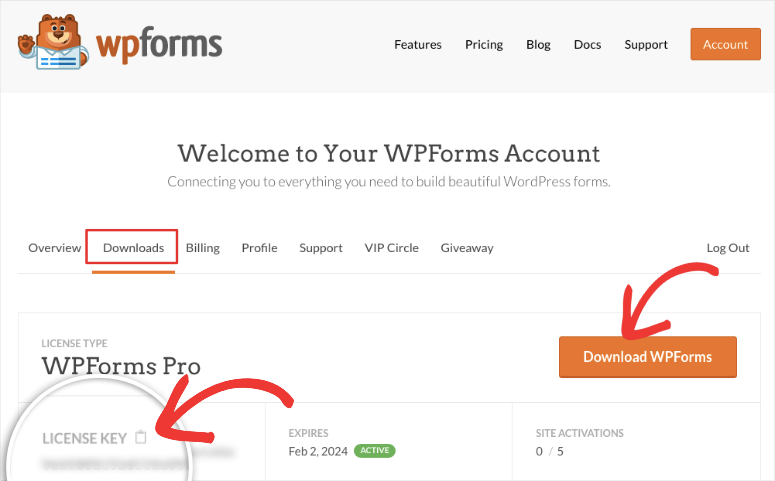
Once you purchase a plan, head into your WPForms dashboard and navigate to “Downloads.” Here, download the plugin ZIP file to your PC. While you are on this page, also copy the License Key, you will need it to activate the pro version of the plugin in WordPress.
After this, head to your WordPress dashboard and go to Plugins » Add New Plugin. Here, upload, install, and activate the WPForms ZIP file like you would any other plugin.
Not sure how to upload the plugin to WordPress? No worries, follow our guide on how to install a WordPress plugin.
Now, to activate the license of this form builder plugin, go to WPForms » Settings under the General tab. Here, paste the code you copied earlier in the License Key text bar and hit “Verify Key.”
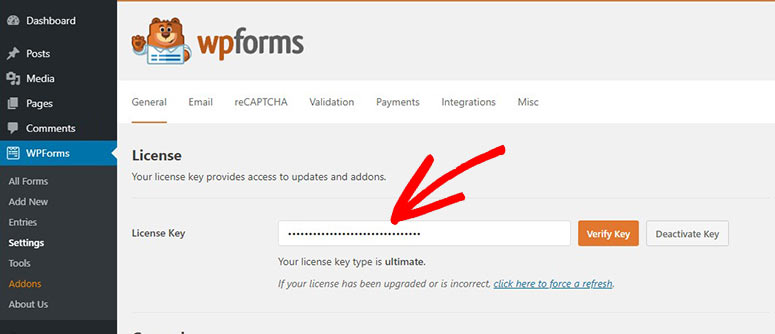
That’s It! WPForms is now active on your site, and you can move to the next step.
Step 2. Install and Activate the PayPal Addon
Now, to create a registration form with PayPal fields, you must integrate WPForms with this online payment gateway in WordPress.
Luckily, there’s a PayPal addon you simply need to activate, and WPForms will handle the rest for you. WPForms uses addons to ensure the base plugin is light and secure. As such, WPForms addons allow you only to add functionalities you need, making it more user-friendly.
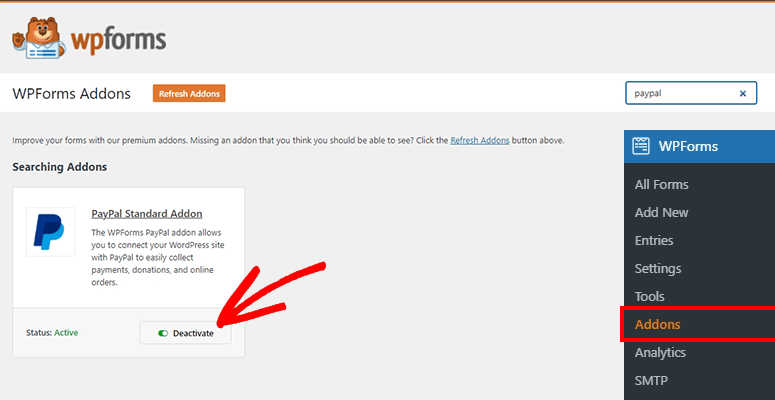
To do this, head to WPForms » Addons in your WordPress admin area. Here, you will find +34 addons that you can quickly set up. To make it easier for you, use the search bar to find the “PayPal Standard Addon.”
Next, install and activate the addon to fully integrate the PayPal payment system to your WordPress website.
Now, let us show you how to create your registration form with WPForms.
Step 3. Create a Registration Form With WPForms
WPForms makes it super easy for you to create any type of form you want. It does not matter what you want to create; the process remains the same.
First, access WPForms » Add New from your WordPress admin dashboard.
Here, start by entering a name for your new registration form. You can change or update the form name later if needed. Keep in mind that this name doesn’t appear on the front end to users; it’s only for internal use. But it will be used as the URL slug if you place the form on a new page.
After you create the form name, you can either build from scratch or use a template to launch the registration form quickly. WPForms offers built-in form templates for:
- Simple Contact Form
- Donation Form
- Request a Quote Form
- Billing/Order Form
- Suggestion Form
- Survey Form
- And more…
Again, you can use the search bar on the left menu to filter the templates and find what you’re looking for faster.
For this tutorial, we’ll search and use the “Conference Registration Form” template. This template contains all the fields we need to create a registration form with the PayPal payment option.
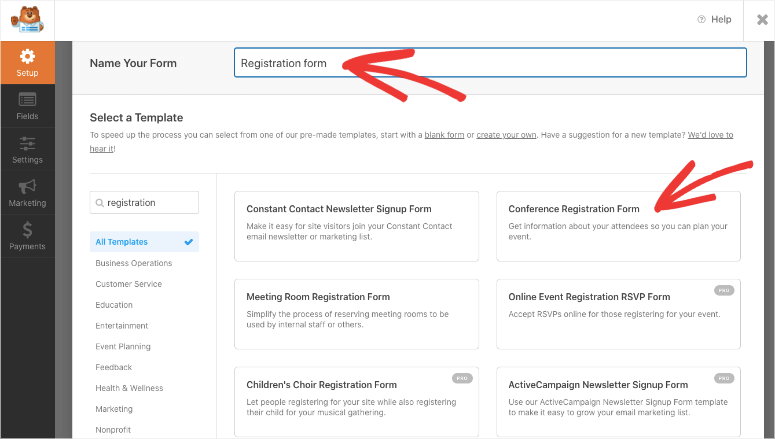
To use this template, hover your mouse over it and select Use Template. You can also use the View Demo button to see how the form will appear to your users when it is live. This can help you experience the form from your users’ point of view to see if it contains everything they need to register and make a payment on your site.
After you select “Use Template,” WPForms will direct you to its drag and drop builder, where you can start creating your form.
We love how well-designed this visual form builder is.
First, it includes a form preview on the right side where you see the exact position of the form elements as they would appear on the live page.
Then, on the left, you get custom form fields. These fields are categorized as Standard, Fancy, and Payment fields to help you easily navigate them. All you have to do is locate the field you want and drag it to where you want it to appear on the form.
Since we are using a template for this tutorial, it comes with all the required fields for users to register and initiate payments already placed. But even so, you can still customize the fields to match your site.
To do this, select the form field in the preview window to open its customization options on the left.
In this case, we selected the “Multiple Choice’ field. Here, you can customize the label, add or remove choices, enable image display for items, add a description, and more.
You can even add an items list with product pricing, fields for shipping address and contact details, and much more.
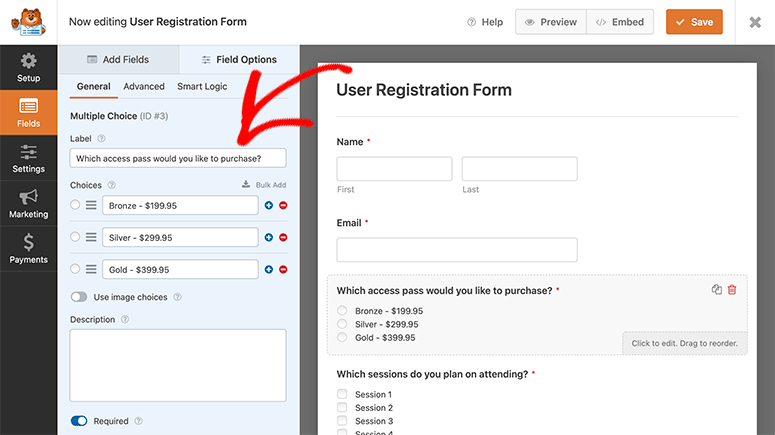
On top of this, you can also add custom fields that you think are important but have not been added to the template. Simply drag and drop the field you want from the left menu to the preview window on the right.
You can add WPForms custom fields that include:
- CAPTCHA
- Image
- File upload
- Dropdown/checkboxes
- Single line text/Paragraph text
- And many more…
Remember, for each field, the customization options will be different but are just as easy to use.
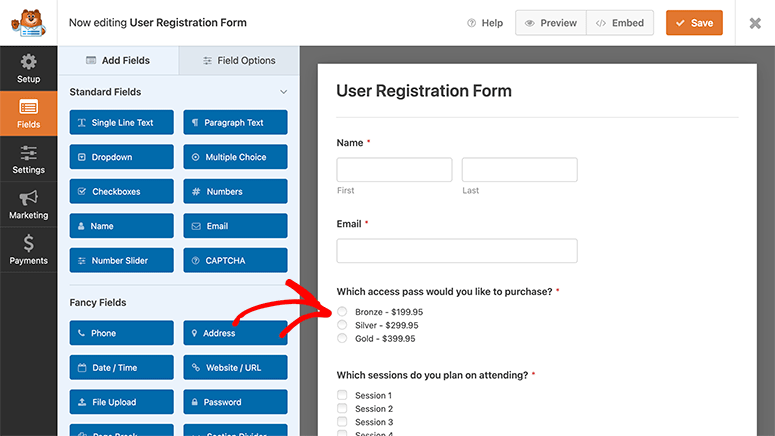
Once you are happy with the customizations of your form, hit Save at the top right corner of the form builder.
Step 4: Add a PayPal Payment Field to the Form
Now to receive Papal payments, you need to add at least one Payment field in your registration form.
To do this, go to the Payment Fields options in the form builder. Here, you get payment options fields like Single Item, Checkbox Items, Dropdown Items, and more.
Remember, the payment field you select should accommodate your products and your customer needs. For example, you can select Checkbox Items or Multiple Items if you are selling many products through the registration form.
For our tutorial, we will go with the “Single Item” payment field. So, drag and drop this field on the location of the form you want it to appear.
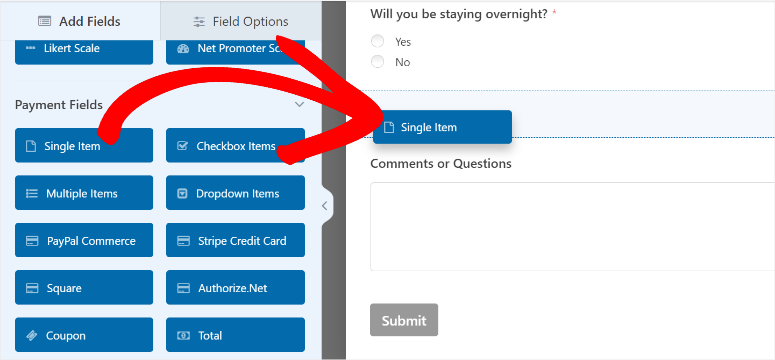
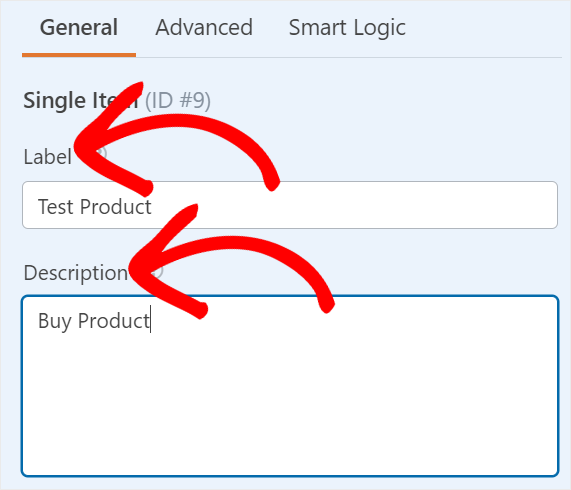
Next, select it in the preview window to open the customization options of the payment field. Start with the Label and Description options, where you will personalize the text to match your product.
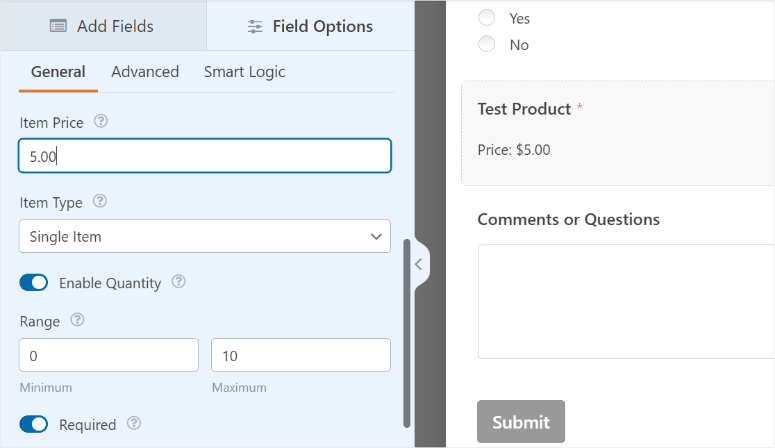
After this, go to Item Price and type the cost. Then, if you want to allow your users to purchase more than one product, use the toggle button to enable “Quantity.” Once this option is activated, use the Range options to set the minimum and maximum number of products that can be purchased.
Finally, enable “Required” with the toggle button. This ensures that a user cannot submit the form until they complete the purchase. The good thing about the Required feature is that you can set it up for any field, not just the payment options.
After making changes to the registration form, click on the Save button at the top right corner of your screen.
Now, let us see how to set up email notifications for the registration form.
Step 5. Configure Email Notifications for Your Registration Form
WPForms has default notification settings to inform you and your customer about the new form submission.
In this case, you’ll get an alert when a new user registers and pays for your conference. On the other hand, the customer will also get an email letting them know that their registration and purchase were a success.
With WPForms, you can customize these notifications, add notification rules, and more. This personalization ensures that you improve user experience and both parties have a record of the transaction.
Let us start by showing you how to set up email notifications for yourself and your team.
1. Email notifications for you and your team
Start by visiting the Settings » Notifications tab from the left panel in the WPForms builder.
In the Sent To Email Address field, you can manually enter your and your team members’ email addresses separated by commas.
But, with WPForms, there should be a default admin notification email ({admin_email}) already set up using Smart Tags. So, instead of manually setting up the emails, you can just leave the Smart Tag as is.
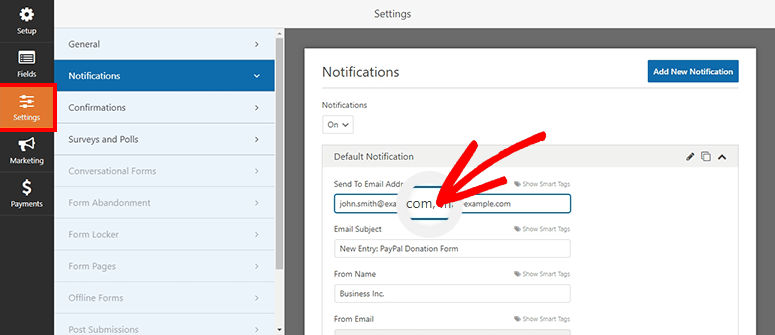
You can then customize the Email Subject Line, From Name, and From Email manually or using Smart Tags.
When you hit the Smart Tags button, a dropdown appears next, allowing you to map fields from the registration form. Below this, you will find the Reply-To and the Email Message text boxes.
These sections will provide the details about the customer registration and purchase. So, for this case, we will specifically use Smart Tags to fetch this information automatically from the registration form after submission.
Then, from the “Reply-To” Smart Tags dropdown, you can either select Name or Email. With this form builder, you can select both options to have detailed information about the customer in your email notification.
Then, in the “Email Message” text box, we will use the {all_fields} Smart Tag so that it fetches all the information about the user from the form.
Great! Now, every time a new customer registers and makes a purchase, you and your team members will receive a notification about it in your emails.
2. Email notifications for customers
As mentioned, when customers submit the form, you can email them to confirm payment and registration. On top of that, you can use this email notification to deliver products. With this feature, you can send them tickets, downloadable products, and any other information they need to receive the product successfully.
To do this, you’ll need to create a separate notification to send automated email alerts to your customers.
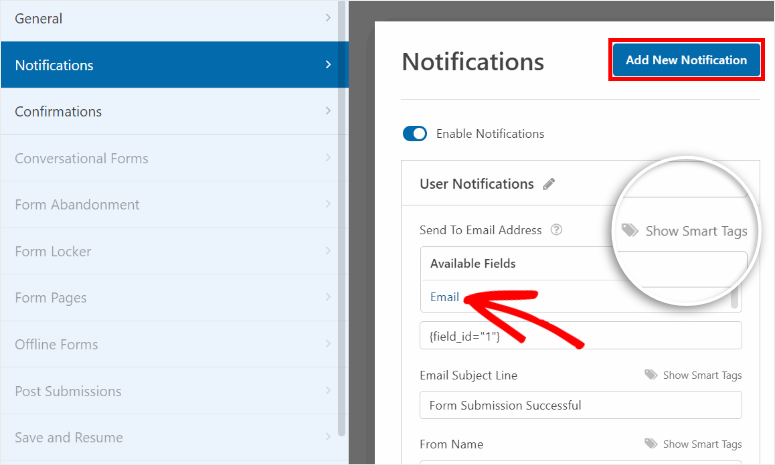
So first, select Add New Notification at the top of the Notifications page in the form builder page. After this, name your notification and hit “Ok.”
Now, under “Send to Email Address,” select Show Smart Tags and then hit “Email” from the dropdown. This way, the notification will be sent to the email the customer used to complete the form.
Next, manually fill out the text bars under “Email Subject Line” and “From Name” with something users will find personal.
If you want users to be able to reply to your email with any queries or follow-ups, you can add a ‘Reply To’ email address as well.
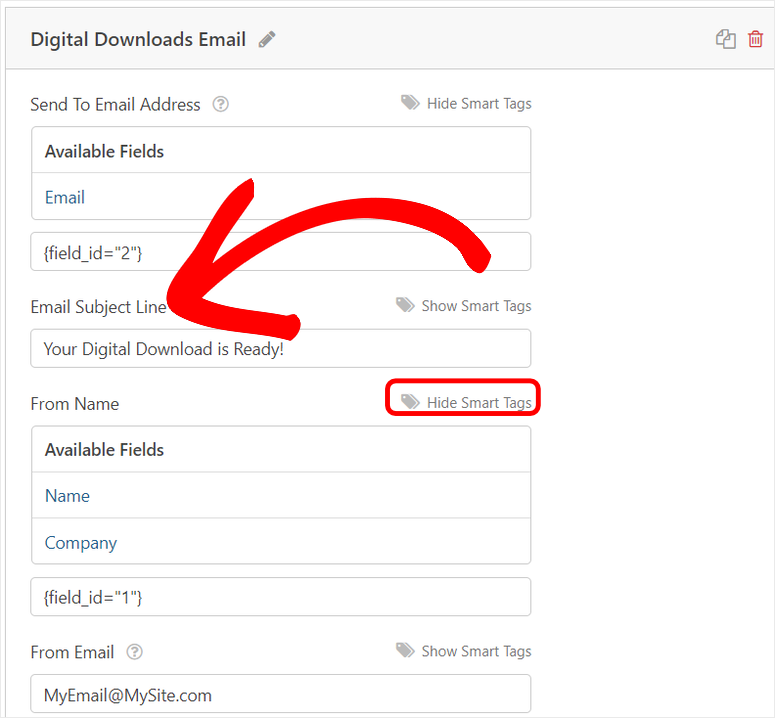
Finally, add a custom message thanking the user for signing up. This can be used to thank the user for registering and buying your product. Such messages are a great way to build a relationship with your users.

But, as mentioned, you can also add links in this section to allow the customer to download content or receive instructions on how to get the product. It is a more direct way to deliver products instead of sending a separate email.
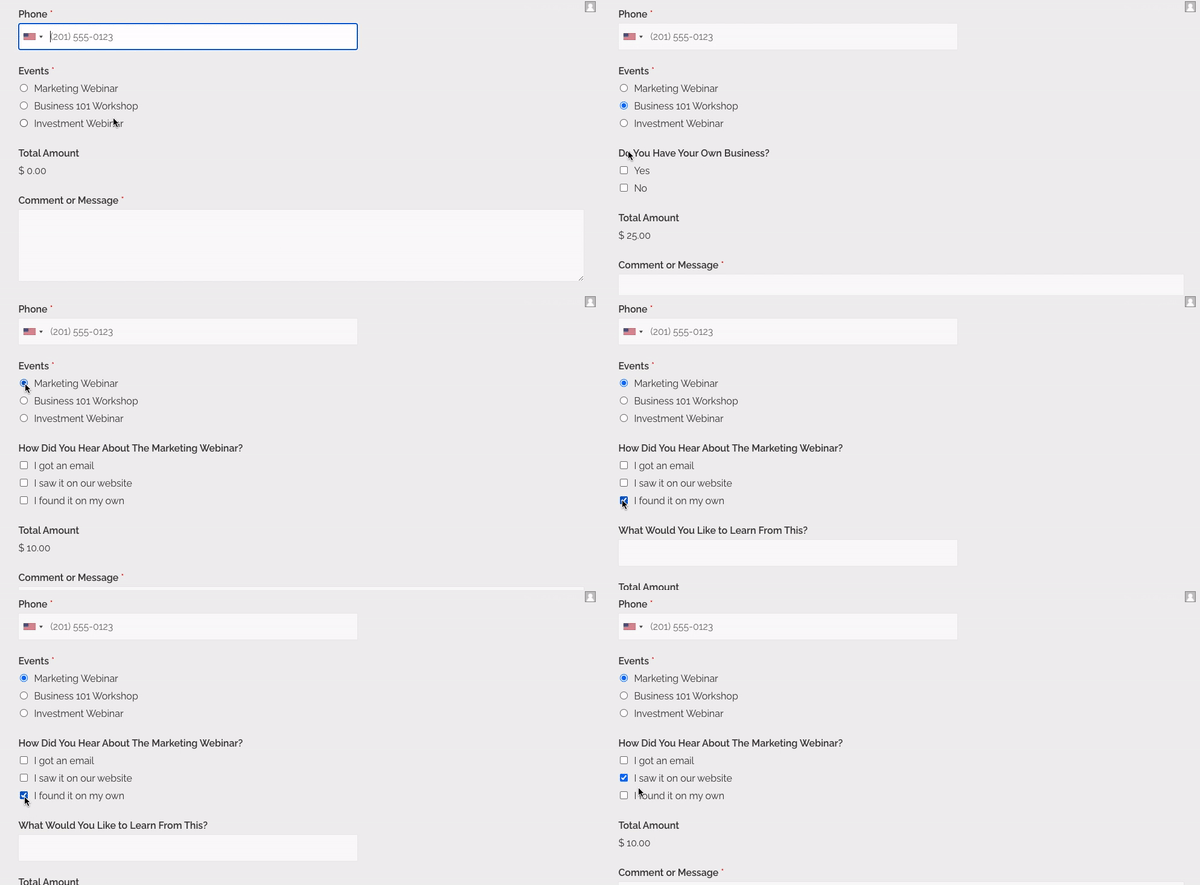
Now, one WPForms feature we like, especially when building forms with payment options, is conditional logic. This lets WPForms trigger emails or additional form fields only when certain conditions are met.
For instance, with conditional logic, you can send different emails to subscribers registered for the gold, silver, and bronze plans. As a result, you can send different product links or separate instructions on how to get a specific product.
To set up conditional logic in WPForms, use the toggle button below the Email Message. After this, fill out the fields that appear next to set up rules.
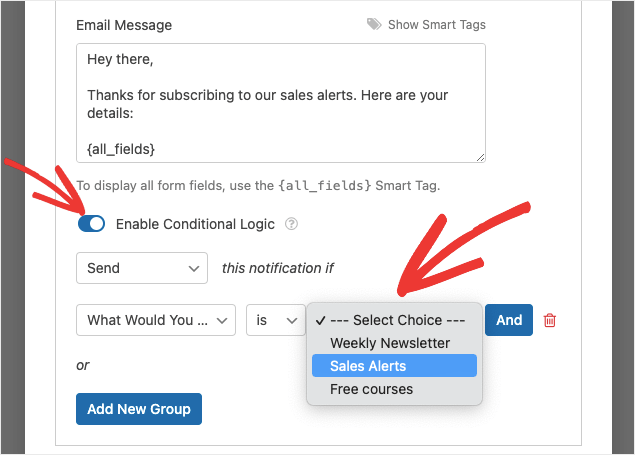
This feature is handy if you are hosting multiple events or have different choices offered in the form. In a nutshell, conditional logic allows your customers to receive a message relevant to what they signed up for.
Check out How to Set Up the Right Form Notifications & Confirmations for more details.
After editing the notification settings, select Save to store your changes.
Step 6. Customize the Confirmation Settings
Aside from the email confirmation, WPForms also lets you display a confirmation or thank you message on your website. This immediate alert lets the user know that the registration and purchase were successful before digging into their mailbox.
You get 3 types of confirmations for users on submitting the form:
- Message: A basic confirmation option that lets you display a custom message to users when submitting the registration form.
- Show Page: Redirect users to a custom thank you page or new URL to continue to explore more pages on your website.
- Go to URL (Redirect): Add a specific URL for customers to visit a different website upon submitting the form.
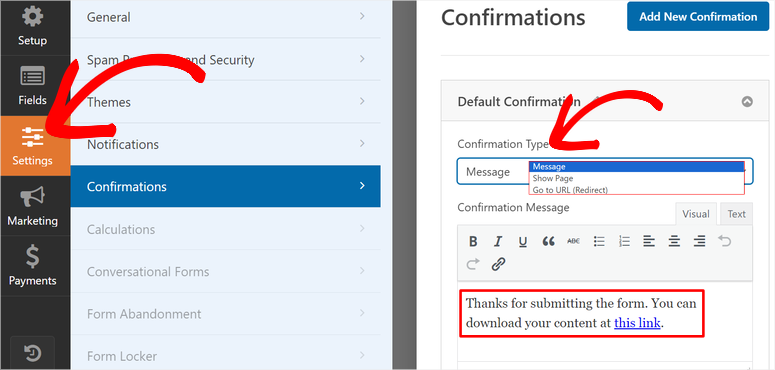
To set up confirmation settings, visit the Settings » Confirmation tab and select an option from the Confirmation Type menu.
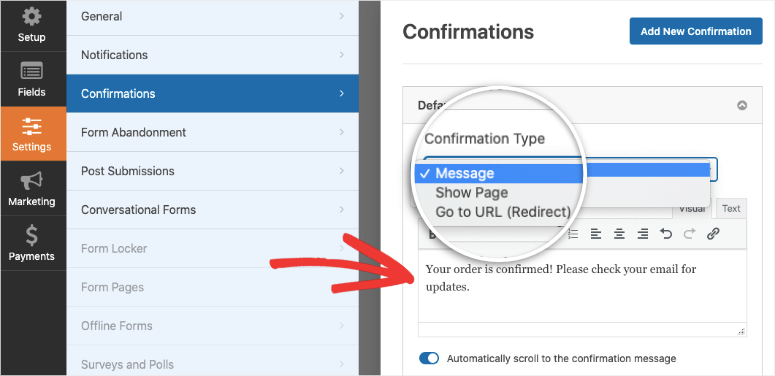
You can write a custom message if you select ‘Message’ as a confirmation type. This appears immediately after the form is submitted.
But, if you choose to Show Page or Go to URL, you will need to enter the link and save your changes. The show Page option redirects your users to a page on your site. While, the Go to URL option takes them to an external page.
Step 7. Integrate PayPal with Your Registration Form
As you recall, we already installed and activated the PayPal addon at the beginning of this guide. With that set, all you have to do is visit the Payments » PayPal Standard tab on the WPForms form builder.
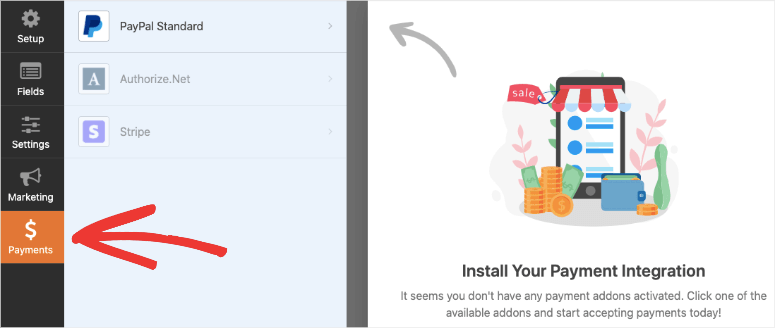
First, use the checkmark to Enable PayPal Standard Payments. After this, WPForms will display the PayPal information fields below so that you can customize them.
Here, enter your PayPal personal or business account details, which include email address, payment type, mode of payment, and more.
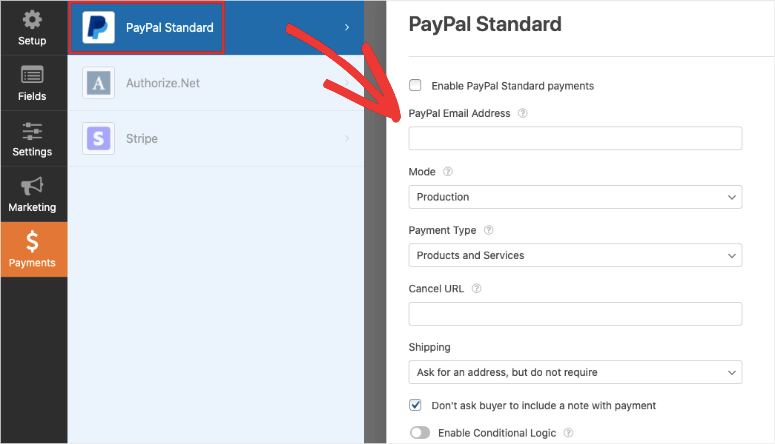
We recommend you carefully check all details related to PayPal payments and hit the Save button to continue.
That’s it! With the form customized, emails and confirmation messages set, and PayPal details added, it is time to add the registration form to your WordPress website.
Step 8. Display the Registration Form With PayPal Payments in WordPress
With WPForms, it’s simple for anyone to add and display a form in WordPress. There are many ways you can add your forms to your websites. You can add the registration form to your pages, posts, sidebar, and other widget-ready areas.
Let us start by adding the form to an existing page.
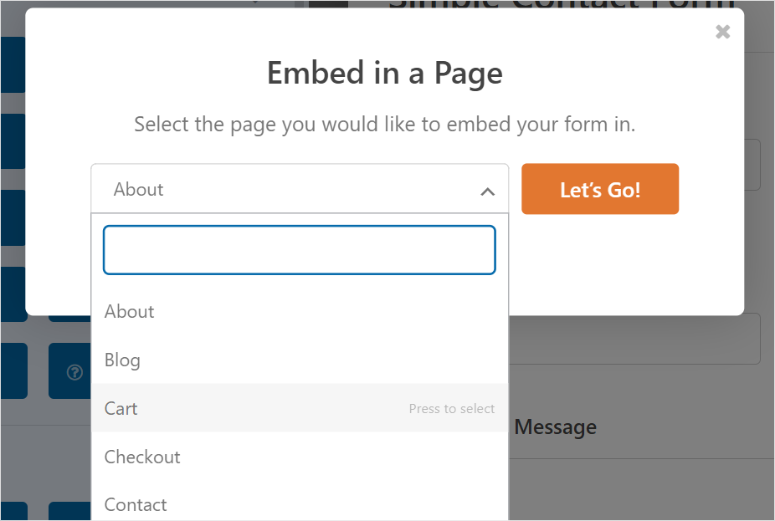
After you save the form, open the WordPress block editor for an existing page in your WordPress dashboard. Alternatively, select the Embed button at the top of the visual form builder. Then, in the next popup, hit “Select Existing Page.”
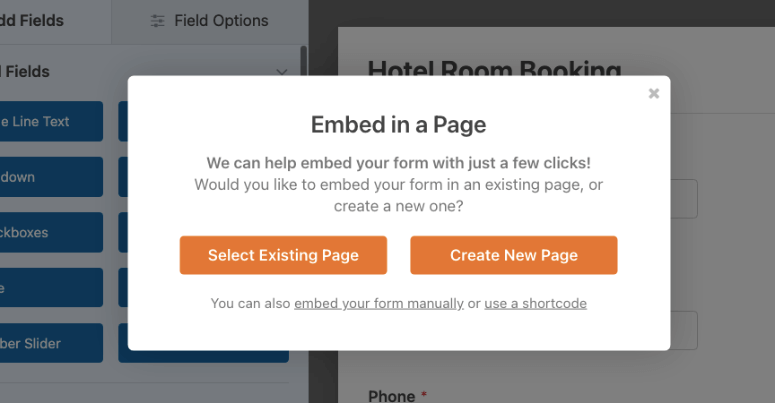
Then, on the following popup, select the page from the dropdown options to which you want to add the registration form. Next, hit Let’s Go to open the page’s block editor.
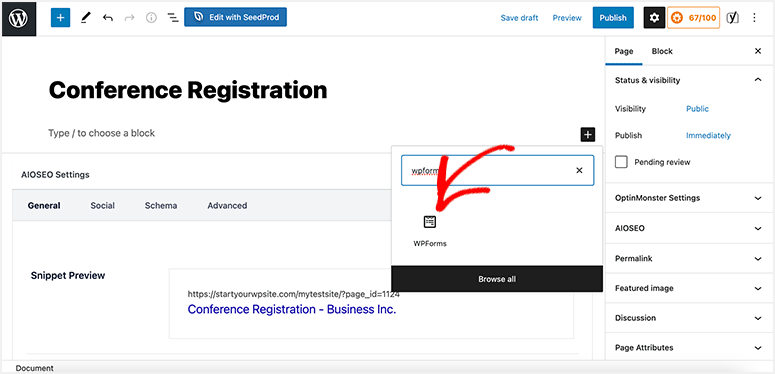
After this, select the Plus (+) sign to open the search bar and find the WPForms WordPress block.
Then, drag the WPForms block to the location on the page where you want it to appear. After this, hit the WPForms block dropdown option and select the registration form you created.
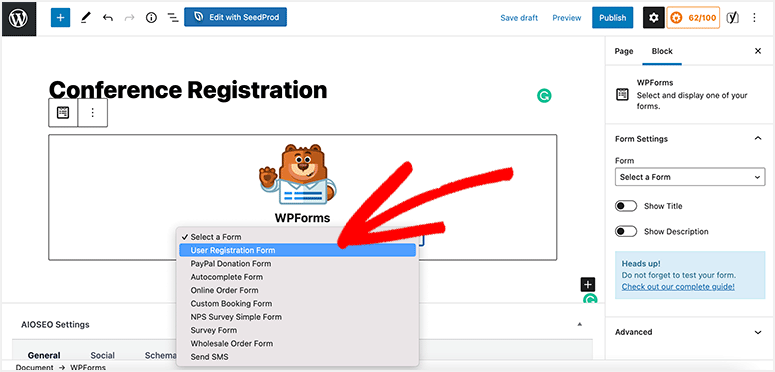
Next, WPForms will preview your form in the WordPress editor so that you can see if it fits your website or if you have missed anything. Now, select the Update button to add the form to your existing page.
You can also add the form to a new page.
Again, select the Embed button at the top of the visual form builder. But this time, select “Create New Page” instead.
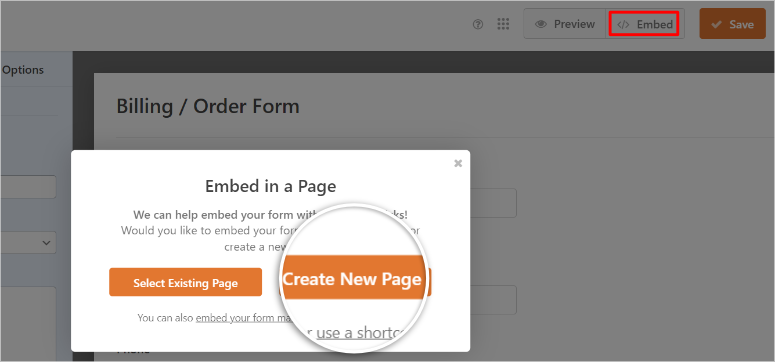
On the next popup, enter the name of the registration form page and hit Let’s Go to open WordPress visual builder.
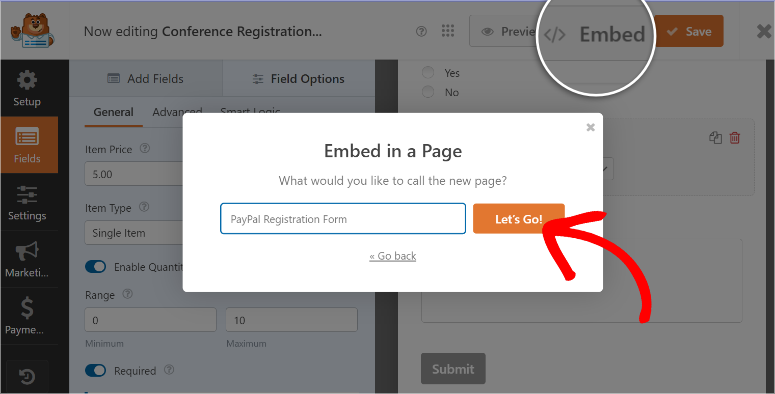
On the next page, you will find your PayPal registration form already placed.
If you want to customize the form page further, you can use the default WordPress blocks. You can also set up the featured image, author and more just like any other page or post.
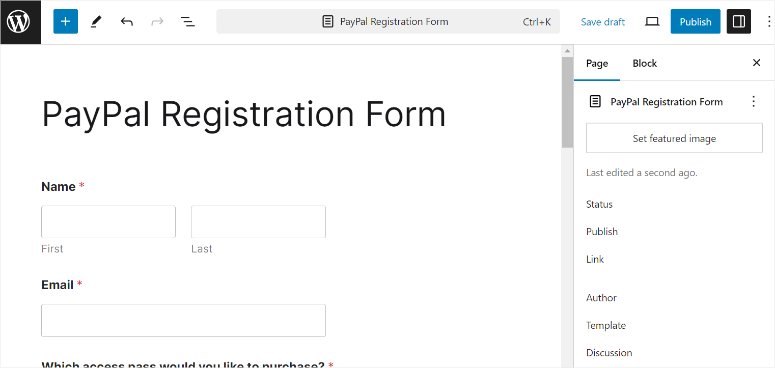
When happy, hit the Publish button, and that’s it. A new page with your registration form is now live on your site.
On top of this, you can add the registration form to any widget-ready area or sidebar.
To do this, you will need to use the form’s shortcode.
To access this, first make sure you have saved the form. Then, go back to your WordPress dashboard and navigate WPForms » All Forms. Here, you will find a list of all the forms you have created using WPForms.
You will also get information like the name of the form, author, date created, and number of entries. Most importantly, you will find the form’s shortcode.
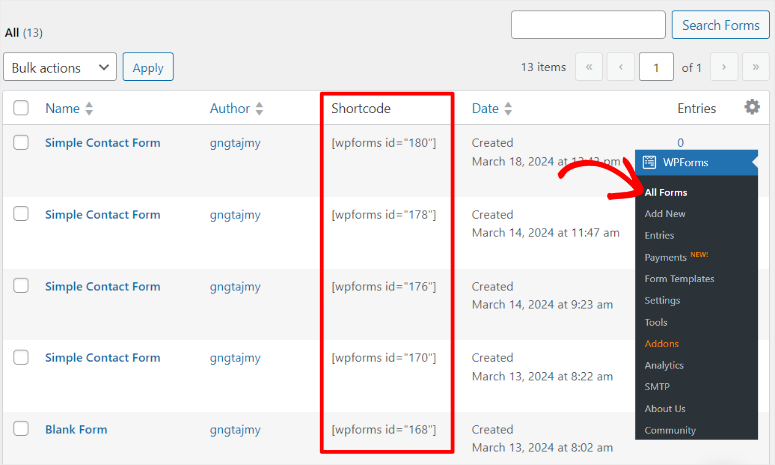
So, copy the shortcode and open a new or existing page. In the page’s editor, search for the “Shortcode” block. After this, drag and drop it in any sidebar or widget-ready area. Once done, paste the shortcode you just copied.
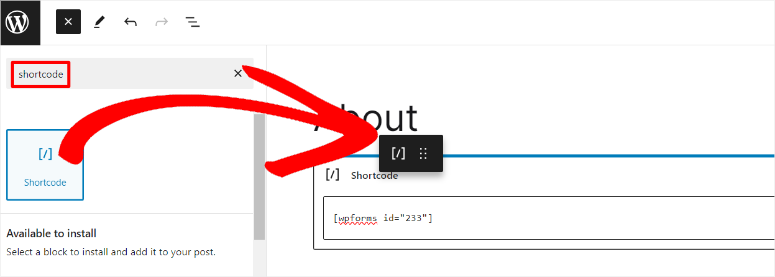
Finally, hit Update or Publish at the top of the editor.
That’s it. The registration form should appear where you placed the shortcode on the live page.
Now, you’ve successfully created and added a registration form with PayPal payments to your WordPress site.
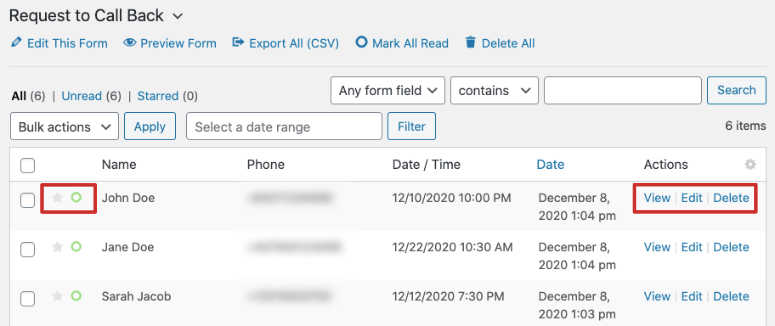
Once users start registering, WPForms will collect the entry and user information. You can access this data inside your WordPress admin panel under the WPForms » Entries. You can select your form and view the entries, graphs, and statistics.
Congratulations! You can now create a WordPress registration form with PayPal payment fields. Next, let us show you how to create a custom PayPal payment form for WordPress sites.
How to Create a Custom PayPal Payment Form For WordPress
A custom PayPal payment form is one of the best ways to easily receive money directly in WordPress. Users do not need to register on your site or jump any other hoops to make a purchase. They just need to add their information and payment details.
You can use this form to sell tickets, products, services, collect donations, custom orders, bookings, and more. Of course, you can use this form also to collect user information, but that is not a requirement.
But, the reality is that manually integrating PayPal with WordPress can take a lot of your time and requires a fair amount of coding.
Once again, we recommend using WPForms, the best WordPress form builder, to create a PayPal payment form.
WPForms allows you to track each form submission and payment within the WordPress dashboard. On top of that, the payments go to your PayPal account, where you can safely transfer the money to your bank account.
Step 1: Install PayPal Commerce Addon
Now, we have already shown you how to install and activate WPForms above. So, you will follow the exact steps above to install and activate the WordPress plugin.
But, for this PayPal payment guide, we will use a PayPal form template instead. So, to access all PayPal templates and get features, you first need to install and activate the PayPal Commerce addon for WPForms.
This WPForms addon allows you not only to receive PayPal payments but also set up card payments. You can also use it to receive recurring payments and set up subscriptions. We should point out, however, that you can only use PayPal Commerce addon with a PayPal business account.
To do this, head to WPForms » Addons. Here, use the search bar to find the “PayPal Commerce” addon. After this, install and activate it.
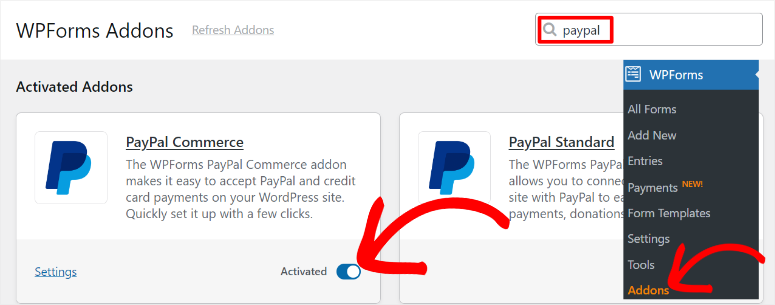
That’s It. You can now use WPForms and the PayPal Commerce addon to receive money through a payment form. Next, let us connect PayPal Commerce to WordPress.
Step 2: Connect a PayPal Business account to WordPress
Connecting WPForms to the PayPal Commerce addon in WordPress is a straightforward process allowing you to easily handle payments through your site.
First, navigate to WPForms » Settings in your WordPress dashboard and select the “Payments” tab. From here, scroll down to the PayPal Commerce section and select “Connect with PayPal Commerce.”
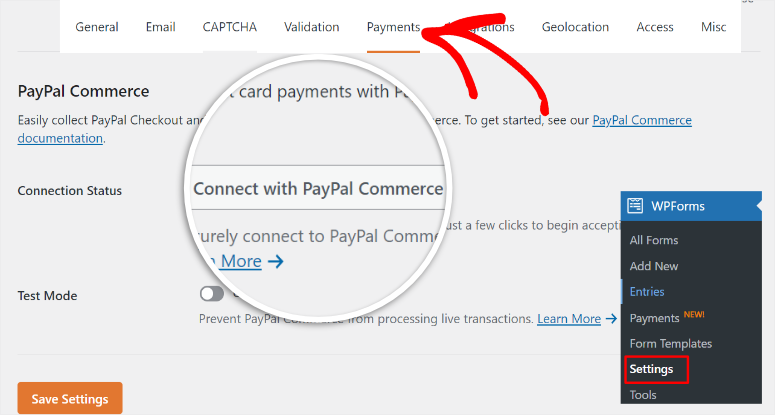
This will prompt a login window where you will enter your PayPal Business account email and select your country or region from the dropdown list.
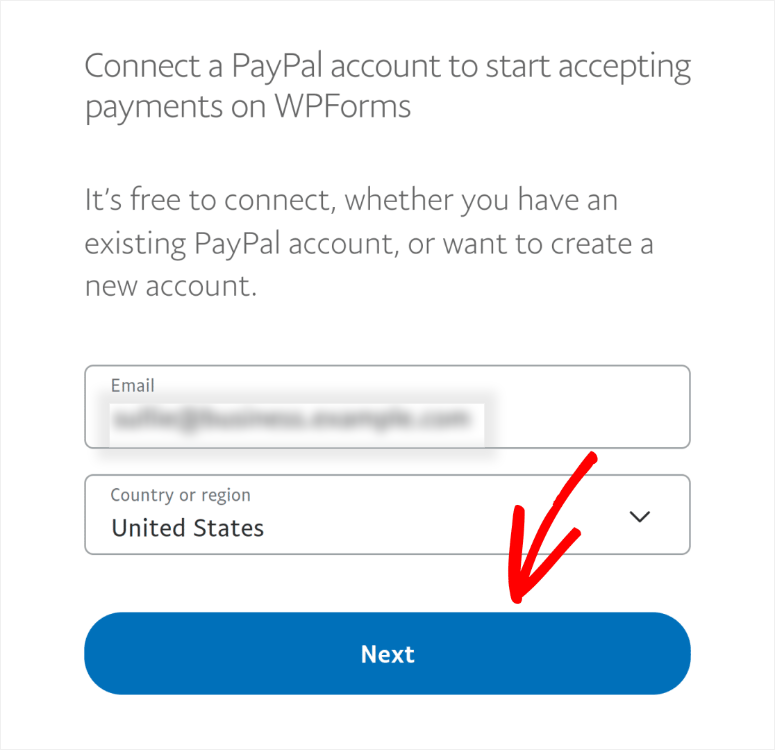
After this, follow the prompts provided in the next popup windows. All you need to do is enter all the personal and business information required to connect your PayPal Business account.
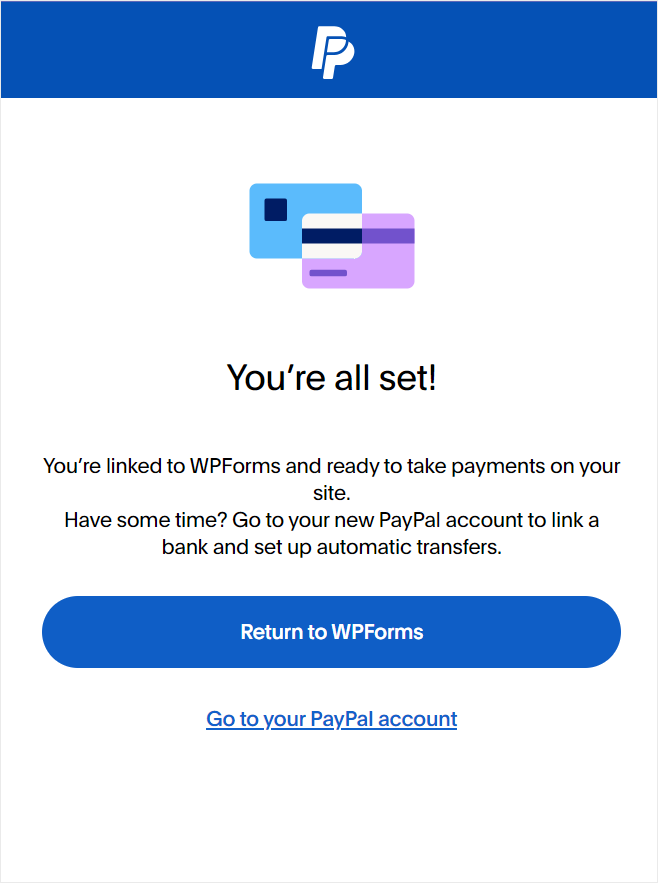
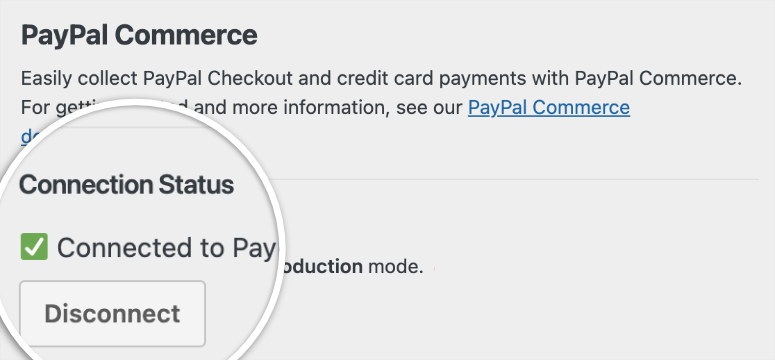
Once done, you will be redirected back to your WordPress dashboard, where you will see a notification letting you know the process was successful.
Step 3: Select a Custom WPForms PayPal Form Template
To access WPForms templates, you will once again navigate to WPForms » Add New. Here, type “PayPal” in the search bar to find all the templates in this category.
You will see options like:
- Alumni PayPal Donation Form
- PayPal Church Donation Form
- School Uniform Order Form
- Wholesale Order Form
- School Trip PayPal Form
- And More…
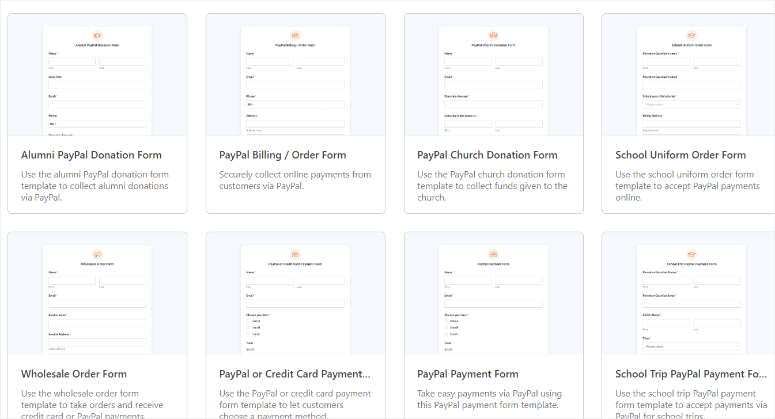
But, for this guide, we’ll use the PayPal Payment Form template because it has all the fields we want to use to create a simple PayPal payment form. Next, hover over the template and select “Use Template.”
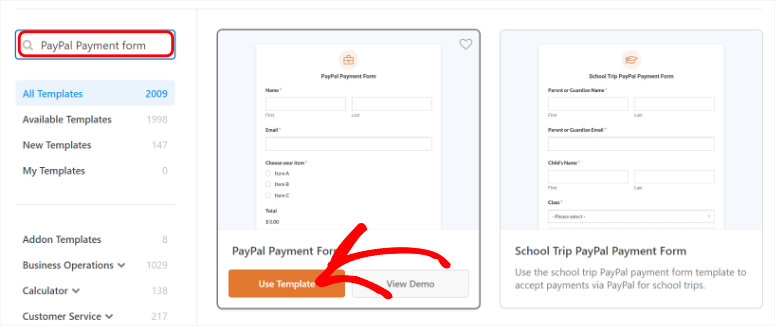
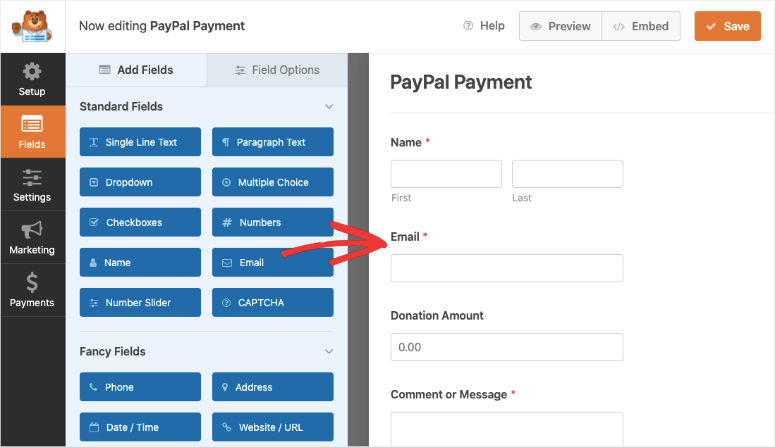
This will open up the WPForms form builder on the next screen. Again, you’ll see the form preview on the right and the form fields on the left.
The form template is ready to launch as-is. But, you can also add any custom fields to suit your goals just like with the registration form we looked at earlier.
Step 4: Connect PayPal to the Form
First, head to the “Payments” tab in your form builder and select PayPal Commerce as your payment gateway. Here, enable either one-time or recurring payment options using toggle buttons.
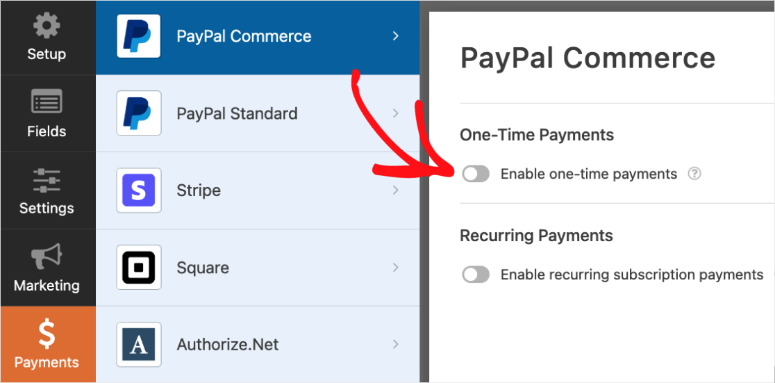
Once done, WPForms will expand mapping options depending on the toggle button you enable. If you select One-Time Payments, you will need to map out the following options using dropdown menus.
- Name – Mapped to “Name.”
- Email – Mapped to “Email.”
- Billing Address – Mapped to “Address.”
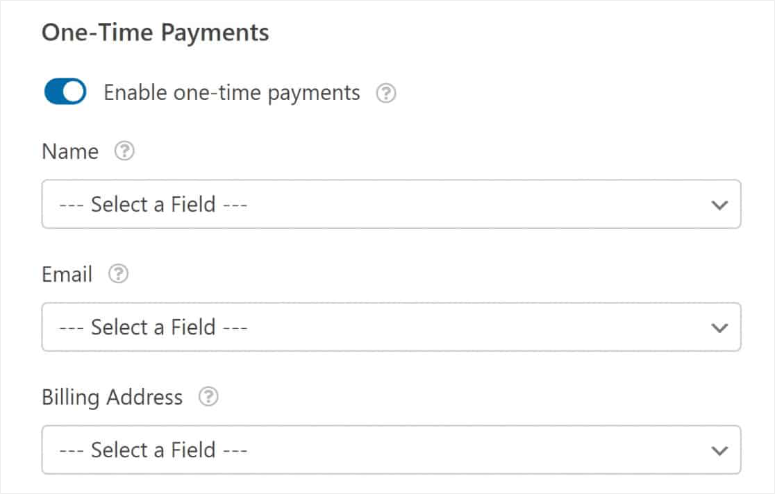
Depending on your form customization, there may be more fields to map. With this option, customers can make single payments for products or services.
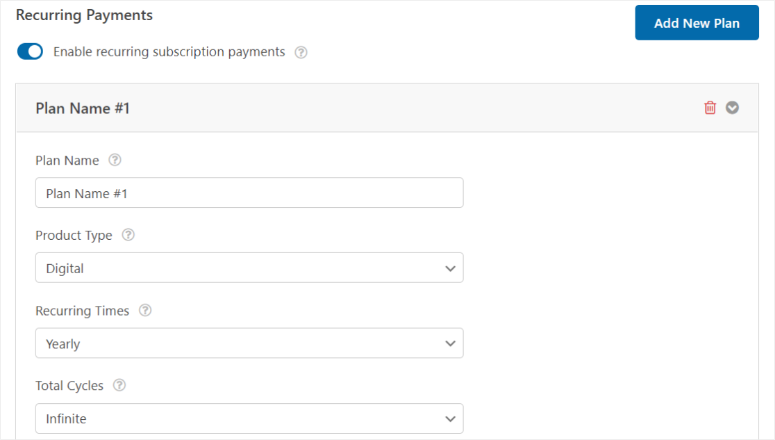
You can also select “Recurring Payments” when using the PayPal Commerce addon.
To do this, create a Plan Name and choose a Recurring Time. These are for subscriptions, with flexible weekly, monthly, or yearly intervals, which you can quickly set up. Next, customize Product Type and Total Cycles.
After this, go to “Fields” and select the Payment Fields section on the form builder page.
Here, drag the “PayPal Commerce” field into your form builder and place it where you want it to appear.
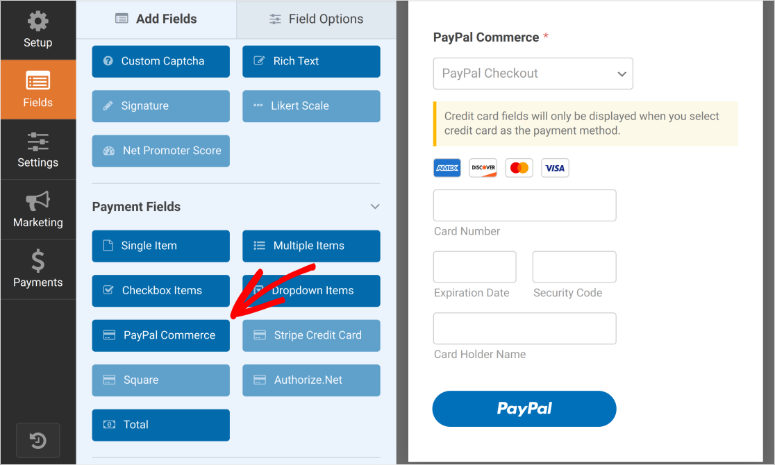
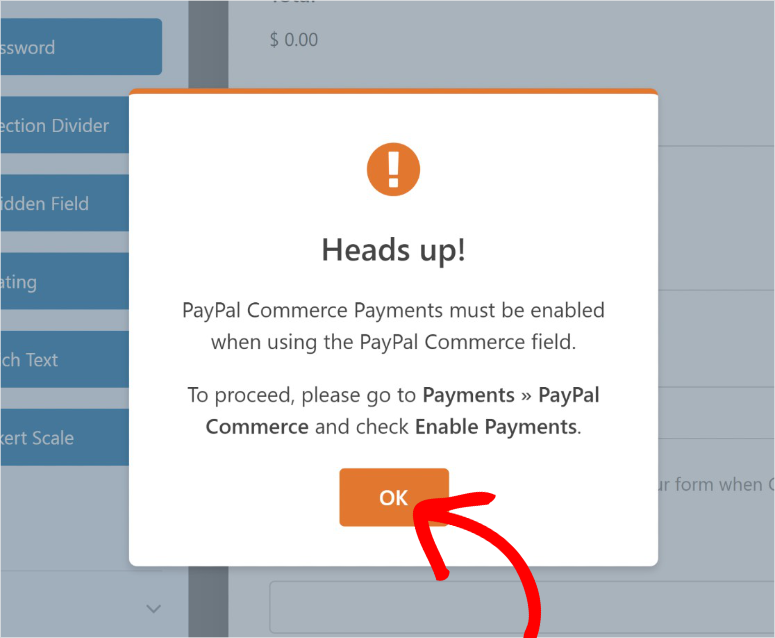
Next, a popup will prompt you to enable PayPal payments, which you can confirm by selecting OK since you have already set it up in “Step 2” of this guide. If you haven’t, don’t worry, WPForms will redirect you to the Settings page at this point.
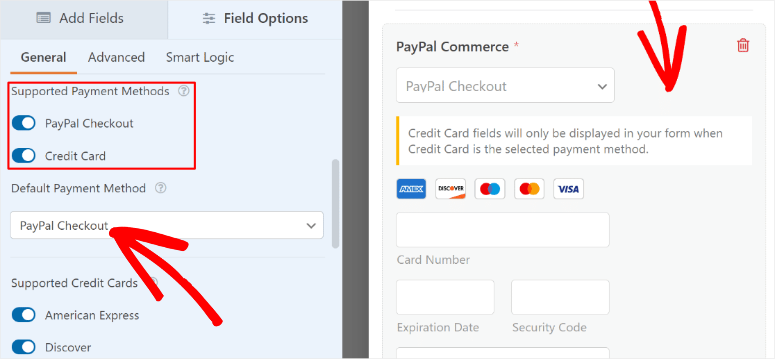
Next, go to Field Options under the “General” Tab. Here, go to “Supported Payment Methods,” where you will again use toggle buttons to enable the options.
You have the option to enable PayPal Checkout and Credit Card. Even though you are using a PayPal addon, WPForms allows you to receive Credit Card payments if the PayPal Checkout toggle button is off.
Below this, select the Default Payment Method. Now, if you have enabled both PayPal Checkout and Credit Card, you can select the one that is most convenient for you as the priority payment method.
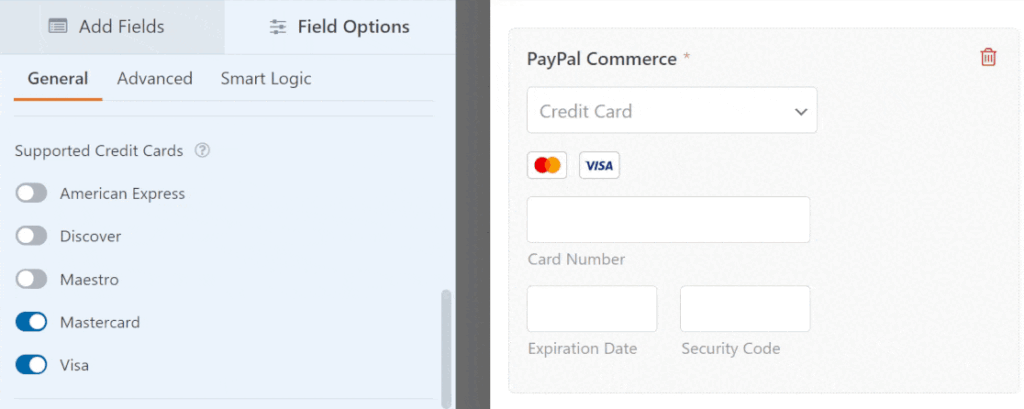
After this, go to the “Supported Credits” section and use the toggle buttons to activate the ones you want. You have options like American Express, Visa, Master Card, Discovery and more.
Step 5: Publish your PayPal Payment Form
Once you are happy with the customizations of your form and the setup of the PayPal payment gateway, it is time to publish. Once again, you have 3 options to publish the form. You can embed the form to a new page, an existing page or use a shortcode to add it to your WordPress site.
That’s all we have for you here. We hope this tutorial has helped you learn how to create a custom PayPal form and a registration form with PayPal fields. If you have any more questions, check out the commonly asked questions below.
FAQs: How to Create Registration and Payment Forms with PayPal Fields
Can I create a PayPal form popup?
Yes, you can. If you’d like to get the PayPal form to open a popup when a customer clicks on a payment button, you can use OptinMonster. It’s the best conversion-optimization tool in the market. OptinMonster is easy to use and lets you target your customers at the right time and place. You can create a popup and then embed the PayPal form inside using the form shortcode. Apart from this, you can add the popup link anywhere on your site, inside URL links, using the ‘Buy now’ buttons or donate buttons. There are so many possibilities. Follow this guide to create an on-click popup for your form: How to Open a WordPress Lightbox Popup on Click.
What is the best free payment plugin?
WP Simple Pay is the best free payment plugin for WordPress. It makes collecting payments online so simple for anyone to set up and use. You can accept one-time and recurring Stripe payments on your WordPress site. And, all of that without setting up a WooCommerce store and a shopping cart.
What is the best donation plugin for WordPress?
WP Charitable is the best WordPress plugin to help you collect donations. It was created to help non-profits raise funds without being charged hefty fees and losing control of their campaigns. You can accept online donations through PayPal and offline. These options are available by default and are free. All you have to do is click a few buttons to enable the PayPal donation option.
Final Say: How to Create Registration and Payment Forms with PayPal Fields
WPForms is hands down the best WordPress form builder plugin that allows you to receive payment with PayPal. The best part is you can use it to build more forms for your site, like a contact form or a request to call back form. This allows potential customers to contact you to learn more about your product or cause. This will help you overcome objections and increase registrations, sales, and conversions.
You’re also not limited to PayPal payments. You can also integrate the form with Stripe, Authorize.net, and Square Payments.
That’s all we have for now. We hope this tutorial has helped you learn how to create registration and payment forms with PayPal fields and a PayPal payment form.
For your next steps, you’ll want to check out these resources to further increase user registrations for your conference or events:
- 8+ Best WordPress Plugins for Affiliate Marketers
- How to Create a Squeeze Page in WordPress That Converts
- How to Sell on WordPress with PayPal (Step by Step)
The first article lists the 8 best WordPress plugins for affiliate marketers. The next post walks you through how to create a squeeze page. While the last article details how to sell on WordPress with PayPal.

Comments Leave a Reply