
Want to learn how to accept Square Payments on your WordPress site?
Square is one of the popular payment gateways that is designed for mobile users to easily make payments via credit cards.
It is perfect for online stores and merchants that want to collect payments from customers directly from their mobile devices or by entering their credit card information.
With the help of a WordPress plugin, you can also connect this payment gateway to your website and sell any type of product with ease.
In this tutorial, we’ll show you how to add the Square payment gateway to your WordPress site in a few simple steps.
The Easiest Way to Add Square Payment to WordPress
There are many payment plugins that are available on the market to integrate your site with Square. However, you need to choose the one that ensures secure and reliable payments.
If you’re using WooCommerce, then you’ll want to use the Square for WooCommerce plugin.
However, in this tutorial, we’ve picked WPForms because this works for all kinds of WordPress sites.

WPForms is the #1 drag and drop form builder that lets you build any type of WordPress form such as contact forms, registration forms, order forms, donation forms, and more.
One of the best things about WPForms is that it offers seamless integration with popular payment gateways such as Stripe, PayPal, and Square. So, you can easily add Square payment to WordPress forms without any coding knowledge.
To get started, WPForms offers a template library where you can choose from a collection of pre-designed form templates. You’ll find a form template for every purpose such as newsletter signup, payment, product order, and many more.
Also, the WPForms form builder is easy to use and very intuitive so you can customize your forms the way you want.
Highlights:
- Mobile-responsive form templates
- Beginner-friendly interface
- Customizable email notifications and confirmation messages
- eCommerce form fields
- Options to set up currency
- Conditional logic and conversational forms
- Built-in spam protection
- Integration with email marketing services
- Form entries management dashboard
- And much more
There’s so much you can do with WPForms. It gives you access to many advanced features and tools so you can add more functionalities to your WordPress website.
When it comes to the privacy and security of your online transactions, WPForms is the best option. It doesn’t store any credit card information of your users. These details are directly sent to Square through your billing forms.
With that said, let’s learn how to easily add Square payment to WordPress.
Step 1: Install and Activate the WPForms Plugin
First, you need to sign up for a WPForms account. There’s a free version of the plugin that you can install from the WordPress repository.
To accept payments and set up currency for your website, you need to upgrade to a pro plan. WPForms offers pricing plans that are tailored to fit the requirements of different users and businesses. So, you can choose a plan that is suitable for you.
After you sign up, you can access your WPForms account dashboard. Here, open the Downloads tab to find your download file and license key.
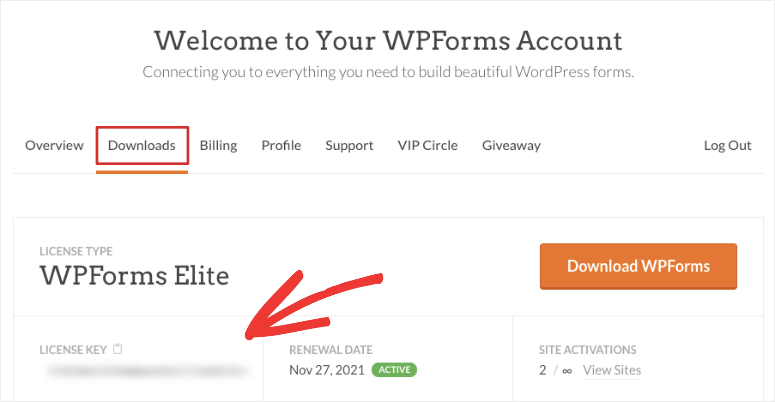
You need to download the plugin file and install it on your WordPress site. If you need help installing a plugin then, see this guide on how to install a WordPress plugin.
Once you install and activate WPForms, head over to the WPForms » Settings tab from your WordPress dashboard. Enter your license key here to activate your pro features.
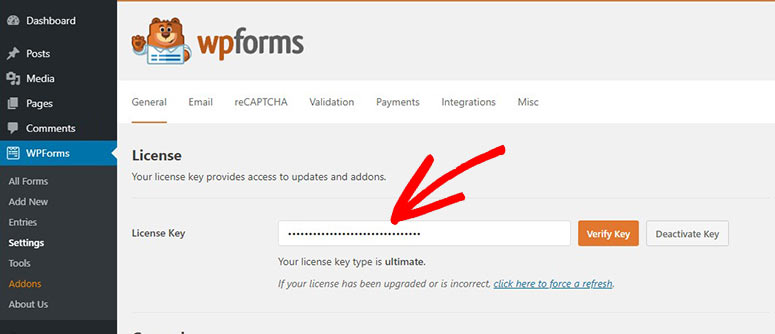
Then, click on the Verify Key button and you’ll see the verification success message.
Now, you’ll need to set up the Square addon on your WordPress site.
Step 2: Install and Activate the Square Addon
To connect with Square, you’ll need to install the WPForms Square Addon. And, you can do that by navigating to the WPForms » Addons page from the admin panel.
If you scroll around on this page, you’ll find the Square addon. All you need to do is click on the Install Addon button.
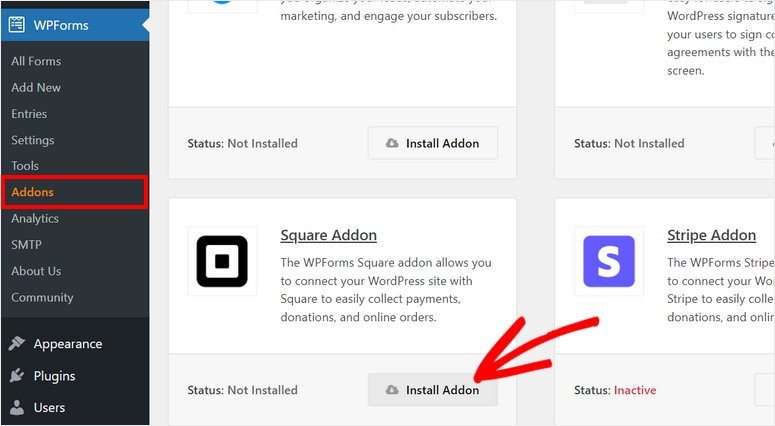
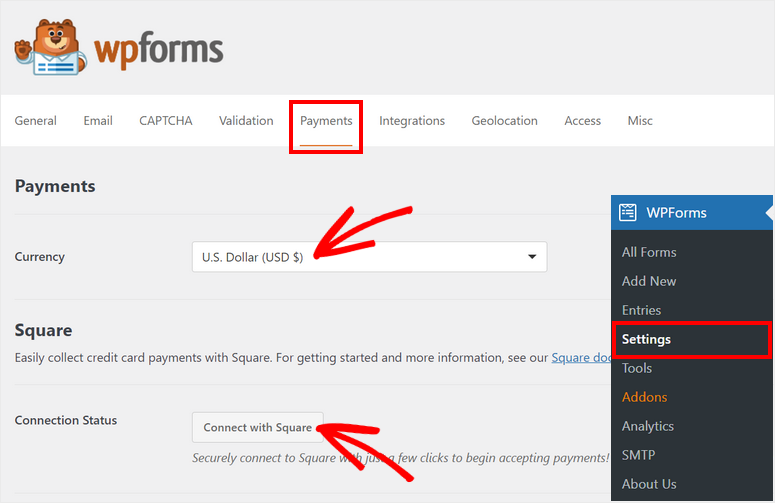
After you install and activate the addon, head over to the WPForms » Settings page and open the Payments tab.
On this page, you’ll see settings for choosing currency and connecting your Square account.
Additionally, WPForms lets you enable the Test Mode to check your Square transactions. This way, you can make sure no live transactions accidentally go through while you connect your Square sandbox account and check if your connection is working properly or not.
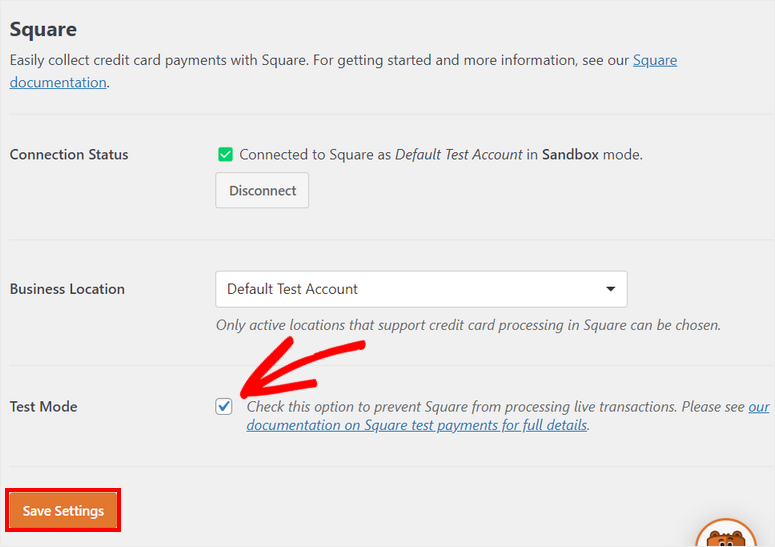
Once you’re done with the settings, click on the Save Settings button.
Now, you’re ready to create a form with the Square payment option.
Step 3: Create Your Square Payment Form
If you don’t have an existing form, you can create a new one by simply clicking on the WPForms » Add New tab on the admin panel. This will launch the form template library.
WPForms offers templates for any kind of WordPress form so you can choose any of these templates that match your requirements. You can preview the templates to make your choice.
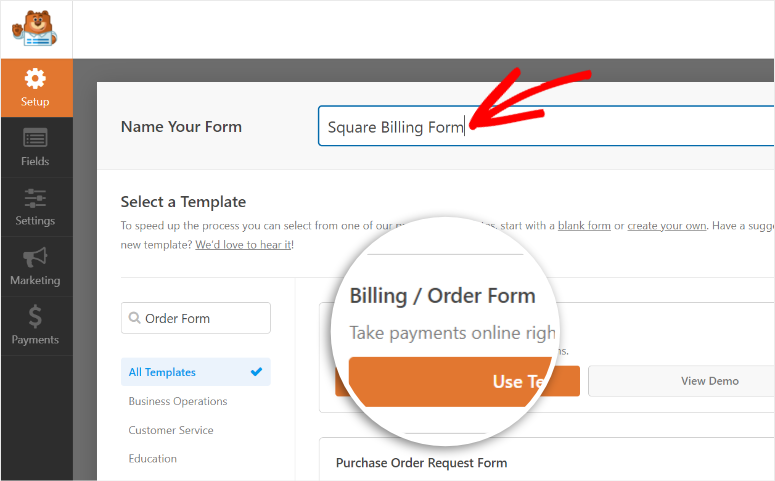
For this tutorial, we’ll be using the Billing/Order Form template. It includes all the necessary fields to collect information and payment details from customers. You can even use the same form to create a catalog of products and sell them on WordPress. This is perfect for small businesses that don’t want the hassle of managing a full-fledged eCommerce store.
At the top of the page, you can enter a name for your form and then click on the Use Template button.
You’ll see the WPForms form builder in the next window. All the form fields and customization options are in the left menu panel and the form preview on the right side of the builder.
To insert a new form field, simply drag it from the left menu and place it on the form preview.
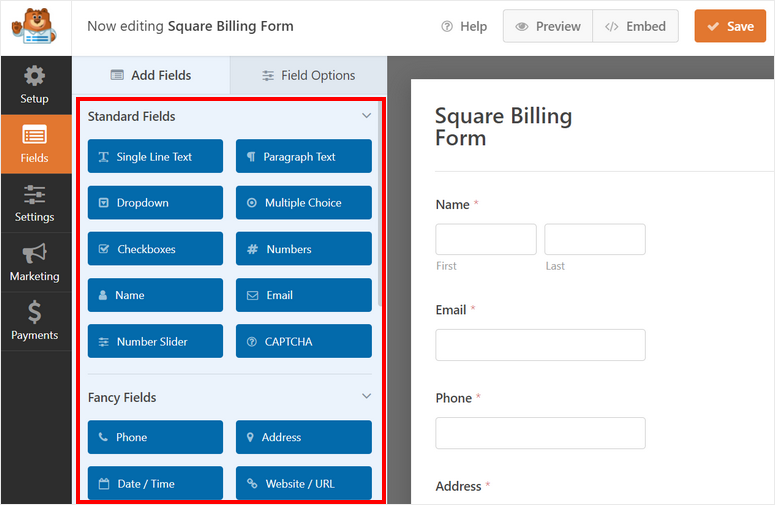
Because WPForms form templates are designed to be ready to use you don’t need to make major changes.
If you want to customize any existing field, you can click on the field and you’ll see the field options on the left panel.
For instance, you can edit the form field called Available Items on the form template. In “Field Options”, you can enter a custom label and product variations with the pricing.
To show your product prices on the front end of the form, enable the Show price after item labels option.
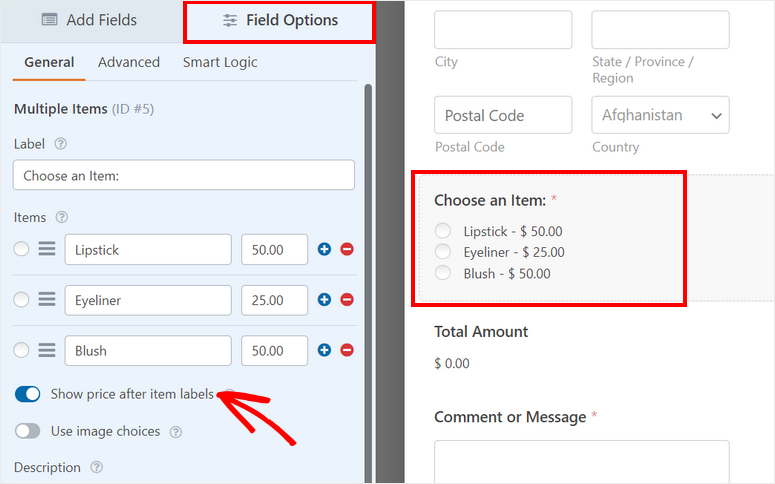
Another great feature of WPForms is that you can add images to your items so that your customers get an idea of your products. This helps them make their purchase decisions quicker.
To do this, you need to enable the Use image choices option and then upload your product images.
WPForm recommends using images that are 250 x 250 px or smaller in size for better image quality.
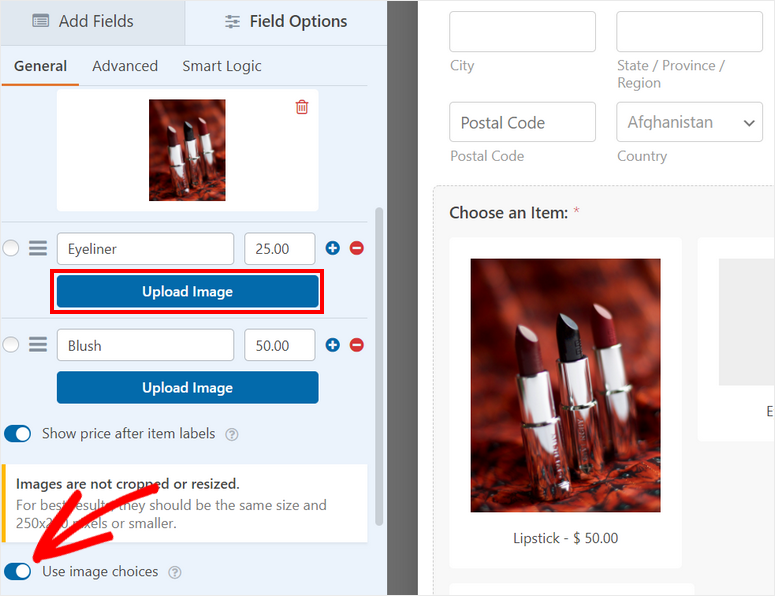
Once you set up your product catalog, click on the Save button at the top of the form builder.
Next, you need to add the Square field on your form and set up the payment details.
Step 4: Set Up Square Payments
On the left menu, you can find the Square field from the Payment Fields section. Drag and drop the field on the form preview.
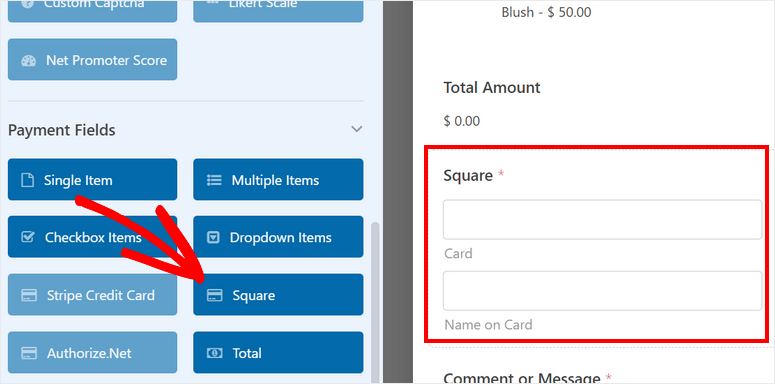
You can even change the label and description for the payment field if you like.
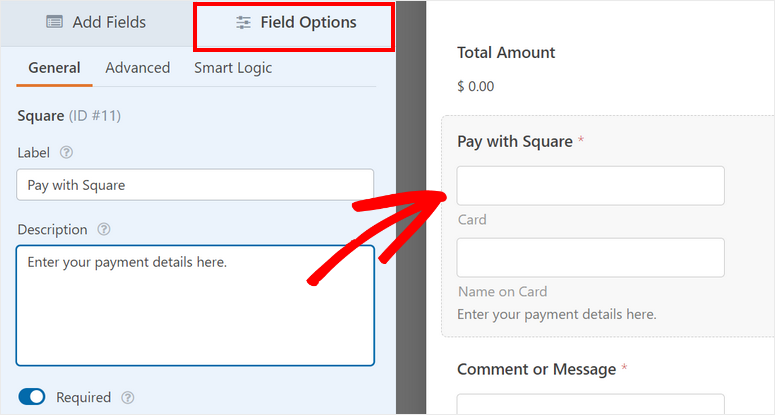
With this payment method, there’s no complicated checkout involved. Customers can make their online payments easily and quickly.
Then, navigate to the Payments tab on the left menu panel and you’ll see different payment options depending on the addon you install.
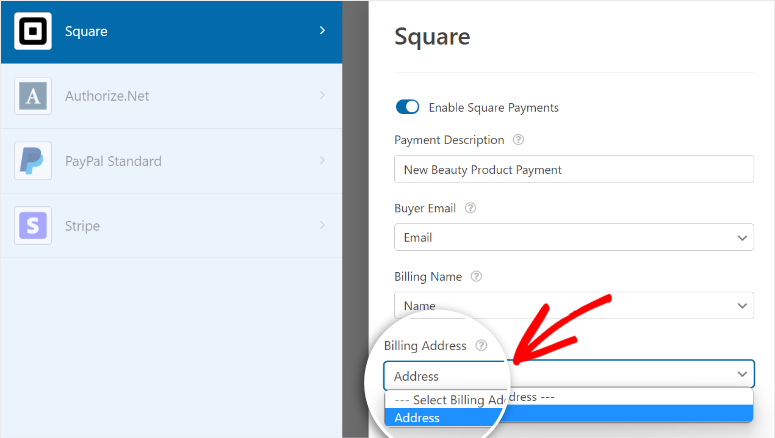
Here, click on Square and check the Enable Square Payments option there.
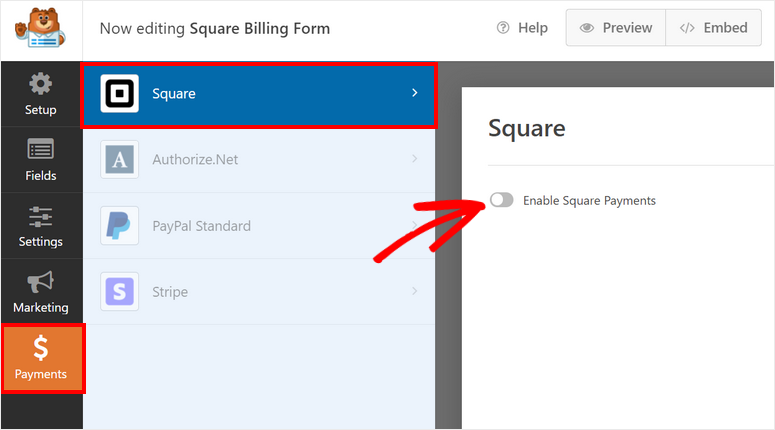
Now, you can configure the settings for your Square payments. You’ll see options for:
- Payment Description: Enter a description for your payment. This will appear on the credit card or bank card statement of your customers.
- Buyer Email: From the dropdown menu, select the Email option to send the payment receipt to the email address entered by the customer in the order form.
- Billing Name: From the dropdown menu, select the Name option to identify the customer’s name for the payment.
- Billing Address: Select the Address option and WPForms will auto-fill the billing address of the customer based on their input in the form.
Don’t forget to click on Save so you don’t lose your progress.
Before you publish your Square payment form on your site, you need to set up form notifications and confirmations.
Step 5: Configure Notifications and Confirmations
WPForms lets you control what happens after a customer successfully makes a payment with Square. You can configure email notifications and confirmations to:
- Send yourself and your team members an email with payment details
- Send customers their form information to confirm their payment
- Show a thank you message after the payment is complete
- Redirect customers to a different page after successful payment
These settings will help you streamline your workflow and automate follow-up tasks.
For email notifications, open the Settings » Notification tab from the left menu panel inside the form builder.
By default, the admin notification is already set up. This is sent to the WordPress admin email address. You can change that and add more email addresses of your team members.
Make sure you separate the email addresses with commas.

If you want to send your customers email notifications as well, click on the Add New Notification button on the top right corner of the page. You’ll need to enter a name for your notification so you can identify it later if you need to edit or delete it.
Then, you can add the customer’s email address to the Send To Email Address field. For this, click on the Show Smart Tags option and then select the Email option.
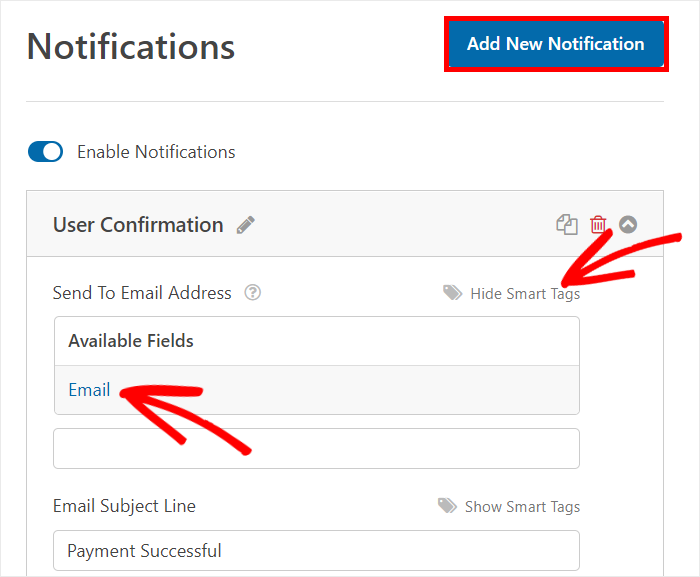
Next, you have the option to add a custom message for your customers. You could enter details about returns and refunds, expected delivery time, and so on.
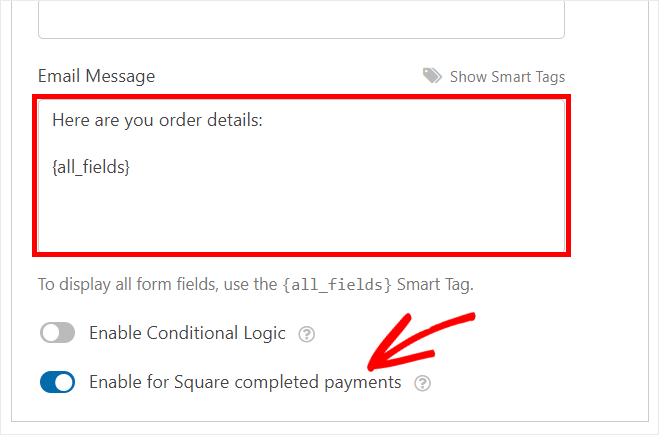
In the email body field, you can enter your content along with the order details using the {all_fields} smart tag. This tag will auto-fill the order details from the WordPress form submitted by the user.
You can also enable conditional logic to send email notifications only if certain conditions are met. This feature is helpful for sending different notifications to customers who select different products on your form.
In the end, there is an option to Enable for Square completed payments. Checking this option means that email notification is only sent after the customer successfully makes the payment.
Now, you need to add a confirmation message for your Square payment form. Go to the Settings » Notification tab to see the confirmation settings.
There are 3 options that you can choose for your confirmation action.
- Show a custom message
- Redirect to a different page on your site
- Redirect to an external website or page
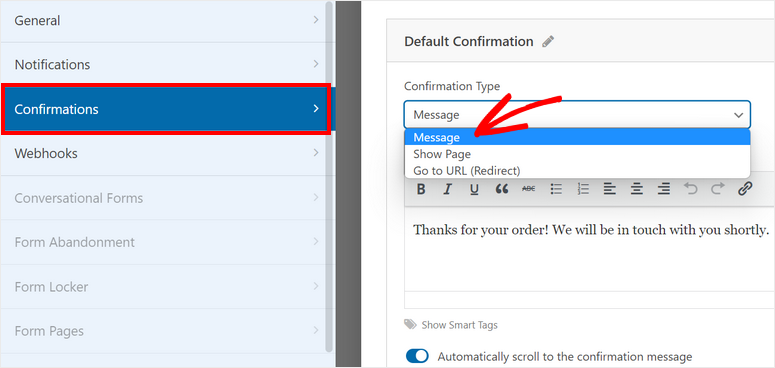
If you want to display a custom confirmation message after a successful payment, choose the Message option. Then, enter your text into the editor.
For more detailed steps, check our guide on how to set up the right notifications and confirmations.
After you finish setting up the notifications and confirmations, hit the Save button.
Step 6: Publish Your Square Form in WordPress
With WPForms, you can add your Square payment form on any WordPress page, post, or widget-friendly area. It supports readymade blocks and widgets for WordPress so you don’t have to manually embed code snippets or even shortcodes.
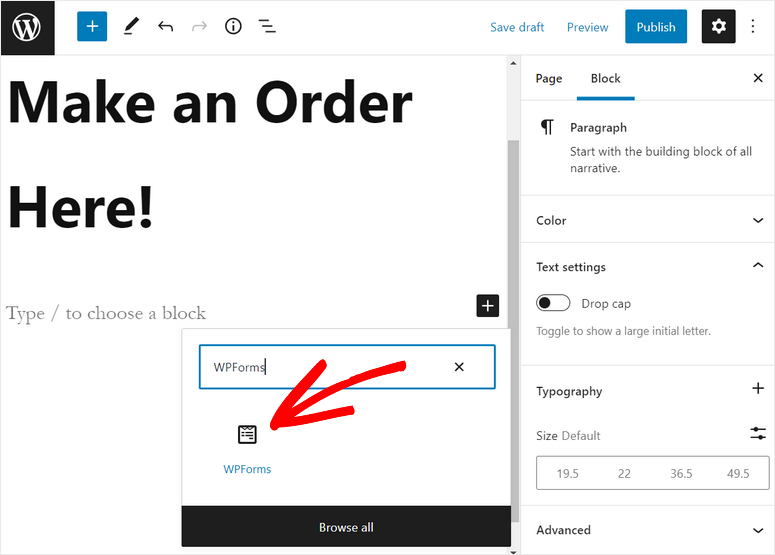
If you’re using the WordPress block editor, search for the WPForms block to add it to any page or post.
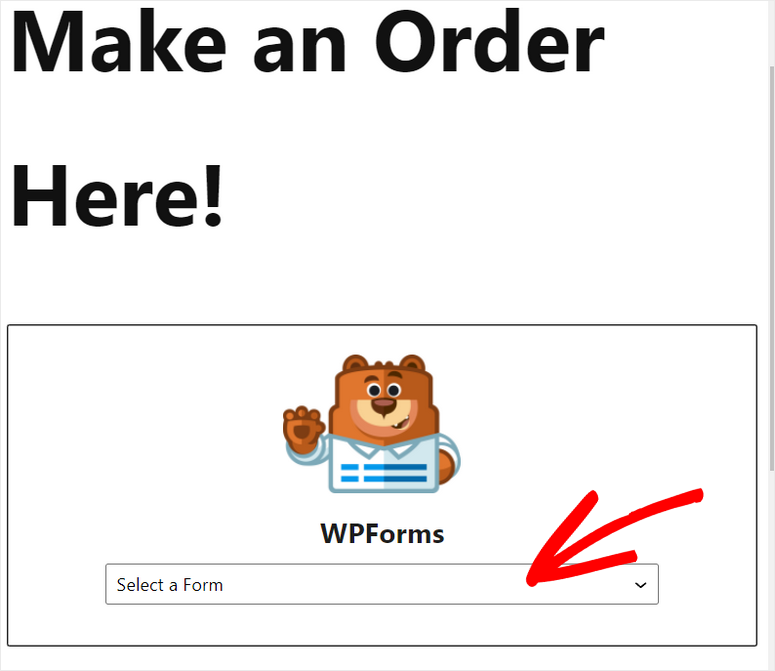
Then, you’ll see a dropdown menu where you can select the Square payment form you just created.
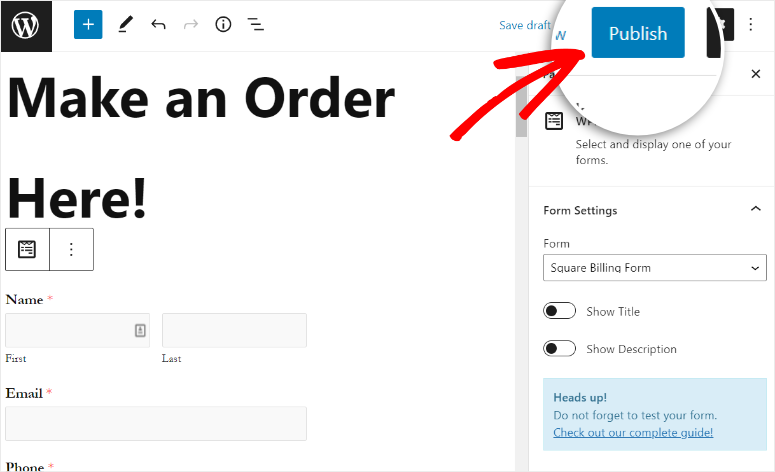
You’ll be able to see the form preview with a Square payment option on the text editor. On the right-hand side, there are options to show the form title and description.
To display the form on your site, click on the Publish button on your page or post editor.
If you use the WordPress classic editor, you can easily add your form using the Add Form button on the post editor.
After you click on the button, simply select the form your want to insert and publish your page.

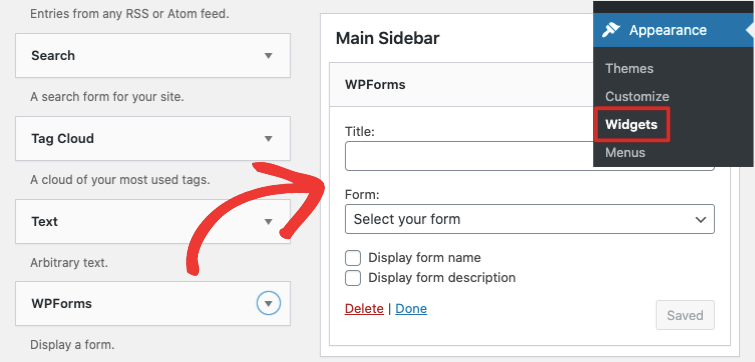
Also, you can add your Square payment form to any widget area like a footer or sidebar. Head over to the Appearance » Widgets tab and drag and drop the WPForms widget into the sidebar or footer menu on the right.
Then, you can select your form using the dropdown menu and save your settings.
Congrats! You’ve learned how to add Square payment to WordPress effortlessly. Now, your customers can easily make payments on your website.
If you’re looking to add options like recurring payments or subscription payments, you can do this through your Square dashboard.
With WPForms, you can create professional-looking WordPress forms such as
- Application forms
- Reservation forms
- Request a quote forms
- Inquiry forms
- Event registration forms
- Survey and polls
- Signup forms
- Product order forms
- And more
You can even connect your forms with popular email marketing services such as Constant Contact, AWeber, and Drip.
What’s more, WPForms is compatible with page builder plugins like SeedProd and Elementor. You can use SeedProd to customize the design and styling of your WordPress forms. This allows you to change the background, fonts, and color to match the rest of your website.
One thing to keep in mind is that card payment acceptance with the Square app is currently available in the US, Canada, Australia, Japan, the United Kingdom, the Republic of Ireland, France, and Spain.
If you want to accept card payments in other countries, you’ll want to try the Stripe Payment Gateway. Stripe lets you accept payments through credit & debit card, bank transfer, Apple Pay, Google Pay, and digital wallets.
Check out our guide on how to accept Stripe payments in WordPress.
That’s all for today! We hope this article helped you add Square payments to your WordPress in no time.
Now that you’re accepting payments online, make sure your website is PCI compliant. You’ll need to install a valid SSL certificate. Most payment processing gateways make this mandatory to protect customer data.
FAQs on Adding Square Payments to WordPress
How do I add Square payments to my WordPress site?
- Install WPForms
- Enable Square integration
- Create a payment form
- Add Square Payments to your payment form
- Publish the form on your site
Do I need a Square account to integrate it with WordPress?
Yes, you need a Square account to integrate Square payments with your WordPress website. You’ll need to sign up for a Square account if you don’t already have one.
Is Square a secure payment method for my WordPress site?
Square is known for its robust security features and compliance with industry standards. It encrypts data and offers security measures to protect payment information. However, it’s crucial to keep your WordPress site and plugins up to date and follow security best practices.
For your next steps, you can check these resources:
- Best WordPress Plugins to Accept Online Credit Card Payments
- Best Platforms to Sell Downloadables and Digital Products
- How to Add a Custom Booking Form to Your WordPress Site
These posts will help you find the best platforms to sell your products and accept credit card payments online. The last one will help you create a booking form for your WordPress site.

Comments Leave a Reply