Do you want to send out automated notifications when someone submits a form?
By automating form notifications, you can have emails sent to yourself or your team to get notified as soon as a user submits a form. You can also send emails to the user to confirm that you’ve received their form submission.
In this tutorial, we’ll show you how to easily set up WordPress form notifications and confirmations. You’ll only have to set this up once and we’ll help you do it in no time.
Why Do You Need to Set Up Form Notifications and Confirmations?
With email notifications, you can keep yourself and your team updated about every form submission.
Also, you can show a success message or set automated confirmation emails for your customers. This helps you improve the user experience of your website.
Having said that, you need an easy and effective tool to set up WordPress form notifications and confirmations the right way.
We recommend using WPForms, the best WordPress form builder plugin.
WPForms is a drag-and-drop form builder that allows anyone to create forms in a few clicks. It offers 1,200+ premade templates to build any type of form with ease. These forms are responsive so they work well on all devices like mobile, tablet, and desktop.
When it comes to form notifications, here’s why WPForms is the right choice:
- Send automated notifications to preferred email addresses
- Auto-detect customer’s email address and send personalized emails
- Customize confirmation message to appear after the user submits a form
- Apply conditional rules to trigger notifications
Moreover, it offers seamless email integrations with popular email service providers like Constant Contact and Mailchimp. With this, you can set up autoresponder emails to be sent according to what the user signed up for such as a newsletter or webinar.
Also, the plugin gives you control over what happens when a user submits a form. You could display a customized message or redirect them to a new page.
Added to all this, with conditional logic, you can set up different rules based on what a user has selected or entered in the form.
With WPForms, you’ll have everything you need to create beautiful forms and set up automated notifications.
Setting Up Form Notifications and Confirmations using WPForms
Below, you’ll learn how to set up form notifications and confirmations in 6 simple steps. Let’s start!
Step 1: Install and Activate WPForms Plugin
To get started, you need to sign up for a WPForms account.
There’s a free version of the plugin in the WordPress repository. However, the pro version offers the best features for building amazing forms for your website.
After you sign up, you can find the plugin and a license key in your WPForms account.
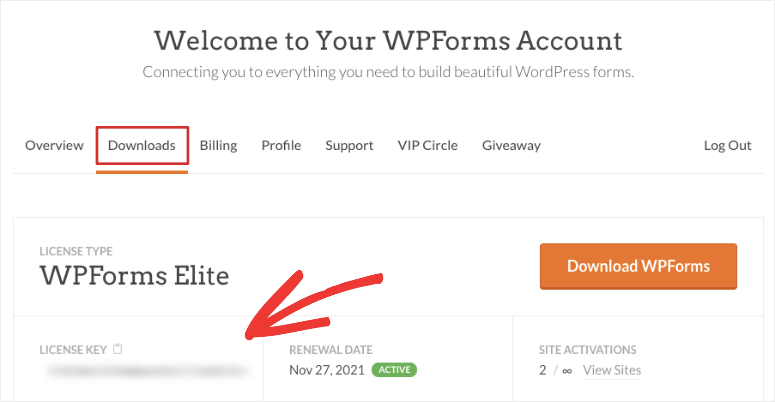
You need to download the plugin and install it on your WordPress site. Never installed a WordPress plugin before? No worries, check out our guide on how to install a WordPress plugin.
Once you install and activate the plugin, you need to add the license key. For this, go to WPForms » Settings page and enter the license key.
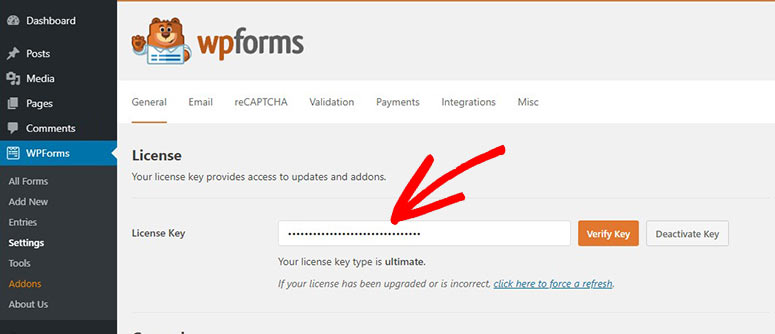
Once you verify the key, you’ll see a success message. Now you’re ready to create any form you want for your site.
Step 2: Add a New Form
To add a new form, go to WPForms » Add New page from your admin dashboard. Next, you need to enter a name for your new form and select a form template to start.
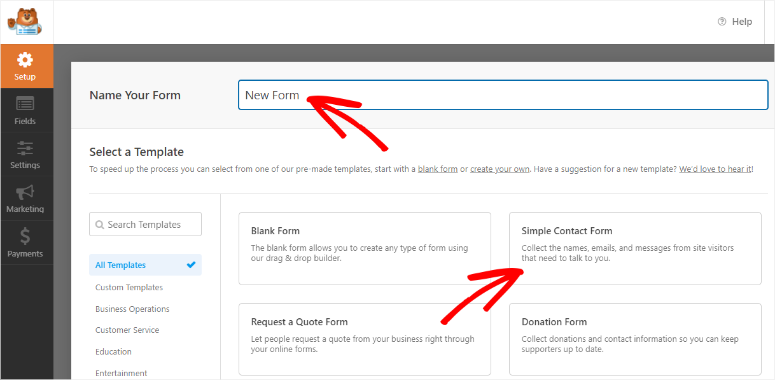
Then, you can see the form builder with form fields on the left side and form preview on the right side of the screen.
The templates from WPForms are designed to suit your marketing goals so you won’t need to make too many changes. That said, you get full control over customizing your form and the form builder is incredibly easy to use.
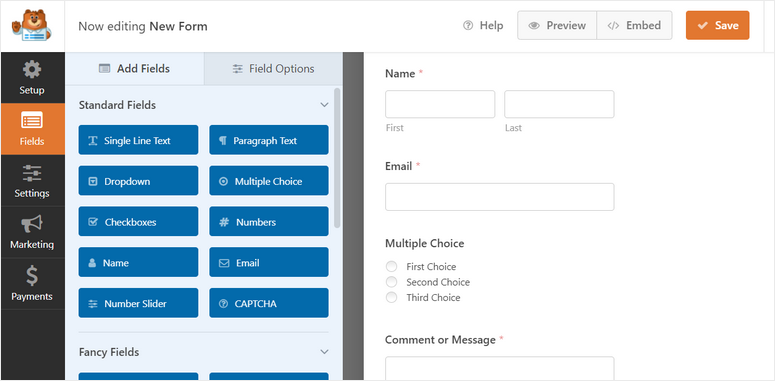
If you want to add new fields, simply drag and drop the fields from the left menu into the form preview.
You can add:
- Checkboxes
- Dropdown menus
- Multiple choice
- Phone number
- Captcha
- Number sliders
…and so much more! If you’re using the premium version, you can allow users to upload documents like a resume. You can even let them select products and accept payments directly through your form.
To customize a field, select it and you’ll see options on the left to change the field name, description, and more.
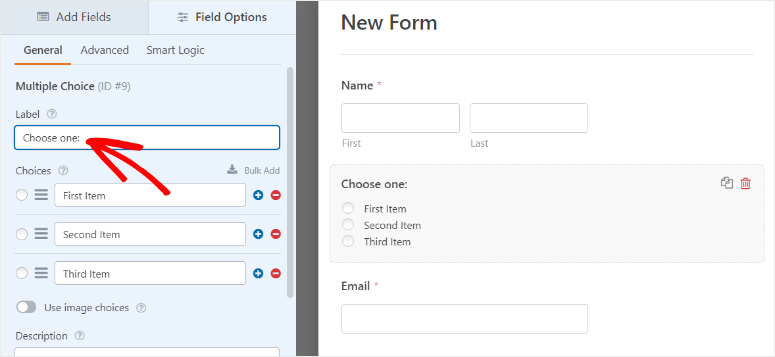
Once you’re done creating your form, hit the Save button at the top to store your changes.
Now that your form is ready, you can set up the automated WordPress form notifications.
Step 3: Configure and Manage Form Notifications
WPForms sends a default email notification to your WordPress admin email when a user fills out a form. So you’ll automatically be notified, however, WPForms has advanced options to create automated notifications that are definitely worth exploring.
First, you can add preferred email addresses and customize the email. So for instance, if someone fills up a contact or request-a-quote form, you’ll want to notify the person who follows up with new leads.
But if the user selects a product and makes a payment through your form, you can notify your product team instead.
Added to internal notifications, WPForms also lets you send automated email notifications to the person after they submit the form. If they signed up for a newsletter, you can welcome them on board and start their journey, or if they purchased something, you can send them a thank you message and confirm their order.
We’ll show you how to set up both these notification emails for your team and your website visitors.
1. Email notifications for you and your team members
In the form builder, go to the Settings » Notifications tab and you can see the default notification settings.
Here, you can add custom email addresses separated by commas. This way you can notify yourself and your team members whenever there is a form submission.
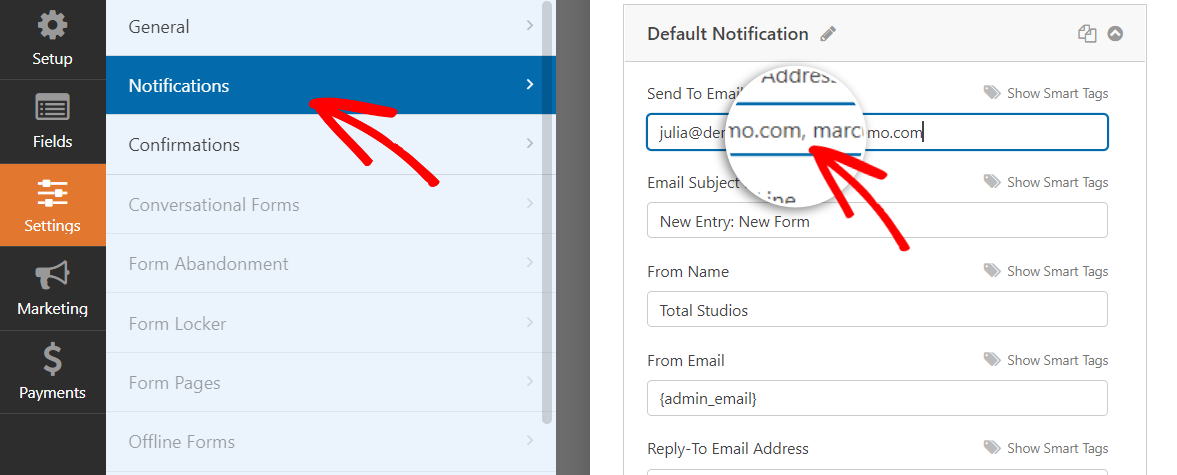
Aside from this, you can change the settings such as the from name, subject line, and email body.
When you scroll down, you’ll see the Enable Conditional Logic option. This lets you set rules so that email notifications are sent only when the criteria are met.

So for instance, you can choose to be notified only if the person adds a comment or message. That way, if you need to respond to their message or special request, you’ll know immediately.
When you’ve added your custom settings, you can save the notification. Like this, you can create multiple notifications using the ‘Add New Notification’ button. So you can notify different people in your team based on a user’s response to your form.
2. Custom autoresponder emails for customers
Next, you can set confirmation emails that are sent to customers immediately after they hit the submit button.
Use the Add New Notification button to create a separate notification for visitors. In the Send To Email Address field, click on the Show Smart Tags option.
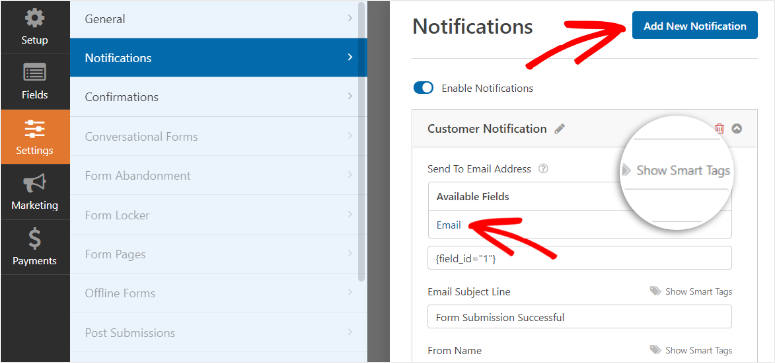
Then, you need to select Email from the available fields. This will auto-detect the email address entered by the visitor.
If you’d like to send the same notification to yourself, you can add the {admin_email} tag or your preferred email ID separate by commas.
Next, you can add a subject line and email message according to your requirements. If you would like to include the details they entered in the form, use the {all_fields} smart tag. This will automatically fetch all the fields from the form and add them to the email message.
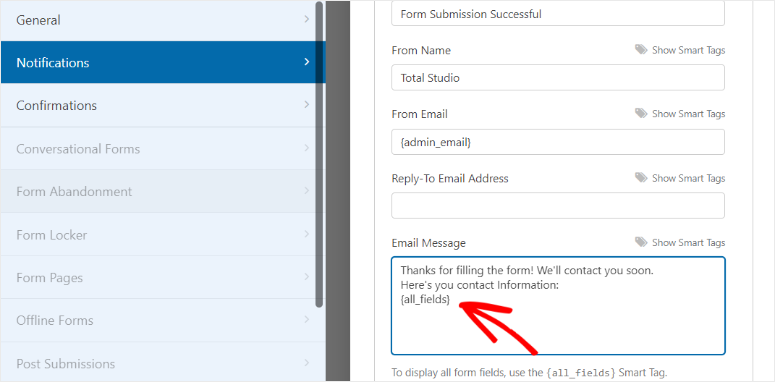
Here too, you can enable conditional logic to trigger notifications only if a rule is met.
Lastly, make sure you click on the Save button to save the changes.
Now you’ve learned how to set up WordPress form notifications with WPForms. Next, we’ll show you how to customize your email notifications.
Step 4: Customizing Email Notifications
WPForms lets you customize your notification to suit your brand colors and website theme.
To add your own custom look, go to WPForms » Settings and open the Emails tab. Here, you can see the settings that will apply to all the email notifications for your site.
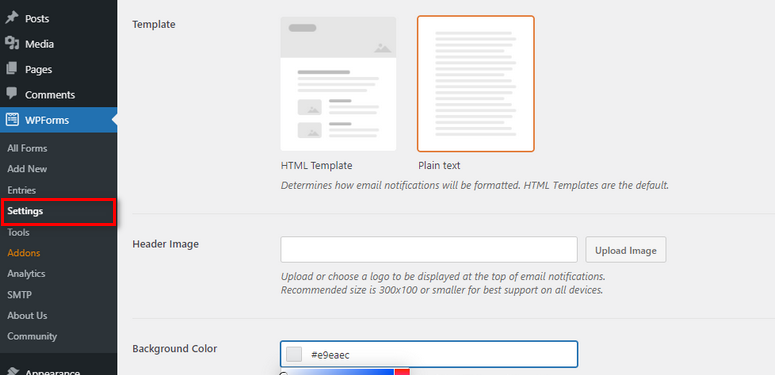
To customize your email notifications, you can use the following settings:
- Template: By default, all the email notifications are sent in HTML format. You can use this option to change the email template to Plain Text.
- Header Image: This option allows you to add a header image or logo to your form notifications. You can click on the Upload Image button to add an image to your emails.
- Background Color: With this option, you can change the background color of your email notifications. Click on this field and you’ll see the color picker where you can select a background color.
To save all your changes, click on the Save Settings button at the end.
Step 5: Set Up Confirmations on Form Submission
Confirmations are different from email notifications. WordPress form notifications are sent to email addresses whereas confirmation messages are displayed to the users on your website.

To set up confirmations, open the Settings » Confirmations tab in the form builder. Now, you can see the Confirmation Type option.
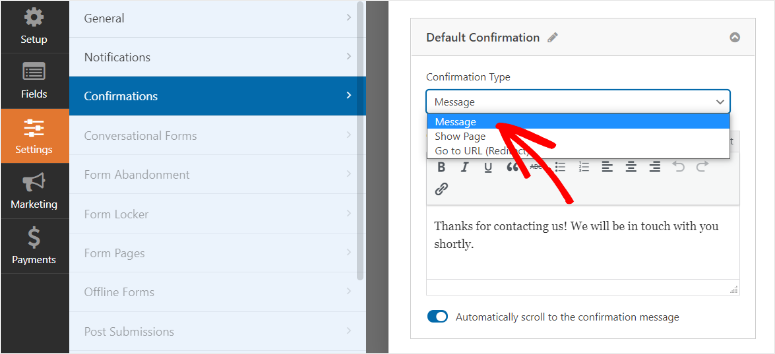
Now, you can choose from the 3 types of Confirmations:
- Message: This is the default option. It allows you to add a success message that confirms the form submission.
- Show page: This option lets you redirect the users to a custom page after they click on the submit button.
- Go to URL (Redirect): This allows you to add any URL and redirect the users to a different site.
After you add a confirmation message and select a confirmation type, click on the Save button.
Step 6: Add the Form to Your WordPress Site
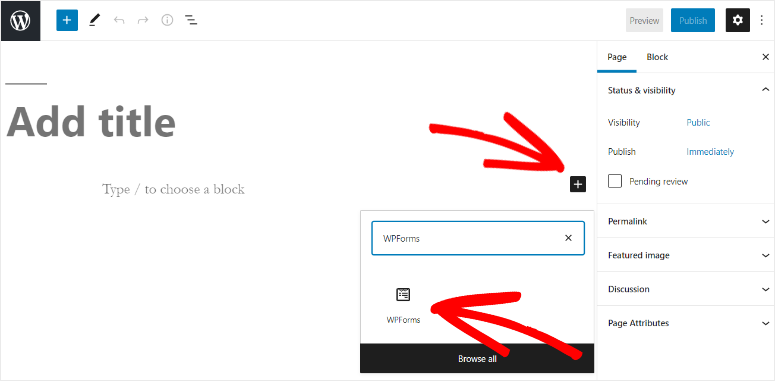
Finally, you can add the form to any page or post on your site. In the block editor, you can search for the “WPForms” block.
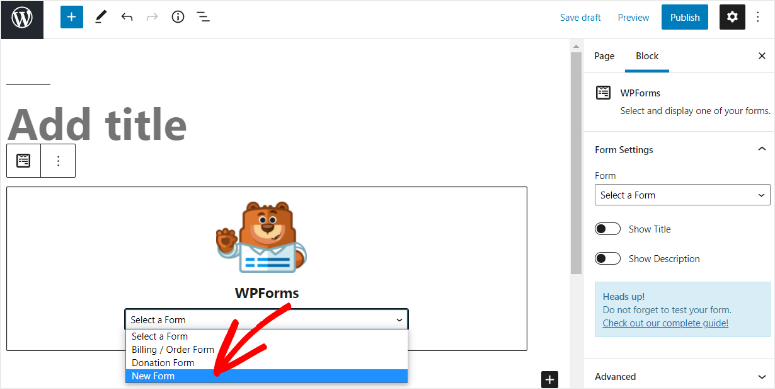
Then, you’ll be able to see the Select a Form option. Click on the dropdown option and select the form that you just created.
Now, you can publish the page or post on your WordPress site.
If you’re using the Classic editor, there’s an ‘Add Form’ button that you can use to select your form:

Lastly, you can also add the form to any widget-ready area on your site such as a sidebar or footer. Head over to the Appearance » Widgets tab.
Simply drag and drop the WPForms tab into your sidebar or footer menu.
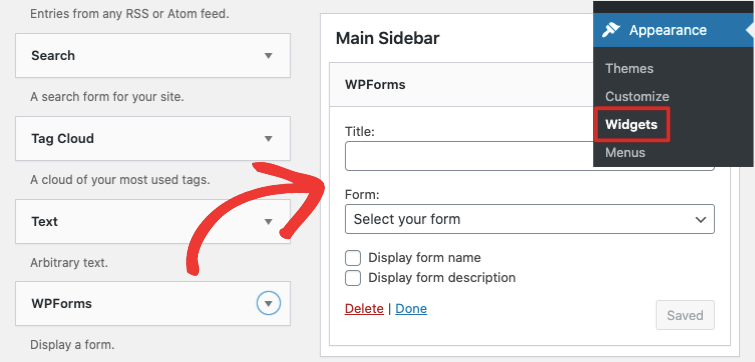
Then you can select your form and it will be added to your site in an instant.
And that’s all we have for you! You’ve successfully set up automated WordPress form notifications and confirmations on your WordPress site.
You can go ahead and use WPForms to create all sorts of forms for your site such as:
- Newsletter signups
- Surveys and polls
- Review and testimonials
- Webinar registrations
- Contact and Call back forms
- Request a quote
- Product orders
WPForms is the best form builder plugin that allows you to improve user experience, collect leads, and grow your website fast!
We hope this tutorial helped you learn how to set up the right email notifications and confirmations.
For your next steps, you’ll find these resources helpful:
- How to Create Autocomplete Address Form in WordPress
- How to Add Google reCAPTCHA to Your Contact Form
- 8 Best Email Capture Tools & Form Builders for WordPress
These posts will help you add useful features like autocomplete address field and Google reCAPTCHA to your forms. And the last one is filled with the best email capture tools for your website to explode your subscriber list.

Comments Leave a Reply