Do you want to learn how to install a plugin on your WordPress site?
If you’re new to WordPress, plugins let you quickly add new features and functionalities to your site without needing to code or meddle with technical settings.
Whether you’re building a form, creating an online store, or growing your email list, you’ll find a WordPress plugin that will do it for you.
In this step-by-step tutorial, we’ll show you 4 different ways to install a plugin on your site.
- How to Install a WordPress Plugin in WP-admin
- How to Manually Upload a WordPress Plugin
- How to Install a WordPress Plugin using cPanel
- How to Install a WordPress Plugin using FTP
Let’s get started with the tutorial.
How to Install a WordPress Plugin in WP-Admin
The easiest way to install a plugin is inside your WordPress admin panel. Log into your WordPress site – this is usually through the wp-admin or wp-login page.
First, open the Plugins tab from the menu on the left. You’ll be taken to a screen where you can see all the plugins currently installed on your WordPress site.
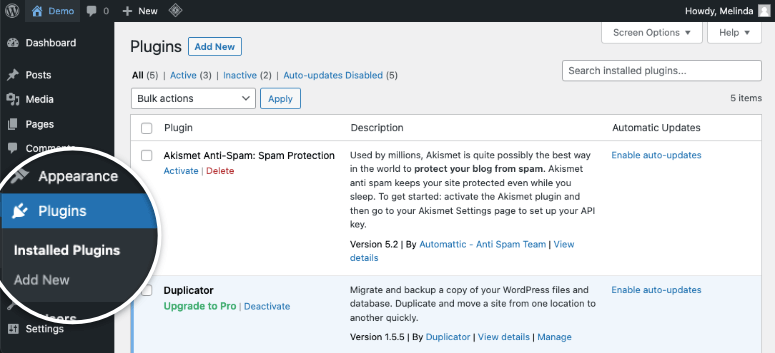
To install a plugin, click on the Add New button and this will open the WordPress.org plugin library. There’s a search bar at the top that you can use to quickly find the plugin you’re looking for.
What’s cool about WordPress is even if you’re not sure about the name of the plugin but know what feature you want, you can simply type in a keyword like ‘contact form’ and you’ll see a list of relevant plugins.
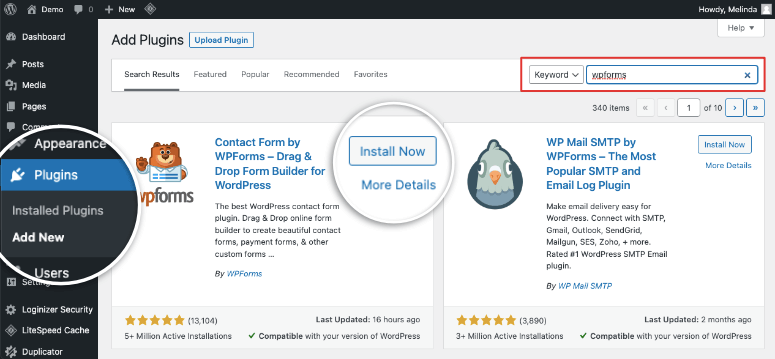
You can browse through the options and pick the best one. Now a good rule of thumb is to make sure the plugin is compatible with your version of WordPress. Also, see how many people have downloaded that plugin. All of this information is displayed at the bottom of the plugin listing.
If you notice that the ‘last updated’ date is years ago, it’s likely not being maintained anymore. Installing such plugins can cause security and compatibility issues on your site so it’s best to stay clear of them. Your best bet is to find a plugin that’s popular, tried and tested, and updated regularly.
To learn more about a plugin, click on the “More Details” link beneath the ‘Install Now’ button. A popup will appear where you can explore more about the plugin including the installation process, screenshots, FAQs, and reviews. This will help you get a feel for how the plugin may work before installing it.
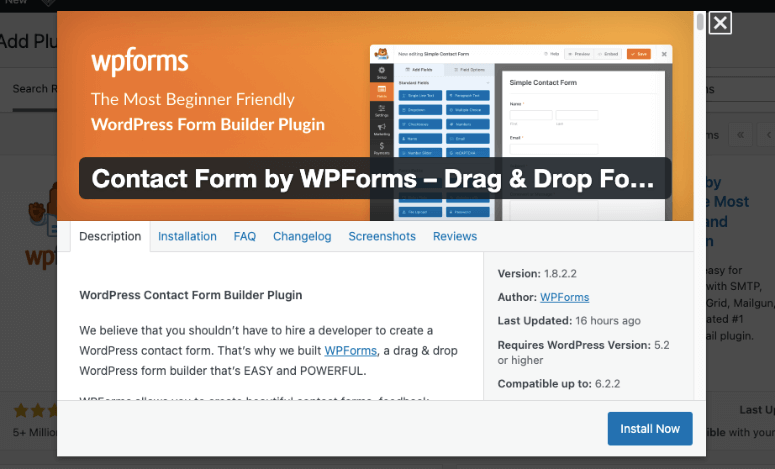
When you’ve decided to download a WordPress plugin, simply click Install Now. WordPress will automatically add the plugin for you and it only takes a few seconds.
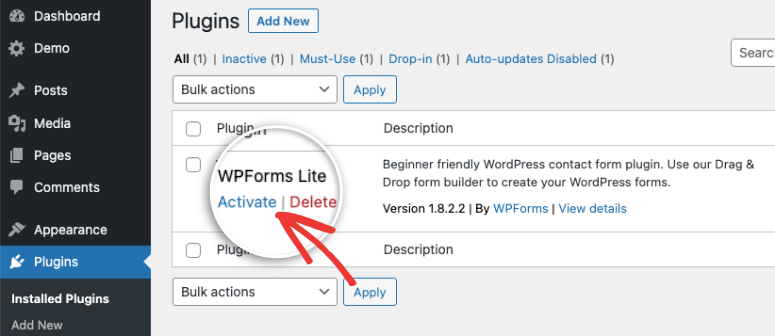
Once installed, you’ll see an ‘Activate’ button appear where the ‘Install Now’ button used to be. You need to activate the plugin to begin using it.
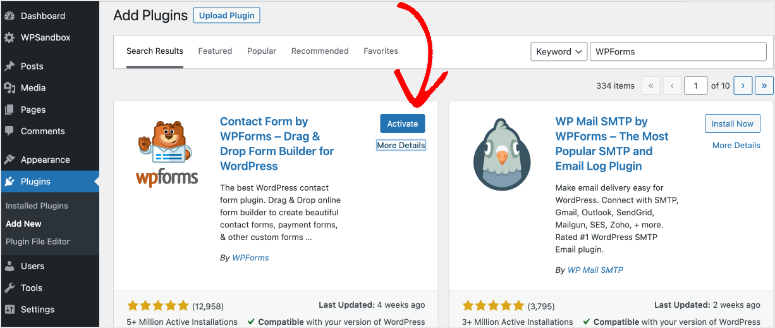
The reason for this is that WordPress lets you install plugins and themes on your site and choose whether you want to activate or deactivate them. If you want to troubleshoot or experiment with plugins, you won’t have to delete the plugin and reinstall it each time. You can just activate or deactivate them as you wish.
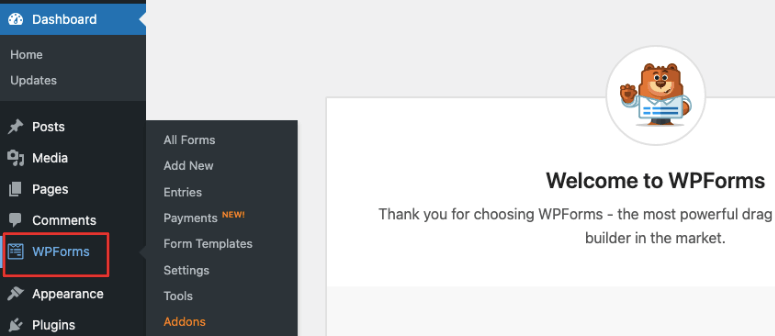
After you install and activate the plugin, you’ll see the plugin launch its welcome page. You can also access it from the wp-admin menu like so:
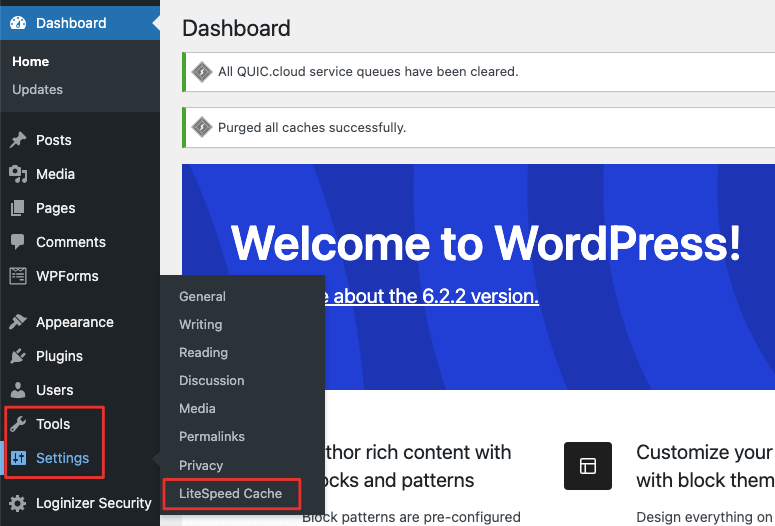
Some plugins don’t appear as separate tabs in the side menu. You may need to access the plugin from the ‘Tools’ or ‘Settings’ tabs.
That’s it! You’ve successfully installed and activated a plugin on your WordPress site. Now, there are thousands of plugins available for WordPress sites that aren’t in the WordPress plugin repository.
Third-party developers create their own plugins and themes and make them available on their own websites or WordPress marketplaces. If you want to install a plugin like this, we’ll show you how to do that next.
How to Manually Upload a WordPress Plugin
If you’ve signed up for a premium WordPress plugin, they usually give you a plugin file that you can upload to your site.
For this tutorial, we’re going to use SeedProd – the best website builder for WordPress. It comes with premade theme kits and a theme builder to help design your WordPress site with ease. It’s one of the must-have plugins for WordPress along with All in One SEO, WPForms, MonsterInsights, OptinMonster, and Duplicator.
All these premium plugins follow a similar process that we’ve listed below. When you sign up for a pro plan, you’ll get access to your own account. Inside, you’ll see a Downloads tab where you can download the plugin zip file and copy your license key too.
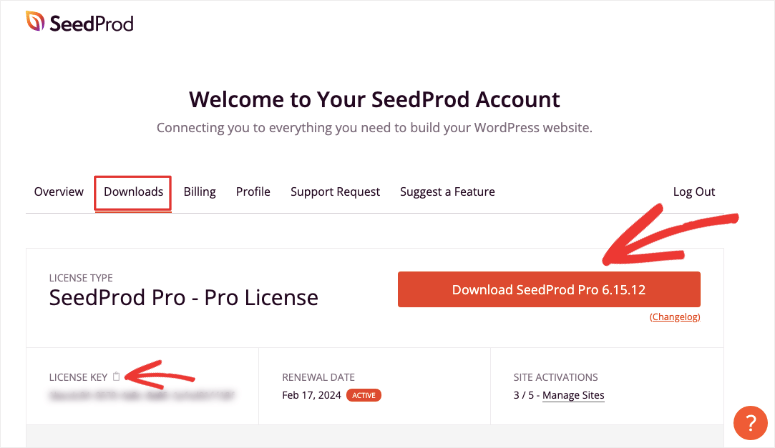
Sometimes, the developer will email the plugin file to you. Save it to your computer and keep it ready for the next step.
Back in your WordPress admin panel, navigate to the Plugins » Add New tab. Here, you’ll see an Upload Plugin button that will take you to this page:
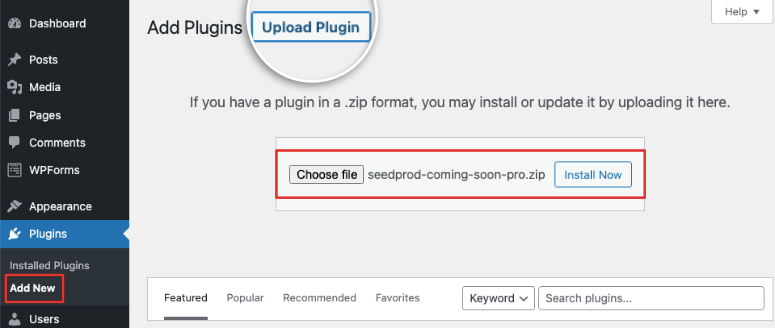
Now, there’s an option to choose the plugin zip file from your local computer. Simply hit the Install Now button and you’ll be redirected to a new page where you’ll see details of the plugin installation.
Once installed successfully, an ‘Activate Plugin’ button will appear.
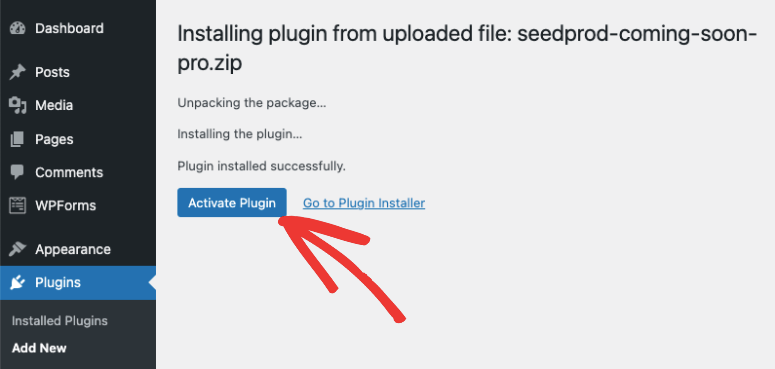
After you activate the plugin, it’s ready to use. Most plugins will automatically redirect you to their plugin dashboard on your site.
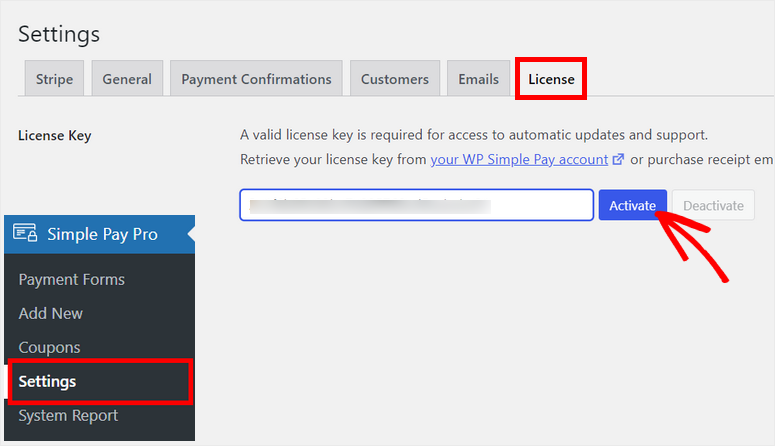
If you’re using a premium plugin, you’ll need to enter a license key to start using the plugin.
With SeedProd, when you install and activate the plugin, you’ll be presented with a page to enter the license key.
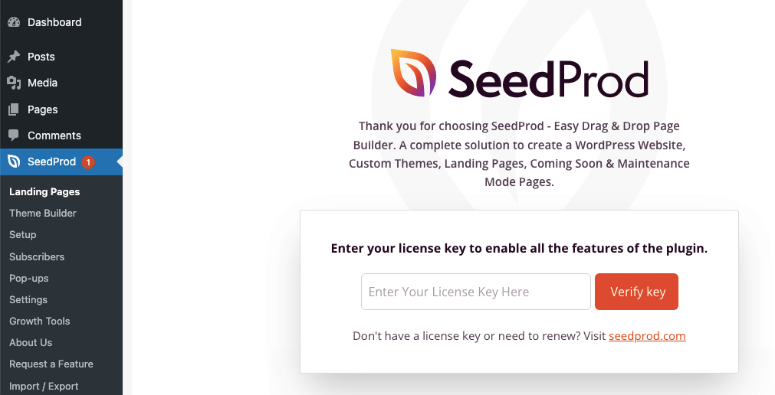
If you don’t see a welcome page like this, you should be able to enter your license key in the Settings tab of the plugin.
The 2 methods we’ve covered are the safest and easiest ways to install a plugin on your site.
However, there are times when you may need to install or even deactivate and delete a plugin from your WordPress site externally. We show you how to do that using cPanel and FTP next.
If you’ve never used either of these tools, you must know that we do not recommend this method for WordPress beginners.
You need to manually modify WordPress files and folders. It’s a bit complex and a slight misstep can cause your site to crash or malfunction. We suggest taking a full backup of your website before going ahead. It’s best to use a staging website to experiment with this method before you touch your live site.
How to Install a WordPress Plugin using cPanel
Most web hosting providers like Bluehost, Hostgator, Hostinger, and SiteGround give you access to cPanel (or Control Panel).
This is a place where you can manage your web hosting, domain, servers, and also your WordPress installation including its files and database.
Inside your web hosting account, you should see an option to open cPanel. If you can’t find it, connect with the support team or follow the documentation they have to find it.
We’re going to use Bluehost for this tutorial. In the Bluehost dashboard, you can access cPanel in the Advanced tab on the left.
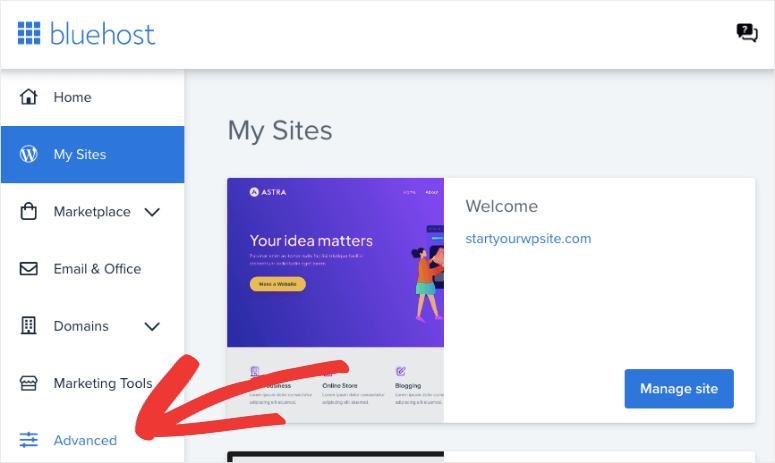
This will open up cPanel where you need to scroll down to the Files section and open the File Manager.
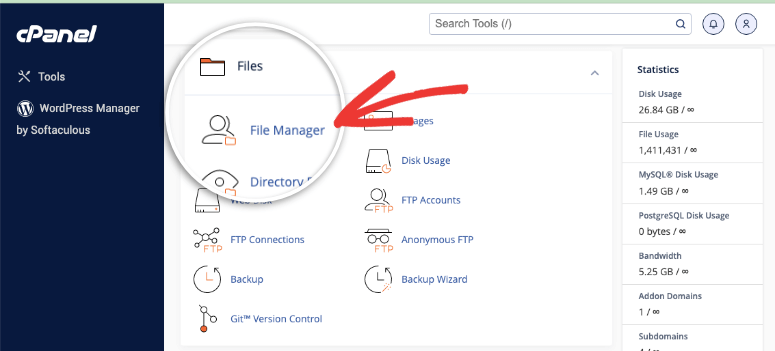
Inside the File Manager, navigate to your site’s WordPress installation. This is usually in the public_html folder unless it was manually created elsewhere.
In the example below, our site’s called demo.com. So we’ll navigate to public_html » Demo.com.
Your website folder should contain 3 more folders – wp-admin, wp-content, and wp-includes. You want to open the wp-content » plugins folder.
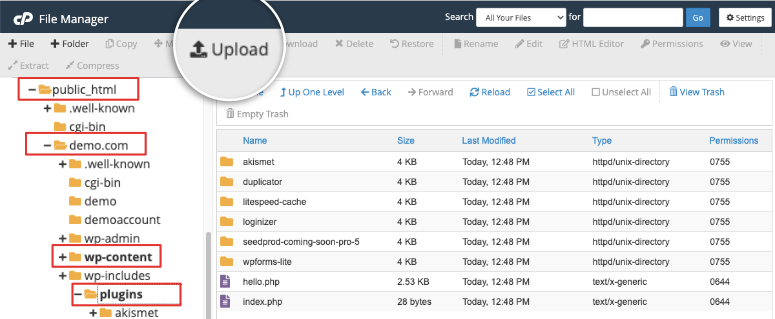
Now you can use the Upload option to select your plugin zip file from your local computer. We’re uploading the All in One SEO plugin (AIOSEO Pro).
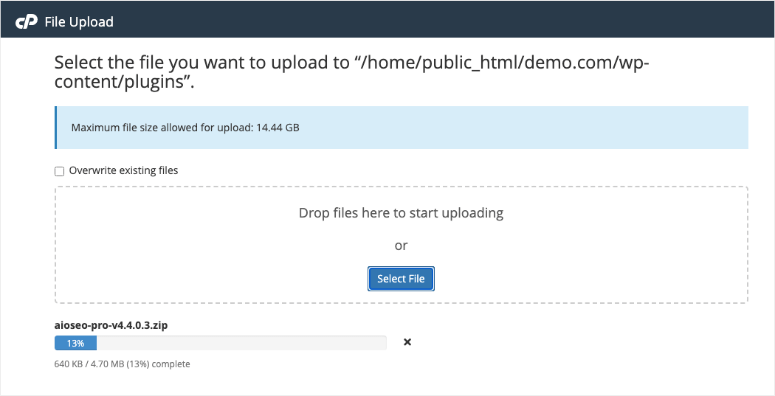
You’ll see a progress bar at the bottom showing you how much is complete. Once you upload it, right-click on it to extract its contents. You can delete the zip file after as you won’t need it anymore.
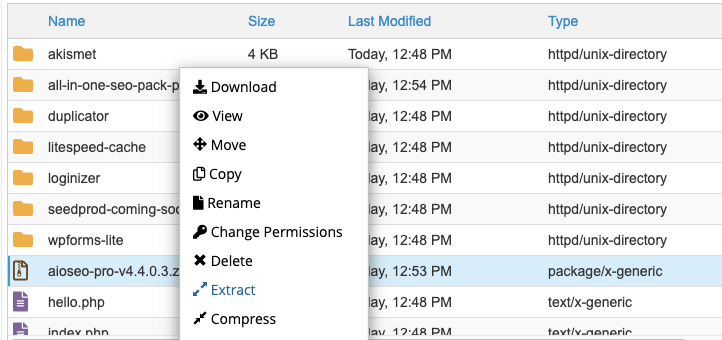
Now sometimes you may upload a plugin and notice it causes incompatibility issues on your site. If you need to delete a plugin from your site, select the file or folder, right-click to open the same menu, and delete it.
You can also rename files, change permissions, compress and download it, move or copy it to another folder, and more.
Back in your WordPress admin panel, on the Plugins page, you should see the plugin appear here and you can activate it like so:
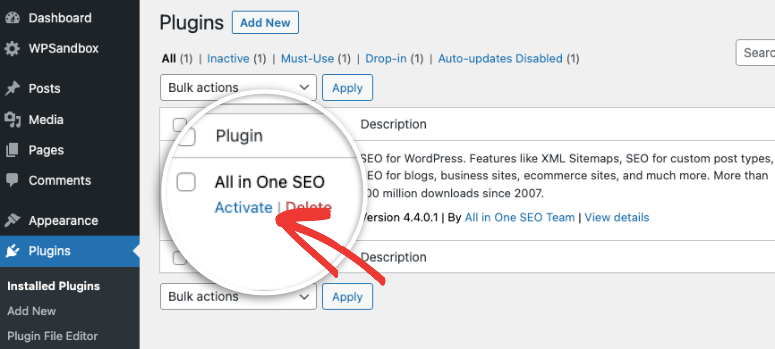
Now you’ve learned to upload a plugin to WordPress using cPanel. Next, we’ll show you how to connect to your site using FTP.
How to Install a WordPress Plugin using FTP
FTP (File Transfer Protocol) is a way to transmit files between your computer and server.
To get started, you need to do 2 things:
- Download an FTP client like Filezilla onto your computer.
- Get your FTP credentials. You can find this in your hosting account. You can also connect with your host support and they’ll give it to you. You can also check the email your web host sent you when you first signed up. It usually contains your FTP username and password.
Before we launch Filezilla, we suggest keeping your plugin file ready on your local computer. You could add it to a separate folder so it’s easy to find.
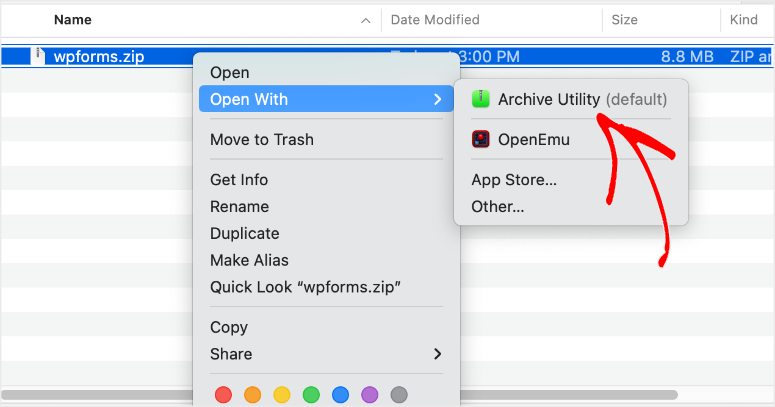
You can also extract the plugin zip file using an app on your computer. For Windows, you may use File Explorer to unzip the plugin file. If you’re using a Mac, this may be the Archive Utility tool.
Now it’s time to launch Filezilla. You’ll see two panels here – a local site where you can access your computer files, and a remote site which is your web server.
To access the remote site, you need to enter your FTP credentials. Add your host name, username, and password, and click on Quickconnect.
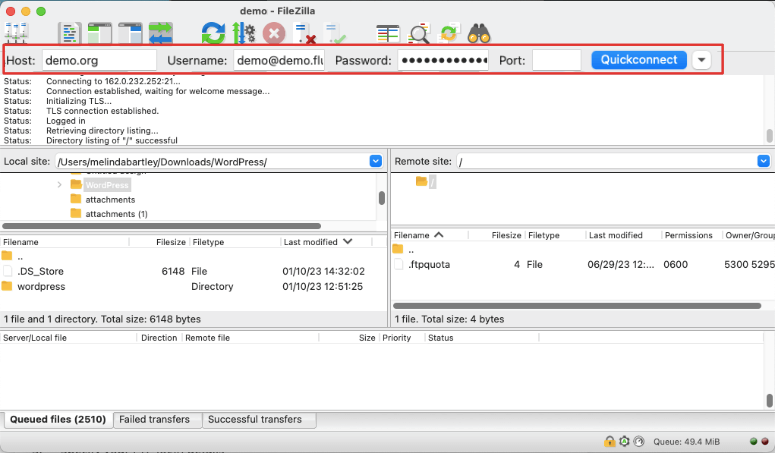
Once you’ve successfully established a connection, your website folders will populate in the right panel. Open this folder: /wp-content/plugins/ folder. This is usually found in the public_html folder.
You need to be doubly sure to choose this Plugins folder on the Remote Site. We want to upload the plugin file specifically to this folder only.
Now in the left panel (your local site), select the plugin folder you want to install. Right-click and upload it.
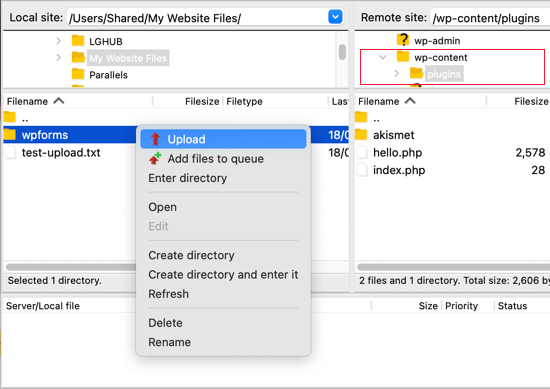
Once uploaded, you can head over to your WordPress site. On the Plugins page, you can activate the plugin to start using it.
In case you weren’t able to connect to FTP, follow this guide for more detailed information: How to Use FTP To Upload Files to WordPress.
That’s it! We hope you’ve found this tutorial helpful for learning how to install a WordPress plugin. If you’re on a search to find the best tools for your site, you may want to see our list of Must-Have WordPress Plugins and Best WordPress Plugins for Bloggers.
You may also want to check out more beginner’s guides:
- How to Install a WordPress Theme
- How to Customize a WordPress Website
- How to Create a Free Landing Page in WordPress
These guides are designed to be easy to understand so that you can set up and grow your website fast.

Mention something specific that you observed that you thought was positive.