Do you want an easy way to sell on WordPress using PayPal?
PayPal makes it incredibly easy to accept payments from customers and clients. Once you set up PayPal on your WordPress site, you can sell just about anything including physical and digital goods, services, event tickets, and much more.
We’ll show you just how easy it is to sell using PayPal on your WordPress site. We’ll help you list your products, integrate with PayPal, and set up automated emails to manage your sales easily.
What You Need to Sell on WordPress with PayPal
To sell on WordPress with PayPal, you’ll need WordPress tools that let you:
- Create your product page or catalog
- Create a payment/order form
- Integrate with your PayPal account to collect payments
Now usually, you’d need multiple plugins or an eCommerce platform to do this. We recommend using WPForms that acts as an all-in-one solution for online selling.

WPForms is a beginner-friendly form builder that works great with all WordPress websites and WooCommerce stores. You can use this form builder to create any form for your website including contact, order, payment, registration forms, surveys, polls, and more
To sell online, WPForms lets you list one or as many products as you like. Then you can link your form to PayPal in just a few clicks.
Being one of the best payment plugins for WordPress sites, WPForms gives you many integration options. You can also add other payment methods that include Stripe and Authorize.Net to give customers more options to check out.
This means you won’t need multiple tools to sell your product. Added to that, once you configure your order form, WPForms will handle everything for you, so you can sell on auto-pilot.
Here’s what you can expect from WPForms:
- Easy customizations with a drag and drop builder
- Order form template with recommended form fields added
- Responsive designs that adjust to any screen size
- Centralized order management to streamline workflow
- Automated email notifications and confirmations
- Smart captcha and built-in spam protection
- Custom block/widgets to add form to your site in 1 click
And the best part? You can do all of it without any coding experience! Plus, you’ll be able to set up an online store without subscribing to an expensive eCommerce platform.
Now that we’ve selected the right tool, let’s show you how you can create a PayPal order form in WordPress.
How to Create a PayPal Product Order Form in WordPress
To follow along in this tutorial, you’ll need to sign up for a WPForms account. There’s a lite version of WPForms that lets you create basic website forms for free. If you want to use the PayPal payment integration, you’ll want to sign up for a Pro plan or higher.
There’s a 100% risk-free money-back guarantee so you can try the form builder before you make a commitment.
Step 1: Install and Activate WPForms Plugin
When you purchase WPForms, you’ll see a license key and a downloadable plugin file in your account.
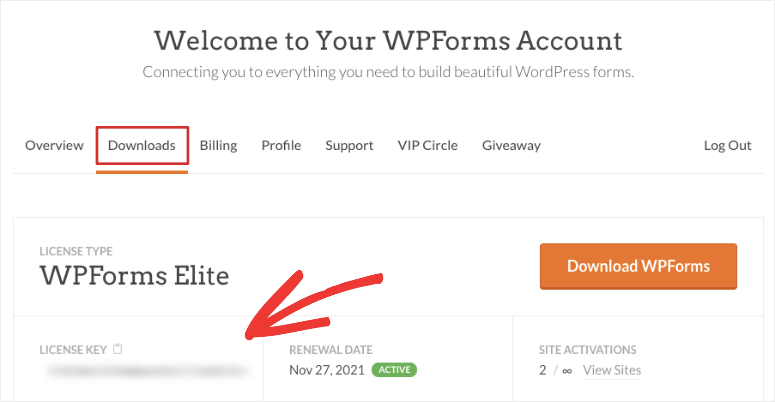
First, you’ll need to upload the plugin to your WordPress site. If you’re not sure how to do that, follow our guide on how to install a WordPress plugin.
Once you’ve done that, WPForms will appear in your WordPress menu. Open the WPForms » Settings page to activate your license.
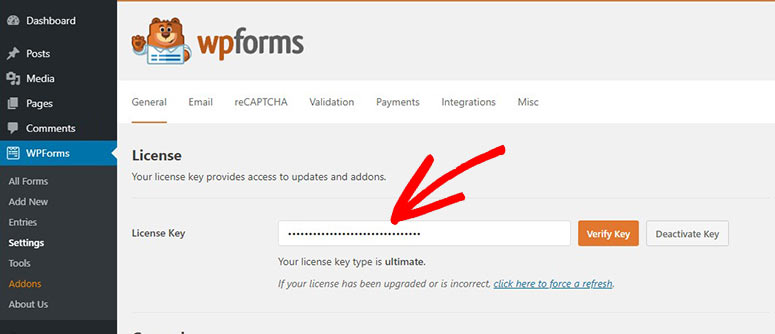
Enter your license key and hit the ‘Verify Key’ button. Now, you can start building the product order form.
Step 2: Create a Product Order Form
After you activate WPForms, go to the WPForms » Add New page in your WordPress dashboard.
Here, you can add a form name and select a template. We’ll be using the Billing / Order Form template but you can also explore the Content Download Form template that’s designed for digital downloads.
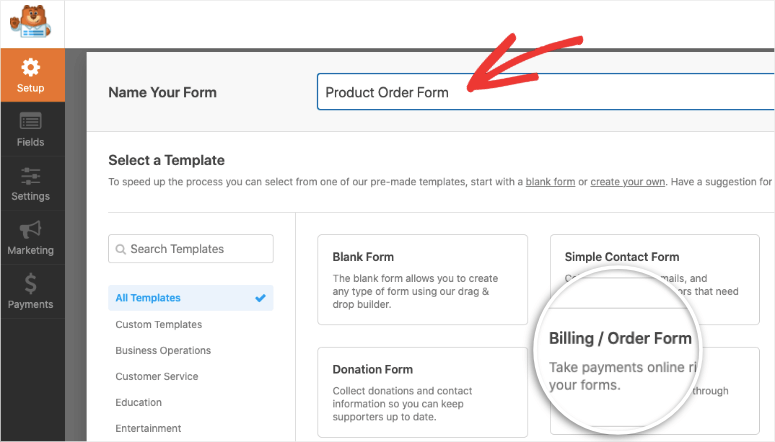
This will open up the form builder where you can customize the template. You’ll see a preview of your online order form with an editing taskbar on the left.
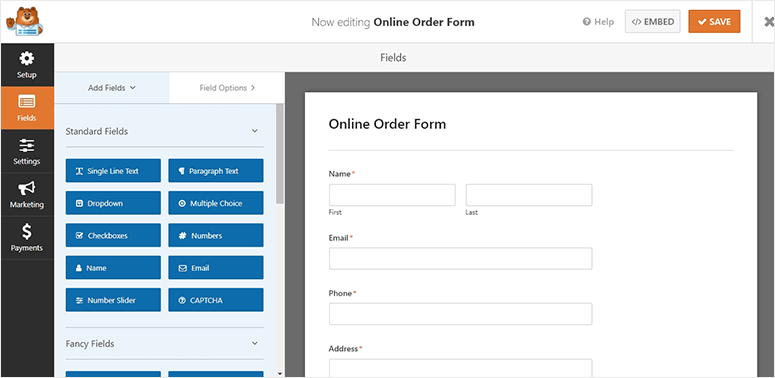
The order template has all the recommended fields already added so you won’t need to make too many changes to it. The template ensures you collect all the details you need from your customers such as their name, contact, and shipping information.
WPForms also gives you complete control of your form and lets you customize every aspect of it.
We’ll get started by editing the Available Items field that lets you list your products. When you select this field, you’ll see options on the left to change the field label. Then you can add, delete, or edit items and even include prices for each one of your products.
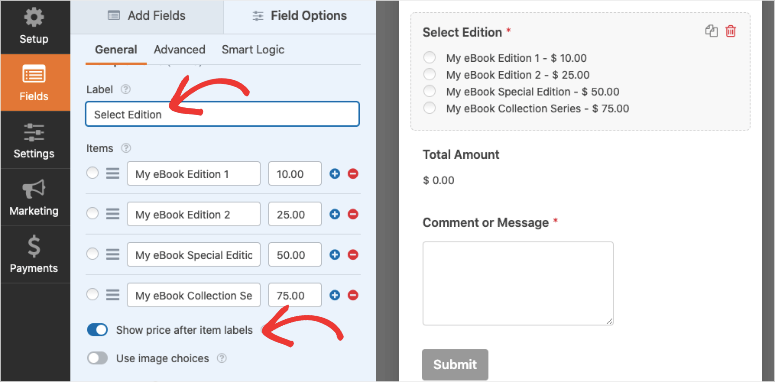
If you’d like to display an image along with your product, switch on the ‘Use image choices’ option. Now, you can upload your product image. WPForms recommends using 250×250 px for best display.
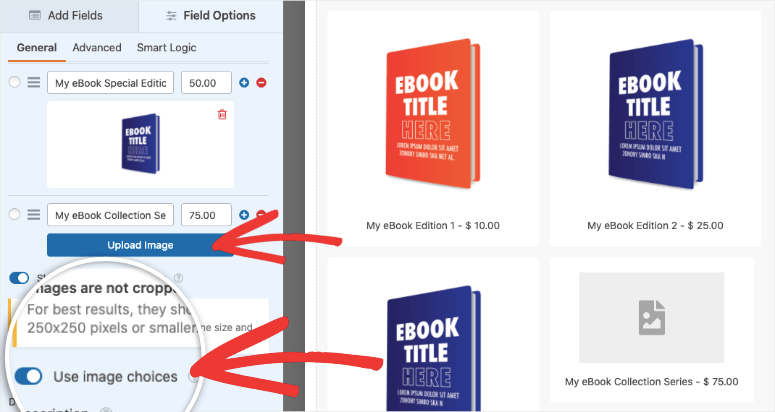
We suggest using images when it comes to selling products because it improves user experience and boosts sales.
Now your product catalog is done. If you’d like to add more fields to the form, you simply need to drag them from the left menu and drop them in your template. And if you select the field, you can edit the field name, placeholder, and more using the form editor.
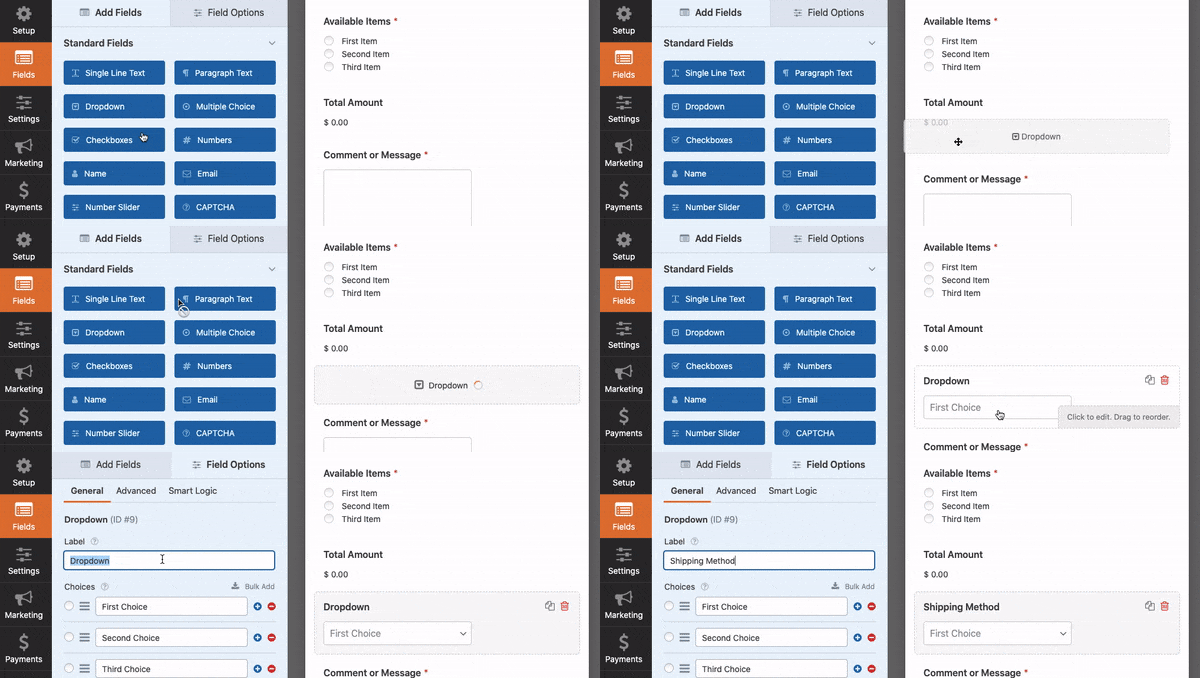
WPForms also lets you add fields like:
- CAPTCHA
- File upload
- Number slider
- Single line/Paragraph text
- Dropdown/Checkboxes
- Multiple choice
- Website/URL
With that, your order form design is ready. Make sure to hit the Save button to store your changes.
Step 3: Connect Order Form to PayPal Payment
PayPal has an easy checkout process making it a preferred payment option around the world.
WPForms has a built-in PayPal integration so it’s easy to connect your form. Inside the WPForms builder, you’ll see a Payments tab on the left.
Open this tab to get the payment integration options. A popup will appear to install and activate the PayPal addon. When you click on the ‘Yes, activate’ button, WPForms will install the addon for you.
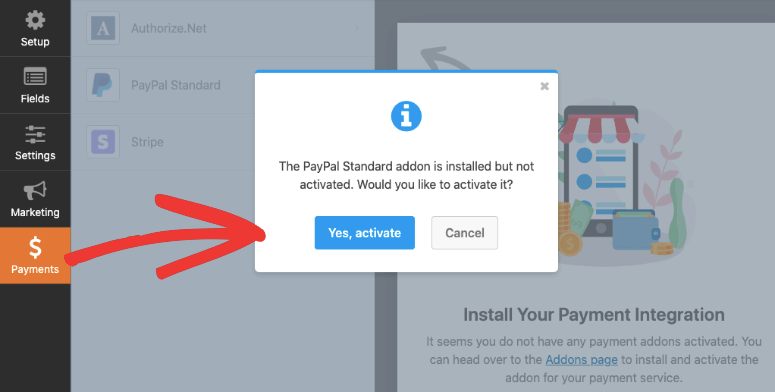
Then WPForms will ask you to refresh the page and you’ll see the PayPal option activated. When you open PayPal Standard tab, there’s a form to enter your PayPal account details. You’ll need to add your PayPal email address, mode, payment type, and other details.
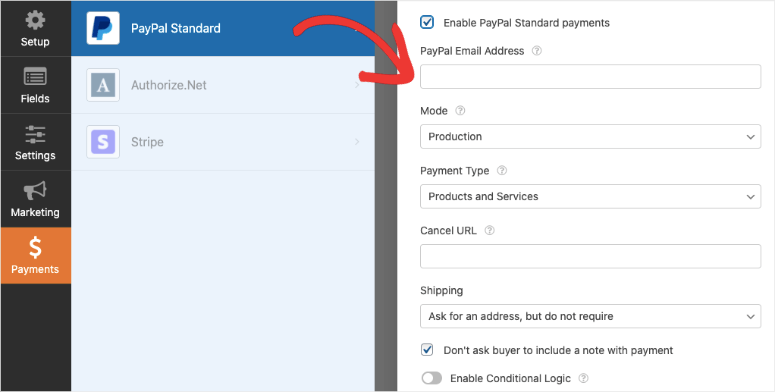
WPForms also has additional settings so you can configure the integration to match your needs.
When you’re done, hit the Save button at the top to store your payment settings. Now you’ve successfully created a product order form with payment integration.
In case you want to give customers the option to pay by credit card, you can enable the Stripe payment option here.
Step 4: Automate Form Notifications and Confirmations
WPForms is backed by a team that is constantly innovating so you’ll find everything you need to make online selling a breeze. For starters, WPForms lets you automate your form notifications that are sent out when someone places an order.
You can create multiple notifications and confirmation messages. This means you can:
- Send yourself an email with the order details
- Send an email to a team or team member
- Send your customer an email to confirm their purchase
- Display a confirmation or thank you message on your website
- Redirect customers to a new page
To create these notifications, open the Settings tab from the menu on the left. You’ll see General settings where you can change the form title, description, and more.
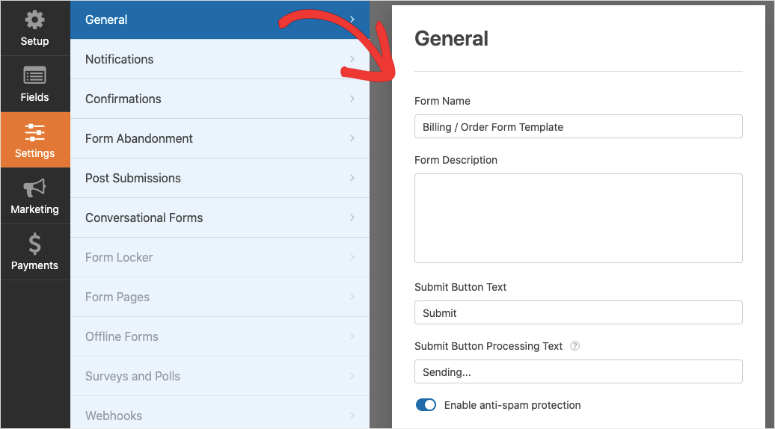
Here, you can also change the submit button text to suit your call to action. You can customize it to a ‘buy now’ button or ‘buy with PayPal’ button.
Next, open the Notifications tab, and you’ll see WPForms has a default notification already set up with your WordPress admin email address. When a customer places an order, you’ll receive an email with the order details.
You can change it to your preferred email address and even add multiple addresses separated by commas.
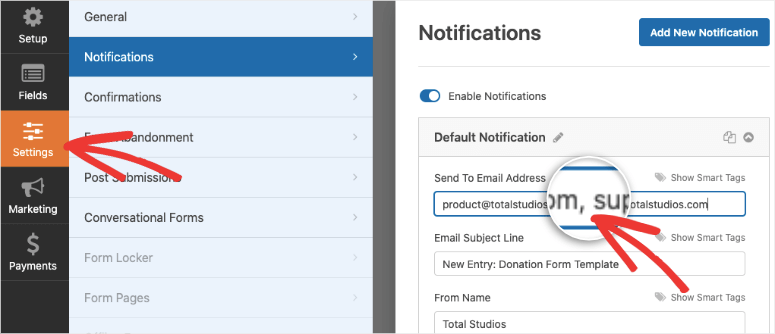
Next, WPForms lets you customize the email subject line and content. There’s even an option to enable ‘Smart Conditional Logic’ to send yourself a notification only when certain conditions are met.
Next, you can create a notification that goes out to customers to confirm their order or to deliver a digital product.
To set this up, use the ‘Add New Notification’ button to create a new notification form. Now click on the Show Smart Tags button and select the Email option.
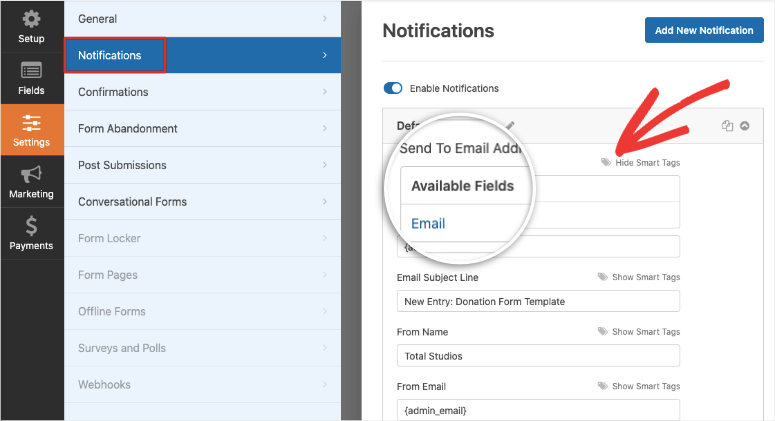
This will automatically fetch the email address entered by the customer in the ‘Email’ form field. Now you can customize the subject line, from name, and email body.
If you would like to include the details they entered in the form, use the {all_fields} smart tag. The tag will autofill the form details in the body of the email.
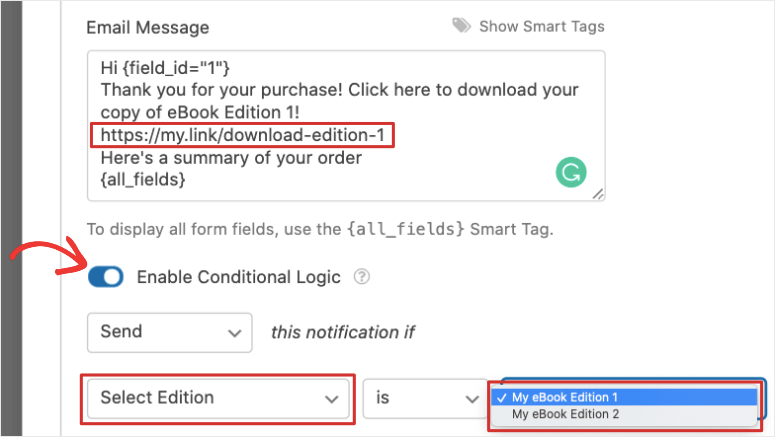
If you want to deliver a digital product such as media files, eBook, music file, or PDF, all you have to do is add a download link here so that the customer can access their downloadable file instantly.
Also see: Easy Digital Downloads. If you’re looking sell digital products with shopping cart options, add to cart buttons, multiple item downloads, and more, Easy Digital Downloads might be the right solution for you.
Back to WPForms, at the bottom of the page, you’ll see an option to enable conditional logic. This will let you send out different notifications based on which product the customer selected. All you have to do is select the form field where you listed the items for sale, and then select the item from the dropdown menu.
So you can deliver different download links for each product. For instance, you can create a separate notification to deliver eBook 1 and another to deliver eBook 2. Based on the customer’s selection, the correct email notification and download link will be sent.
For more details on this, use our guide on Setting Up the Right Form Notifications.
Now your notifications are all set up. Next, you can add a confirmation message that will display on your website as soon as the order is complete.
Open the Confirmations tab from the left menu. You’ll see 3 options to:
- Display a custom confirmation/thank you message
- Show a page
- Redirect the customer to a third-party URL
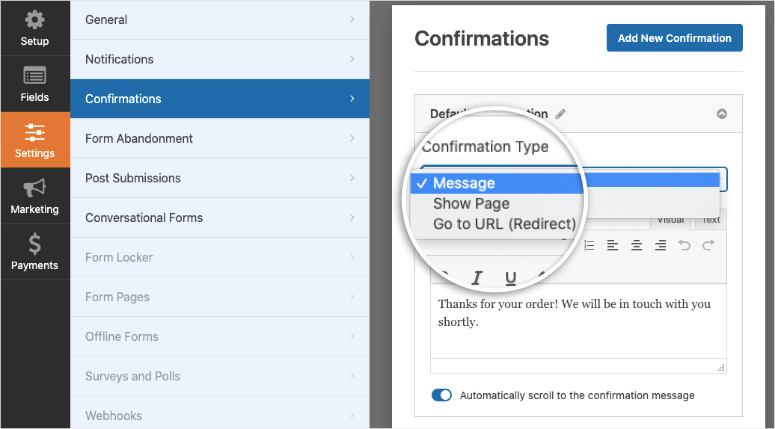
All you have to do is select the confirmation type and customize the message or link.
Now you’ve successfully created a PayPal product order form with automated notifications. Before we publish the form, we’ll show you how to sync the form to your email account. This will make email marketing a lot smoother.
Step 5: Connect to Your Email Account
By connecting to an email account, your customer’s email addresses and other details will automatically be stored in your email account. You can then start sending out marketing emails to them to update them about new features, products, sales, and more.
Keep in mind, you’ll need to get their consent before you send out marketing emails. We suggesting adding a checkbox in the form to ask them to opt in to receive your newsletter or updates.
To integrate the form with your email marketing account, open the Marketing tab and select your email provider. WPForms will prompt you to install and activate the email marketing addon just like you did with PayPal.
Then you can follow the onscreen instructions to connect your email account.
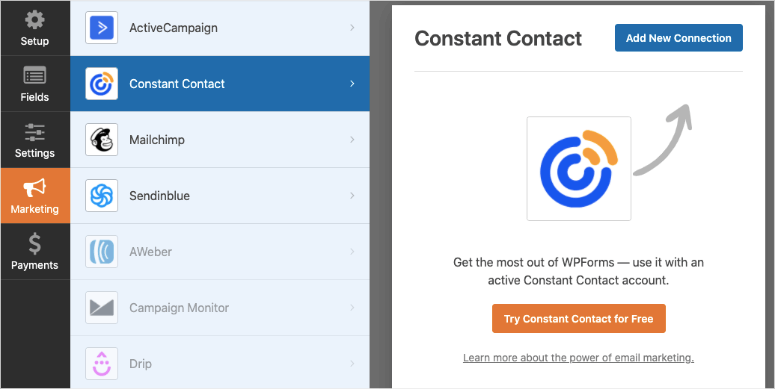
Once you’re connected, you can segment your leads based on what they order from you. This will help keep your list organized.
You can even add your customers to automated drip campaigns to improve engagement and sales.
Now you’re ready to publish the order form on your WordPress site.
Step 6: Add the Order Form to Your Website
WPForms lets you add the product form anywhere on your website. You can add it to posts, pages, or even your sidebar. The plugin also gives you a form shortcode to add it to third-party campaigns.
To embed the form in a page or post, inside the WordPress block editor, you can search for the WPForms block. Add it to your post or page, and you’ll get a dropdown to select the form you created.
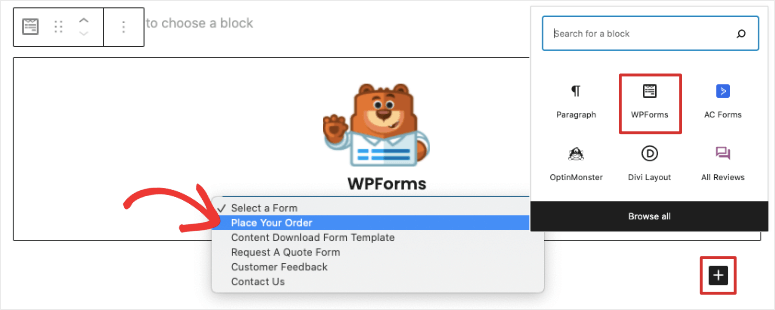
If you’re still using WordPress classic editor, you’ll see an Add Form button here. This lets you select the payment form you’ve created and it will automatically be added to your post.

All you need to do next is preview and publish your post or page. Then you’ll see the PayPal product form appear on your website.
To add the form to a widget-ready area such as a footer or sidebar, navigate to the Appearance » Widgets page.
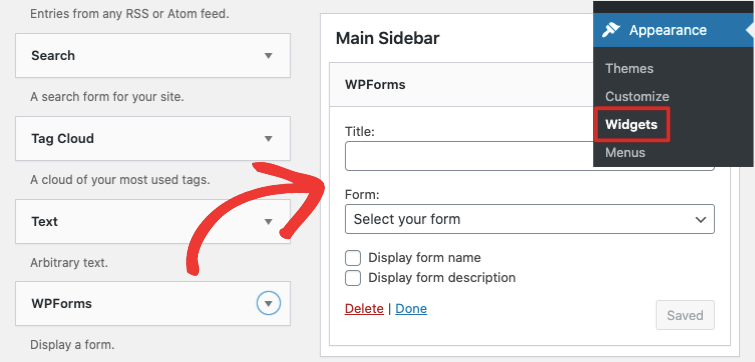
Simply drag and drop the WPForms block into your sidebar and select your form. Now save your changes and visit your website and you’ll see the order form appear.
Whenever you create order forms, we recommend testing them out by placing an order to make sure your online payment is set up correctly.
That’s it! You’re all set to sell your product on WordPress using PayPal as the payment option!
When customers select the products and checkout, they’ll be directed to a PayPal checkout where they can complete their purchase.
WPForms is the perfect option for website owners that don’t want to set up a full-fledged eCommerce solution. It gives you all the payment gateway options you need.
Next, if you want to accept recurring payments, you’ll want to consider giving MemberPress a try. It lets you create membership programs with automated renewal reminders, recurring subscriptions, and more.
We hope you found this tutorial helpful. To market your products in the best way possible, you’ll want to read these posts:
- Grow your Business with Online Marketing Tools
- Build a Sales Page to Promote your product
- Instantly Boost Conversions and Revenue with Live Sales Notifications
These resources have all the info you need to get more visibility for your products to skyrocket sales and conversions.

Comments Leave a Reply