Want to open a lightbox popup at the click of a button on your site? Lightbox popups can help generate more targeted leads and grow your email list.
If you make the popup open when the user clicks a button, you can prompt them to sign up for your newsletter, download an eBook or report, and get coupons or discounts.
In this tutorial, we’ll show you how to easily create lightbox popups that open on a click to increase your subscribers and get more leads.
Creating WordPress Lightbox Popups on Click the Right Way
Popups can be an excellent way to drive conversions and help grow businesses faster than many other methods.
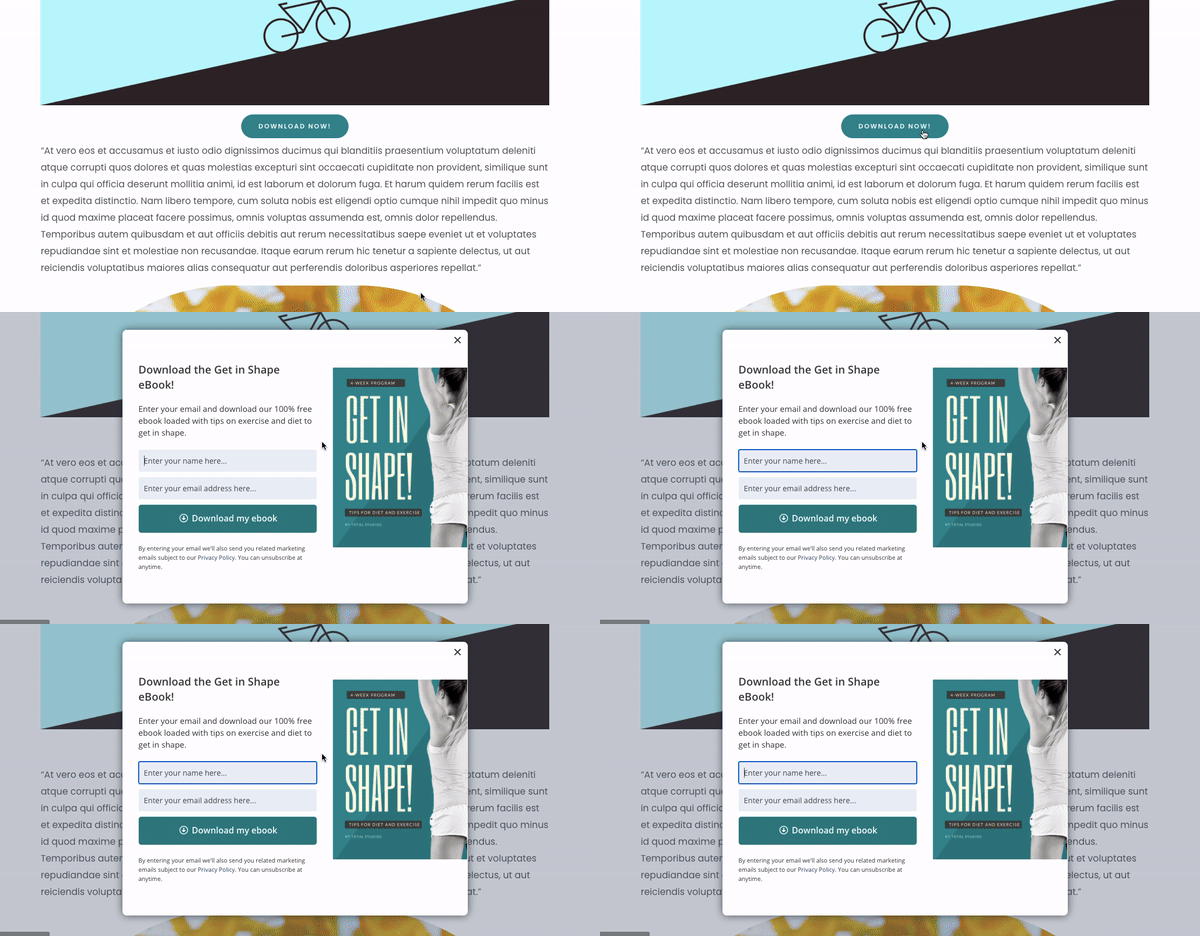
One of the most effective ways to display your popup is to let your user’s behavior trigger it. For instance, you can make a popup that opens on a button click like the example below:
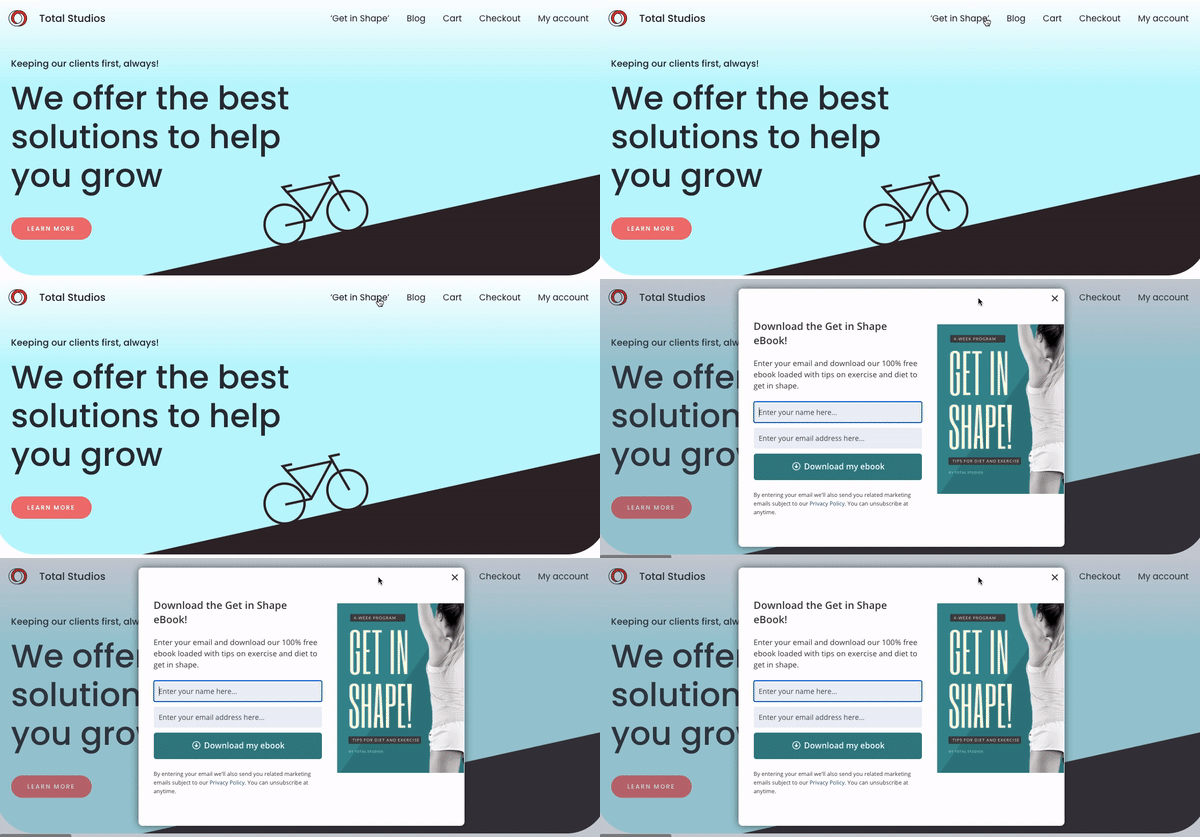
This way, the user is not bombarded by a popup, but instead, they see it only when they show interest.
These popups work well if used correctly. You may want to see how CodeinWP increased conversions by 1000% using popups that appear on a click.
They were able to do so because they designed a great campaign that appeared where users were most likely to be interested in their popup.
They tailor-made their popups, used split testing to check what works and what doesn’t, and made data-driven decisions. As a result, they achieved massive success.
The best part is that creating a popup that opens on a click is easier than you think. It doesn’t even require any coding skills or technical knowledge!
The truth is anyone can easily create a successful popup campaign in a few minutes using OptinMonster:
OptinMonster is by far the best lead generation plugin on the market that makes it easy to create powerful popup campaigns. And it’s the easiest way to make a popup that appears on a button click.
In short, OptinMonster is your best bet for growing your email list, reducing cart abandonment, and improving website conversions.
Just like CodeinWP, there are many more OptinMonster success stories that you can check out.
Now, let’s look at exactly how you can create your own lightbox popup that opens with a click using OptinMonster.
How to Open a Lightbox Popup on Click
We’ll show you how to create a visually stunning popup and get it to open on a click.
The first thing you need to do is create a risk-free OptinMonster account. Once you’ve signed up, you can install the OptinMonster plugin on your site to get started.
Then you’ll simply need to follow the next few steps.
1. Create Your Popup Campaign
There are two ways to access the OptinMonster dashboard to create campaigns. You can log into your account on the OptinMonster website and create a new campaign here:
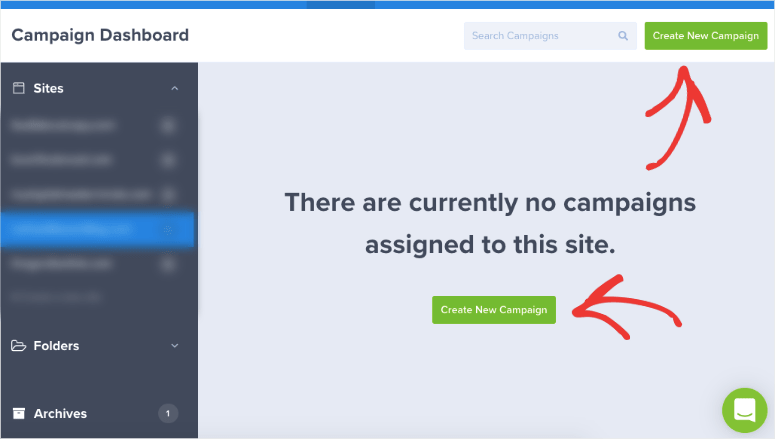
You can also also visit your WordPress admin panel and select OptinMonster » Dashboard to access the same dashboard.
When you open the dashboard, you’ll see options to create new popups, floating bars, slide-ins, and more.
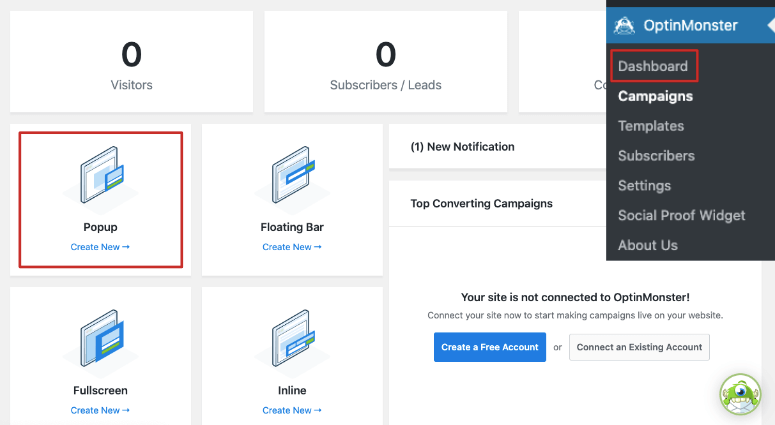
To create a lightbox popup, select Popup, and OptinMonster will generate a list of templates that are readily available to create your campaign.
OptinMonster has over 100 prebuilt templates that you can choose from, all of which look great across mobile, desktop, and tablet devices.
These templates save you hours of time in the design process. But you also have the option to build a campaign from scratch with the Canvas template.
Today, we’ll use the Magnet template for this tutorial. When you select the template, a prompt will appear where you can enter a name for your campaign.
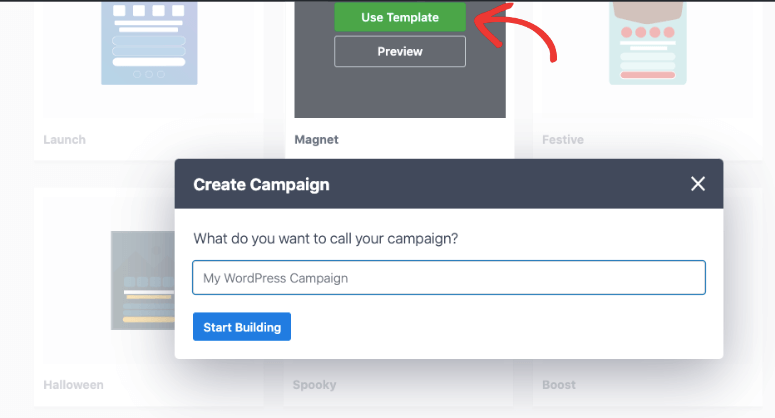
Then you’ll be directed to the OptinMonster campaign editor where you can customize the template.
2. Design Your Popup Campaign
OptinMonster has a visual editor which means you can edit the popup as it would appear on your website.
You can start by editing the headline. Simply select the headline and the text editing options will automatically appear above.
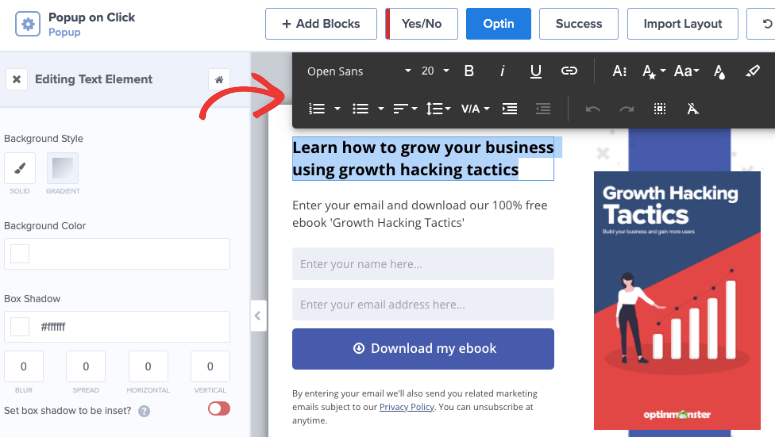
Now, you can replace the content with your own text, change the color, font type and size, and alignment. In the left panel, you’ll also see a text editor that allows you to change the background style and color, add a box-shadow, and more.
In the same way, you can change the body text of the popup as well.
Next, click on the image in the campaign. The image editor appears on the left where you can replace the image with your own. You can either choose an image from your media library or upload a new one from your computer.
Similarly, you can choose the purple banner and change the color, delete it, or replace it with another image.
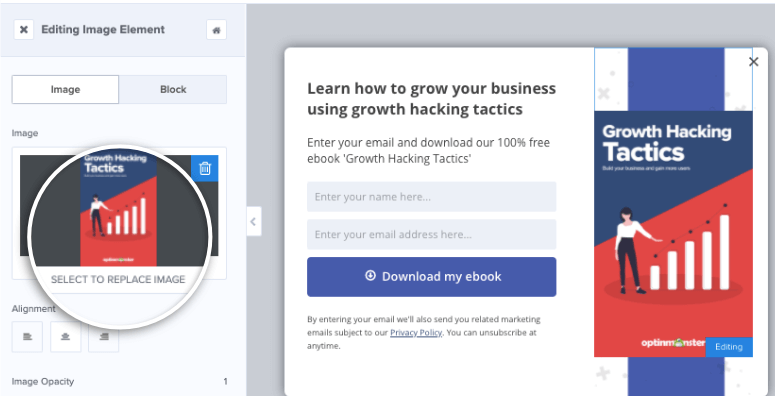
In the image editor, you’ll see options to change the image opacity, width, border, and more.
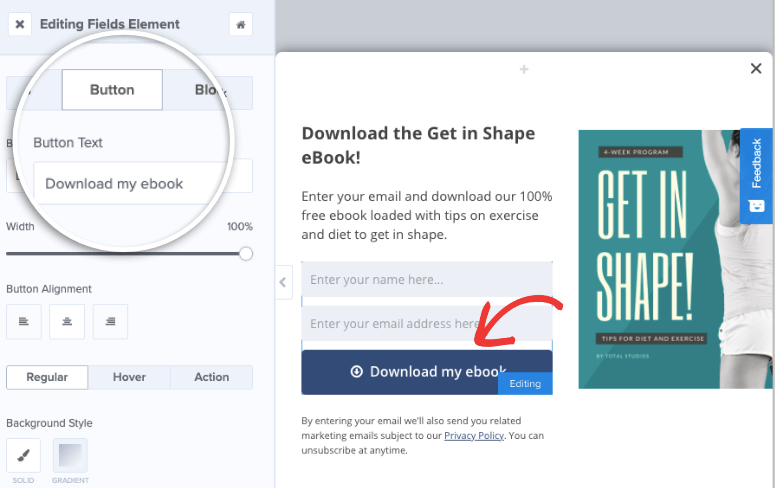
After editing the image, you can edit the button that says ‘Download my eBook’. You can start by selecting the button and the button editor will open in the left panel. Here, you’ll be able to change the color, text, and style of the button:
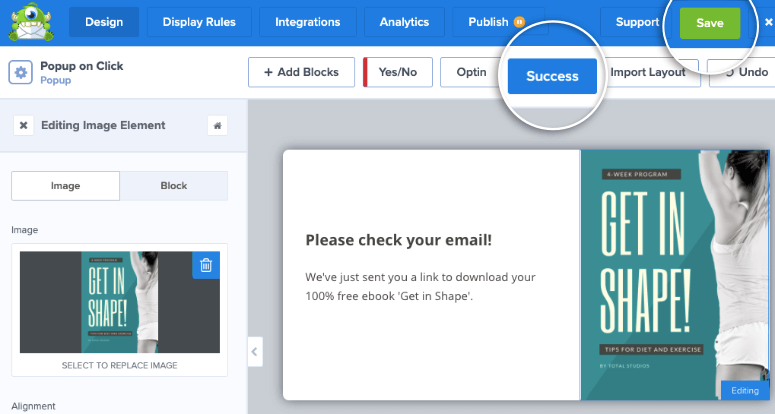
Finally, go to the ‘Success’ tab to change the message to be displayed to users who sign up. You’ll be able to replace the text and image in the same way you did in the popup editor:
These are just a few examples of how you can edit your OptinMonster campaigns, though there are many others. For more help, you may want to check out this resource: How to Create and Design Your First OptinMonster Campaign.
Once you’ve customized the popup, it’s a good idea to save your campaign by clicking on the ‘Save’ button at the top.
3. Set Display Rules to ‘On Click’
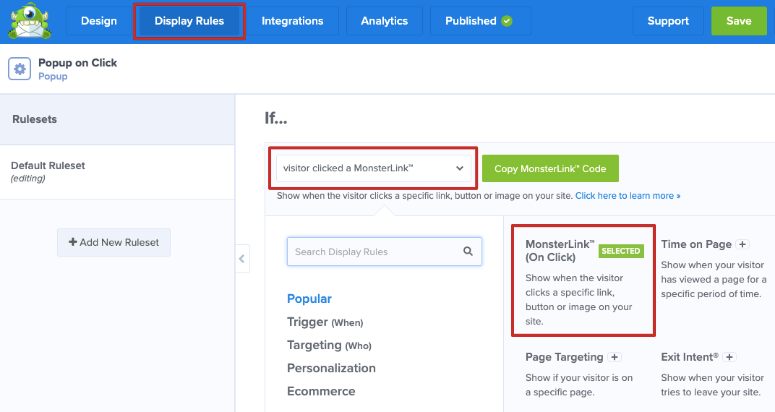
Now that your popup campaign is ready, you can set a rule for it to appear on click on your site. To do this, switch over to the ‘Display Rules’ tab.
Select MonsterLink™ (On Click) and this will create a rule that says ‘If visitor clicked a MonsterLink™’.
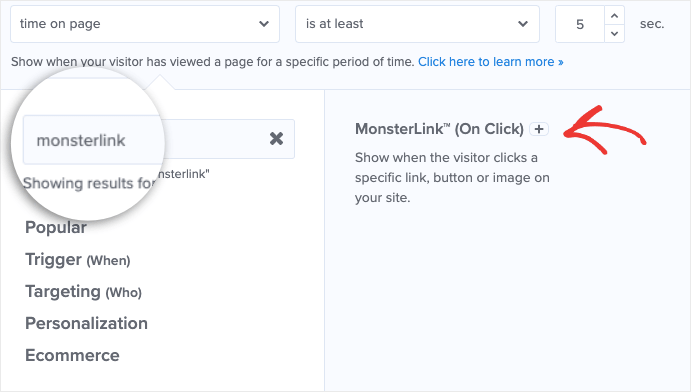
If you don’t see this option right away, you can use the search bar in the display rules menu:
Don’t forget to save your changes. This rule will allow you to display your popup when a user clicks on a specific link, button, or image on your site.
4. Add an Email Provider
Your popup display helps you collect email addresses from your visitors so that you can promote your brand or product, or connect with them over email.
By default, OptinMonster uses Monster Leads to capture popup form entries. This means that when someone enters their name and email address in your popup, it will automatically be registered under Monster Leads.
You will be able to view all these entries on your WordPress dashboard and we’ll show you how to do that once you’re campaign is live.
You can also integrate the popup campaign with your own email provider such as Constant Contact and SendInBlue.
By integrating it with your email provider, you can send automated emails to those who sign up for your newsletter or discounts, or download your eBook, and so on.
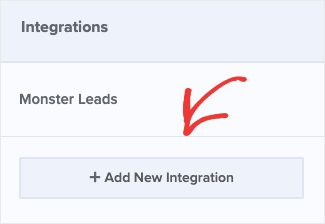
To integrate your email provider, select the ‘Integrations’ tab from the OptinMonster dashboard. Then, click the ‘Add new integration’ button:
Next, under ‘Email Provider’, you can explore the list of email integrations available in the dropdown menu:
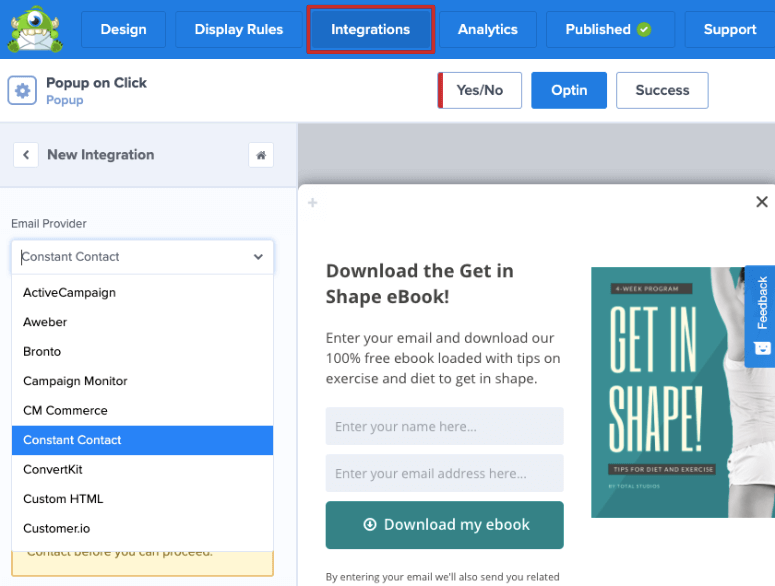
Once you select your email provider, scroll down to add notifications and tags to your popup form entries to better organize your campaigns.
Don’t forget to save your integrations once you’re done.
5. Publish Your Campaign
The next step is to make your popup campaign live on your site.
First, make sure you save your campaign and then click on the ‘Publish’ tab. Here, you can change the status of your campaign from ‘Draft’ to ‘Published’. If you’re not ready to launch your campaign, you can also schedule a time and date for the campaign to go live.
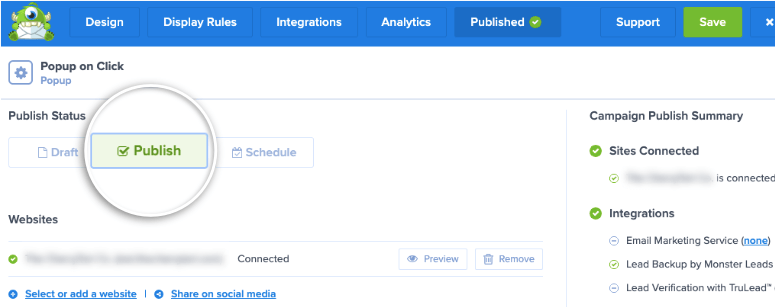
You can preview how the campaign will look on your site by selecting the ‘Preview’ button. Once you’re happy with all the changes, save your changes to make the campaign live.
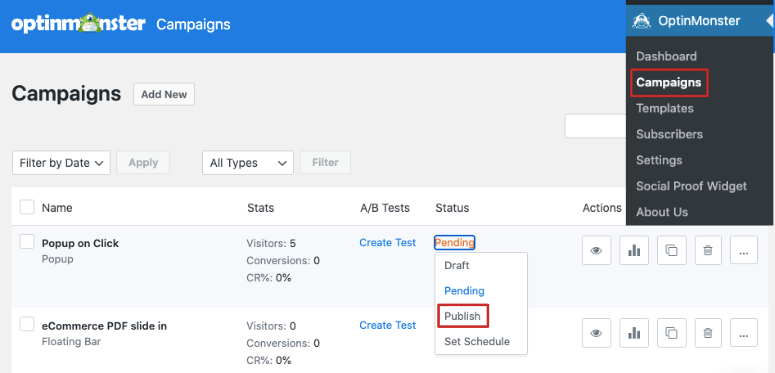
To make sure your campaign has been published, visit the OptinMonster » Campaigns tab from your WordPress dashboard. If you see that the status is ‘Pending’, click on it to get a dropdown menu and then select ‘Publish’ to make your campaign live.
All that’s left is to add your popup’s URL to a clickable link on your website.
6. Add On-Click Popup to Your WordPress Site
OptinMonster lets you add the popup on click to any text, button, or your main menu.
First, you need to copy the MonsterLink™ you created earlier. In the OptinMonster dashboard, go to the Published tab. Under ‘Platforms’, you’ll see an option to get a shareable link.
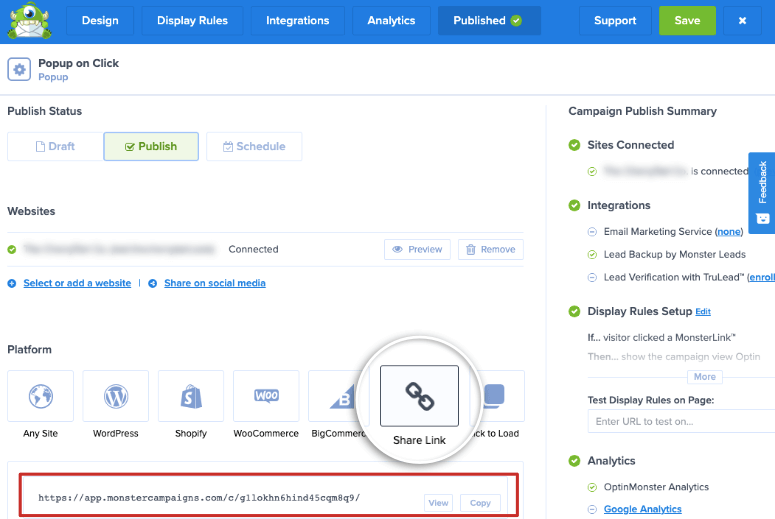
Copy this link and keep it ready for the next step.
Now, we’ll show you how to use this link to add the on-click popup to text, button, or even your website’s main menu.
1. Add MonsterLink™ to a Button and Text
You can easily add the MonsterLink™ to any text or button in WordPress. To do this, edit the page or post where you want to add the link.
In the block editor, add a button to your page or post by clicking on the (+) sign and selecting the button block. Once you’ve added a button, select it to open the block settings menu. Now, click on the link icon to open up the link field, and you can paste the MonsterLink™ inside.

Similarly, you can select any text on your site, select the link icon, and paste the link to embed the popup. Once you’re done, Save or Publish your post and then preview it to see how your popup works.
2. Add MonsterLink™ to a WordPress Menu
If you would like to add your link to your WordPress menu, you can do so by visiting the Appearance » Menus tab on your WordPress dashboard.
Inside this page, you can select ‘Custom Links’ and you’ll see a dropdown appear that lets you enter a URL and link text.
Paste the MonsterLink™ inside here and add the link text according to the content of your popup campaign.
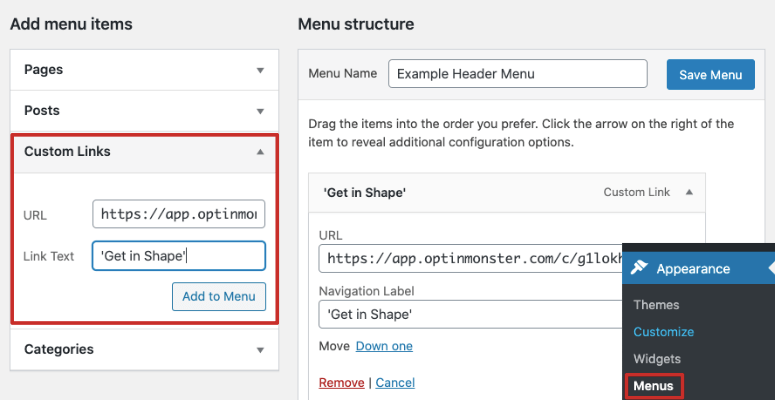
Once you’ve filled out the fields, select the ‘Add to Menu’ button, and then Save your menu.
After this, head over to your WordPress site and you’ll see that the link to your popup on-click campaign appears in your menu.

Now, your popup will appear when a user clicks on the text, button, or menu item where you’ve added the MonsterLink™.
Track Your Popup Campaign Leads and Optimize for Success
OptinMonster lets you create beautiful popups to increase your leads and grow your business, but that’s not all. It also helps you track the success of your campaigns to see how well they are performing.
OptinMoster uses Monster Leads to record all your popup form entries. You can find the list of entries under OptinMonster » Subscribers tab. You’ll be directed to the Leads tab on the OptinMonster dashboard.
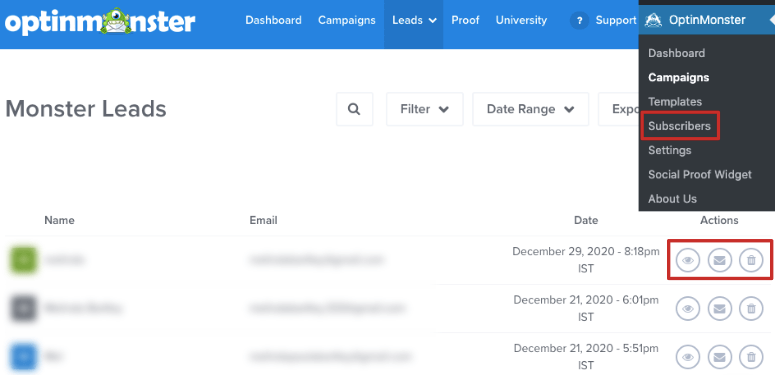
Here, you can see the subscriber’s name, email address, and date. You can use the action menu to view more details, email them, or delete their entry.
Next, you can view your campaign data to see how successful it is. For this, you need to open OptinMonster » Campaigns tab and you’ll see a list of the campaigns you’ve created.
To view the data and statistics of any campaign, select the analytics icon under the Actions menu:
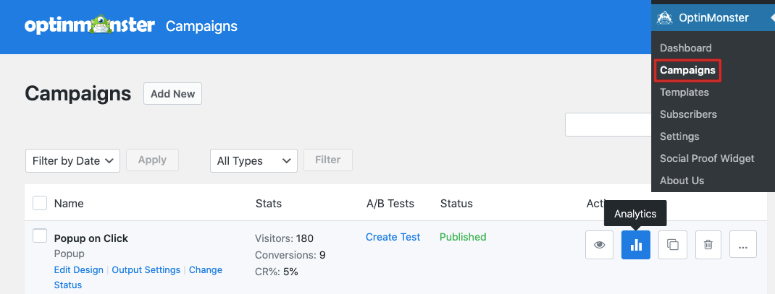
Here, you can see a graph of how many people have viewed your popup campaign and how many have subscribed. You can also check which pages or links lead to the highest conversions.
This way, you can determine where the user is most interested in your popup.
OptinMonster also gives you an option to integrate the campaign with your Google Analytics account.
With actionable insights, you can make changes to your campaign to increase your success rate of conversions.
That’s it! We hope you found this post helpful. If you liked this article, you might also be interested in:
- Best Email Marketing Services for Small Business
- Best WordPress Lead Generation Plugins
- Create Automated Recent Sales Notification Popups
These articles are packed with information to help generate new leads, drive more profits, and grow your business.

Comments Leave a Reply