Want an easy way to create a recent sales notification popup in WordPress?
Automated recent sales popups help attract visitors and keep them updated about new product sales. They act as social proof to build trust in customers and eventually boost conversions on your eCommerce site.
In this tutorial, we’ll show you how to easily create automated recent sales notification popups in WordPress in just a few steps.
Before we start, be clear about why you should add recent sales notifications to your website so you can be sure you get the most out of them.
Why Create a Recent Sales Notification Popup in WordPress?
A recent sales notification popup is a non-intrusive popup displayed on your visitors’ screen whenever someone purchases a product from your website.
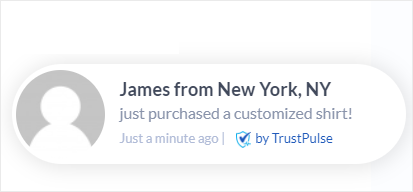
It sparks interest in casual visitors who are browsing your website. If they click on it, you can redirect them to the product page where they can make their purchase.
Recent sales popups work on a phenomenon known as the fear of missing out (FOMO). When people see others enjoying something, they want to get in on the action too. And many marketers use this technique to build trust and confidence in customers. This in turn helps generate more leads and boost sales.
Now if your store is new, you may be worried that you won’t have anything to display. There are tools that let you display fake sales notifications but you should never do this! You could tarnish your brand permanently. Read more on that here: Why Not to Use Fake Sales Notifications (What to Do Instead)
There are plenty of ways you can use these popup notifications to make your store look busy and create an atmosphere of FOMO. A few ideas include:
- Cross-promote and upsell products
- Boost traffic on your recent blogs and pages
- Persuade visitors to sign up for your email newsletter
- Promote your webinar and register attendees
- Collect user feedback, reviews, and testimonials
Now, we’ll walk you through the easiest way to create an automated recent sales notification popup with the help of the TrustPulse plugin.
How To Create a Recent Sales Notification Popup (Using TrustPulse)
Adding an automated recent sales notification popup can seem like a difficult task for beginners and non-technical users. But we have a simple solution for you and that’s using a live sales notification plugin.
There are a few options out there but we recommend TrustPulse as #1.

TrustPulse is the best social proof and FOMO software for creating recent sales notification popups in a few clicks. You can set up this tool and add eye-catching sales notifications popups to your site without any coding knowledge.
Once you install TrustPulse, it lets you easily create customized popups by adding a custom message, background color, icon, and logo using its campaign builder. The plugin will also auto-detect the customer name and display it in the sales popup.
The sales popup plugin automatically tracks user activity such as new purchases, signups, page views, and registrations on your site. So, you can connect the live stats with your popups to create a busy atmosphere among website visitors.
Here are some of the reasons to choose TrustPulse to create your recent sales notification popups:
- Responsive and flexible popup designs
- Smart targeting features to show sales notifications to potential buyers
- Real-time event tracking and analytics
- Integration with email marketing services
- Compatible with platforms like WordPress, Shopify, and WooCommerce
That said, we’ll show you how to easily create an automated recent sales notification popup for your WordPress site using TrustPulse.
Step 1: Install and Activate TrustPulse
First, you’ll need to install TrustPulse on your WordPress website. The plugin is available 100% free on the WordPress repository so you can directly install it from your admin dashboard.
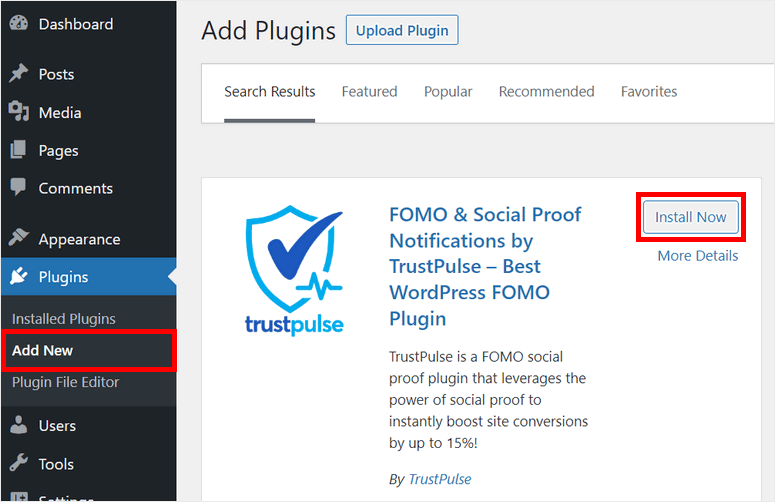
For this, open the Plugins » Add New tab and search for the TrustPulse plugin. Then, click on the Install Now button and activate the plugin.
If you need more information on this, you can check our easy guide on how to install a WordPress plugin.
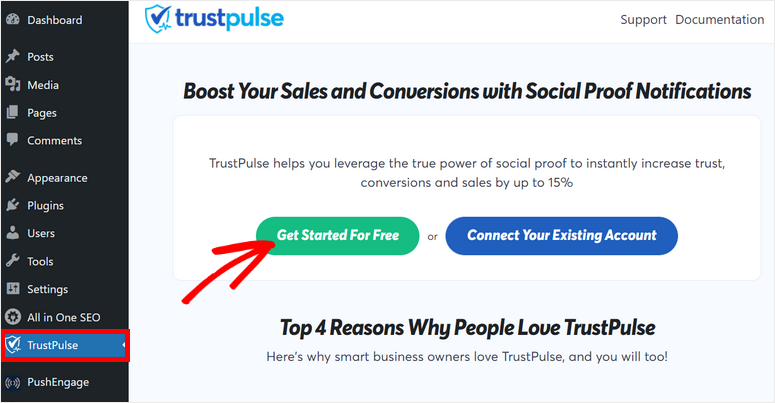
Once you install and activate TrustPulse on your site, you’ll see this page in the next window.
If you haven’t created an account yet, you can click on the Get Started for Free button. This will take you to the TrustPulse website where you can sign up for free.
The free version gives you 500 sessions per month for your website. For unlimited sessions, you can upgrade to the pro version.
After you sign up for an account, you’ll need to add your site details and connect with TrustPulse.
Next, you can create a new campaign to add a recent sales popup notification to your site.
Step 2: Create a New Sales Notification Popup Campaign
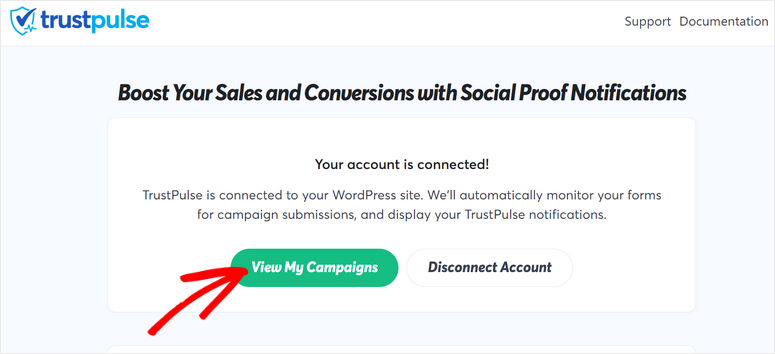
Once your TrustPulse account is connected to your WordPress site, you’ll see the success message on your admin dashboard.
To create a new campaign, you need to click on the View My Campaign option there.
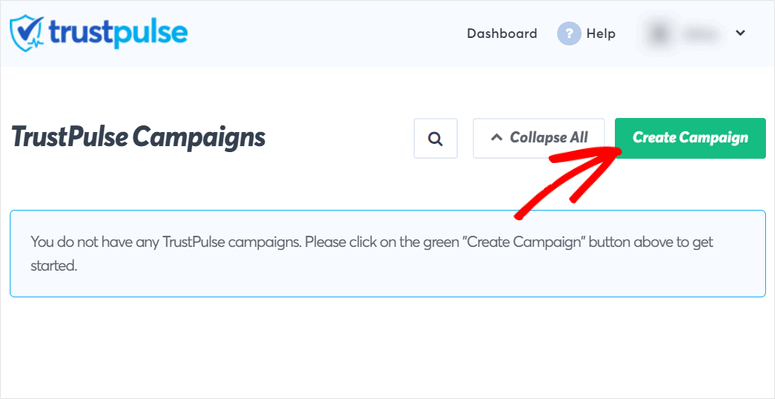
This will take you back to your account dashboard in TrustPulse. To get started, click on the Create Campaign button.
In the campaign builder, first, enter a name, select your site, and select a campaign type.
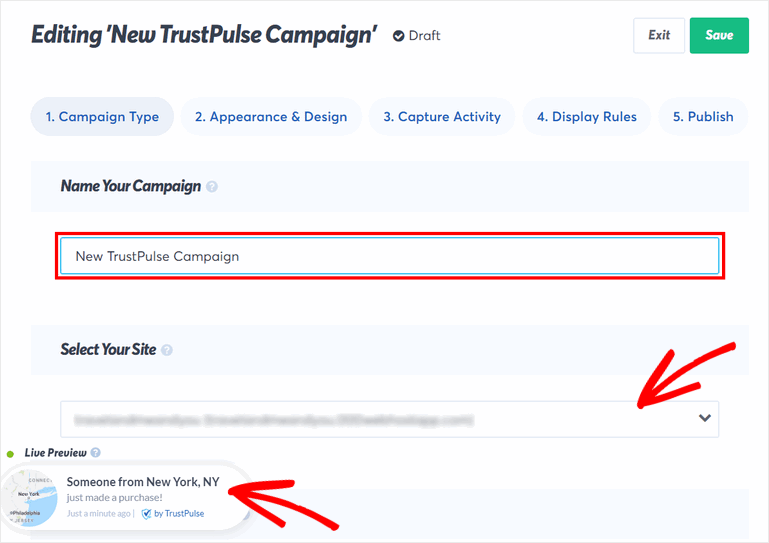
You’ll also see the live preview of a sample live sales notification on the bottom left corner of the page.
For the campaign type, you get 4 options:
- Recent Activity: Displays live activities on your websites like recent orders, registrations, signups, and more.
- On-Fire: Shows the number of people taking action on your site in a given period.
- Visitor Analytics: Showcases the page views on your site to boost conversion rates.
- Action Message: Static notifications with customized messages that trigger visitors to take action like sign up, grab a discount, visit a page, and so on.
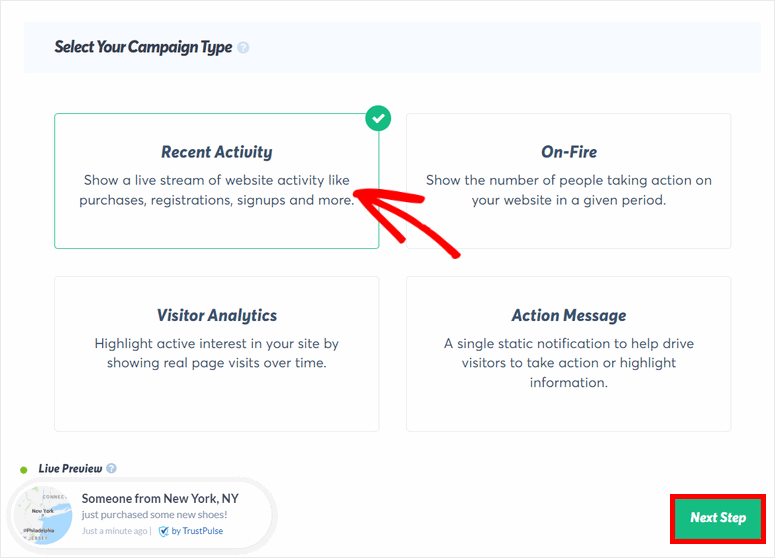
For this tutorial, we’ll be using the Recent Activity campaign to show individual sales notifications to your visitors.
You can also use the On-Fire campaign type to display a larger number of sales and leverage social proof. So instead of seeing “Someone just purchased a pair of shoes”, your visitor will see “150 people purchased new shoes in the last 24 hours!”
After you select Recent Activity, click on the Next Step button on the bottom right corner of the page.
Now, you can customize the look and feel of your recent sales campaign notification popup.
Step 3: Customize Your Recent Sales Notification Popup
In the Appearance & Design step, you can see all the settings to personalize your recent sales feed.
The first option here lets you Display a Default Notification. You can enable this option to show a welcome notification popup when there are no new activities on your site.
To preview the notification, click on the Preview Default Notification button. You can also add your custom message and title to the notification.
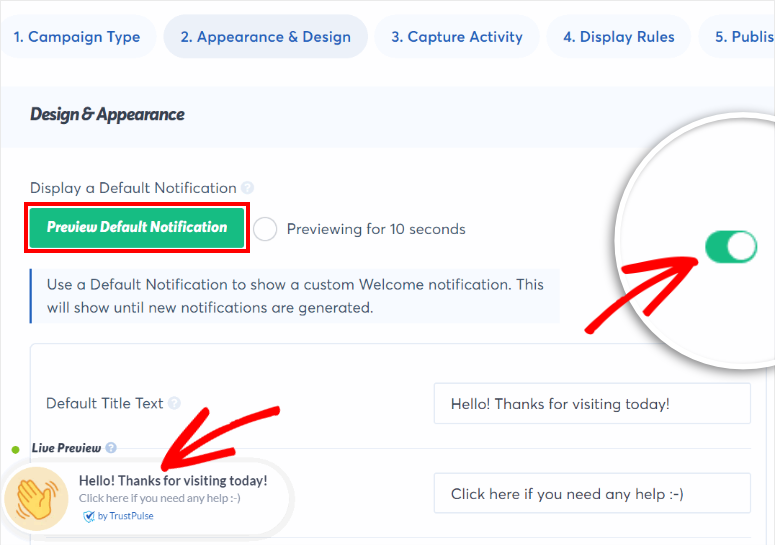
If you don’t want to show this notification, you can simply disable it. Now, you can customize your recent sales notification popup with the settings below.
TrustPulse auto-detects the name of your customers when they make a purchase and adds it to your notification title. If it can’t detect the name, it will refer to the visitors as “Someone”. You have the option to change the default text to anything you prefer like “A new visitor”.
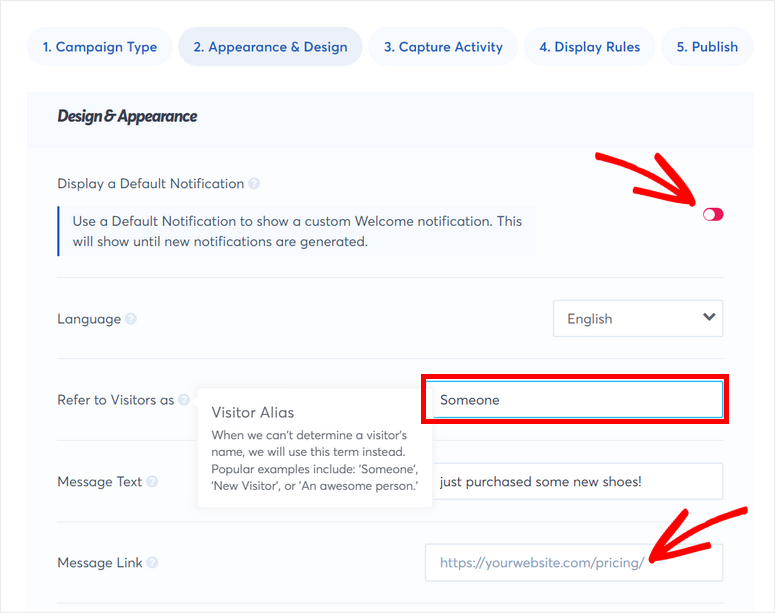
You can also change the notification message depending on the product you want to promote. Then, you can add the link to redirect the customers to the specific product page.
Next, you’ll see the option to change the notification image, position, corner style, size, and more. To see how your changes look in the live preview, you can click on Save the button.
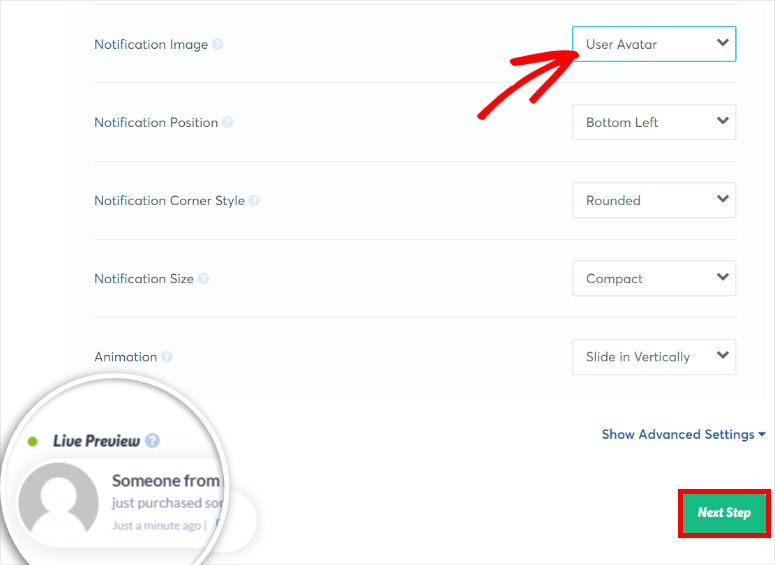
For more customization options, click on the Show Advanced Settings menu. This gives you more options to style the popup the way you like.
Once you’re happy with how your recent sales notification popup is looking, you can click on Next Step.
Step 4: Capture User Activity
TrustPulse allows you to create a notification popup for any activity like registrations, page views, and purchases on your WordPress site.
To capture the activity on your site, it gives your three different options:
- AutoMagic: Allows you to capture any live activity that happens on your site
- WooCommerce Orders: Connect with your WooCommerce store and automatically capture new product orders for your notifications.
- Zapier: Capture activities and user submissions from over 4,000+ 3rd party apps that are integrated on your site.
For our tutorial, we’ll show you two ways to capture live sales on your site i.e. AutoMagic and WooCommerce Orders.
1. AutoMagic
This option will capture all the sales activity from your checkout or product sales page.
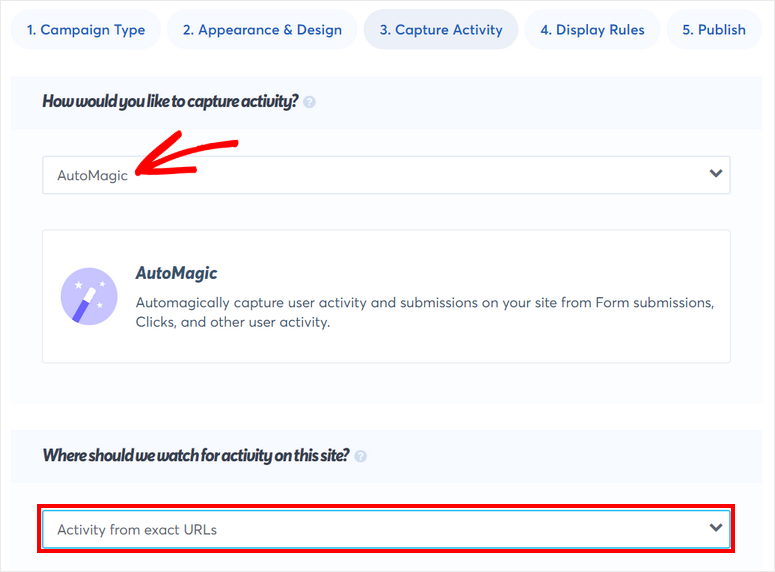
So after you select the AutoMagic option, you need to set up a trigger for when a customer purchases a product on your site.
Under the Where should we watch for activity on this site? option, select “Activity from exact URLs” from the drop-down menu.
Then, you’ll have to enter the URL path of the page where you want to track the sales. It can be a checkout page or a product sales page. Once you do that, you need to click on the “+” icon button.
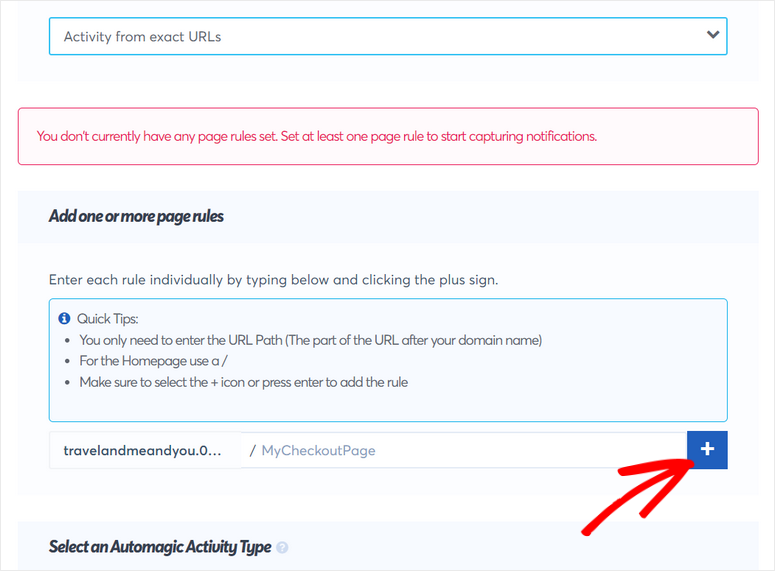
Now, under the Select an Automagic Activity Type, you get two options “User Click” or “Form Activity”. If you’ve added a form on your checkout page, you can capture sales activities every time someone submits this form.
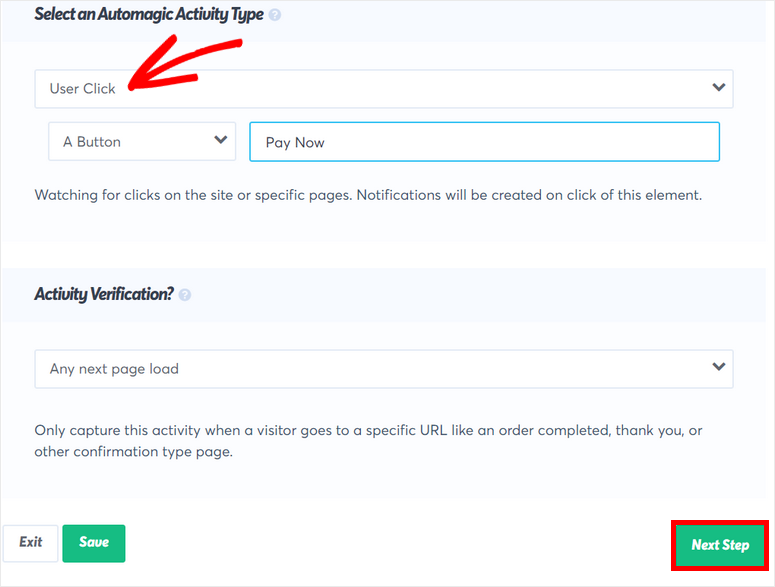
Or, you can check the User Click option to capture the sales from buttons or links on your page. So for instance, if a buyer clicks on the “Pay Now” button, it will count as a sale. TrustPulse will track this and display a notification for it.
2. WooCommerce Orders
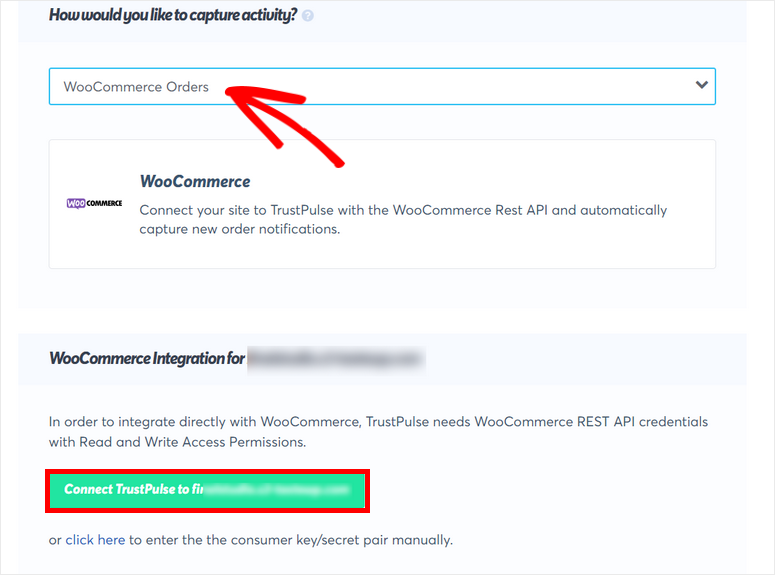
If you want to capture your sales directly from your online store. you can select the WooCommerce Orders option. To connect your site, simply click on the Connect TrustPulse to “website name” button there.
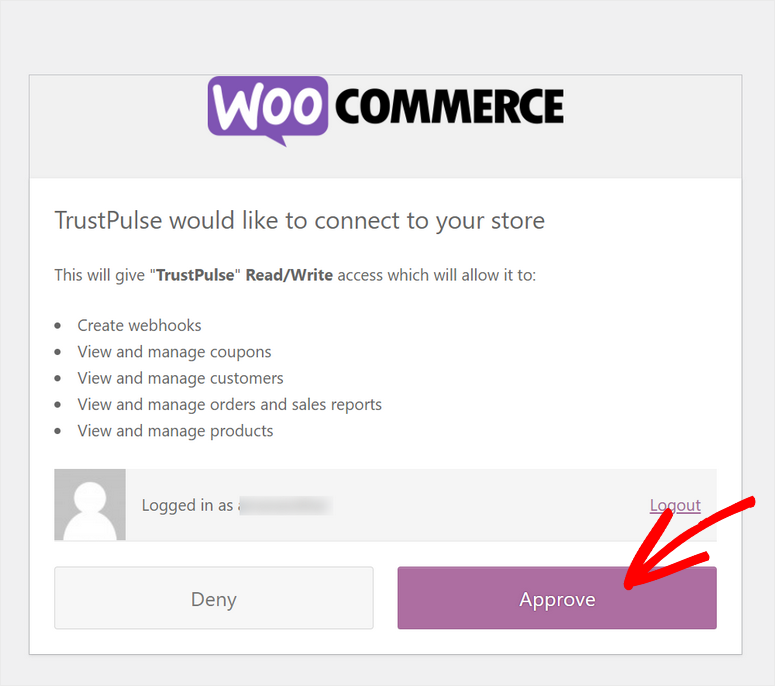
This will open a popup where you can log in to your WooCommerce store if you haven’t already. Then, you need to approve permissions for TrustPulse to connect to your store.
Once your WooCommerce store is connected, you’ll see the success message on the campaign builder. Now, you need to click on the Create new webhook button for the recent sales notification to work on your store.
This button automatically creates and adds the webhook to your WooCommerce settings. TrustPulse also provides step-by-step instructions, so you can do this manually if you want.
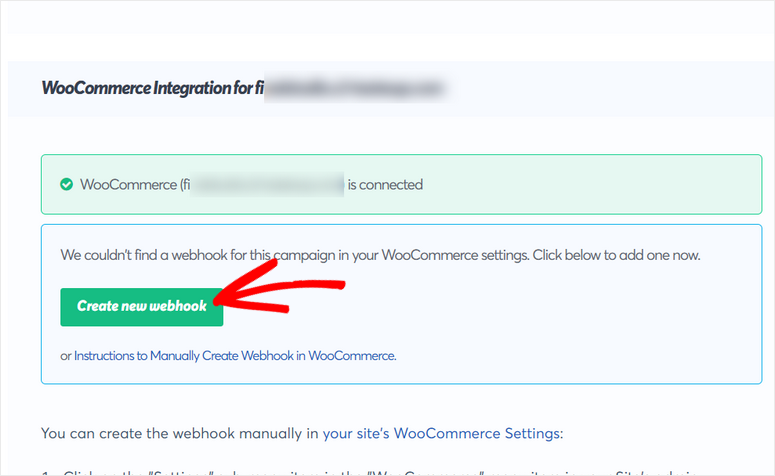
You’ll see the “Webhook is active” message after it is created.

Now, you can customize the WooCommerce sales notification popup message. You’ll get 4 settings here:
- Message Text: The default message is “just made a purchase”. But, you can use the smart tag {{product_name}} and add something like “just purchased {{product_name}}!” as the message. This smart tag will automatically retrieve the product name from your WooCommerce store and display it on the notification.
- Single Product Priority: If a customer purchases multiple cart items, then you can choose which item to display on the notification. You get 3 options here: First, Most Expensive, and Random.
- Replace Icon Image if Product Image is available: Enable this option to display the WooCommerce product image on the notification.
- Replace Notification Link with Product Link: Enable this option to add the product link to the notification automatically. When visitors click on it, they’ll be taken to the specific product page.
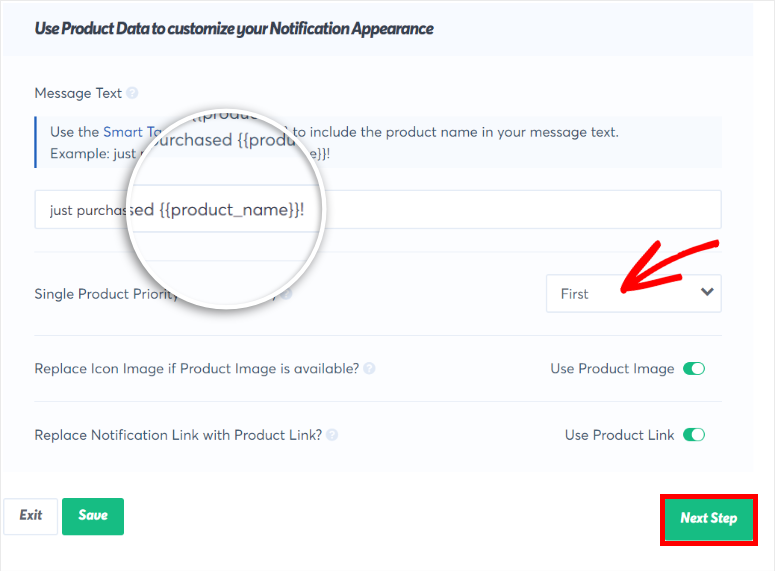
After you’re done, click on the Next Step button and move on to setting up Display Rules.
Step 5: Set Up Display Rules
Now, you need to set up display rules which determine where and when the recent sales notification popup will appear on your site.
On the “Where should we display your notifications?” dropdown menu, you’ll find many options for displaying your notification. The default setting is Display on any page and it shows the notification popup throughout your website.
If you want to display the notification on certain pages only, you can select the Display on exact URLs option. You can use this to promote product discounts and flash sales to the customers who land on specific pages of your online store.
Also, you can choose the Display on URLs containing specific text option to make the notifications appear only on the product pages that have a certain word in the page URL.
For example, you can upsell a higher-end shoe on all the pages that contain the word ‘shoes’ in the URL.
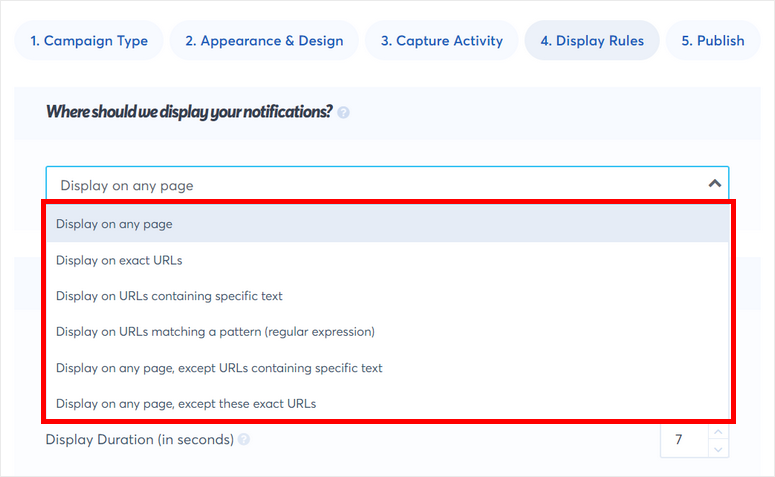
Next, you’ll see options to configure these notification settings:
- Delay before showing notification: The amount of time to wait before displaying the first notification after visitors land on your site.
- Display duration: The amount of time to display a notification before it disappears. If you want to display one notification permanently, you can set this to 0.
- Delay time between notifications: The amount of time to wait before the next notification is shown.
- Load notification on mobile: Enable this option to display the notification popup on mobile devices. By default, the notifications will always show on desktop devices.
- Loop notifications: After a visitor has viewed all the notifications, it loops the notifications and shows them again starting with the newest notifications.
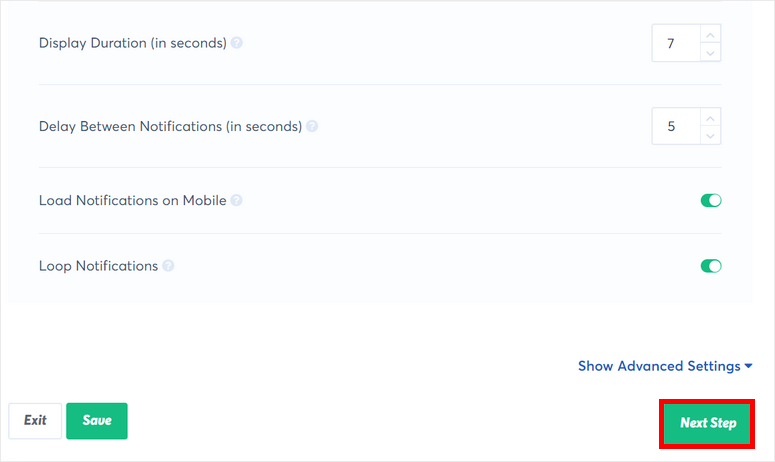
After you’ve set up the notification display rules, make sure to check the live preview and see everything is good to go.
Then, click on the Next Step button to launch your campaign.
Step 6: Publish Your Recent Sales Notification Popup in WordPress
All you need to do now is publish your recent sales notification popup on your WordPress site.
Because you’ve already connected your site with TrustPulse, you can publish the notification by simply clicking on the Launch your TrustPulse campaign button.
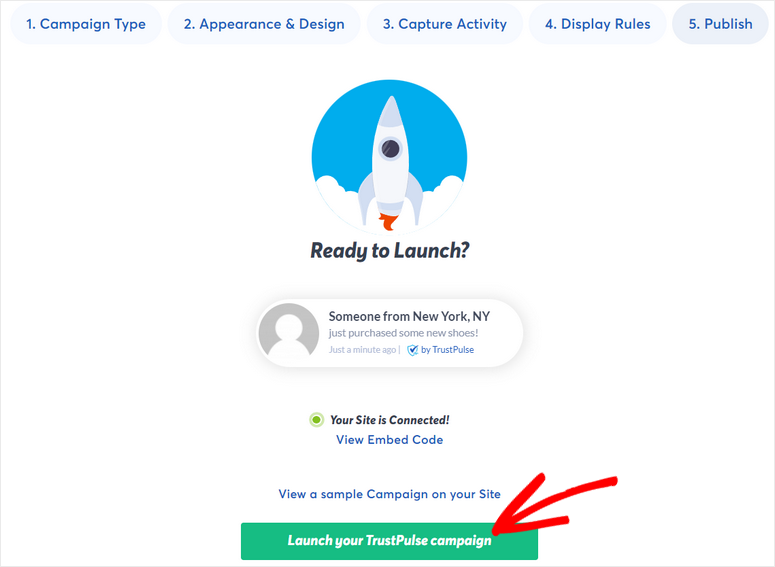
And there you go! You’ve successfully learned how to create automated recent sales notification popups for your website.
On the same page, you can return to your dashboard. Here, you will see all your campaigns listed along with an option to view the statistics for each campaign.

With TrustPulse, you can easily use social proof and FOMO to drive more traffic and increase sales. It comes with powerful targeting and display rules so you have full control over how you want to show the notifications on your site.
Apart from showing recent sales notifications, you can also create TrustPulse campaigns to make site visitors sign up and grow your email list using social proof.
That’s all for today! We hope this article helped you learn how to create a recent sales notification popup without any trouble.
For your next steps, you can check these resources out:
- Best Marketing Automation Tools for WordPress
- Best WordPress Banner Plugins to Boost Conversions
- How to Create a Profitable Online Store
These posts reveal cool marketing tools to automate your campaigns and create promotional banners to boost your product sales. The last one will help you create a successful online store step-by-step.

Comments Leave a Reply