A few years back, I launched what I thought was the perfect online store. It had a beautiful design, fast loading, and clear products.
Then I checked my cart abandonment rate analytics after the first week. It was at 73%.
I couldn’t figure it out. People added items to their carts, started checkout, and then… disappeared.
After talking to customers, the truth hit me. I only accepted credit cards: no PayPal, digital wallets, or alternatives.
One customer told me, “I wanted to use PayPal, but you didn’t have it. So I found another site that did.”
Research confirms it: rigid payment options are a top reason for cart abandonment. When customers don’t see their preferred payment method, they leave.
Think about it. If you only accept bank transfers, will someone sign up for a new payment method just to buy from you? Not when your competitor offers PayPal, Apple Pay, and credit cards.
The solution? Give your customers choices!
In this guide, I’ll show you three simple methods to let users pick their preferred payment gateway. Each takes 15-25 minutes to set up, and the impact on conversions can be immediate.
Let’s fix your checkout before you lose another sale.
What You’ll Need Before We Start
Before we dive into the three methods of adding multiple payment options to WordPress, let’s make sure you have everything ready.
You’ll need:
WordPress Basics:
- Active WordPress website
- Admin access to your dashboard
Payment Gateway Accounts:
- Stripe account (for all three methods)
- PayPal Business account (for WPForms or Easy Digital Downloads)
- Square account (optional, for Easy Digital Downloads only)
Plugin Installed:
- One of these plugins: WP Simple Pay, WPForms Pro, or Easy Digital Downloads
- I’ll focus on configuring payment options, not installing the plugins (I will share guides for the installation processes for each)
Time Investment:
- 15-25 minutes per method
- All three methods are beginner-friendly
Each method handles the setup differently. So I’ll walk you through the specific requirements as we go.
Plus, we’ll start in test mode for every method. This lets you practice without processing real payments.
I have created a quick table of contents below to allow you to skip to any method you want.
- Method 1: Using WP Simple Pay for Multiple Stripe Payment Options
- Method 2: Using WPForms to Combine Multiple Payment Gateways
- Method 3: Using Easy Digital Downloads for Multiple Payment Gateways
- Choosing the Right Method for Your Business
- FAQs: How to Set Up Multiple Payment Options in WordPress
- Should You Allow Multiple Payment Options on Your WordPress Site?
- Related Resources
Ready? Let’s start with the simplest option first.
Method 1: Using WP Simple Pay for Multiple Stripe Payment Options
WP Simple Pay is the smoothest way to handle Stripe payments in WordPress. The setup wizard walks you through everything in under 10 minutes.
⚠️ Here’s the critical limitation: WP Simple Pay only works with Stripe.
This means you cannot offer both PayPal and credit cards together. If customers ask for PayPal, you’re out of luck with this plugin.
But, there is good news! You can work around using Uncanny Automator to connect PayPal separately. But that adds a bit of complexity.
All the same, check out my Uncanny Automator review to see how you can use it to connect different apps and web applications.
If PayPal is your top priority, you can integrate it directly with WPForms or Easy Digital Downloads.
But, through that single Stripe connection, you can offer customers a surprisingly wide range of payment methods, including:
- Credit and debit cards
- Apple Pay
- ACH bank transfers
- Google Pay
- Buy Now Pay Later options (Klarna, Afterpay, Affirm)
- Cash App Pay
Enabling these options requires zero technical knowledge. You simply check boxes next to each payment method you want. That’s it.
Check out my full WP Simple Pay review for more details.
With that in mind, WP Simple Pay works best for businesses committed to Stripe who want the absolute simplest setup process. If that’s you, let’s get started.
Step 1: Verify Your Stripe Connection and Enable Test Mode
First off, the free version of WP Simple Pay can also allow you to accept Stripe payments, but only through separate forms and a Stripe checkout page.
You can access WP Simple Pay through your WordPress plugin repository.
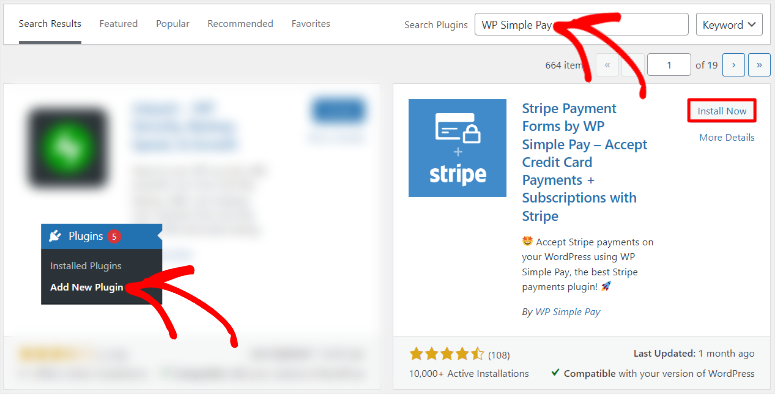
While this is great, the whole idea of this tutorial is to give your users options in one place.
With WP Simple Pay Pro, you collect payments right on your site, combine multiple payment options in one form, and offer a smoother checkout experience.
That is why we will use the Pro version of WP Simple Pay for this tutorial.
Before enabling multiple payment methods, you need to make sure WP Simple Pay is fully set up and connected to Stripe. This ensures your forms work correctly and payments are processed without issues.
Here is a step-by-step process on how to install and set up WP Simple Pay.
If you skipped the wizard, go to WP Simple Pay » Settings » General » Advanced to run it now.
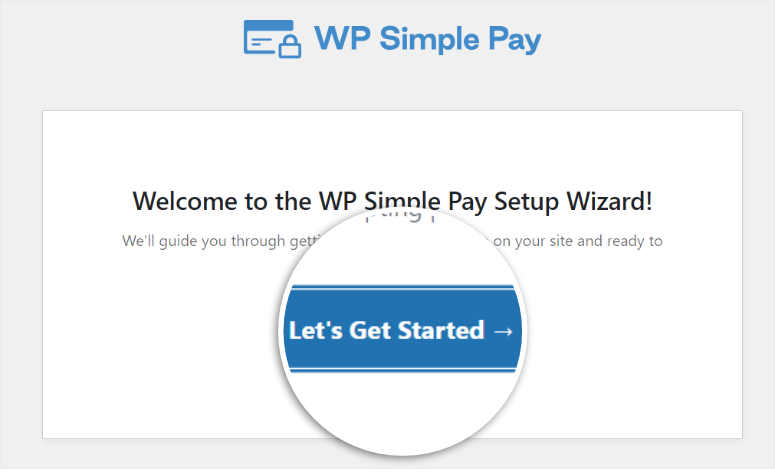
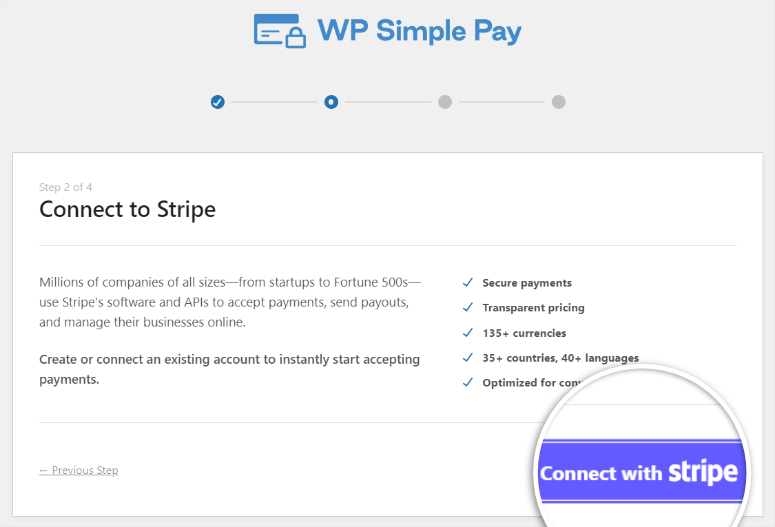
There is no heavy lifting since the WP Simple Pay wizard handles the Stripe connection automatically.
All you need to do is hit the “Connect with Stripe” button on the setup wizard, then add your Stripe information.
Now let’s verify everything’s working.
In your WordPress dashboard, go to WP Simple Pay » Settings » Stripe.
You should see a connection status that says “Connected” with your Stripe account email displayed.
If you don’t see this, click the blue “Connect with Stripe” button and log in to your Stripe account. The plugin handles all the technical authentication for you.
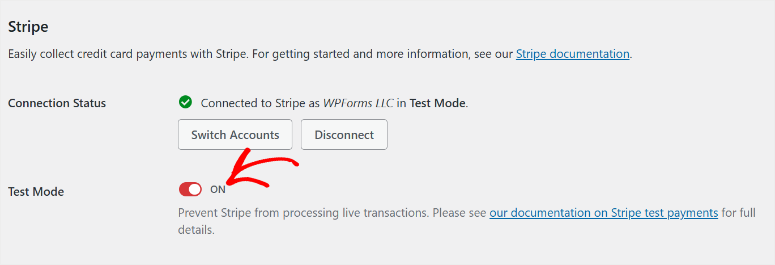
Here’s the critical step: Toggle “Test Mode” to ON.
This is incredibly important. Test mode lets you enable different payment methods and process fake test payments without charging real money. This way, you can practice the entire checkout flow safely.
To set this up, scroll down the Stripe tab where you checked the Stripe connection. In the Test Mode section, use the checkbox to activate it.
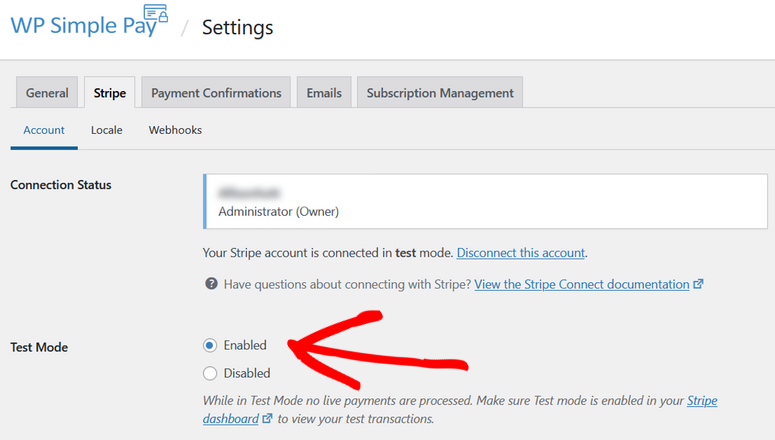
You’ll switch to Live Mode later after you’ve tested everything. But for now, leave it in test mode.
The test mode toggle should now show as enabled with a green indicator.
Perfect. Your Stripe connection is ready.
Step 2: Create Your Payment Form
Now let’s build the actual payment form customers will use.
Go to WP Simple Pay » Add New. You’ll see a template library with over 70 pre-built options. These templates cover common scenarios like donation forms, event registration, and product payments.
For this tutorial, let’s start simple. Select the “Payment Form” template. This gives you a basic form you can customize.
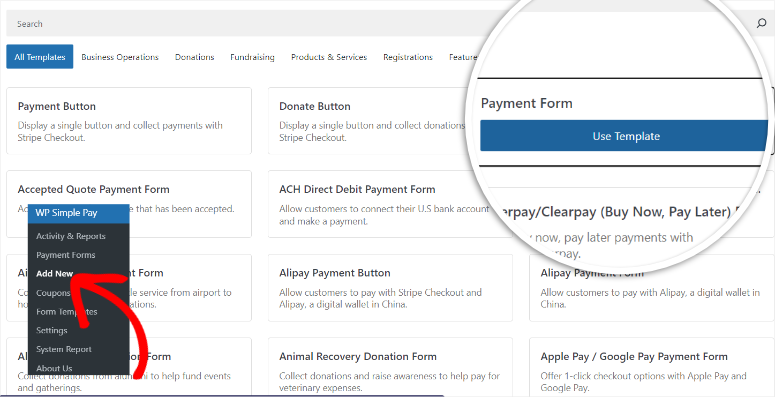
Once selected, WP Simple Pay creates your form and opens the form builder.
Here’s what you’ll see:
On the left side, you find form settings organized into tabs. On the right is a live preview that shows exactly how your form will appear to customers.
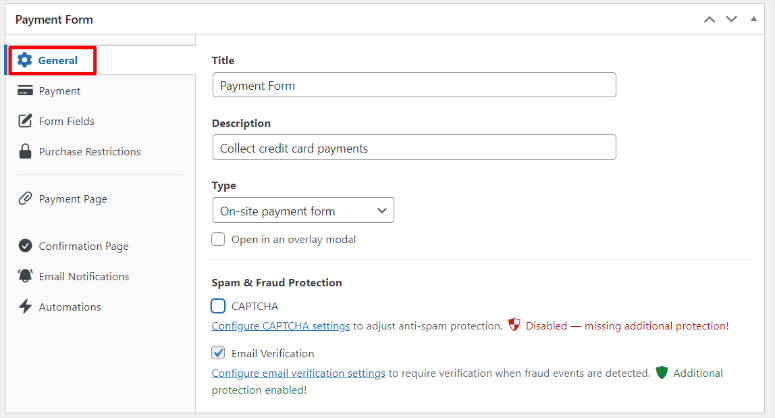
Start with the General tab and give your form a name at the top. Something like “Product Payment Form” or “Service Fee Payment” works fine. This name is just for you; customers won’t see it.
Then, under “Description,” mention what the form is for. Once done, go to the dropdown and select the Type of form you are building.
Finally, set up your Spam & Fraud Protection by enabling CAPTCHA and email verification.
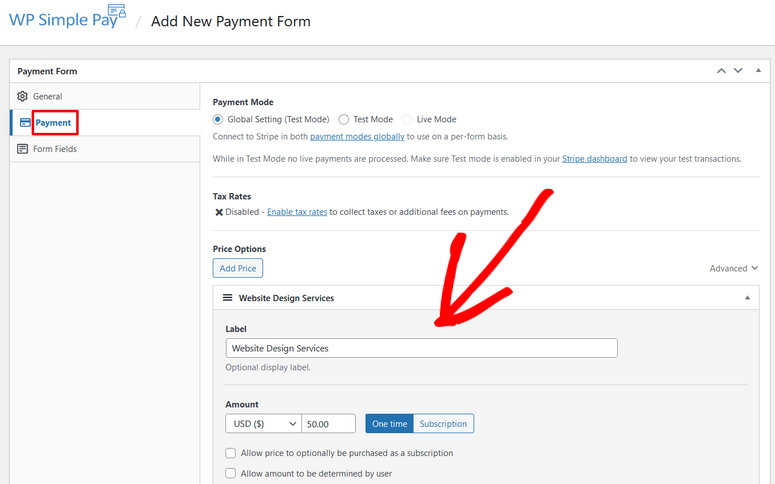
Next, scroll down to the “Payment” tab in the left sidebar.
First, add a “Label” to display alongside the amount payable.
Then under “Amount,” enter your price. You can set a fixed amount like $50.00, or choose “User Defined” to let customers enter their own amount. For most products and services, fixed amounts work best.
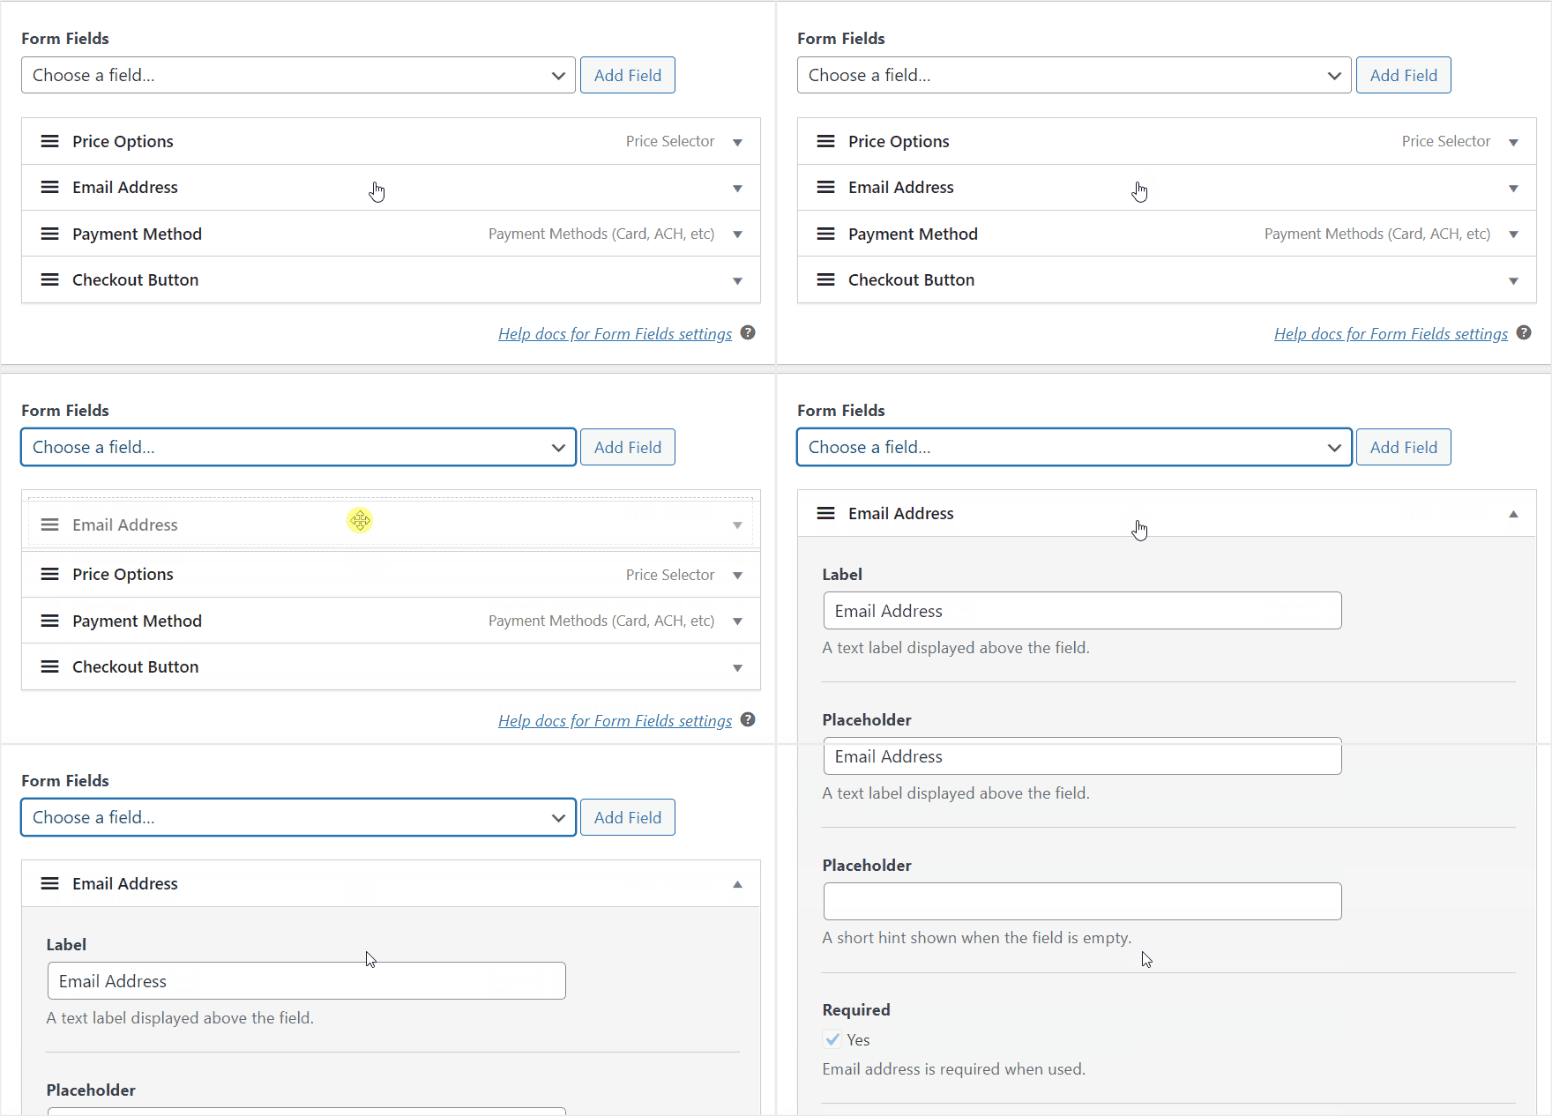
Once done, go to the Form Fields tab to customize your form fields. Since we are using the “Payment Form” template, you should already see fields like:
- Email Address
- Price Options
- Payment Method
- Checkout Button
You can rearrange their order by dragging and dropping. Or delete and add fields.
At this point, your form should be ready. But with this tutorial, we have covered the very basics of how you can customize your WP Simple Pay form. You can check more customization options here.
Once you are happy with your creation, hit “Save” at the top right.
Your basic payment form is ready. Now comes the fun part: enabling multiple payment methods.
Step 3: Enable Multiple Payment Methods
This is where WP Simple Pay really shines. Enabling additional payment methods takes about 30 seconds per method.
Still in your form builder, go to the “Payment” tab and scroll until you find Payment Methods. Here you will see a long list of payment options you can select.
Use the checklist to activate the different payment methods Stripe can process. Plus, you can drag and drop them to place the payment methods you prioritize at the top.
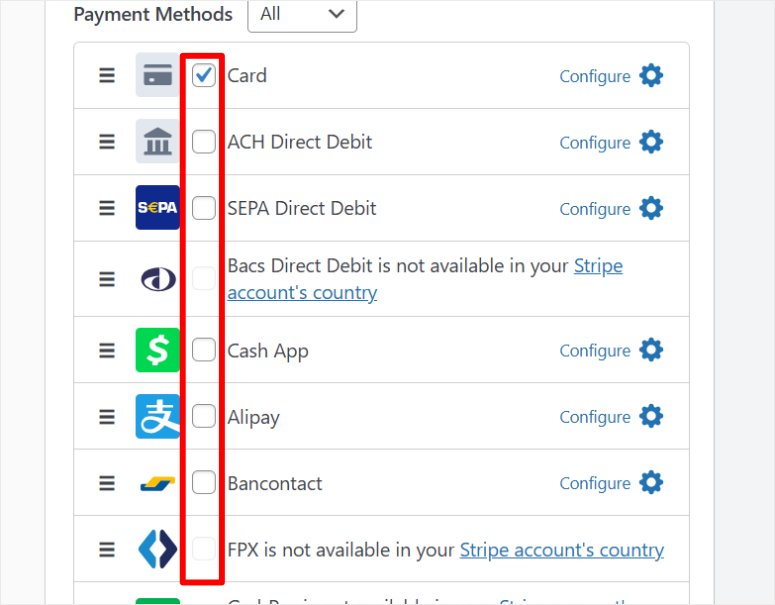
For example, you can enable Card Payments, which is on by default. This allows you to accept payments from Visa, Mastercard, and so on.
Mobile Wallets allow you to receive payment from Apple Pay and Google Pay. Plus, you get other options like ACH Direct Debit, Cash App, Alipay, SEPA Direct Debit, and many more.
My recommendation for most businesses is to start with Card Payments and Mobile Wallets. These cover 90% of customers right away.
Once done, hit “Save.” That’s it. You’ve just enabled multiple payment options.
Step 4: Publish Your Payment Form
Your payment form is ready. Now let’s get it live on your site. But first, you want to make sure that the form is ready and works perfectly.
To do this, click the “Preview” button in the form builder to see exactly how your form will look. This lets you catch any layout issues or verify that all your payment options are displaying correctly.
If it looks perfect, select the “Publish” button at the top right of your form builder.
Now, you have two options to publish your payment form. You can either add it to an existing page or create a dedicated payment form. I will walk you through both!
Publishing on a Dedicated Payment Page
WP Simple Pay can create a standalone payment page for you automatically, which is the quickest way to get your form live.
After clicking Publish, go to the Payment Page tab on the far left of your form builder. Here, use the checkbox to “Enable a Dedicated Payment Page.”
At this point, WP Simple Pay generates a distraction-free payment page with your form embedded.
This page focuses entirely on checkout without sidebars, navigation menus, or other elements that might distract customers from completing their purchase.
But you can also customize it to fit your site better. You can customize the Permalink to be something more relevant to the form. Edit the color scheme, Add your logo, display a title, description, and footer.
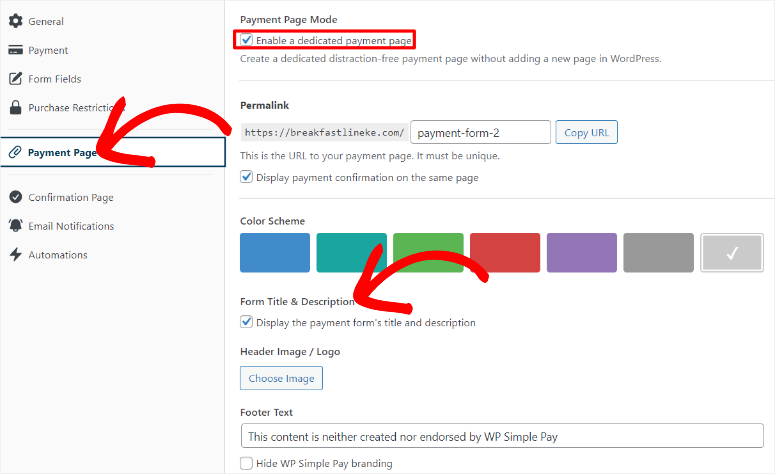
Again, you can always use the Preview button to see how your changes appear on the live page.
Adding the Form to an Existing Page
Maybe you don’t want a dedicated payment page. Perhaps you’d rather embed the form on your existing product page, services page, or checkout page. WP Simple Pay makes this easy with two methods.
Using the WP Simple Payment Form Block
If you’re comfortable with the WordPress block editor, this is the fastest method. Open the page where you want to add your payment form. Click the + icon anywhere on the page to add a new block.
In the search box that appears, type “WP Simple Payment Form” and the block will appear in the results. Click it to add the block to your page.
The block appears with a dropdown menu. Click the dropdown and select the payment form you just created.
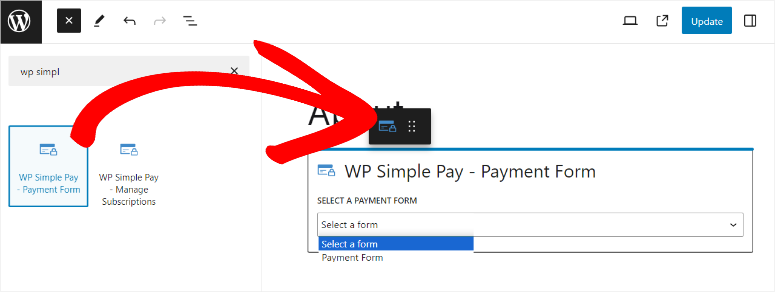
The form appears instantly in the preview, showing all your enabled payment methods.
Once you’re happy with the placement, click “Update” at the top right of the page editor. Your form is now live on that page.
Using the Form Shortcode
The shortcode method works great if you’re using a page builder or prefer working with shortcodes. It’s also helpful if you want to add the same form to multiple pages quickly.
Go to WP Simple Pay » Payment Forms in your WordPress dashboard. You’ll see a list of all your payment forms.
Find the form you just created and look for the shortcode column. It shows something like [wp_simple_pay id="123"]. Click to copy this shortcode.
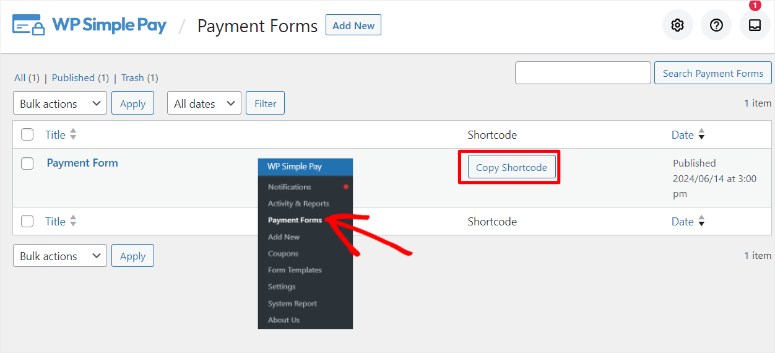
Now open the page where you want to display your form. In the page editor, click the + icon to add a new block. Search for “Shortcode” and add the Shortcode block to your page.
Paste your copied shortcode into the block. The form won’t display in the editor preview, but it will appear on the live page.

Click “Update” to save your changes and visit the live page to see your payment form with all the payment options working.
Switching from Test Mode to Live Payments
Remember, you’re still in test mode right now. Your form is live, but it’s only processing test payments.
Before you can accept real money from customers, you need to switch to live mode. So, go to WP Simple Pay » Settings » Stripe in your WordPress dashboard.
Find the “Test Mode” toggle at the top of the page. Switch it from Enabled to Disabled. The toggle should change color to indicate live mode is active.

Click “Save Settings” at the bottom of the page.
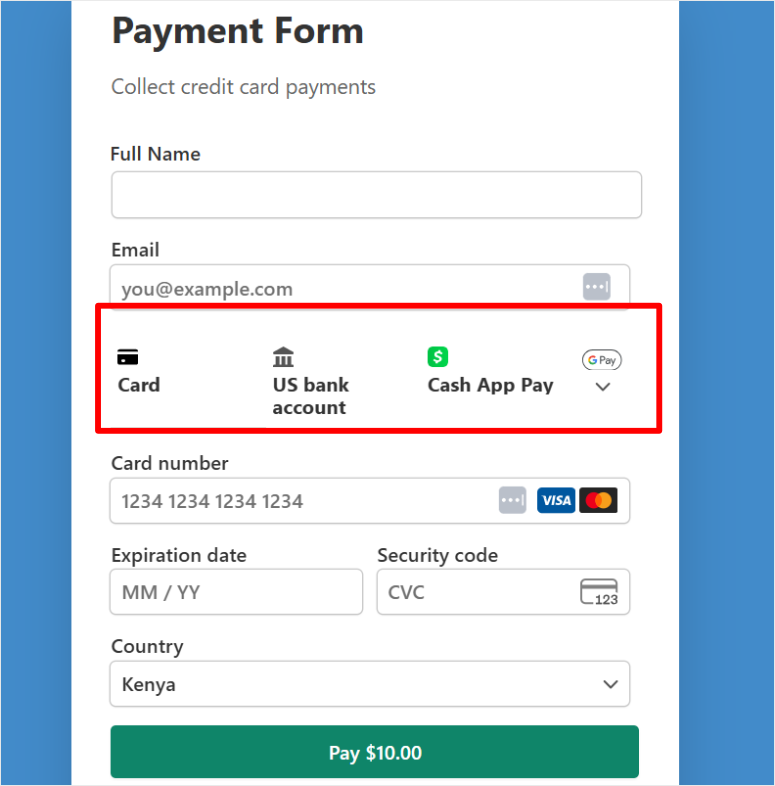
That’s it. Your multiple payment options are now live and accepting real payments through all the methods you enabled, like credit cards, Apple Pay, Google Pay, ACH, Buy Now Pay Later, or Cash App Pay.
Check out the screenshot below to see a sample.
Who Should Use WP Simple Pay
WP Simple Pay is perfect if:
- You’re committed to Stripe exclusively. You don’t need PayPal or other payment processors. Stripe’s ecosystem gives you everything you need.
- You want the simplest setup possible. The checkbox approach means zero technical knowledge required. If you can check a box, you can enable a payment method.
- You’re accepting one-time or recurring payments. Service fees, product purchases, donations, event tickets, and more.
Now, with that out of the way, let us look at method 2 of accepting multiple payment methods with WPForms.
Method 2: Using WPForms to Combine Multiple Payment Gateways
WPForms is the only option on this list that lets you combine Stripe and PayPal payments on the same form.
This is huge!
Your customers can choose between PayPal and credit cards at checkout. One form. Multiple gateways. Complete flexibility.
Plus, WPForms uses conditional logic to control which payment options appear based on factors like purchase amount, customer location, or form selections.
Check out my detailed WPForms review for more details.
With this in place, you can show Authorize.net for orders over $500 and PayPal for smaller amounts, for example. Or display only PayPal for international customers. The choice is yours!
This level of control makes WPForms perfect for:
- General payment collection, like donations, event fees, and service payments
- Forms that need flexible payment routing
- Businesses where customers strongly prefer PayPal
- Situations requiring payment gateway rules
But I should point out that WPForms requires the Pro license to access multiple payment features. The free version only includes Stripe and Square payment capabilities.
Plus, there’s a 3% fee per transaction on top of the regular Stripe and Square fees. While this is great, it does not give your users the option to choose the most comfortable payment options.
But all the same, you can definitely start with the free version of WPForms from your WordPress repository and upgrade as your payment options grow.
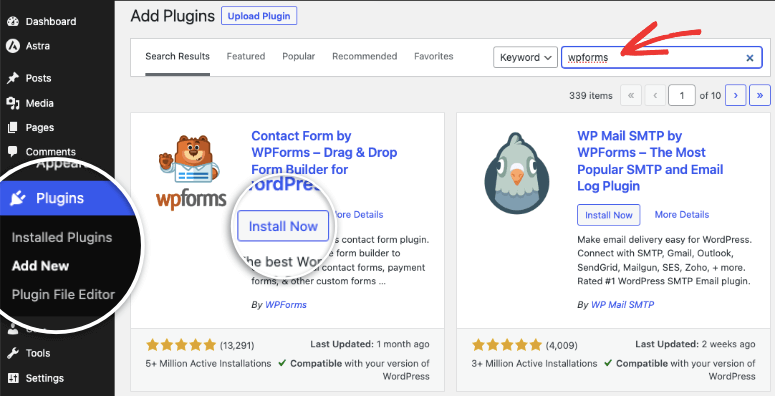
So let me show you how to combine PayPal, credit cards, and other payment options with WPForms.
Step 1: Connect Your Payment Gateways
First, you need to purchase, install, and set up WPForms before continuing. After this, verify your license is activated at WPForms » Settings » General.
Without an active Pro license, you won’t see payment gateway options in your settings.
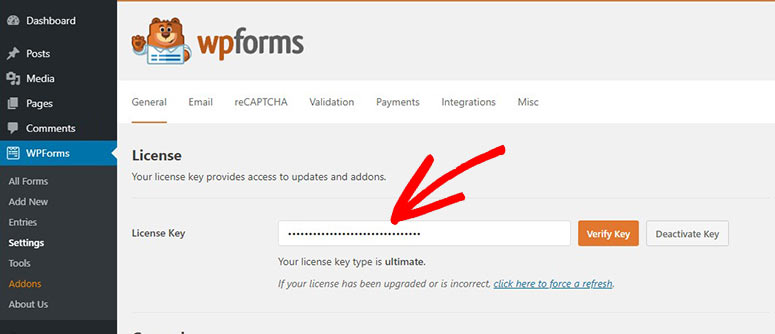
Check out this post on how to install and set up WPForms for a full breakdown.
After setup, you first need to activate the addons that you need to receive payment on your forms.
So, next, go to WPForms » Addons in your WordPress dashboard. On this page, you can either search or scroll until you find the “PayPal Commerce” addon.
You also get the “PayPal Standard” addon, but this limits you to redirecting users to the PayPal website. PayPal Commerce gives you more control over your checkout page.
Then, find the Stripe Pro Addon and Authorize.net as well, and make sure you install and activate all the payment addons you need.
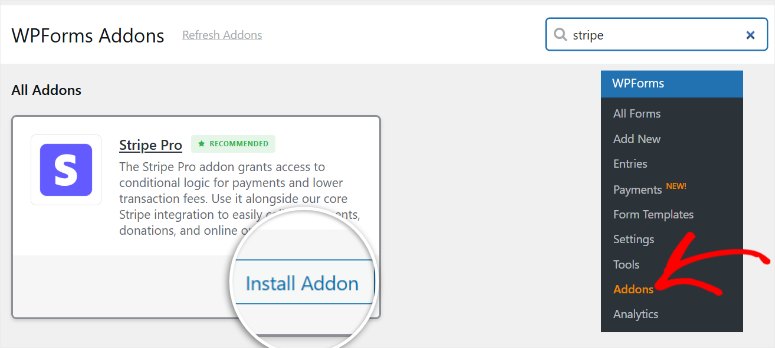
With the setup process out of the way, let’s connect your payment gateways.
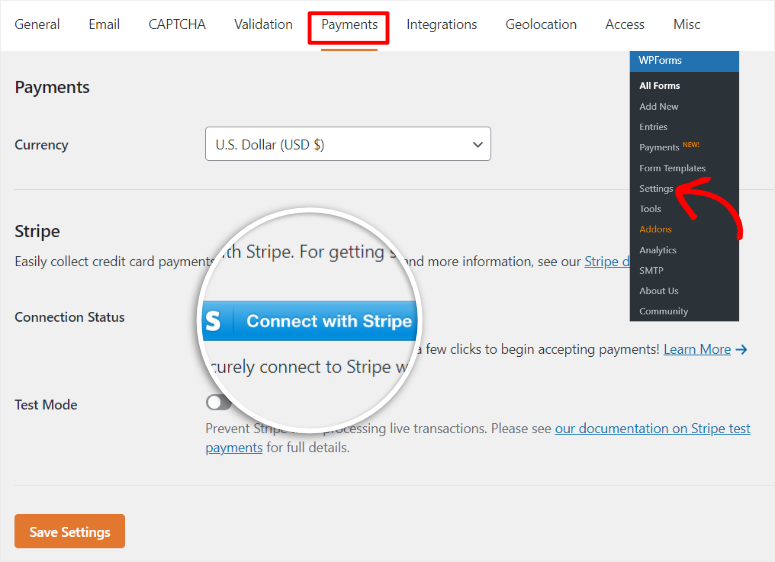
In your WordPress dashboard, go to WPForms » Settings » Payments. Then, on this page, hit the “Get Started” button.
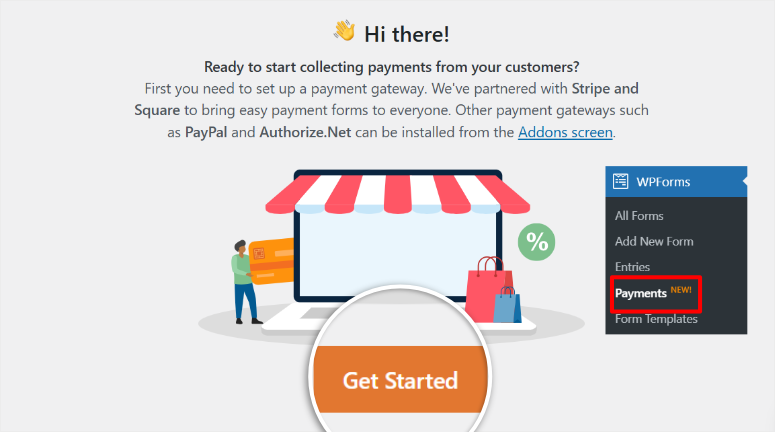
On the next page, you’ll see tabs across the top for different payment processors: Stripe, PayPal Commerce, Authorize.net, and Square. This depends on the payment addon you activated.
Now I will show you how to connect Stripe payments in WPForms.
The good news, regardless of the payment option you want to use, the process is the same. So, whatever we do with Stripe, use the same process for the others.
At the top, you’ll see a toggle for “Test Mode.” Switch it to ON. The toggle should turn blue.
Now go to the Stripe section of the page and toggle the “Test Mode” button ON. This allows you to test the payment gateway first without live transactions. Then, select the Connect with Stripe button.
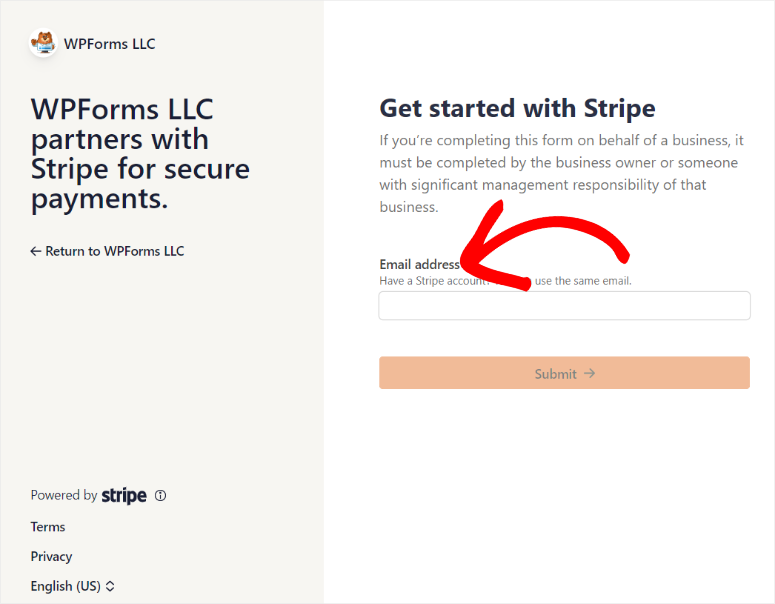
A new window opens asking you to log in to your Stripe account. Enter your Stripe email and click “Submit.”
In the next page, Stripe will walk you through all the steps in a quick and easy way. Just follow the wizard. On the last step, Stripe will ask permission for WPForms to access your account. Click “Connect.”
The window closes automatically, and you’re back in WordPress. You should now see “Connected” with a green checkmark next to your Stripe account email.

Perfect. Stripe is ready. Now follow the same steps to set up the other payment gateways to allow you to add them all in one form.
Step 2: Create Your Payment Form
Once this is done, go to WPForms » Add New. On this screen, WPForms shows you a template library with over 2,000 options.
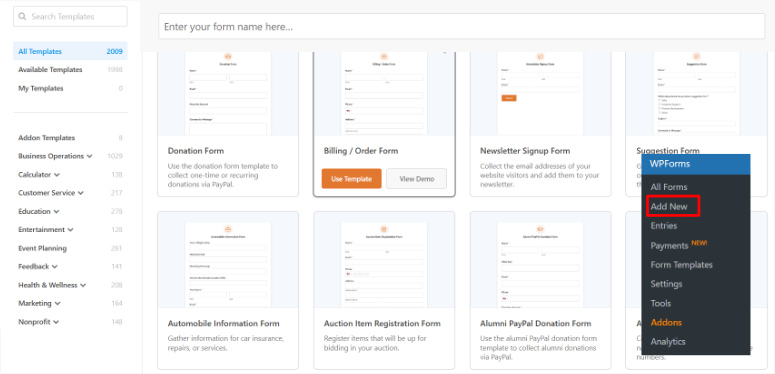
For payment forms, look for templates labeled “Payment Form,” “Donation Form,” or “Order Form.” While you can pick any template or start from scratch and add the payment options, starting with a template makes it simpler.
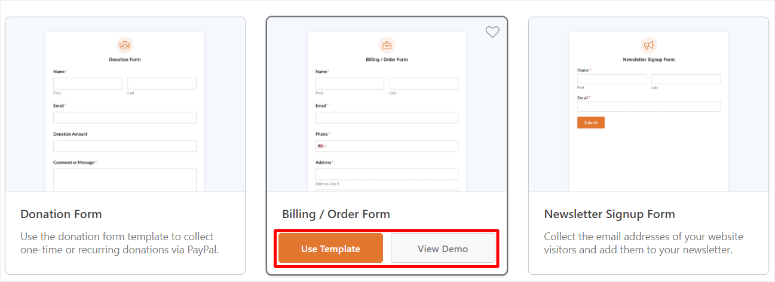
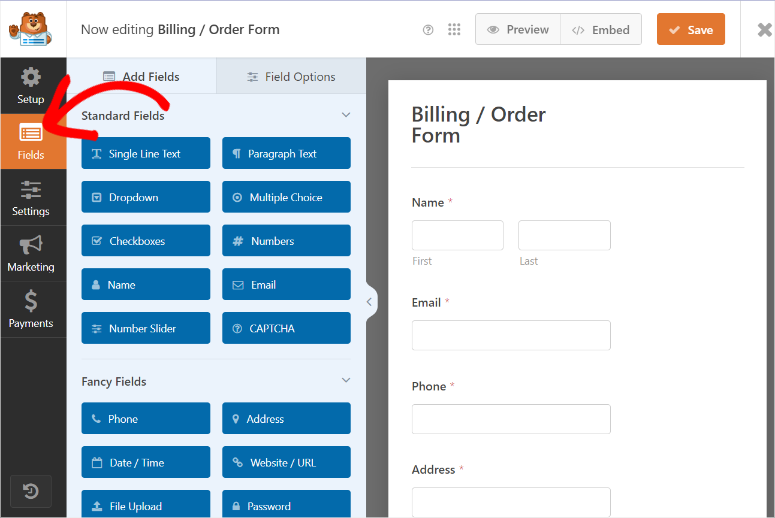
For this tutorial, I selected “Billing/ Order Form.” This gives you a clean starting point. Click “Use Template.”
The WPForms drag-and-drop builder opens. On the left, you’ll see available form fields. On the right is your form preview.
The template already includes:
- Name field
- Email field
- Payment field (this is the important one)
You can add more fields by dragging them from the left panel onto your form. Common additions include:
- Phone number
- Message/Comments
- Dropdown menus for product selection
You can experiment and build the perfect form for your business. If you need more information, check out this article on how to customize WPForms.
Step 3: Configure Multiple Payment Options
This is the most important step in adding multiple payment options, so take a closer look.
For this, we will use WPForms conditional logic.
So instead of displaying all the payment options at once, cluttering the form, we allow the user to first pick the payment option they want.
Then, depending on their option, WPForms uses conditional logic to expand the payment option.
We first need to add the fields that will contain the payment options. To do this, we will add a Multiple Choice field to the form.
Select the “Fields” tab on the left, and go to the “Standard Fields.” Then, drag and drop the Multiple Choice field to the location on the form you want your payment options to appear.
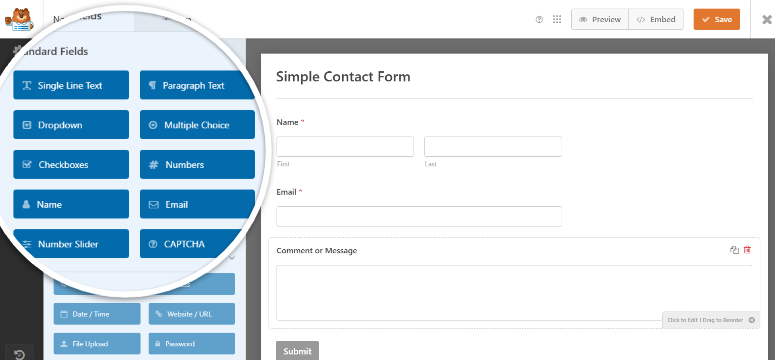
Then, once added, click on the Multiple Choice field inside the preview area on the left to open its settings on the right.
As you can see in the screenshot below, the labels are generic with placeholders like “First Item.” We need to customize these to show payment options instead.
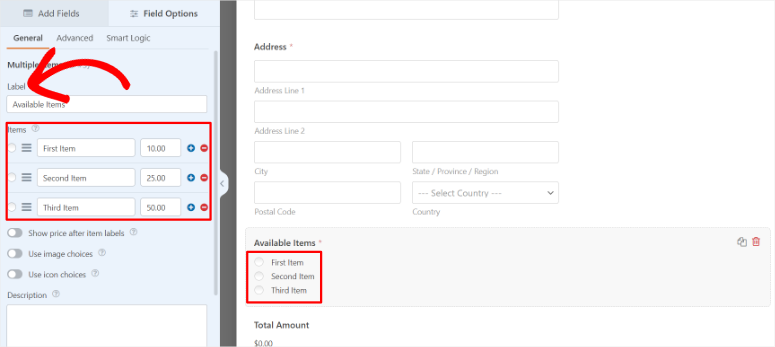
To edit the names of the fields simply type on the text bars under Label and Choices. When you look at the preview screen on the right, you should see those names duplicated.
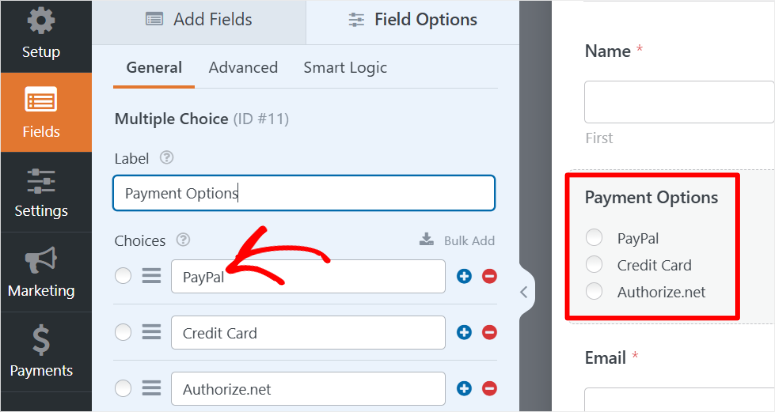
Once done, make sure you use the toggle button at the bottom of the screen to make this field “Required.” This way, users have to fill out the payment details before submitting the form.
Step 4: Add Payment Options with Conditional Logic
Before adding payment fields to your form, you need to activate and configure each payment gateway. This tells WPForms which payment processors to make available on your form.
In your form builder, go to the Payments tab on the far left.
Here, a list of available payment gateways appears. You’ll see options for Stripe Credit Card, PayPal Commerce, Authorize.net, and others, depending on which gateways you connected through addons.
Since enabling all the payment gateway uses one process, we will go through Stripe.
Select Stripe to open more options, then enable the toggle button “Enable One-time Payments” toggle button.
Note that there is also a button to set up recurring payments; for that, go through this guide.
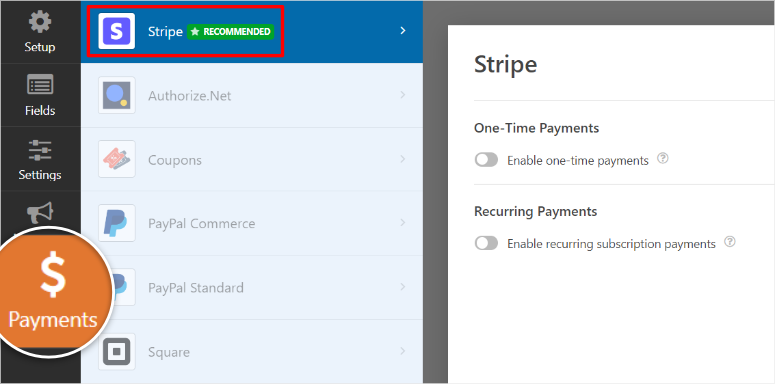
After this, more options will expand under the “Enable One-time Payments” so that you can map out form fields to the payment information Stripe needs.
This ensures customer data flows correctly from your form to Stripe’s payment processor.
Look for the “Email” field mapping. Click the dropdown and select the email field from your form. This tells Stripe which field contains the customer’s email address.
Do the same for the Name field, Billing Address field, and so on.
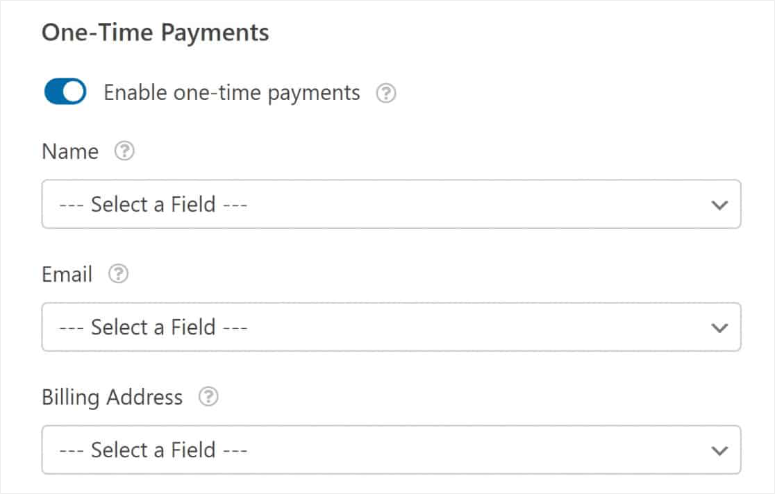
As mentioned, the configuration process for PayPal Commerce, Authorize.net, and all payment gateways mirrors what you just did for Stripe.
For each gateway, click on it to expand its settings. Map the email field by selecting your form’s email field from the dropdown, and add a payment description that tells customers what the charge is for.
Once all your payment gateways are activated and configured, you’re ready to add the actual payment fields to your form.
So, how do you actually add payment fields in WPForms?
Go back to the “Fields” tab on the left side of your form builder and scroll down to the “Payment Fields” section.
You’ll see the payment options you just activated in the Payments tab. Drag and drop the “Stripe Credit Card” field onto your form preview, right below the Multiple Choice field you created.
The Stripe payment field appears on your form with input boxes for card number, expiration date, and security code.
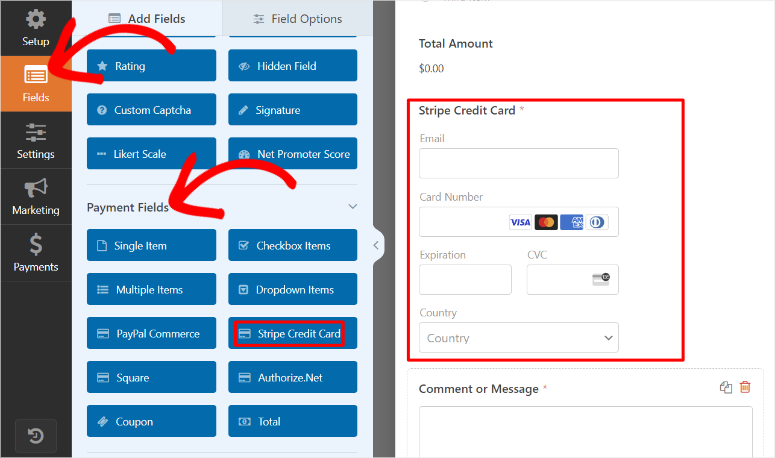
But right now, it’s visible to everyone all the time. We need to hide it until someone selects “Credit Card” from the payment options.
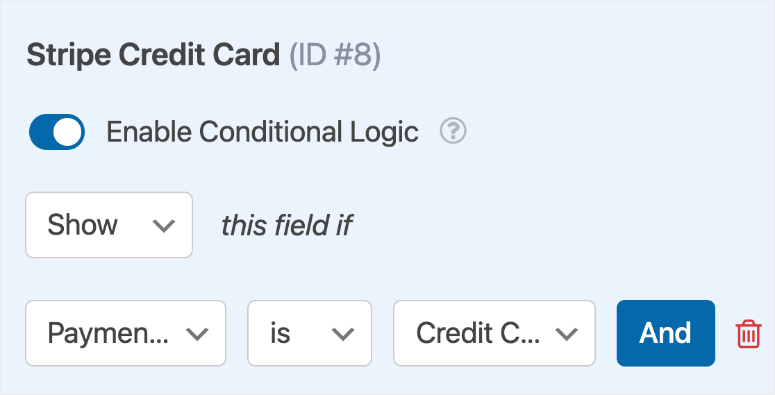
To do this, click on the Stripe Credit Card field in your form preview. The field settings open on the left panel. Go to the “Smart Logic” tab, and use the toggle button to activate Enable Conditional Logic.
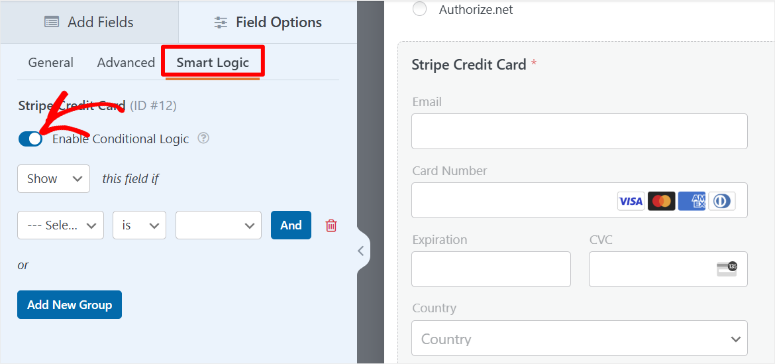
Now you can set the rule for when this field appears. The interface shows dropdown menus where you create your condition.
Set it up like this:
- Show this field if
- Payment Options
- is
- Credit Card
This tells WPForms: “Only show the Stripe payment field when someone selects Credit Card from the payment options.”
Now repeat the exact same process for PayPal Commerce, Authorize.net, or any other payment gateway you want.
For each payment gateway:
Go to the “Fields” tab, drag the payment field, like PayPal Commerce or Authorize.net, from the Payment Fields section onto your form below the previous payment field.
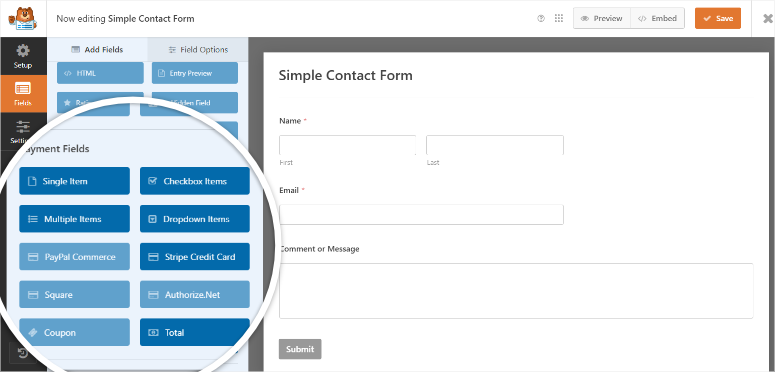
Then, on the newly added field, click the “Smart Logic” icon. Toggle “Enable Conditional Logic” to ON.
Finally, set up the conditional rule to show that specific payment field only when its corresponding option is selected in your multiple-choice field.
Once you’ve added conditional logic to all your payment fields, you’ll have a smart form that displays only the relevant payment option based on customer choice.
At this point, your form is ready to go live!
Step 5: Test and Publish
Your form is ready with multiple payment options and smart conditional logic. Now let’s get it live on your site.
At the top right of your form builder, click the “Embed” button. A popup appears showing you four different ways to add your form to your site. Let’s walk through each option.
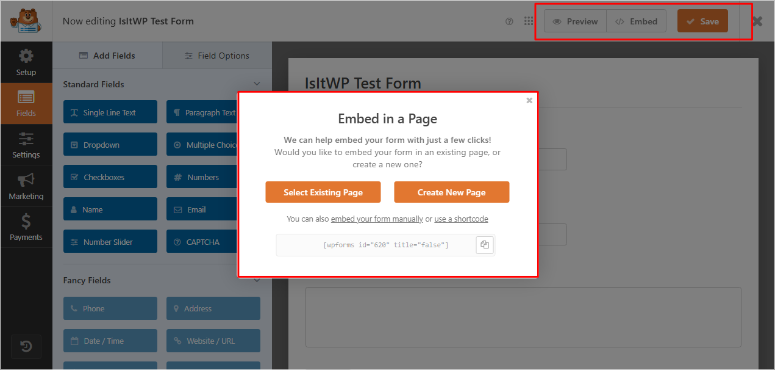
Let me quickly walk you through each method to publish forms with WPForms.
Embed on an Existing Page
This is the fastest method if you already have a checkout page, product page, or services page where you want to collect payments.
In the embed popup, click “Select Existing Page.”
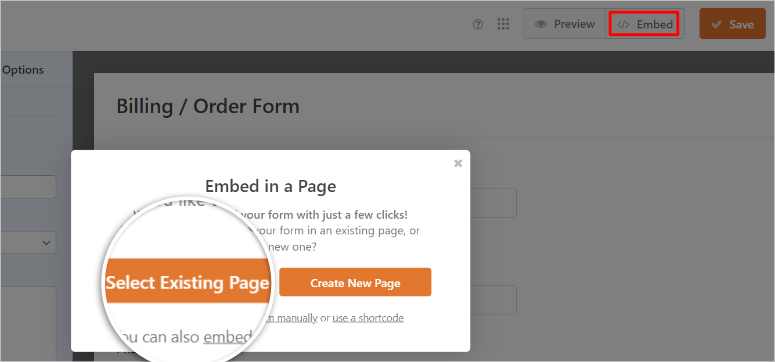
A list of your existing pages appears. Find the page where you want your payment form and click “Let’s Go!” next to it.
WPForms opens that page in the WordPress editor. Now you have full control over where to place your form.
Click the Plus + icon anywhere on the page where you want your payment form to appear. In the search box, type “WPForms” and select the WPForms block.
The WPForms block appears with a dropdown menu. Click the dropdown and select your payment form. The form displays exactly where you placed it.
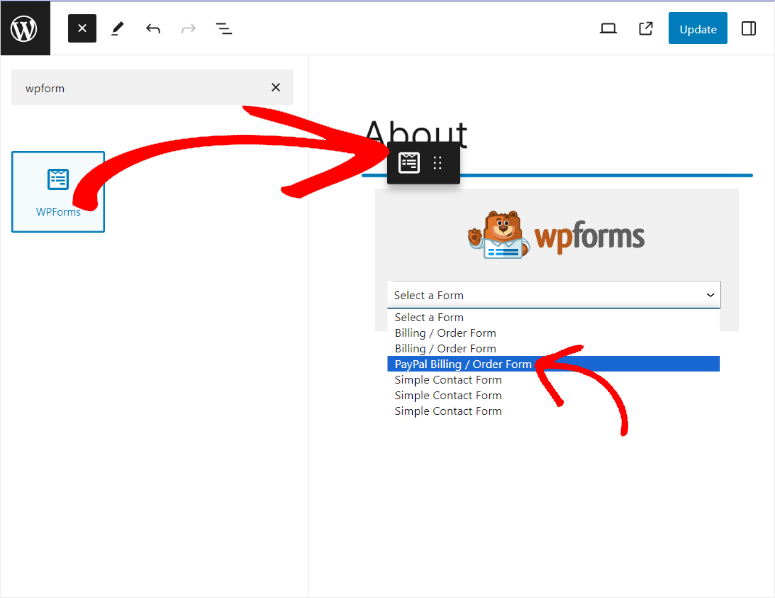
Once you’re happy with the placement, click “Update” at the top right to make it live.
Create a New Page
If you want a dedicated payment page, this option creates one automatically.
In the embed popup, click “Create New Page.” Then name the form on the next page and select “Let’s Go!”
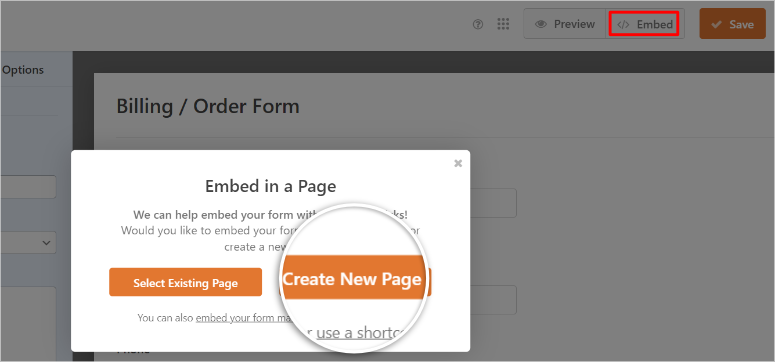
WPForms creates a new page with your payment form already embedded. As a result, the page editor opens automatically showing your form.
Your payment form now lives on its own dedicated page. WPForms gives you the page URL so you can link to it from anywhere on your site.
Use the Shortcode
The shortcode method works great if you’re using a page builder like Elementor, Divi, or Beaver Builder. It also helps if you want to add the same form to multiple pages quickly.
In the embed popup, you’ll see a shortcode that looks like . Click the “Copy” button next to it.

Now open any page or post in your WordPress editor. Add a Shortcode block wherever you want the form to appear. Paste your copied shortcode into the block.
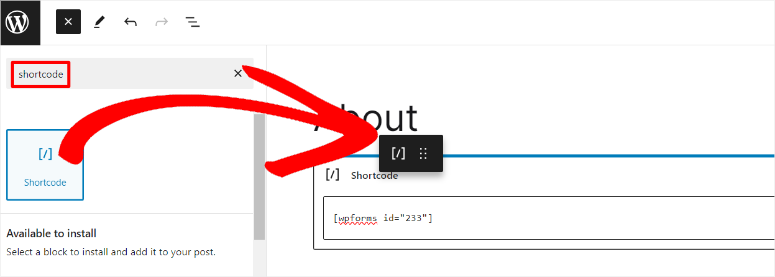
The form won’t display in the editor preview, but it will appear perfectly on the live page. Click “Update” or “Publish” to make it live.
Add Through Widgets
Open any page or post where you want to add your payment form. and click the Plus + icon to add a new block.
Then, scroll down to find the “Widgets” section and look for WPForms in the widgets list, and click on it.
The WPForms widget appears with a dropdown menu. Click the dropdown and select the payment form you just created. The form displays in your editor.
Click “Update” or “Publish” to make it live.
Switch from Test Mode to Live Payments
One critical final step: your payment gateways are still in test mode from Step 1. To make it live, go to WPForms » Settings » Payments in your WordPress dashboard.
For each gateway you enabled (Stripe, PayPal, Authorize.net), click on its tab and toggle “Test Mode” to OFF. And finally, click “Save Settings” after each one.
Your form now accepts real payments through all your enabled gateways.
Visit your live page where the form is embedded. Select different payment options from the dropdown to verify each one displays correctly with conditional logic working as expected.
Your customers can now choose their preferred payment method and complete purchases through your WordPress site.
Check out the sample of the multiple payment form we have created for this tutorial.
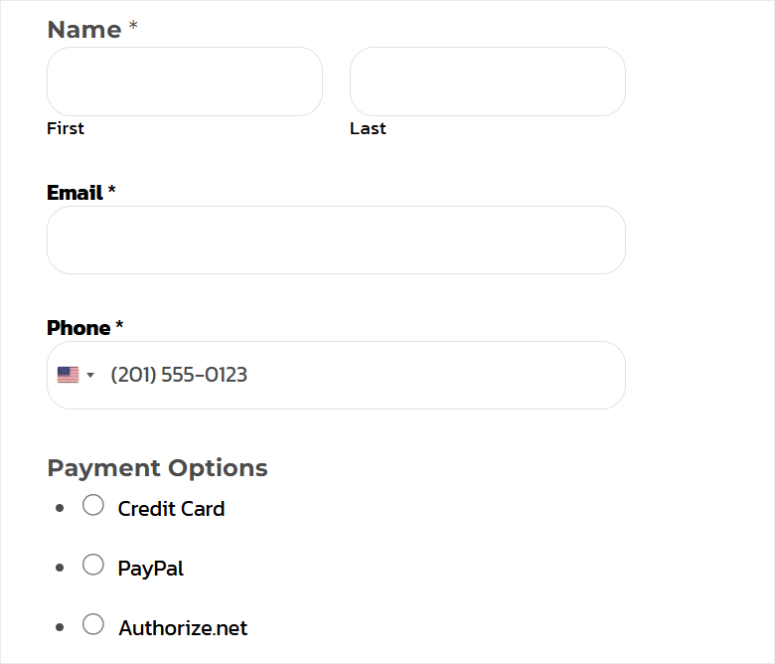
Who Should Use WPForms
WPForms is perfect if:
- You need PayPal + credit cards on the same form. This is WPForms’ killer feature. No other form plugin makes this combination so easy.
- You’re collecting payments via forms, not running a store. Donations, event registrations, service fees, membership payments—WPForms handles all of these beautifully.
- You need conditional payment routing. Show different gateways based on amount, location, or customer selection. This level of control is unmatched.
- You already use WPForms for other forms. If you’re already paying for WPForms Pro for contact forms or surveys, adding payment forms makes sense.
For businesses that need maximum payment gateway flexibility in a form-based system, WPForms delivers exactly that. Just make sure the annual cost fits your budget.
Method 3: Using Easy Digital Downloads for Multiple Payment Gateways
Easy Digital Downloads (EDD) is the hidden gem on this list because it is the best WordPress tool for selling digital products.
Plus, the free Easy Digital Downloads version supports multiple payment gateways with zero upgrade required.
You can offer Stripe + PayPal + Square at the same time without paying EDD a single dollar. The only costs are the standard payment processor fees, which are around 3% per transaction.
EDD is purpose-built for selling digital products, like making courses, eBooks, software, and downloadable files. That’s where it truly shines.
But as a bonus, EDD can also handle physical products thanks to built-in shipping features and inventory management.
So if you sell digital courses alongside physical workbooks, EDD handles both in one system.
Check out my complete Easy Digital Downloads review for more details.
As mentioned, the free version of Easy Digital Downloads supports multiple payment gateways. So you do not need to upgrade to use this feature.
But if you run a larger business, an additional 3% per transaction on top of standard Stripe transaction fees adds up quickly.
If you process $10,000 in sales monthly, that’s an extra $300+ going to EDD instead of your business.
Any paid plan removes this fee completely, letting you keep more of your revenue while still enjoying multiple payment gateway support.
So start with the free version if you are a small company, but upgrade as your business grows.
With that said, let me show you how to add multiple payment options with Easy Digital Downloads.
Step 1: Connect Your Payment Gateways
Once you make your decision on which version to use, the first step is to install EDD. For Easy Digital Downloads Lite, you can quickly install it from your WordPress plugin Repository.
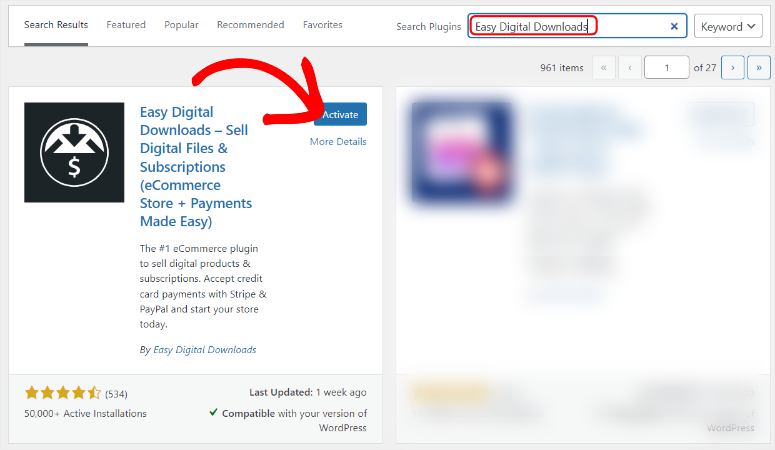
But for this tutorial, we will use the Pro version of Easy Digital Downloads. You can purchase and download it from their official site.
After this, you must complete the Setup Wizard to help you set your store location, currency, and email settings. This ensures payment gateways function properly.
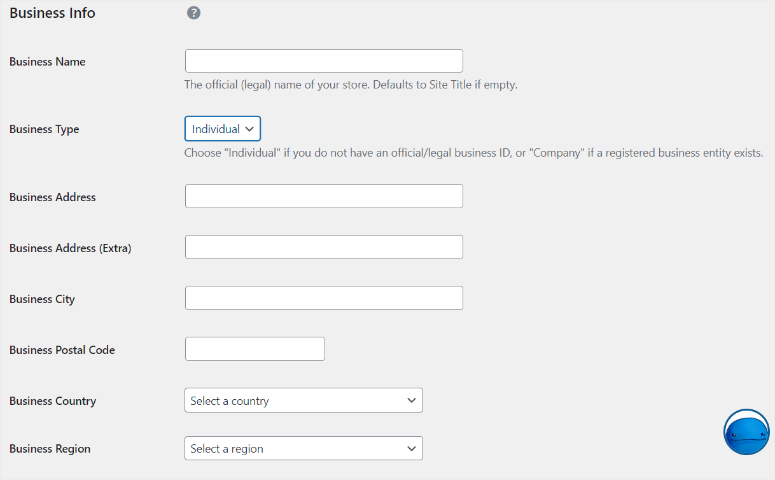
Now Stripe is the default payment gateway for Easy Digital Downloads. So you will also connect it through the setup wizard to make things simpler for you.
Check out this article to see the full breakdown of how to install and set up Easy Digital Downloads.
Now, let’s connect your payment processors.
Easy Digital Downloads has streamlined the payment setup process significantly. Now, all you need is a Stripe account, and EDD handles the rest through the Stripe Payment Element feature.
This modern approach lets you offer multiple payment methods like credit cards, digital wallets, bank transfers, and Buy Now Pay Later options, all through a single Stripe connection.
To unlock this, go to Downloads » Settings » Payments in your WordPress dashboard. Below the large “Payment” tab menu, use the sub menu to navigate to the different payment gateways.
Ideally, you should have connected Stripe with the wizard. But if not, navigate to the Stripe tab under Payments and select Connect with Stripe.
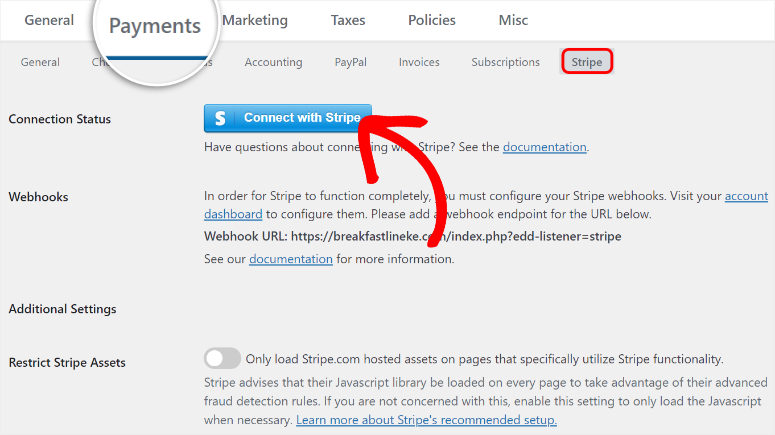
Then on the next screen, enter your Stripe email address and hit Submit.
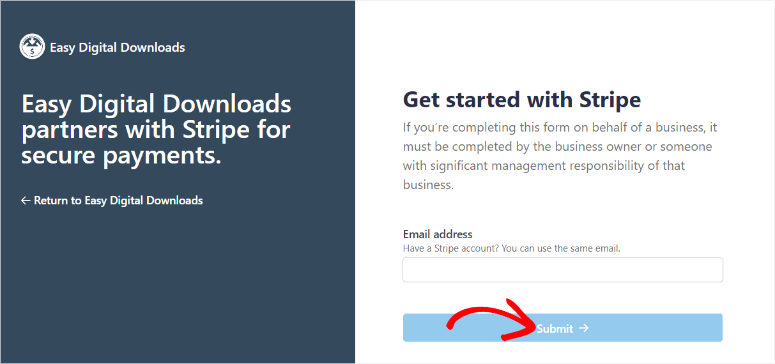
Once you do this, Stripe will walk you through a quick signup process. After this, it will redirect you back to your WordPress site with the connection checkmark showing it was a success.

Next, let us set up multiple payments through its Stripe Payment Element.
To do this, scroll down the Stripe tab to the “Payment Methods” section. You’ll see toggle buttons for various payment options:
- Card (credit and debit cards) – enabled by default
- Apple Pay / Google Pay (mobile wallets)
- ACH Direct Debit (bank transfers)
- Buy Now Pay Later (Afterpay, Klarna, Affirm)
- Cash App Pay
Check the boxes for all the payment methods you want to offer. I recommend starting with at least Card and mobile wallets (Apple Pay/Google Pay) to cover most customers.
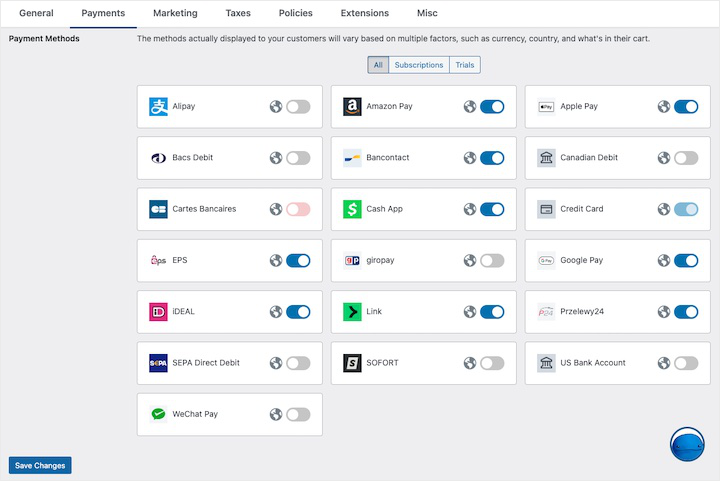
As you enable each payment method, customers will see these options at checkout based on factors like currency and location. Click “Save Changes” at the bottom of the page
Connect PayPal
While Stripe Payment Element handles most payment methods, many customers still prefer PayPal. Let’s add it as a separate gateway option.
Still on the Downloads » Settings » Payments page, select the “PayPal” submenu. Then click “Connect to PayPal.”
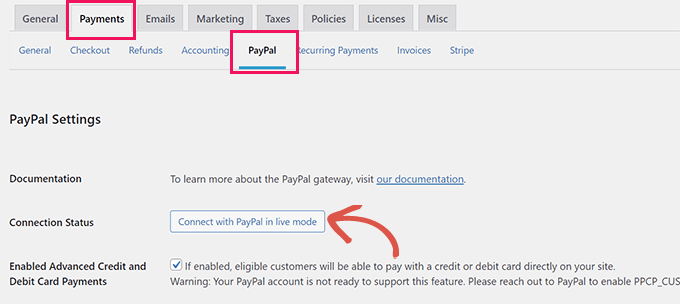
A PayPal window opens, asking you to log in to your PayPal Business account. Enter your PayPal credentials and click “Log In.”
If you only have a Personal PayPal account, don’t worry. PayPal will prompt you to upgrade to a Business account during this process. The upgrade is free and takes about 2 minutes.
After this, PayPal asks permission for Easy Digital Downloads to process payments through your account. Finally, select “Connect.”
The window closes automatically, and you’re back in WordPress. You should see “Connected” with a green checkmark and your PayPal account email displayed, just like with Stripe.
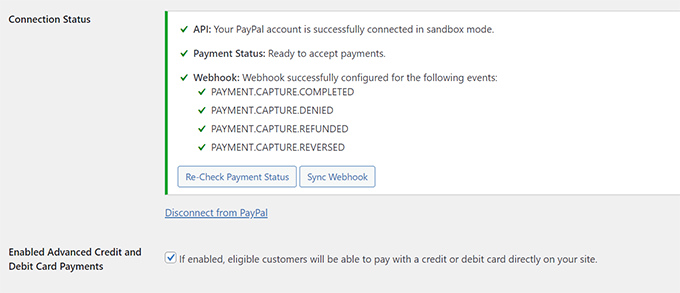
Perfect. PayPal is now connected and ready.
Step 2: Activate Your Payment Gateways
Now that both Stripe and PayPal are connected, you need to activate them so they appear at checkout.
To do this, scroll down on the same Payments settings page to the “Active Gateways” section.
You’ll see toggle switches for the following payment gateways. All you have to do is switch them on:
- Stripe
- PayPal Standard
- Store Gateway (for manual/offline payments)
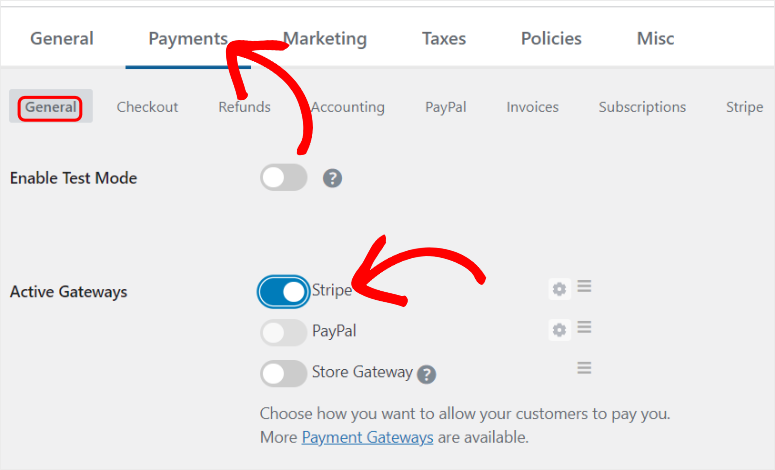
Below the toggles, you’ll see “Default Gateway.” This dropdown controls which payment option is pre-selected when customers reach checkout.
I usually set Stripe as the default since it keeps customers on your site and offers the most payment method variety. But you can choose PayPal if most of your customers prefer it.
After this, you can use the toggle buttons below to display different payment icons.
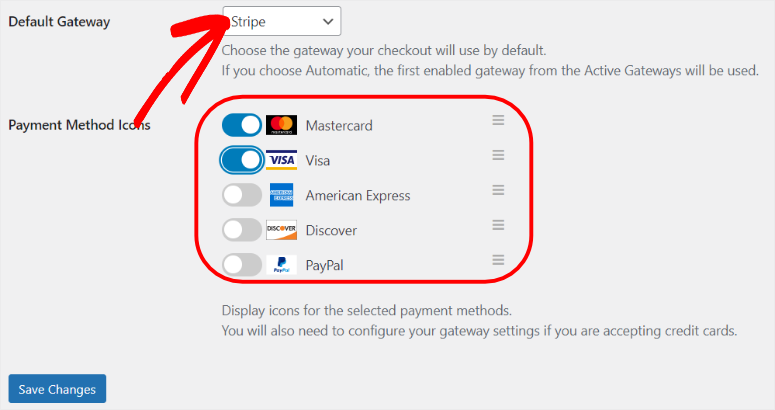
Click “Save Changes” at the bottom of the page. That’s it, your payment gateways are set up. Next, let us see how to add the payment gateway options to our Easy Digital Downloads checkout page.
Step 3: Customize Your Payment Form and Checkout Page
Now that your payment gateways are connected, let’s set up how customers will see and interact with those payment options at checkout.
Important: To ensure that you customize and preview your checkout, you’ll need at least one product in your store.
If you haven’t created a product yet, check out this guide on how to create and sell digital products with Easy Digital Downloads before continuing with this step.
Easy Digital Downloads automatically creates a checkout page for you when you install the plugin.
But you’ll want to customize how the payment form looks and ensure the checkout experience matches your brand.
Configure Payment Form Style
First, let’s control how payment options appear to customers on the checkout form.
Go to Downloads » Settings » Payments » Stripe and scroll down to find the “Payment Methods Style” dropdown menu.
You’ll see two layout options:
- Tabs – Payment methods appear as clickable tabs across the top
- Accordion – Payment methods appear as expandable sections stacked vertically

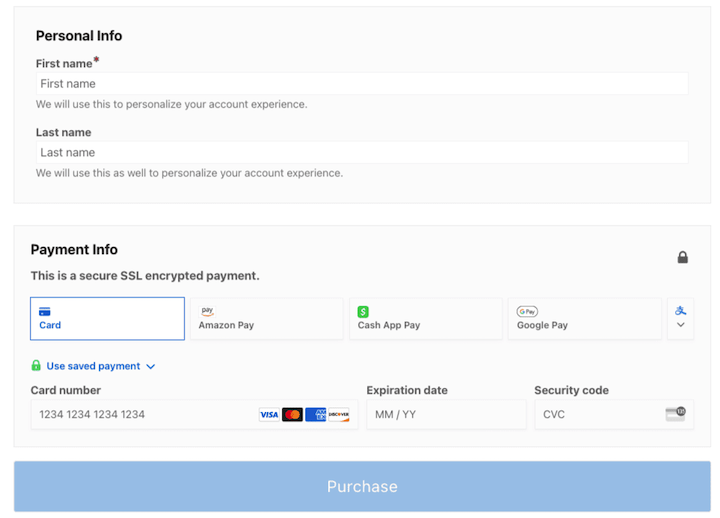
For me, the Tabs layout works great if you have 2-4 payment methods. It shows all options at once, making it easy for customers to see their choices like the screenshot shows.
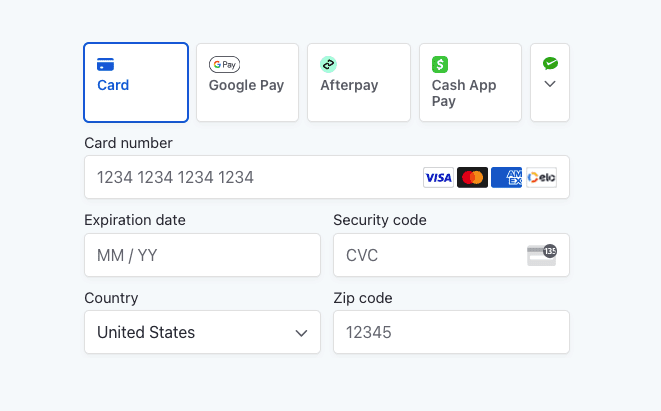
The Accordion layout works better if you have many payment methods enabled. It keeps the form cleaner by letting customers expand only the payment option they want to use.
Once you select the style you want, click “Save Changes” at the bottom of the page.
Customize Billing Address Fields
While you’re on the same Stripe settings page, you’ll see “Billing Address Display” settings.
These controls which address fields, appear on your checkout form. You can require full addresses, just ZIP codes, or hide address fields entirely, depending on your product type.
For most digital products, a simple email and ZIP code are enough. But if you need full addresses for tax purposes or customer records, you can require them here.
The more detailed checkout customization options live under Downloads » Settings » Payments » Checkout.
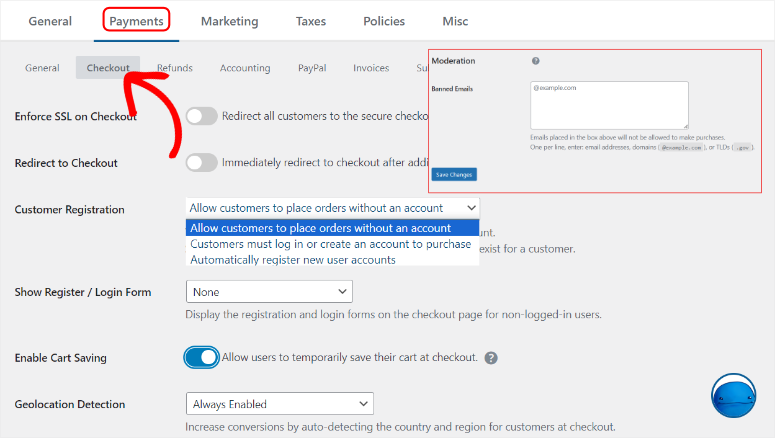
There, you can customize individual address fields, add custom fields, or adjust field requirements.
For now, the default settings work fine. We’ll keep things simple.
View and Customize Your Checkout Page
As mentioned, Easy Digital Downloads created a checkout page automatically during setup. Let’s make sure it looks good.
Go to Pages » Checkout in your WordPress dashboard.
The page opens in the WordPress editor. You’ll see the EDD Checkout block already placed on the page. This block displays your entire checkout form, including the payment options you just configured.
The checkout block handles everything automatically, like product details, customer information fields, and payment options. You don’t need to add anything else to make it work.
However, you can customize the overall design and appearance through your WordPress theme settings.
Go to Appearance » Customize in your WordPress dashboard.
Your theme’s customization panel opens. Depending on your theme, you’ll find options to:
- Change colors to match your brand
- Adjust fonts and typography
- Modify layout spacing
- Customize button styles
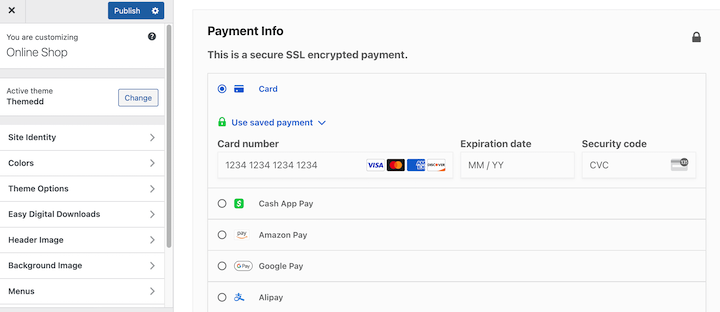
Take note that these changes affect your entire site, not just the checkout page. Make adjustments until your checkout looks professional and matches your brand.
When happy with your form, click “Publish” to save your theme customizations.
That’s it! Now your users can select the type of payment they want to use with just a click. Check out the screenshot below to see an example of how the EDD multiple payment gateway form looks.
Who Should Use Easy Digital Downloads
Easy Digital Downloads is perfect if:
- You’re selling digital products primarily. Downloads, courses, ebooks, software, templates—anything customers download after purchase. This is EDD’s sweet spot.
- You also sell some physical products. EDD includes shipping and inventory features, so you can sell digital courses alongside physical workbooks or merchandise in one system.
- You want multiple payment gateways without paying for a plugin. The free version supports Stripe + PayPal + Square simultaneously. Zero plugin costs beyond standard processor fees.
- You value straightforward interfaces. Products work like WordPress posts. The learning curve is minimal if you’ve used WordPress before.
- You might need subscriptions later. Start free with one-time payments. Upgrade to recurring payments only when your revenue justifies it.
Great! I have just walked you through three simple ways to give your users payment options on WordPress. But how do you choose the best solutions for your needs?
Choosing the Right Method for Your Business
You’ve seen three ways to add multiple payment options to WordPress. Now let’s figure out which one fits your needs.
The decision comes down to three main factors: which payment gateways you need, what you’re selling, and your budget.
Here’s a quick comparison:
| Feature | WP Simple Pay | WPForms | Easy Digital Downloads |
|---|---|---|---|
| Payment Gateways | Stripe only | Stripe, PayPal, Authorize.net | Stripe, PayPal, Square (+ 70 extensions) |
| Combine PayPal + Stripe | No ❌ | Yes ✅ | Yes ✅ |
| Free Version Available | Yes ✅ (limited) | Yes ✅ ( but no payments) | Yes ✅ (full multiple gateways) |
| Minimum Cost for Multiple Options | $49.50/year (Pro) | $199.50/year (Pro) | FREE |
| Setup Time | 10 minutes | 15 minutes | 20 minutes |
| Best For | Stripe-only businesses | Form-based payments | Digital product stores |
| Recurring Payments | Yes ✅ (on pro plans only) | Yes ✅ (on pro plans only) | Yes ✅ (on pro plans only) |
| Conditional Logic | No ❌ | Yes ✅ | Yes ✅ |
| Physical Products | No ❌ | No ❌ | Yes ✅ |
| Difficulty Level | Easiest | Easy | Easy-Medium |
Now you know how to set up multiple payment options on WordPress using three tools, and understand which one meets your needs. If anything is unclear, check out the commonly asked questions below.
FAQs: How to Set Up Multiple Payment Options in WordPress
Can I use multiple payment plugins together on the same site?
Yes, but I highly DO NOT recommend it. Running multiple payment plugins creates conflicts and confuses customers. Pick one method that fits your business and stick with it. If you need to switch later, disable the old plugin completely before activating the new one.
Do I need business accounts with Stripe, PayPal, and Square?
Personal accounts work fine initially. Upgrade to business accounts once you’re processing over $1,000 monthly. Business accounts offer lower fees, better fraud protection, and professional branding. Most processors let you upgrade with a few clicks.
Which payment gateway has the lowest fees?
Stripe and Square tie at 2.9% + $0.30 per transaction. PayPal Standard costs 3.49% + $0.49. Stripe ACH (bank transfers) is cheapest at 0.8% capped at $5. But choose based on what your customers actually use, not just fees.
Can customers save payment methods for faster checkout?
Yes with WP Simple Pay and WPForms through Stripe. Customers check “Save payment method” for one-click future purchases. Easy Digital Downloads requires the Recurring Payments extension for this feature. Saved methods only work within one gateway.
Can I offer payment plans or installments?
Yes. Enable Afterpay, Klarna, or Affirm through Stripe (works with WP Simple Pay and Easy Digital Downloads). Customers choose installments at checkout. You get paid upfront while the gateway collects from customers over time. Easy Digital Downloads also offers custom payment plans with Recurring Payments extension.
Do I need an SSL certificate for payment processing?
Yes, absolutely required. Without SSL, payment gateways won’t connect and customers see security warnings. Most hosts include free SSL certificates through Let’s Encrypt. Enable it in your hosting dashboard or use the Really Simple SSL plugin. All payment processors require HTTPS.
Should You Allow Multiple Payment Options on Your WordPress Site?
Absolutely!
Remember, your customers aren’t all the same. Some trust credit cards. Others only use PayPal. Many prefer Apple Pay on mobile.
When you force everyone through one payment gateway, you’re deciding for them. And they’ll decide to shop elsewhere.
The research backs this up. Rigid payment options consistently rank among the top reasons for cart abandonment. It’s not about your preferences. It’s about removing friction from the buying process.
The good news? Adding multiple payment options takes 15-25 minutes with any of the three methods I covered. The setup is simple. The impact is immediate.
Give your customers choices. Watch your conversion rate improve.
Related Resources
Want to take your WordPress payment setup even further? Check out these helpful guides:
- How to Add Stripe QR Code Payment in WordPress – Let customers pay by simply scanning a QR code with their phone for faster, contactless checkout.
- How to Accept Online Recurring Payments in WordPress – Set up subscription payments and recurring billing for memberships, courses, or ongoing services.
- Best WordPress Payment Plugins – Explore other powerful payment solutions beyond the three methods we covered in this guide.
- How to Create a Registration Form with PayPal Payments – Collect event registrations, course signups, or membership applications with integrated PayPal payments.
- How to Sell on WordPress with PayPal – Complete guide to setting up PayPal as your primary payment processor for selling products and services.
- Best Trust Badge Plugins for eCommerce – Display security badges and payment icons to build customer confidence and reduce cart abandonment.
- Best Recurring Donations WordPress Plugins – Accept monthly donations with multiple payment options if you run a nonprofit or fundraising campaign.
These resources will help you optimize your payment system, increase conversions, and provide an even better checkout experience for your customers. Pick the one that matches your next business goal and start implementing it today.

Comments Leave a Reply