Integrating SMS and WhatsApp with WordPress can feel like trying to bridge different digital universes.
Think about it, WordPress operates as a web-based content management system, while SMS runs through telecommunications networks.
On the other hand, WhatsApp functions as a closed messaging platform. It is not surprise then that beginners find it so difficult to connect them to WordPress.
But, since SMS and WhatsApp offer instant communication, they can be highly beneficial to business owners.
After testing dozens of communication methods, I concluded that SMS and WhatsApp messaging can improve how you engage with your website visitors.
It is no surprise that most WordPress sites rely heavily on email for user communication. After all, email marketing offers a quick and easy connection to WordPress.
Plus, you can quickly communicate and nurture leads through email marketing campaigns and newsletter blasts.
But here’s what I have noticed in 2025: email open rates are declining while mobile messaging engagement is skyrocketing.
While emails sit unread in crowded inboxes, text messages and WhatsApp notifications get immediate attention.
On top of that, people check their phones constantly. This makes these channels perfect for time-sensitive communications, customer support, and marketing messages.
So I tested nearly every SMS and WhatsApp integration for WordPress. I was looking for solutions that were both powerful and beginner-friendly.
The winners? WPForms with Twilio for SMS messaging, and PushEngage for WhatsApp communication.
With these connections, you can:
- Send order confirmations
- Appointment reminders
- Customer support messages
- Send marketing campaigns directly to your users’ phones
Plus, both WPForms and PushEngage integrate seamlessly with WordPress, so you don’t need technical skills to get started.
In this guide, I’ll show you exactly how to set up both systems.
You’ll learn to create professional messaging workflows that keep your audience engaged and boost your business results.
What You’ll Learn (Key Takeaways)
- Professional SMS Communication: How to connect WordPress with Twilio through WPForms to send instant text messages for customer service, order updates, and marketing campaigns.
- WhatsApp Business Integration: Step-by-step setup of PushEngage’s WhatsApp feature for rich media customer communication and automated messaging workflows.
- Smart Messaging Strategy: My proven approach for using SMS for urgent communications and WhatsApp for detailed, media-rich customer interactions.
Let’s dive right in and start with how I connect SMS messaging to WordPress.
How to Integrate SMS Notifications Using WPForms
As mentioned, unlike email, SMS messages appear immediately on the recipient’s screen and have incredibly high open rates.
In WordPress, SMS messages work perfectly for:
- Order confirmations and shipping updates
- Appointment reminders and booking confirmations
- Customer support responses and status updates
- Promotional offers and flash sales
- Password resets and security alerts
- Event notifications and reminders
Plus, most people read text messages within 3 minutes of receiving them, especially through the notification window that pops up at the top of the screen.
This makes SMS perfect for time-sensitive customer communications.
Why I use WPForms to Connect SMSs to WordPress
I love how WPForms offers seamless SMS integration through its Twilio addon. Twilio is one of the most reliable messaging platforms used by companies like Uber, Netflix, and Shopify.
This reliability allows me to send instant text messages to customers when they interact with my WordPress site.
The best part is, the WPForms Twilio addon connects your WordPress forms directly to Twilio’s SMS service.
Here’s how it works:
- When someone submits a WPForms form, the Twilio addon can automatically send SMS messages to both you and the customer.
- You can customize message content, include form data, and create professional automated communications that enhance the customer experience.
As you can see, it is the perfect alternative to sending an email. Plus, this connection still works with your mail settings, so you can also send out emails at the same time.
Check out my detailed WPForms review to see everything this form builder can do.
With that out of the way, let me walk you through the process step by step.
Step 1: Set Up Your Twilio Account
Before setting up an integration in my WordPress dashboard, I always start by setting up external or third-party tools first. This way, I do not need to go back and forth between dashboards.
So that is exactly what we will do in this tutorial: we will set up Twilio first.
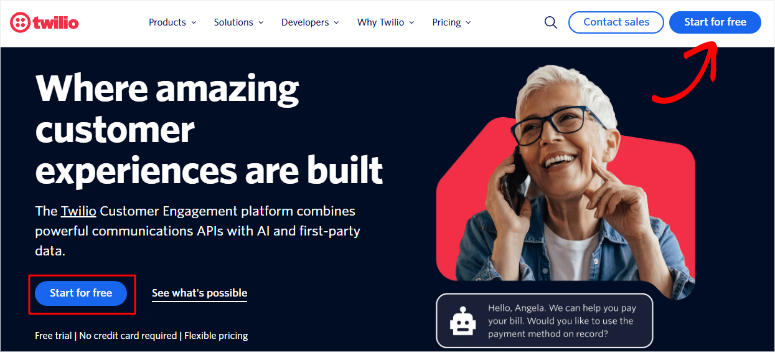
In a new browser tab, go to the official Twilio.com website and hit the Start for Free button to create a free Twilio account.
On the next page, enter your details and hit Continue. Alternatively, you can sign up with your Google account.
Follow all steps to complete signing up, which should eventually lead you to the Twilio console, which looks like this:
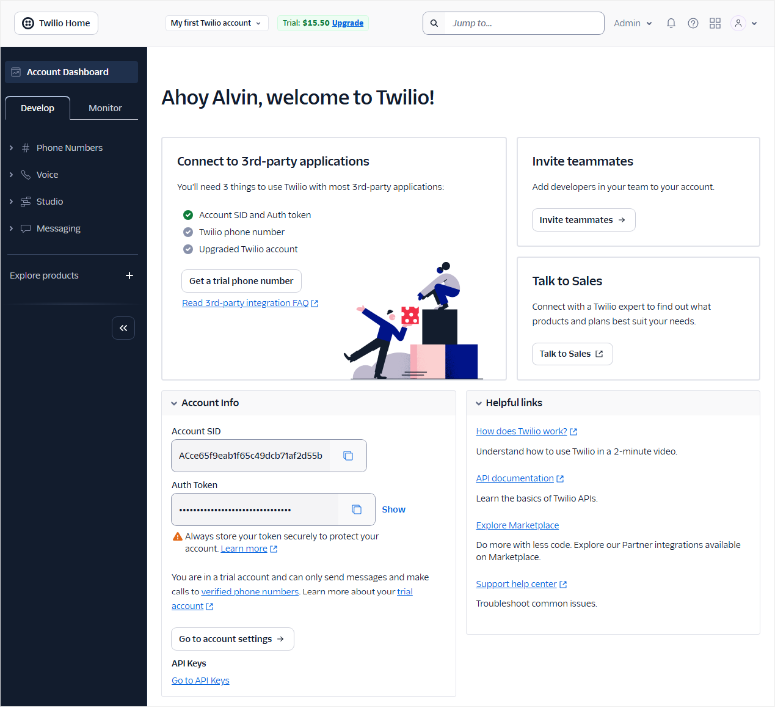
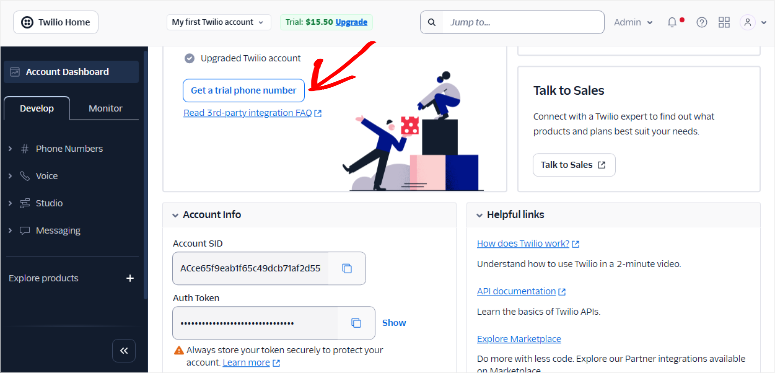
As you can see, Twilio offers a generous free trial with $15.50 in credits. This provides you with sufficient room and SMS messages to test your WordPress integration.
Then, in your Twilio Console dashboard, hit the Get a trial number button.
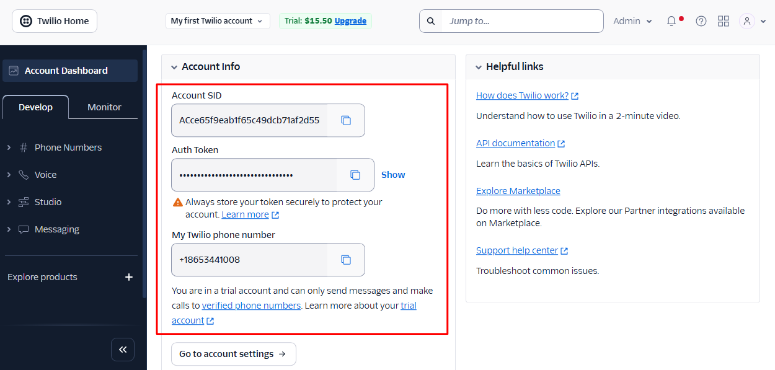
You’ll then find three important pieces of information for the WPForms integration:
The details are:
- Account SID – Your unique account identifier
- Auth Token – Your authentication token for API access
- Twilio Phone Number – A dedicated number for sending SMS messages
While Twilio provides you with a trial phone number during signup, you want to purchase a dedicated number for professional customer communication.
Also, it helps to get a memorable number that customers will recognize. Remember to also include your area code and business location, too.
That’s it! Your Twilio account is ready. Now, let us move to our WordPress dashboard, where we will set up the Twilio connection.
Step 2: Install WPForms Pro
I will point out that you’ll need WPForms Pro since the Twilio addon is only available in paid plans.
Even though there is a free version of WPForms, it does not offer the advanced functionalities that you will need for this connection.
So, to get started, visit the WPForms website and choose a plan that includes the Twilio addon. For this, you’ll need the Plus plan or higher.
After purchase, download the WPForms Pro plugin and install it on your WordPress site just like you would any other plugin.
If you need help with this part, read how to install a WordPress plugin – 4 methods (step by step).
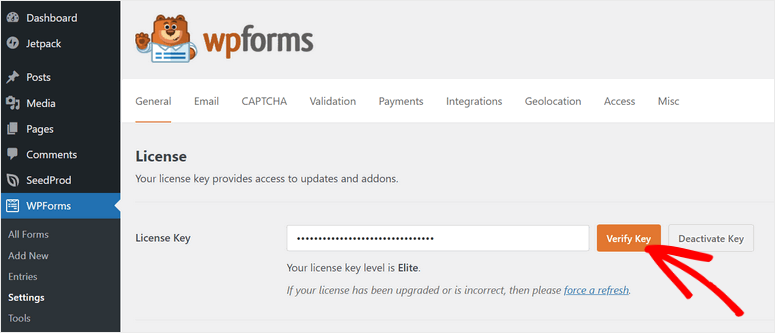
After activation, go to your WPForms settings and enter your license key to unlock all premium features.
This includes access to premium addons like Twilio for SMS messaging.
With WPForms ready and activated, let us now add the Twilio functionality.
Step 3: Install the WPForms Twilio Addon
In your WordPress dashboard, go to WPForms » Addons. Here, look for Twilio and click “Install Addon.”
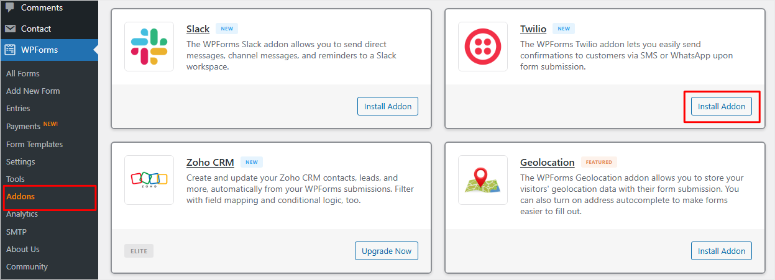
Once installed, the addon activates automatically.
At this point, you are ready to configure text message communications for any form on your site. Let us learn how to do that.
Step 4: Configure SMS Communications in WPForms
First, you will need to create a form with WPForms. This is very easy and straightforward, as all you have to do is go to WPForms » Add New in your WordPress dashboard.
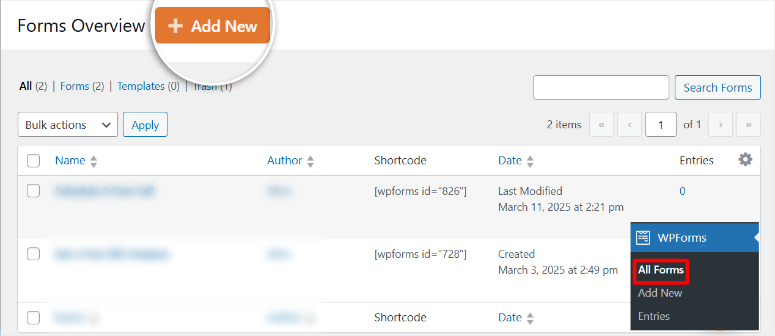
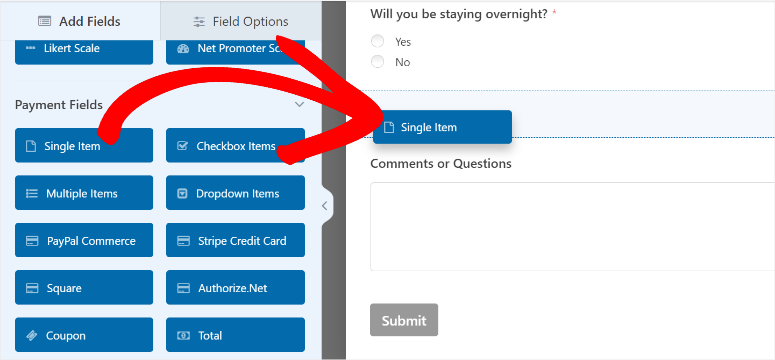
This will take you to the WPForms drag and drop form builder. You will see form fields on the left, which you can drag and drop to the preview window on the right.
Apart from that, you get Fancy Fields and Payment Fields to help you turn a simple form into a more advanced WordPress communication tool.
For example, you can add Stripe payments, Likert Scales, star ratings, add credit card fields, and so on.
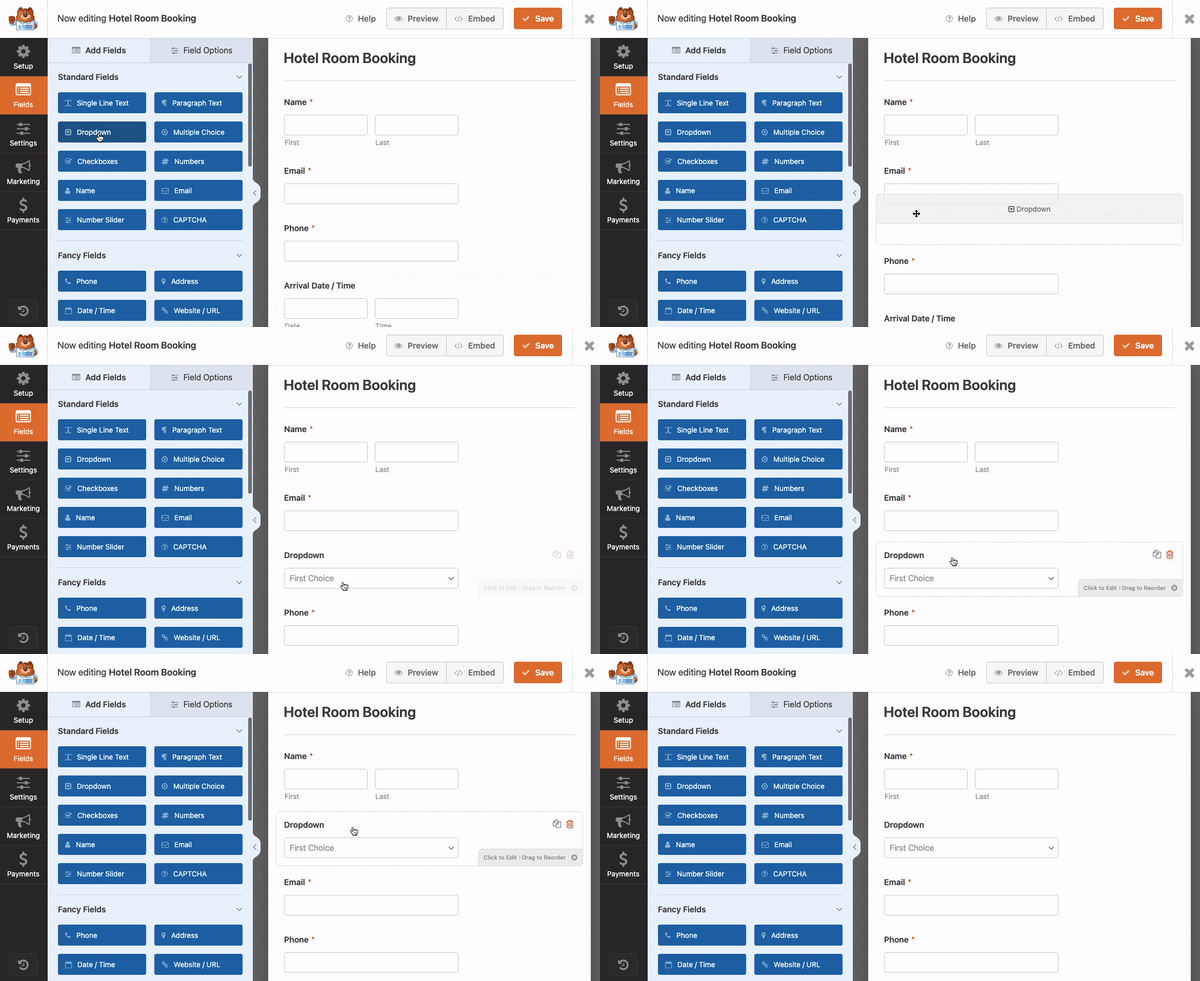
That is not all, you can reorder the position of your fields by moving them up or down the preview screen. This allows you to structure the form exactly as you have envisioned.
For a step-by-step guide, check out my tutorial on how to set up contact forms with WPForms. If this is not working for you, WPForms also allows you to create forms with AI.
Once you are happy with your form, it is time to add Twilio to it.
To do this, go to the “Marketing” tab in your form builder and select Twilio. Then, on the screen that appears on the right, hit Add New Connection.
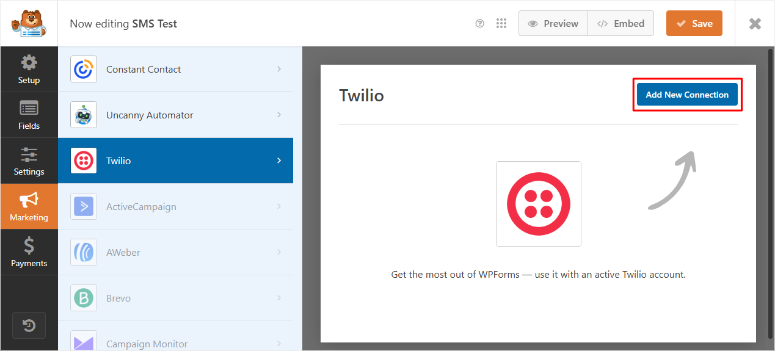
Remember the Twilio console details you copied earlier; this is where you use them.

So, here, enter your Twilio account SID, auth token, account name, and hit Add to move to the next step.
The first two are the most important credentials and should be exactly as they are in your Twilio account. For the name, use something that will help you remember your integration if you have several.
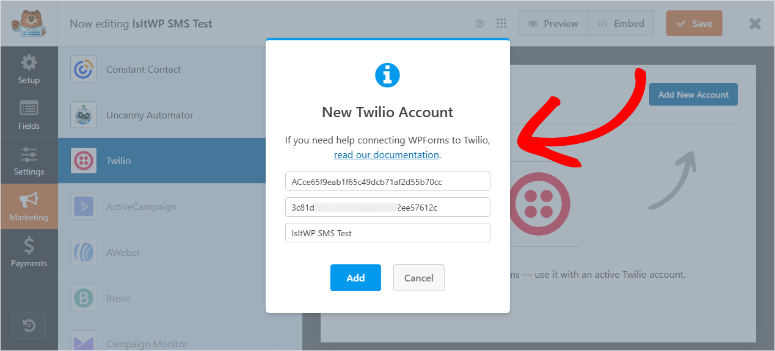
After this, enter your connection nickname in the next popup and hit OK:
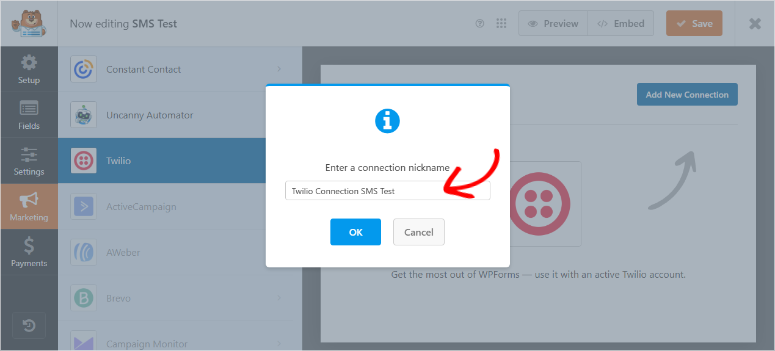
This completes your Twilio WordPress connection through WPForms.
Next, you will see new fields populated under the Twilio tab in WPForms. This allows you to create your SMS integration.
Fill out the fields as follows:
- Select Account – choose your Twilio account here. Useful if you have several subaccounts.
- Send As – Here, you can choose to send the message as an SMS or a WhatsApp message. For this section, we are going with the SMS option.
- Send From – Choose the phone number that sends SMS messages. For this tutorial, we are using the free trial number Twilio gave us during sign-up.
- You also have a “Manage Phone Numbers” link that redirects to the Twilio console, where you can buy a phone number for a monthly fee of $1.15 at the time of writing.
- Send To – This field specifies where you will send the text. You can either send the SMS to the number a user enters in the phone form field or to a verified list of numbers.
- Phone Field – If you choose to send SMS to the number that a user enters in the phone form field, choose that specific phone field here.
- Message – This is where you write your SMS text. You can use smart tags that allow you to personalize the message extensively.
- For example, you can automatically grab the user’s name from their form submission. But remember, you have a limit of 320 characters.
- You can create a message like “Hi {field_id=’1′}! Thanks for your order #{entry_id}. We’ll send shipping updates to this number. Questions? Reply STOP to opt out.”
- Enable Conditional Logic – You can add conditional logic to your SMS integration to have more control over your messaging.
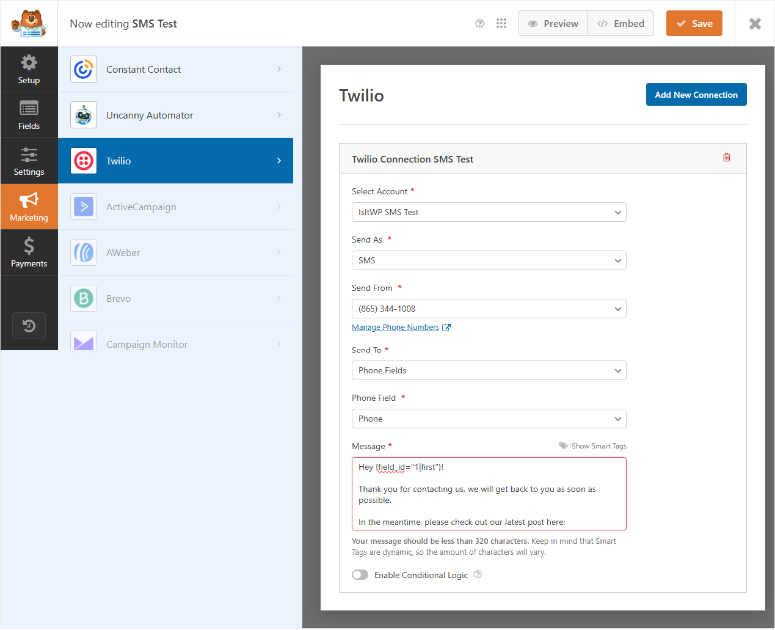
Once you have filled out the fields, hit the Save button at the top. Next, it is time to add the form to your site.
The good thing with WPForms is that you can embed your form in a new or existing page with 3 easy methods. Through a WPForms WordPress block, a shortcode, or by creating a new page for your form.
You get all these options by selecting the Embed button at the top right corner of your form builder.
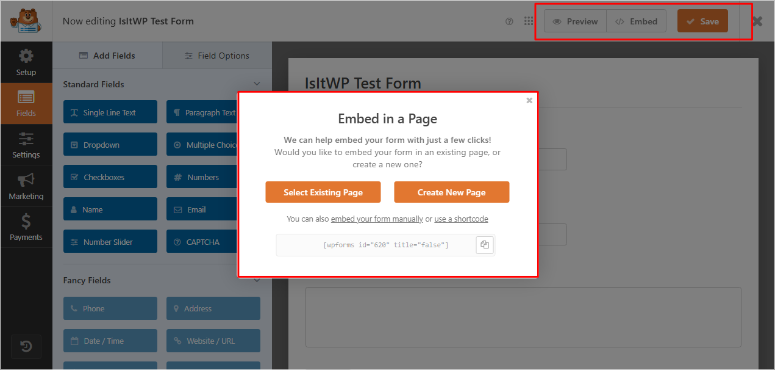
Once you add the form to your site, it should look something like the screenshot below.
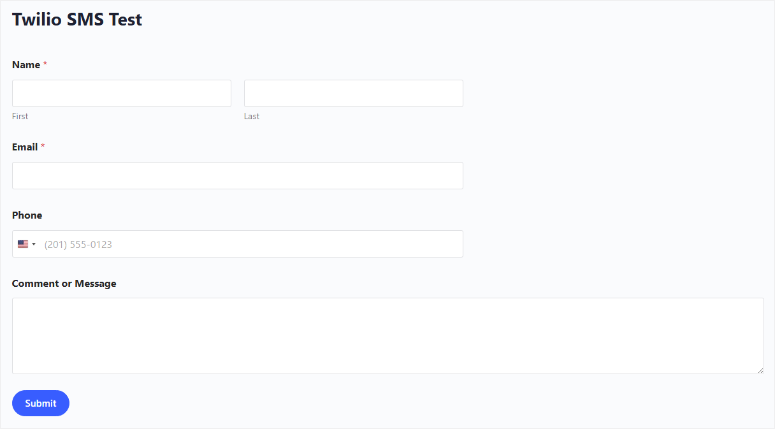
Now, once the user hits the Submit button on your form, the Twilio integration will automatically send an SMS to either a verified number on file or the number they provided via the above phone field.
And that’s it! Your WordPress + Twilio SMS integration is ready!
As you can see, it is very easy to integrate Twilio SMS with your WordPress website via the WPForms plugin.
The only thing left for you to do is to get creative with your messages to achieve the best SMS engagement now that the technical part is out of the way.
Plus, you can include links to order tracking or customer support.
How to Integrate WhatsApp Notifications Using PushEngage
Unlike traditional SMS, WhatsApp supports rich media, longer messages, and interactive elements. This makes it ideal for improving customer communication and marketing in a visual way.
For WordPress businesses, WhatsApp messages can include:
- Customer service messages with images and documents
- Order confirmations with product photos and tracking links
- Appointment reminders with location maps and contact info
- Marketing campaigns with product catalogs and special offers
- Support conversations with file attachments and voice messages
- Automated welcome messages for new customers
Why I use PushEngage for WhatsApp WordPress Connection
I like using PushEngage to integrate WhatsApp and WordPress because of how easy it is. It allows me to send messages directly from WordPress through the WhatsApp Cloud API.
Primarily, PushEngage is a web push notification tool. But it has evolved to become a complete multichannel marketing software.
Now you can set up triggered notifications, drip campaigns, segment your audience, run Android and iOS push notifications, and so much more.
Check out my updated PushEngage review to see all it can do.
Most importantly, the latest PushEngage update allows you to connect WhatsApp to WordPress and send messages from your dashboard.
So, what can you do with this WhatsApp WordPress connection?
- You can trigger WhatsApp messages based on customer behavior, form submissions, purchase events, or custom triggers.
- You can send targeted WhatsApp messages to specific customer groups based on their WordPress activity, purchase history, or location.
- Plus, you can create automated WhatsApp workflows that enhance customer relationships.
With that said, let me walk you step by step through the setup process.
Step 1: Set Up Your PushEngage Account
I like that, like WPForms, PushEngage also offers a free version. But unlike WPForms, you can use the free version of PushEngage to connect WhatsApp to WordPress.
This is because this customer engagement tool allows you to make one website-app connection.
So first, visit PushEngage.com and hit Get Started to create an account.
This takes you to the pricing page where you can pick your plan. To show you how to get started for free with PushEngage, I will use the free plan for this tutorial.

On the next page, you can sign up with your email address or Google account. After that, provide your website address and choose the business category (industry), and select Setup Your Account.
Next, enter your credit card details and hit Complete Registration and Get Instant Access.
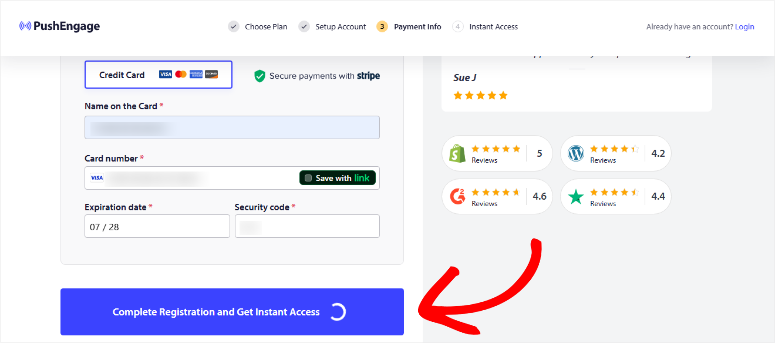
Even though this is a free account, PushEngage requires you to add your credit card information, citing a history of people trying to abuse this option.
But do not worry, they will never deduct money from your account unless you upgrade.
Then, on the next page, enter your site details and hit the Save and Continue button.
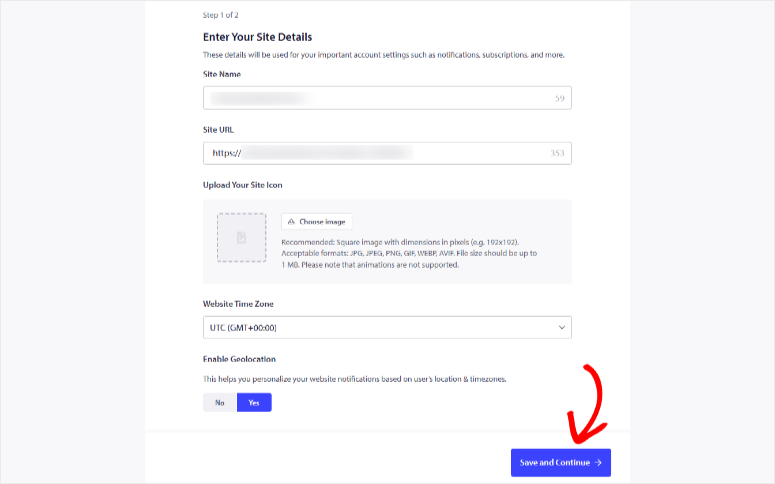
As you can see on the next screen, you can install PushEngage on multiple platforms. For this tutorial, choose WordPress and hit the Install PushEngage WordPress Plugin.
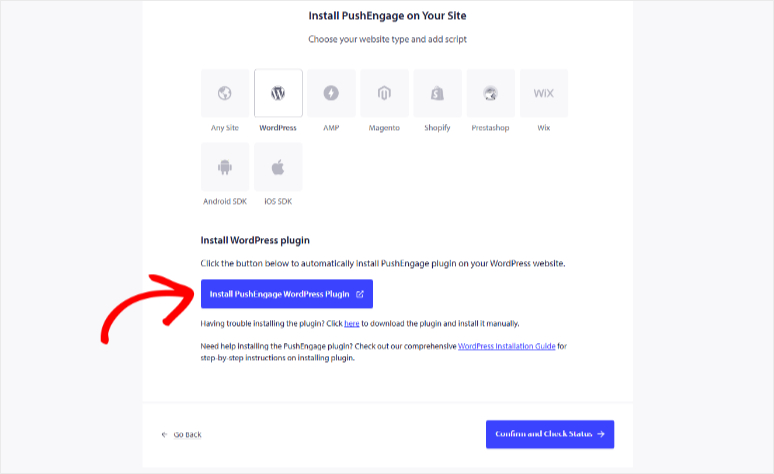
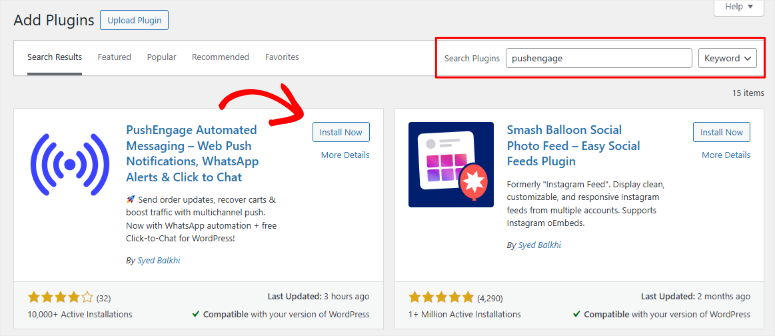
After this, you will be redirected to the plugin repository page on a new browser tab in your WordPress dashboard. Alternatively, go to your WordPress dashboard and navigate to All Plugins » Add New Plugin.
This will take you to the plugin repository page as well.
So all you have to do on this page is find PushEngage using the search function, then install and activate it.
After activation, PushEngage takes you to a quick setup wizard. Here, you can either claim a new free account or use an existing one.
Since we already created a PushEngage account, we will select Connect Your Existing Account.
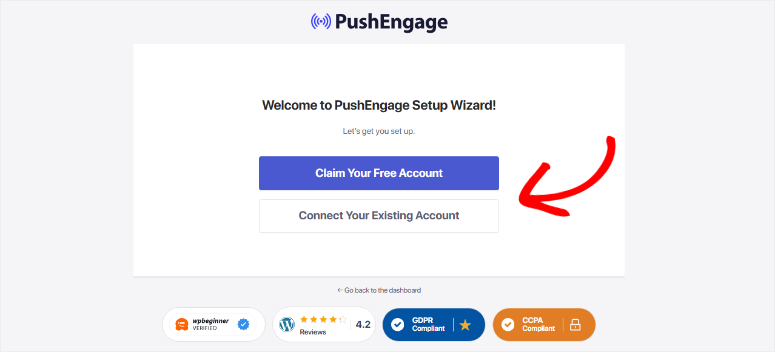
On the next screen, choose your website and hit Let’s Get Started. Now, to complete the setup process, all you have to do is follow the setup wizard.
You will just enable different features with checkboxes and toggle options. If you face any issues, you can refer to this post I did on how to set up PushEngage.
Once PushEngage is ready, move to step 2, where I will show you how to configure your WhatsApp account in WordPress using PushEngage.
Step 2: Configure WhatsApp Account
Once you complete the PushEngage setup, go to PushEngage » WhatsApp BETA in your WordPress dashboard.
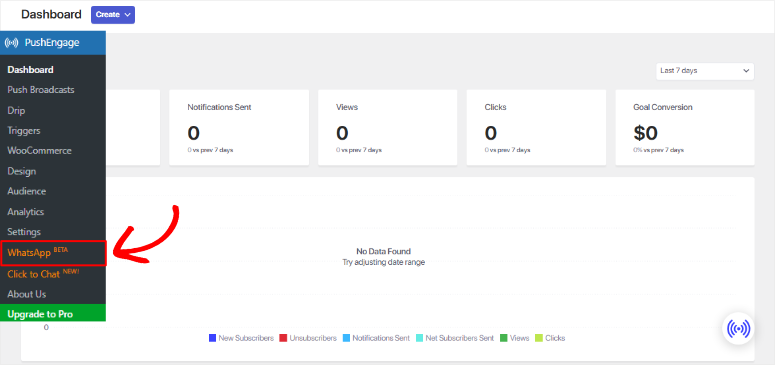
On the next screen, you can use toggle buttons to set up automations to keep you informed about your site.
For example, you can set up PushEngage so that you get an alert on WhatsApp when a new order is placed, when order processing, order is on hold, and more.
As a result, this WhatsApp WordPress connection does not just serve your clients, but you and your business as well.
But for our tutorial, we will just hit the Connect Now button.

Once done, you will be redirected to the Settings window under the “WhatsApp Cloud API” tab.
So enter your WhatsApp Business ID, Phone Number ID, WhatsApp Phone Number, and Access Token.
Once done, Hit Save Changes.

To generate your WhatsApp Cloud API credentials, simply follow the instructions provided on the right side of the screen. PushEngage offers detailed documentation to help you with this.
That’s It! You can now connect WhatsApp to WordPress using PushEngage. Now, let us look at how you can use WhatsApp in WordPress.
1. Click to Chat WhatsApp Widget
PushEngage offers you an easy-to-use click-to-chat WhatsApp widget that allows users to contact you with a single tap. This feature is also on PushEngage Lite, so you can use it for free.
Configuring the widget is incredibly easy. In fact, you don’t even need to connect with the WhatsApp Cloud API first.
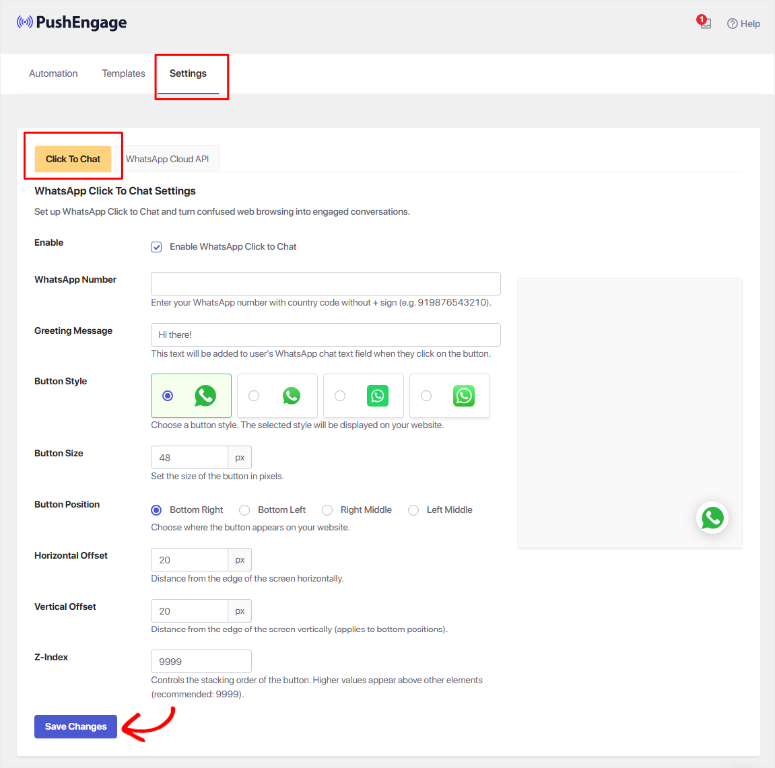
To add a click-to-chat WhatsApp widget to your WordPress website, go to the PushEngage » WhatsApp BETA and navigate to the Settings tab. Here, select the Click to Chat tab.
Next, use the checkbox to enable this feature. After that, enter your Phone Number, Customize Greetings, select a Button Style, and then go through all the other customization options.
Finally, hit Save Changes at the bottom.
Now, every time a user visits your website on their phone or computer, they will see the WhatsApp widget. Hitting the button launches WhatsApp Messenger.
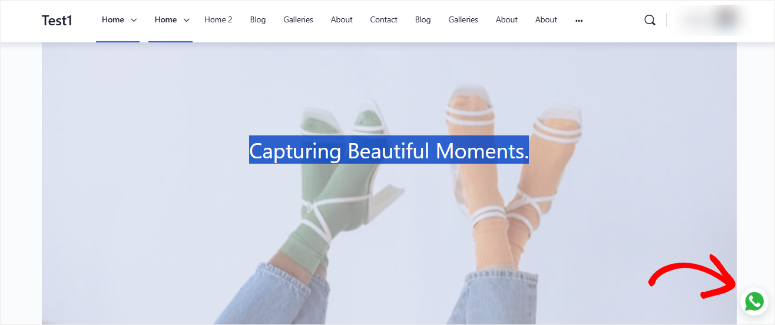
And that’s it. Customers can easily contact you via WhatsApp Messenger, and you can automatically send them notifications as needed.
2. Create WhatsApp Message Templates
WhatsApp requires pre-approved message templates for business communications.
This ensures your messages are professional, compliant, and consistent. It also speeds up the approval process, so you can start sending updates and promotions without delays.
Apart from that, this consistent messaging keeps your brand looking the same across all customer interactions.
So, how do you set up WhatsApp templates in PushEngage?
In your WordPress dashboard, go to PushEngage » WhatsApp BETA and navigate to the “Templates” tab. On this page, select “Create Template.”

Once done, you can create WhatsApp template messages like:
- Order Confirmation – “Hi {name}, your order #{order_id} has been confirmed! We’ll send updates as it ships. Questions? Just reply here.”
- Appointment Reminder – “Hi {name}, friendly reminder: Your appointment is tomorrow at {time}. See you then! Reply if you need to reschedule.”
- Customer Welcome – “Welcome {name}! Thanks for joining us. Here’s a 10% discount for your first purchase: {coupon_code}”
The downside is that each template must be submitted to WhatsApp for approval, which typically takes 24-48 hours.
But on the flip side, approved templates can then be used in your automated WordPress customer communication workflows.
3. Set Up Customer Communication Triggers
With PushEngage, you create automation rules that trigger WhatsApp messages based on customer actions on your WordPress site.
Common customer communication triggers include:
- WooCommerce Orders: Send order confirmations and shipping updates to customers
- Contact Form Submissions: Acknowledge customer inquiries and provide response timeframes
- User Registration: Welcome new customers with helpful information and special offers
- Cart Abandonment: Remind customers about items they left behind with recovery incentives
- Appointment Bookings: Confirm appointments and send helpful reminders
You can configure each trigger with the appropriate WhatsApp template and personalization data from your WordPress customer database.
Step 3: Test and Launch Your Customer Communications
Before going live, test your WhatsApp customer communications thoroughly. Submit test forms and place test orders.
Plus, trigger various WordPress events to ensure messages are delivered correctly with accurate customer information.
Finally, monitor your WhatsApp message delivery rates and customer engagement metrics through the PushEngage dashboard.
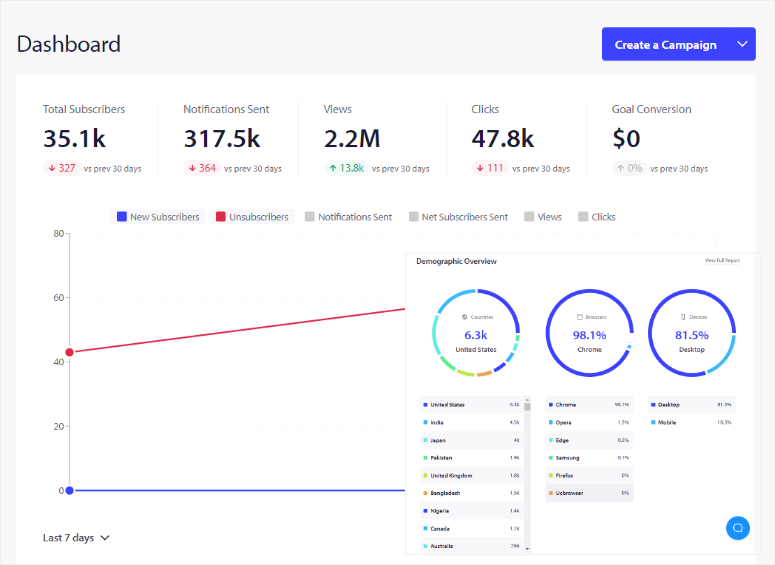
This data helps you optimize message timing, content, and targeting for better customer communication results.
Remember that WhatsApp has strict policies about customer consent and message relevance. Only send WhatsApp messages to customers who have explicitly opted in to receive business communications.
Plus, always provide value in your messages to maintain positive customer relationships.
Congratulations! You can now send both SMSs and WhatsApp messages from your WordPress Dashboard. So, how exactly do you use WhatsApp and SMSs to make communication better?
How to Use SMS and WhatsApp to Make Communication Easier with Clients
Implementing both SMS and WhatsApp creates a well-structured customer communication strategy that improves satisfaction and reduces support workload.
By using each platform strategically, you can provide better service while automating routine customer interactions.
Here is the approach I use:
1. Create a Smart Communication Strategy
- Use SMS for urgent, time-sensitive customer communications. For example, use SMS messages for order confirmations, appointment reminders, or flash sale notifications that require immediate attention.
- Save WhatsApp for detailed customer service conversations, product recommendations, or marketing campaigns that benefit from rich media and longer explanations.
2. Automate Routine Customer Interactions
- Set up automated workflows that handle common customer communications without manual effort.
- For example, when a customer places an order, automatically send an SMS confirmation followed by detailed WhatsApp messages with shipping updates and product care instructions.
3. Personalize Messages with Customer Data
- Leverage your WordPress customer database to create personalized SMS and WhatsApp messages.
- Include customer names, order details, appointment information, or purchase history to make automated messages feel personal and relevant to each recipient.
4. Offer Multiple Communication Preferences
- Give customers a choice in how they receive communications by offering both SMS and WhatsApp opt-ins during checkout or registration.
- Some customers prefer the simplicity of SMS. While others appreciate WhatsApp’s rich features and international accessibility.
5. Enable Two-Way Customer Support
- Use both platforms as conversation channels, not just notification systems. Monitor customer responses and ensure prompt replies.
- Quick response times through messaging platforms significantly improve customer satisfaction compared to traditional email support tickets.
I hope you have enjoyed learning about how to connect WhatsApp and SMS messaging to WordPress. If you have more questions, check out the FAQs below.
FAQs: How I Set Up SMS and WhatsApp Notifications in WordPress (Simple Guide)
How much do SMS messages cost through WPForms and Twilio?
Twilio charges approximately $0.0083 per SMS in the US, making it very affordable for customer communications. With WPForms handling the integration, you only pay Twilio’s message fees plus your WPForms subscription.
A small business sending 500 customer messages monthly would spend less than $5 in messaging costs. Not bad.
Can I send WhatsApp marketing messages to all my customers?
Yes, but remember, WhatsApp requires explicit opt-in consent before sending marketing messages to customers. You can only send promotional WhatsApp messages to customers who have specifically agreed to receive marketing communications.
But you can send transactional messages like order confirmations to any customer who makes a purchase.
What’s better for customer communication – SMS or WhatsApp?
SMS works on all mobile phones and delivers instantly, making it perfect for urgent customer communications like order confirmations or appointment reminders.
WhatsApp supports rich media and longer conversations, making it ideal for customer service, detailed product information, or marketing campaigns with images and videos.
Can customers reply to my SMS and WhatsApp messages?
Yes, both WPForms and PushEngage support two-way communication. Customers can reply to your messages, ask questions, or request support.
You’ll receive these replies through your Twilio dashboard for SMS or WhatsApp Business interface if you use PushEngage. This allows you to provide real customer service through messaging.
Final Verdict: Should I Use WhatsApp and SMS Messages in WordPress?
Absolutely! Setting up SMS and WhatsApp communication for your WordPress site revolutionizes how you connect with customers.
These instant messaging channels ensure important information reaches customers immediately while providing the personal, convenient communication they prefer over email.
The combination of WPForms + Twilio for SMS and PushEngage + WhatsApp creates a complete customer communication system.
With this setup, you can transform your WordPress site from a simple website into a powerful communication hub that keeps customers engaged and informed in real-time.
Resource Hub
Now, if you are looking for WPForms alternatives to help you improve your client communication, check out this comparison article on WPForms vs Formidable Forms.
On that note, if you are looking for a web push alternative, here is an article on PushEngage vs OneSignal.
Apart from that, here are other articles you may be interested in reading.
- 5 Best SMS Marketing Tools To Improve Customer Engagement
- 10+ Best Autoresponder Plugins for WordPress (Free & Premium)
- 8 Best Push Notification Tools for Your WordPress Website
These articles will not only help you find the right SMS and push notification WordPress plugin for your business, but also help you set up communication automations.

Comments Leave a Reply