Are you looking for the best way to add galleries to your WordPress Website?
Galleries are a great way of making your site more visually appealing. They can help quickly showcase digital portfolios. This allows creators to display their best work in an easy-to-follow way to potential clients.
But galleries are not just great at building portfolios, you can also use them for storytelling through images. They allow you to display images following an order, ensuring your visitors easily understand the visual story.
Because of these properties, galleries can increase engagement on your site and result in more social shares.
In this article, we will show you how to place galleries on your site. We will also walk you through how you can customize your galleries to give your visitors the best experience.
Why You Should Use Galleries in WordPress
As mentioned, galleries are a collection of images, so they are great at storytelling or showcasing your work. Let us look at other advantages of galleries.
- Site Organization: Galleries can help you organize your site images, ensuring your visitors easily navigate through your site. As a result, users are more likely to explore your site and read more content, leading to more engagement and page views.
- Easy Content Consumption: With more people looking for quicker and easier ways to consume informational or educative content, galleries can be a great visual aid. They can be particularly useful for blogs and websites that offer tutorials and how-to guides. In such situations, they can help you show the information in a step-by-step way so that even newbies can understand.
- Marketing: You can also use galleries to showcase your products in a visual and easy-to-understand way, improving your customer journey experience. The better the experience your visitors have on your site, the more likely they are to make a purchase from you.
- Branding: Branding is all about using visuals and message consistency to create an identity. As stated, galleries can help you improve user engagement, tell a story, showcase your portfolio and easily display your products. These properties make galleries great at brand building as well.
- SEO: Well-optimized galleries can help improve image SEO and SEO as a whole. This ensures your visitors can also organically find you through image searches, not just written text.
Now that you understand the advantages of galleries, let’s walk you through how you can add them to your WordPress site.
To help you easily navigate this article, you can click on the links below to jump to the section of the post you want to read.
- Adding a gallery to WordPress with a plugin (recommended)
- Adding a gallery to WordPress without a plugin
- Bonus tips and tools to improve your gallery
Adding a Gallery to WordPress with a Plugin (Recommended)
Using a plugin to insert a gallery into your site is the best approach because of how simple it is.
But even if you are using an image gallery plugin, you should still select one that is affordable and easy to use.
That is why, for this tutorial, we will use Envira Gallery.
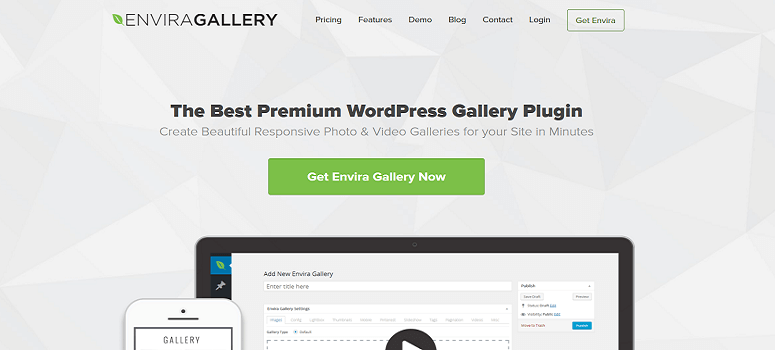
Envira Gallery is the best plugin for adding galleries to your site, without coding or designing experience. It comes with a simple drag and drop gallery builder that allows you to customize your galleries, giving them a unique spin.
If you need help customizing the galleries further, Envira Gallery comes with themes that you can also use to personalize them to suit your branding.
To top it off, this gallery plugin comes with inbuilt image compression features. These ensure you maintain site performance and load time even with many galleries on your site.
If you want to learn more about this WordPress photo gallery plugin, check out our complete Envira Gallery review here.
Now that you understand more about Envira Gallery, let us walk you through how to add a gallery with it.
Step 1: Install Envira Gallery
First of all, it is important to mention that Envira Gallery offers both a premium and a free version of the plugin.
The free version, Envira Gallery Lite, allows you to test out the plugin before you make your decision.
To set it up, just go to Plugins » Add New Plugin in your WordPress dashboard. Then, in your plugin repository, type “Envira Gallery” into the search bar to locate the plugin.
To make sure you have found the right plugin, ensure it is from the Envira Gallery Team and has over 1,500 reviews with a 4.5 rating.
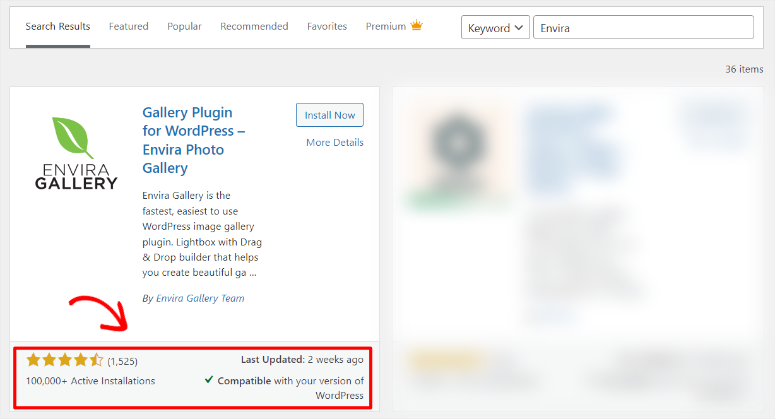
Once you install the plugin, activate it as you would any other plugin, and you should be ready to use it at this point.
But for this WordPress tutorial, we will focus on Envira Gallery Pro, so that we can discuss all the amazing features you should expect.
So, to get the Pro version of the plugin, go to their official page. Here, sign up and select a plan to get started.
The good news is that Envira Gallery Pro comes with 4 plans so you can easily select the best package for your business.
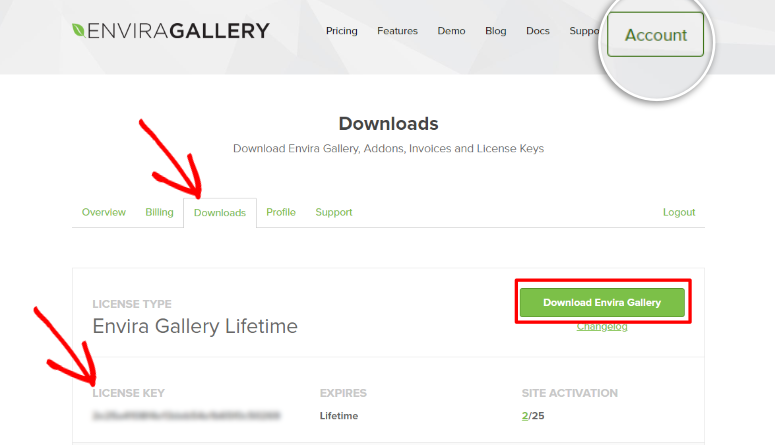
Once you have created a profile and bought a plan, the next step is to your Envira Gallery Dashboard and proceed to Account.
Next, go to the “Downloads” tab to download the Evnira Gallery ZIP file. While you are on this tab, also copy the Licence Key, which you will use later to activate the premium plugin.
Next, in your WordPress dashboard go to Plugins » Add New Plugin and select “Upload Plugin.”
Then, drag and drop the ZIP file you downloaded earlier and upload it to WordPress. After this, activate it, resulting in the “Envira Gallery” menu options appearing in your WordPress dashboard.
Now, to activate Envira Gallery Pro, go to Envira Gallery » Settings. On the settings page, find the “Envira License Key” bar and paste the code you copied earlier.
Finally, hit Verify Key, and just like that you have fully installed and activated this gallery wall online tool.

If you have any problems, check out this tutorial on how to install a WordPress plugin.
Step 2: Initial Plugin Set Up
Envira Gallery was created by Thomas Griffin, the same person behind OptinMonster, the best conversions and lead generation plugin, and Soliloquy, the best WordPress slider plugin.
These are plugins for WordPress known for their ease of use and putting the customer’s needs first. And Envira Gallery is no exception!
With that said, to make the WordPress gallery plugin easy to use and ensure consistency, Envira Gallery allows you to set up initial configurations.
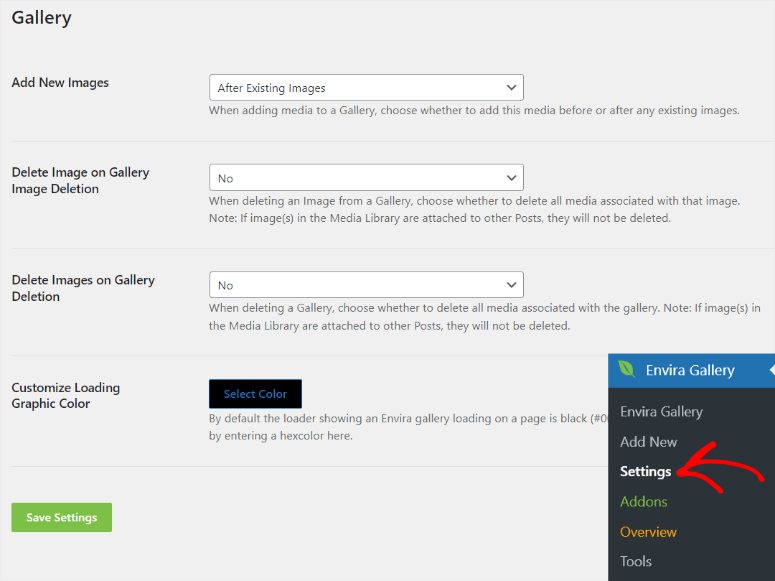
So, first, go to “Settings” under the Envira Gallery menu.
Then, below the activation bar, you will see “Gallery.” For these gallery options, select what you want from a simple dropdown menu, making it easy and convenient for you.
The options you have under Gallery include the following.
- Add New Images: Here, first set up the plugin so that if you add new images to your online photo gallery, they will appear either before or after existing images.
- Delete Image On Gallery Image Deletion: Then, in the next dropdown menu, decide if when you delete an image from a gallery, you also delete all media associated with that image.
- Delete Images On Gallery Deletion: Below this, decide if when you delete a gallery, you also delete all media associated with the gallery.
- Customize Loading Graphic Color: Finally, you can also customize the loading graphic color to personalize your WordPress galleries better for your audience.
Step 3: Upload Images
With installation and the initial setup complete, the next step is to upload your images to your WordPress dashboard.
To do this, go to Envira Gallery » Add New to open the gallery editor.
The Envira Gallery builder has a simple interface that looks like the Classic WordPress Editor, ensuring you do not experience a learning curve.
Apart from the nostalgic appeal, the classic editor design allows you to easily find all the gallery features at a glance.
For example, you see the Save Draft, Preview, and Publish buttons quickly on the far right. To add to that, you can easily add the gallery’s featured image like you would any post or page using the classic WordPress Editor.
This simple design also allows you to quickly add the Gallery’s title before you start adding the images.
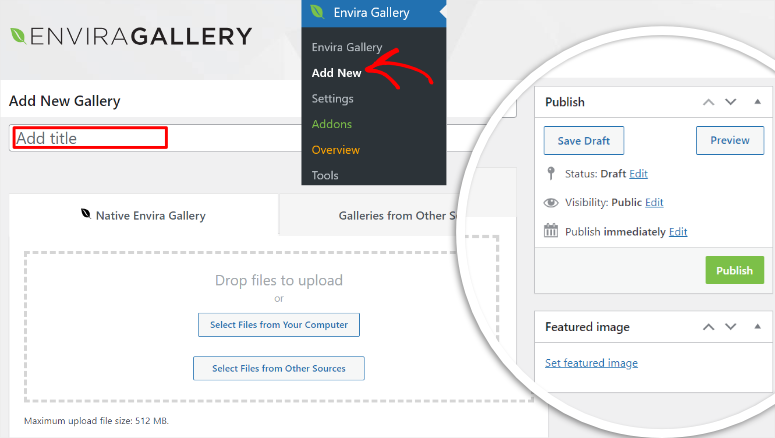
Now, to add images to your new online picture gallery, you can either upload them from your computer, from Instagram, or from your blog’s featured images.
For this tutorial, we will focus on uploading the images from the PC. This is the default way to upload images to an Envira WordPress gallery.
All you have to do is select images you want from your computer. Then, drag and drop them to the “Drop Files to Upload” area.
That’s it! You have just uploaded your gallery images to WordPress.
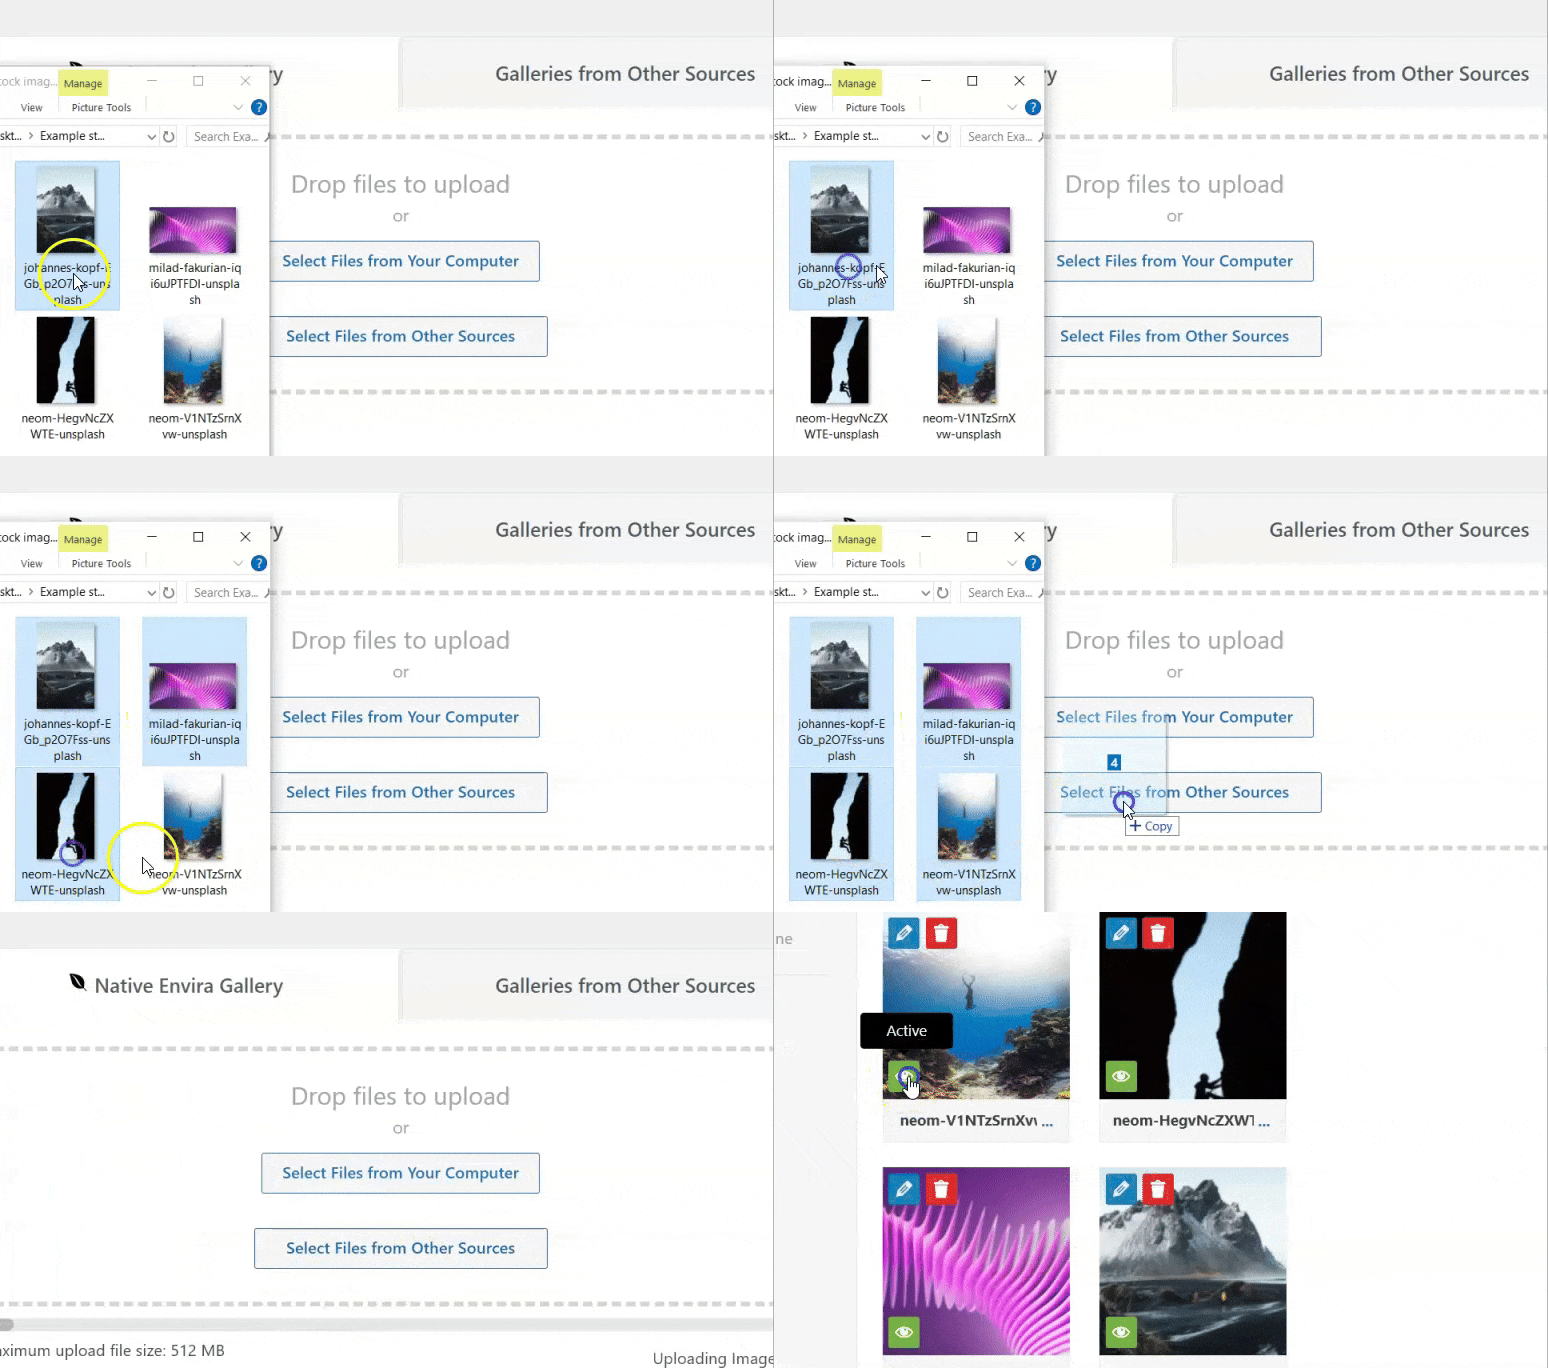
The problem with many gallery plugins is that they only allow you to upload small images. This is to ensure your galleries do not bulk up your site and interfere with your site performance or speed.
But, Envira Gallery is different because it has inbuilt compression features. This ensures that even if you upload large images, they do not affect your site. As a result, you will notice that Envira Gallery allows you to upload media files of up to 512 MB.
Step 4: Configure your Images
Now, Envira Gallery allows you to also customize your images so that they fit your brand and style.
To add to this, the Envira Gallery plugin makes it incredibly easy to personalize your gallery by ensuring all the configurations are done on the same page where you uploaded the images.
So, to access the configuration, scroll past the upload area and find the vertical tab menu.
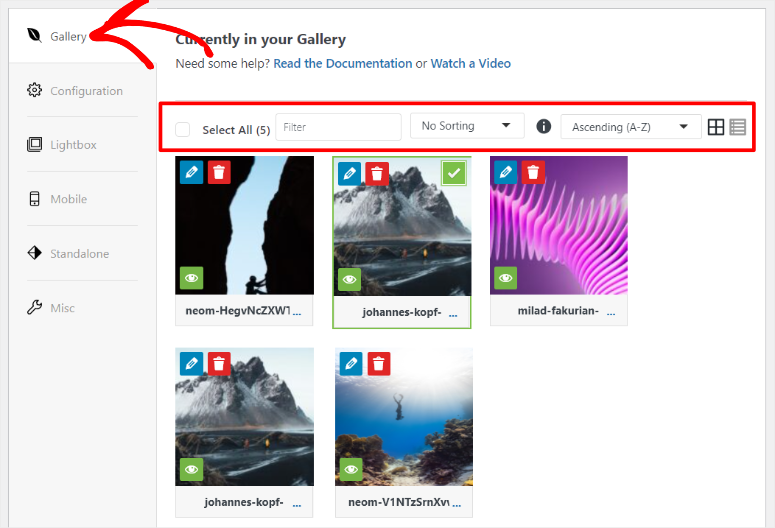
We will go to the “Gallery” tab first.
Here, arrange the images as you would want them to appear in the gallery. This is especially important if you are creating a portfolio gallery or a storytelling gallery.
You can use the drag and drop interface to move the images to the position you want with ease.
If you have many images, Envira Gallery allows you to arrange them through a “Filter” option or through an “Ascending or Descending Order” option.
You can also use the “Sorting” dropdown menu. Here, you can arrange the images at random, published date, title, caption, Alt text, filename, and URL.
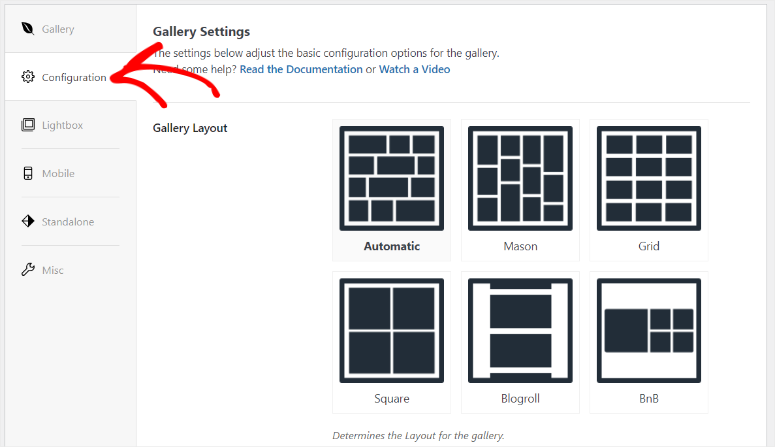
Next, let’s move to the “Configuration” tab.
On this tab, you will first set up the gallery layout. Envira Gallery offers several options, which include Automatic, Mason, Grid, Square, Blogroll, and BnB.
Each of these layouts will give your users a different experience, so you can experiment with them to see which is best for your audience.
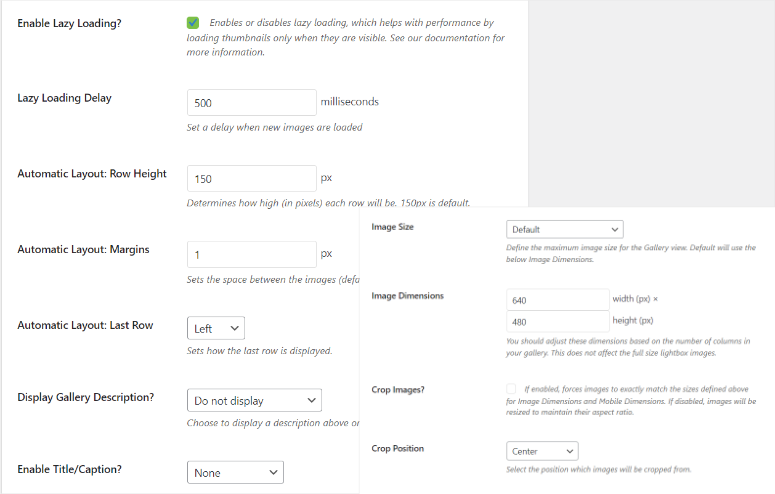
Under the layout options, first, decide if you want to enable Lazy Loading by marking the checkbox.
Lazy loading ensures that you utilize your site resources better by only loading an image when it is needed. This ensures your site’s performance is not affected.
Then, follow this up by setting Lazy Loading Delay for your images in milliseconds. This option will set how long the next image will start loading after the initial one.
It is another great way to also utilize your site resources while ensuring your readers focus only on the specific image that has loaded.
Next, you will set up:
- Row Height
- Image Size
- Image Dimensions
- Margins
- Crop Images
- Crop Position
- Last Row Position
- Enable Caption
Enira Gallery makes it easy to set up these options through dropdown menus or by simply specifying the number.
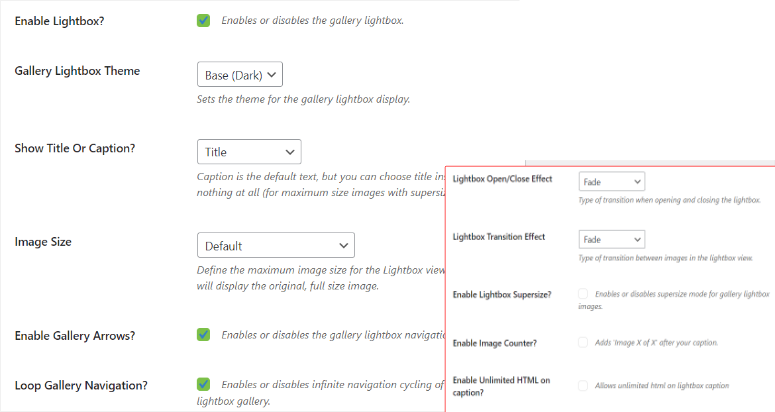
Let us now proceed to the “Lightbox” tab.
A Lightbox gallery effect ensures your visitors view the images on a full screen, making it more user-friendly.
So, to set it up, go to the “Lightbox” tab and mark the “Enable Lightbox” checkbox. Then, select a theme for your Lightbox.
Next, decide if you want a title or caption for your lightbox and set up the image size as well.
Below these options, find checkboxes to enable Gallery Arrows and Loop Gallery Navigation. Both these options are great at improving user experience by making navigation easier.
Apart from these options, you will also decide on the following.
- LightboxOpen/Close Effect
- Transitional Effect
- Supersize Images
- Image Counter
- Enable Unlimited HTML on Caption
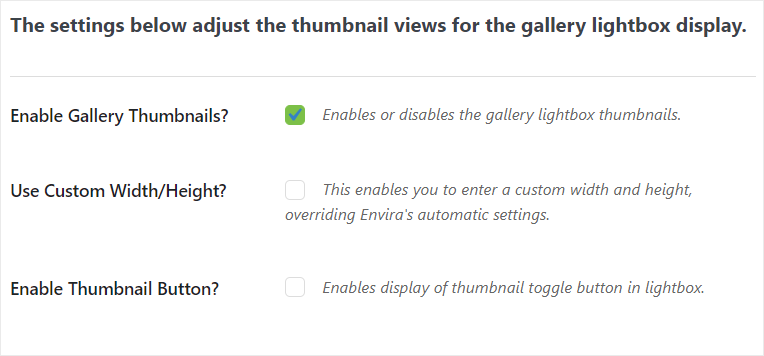
Below these options, you can also set thumbnails for your lightbox with a simple checkbox. Since a Lightbox image covers the entire screen, adding thumbnails can improve navigation.
You can also set the width and height of the thumbnails so that they are just right for your site. To add to this, you can give your users the flexibility to turn the thumbnails on or off with a button.
Now, let’s set up the mobile gallery.
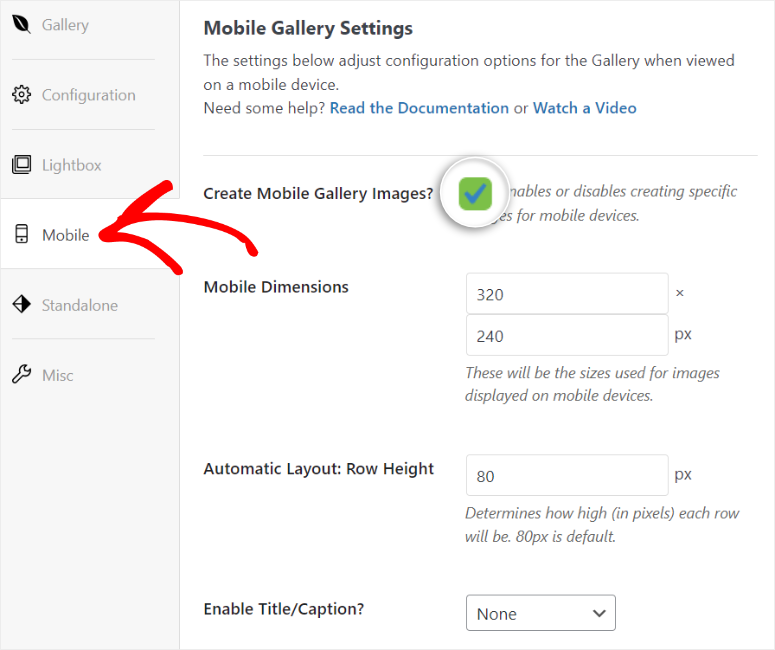
To do this, go to the “Mobile” tab to ensure your users have a better gallery experience on small devices.
First, enable “Create Mobile Gallery Images” with a checkbox and specify the dimensions. Then, determine how high the rows will be in pixels.
Below this option, you will use a dropdown menu to decide whether you want your mobile gallery to have a caption and/or a title.
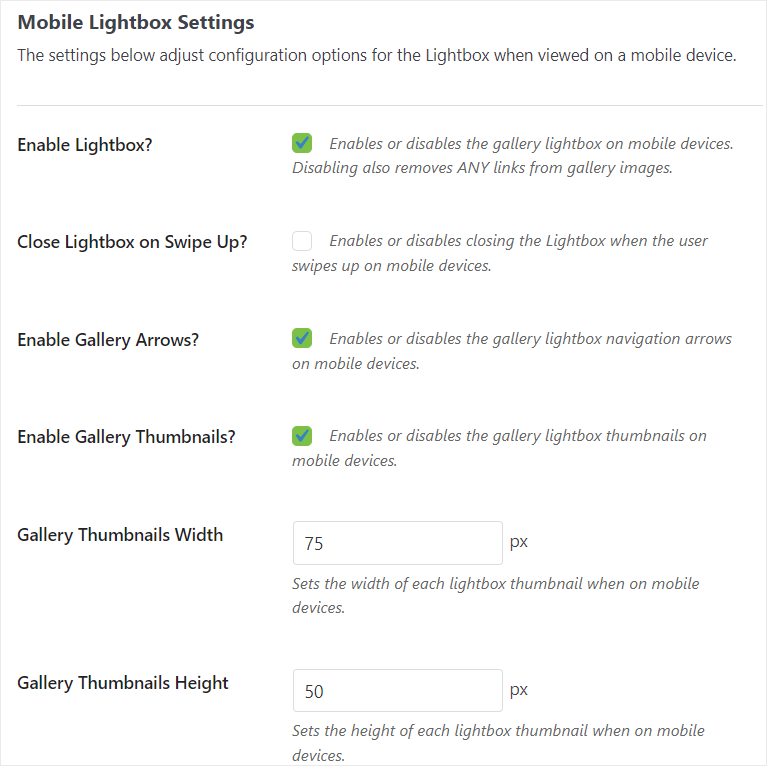
When you scroll further down the page, you will see mobile gallery settings for Lightbox.
Again, enable the Lightbox effect with a checkbox. To add to that, since most mobile devices are touchscreen, you can set up the Lightbox so that it closes when someone swipes up, improving user experience.
Then, using checkboxes again, you can set gallery arrows and thumbnails for better mobile navigation.
If you enable thumbnails, Envira Gallery will show you more options so that you can set up their width and height.
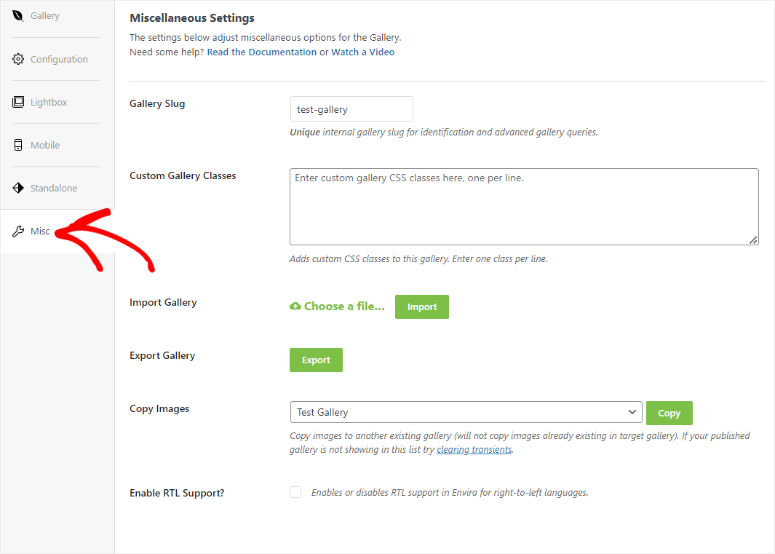
Finally, let us set miscellaneous options for the gallery.
To do this, go to the “Misc” tab where you will first have the option to set the gallery slug to help with gallery identification and advanced gallery queries.
Then, for more experienced users you can enter custom gallery CSS classes in line format for better gallery customization.
You will also see options to import and export galleries in JSON format. This file format ensures that the galleries are lightweight and the structure can be used by other online picture gallery plugins.
To add to this, the import/export function can be very beneficial when you want to switch from another photo gallery plugin. For example, you can use this feature to move from NextGen Gallery to Envira Gallery.
Next, you will see an option to copy images to another gallery. This is a great feature to use to reduce the time and errors that come with manually adding images to a gallery.
Finally, you can enable RTL support on this page as well. This allows Envira Gallery to support languages that are written right to left, like Arabic and Mandarin.
Step 5: Add Your Gallery to WordPress
With your gallery ready and personalized, the next step is to add it to your site.
There are 3 ways you can add an Envira gallery to your site.
- Through an Envira WordPress gallery shortcode
- Through the Envira Gallery Block (recommended)
- Insert the gallery in the template files.
Let’s start by discussing how you can use a WordPress gallery shortcode.
Using a shortcode allows you to add multiple galleries on the same page, or the same gallery on multiple pages easily. To add to this, using a shortcode allows you to easily add the gallery to a sidebar without using widgets.
With this method, you will first select the “Envira Gallery” submenu so you can view a list of all your galleries.
Then, when you find the gallery you want to add, copy its code from the Shortcode column.
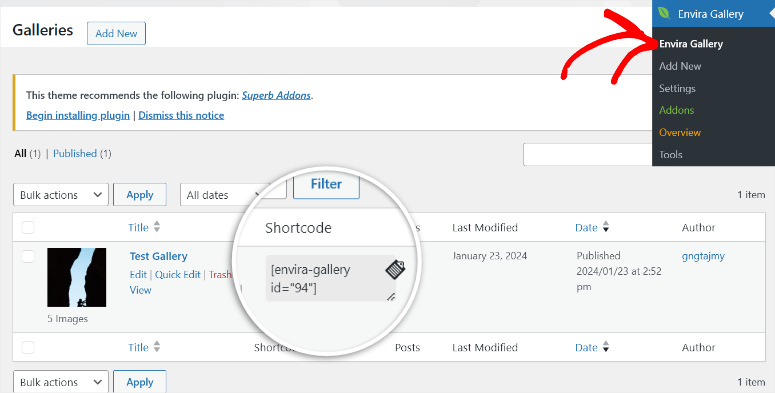
Once you have the gallery shortcode, open a new page/post, or an existing one.
Next, in the Gutenberg block editor you open, use the Plus (+) icon to open the search bar. In the search bar, type in “shortcode” to find the block.
After this, drag and drop the shortcode block to anywhere you want it to appear on the page you want to add the gallery.
Once you drag and drop the block where you want it, paste the Envira Gallery shortcode in the bar provided.
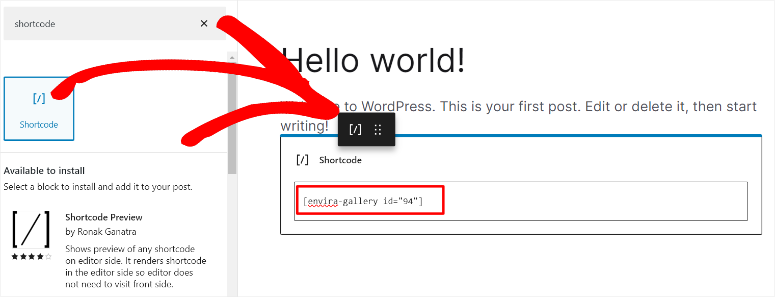
Finally, hit on “Update” to add the WordPress image gallery. When you visit the live page, you should see the gallery displayed exactly where you dropped the shortcode in your block editor.
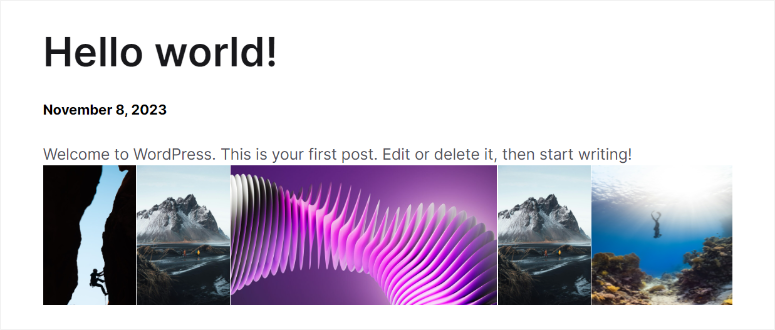
Congratulations! You have just added a gallery with a WordPress shortcode.
Now, let’s see how you can add a gallery with the Envira Gallery block.
Using the Envira Gallery block is super easy and highly recommended for beginners. This is because you do not need any coding knowledge, even shortcode experience.
To get started, open a new page or use an existing one like before.
Then, hit the Plus (+) icon to open the block search bar. You will then type in “Envira Gallery,” and its block should appear. Next, drag and drop it to where you want to add the gallery on the page.
When the Envira gallery block opens, you should be able to select the gallery you want by using the search bar or selecting it on the dropdown menu.
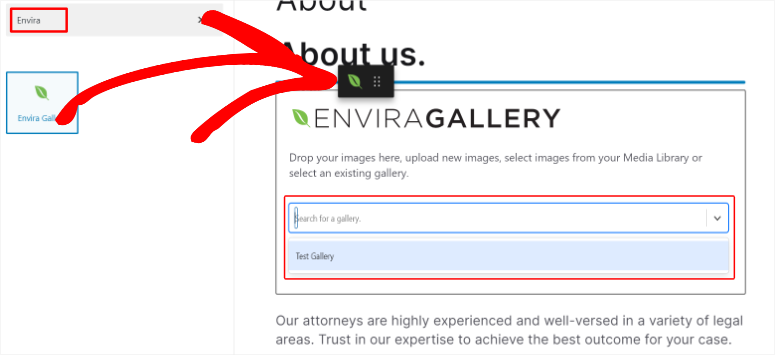
The best thing about using the Envira block to add a gallery is that it allows you to edit gallery directly in the block editor. This is something you cannot do when you use a shortcode to add a gallery.
You will also have the option to upload images from your laptop or from your media library, making it convenient for building galleries with the front-end editor.
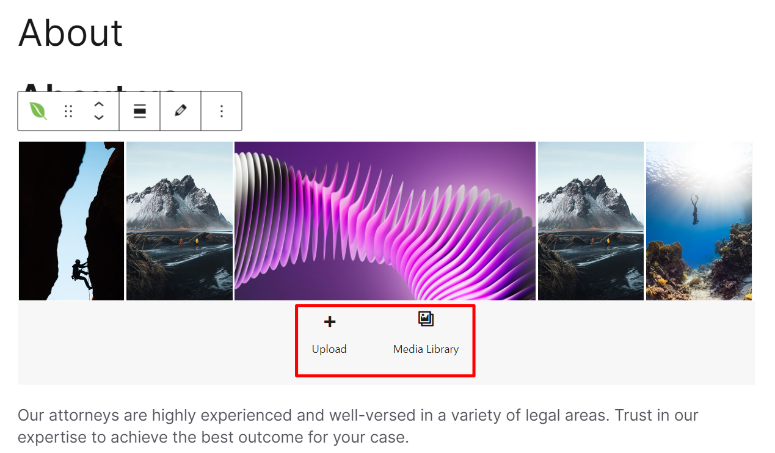
Well done! You can now use the Envira Gallery block to add your gallery.
Remember, if you want to add a gallery through the template files, you will need coding experience.
Adding a gallery directly to the template files ensures you integrate your galleries better with your site design, improving the visual appeal.
Even though this process looks complex, you can use WPCode to help you quickly complete this coding process.

WPCode is the best snippet plugin because it can help you complete plenty of coding processes with just a few clicks and with no programming experience.
To get WPCode, go to its official site to get the premium version or through your WordPress Repository to access WPCode lite. Make sure you have it installed and activated before proceeding to the next step.
You can also check out our complete WPCode review here.
Now with WPCode installed, go to the Envira Gallery submenu. Then, select the one you want to use from your list of galleries.
You can also go to Envira Gallery » Add New, if you want to add a new gallery to the template files.
Then, on the far right of your gallery editor, you will see a section called, “Envira Code.”
Scroll to the bottom of this list of shortcodes and copy the one under that talks about template files and tags.
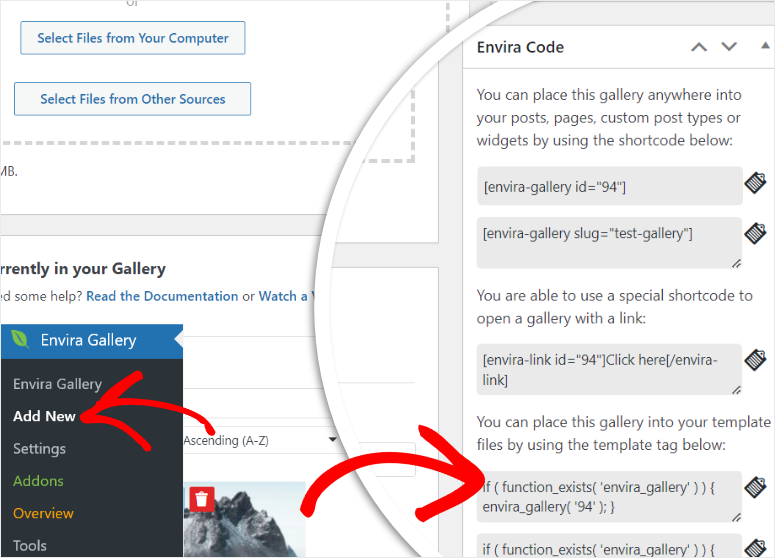
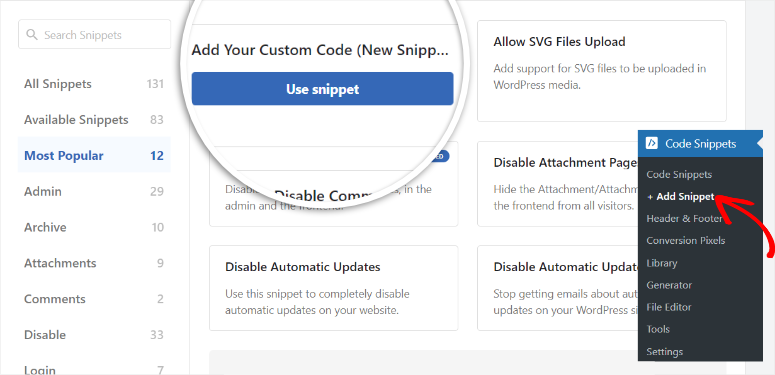
With your code at hand, go to Code Snippets in WPCode’s menu options, and select “+Add Snippet.”
The amazing thing is that WPCode has plenty of snippet options you can select from, even with the free version. So much so that, it has a search bar you can use to find the snippet you want. At the same time, you can select a snippet category to find what you are looking for easily.
But for this situation, we will first hover over the “Add Your Custom Code” and then select Use Snippet when the button lights up.
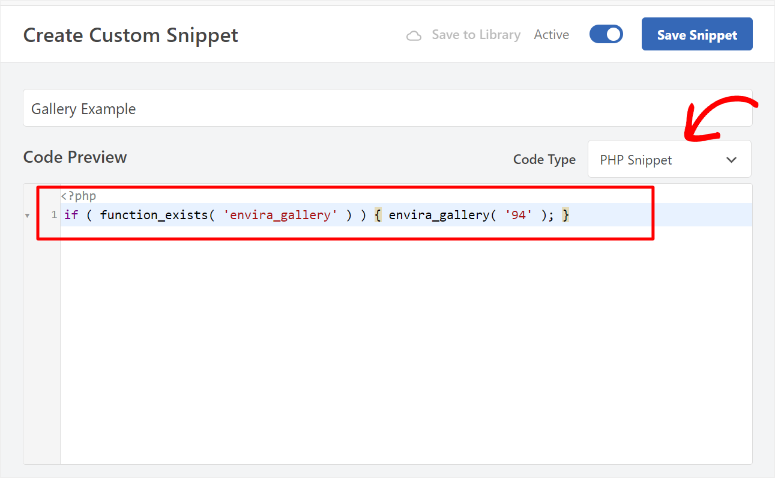
On the next page, switch on the active/inactive toggle button and name the code snippet so that you can easily find it.
Next, switch the code type to “PHP Snippet.” Once you do this, add the code you previously copied from the Envira Gallery editor and insert it into the Code Preview section.
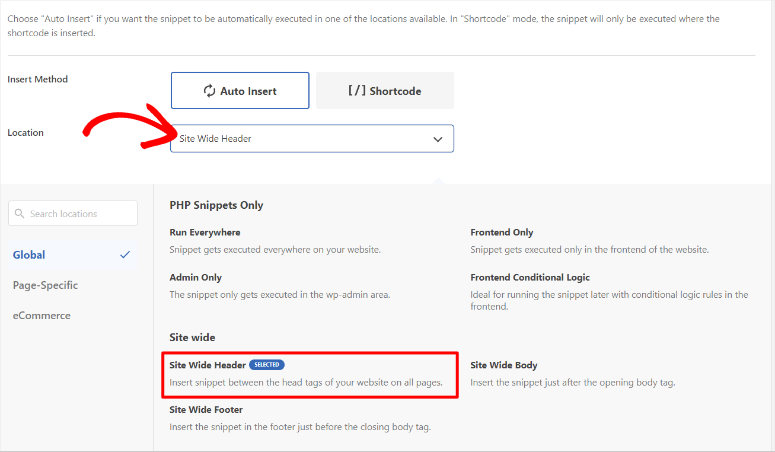
Then, scroll below the code preview screen to find “Insert Method” where you will select Auto Insert.
Next, in the Location dropdown menu, decide where you want to add the gallery from the many options available. The location you decide is up to you, so select one that will best suit your audience.
For this WordPress tutorial, we went with “Site Wide Header.”
Finally, hit Save and visit your site to see the gallery on the live page.

And just like that, you have successfully added a gallery through your template files.
Well done! You can now add a gallery with a plugin. Next up, let’s see how you can add a gallery without a plugin.
Adding a gallery to WordPress without a plugin
If you do not want to use a plugin, WordPress offers a default block you can use to create gallery. But the reality is that it does not have the customization options you have just seen with Envira Gallery above.
So, to get started, create a new page/post or use an existing one. Then, hit the Plus (+) icon at the top left to open the search bar where you will type in “gallery.”
Once you find the default gallery block, all you have to do is drag and drop it to the position on the page you want it to appear.
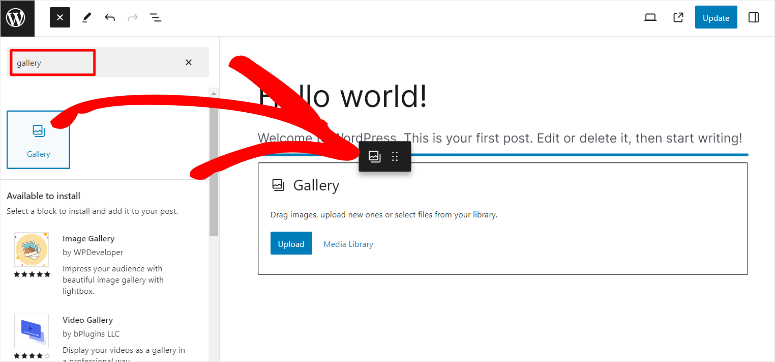
Next, when the gallery block opens, you will be given 2 options to add photos to your gallery. You can either upload the images from your PC or select them from your Media Library.
For this tutorial, we added images to the gallery by uploading them from our computer.
To do this, go to the folder on your PC where the images are located. Then, drag and drop the selected pictures to the gallery block’s upload area.
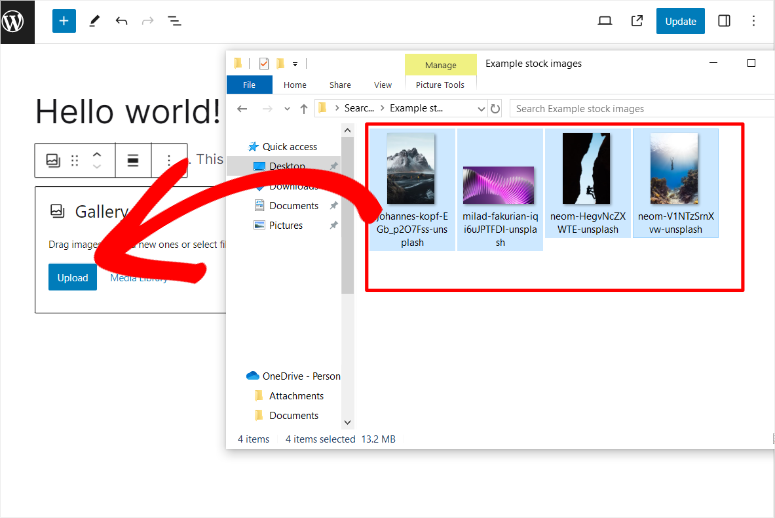
Once you upload the images, you will have options to crop or move the images so that you can organize and customize the gallery. You can also add a caption to individual images or to the entire gallery.
Once you are happy with your gallery, hit “Update” at the far right corner of your block editor page to make the gallery live.
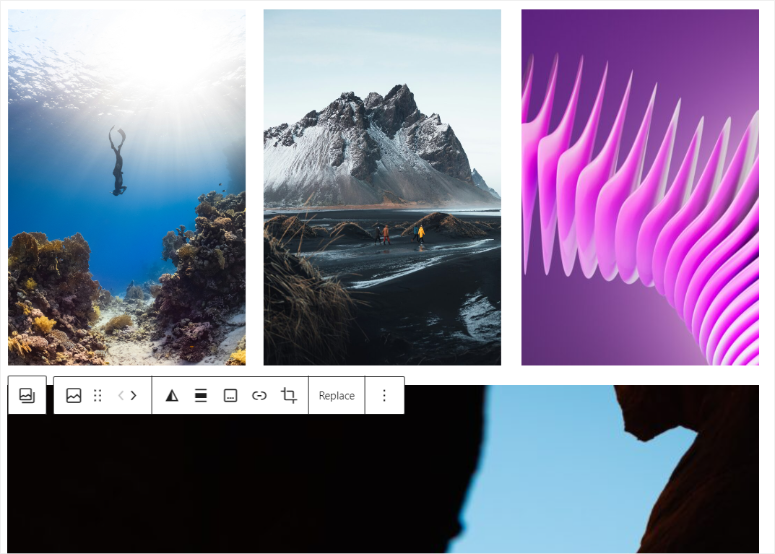
But the disadvantage of this approach is that, if the images are of different sizes as the ones shown above, your gallery may not be very aesthetically pleasing, even if you crop them.
To add to this, since the images maintain their original size, they may take up a lot of space, leading to your site bloating up.
Great! You just learned how to add a gallery using the default gallery WordPress block.
Next, let’s take a look at some bonus tips and tools.
Bonus Tips and Tools to Improve Your Gallery
Now that you have learned how to create a gallery with a plugin and manually, let us discuss how you can improve them.
Tip 1: Optimize Gallery Images
One of the best ways to carry out image optimization is by adding an ALT text to each photo. This will help your images rank, and search engines find them, creating another way for your visitors to find your content.
To add an ALT text, first, go to Media » Library and select a photo to open the “Attachment Details” popup window. Then, on the right, you will see text boxes to add a caption, title, description, and, most importantly, an ATL text.
Make sure the ALT text is a keyword related to the image so that you do not mislead your audience or Google.
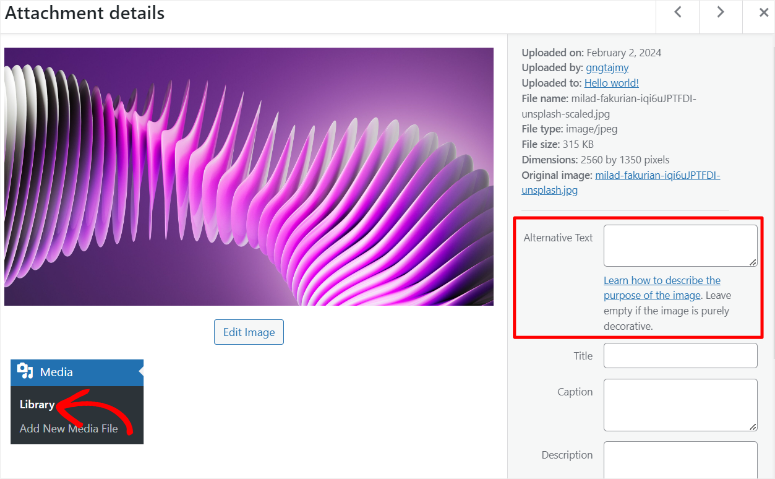
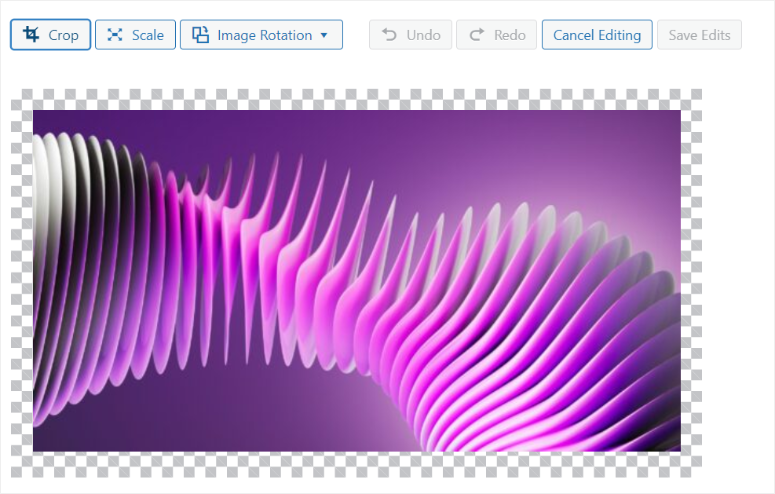
Now, still on the Attachment Page, you can also edit the photo so that you can change the size, dimension, or position. To do this, select “Edit Image.”
On this page, you will see options for Crop, Scale, and carry out Image Rotation. All these options can help you improve your gallery images to help give your visitors a better experience.
But, as you have seen, this process can be a little long, especially if you have many images in the gallery.
A better way to add ATL texts automatically to your images is by using All in One SEO.

AIOSEO is the best SEO plugin. It can quickly help you add ALT texts, image titles, captions, and more without the long process we have described above. It also automatically generates XML sitemaps for your images, making it easier for search engines to discover and index them.
To add to this, AIOSEO comes with settings for OpenGraph for Facebook and Twitter Cards, ensuring that your images are displayed correctly when shared on social media platforms.
Check out our complete AIOSEO review here.
Tip 2: Organizing your Galleries
Organizing your galleries is a great way to ensure that your visitors quickly navigate through your gallery images. To add to this, they can be indexed more effectively by search engines, improving your SEO.
So with this in mind, one of the best ways to organize content on WordPress is by using tags. But sadly, WordPress does not have a default way to add tags to images.
To help with this, you can use Envira Gallery and install its Tags Addon.
The Tags Addon is a great way to create a connection between related images or galleries. This will allow your users to quickly filter through your images so they can view what they want. Image tags can also help your users create a unique viewing experience specific to what they are looking for.
But, if you want to improve the aesthetic appeal and navigation of your galleries, you should consider creating albums.
For this, the Envira Gallery Albums addon is the perfect solution.
It allows you to organize and display your collection of galleries on the same page. This can help your visitors go through a collection of related galleries easily without going through several pages.
Now, even though tags and albums are great at organizing and improving the navigation of your galleries, if you want to make them more dynamic, consider creating sliders.
For this reason, you can use Soliloquy, the best WordPress slider plugin.

Soliloquy is the best slider plugin because it can help you turn any static galleries into dynamic content by adding motion to the images. As a result, you can use your galleries to story-tell or highlight specific images better in a carousel. You can also use WooCommerce sliders with Soliloquy to help improve your user experience and checkout process on your eCommerce store.
If you want to learn more about this plugin, check out our Soliloquy review here.
That’s it! You now have a better understanding of how to add a gallery with and without a plugin.
Plus, you also have additional knowledge of other tools you can use to improve your gallery. If you have more questions, check out the FAQs below.
FAQs: How to Create an Image Gallery in WordPress
Can I create a gallery grid in WordPress?
Yes, Envira Gallery allows you to create a stunning gallery grid without coding or custom CSS experience. All you have to do is, select the “Grid Layout” in the gallery editor, then specify the number of columns you want, and that’s it. You can then further customize your gallery on the same page to make it more appealing to your audience.
Can I add multiple galleries on the same page?
Absolutely! With Envira Gallery, you can add multiple galleries on the same page. You can do this by either using the Envira WordPress gallery shortcode or using the Envira Gallery block. Both these options will allow you to drag and drop the galleries to different positions on the same page.
Can I create a dynamic gallery with Envira Gallery?
Most definitely! Envira Gallery allows you to create beautiful and dynamic galleries. You can do this by pulling images from your social media platforms or by using the featured images of your blog posts.
Is Envira Gallery free?
Yes, it does. You can use Envira Gallery Lite for free. But, if you want to access more advanced features, you should consider purchasing the premium version of the plugin.
We hope you enjoyed reading about how to add a gallery to WordPress. If you want another way of adding images to your WordPress, read our Smash Balloon review here; hands down it is the best feeds plugin.
To add to that, here are other articles you may be interested in reading.
- 10 Best WordPress Gallery Plugins Reviewed & Compared
- Envira Gallery vs. FooGallery – Which One is Better? (Comparison)
- How to Protect Your WordPress Site From Duplicate Content
The first article lists 10 of the best WordPress gallery plugins, all tested and reviewed. The next post compares Envira Gallery and FooGallery if you are looking for an alternative. While the last article teaches you how to protect your content, such as images, from being copied and duplicated.

Comments Leave a Reply