
I’ve tested almost every social media platform to grow businesses through ads over the years. Facebook, Instagram, TikTok – you name it, I’ve run campaigns on it.
But Pinterest? Pinterest is different.
Unlike platforms where ads compete with friends’ posts and viral content, Pinterest users come specifically to discover and plan purchases.
They’re actively searching for products to buy, planning weddings, remodeling kitchens, and shopping for their next purchase.
That’s why I love Pinterest ads.
The platform works incredibly well for visual products. If you sell home decor, fashion, food products, or anything people can see and imagine owning, Pinterest delivers quality traffic that actually converts.
But where it really shines is the Pinterest PPC ads. It keeps working long after your campaign ends because users save and reshare your pins organically.
The problem is tracking. Without proper analytics, you’re guessing which pins drive sales and which ones waste your budget.
From experience, I can tell you that setting up Pinterest pixel tracking through Google Analytics 4 requires managing both the Pinterest Tag and Conversions API.
It’s technical, time-consuming, and easy to mess up.
So in this article, I will show you how to track Pinterest ads in a simple way using MonsterInsights. No coding required. No complicated dual-tracking setup.
But if you want to use the manual way, I’ve got you covered as well. I will also show you how to track Pinterest ads through Google Analytics 4.
Here’s Exactly What We’ll Cover:
- All data viewable from your WordPress dashboard
- How to set up Pinterest ads tracking without touching code
- The simple way to view Pinterest campaign performance in WordPress
- Which pins drive sales versus just saves and clicks
- How to track both Tag and Conversions API automatically
How to Track Pinterest PPC Ads in WordPress

Now, to fully show you how to track your Pinterest ads, I will walk you through both the manual way, using Google Analytics 4, and through a plugin, MonsterInsights.
So you can use the table of contents below to see the steps in one go or skip to any section you want to read.
With that, let us begin.
Manual Way to Track Pinterest Ads with GA4
Pinterest tracking through Google Analytics 4 is more complex than connecting GA4 to TikTok manually because Pinterest requires two separate tracking methods.
You need the Pinterest Tag for browser-based tracking. Plus, you need the Pinterest Conversions API for server-side tracking.
Both work together to capture conversions that browser tracking alone would miss. Let me walk you through what’s involved.
The Standard Manual Setup Method
Step 1: Get Pinterest Tag Code
First, you will need a Pinterest Business Account. This process is very easy, and all you have to do is go to your personal account profile and hit “Convert to Business.”
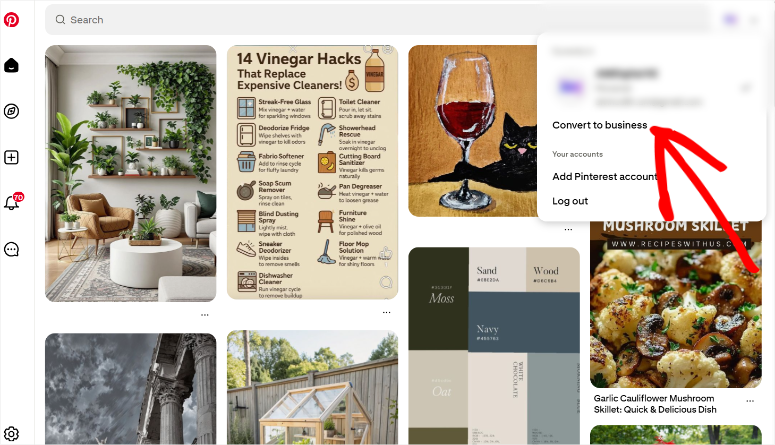
After this, log in to your Pinterest Business account at ads.pinterest.com and fill out the basic information like currency, ad account name, and country.
Next, navigate to Ads » Conversions » Pinterest Tag » Tag Manager using the top menu.
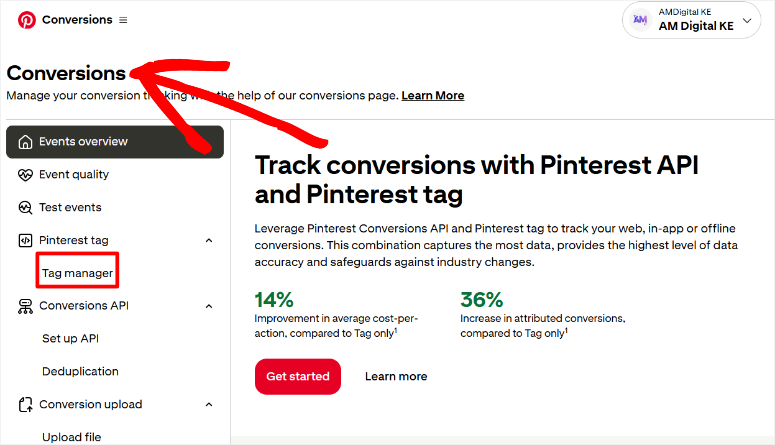
Now click the Install the Pinterest tag button to begin the setup wizard.
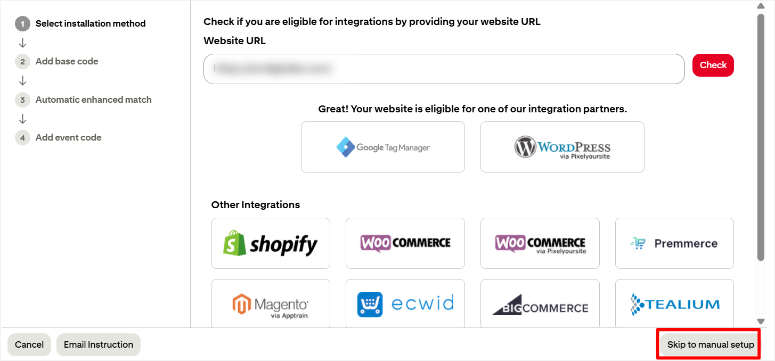
On the first screen, Pinterest asks you to check if you’re eligible for integrations. Enter your website URL in the field provided and click Check.

Pinterest verifies your site and gives you automatic options to help you connect your data source, depending on the type of site you have. But for this tutorial, we will “Skip to Manual Setup.”
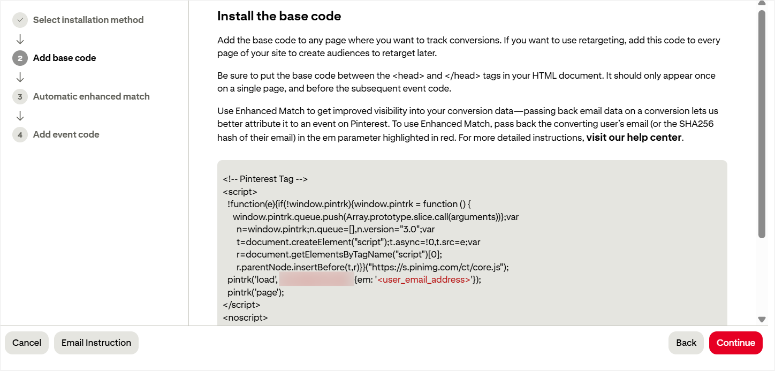
Then, on the next page, Pinterest will display your base code. This is the tracking code you need to add to every page of your website.
Copy this entire code block and make sure you get everything from the opening <script> tag to the closing </script> tag. Keep this code handy. You’ll need it in just a minute.
On the next screen, Pinterest displays event code options. This is where you’d normally add specific tracking codes for actions like purchases, add to cart, and page visits.
For the manual installation method, you would need to copy each event code and add it to the specific pages or actions on your site where you want tracking to occur.
For example, the Checkout event code needs to be placed on your order confirmation page. The Add to cart event code goes wherever customers can add items to their cart.
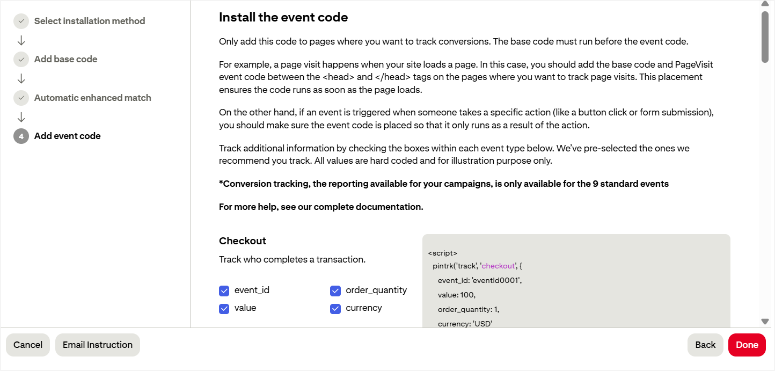
Once you complete the wizard by clicking Done, your Pinterest Tag is created. But remember – you’ve only created the tag. You still need to install it on your website.
Step 2: Install the Pinterest Tag Code
This is where things get technical.
You need a Google Tag Manager account to proceed. If you don’t have one, you’ll need to create it first at tagmanager.google.com.
Once inside GTM (Google Tag Manager), create a Custom HTML tag. This tag will contain the Pinterest base code you copied earlier.
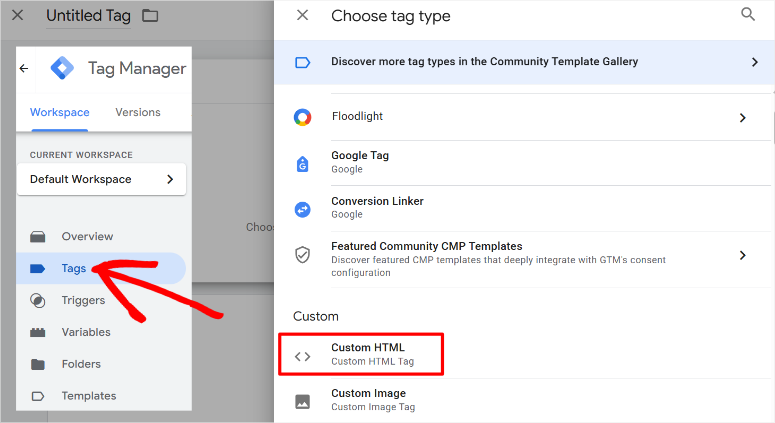
Next, configure triggers to fire this tag on all pages of your website. Remember, getting the trigger settings wrong means your tracking won’t work.
After that, manually add each individual event code to the appropriate pages as mentioned earlier.
Just a reminder, the Checkout event goes on the thank you page. The Add to cart event needs JavaScript to fire when the button is clicked. Each requires careful placement and testing.
Most importantly, the tag sequencing matters here. So, your base code must fire before event-specific tags. If you get the order wrong, nothing tracks properly.
A Simpler Semi-Manual Option:
If you want to use the manual method but skip Google Tag Manager’s complexity, WPCode offers a middle-ground solution as the best Google Tag Manager plugin.
WPCode is a code snippets plugin that lets you insert the Pinterest Tag into your site without editing theme files or learning GTM.
You still need to manage the event code setup and Events API configuration manually, but WPCode handles the base code injection part safely.
The good news is that even the free version of WPCode can help you connect Pinterest to your WordPress site and add manual tracking events.
Let me show you!
Once you install WPCode Lite, go to Code Snippets » Header & Footer.
Here, paste the Pinterest base code you copied earlier into the header section and click save. This will add the Pinterest Tag globally so you do not have to add it to every page.
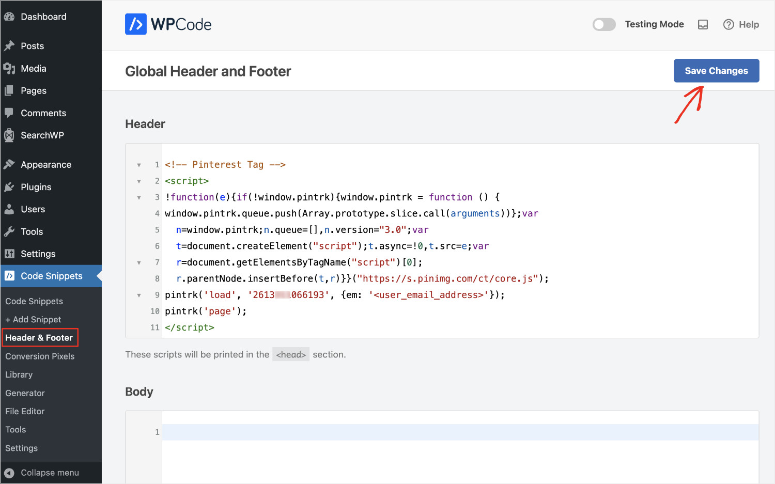
But, this only installs the Pinterest base Tag.
You still need to manually add event codes to specific pages and test each event separately. WPCode doesn’t handle these parts automatically.
But you can add the codes manually by again going to WPCode » Add Snippet. Here, select + Add Custom Code.
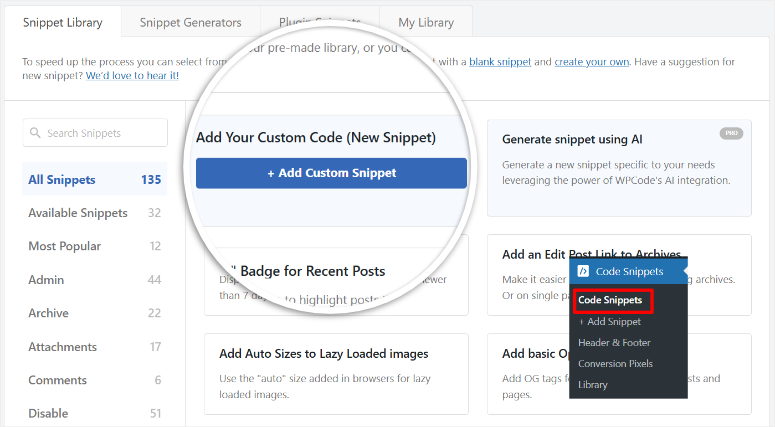
Then make sure you select HTML Snippet from the dropdown. After this, paste the individual event tracking codes from Pinterest in the Code Preview area.
Remember that you will need to do this separately for each code, as displayed on Pinterest.
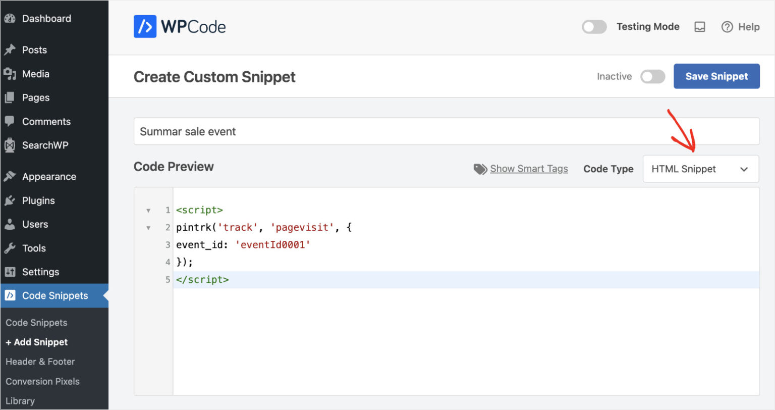
Once done, scroll to the bottom of the page, where, by default, WPCode will place the code site-wide. But this is not what we want; we want it placed on specific pages.
So instead, you will use Conditional Logic to direct WPCode to only place the code on the specific page you want.
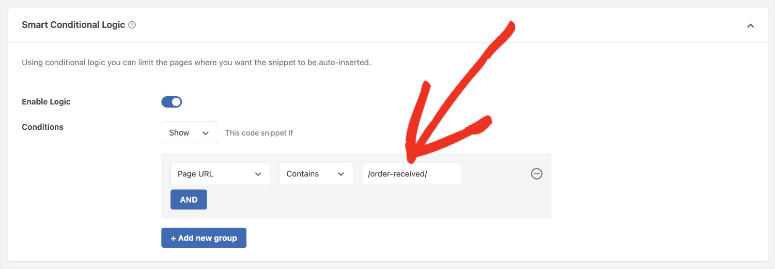
That’s it! You have now added the Pinterest base code site-wide and event codes on individual pages. To see how to use this snippet plugin, check out my WPCode review here.
Easy Automated Way (Plugin) – Track Pinterest Ads with MonsterInsights
Here’s what you’re actually signing up for with the manual approach:
Even with WPCode simplifying the code injection, manual Pinterest tracking quickly becomes overwhelming. You’re managing multiple moving parts that all need to work together perfectly.
Manual setup takes experienced developers 5-8 hours minimum. If you’re learning as you go, expect 2-3 days of frustration.
Most businesses end up hiring developers at $100-200 per hour, spending $500-1,600 just for initial setup.
Then you pay again whenever Pinterest updates its tracking specifications.
There’s a simpler way that handles all of this automatically.
How to Use MonsterInsights to Track Pinterest PPC Ads

MonsterInsights handles both Pinterest Tag and Conversions API setup automatically.
It installs the Pinterest Tag automatically across your entire site and injects the code in the right location without you touching theme files.
On top of that, the Conversions API integration, which is very hard to set up manually, happens at the same time. This helps you configure server-side tracking without requiring any coding knowledge from you.
This dual tracking approach captures 20-30% more conversions than the Tag-only manual process we discussed.
This is because browser-based tracking (Google Manager Tag process) misses conversions from users with ad blockers or strict privacy settings.
The Conversions API catches those missed conversions through server-side transmission.
Apart from that, event tracking with the manual tag approach often leads to deduplication. This can result in wrong analytics.
MonsterInsights handles the event_id logic that prevents double-counting between Tag and API effectively.
So, let me show you how to use MonsterInsights to properly track Pinterest ads.
Step 1: Get Your Pinterest Credentials (Tag ID, API, and Ad Account ID)
First, you will still need to access your Pinterest Tag. To do this, log in to Pinterest Ads Manager through your Pinterest Business Account.
After this, navigate to Ads » Conversions » Pinterest Tag » Tag Manager.

Then hit the “Install the Pinterest Tag” button on the next screen.
On the next page, you should see your Tag ID displayed next to your tag name as a 13-digit number. Copy this complete number.

Now navigate to Set Up API under “Conversions API.”
Look for your Ad Account ID under the “Generate conversion access token” heading. It appears in brackets next to your business account name.
Click the Generate new token button to create a 13-digit number.
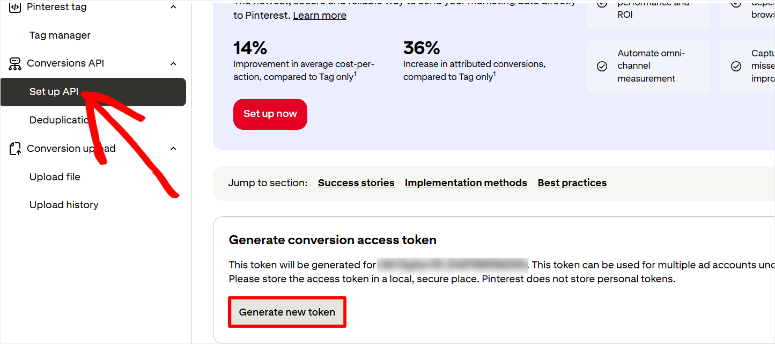
This is your Conversion Access Token. Copy it right now and paste it somewhere safe, like a text file.
Pinterest shows this token only once. So, if you close this screen without copying it, you’ll need to generate a new token and start over.
Finally, you need your Ad Account number from Pinterest. This is very easy to locate. Just select the profile dropdown on the far upper right corner of your Pinterest ad account.
This should work on any page you are on. Then, in the dropdown, you should see your Ad Account ID under the Ad Account tab. Copy this too.
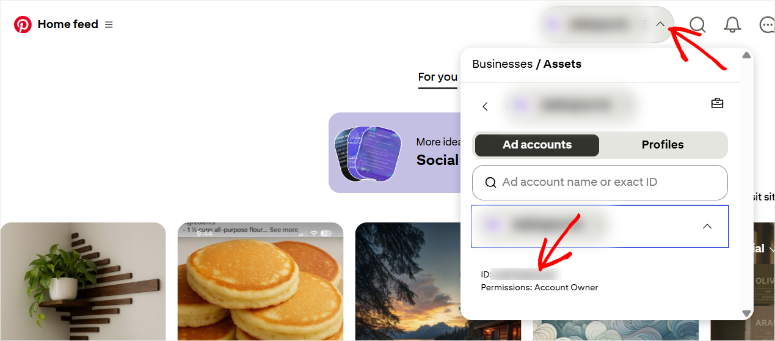
Keep all three credentials ready. You’ll paste them into MonsterInsights in the next step.
Step 2: Add Pinterest to MonsterInsights
Now you need a MonsterInsights Pro Account and plugin set up in WordPress before proceeding. Even though MonsterInsights offers a free version, you cannot track Pinterest ads on this.
To learn how to purchase and set up this analytics plugin, check out my MonsterInsights review.
Now, once MonsterInsights is ready, you will need to get the PPC Tracking Addon. To do this, head to Insights » Addons in your WordPress dashboard.
Then use the search function or scroll until you find the PPC Tracking Addon. Here, install and activate the plugin with the toggle button.
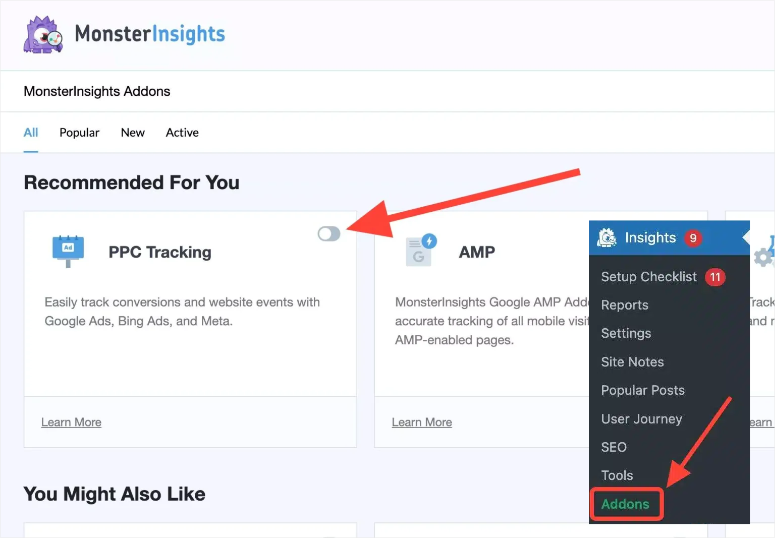
After this, the next step is connecting Pinterest ads to your WordPress dashboard. So go to Insights » Settings » Conversions in your WordPress dashboard.
Scroll down the page until you find the “PPC Ads Pixel Tracking” section.
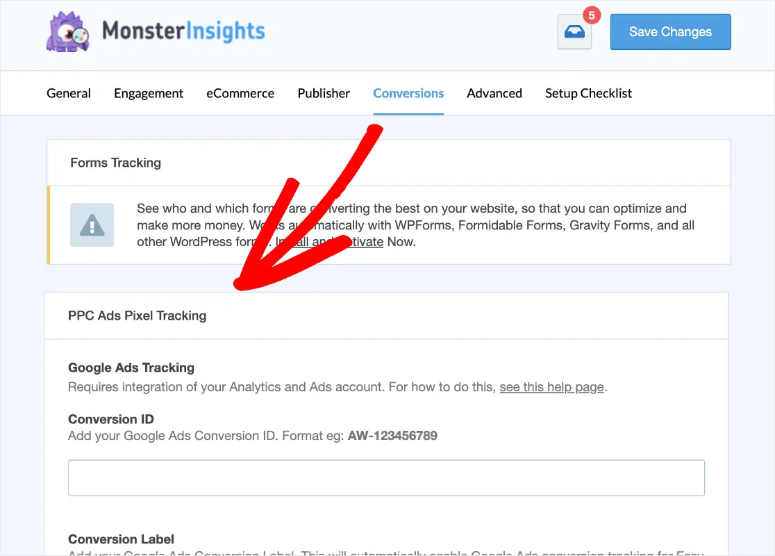
Keep scrolling to locate the “Pinterest Ads Tracking” fields. You’ll see three empty text boxes. Here, fill out the following:
- Pinterest Tag ID: Paste your 13-digit Tag ID here.
- API Token: Paste your Conversion Access Token. Make sure you paste the entire string with no extra spaces.
- Ad Account ID: Paste your 13-digit code.
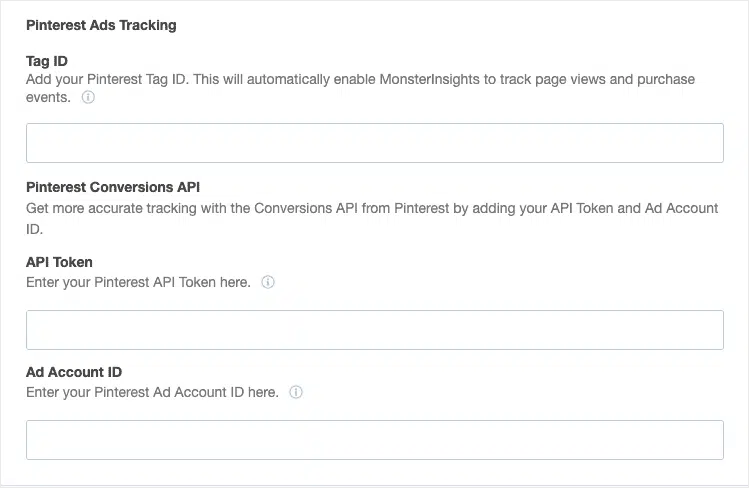
All three fields must be filled out for full functionality. The Tag ID alone provides limited tracking. The complete set enables dual integration through both Pinterest Tag and Conversions API.
Click Save Changes at the top or bottom of the page.
That’s it. You can now track Pinterest PPC ads with MonsterInsights without touching code.
Understanding Your Pinterest Ads Reports
Your Pinterest campaign data flows into the same MonsterInsights reports as your other social media ad campaigns. Check out how to track TikTok ads to see what I mean.
Everything lives in one dashboard. No more jumping between Pinterest Ads Manager and Google Analytics to piece together performance data.
So, how do you access your Pinterest ad reports in MonsterInsights?
Navigate to Insights » Reports » Traffic » Campaigns in your WordPress dashboard.
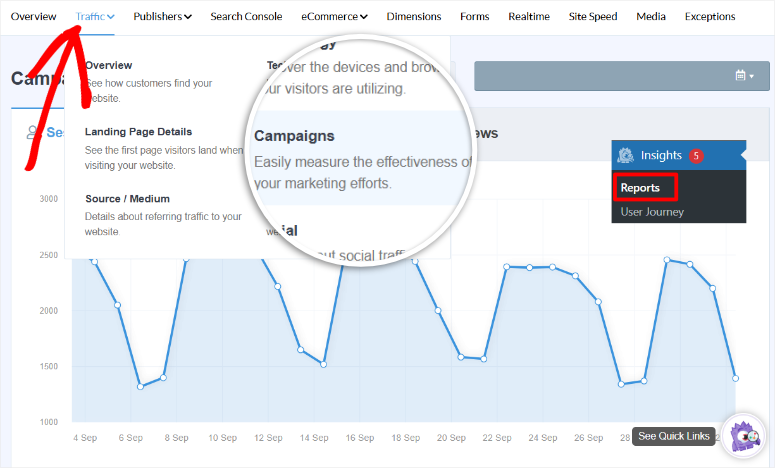
Pinterest campaigns appear in this report alongside your other marketing efforts. But just like TikTok, Pinterest campaigns also show up as “referral” traffic by default.
To ensure it displays under “Pinterest,” you need to add UTM parameters to your ad links.

How do you add UTM parameters to your Pinterest ad links in MonsterInsights?
All you have to do is go to Insights » Tools » URL Builder in WordPress. Here, fill out the form with these values:
- Website URL: The landing page for your Pinterest ad.
- Campaign Source: Type “pinterest” in lowercase. Consistency matters here.
- Campaign Medium: Enter “paid” or “ppc”. Pick one and use it for all Pinterest campaigns.
- Campaign Name: Use a descriptive name like “spring_collection” or “holiday_sale_2025”.
- Campaign Content (optional): Test different pin designs by using values like “carousel_v1” or “video_pin”. This helps you identify which creative formats work best.
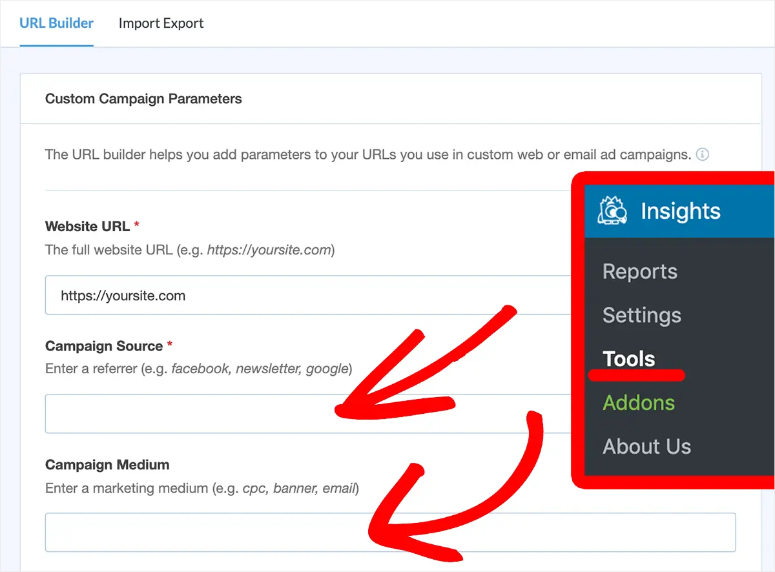
Click generate to create your tracking URL. After this, copy the entire URL and paste it into your Pinterest ad campaign settings.
From this point, your Pinterest ad traffic will show up under “Pinterest” in your MonsterInsights WordPress dashboard.
Key Pinterest Metrics
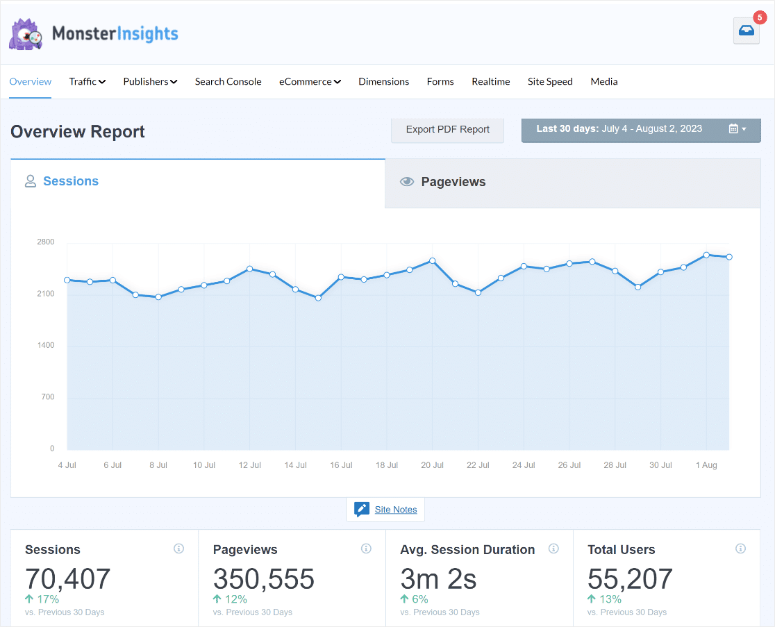
The MonsterInsights Campaigns report shows the same metrics for Pinterest as it does for TikTok:
- Sessions show how many people clicked your pins and visited your site.
- Conversions display how many visitors completed purchases or other goals.
- Revenue shows total dollar amount generated. This only appears if eCommerce tracking is enabled.
- Conversion Rate tells you what percentage of Pinterest visitors actually buy. Higher rates mean your targeting matches your product offering.
Event Tracking Overview
MonsterInsights automatically tracks multiple Pinterest conversion events:
- PageVisit events fire on every page load. These verify your pixel is working.
- AddToCart events trigger when customers add products to their shopping cart.
- Checkout events track when users begin the checkout process.
- Purchase events capture completed transactions with full revenue data.
All of these happen automatically once you’ve entered your Pinterest credentials. No manual event configuration needed.
Pinterest’s Unique Advantage
Pinterest has over 450 million monthly active users worldwide. But the number that really matters is this – 85% of Pinterest users say they use the platform to plan new purchases.
Think about that for a second.
When someone searches “kitchen organization ideas” on Pinterest, they’re planning to buy storage containers. Or, when they search for “summer wedding guest dress,” they’re ready to purchase.
On top of that, Pinterest content has a much longer lifespan than other platforms. A pin you create today can drive traffic for months or even years.
Compare that to Instagram posts and feeds that disappear within hours.
Apart from that, users visit Pinterest with buying intent. They’re not there to watch funny videos or argue in comments. Instead, they’re there to discover products and make purchase decisions.
Which Businesses Benefit Most from Pinterest Ads
Pinterest works incredibly well for visual products and services. Top eCommerce stores see some of the best results, especially in these categories:
- Home decor and furniture
- Fashion and accessories
- Food and recipes
- Crafts and DIY projects
- Wedding planning
- Beauty and skincare
But here’s what many businesses miss – Pinterest also works for B2C service businesses with visual appeal. Interior designers, photographers, and consultants all succeed on Pinterest.
If your business can be explained or showcased through images, Pinterest deserves your attention.
How Pinterest Ads Work
Pinterest offers several ad formats to fit different goals:
- Standard Pins are single-image ads that appear in users’ feeds and search results. These look like regular pins but include a “Promoted” label. Users can save them to their own boards, giving you free organic reach beyond the paid promotion.
- Video Pins autoplay as users scroll through their feed. These grab attention and showcase products in action. Video ads typically cost more but deliver higher engagement rates.
- Carousel Pins let you display 2-5 images in a single ad. Users swipe through to see different products or different angles of the same product. These work great for showcasing product collections or step-by-step tutorials.
- Shopping Pins sync directly with your product catalog. They show current pricing and availability, plus take users straight to checkout. These convert especially well because they remove friction from the buying process.
Why Pinterest PPC Ads Work
Pinterest ads succeed for three main reasons:
- First, users are in a planning and shopping mindset. They expect to see products and aren’t annoyed by ads like they are on other platforms.
- Second, pins keep circulating long after your campaign ends. Users save promoted pins to their boards, where they continue driving organic traffic for free.
- Third, Pinterest has lower competition than Facebook and Instagram. Fewer advertisers mean lower costs per click and better ad placement.
For visual products, Pinterest often delivers better ROI than any other paid social platform. But just like TikTok, you need proper tracking to know what’s actually working.
Congratulations! You can now track your Pinterest PPC ads through Google Analytics 4, formerly Universal Analytics, a manual approach, and also MonsterInsights, the easier automated approach.
If anything is unclear, check out the commonly asked questions below.
FAQs: How to Track Pinterest Ads on WordPress
Do I need a Pinterest Business account to track ads?
Yes. You need a Pinterest Business account to access Ads Manager and create your Pinterest Tag. The account is free to create at ads.pinterest.com. Personal Pinterest accounts can’t run ads or generate tracking tags.
Can I track Pinterest ads with the free version of MonsterInsights?
No. The free version doesn’t include the PPC Tracking addon needed for Pinterest Tag and Conversions API integration. You need MonsterInsights Pro, which includes tracking for Pinterest, TikTok, Facebook, Google Ads, and other platforms.
How long does Pinterest tracking data take to appear in reports?
Allow 24-48 hours after setup for initial data to populate. Google Analytics processes data with built-in delays. Real-time reports show some activity faster, but complete campaign reports need the full waiting period.
Why does Pinterest require both Tag and Conversions API?
The Pinterest Tag tracks conversions through browser cookies, but ad blockers and privacy settings block 20-30% of this tracking. The Conversions API sends conversion data directly from your server, capturing the conversions that browser-based tracking misses. Using both together gives you complete conversion visibility.
Can I track Pinterest organic pins or only ads?
MonsterInsights tracks all traffic from Pinterest, including both paid ads and organic pins. But, without UTM parameters, Pinterest traffic appears as referral traffic rather than organized campaign data. Use UTM tags even on organic pins for detailed tracking.
Do I need Google Tag Manager if I use MonsterInsights?
No. MonsterInsights handles all code injection and Conversions API configuration automatically. You don’t need Google Tag Manager, WPCode, theme file editing, or any manual code insertion. Just paste your three Pinterest credentials, and MonsterInsights does the rest.
What’s the difference between Pinterest Tag and Pinterest Pixel?
Pinterest officially calls it the “Pinterest Tag” now, though some people still refer to it as a “pixel.” They’re the same thing – the tracking code that monitors visitor behavior on your website after they click your Pinterest ads.
Can I use the same Pinterest Tag for multiple websites?
No. Each website needs its own unique Pinterest Tag. If you run multiple sites, create a separate tag for each one in Pinterest Ads Manager. This keeps your conversion data separate and accurate per site.
Final Verdict: Should I Track Pinterest Ads on WordPress?
Absolutely yes, especially if you sell visual products.
Pinterest users actively search for things to buy, making them higher quality than casual social media scrollers. Without tracking, you’re guessing which pins convert versus which ones waste money.
MonsterInsights makes Pinterest tracking simple by handling both Tag and Conversions API automatically. You’ll see exactly which campaigns drive revenue, which pins perform best, and your true cost per conversion.
Curious about what else you should track?
- Start by tracking cart abandonment rates to see which products Pinterest visitors add to cart but never purchase, helping you identify checkout friction and recover lost sales.
- Track Facebook traffic in Google Analytics to compare Pinterest ad performance against other social platforms and identify which channels deliver the highest quality traffic.
- Beyond ad tracking, set up user tracking in WordPress to monitor individual visitor journeys from first Pinterest click through final conversion.
- Track links and button clicks in WordPress to see which CTAs and product links Pinterest visitors engage with most on your landing pages.
- Track file downloads in WordPress with Google Analytics to measure which catalogs, lookbooks, or product guides Pinterest users download after clicking your ads.
- For simpler analytics without WordPress dashboard access, check out our OnePageGA review to see if this lightweight alternative fits your basic tracking needs.
Tracking Pinterest ads is just the beginning of understanding your website performance.
These related guides help you monitor every aspect of visitor behavior, from cart abandonment to button clicks, giving you complete visibility into how users interact with your content after discovering your pins.

Comments Leave a Reply