Are you looking for the best way to track conversions in your WordPress dashboard?
As a business owner, there are many metrics you should check. But, conversion is one of the most important.
Conversion tracking identifies the best marketing channels that lead to a return on investment.
This, in turn, can help you identify products that excel, allowing you to capitalize on them. With this information, you can also pinpoint products that need more marketing attention or determine if any should be discarded completely.
In this article, we will discuss how to track various conversion types straight from your WordPress dashboard.
The conversion tracking topics we will look at include:
- What is conversion tracking?
- Set up MonsterInsights
- Set up eCommerce conversion tracking
- Set up form conversion tracking
- Set up affiliate link tracking
- Set up Google Ads tracking
- Set up Meta (Facebook) conversion ad tracking
- Set up UTM parameter
- Set up Twitter conversion tracking
- Set up OptinMonster for conversion optimization
Use the Table of contents above to skip to the exact method you want to use.
What is Conversion Tracking?
Think of conversion tracking as a way to keep score for your website.
In a nutshell, it is how you measure how successful you are at telling people what to do on your website.
This is important because it helps you understand what’s working on your website and what’s not.
By knowing which actions are converting and which are not, you can make data-driven decisions to improve your website’s performance. As a result, conversion tracking can help you grow your online store and have happier customers.
But at the end of the day, conversion for different businesses could mean different things. For example, it could be downloads, sales, event signups, video views, form submissions, and so much more.
However, the good news is that Google Analytics (now Google Analytics 4) can help you track all these metrics. This is because Google Analytics is the best and most comprehensive tracking tool.
But remember, the default Google Analytics site connection requires coding experience.
The downside to this is that any coding error you make could lead to your site crashing. Even after connecting the two platforms by coding, you will still have to move back and forth between Google Analytics and your WordPress dashboard to check your metrics.
This can be confusing and time-consuming.
The solution? Adding Google Analytics to your WordPress dashboard through MonsterInsights.

MonsterInsights is the most powerful plugin that you can use to see all your site metrics right in your WordPress dashboard. It converts complex Google Analytics data to simple, easy-to-follow information even a beginner can quickly pick up.
MonsterInsights also offers:
- Over 100 data points
- Real-time analytics
- easy to understand eCommerce Reports
- User behavior reports
- SEO ranking reports
- Affiliate and link Tracking
- Form tracking
- Page level analytics
- Video engagement metrics
- User journeys
The best part? You can customize your reports to your exact needs and use this plugin without coding experience or technical support.
If you need more information about this amazing tracking plugin, check out our MonsterInsights review here.
Set Up MonsterInsights
First, before we talk about how to track different conversion elements, let us see how to set up MonsterInsights.
To do this, you will need to first go to MonsterIsight’s official website. Here, you will sign up and then select a plan that best suits your needs.
For this tutorial, we will choose the MonsterInsights Pro plan because it has all the conversion tracking features we will discuss in this article. But, remember, there are more plans you can choose from, so choose one that matches your budget.
Once you have selected and paid for a plan, download the plugin’s ZIP file to your PC and copy the license key; you will need it later.
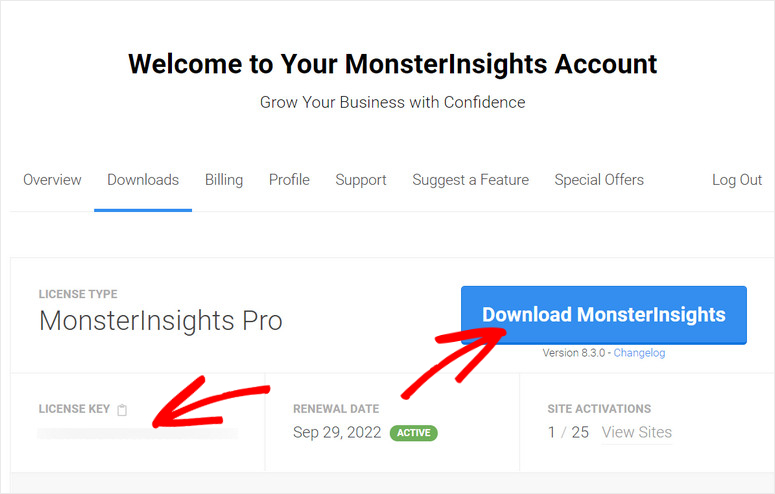
Next, head to your WordPress dashboard and upload and activate the plugin as you would any other plugin.
If you need help, check out this article on how to install a plugin.
Then, once you install and activate the plugin, you will notice a new menu option on your left called “Insights.”
So, go to Insights » Setting, and find the license key bar in the “General” tab. Here, paste the code you copied from your MonsterInsights dashboard and hit Verify.
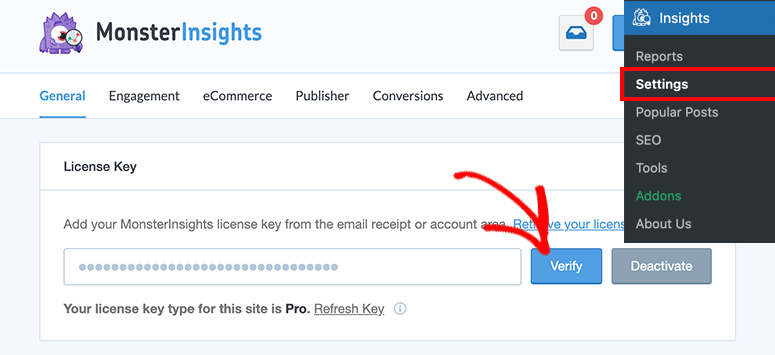
Once done, scroll down the same page to “Launch Setup Wizard.” Once you launch the setup wizard, follow the steps to fully set up the plugin.

The Setup Wizard will ask you to connect your Google Analytics account.
But, the amazing thing about connecting Google Analytics with MonsterInsights is you also automatically connect Google Tag Manager to your WordPress Website. This is a task that is often time-consuming and needs coding experience.
Now, to check if Google Tag Manager is actually connected to your site, all you have to do is go to Insights » Settings after the setup wizard process is complete. Then, in the “General” tab, right beneath the setup wizard button, check to see if the Google Authentication code has already been added.
In the screenshot below, you can see that we have successfully added Google Tag Manager during the MonsterInsights setup process.
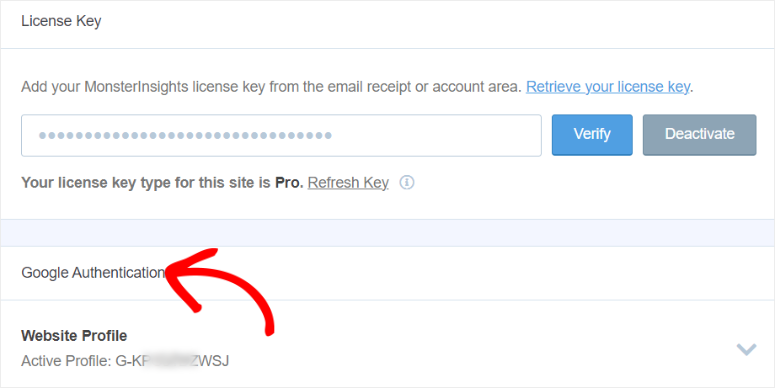
Congratulations! You have just set up MonsterInsights and added Google Tag Manager to your WordPress site in one go. You are now ready to set up conversion tracking.
If you need more help, here is an article on how to install and set up MonsterInsights.
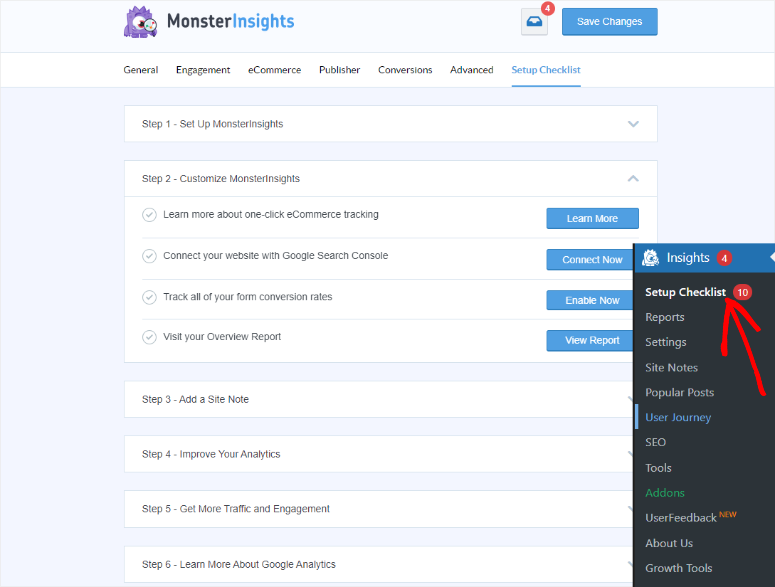
To add to that, MonsterInsights offers a checklist and additional resources for other installation processes in the Setup Checklist submenu in your WordPress dashboard.
Here, you can easily configure or learn how to set up multiple tracking elements.
Now that you have learned about how to set up MonsterInsights, we can discuss how to set up different tracking elements.
Set Up eCommerce Conversion Tracking
The eCommerce space is highly competitive. You need to take advantage of everything you can to stay competitive.
Proper conversion tracking could offer you the edge you are looking for.
Step 1. Enable Enhanced Measurement in Google Analytics
First, you will need a Google Analytics account so that you can connect your site (property) to it. If you do not have one and do not know how to connect a property, follow this guide on how to set up a Google Analytics account.
Once you create your Google Analytics account and connect it to your site, go to All Accounts and select the website you just connected.

Next, you will select Admin at the bottom left. This will open a new page where you will see the “Property Setting” and the “Account Settings” tabs.
Then, in the Property Settings tab, select “Data streams” to open the Web Stream Details page.
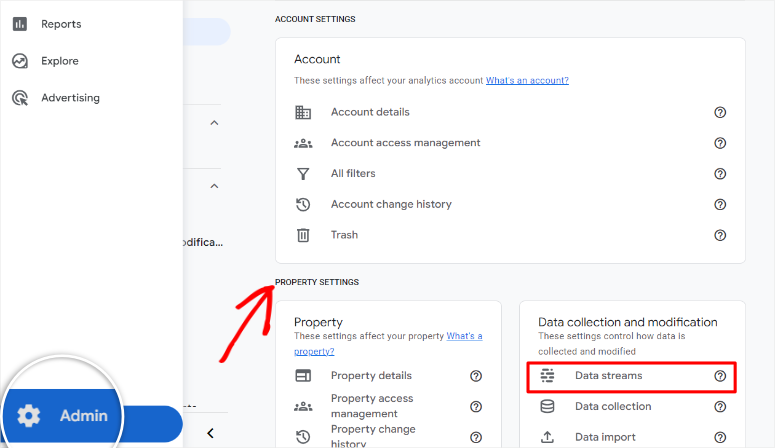
Next, on the Web Stream Details page, select the data stream you want to use from the list of properties. This should be the site you connected to Google Analytics.
On the next page, you will see the Stream Name, Stream URL, Stream ID, and Measurement ID. Just below these details, you will also see the Events tab, where we will enable advanced tracking.
Next, switch on the Enhanced Measurement toggle button. This is because, when it is off, you will only receive standard page view metrics.
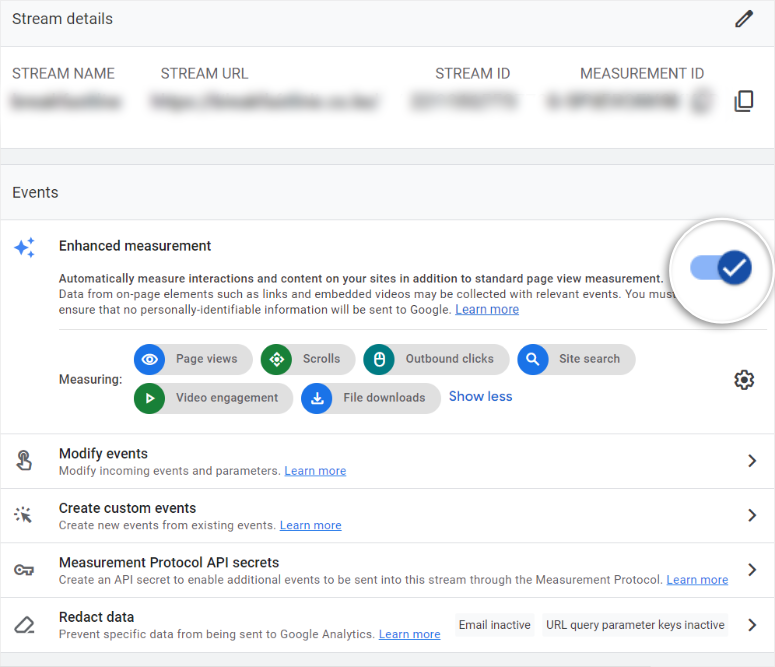
Remember, you have the option to leave all the tracking elements as they are once you switch on the Enhanced Measurement toggle button.
But, you can change the tracked events through a checkbox. To do this, you will select the “Setting Gear” icon that appears under the “Enhanced Measurement” toggle button.
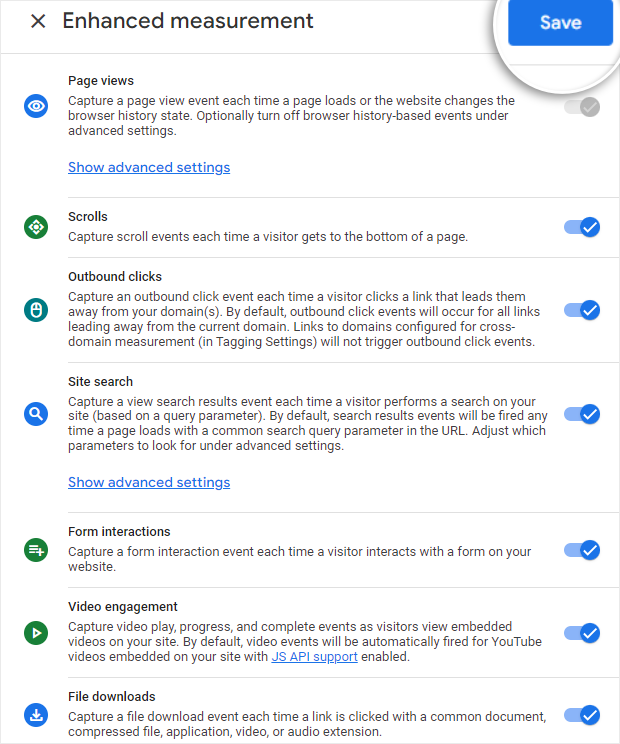
Once you select the enhanced measurements you want to track, all you have to do is hit “Save.”
Step 2. Install eCommerce Addon in MonsterInsights
Now, with Google Analytics, MonsterInsights, and Google Tag Manager all set and ready, head over to your WordPress dashboard and go to the Insights » Addons.
On this page, find the “eCommerce” addon. Then, install and activate it to get started.

Next, go to the Reports submenu and proceed to the “eCommerce” tab. Once you select it, you will see a drop-down menu consisting of Overview, Funnels, and Coupons options.
Here, you will select “Overview” to see the entire landscape of your site eCommerce tracking.
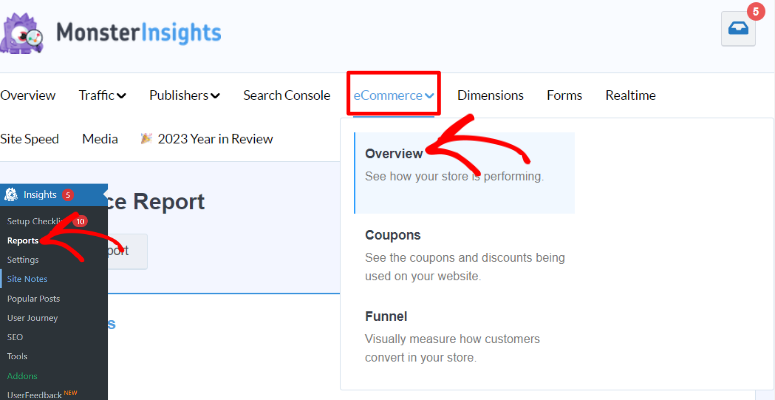
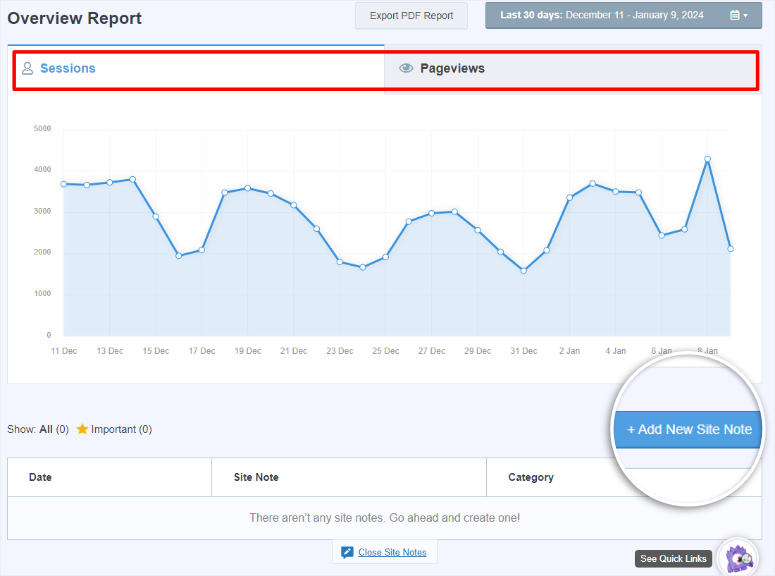
On this page, you will first view the eCommerce overview report for sessions and pageviews at the top. This can help you understand how many people visited your site and how many pages they viewed.
Below the graph, you can add Site Notes. This can help you easily keep records of the metrics of your eCommerce store for a specific period of time, without pen and paper or other external tools.
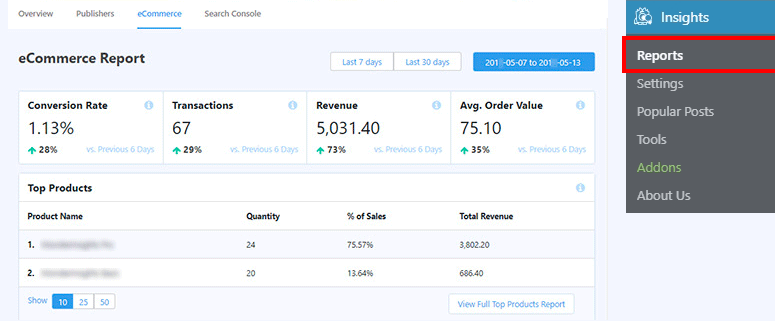
Further down the page, you will see the Conversion Rate, Transactions, Revenue, and Average Order Value.
These metrics are very important when it comes to eCommerce conversion tracking.
For Example, the “Conversion Rate” percentage will tell you, out of all the people who visited your site, how many people actually made a purchase.
On the other hand, the “Average Order Value” tells you the estimated amount spent on each purchase by each customer. By knowing what your customers spend on average, you can adjust your prices which can help you convert more visitors.
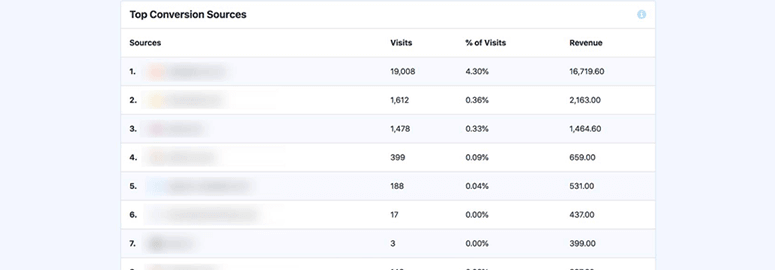
When you scroll further down you will see your Top Products and Top Conversion Sources.
Here, you will also see site-specific metrics, including Total Add to Carts, Total Removed from Carts, New Customers, and Abandoned Checkouts.
Now, as you have seen eCommerce plugin provides simplified data that you can easily understand.
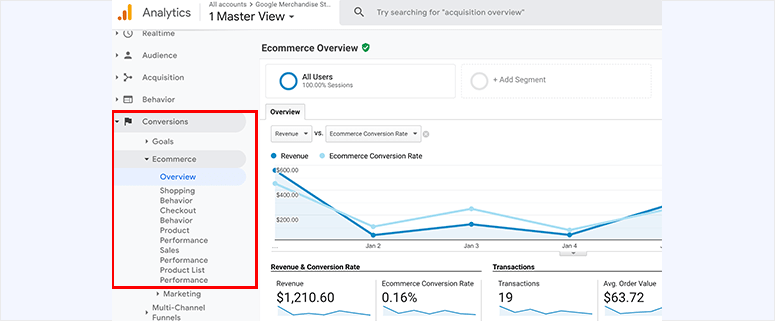
But, if you want to double-check, see more metric details, or view your data in a different style, you can select “View Full Top Products Report” at the very bottom of the eCommerce report page.
This will redirect you to your Google Analytics account under the eCommerce menu option in specific.
With that, you can now set up eCommerce tracking.
Set up Form Conversion tracking
As mentioned, conversion tracking is not just about sales. So, some business owners may measure a visitor who completed a form as a type of conversion.
Again, MonsterInsight is the best solution for form conversion tracking.
It is compatible with several form builders including WPForms, Contact Form 7, Formidable Forms, and many more.
For example, if you want to use WPForms to collect user information, You will first go to Plugins » Add New. Then, in your WordPress plugin repository, you will search for “WPForms” to get the lite version of the plugin.
Next, you will install and activate the plugin like you would any other plugin.
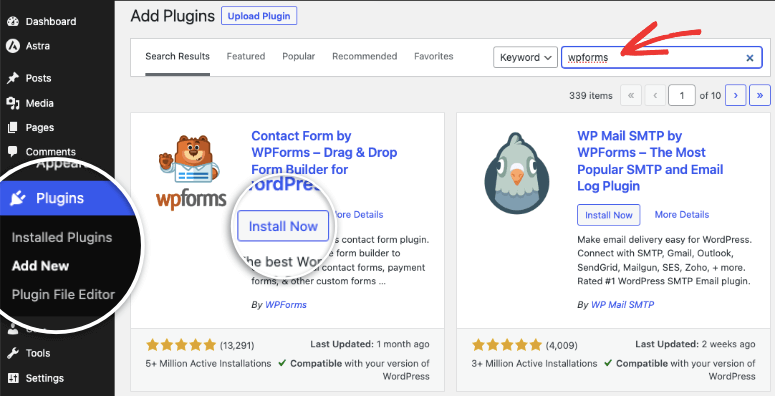
Remember, WPForms offers a premium version of the plugin with amazing features such as geolocation, smart workflows, digital signatures, and so much more. But for this tutorial, we will use the free version of the plugin as it can still help us complete form conversion tracking.
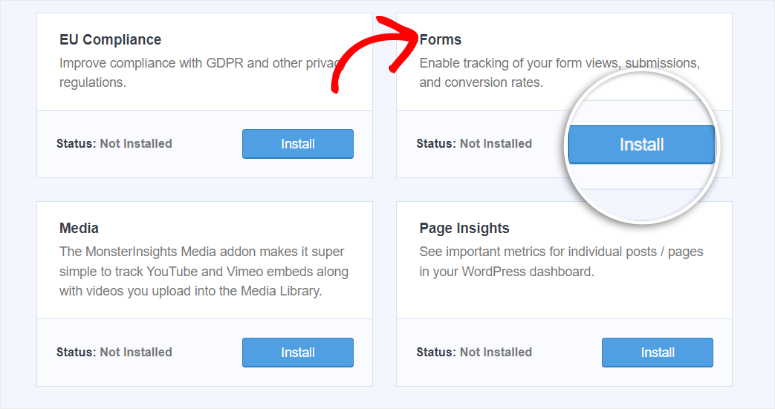
So, once you have installed WPForms, go to Insights » Addons under the MonsterInsights menu in your WordPress dashboard. Next, locate and install the Forms addon.
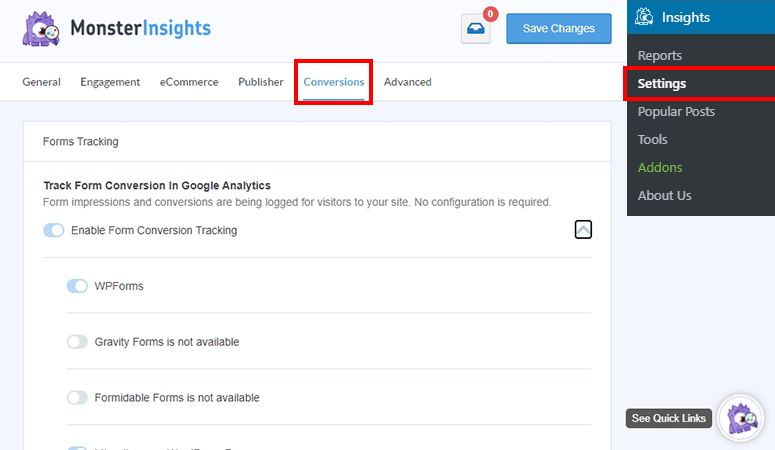
To confirm that the addon works correctly, go to Insights » Settings. Then, under the “Conversions” tab, you will see Forms Tracking, and below it, you will notice WPForms automatically enabled with a toggle button.
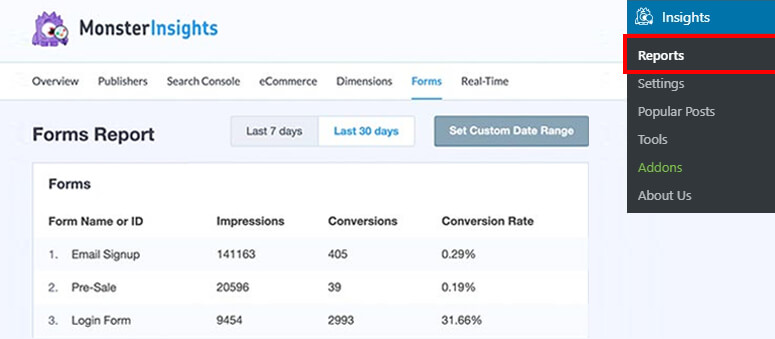
Then, to actually see the form metrics, you will go to the “Reports” submenu under the “Insights” MonsterInsights menu. Then, you will proceed to the Forms tab.
Here, you should see form-specific metrics like Email Signup, Pre-Sale, Login Form, and so on.
That’s it! You can now track conversions of your forms with the MonsterInsights Forms addon and Google Analytics.
Set Up Affiliate Link Tracking
Step 1: Set up Pretty Links
Affiliate link tracking is another popular conversion element you can track using MonsterInsights.
Affiliate link tracking is challenging because your advertising partner may take a long time to confirm your link clicks and earnings. So, finding a quick way to do it yourself is essential.
To begin, install a URL shortener plugin like Pretty Links to cloak your affiliate URLs with your brand name or something professional.
You can also install the free version of Pretty Links by going to the Plugin repository in your WordPress dashboard.
Once installed and activated the plugin, go to Pretty Links » Add New to enter your affiliate link.
On this page, you will first name your Pretty Link. Next, you will insert your affiliate link in the space provided next to “Target URL.”
The good thing about Pretty Links is that it allows you to customize your link and path however you want by editing the link slug. To do this, you will type in how you want your link to appear to your users in the Pretty Link text bar.
Once you add your affiliate link and the Pretty Links slug, select “Update” to add your new shortened link.
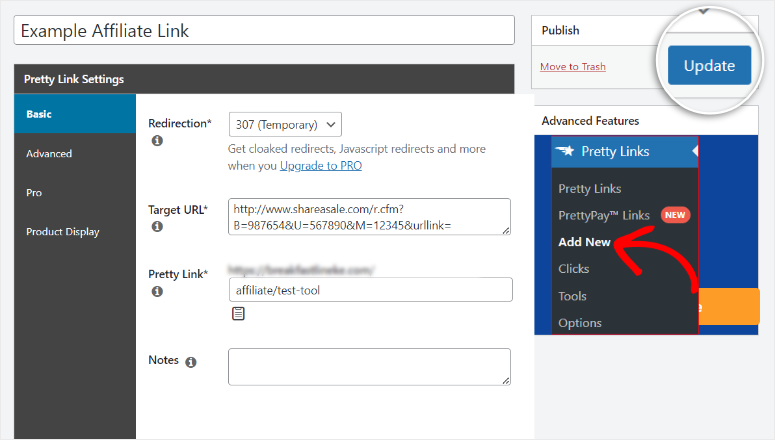
With this set, Pretty Links will change your long or ugly link to a URL that is customized, shorter, or branded.
It will turn a long URL like: http://www.shareasale.com/r.cfm?B=987654&U=567890&M=12345&urllink=
To something like: mysite.com/affiliate/test-tool.
Remember to set a uniform path for all your affiliate links.
In this case, we used /affiliate/ as the path. Once you add the path, add the product name. For this tutorial, we used the product name as /test-tool. Y
This simplified URL offers a better structure, leading to more clicks and better conversion.
Step 2: Set up Affiliate Links
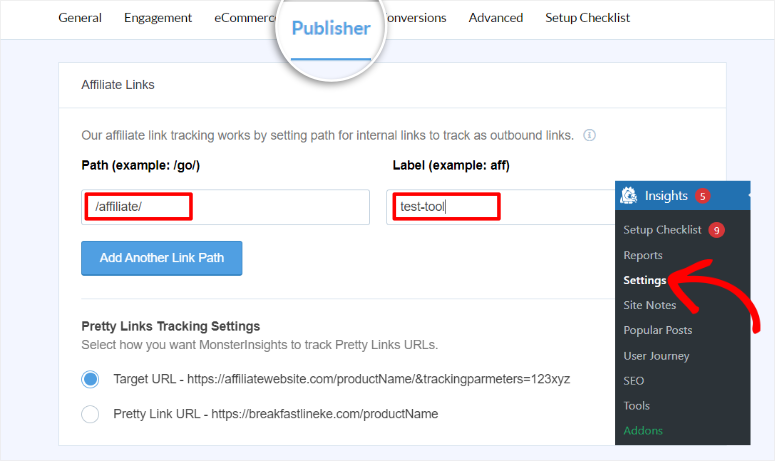
In MonsterInsights, navigate to Insights » Settings and go to the “Publisher” tab.
Then, on the Affiliate Links page, enter the URL path (for our tutorial, we used /affiliate/) and a “Label”(in this instance, we used “test-tool”) for tracking in Google Analytics.
It is important to also create a label that you will remember since this is what will appear in Google Analytics.
Next, Save Changes, and MonsterInsights will now automatically track the affiliate links for you.
To view your affiliate tracking report in WordPress, go to Insights » Reports » Publishers and select “Overview.”

Here, you can view tracking elements like Top Landing Pages, Top Outbound Links, Top Affiliate Links, and Top Download Links.
This data can further be segmented by age, gender, and interests. To add to this, you can also view the Average Scroll Depth on this page as well.
Set Up Google Ads Tracking
Tracking Google ads (formally Google AdWords) via Google Analytics is often complicated because it requires coding. But with MonsterInsights, you can quickly add it with just a few clicks.
Step 1: Connect Google Analytics to Google Ads
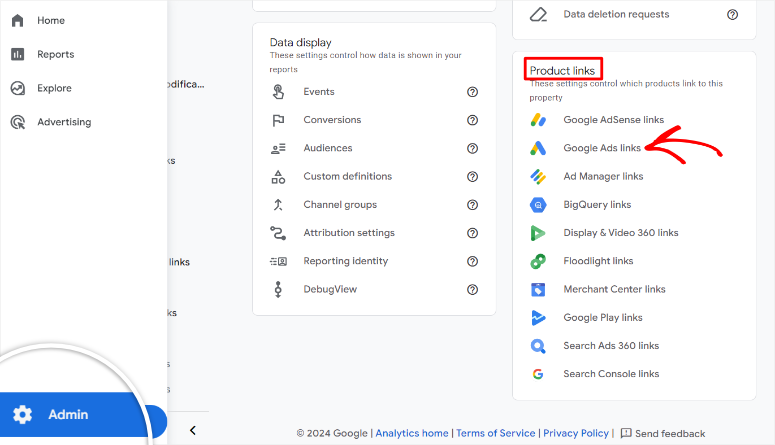
To set up Google Ads conversion tracking, you will first go to your Google Analytics account and select “Admin.” Then, in the Product Links tab select “Google Ads Links.”
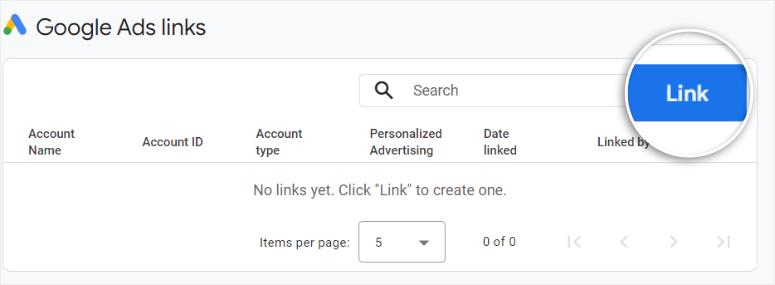
On the new page, you will hit “Link” to start the connection between Google Ads and Google Analytics.
Next, on the Link Setup page, Select “Choose Google Ads Accounts.”
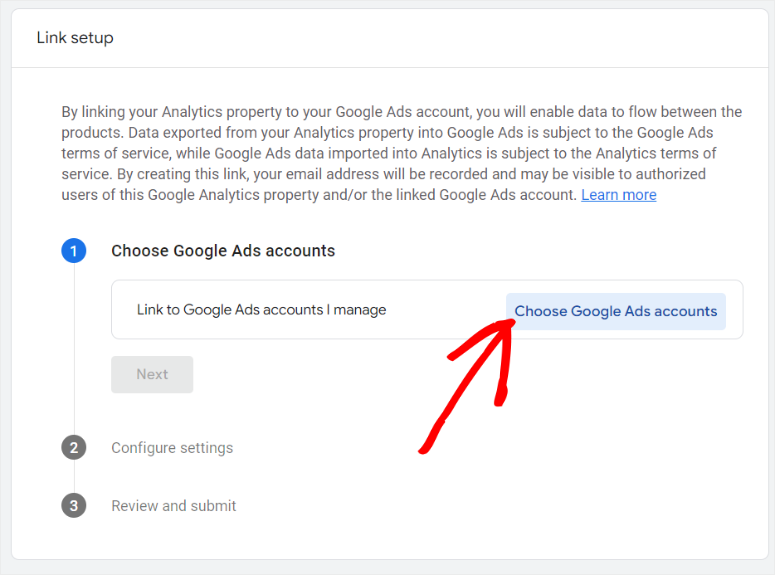
On the next page, you will see a list of Google Ads accounts connected to the email you signed for Google Analytics.
Remember, you can select up to 20 Google Ads accounts to connect to your Google Analytics account.
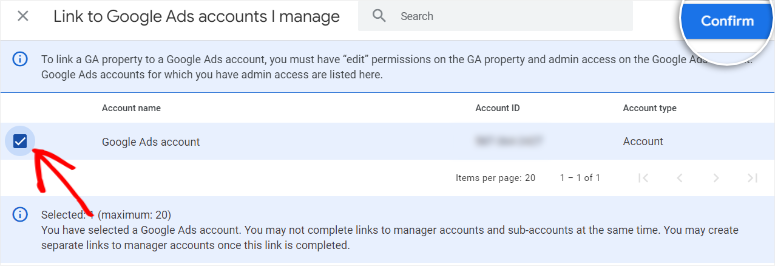
Once you hit Confirm, you will be redirected back to the “Link Setup” page. Then, you will select Next to go to “Configure Settings.”
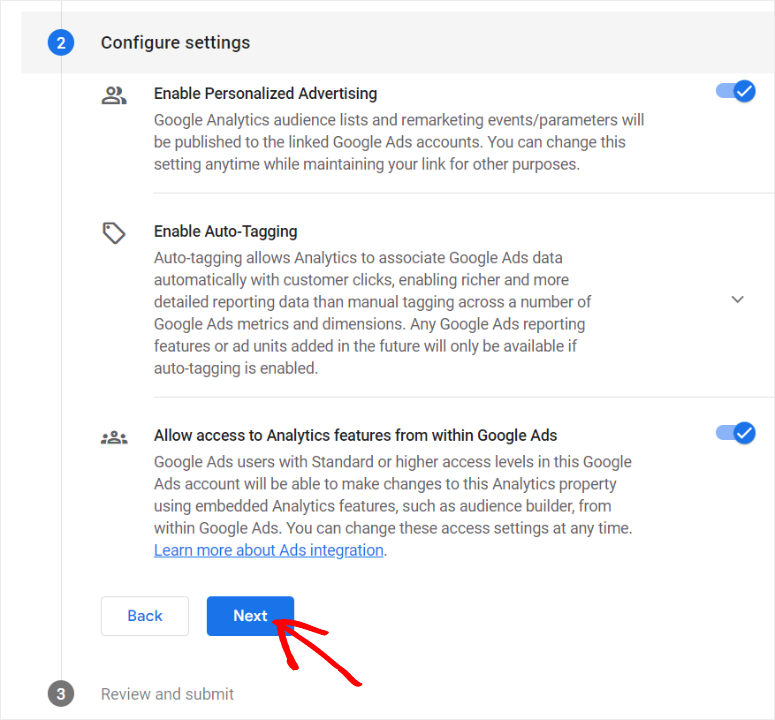
On the Configure Settings page, you will “Enable Personalized Advertising” with a toggle button. You will also “Enable Auto-Tagging” and “Allow Access to Analytics Features from within Google Ads” with toggle buttons. When you are done, hit Next to proceed.
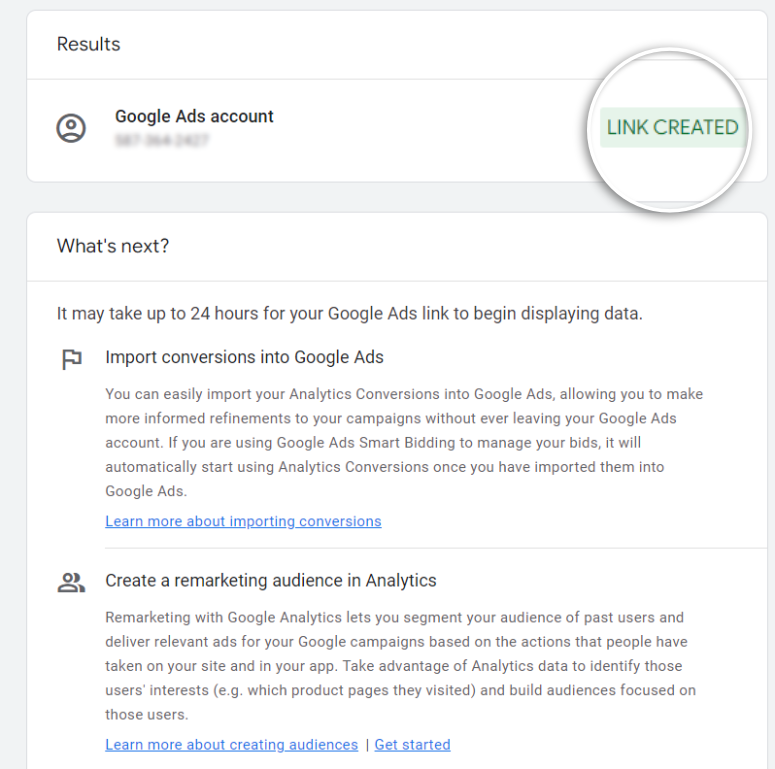
With that, You should have linked your Google Ads account to your Google Analytics account.
But, Google warns that it may take up to 24 hours for the Google Ads link to display data. So, it is important to be a little patient at this point.
Step 2: Set Up MonsterInsights Ad Addon
Now, to track Google Ads using MonsterInsights, first, go to your WordPress dashboard and navigate to Insights » Addons.
Here, you’ll find the ‘Ads’ addon. Then, you will Install it and activate the addon.

Now, head to your Google Ads account and create a conversion action.
Step 3: Create a Conversion Action
To add a conversion action, you will go into your ads.google.com account and select the “Create” button.
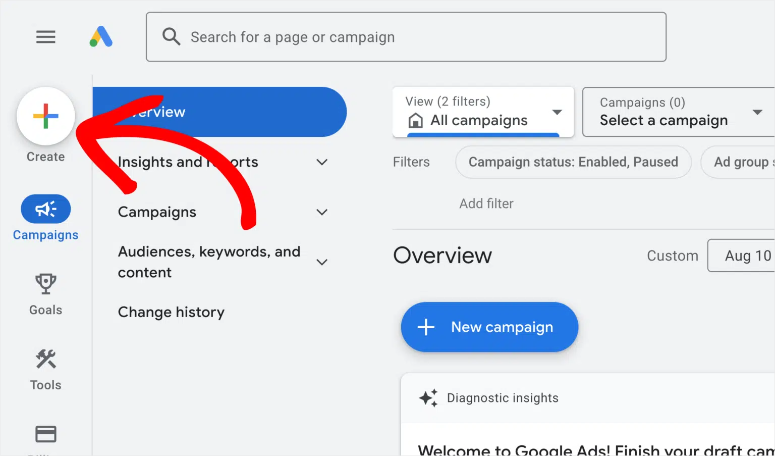
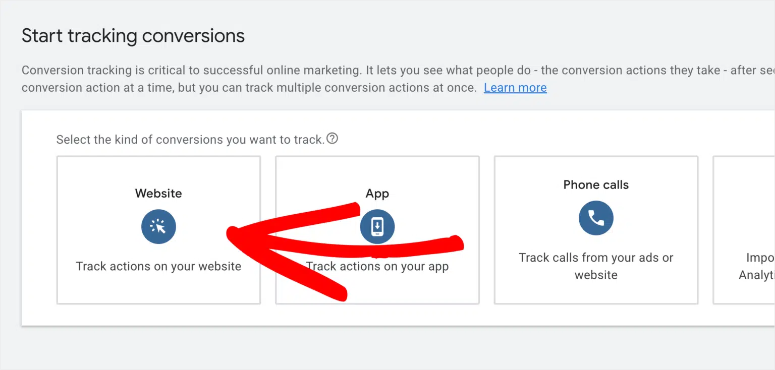
Then, you will select “Conversion Action.” On the next page, you will go with “Website” as the tracking action you want to add.
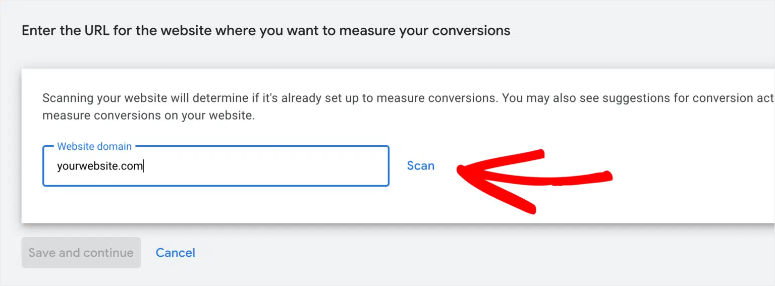
Next, Google Ads will provide a text box where you will enter the URL of the site you want to measure conversions. Once you enter your link, hit “Scan” so that Google Ads can see if you have already set up ad campaign conversion tracking.
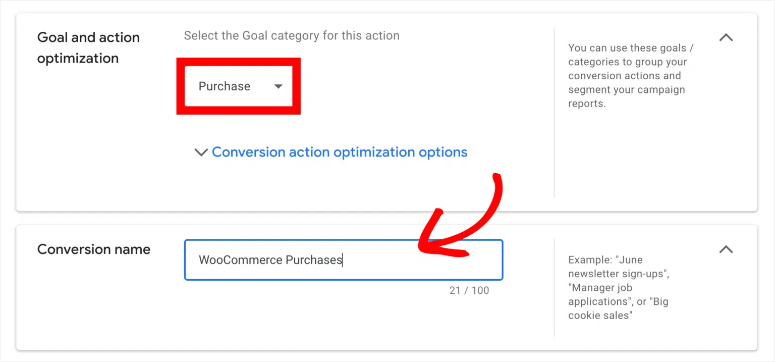
After your website scan, select “Add a conversion action manually.” After this, you will set “Goal and Action Optimization” to Purchase.
Below this, you will name the conversion something you will remember. For this example, we named it “Woocommerce Purchases.”
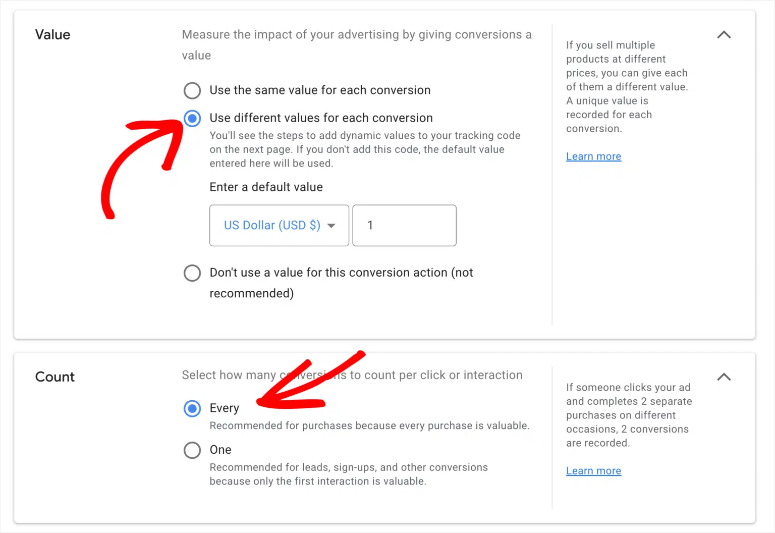
When this is done, you will set Value as “Use different values for each conversion,” and below this, ensure the Count is set to “every.” This will allow you to track every purchase individually.
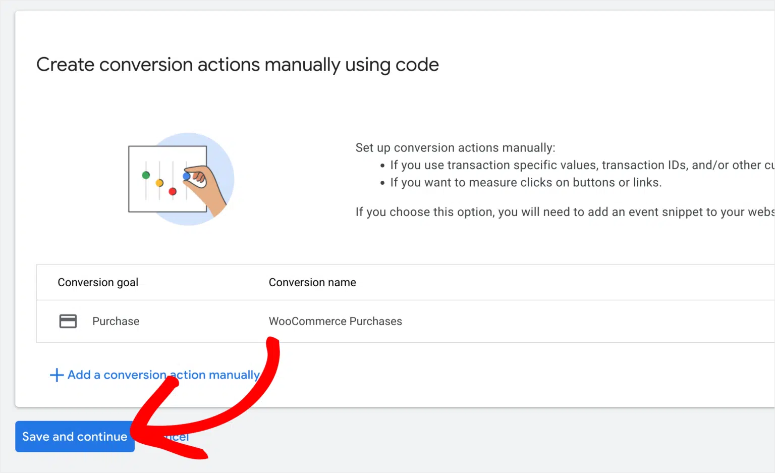
Finally, review the conversion action you just created and hit “Save and Continue.”
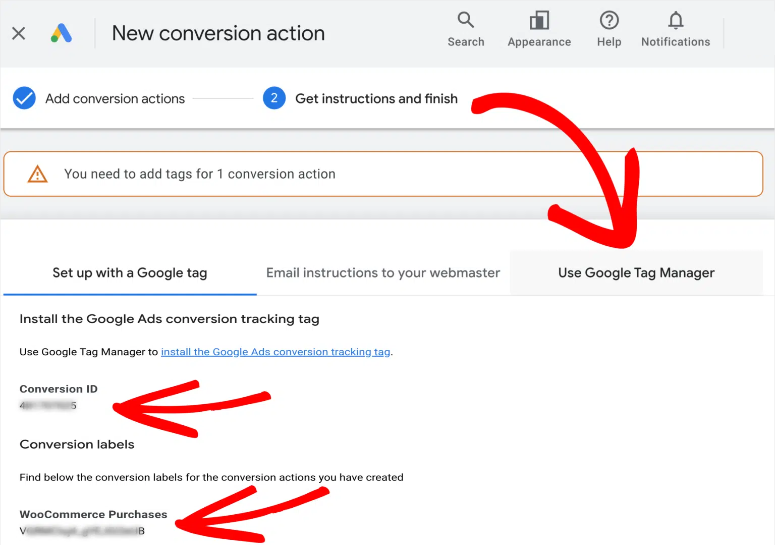
Then, on the next page, go to the Use Google Tag Manager tab and copy both the “Conversion ID” and the “Conversion Labels.”
Step 4: Add Conversion ID and Label to MonsterInsights
Now, With your Conversion ID and Conversion Label copied, return to your WordPress dashboard. Then, go to Insights » Settings, and proceed to the “Conversion” tab.
Next, scroll to the ‘Ads Tracking’ section.
Here’s where you’ll enter the Conversion ID and the Conversion Label you copied earlier. Make sure to input it in the correct format (e.g., AW-4384020529). Remember that MonsterInsights only works with “AW-” format.
So, if you just have a number, make sure you add “AW-” before the number when entering the tracking code to the Conversion ID text bar.
The Conversion ID should be enough if you are just tracking Google Ads.
But, if you’re tracking Easy Digital Downloads, WooCommerce, or MemberPress, you should enter the Conversion Label in the respective field.
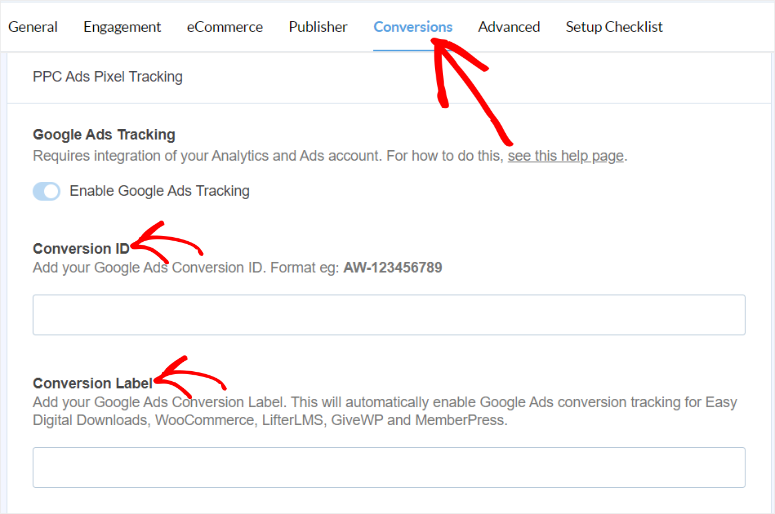
Finally, hit “Save Changes” at the top right corner of the Conversions tab page.
Now, if you want to view Google Ads metrics directly in Google Analytics, go to Acquisition » Campaigns » Paid Keywords. Here, you can view your Keywords, Users, New Users, Sessions, Bounce rate, and more.
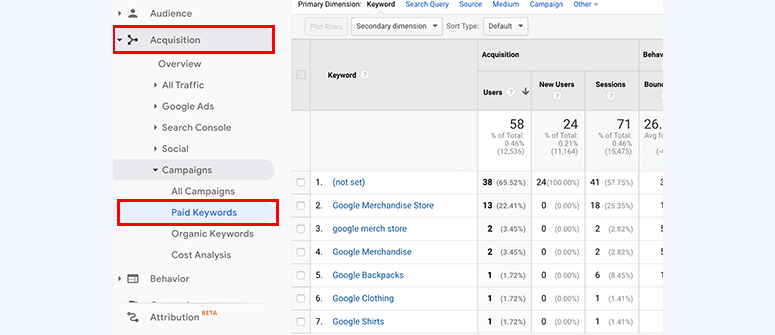
Congratulations! You can now track Google Ads( formally Google AdWords) using MonsterInsights.
Set Up Meta (Facebook) Conversion Ad Tracking
If you’re running advertisements on Meta (formerly known as Facebook), you can effortlessly monitor your conversions using MonsterInsights. This WordPress plugin can keep track of both page views and purchase events associated with your Meta ads.
Step 1: Get the Meta Pixel Code
To get started, you will first visit Facebook Ads Manager. Then you will go to Campaigns » Events Manager in the navigation menu.
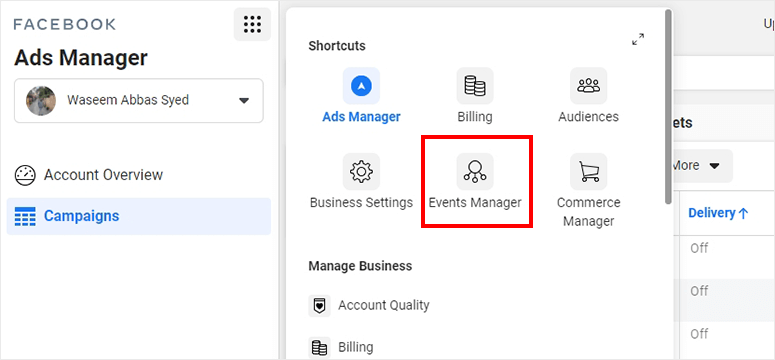
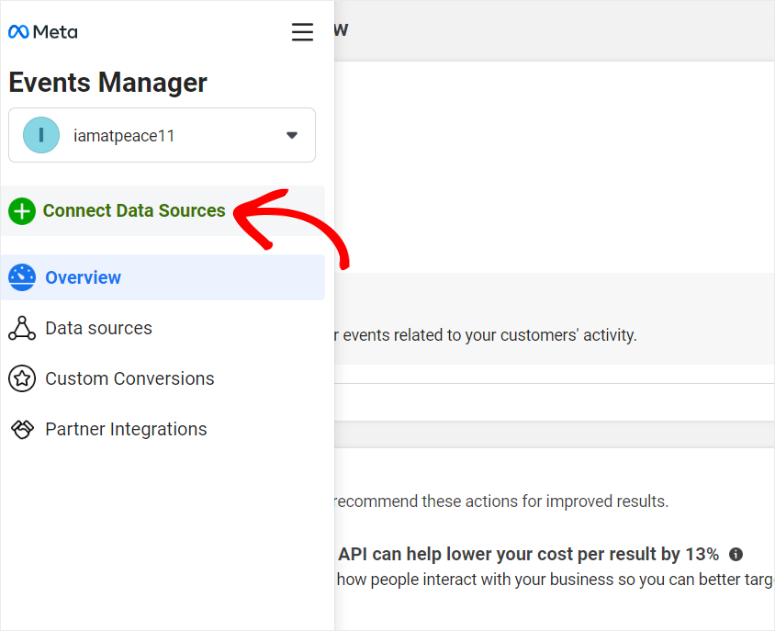
Here, select Connect Data Sources, from the menu options on the left.
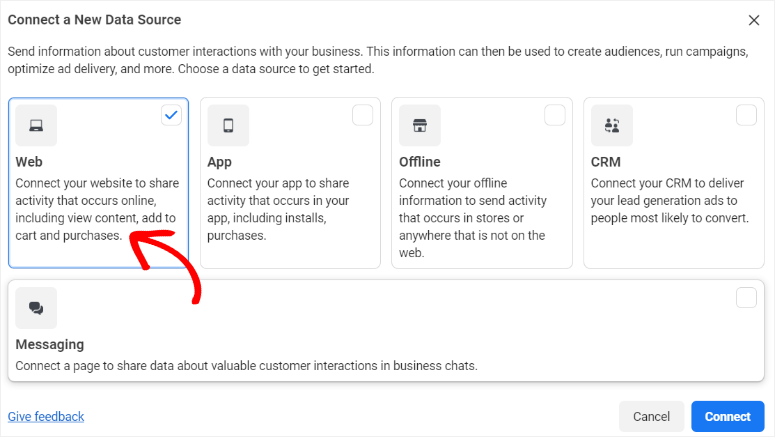
Next, a popup window will appear with options to connect Web, App, Offline, CRM, or Messaging using Facebook Pixel.
For this tutorial, we will connect with “Web.”
Then, you will give your dataset a name before you proceed. On the next page, enter your site URL and hit “Check” so that Facebook can tell you if you can connect Pixel with one of their partners.
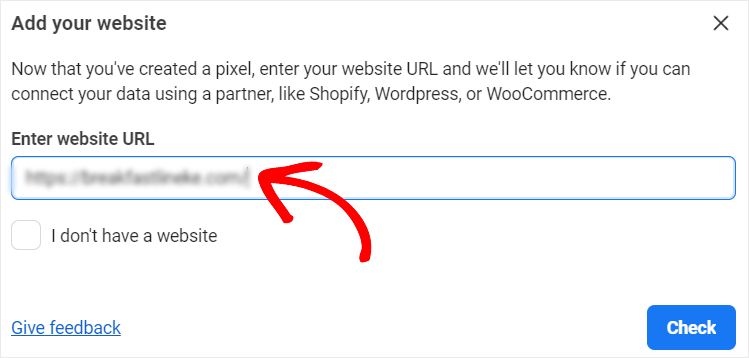
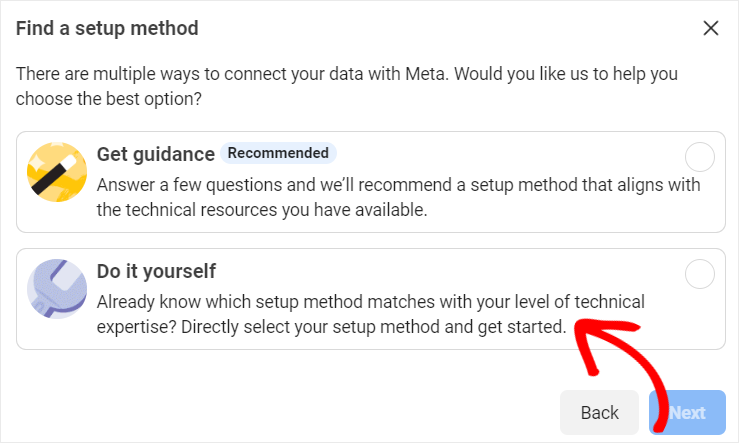
Then, Facebook will ask you to find a setup method.
You can either select Get Guidance, where Facebook will ask you questions so it can recommend a setup method, or go with Do It Yourself.
Since we already know how we want to add the Pixel code, we will select “Do It Yourself.”
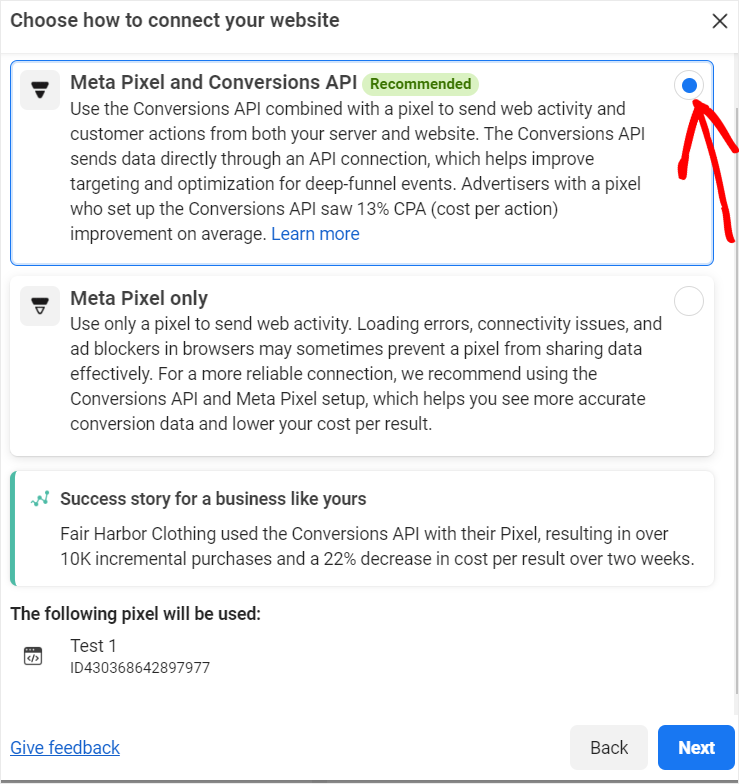
Next, you will choose how to track your Facebook ads.
You can add both the “Meta Pixel and Conversion API” together, so you can track customer actions and web activities. Or you can only add the “Meta Pixel,” which will only track web activity.
But our focus in this article is conversions, so, we will select Meta Pixel and Conversions API.
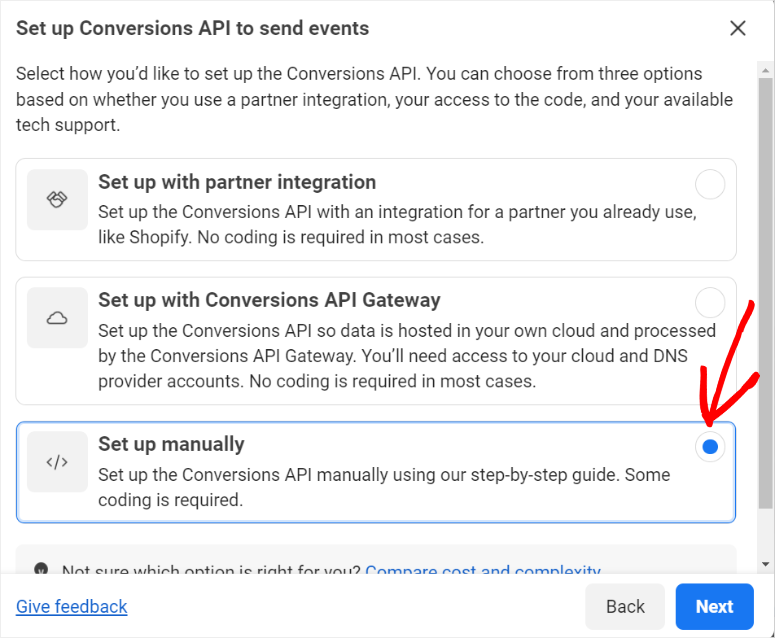
In the next popup window, Facebook will give you several options to set up the API. You can “Set Up with Partner Integration,” Set Up with Conversions API Gateway,” or “Set Up Manually.”
Again, we will select “Set Up Manually.”
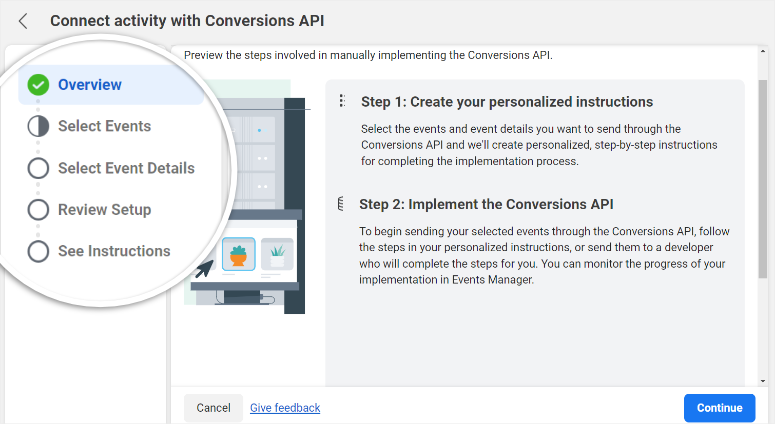
Now, even though we want to add the code manually, Facebook still wants to make sure that the process is as smooth as possible. To help with this process, it provides a connection overview page.
To complete the process, all you have to do is follow the steps. You will first select the events you want to track, then select event details, you will follow this by reviewing the setup. Finally, Facebook will provide you with instructions to complete the setup.
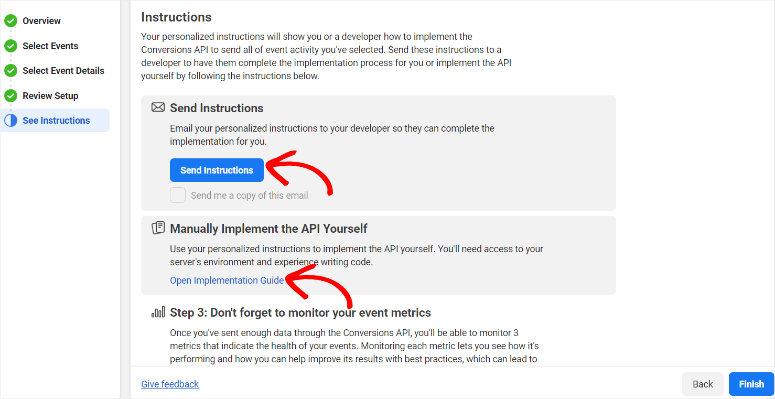
Now, once you complete the steps above, you should know that the next step requires coding experience. So Facebook lets you either send the instructions to your developer or do it yourself.
But, since we have a quick way to add the code without coding (check step 2 below) we will select “Open Implementation Guide.”
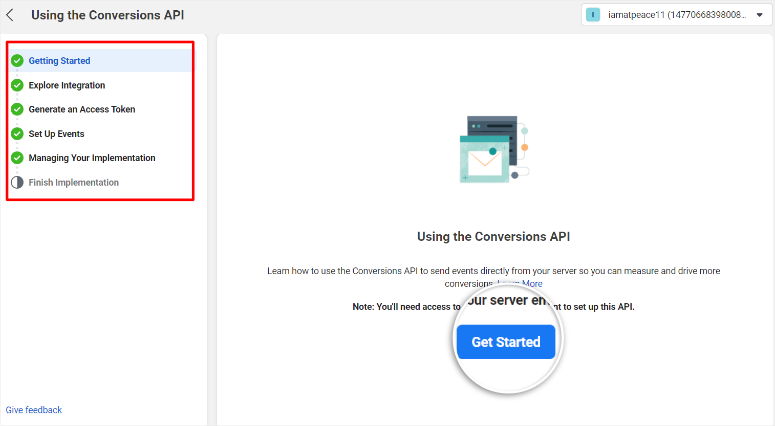
On the implementation page, Facebook offers a step-by-step guide that you can quickly follow. So, select “Get Started,” and follow the instructions.
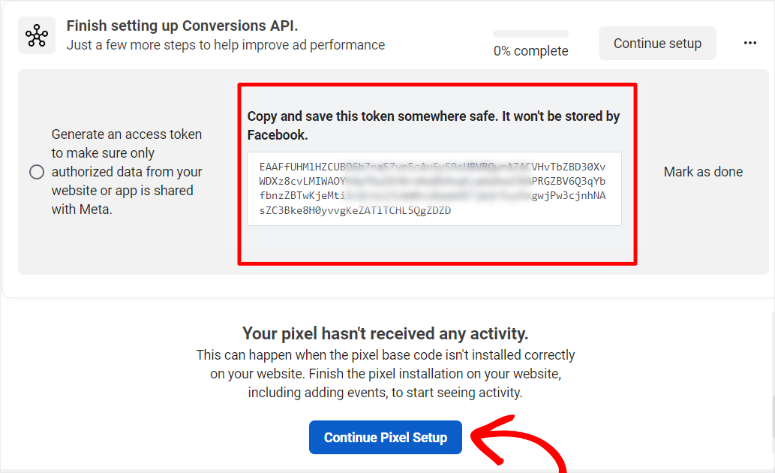
Next, go to the bottom of the page after you complete following all of Facebook’s instructions. Then, first, copy and store the “Access Token” Provided.
After you store the Access Token somewhere secure, select Continue Pixel Setup.
Next, Facebook will give you two options for Web Events configurations. For this tutorial, we will select “Meta Pixel.”
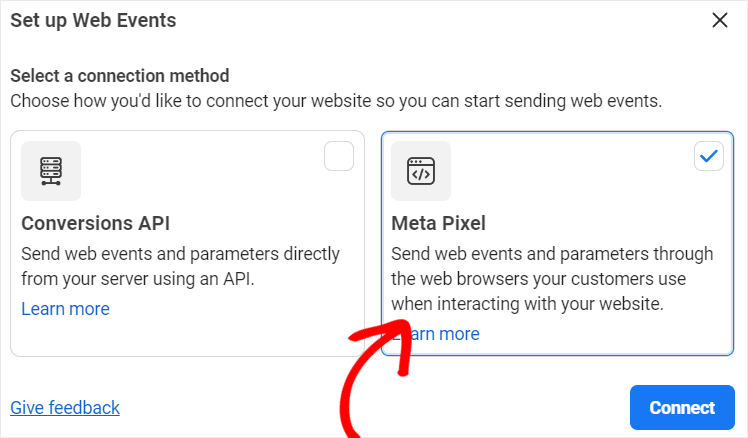
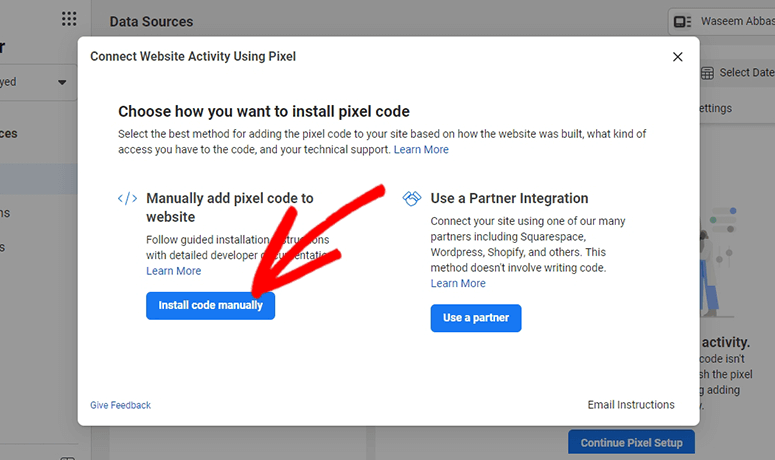
Then, on the next screen, you will select Install Code Manually.
On the next page, you will copy the code manually and proceed by selecting continue.
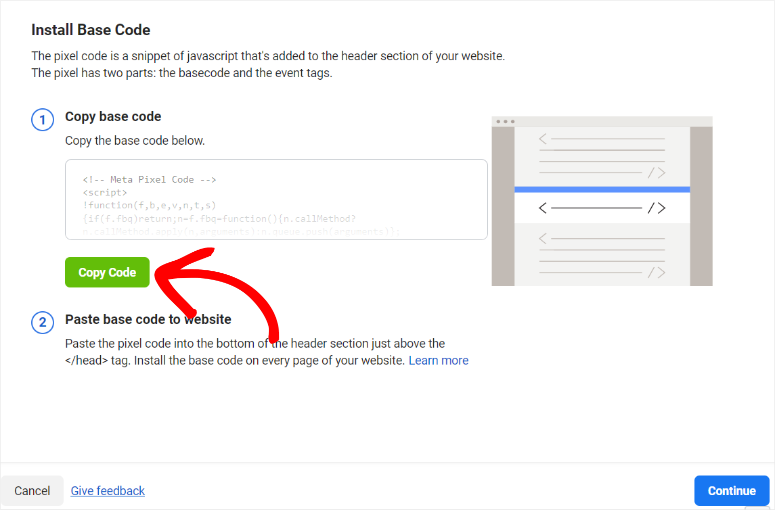
With your Pixel ID copied, you are now ready to add it to your WordPress site.
Step 2: Add Meta Pixel to WordPress
Now, head back to your WordPress backend, where you will add the code to your site’s header. To do this manually, you will need to edit your theme header. But, if you do not have any coding experience, editing your site code could break it.
So, we will use WPCode, the best WordPress code snippets plugin. As promised in Step 1, this plugin will allow you to place Facebook Pixel with just a few clicks and without touching your site code.

You can also use WPCode Lite by going to your WordPress plugin repository and installing it. This free version of the plugin can also help you add the Pixel code, but it has limited features.
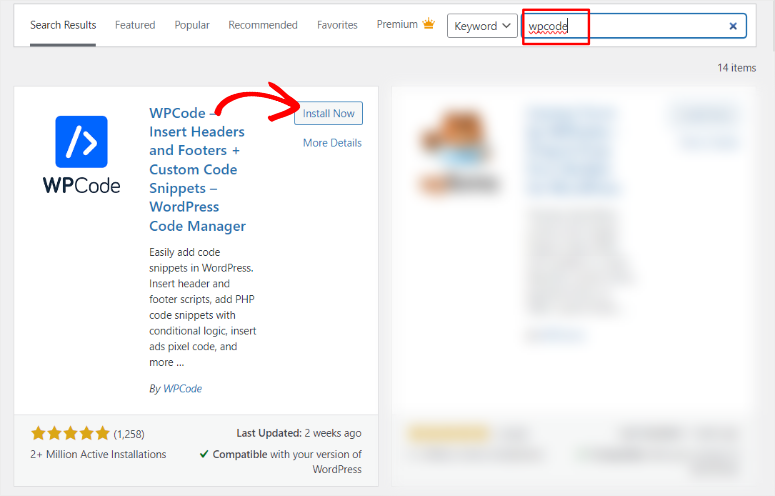
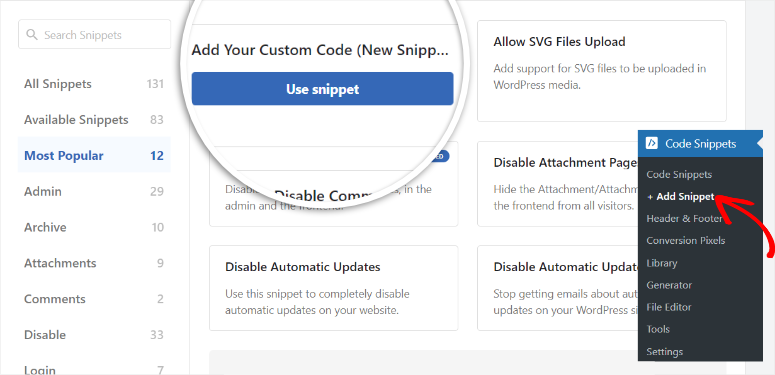
Once you set up WPCode, go to Code Snippets » + Add New Snippet. Here, you will select “Add Your Custom Code” so you can add your Facebook code on a blank canvas.
Then, in the Code Preview space, paste the Meta Pixel code, and hit “Save Snippet.”
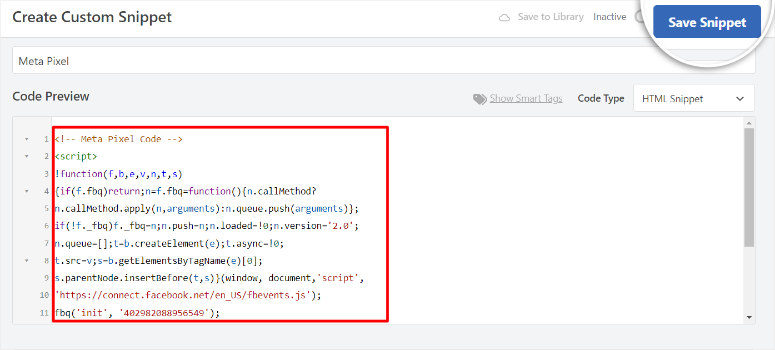
And just like that, you have connected Facebook to your site.
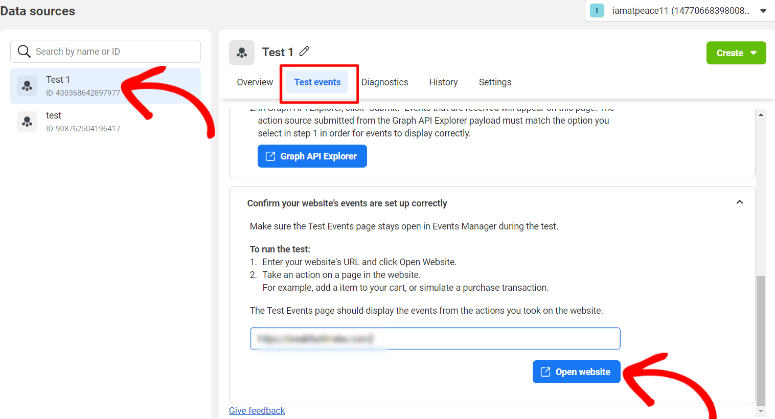
If you want to test the connection, simply go to Data Sources in your Facebook Ad Manager account and select the “Data Source” you connected earlier.
Then, go to the “Test Events” tab and scroll to the bottom. Here, insert your URL in the bar provided, and finally, hit Open Website.
Facebook will redirect you to your site, where you can try out one of the events you added to your Pixel, like making a purchase.
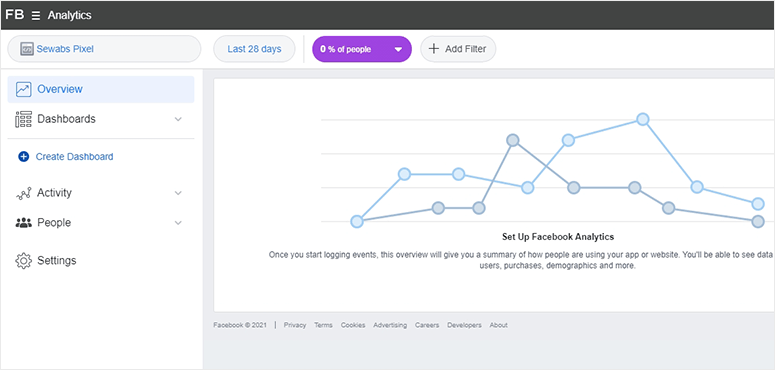
So, how do you view Facebook Ads conversion tracking reports?
All you have to do is visit Facebook Analytics and select the Pixel for which you want to see the metrics.
Set Up UTM Parameter
UTM Parameters are codes added at the end of URLs to track campaign sources with Google Analytics.
The good news is that you can easily track campaign sources in Google Analytics by adding UTM parameters to your URLs using MonsterInsights.
All you have to do is go to your WordPress dashboard and select Insights » Tools from your MonsterInsights menu options. Then, in the URL Builder tab, insert your parameters in the space provided.
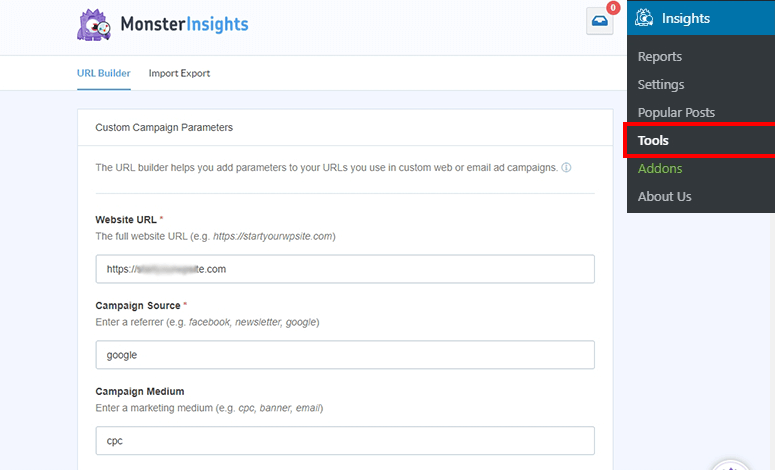
Once you do this, you can share the resulting URL anywhere so you can monitor your traffic sources effortlessly.
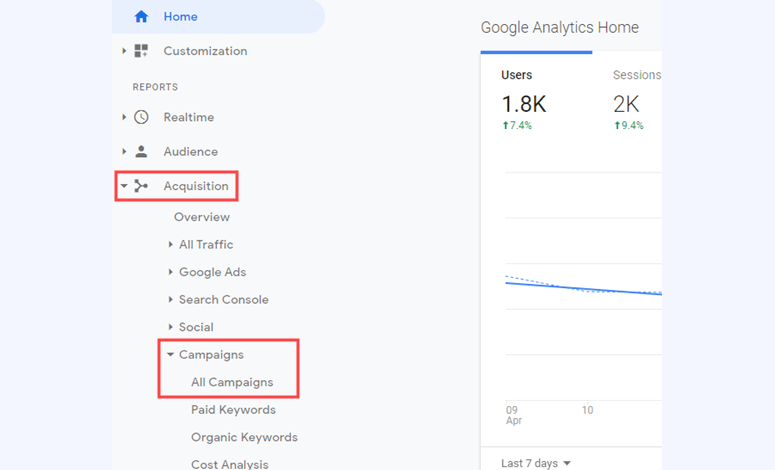
To access UTM reports in Google Analytics go to Acquisition » Campaigns » All Campaigns.
Here, you can view all your campaign details, including UTM parameters.
That’s it! You can now set up and monitor UTM parameters.
Set Up Twitter Conversion Tracking
You can easily boost your brand with Twitter-sponsored ads(now X) and track them by setting up conversion tracking in WordPress.
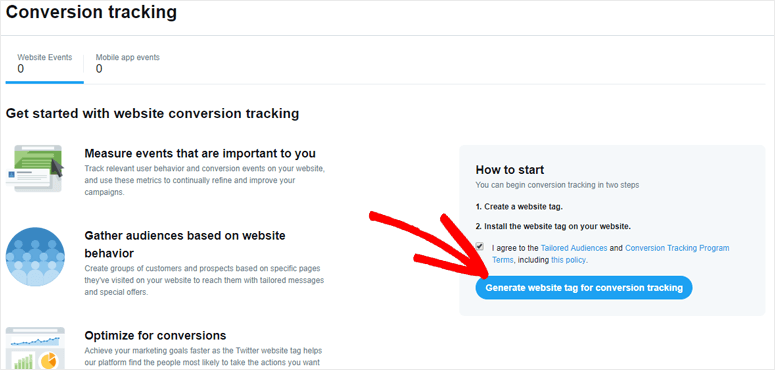
To do this, first log in to your Twitter Ads account and navigate to Tools » Conversion Tracking. Here, select “Generate Website Tag.”

On the next page, all you have to do is select the Generate website tag for the conversion tracking button.
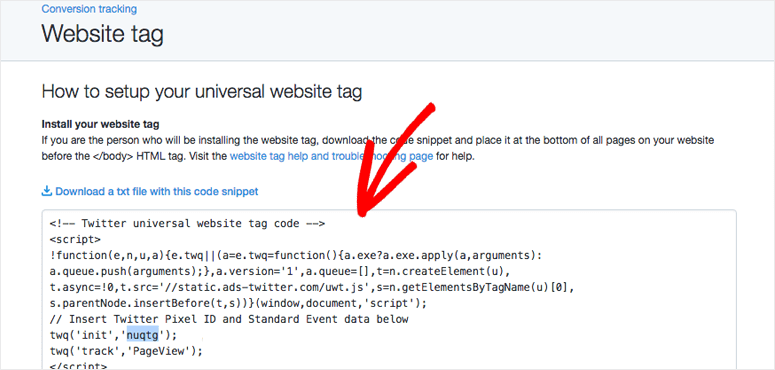
Next, Twitter will display the Universal Website Tag, that you will use to connect the social media site to your website. So, all you have to do on this page is copy this code.
Next, return to your WordPress dashboard, and use the WPCode plugin (ensure it’s installed) to paste the code.
To do this, head to Settings » Insert Headers and Footers in WPCode’s menu options. Then, in the “Scripts in Body,” paste the code you copied earlier.
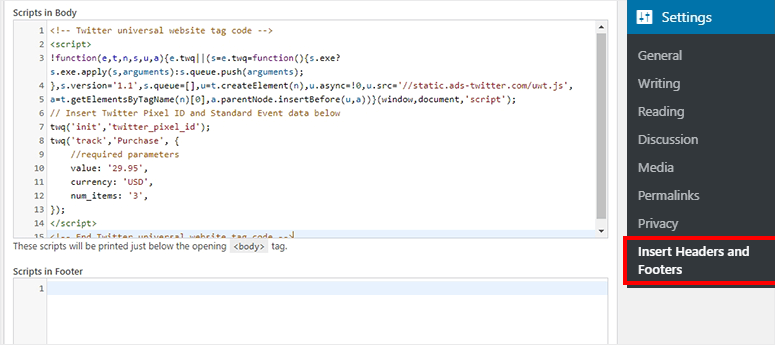
Finally Save, the changes and you’re set!
Set Up OptinMonster for Conversion Optimization
After tracking website conversions, enhancing your conversion rates should be your next objective.
For this, we present to you OptinMonster!
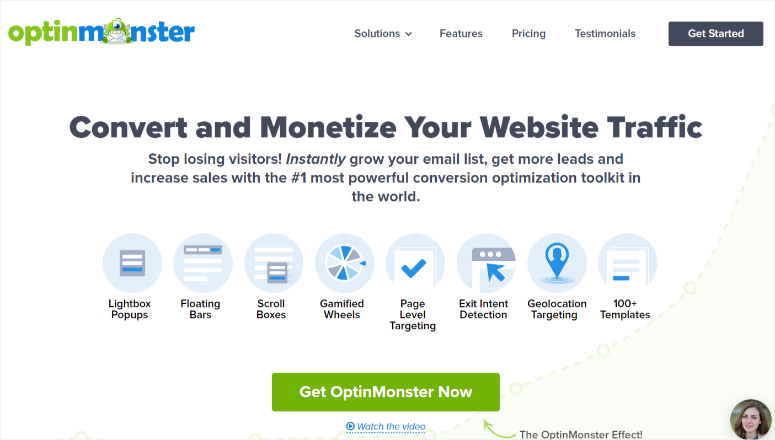
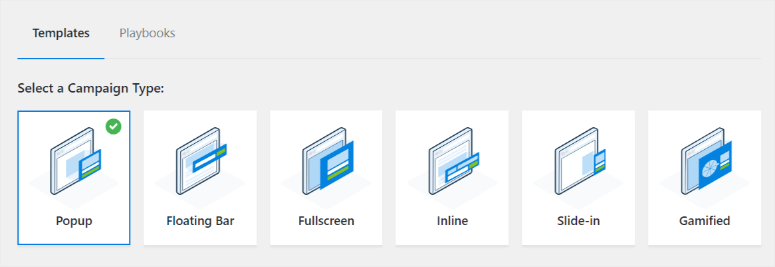
OptinMonster is the best lead generation and conversion tool. It offers campaign types like Popup, Floating Bar, FullScreen, Slide-in, and more to capture the attention of your leads the right way.
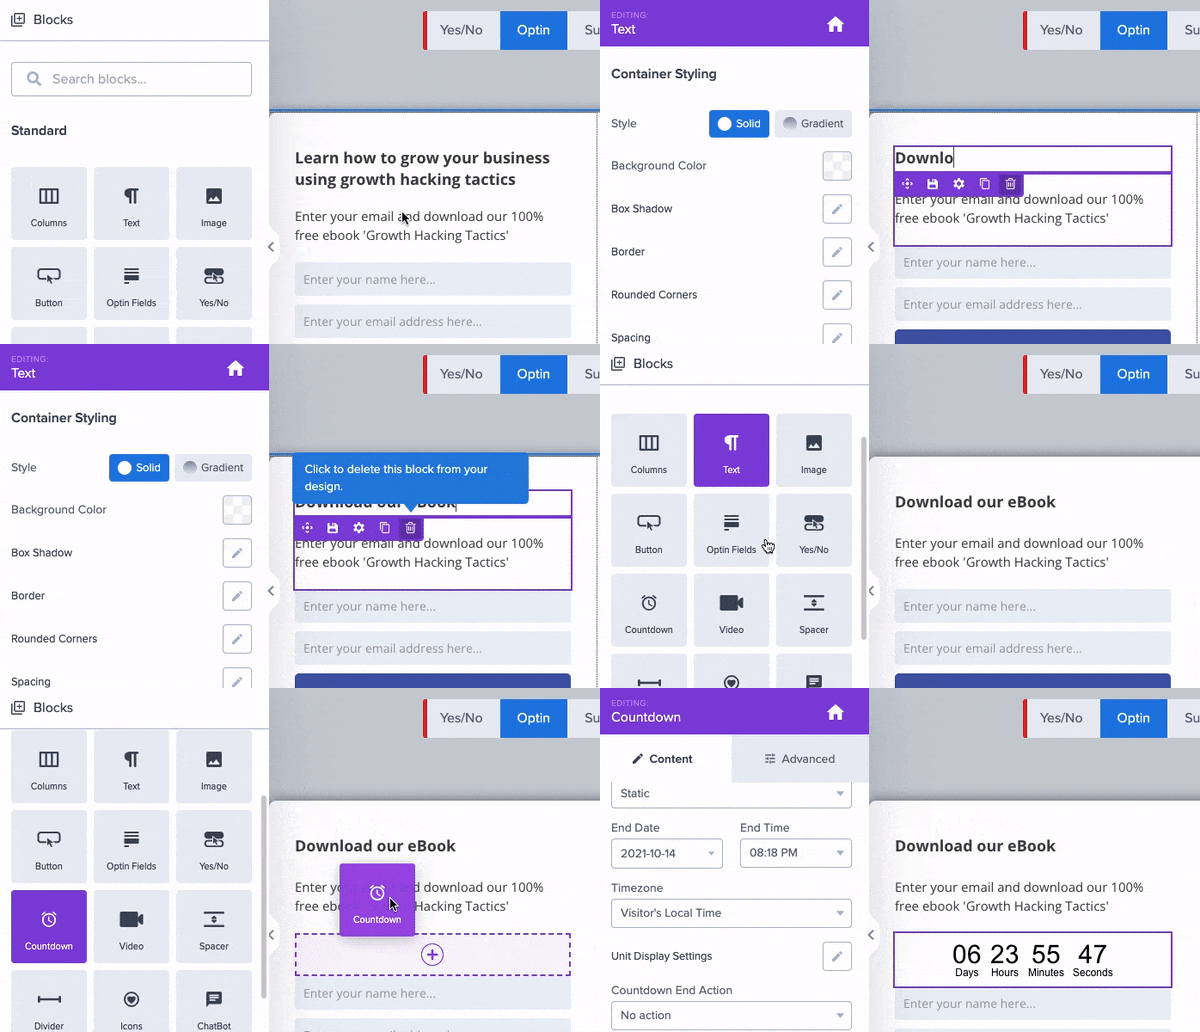
You can customize each of these marketing campaigns with a simple drag and drop interface so that they can match your brand and style. Plus, it comes with 400+ templates of different campaign types to help you get started.
OptinMonster seamlessly integrates with email marketing services and popular eCommerce platforms, such as Constant Contact, MailChimp, HubSpot, Brevo, and many more.
These tools can help you automate and streamline your workflow, making your marketing efforts more efficient.
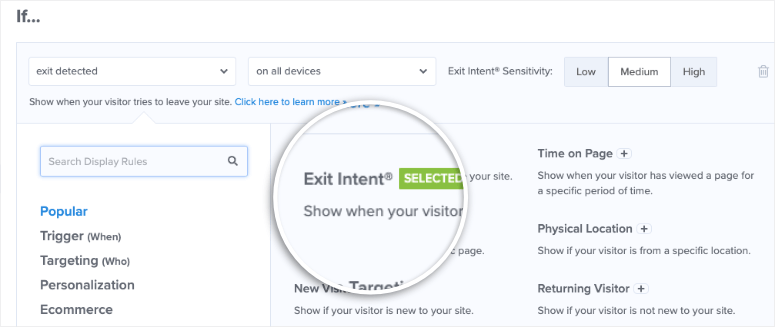
You can also create highly targeted messages using display rules to guide customers toward purchasing decisions. To add to this, you can offer discounts or coupons to visitors about to leave your product pages using the Exit-intent technology.
This, in turn, can help you grow your mailing list with people actually interested in what you are offering.
If you want to learn more about this conversion tool, check out our complete OptinMonster review here.
Well done! You have just learned about how to set up different conversion metrics. If you have any more questions, have a look at our FAQs below.
FAQs: How to Set Up WordPress Conversion Tracking
Do I need MonsterInsights if I have Google Analytics?
No, but MonsterInsights simplifies all the Google Analytics data into a simple format that you can easily understand. Plus, with MonsterInsights, you can view all your metrics right in your WordPress dashboard, making it convenient. To add to this, you do not need any coding experience to set up MonsterInsights.
Is Pretty Links only for affiliate marketing?
No, Pretty Links is a popular URL shortener you can use on any link. It is used to make URLs more appealing or branded so that they do not look spammy, increasing the chances of people clicking them. Because of this, it is widely used in affiliate marketing for creating clean, branded URLs.
Is there a better metrics tool than Google Analytics?
Google Analytics is considered the best analytics tool. But, it can be complicated to use, as it displays so many metrics, which can confuse even experts with years of experience. To help with this, you can use MonsterInsights, the best analytics plugin to simplify Google Analytics data. This plugin also allows you to view all your Google Analytics data right in WordPress.
What is the best way to improve conversions?
OptinMonster is the most powerful tool to help you improve conversions. It offers amazing campaign types, such as Welcome Mats, Popups, and Slide-ins, which can help you capture your users’ attention without being pushy. You can also use different targeting rules, such as Exit-Intent technology and geotargeting, so you can capture the right leads at the right time.
We hope you enjoyed learning about conversion tracking. Next, you can check out these 9+ FOMO plugins to skyrocket conversions in WordPress.
To add to that, here are other articles you may be interested in reading.
- 6 Spin The Wheel WordPress Plugins to Boost Conversions
- How To Reduce Form Abandonment and Boost Conversions
- How to Delay a Popup to Boost Conversions
The first article lists 6 of the best spin the wheel plugins to help you boost conversions. Then, the second post will walk you through how you can reduce form abandonment. While the last article focuses on how you can delay popups to increase conversions.

Comments Leave a Reply