
Are you looking for the best way to verify your leads automatically?
Automatic lead verification is an important step in email list building. It ensures that all your contacts are real and up to date. It also lets you deal with people or companies who are genuinely interested in your products.
By automating your lead verification process, you can reduce spam and convert visitors to customers better.
In this article, we will look at the best way to automate lead verification. By following these steps, you can reduce the cost and time of your list creation process so you can quickly access leads that actually convert.
Why Automate Lead Verification
Automatic lead verification can help you filter through your contact list to ensure that all the information provided is accurate and up to date without your input.
To add to this this automated process can also help you with the following.
- Save time and resources: You do not need to spend time sending emails to dead ends. And since sending emails can be expensive, ensuring they are only delivered to an actual inbox can help you cut costs.
- Better data collecting: It is very easy to misinterpret email list data with untrue or fake information. To help with this, automatic lead verification reduces the chances of human error and oversights.
- Better targeting: Automatic lead verification can help you reliably understand your audience, which can help you better target your email marketing campaigns.
- Improve delivery score: Each time you send an email, your email provider rates it. As such, a higher email bounce rate could lead to your future emails being considered spam. By ensuring your emails land in an actual inbox, you can build a better trust score with your email provider.
- Follow data privacy rules: It ensures that you have consent from people who provided their information to you. This way, you can legally and ethically send them emails without any issues.
The Best Way to Automate Lead Verification
Even with the advantages that come with automatic lead verification, many people often overlook this process because they feel it might be difficult to set up or an unreliable solution.
To help with this, OptinMonster offers the TruLead addon.
OptinMonster is the most powerful lead generation and conversation tool.
When paired with the TruLead addon, it can help you automate lead verification without adding a line of code on your WordPress website. To add to this, it uses an AI-powered filter system to go through email addresses, making it a reliable option for blocking spam submissions.
TruLead is a feature that works in the background to look through visitor information and ensure you only have a list of quality leads. It can help you with the following.
- Fix common email address spelling errors
- Block temporary, free, or restricted business emails
- Filter out role-based emails such as contact@ help@, support@, etc)
- Reduce low-quality leads in your list
- Increases deliverability score
- Maximizes email opening rate
If, for whatever reason, TruLead gets it wrong, you have the option to manually look at the reject list within 30 days so you can move the leads back to your list.
To add to this, it is straightforward to set up and use. Let us walk you through the steps.
How to Set Up TruLead
Step 1: Install OptinMonster
Since TruLead is an OptinMonster addon, the first step is to sign up for the WordPress plugin on its official website and select a plan.
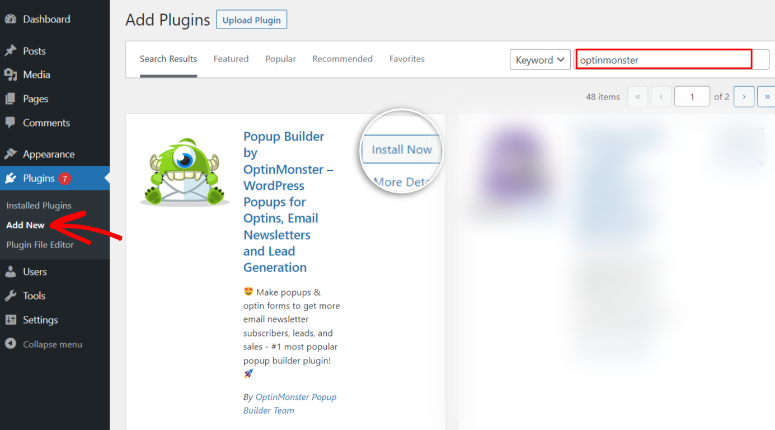
Next, you will go to your WordPress dashboard to Plugins » Add New. Here, you will find and install the OptinMonster from the repository like you would any other plugin.
If you need help with this, here is a tutorial you can look at on how to install a plugin.
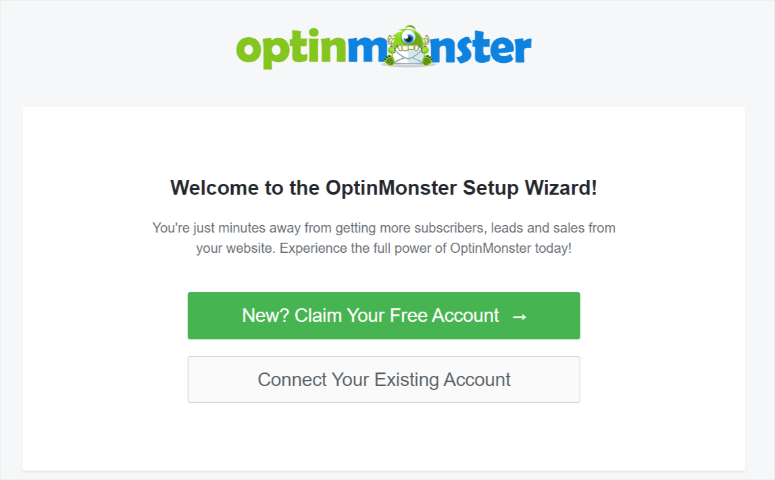
Next, you will follow the setup wizard to activate the plugin and connect your OptinMonster account to WordPress. The wizard will help you set up everything you need to use OptinMonster in an easy step by step process, making it great for beginners.
Plus, if you need more assistance, you can check out this tutorial on how to set up OptinMonster.
Step 2: Set up TruLead Addon
Once you set up OptinMonster, the next step is to activate the TruLead addon.
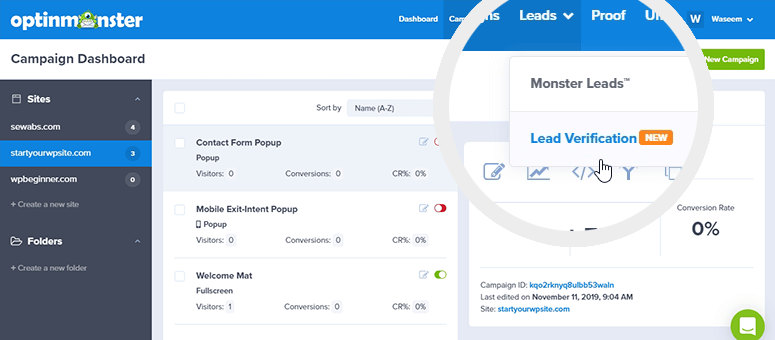
To do this, head over to your OptinMonster account and go to Leads » Lead Verification. Next, select “Lead Verification” and the WordPress plugin should direct you to the addon’s signup page.
Here, the plugin will ask you to Click Here to Enroll to sign up for the addon.
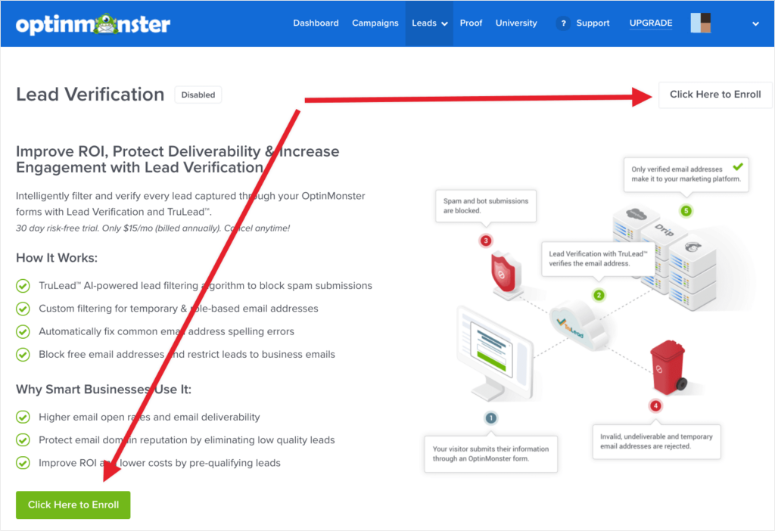
Even though OptinMonster does not have a free version, TruLead offers a 30-day risk-free trial. This allows you to test out the addon without making any additional investment.
Step 3: Create a Filter
Once you sign up for your risk-free TruLead trial, the next step is to create a filter.
To do this, hit Create New Filter on the “Lead Verification” page.
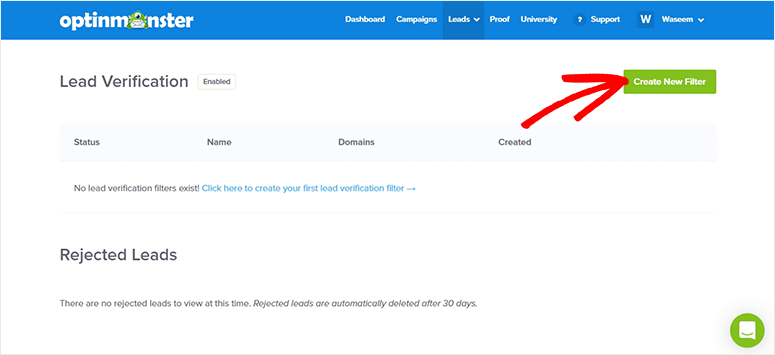
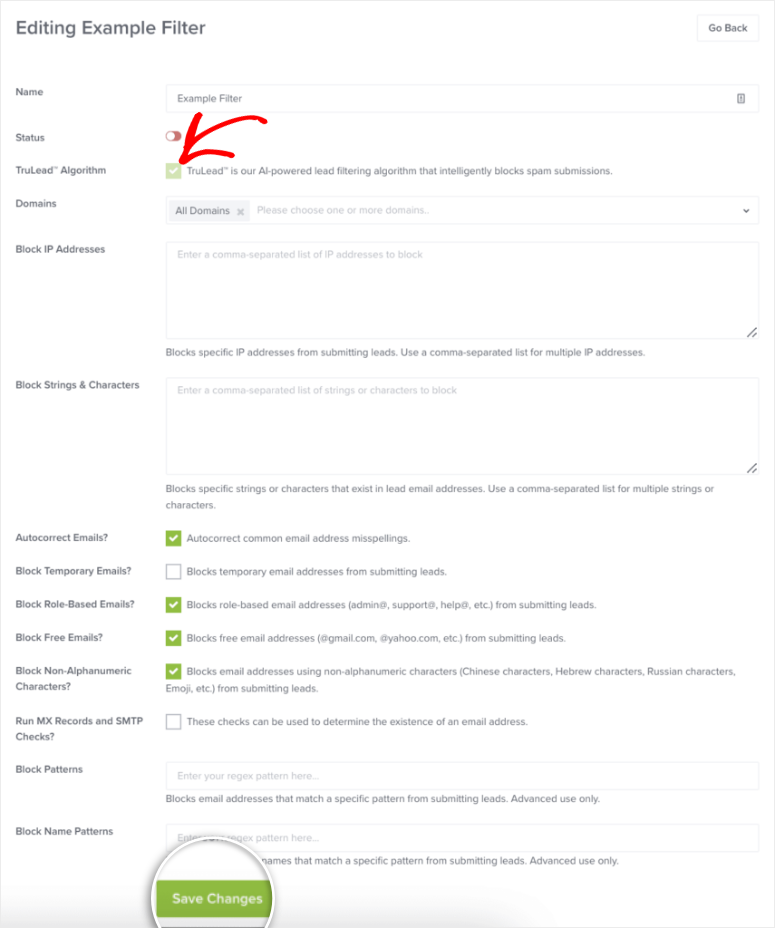
Next, name the lead verification filter you have just created so you can easily remember it.
You will then follow this up by checking the TruLead Algorithm box that enables its AI-powered filter.
This will allow the addon to filter leads through a quick and reliable AI analysis process. Since it is AI-powered, you can be sure that the leads you get will be consistent with what you are looking for. This removes the headache of manually looking at each lead to determine if it is right for you.
Once you check this box, select one or more domains connected to your OptinMonster account from the dropdown list. Follow this up by adding IP addresses, strings, and characters you want to block.
Then, move down the list and enable or disable the following options with a toggle button.
- Block Temporary Emails
- Autocorrect Emails
- Block Role-Based Emails
- Run MX Records and SMTP Checks
- Block Non-Alphanumeric Characters
Finally, hit the Save Changes button to create your lead verification filter.
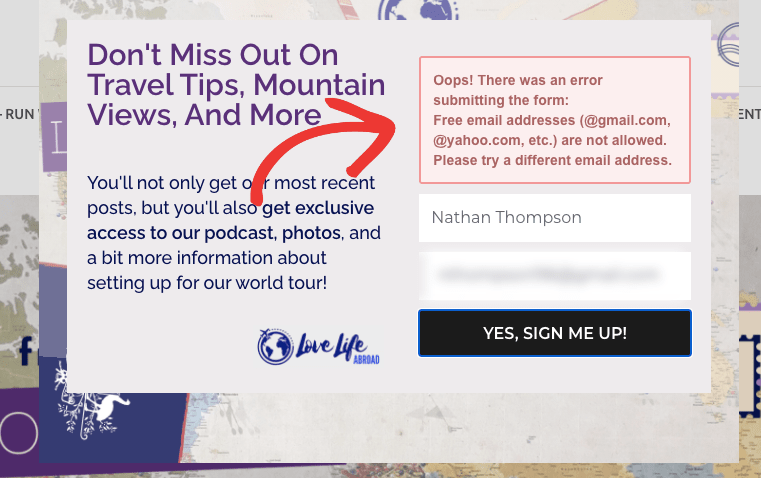
Now, when someone fills out an email address that does not match your filter or has a mistake, the first thing that will happen is they will get an error message. This allows them to correct the email address or provide one that matches your filter.
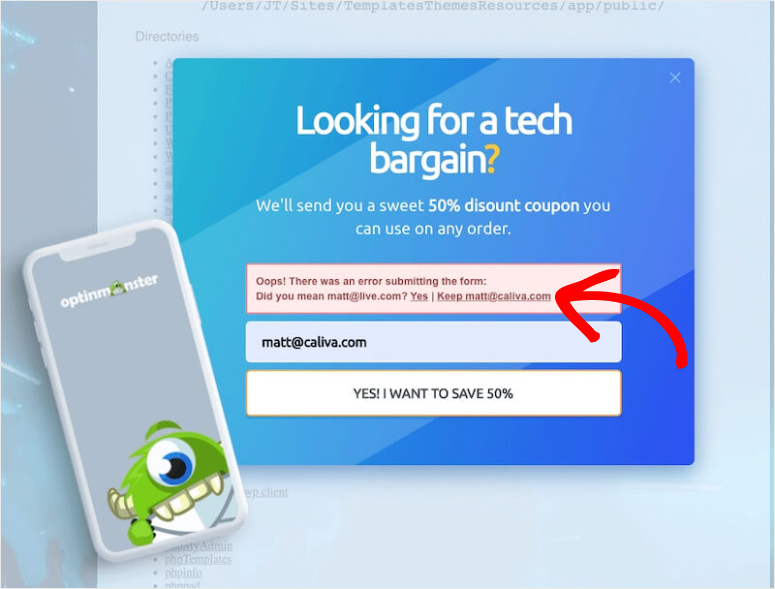
To add to this, TruLead will also fix common spelling errors in email addresses, ensuring they are not excluded from your mailing list for minor mistakes.
Since you may have a better judgment than AI, TruLead keeps the rejected list for 30 days so you can manually approve any that you feel were filtered wrongly.
To find this option, go to Rejected Leads under the “Lead Verification” page in your OptinMonster account.

With TruLead you can use the process above to update your filter to suit your business better as you learn more about your audience.
That’s it! You can now carry out lead verification automatically with OptinMonster through its addon TruLead.
How Else Can OptinMonster Help Generate Leads?
First, you should remember that a very small percentage of your website visitors actually revisit your site. They will likely find your site, get the information they seek, and move on to the next website.
It is up to you to grab their attention and show that your site is a resource they can count on.
One of the best ways to do this is by asking them to leave their information through optin forms. This can help you establish communication and follow up later.
But, not many people leave their information just on any site.
They need to have the right motivation, and they need to trust your brand. But, most importantly, they need the right message to capture their attention.
That is where OptinMonster comes into play!
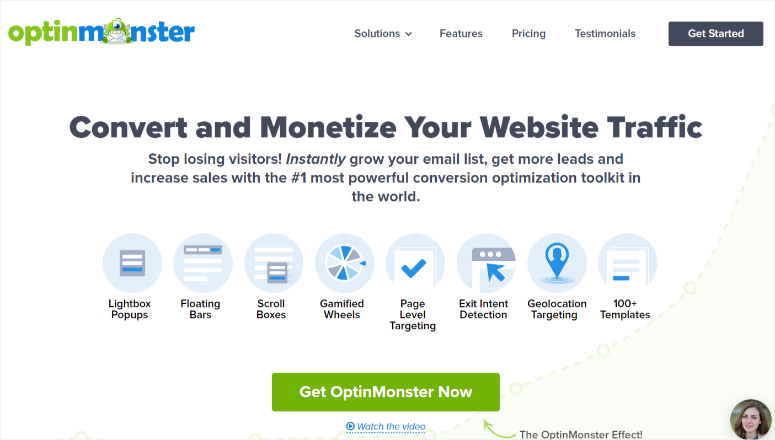
OptinMonster is the most powerful lead generation and conversion tool with the best automatic lead verification features.
Through its highly customizable campaigns and optin forms, you can create the right lead magnet to target the right people. Plus, you can further personalize these campaigns and popups through its user-friendly drag and drop builder.
To ensure they turn out exactly as you want, you can view all the changes to the campaign design in real time on the page builder preview window.
At the same time, you can integrate it with some of the best marketing tools to streamline workflows. For example, you can connect to MailChimp to help you set up automated emails. You can also use it with Woocommerce to help you build a sales funnel and Hubspot for your CRM needs.
To add to this, you do not need any coding experience to set it up or any hire email marketing services to help you use it.
OptinMonster conversion-focused lead magnets can help you quickly get the attention of your visitors without being pushy or annoying. The best part is that with this tool, you can easily do this while following all of Google’s data privacy guidelines and GDPR.
This makes the automatic lead verification more effective, as your audience is already willing to offer you their information.
OptinMonster comes with Exit-intent Technology.
By monitoring cursor movements, this feature can tell when a potential customer is about to leave your landing page. Once it notices a user about to exit your page, it triggers a campaign just at the right moment, improving your chances of getting the user’s information.
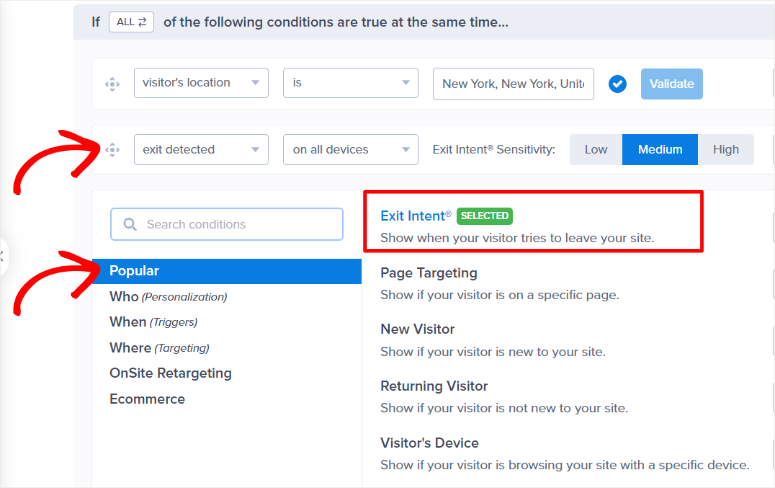
But OptinMonster doesn’t just trigger campaigns based on whether someone is about to leave your page.
You can display a customized campaign to people from a particular location or using a specific device. To add to this, it can also help you send personalized campaigns for first-time visitors or returning users.
All this helps you show better-targeted messages and carry out proper onsite retargeting, leading to better conversions.
As you have seen, OptinMonster understands that the more you optimize a campaign, the more likely visitors are to leave their information with you.
For this reason, it comes with a variety of campaign types that you can use in different situations to target your audience better. Check out the list below for a few examples of its campaign types.
- Welcome Mat/ Fullscreen: These are effective campaigns for first-time visitors who have never been on your WordPress site, as they can help give a solid first impression. With this, you can quickly pass your message while a visitor has your full attention. This makes it more likely they will remember your site.
- Floating Bar: When you want to be persistent without being pushy, a floating bar campaign is the perfect solution. This is because you can place this campaign type at the top or bottom of your landing page so that your message is always in view of a visitor while they are on your site.
- Popups: Popup campaigns can be annoying if done wrong. However, with OptinMonster, you can target your audience with specific optin forms triggered by user behavior and location, among other things. This ensures it is displayed at the right time to the right person.
- Inline: With OptinMonster, you can place campaigns within your content. This way, you can capture leads interested in specific topics or keywords.
- Slidein: SlideIn presents the perfect opportunity to display a notification on the page gently without interrupting the visitor from what they are doing. As such, you can use this campaign type to showcase a message after a visitor scrolls through a certain percentage of your page without interrupting them.
- Gamified: These campaigns are great at increasing engagement and user interactions because they add a gaming concept to your marketing automation. Such campaigns are fun, helping your audience remember your brand and making it more likely they will fill out your contact form.
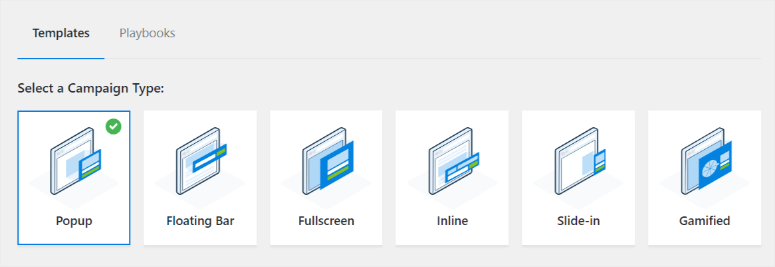
Even though these campaign types are highly effective at lead capturing, OptinMonster also comes with over 100 templates that you can use to personalize your campaigns further and offer a great user experience.
To add to this, you can utilize special holiday templates like Christmas, New Year, Black Friday, and so many more. This can be a great opportunity to take advantage of current events and seasonal opportunities to better connect with your audience.
Such holiday templates can help you cross-promote your products, tell your brand story, and show that you are in touch with and appreciate the culture of specific people.
For example, you can use one of the many Gamified holiday campaign templates on these special days. They can help you stick to the theme of the day, ensuring your visitors have fun on your WordPress website while they share their contact information with you. In turn, this can also make your visitors stay longer on your site, improving your SEO.

As you can see, Optinmonster can help you grow your site visitors, capture new leads, and eventually help you convert them.
But with that said, OptinMonster doesn’t just help you capture leads; it enables you to capture quality leads.
Congratulations! Now you can use OptinMonster to boost lead generation and conversions. Plus, you can also use its TruLead addon to automate lead verification. Finally, if you have any more questions, check out the FAQs below.
FAQs: How to Automate Lead Verification
How do you get genuine leads?
You can get genuine leads by using a tool like OptinMonster’s TruLead. It will help keep spammers and invalid email IDs out of your list.
How can I get leads without paying?
You can get leads without spending a dime by offering a free lead magnet such as an eBook, checklist, or guide. The user can submit their email address in exchange for the freebie or even a discount code.
Is OptinMonster free to use?
OptinMonster is a premium plugin and does not have a free version. However, there’s a 14-day money-back guarantee on all plans. For the TruLead addon, they offer a 30-day trial period
What are OptinMonster campaigns?
OptinMonster campaigns are highly customizable strategies designed for lead generation and conversion. They can help you capture leads at different stages of user interaction. OptinMonster offers various campaign types such as Welcome Mat/Fullscreen, Floating Bar, Popups, Inline, Slidein, and Gamified campaigns.
How can OptinMonster help with A/B testing?
A/B testing in OptinMonster helps you to experiment with different campaign elements, such as content, visuals, or call-to-action buttons. This data-driven approach helps you identify the most effective elements for higher conversions.
We hope you enjoyed learning about how to automate your lead verification process. Check out this article if you want a full OptinMonster review so you can learn about all its powerful features.
To add to that, here are more articles you may be interested in.
- How to Create a Popup Based on Location
- How to Create a Countdown Timer in WordPress (Step by Step)
- 6 Spin The Wheel WordPress Plugins to Boost Conversions
The first article will help you learn about how to capture leads based on location. The second article is about how you can use FOMO to get more leads. While the last article focuses on a list of spin the wheel plugins to help you get the full attention of new site visitors.

Comments Leave a Reply