
Do you want to create popups based on your visitor’s location?
One of the best ways of grabbing visitor attention is through popups. However, if the wrong approach is used, popups can be annoying, intrusive, and pushy, quickly making them lose value and your audience’s attention.
The best way to improve popup efficiency is to use correct targeting and zeroing down on the exact people you want to view the information.
As a result, showing popups based on location is one of the best ways to utilize this marketing tactic.
In this tutorial, we will show you how to create stunningly beautiful popups without coding. We’ll also show you how to use them to drive up conversion, page views, and your email list.
Why Should You Use Geo-targeting Popups?
Don’t you just hate it when browsing a page, and every few minutes, a popup appears displaying information you do not find helpful?
As such experiences will show you, it is very easy to misuse popups.
In fact, it is such a major issue that Google introduced intrusive interstitial penalties for adding page elements obstructing the content view, usually to display promotion material, i.e. popups.
However, if popups are used correctly, they can quickly help you build engagement and increase pageviews and conversion.
Geo-targeting your popups is one of the best ways to ensure the information displayed is relevant, provides value, and is not intrusive.
Geo-targeted popups can also help with:
- Personalization
- Localization with offers
- Timing
- Improve user experience
- Optimization of conversion rate
- Better data collection
With these in mind, OptinMonster quickly becomes the best solution for geo-targeting popups.
Why OptinMonster is the Best Geo-Targeting Popup Plugin
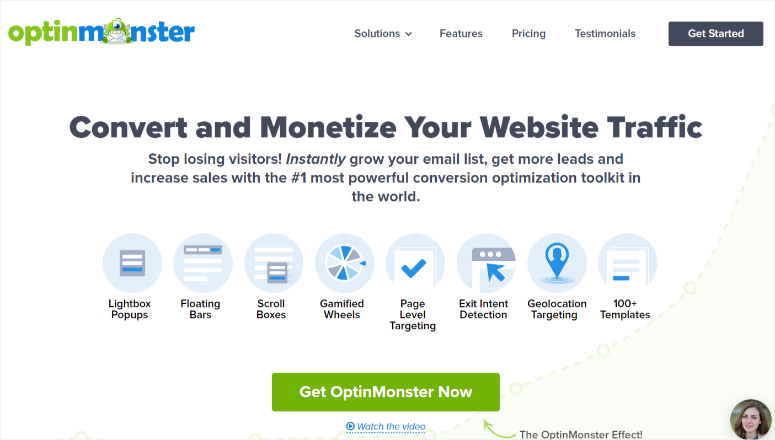
OptinMonster is the best lead generation and conversion plugin, providing beautifully designed optin forms.
It goes beyond just popups as you can also create slide-ins, scroll boxes, inline forms, full-screen mats, and so on. There are premade templates and a drag and drop builder to customize your popup design to match your website.
Added to this, you can add geo-targeting rules with just a click. There’s absolutely no coding needed!
However, location targeting is not all this plugin can do. Other popup triggers you can use with OptinMonster include:
- Exit-Intent Trigger: Through powerful exit-intent technology, the plugin will notice when a visitor is about to leave your site and display a popup.
- Scroll Trigger: You can set a popup to display once a visitor scrolls through a certain portion of the page.
- Time Delay Trigger: Set a location-based popup to appear once a visitor stays on the page for a specific time period.
- Click Trigger: Through MonsterLinks technology, Optinmoster can turn any link or image into a two-step signup form.
- InactivitySensor Trigger: A popup will appear if a visitor stays idle for a certain time on your site.
- Device-Based Triggers: The popup will only appear if the visitor uses a specific device.
- Page-Level Targeting: Only display popups on particular pages on your site.
As you can see, OptinMonster is a beast when it comes to highly specialized targeted conversion features.
Plus, if you want to know how your popups are performing, the tool comes with powerful built-in analytics. You can see the number of views, conversions, and more right inside your WordPress dashboard.
While OptinMonster is primarily used as a WordPress plugin, you can also use it in Shopify, BigCommerce, and HTML sites.
For this tutorial, we will focus on how to use the OptinMonster WordPress plugin to add a location-based popup.
So, let us walk you through, step by step, how you can use geo-targeting popups with OptinMonster.
Step 1: Install and Activate OptinMonster
Before you get started, you will first need to create an account and buy a plan from OptinMonster’s official website.
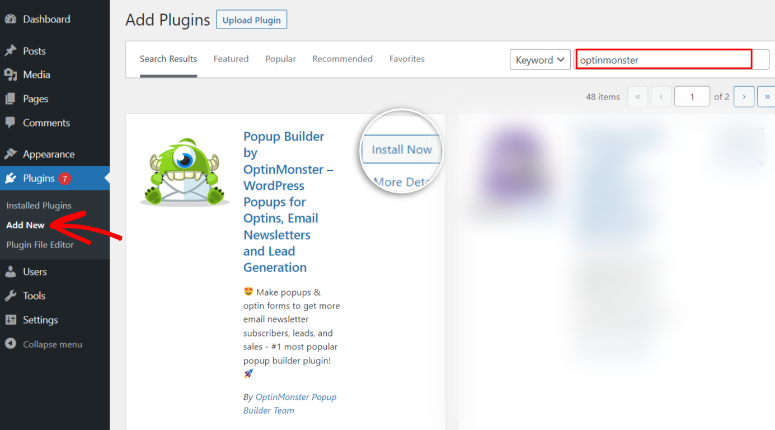
In your WordPress dashboard, go to Plugins » Add New. In the search bar, type in “OptinMonster.” Then install and activate the plugin.
Check out this article if you need help on how to install a WordPress plugin.
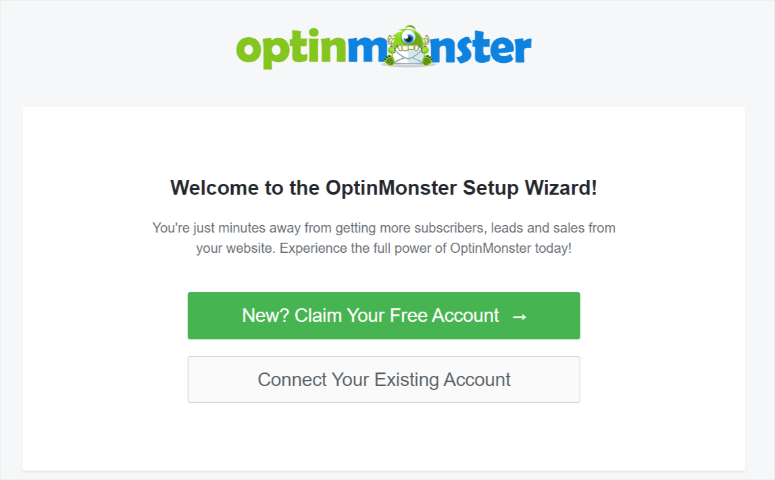
Once installed and activated, OptinMonster will automatically redirect you to its onboarding wizard page. Here, you will add the OptinMonster account you made earlier by hitting the Connect to Existing Account button.
When this is selected, a popup window will appear requesting you to connect your existing account.
You also have the opportunity to create a new OptinMonster account if you have not created one earlier.
When you select the New? Claim Your Free Account button; the plugin will redirect you to the OptinMonster site to sign up.
Once you’ve connected your OptinMonster account to your WordPress site, you’re ready to create your first popup.
Step 2: Create a Popup Campaign
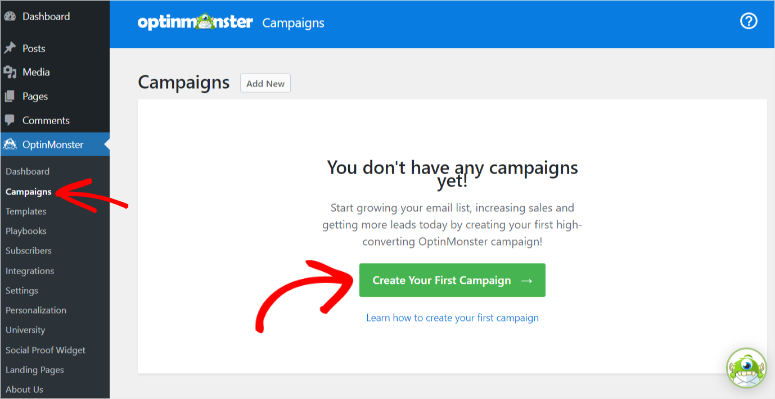
Inside your WordPress dashboard, select OptinMonster » Campaigns from the menu on the left.
Now you can click on Create Your First Campaign to get started.
On the next screen, you will see different types of campaigns that you can create that include Popups, Floating Bar, Fullscreen, Inline, Slide-in, and Gamified.
Select the Popup campaign.
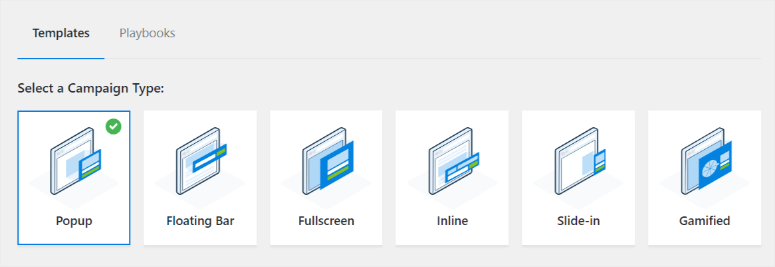
Below this, you’ll see a library of templates.
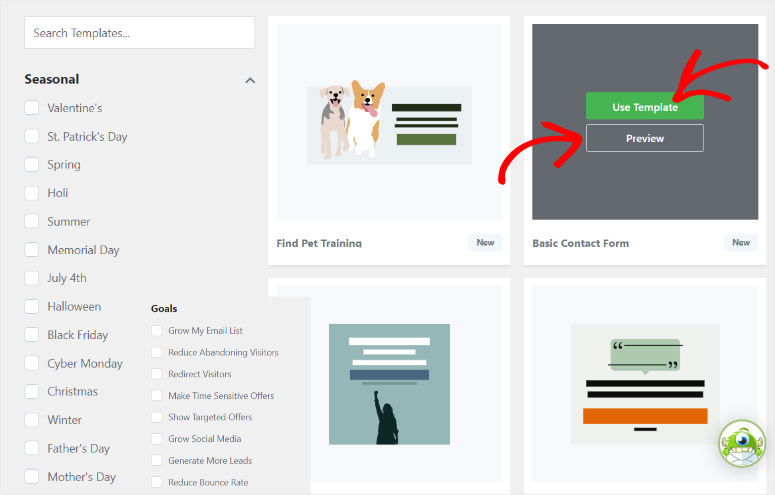
OptinMonster offers +100 templates that you can customize further to create uniquely personalized campaigns.
Because of the large number of templates, the plugin has arranged them according to different categories, and a search bar is also available to help you find what you are looking for more easily.
Before you select a template, you can preview it to see if it fits what you are going for.
Once you have found the ideal template, hit the Use Template button.
In the popup menu, name the campaign so you do not confuse it with other campaigns, and select the Start Building button.
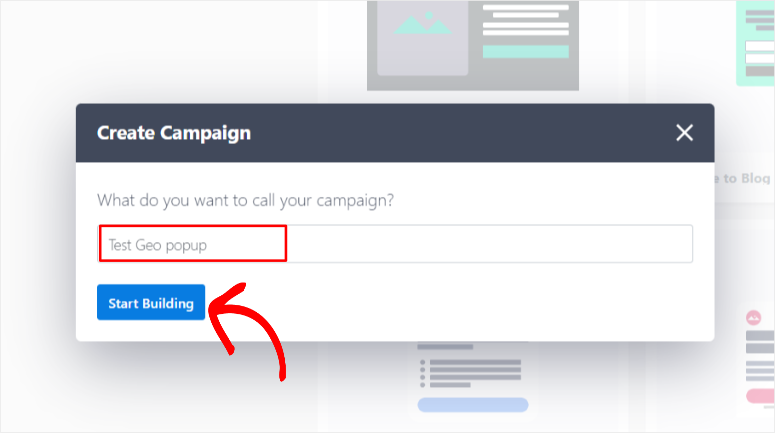
At this point, the plugin will automatically redirect you to the OptinMonster campaign builder page.
Even though all OptinMonster templates are beautifully designed, you can customize all popup elements here to ensure you create exactly what you want.
Let us see how.
Step 3: Popup Customization
The OptinMonster campaign builder is a powerful drag-and-drop builder that makes it incredibly easy to customize popups.
The builder’s design is easy to use, and options are well-arranged to make the whole process even easier for you.
You will notice a preview window on the right of the design tab. Here, you can drag and drop any design elements from the left to the exact point you would like them to appear in the popup.
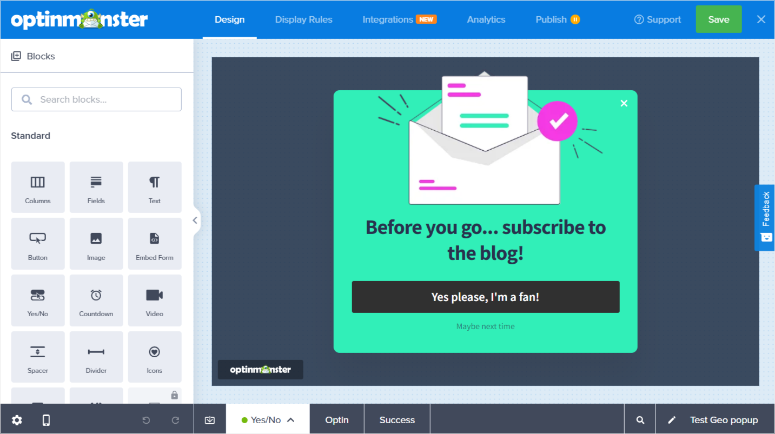
Once placed on the page, each element will instantly become editable, and you can change the size, color, font, and so on.
So for instance, you can simply click on the text in the preview. The text becomes editable and you can enter the content you want. At the same time, you’ll also get more editing options in the left menu. You Here, you can edit the style, color, spacing, border, background, and more.
To change the image of the popup, simply select the placeholder picture in the popup template. The image menu will appear on the left, which allows you to replace or remove the image.
When you select the placeholder image, you will have the option to either upload a new file from your PC or one from the popular stock image site ‘Unsplash.’
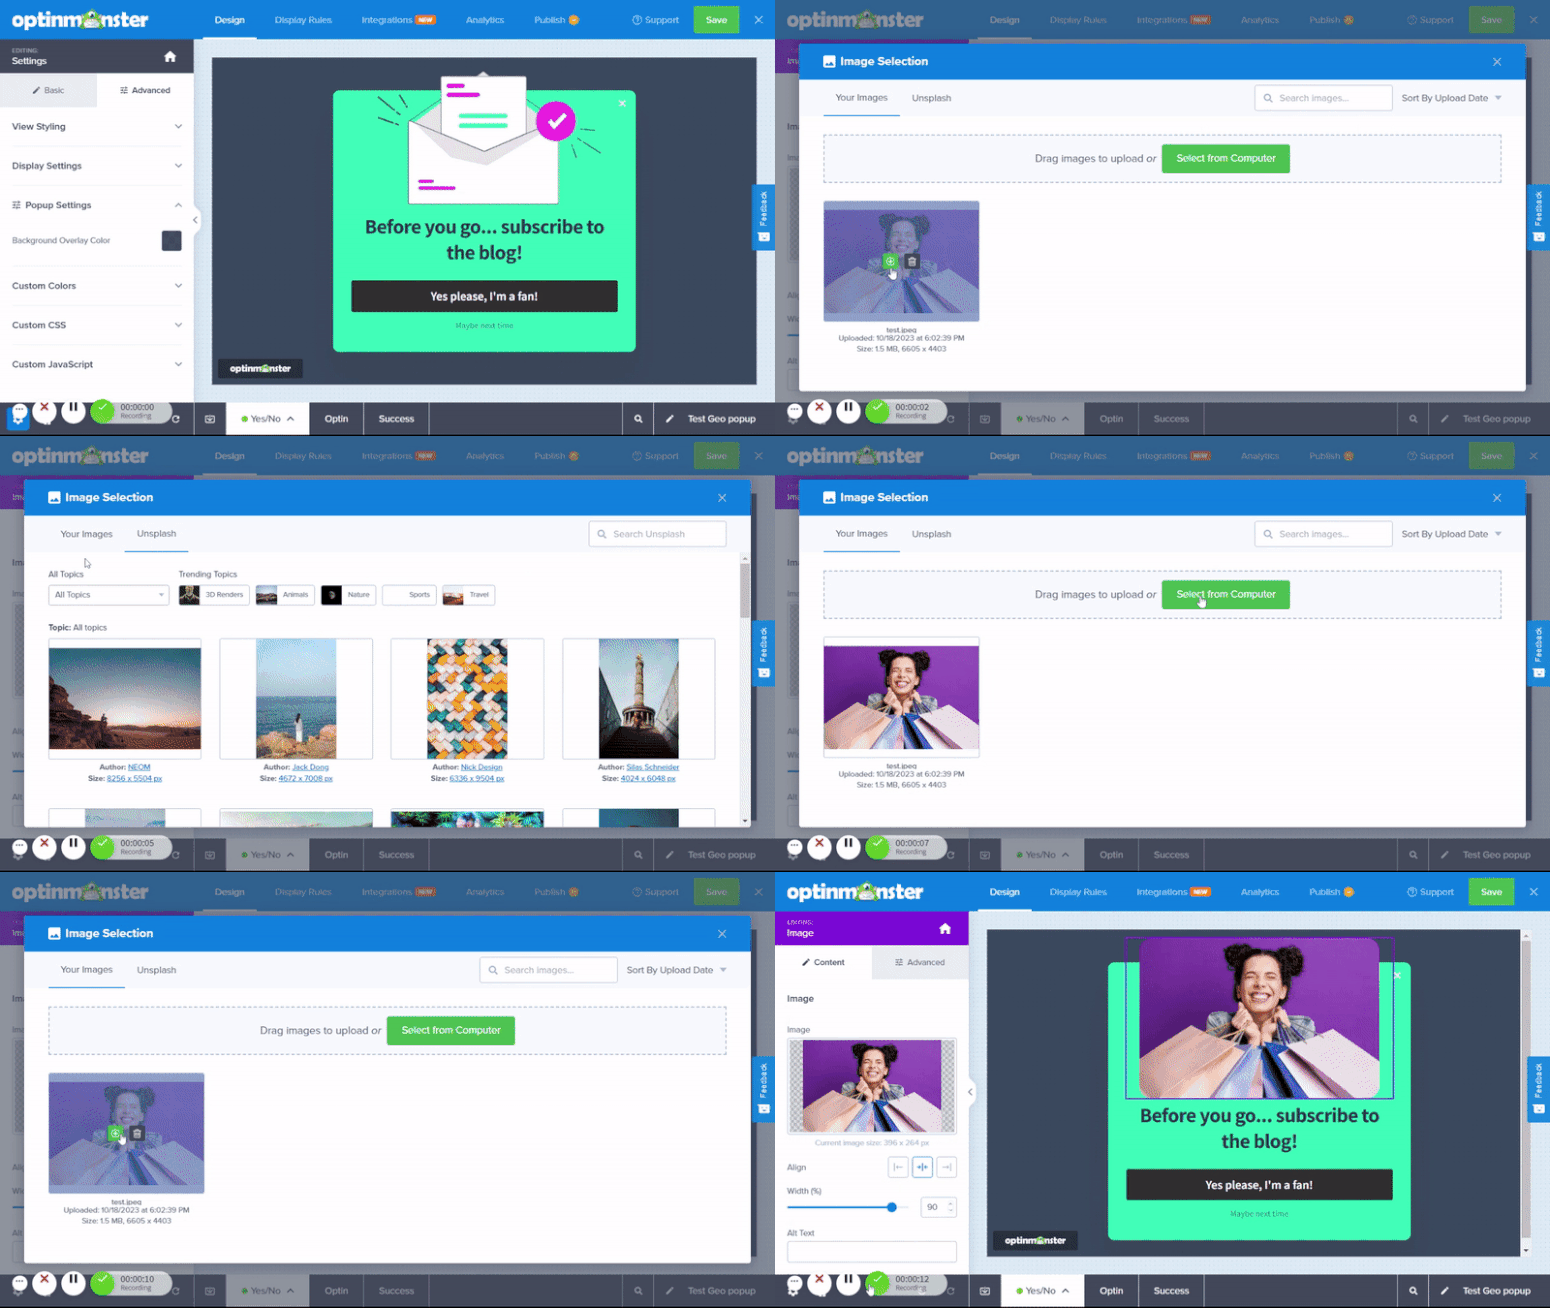
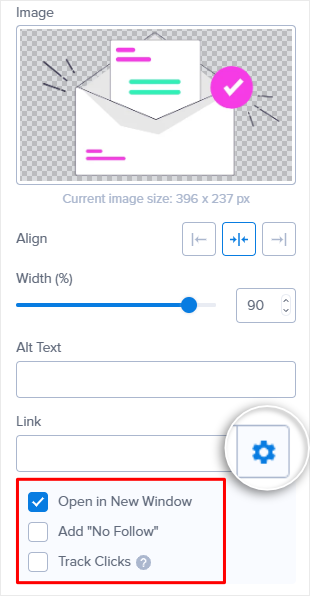
Once you choose your image, you can customize the alignment and width. Below these options, you can also add an ALT text and a link to the image, which are great for SEO.
To help with SEO further, select the Settings icon under the link bar. Here, set if the link should open in a new tab, if it should be have a “nofollow” tag, and if the clicks should be tracked.
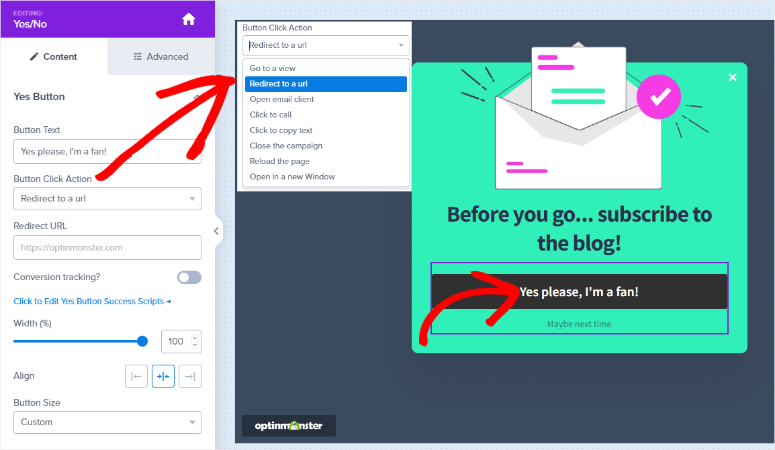
Coming to the call-to-action buttons in the campaign. You can easily custominze the text and change the button size. Added to that, you can personalize the Button Click Action.
Here, you can add a URL to the button, redirect the user to open an email, add a call button, and so much more. If you want to track conversions on this button, you simply need to switch on ‘Conversion tracking’ in this menu.
With the popup image, text, and other element customizations done, move to the Success tab at the bottom of your screen to configure the message your visitor will see once they complete filling out the popup form.
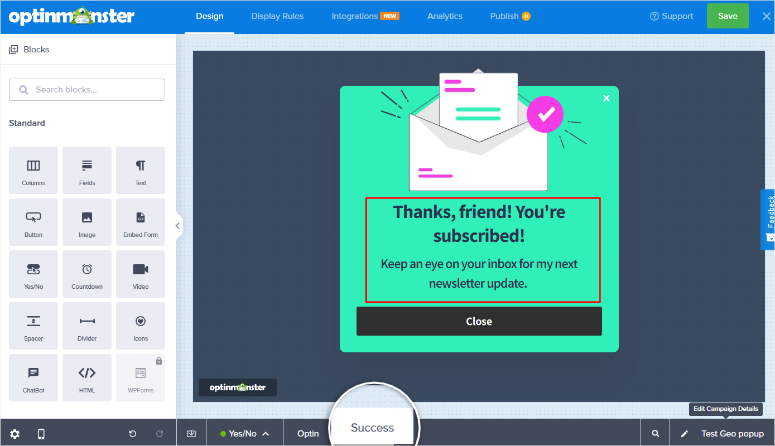
You will design the success popup in the same way you created the optin popup. That is, adding and editing elements from the left, then dragging and dropping them to the preview window on the right.
Remember, the success popup is a great opportunity to offer more information or thank your visitor.
Once done, your popup design is ready. You can go ahead and add geo-targeting rules.
Step 4: Adding Popup Geo-targeting Rules
OptinMonster comes packed with a range of triggers and targeting options.
To access this, go to the Display Rules tab at the top of the OptinMonster campaign builder page.
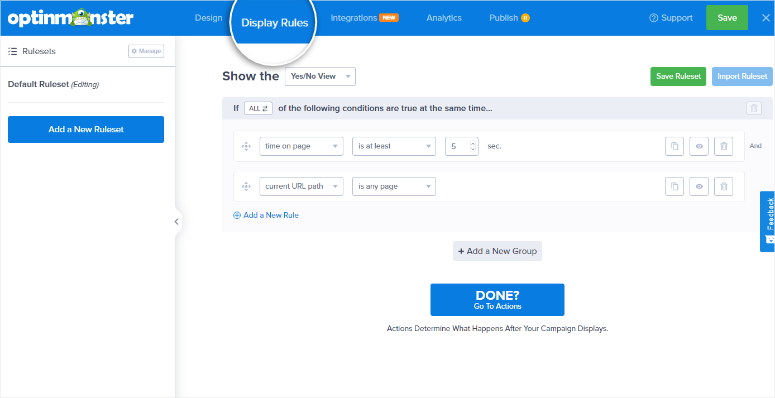
You’ll see that by default, OptinMonster displays your popup if a visitor spends at least 5 seconds on any page. Let’s change these rules.
In the first rule, click on ‘Time on page’. This will open up the library of display rules and triggers. This a quite a huge library, so you can quickly find what you’re looking for using the filters on the left that include popular, who, when, where, onsite retargeting, and eCommerce.
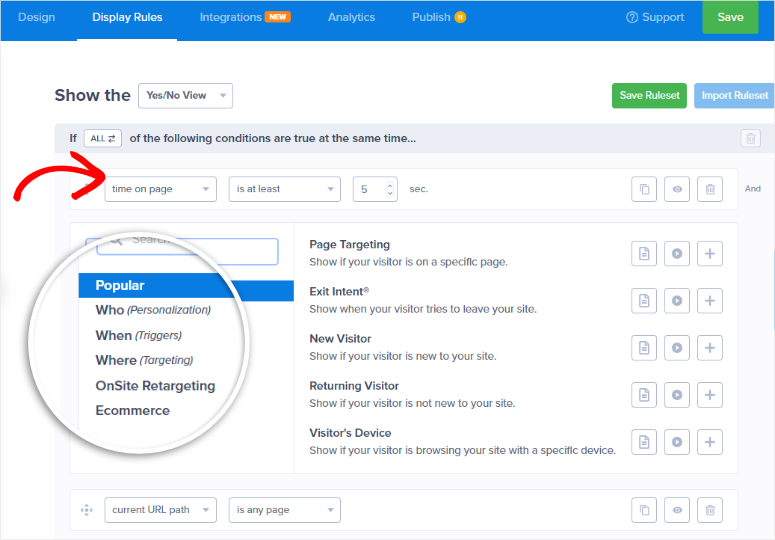
You want to choose the ‘Who(personalization)” filter and you’ll see Physical Location.
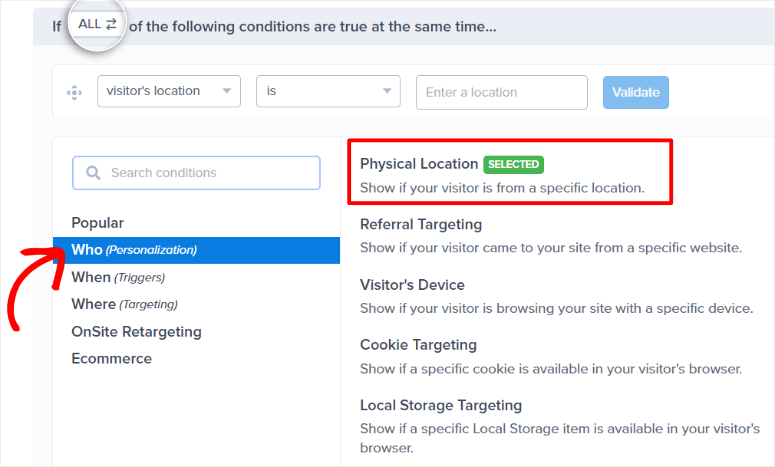
Follow this by setting up if you want people in this location to view or not view the popup from the dropdown menu. We will go with “IS” in the location so that people who are in the area can see the popup.
Next, enter where you want the popup to target.
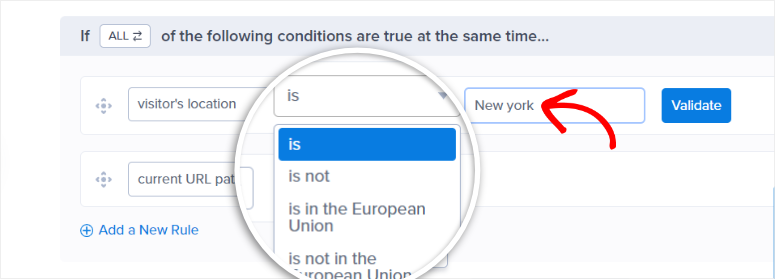
In the location box, type in the place; it can be a country, city, or state. We’re entering ‘New York’ here. Finally, hit the Validate button.
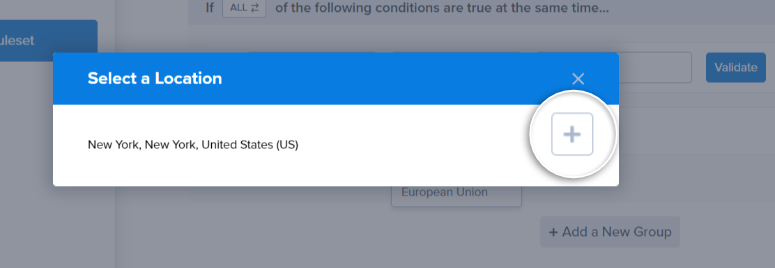
When you hit Validate the rule with your location added, a popup window will appear where you add the location by clicking on the plus icon next to the exact location you want.
Now let’s edit the second default rule. Let’s add an exit-intent popup so they’ll see the popup right as they’re going to leave the site. You can find the “Exit Intent” rule quickly under the Popular target rules.
Once added, you’ll see an option whether you want to show/hide the popup on certain devices such as desktop or mobile.
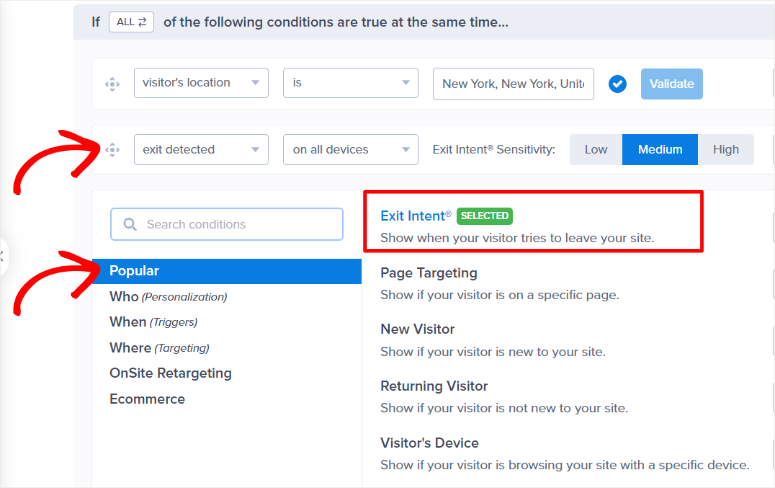
Lastly, you can also control the sensitivity of the Exit Intent® detector. We recommend leaving the sensitivity at medium.
Your popup rules are set.
There’s just one more thing you’ll want to check. If you’re using multiple rules, you can tell OptinMonster whether all rules must apply or just ONE of the rules needs to be met.
Just above the rules, you’ll see a sentence “If ALL of the following conditions are true at the same time…” If you click on the word ‘ALL’ you’ll see the option to change it to ‘ANY ONE’. Let’s quickly understand this.
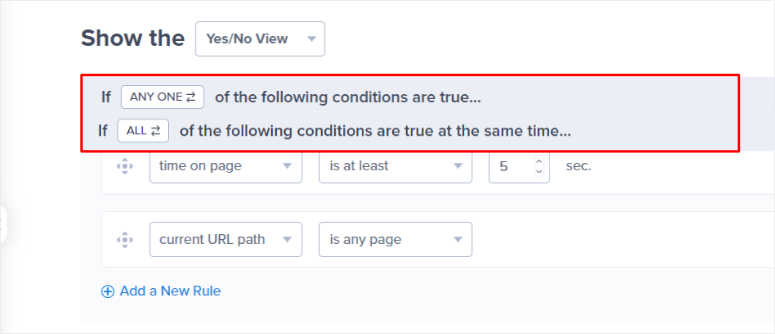
If set to “ALL” in the popup we just created, the user needs to be located in New York AND exiting the page. Both rules must apply.
If set to ‘Any One’, then just one rule must be true for the popup to appear. So the popup will appear if the user is in New York OR is exiting the page. That means visitors who are exiting your site in other geographic locations will also see the popup.
So for this geo-based popup, you want to make sure you’ve selected the ‘ALL’ option.
Now you’re ready to go to the next step using the Done? Go To Actions button below..
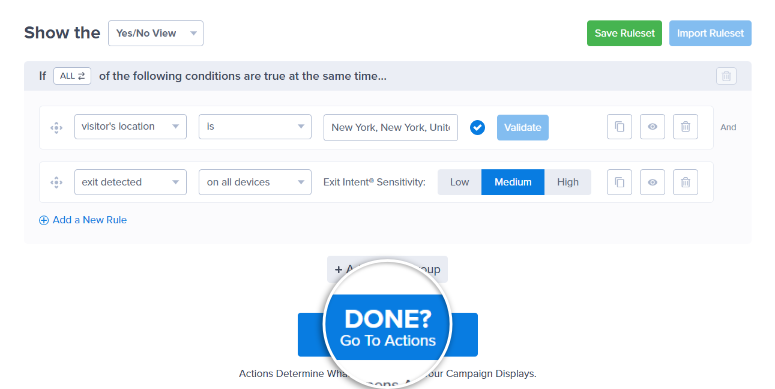
In the Actions tab, decide if you want the geo popup to display with animations or sound to help capture your audience’s attention from the dropdown menus.
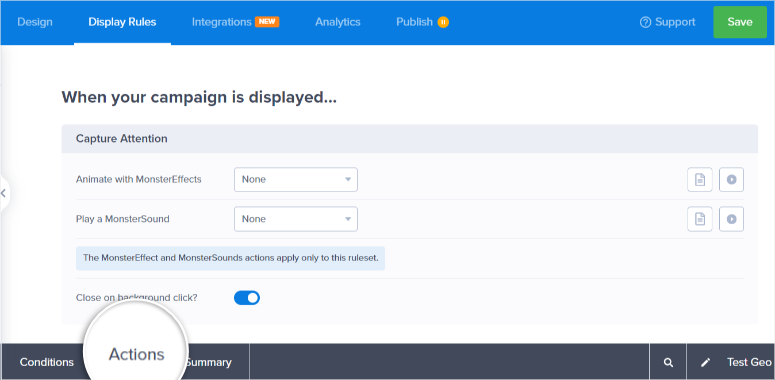
On the same page, you can set cookies to help you with onpage retargeting.
These cookie settings include:
- If it is converted, show it again…
- If it is closed but not converted, show it again…
- Remember a visitor who has seen this campaign…
Finally, go to the Summary tab found next to the ‘Actions’ tab to see the overview of the conditions and actions set for your geo-targeting popup.
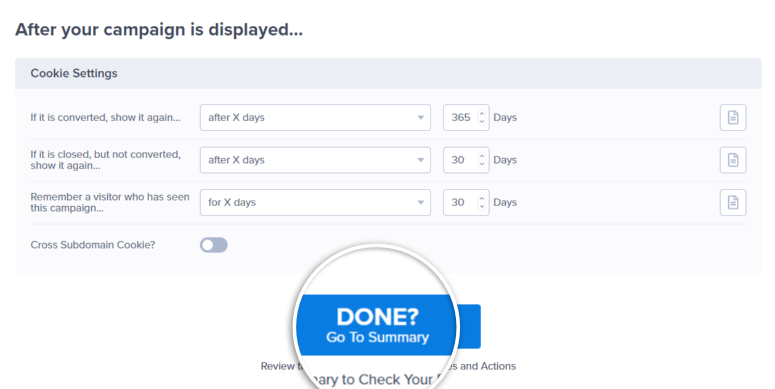
On the summary page, you can review the rules once again to see if it makes sense and works for your particular scenario. Once done, hit Save.
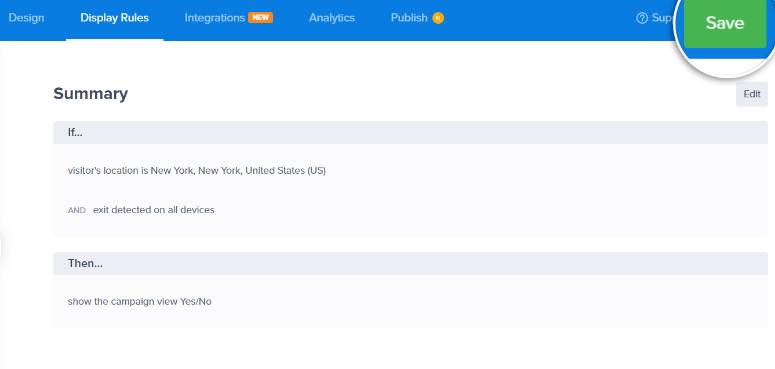
Thats it! You are ready to publish your geo popup.
Step 5: Publish the Geo-Targeting Popup
Go to the Publish tab in the top menu of the OptinMonster campaign builder and select ‘Publish’ in the Status section.
You will notice the small yellow pause icon next to the ‘Publish’ tab before you publish the popup. Once done, it will display a green check mark, indicating the popup is published.
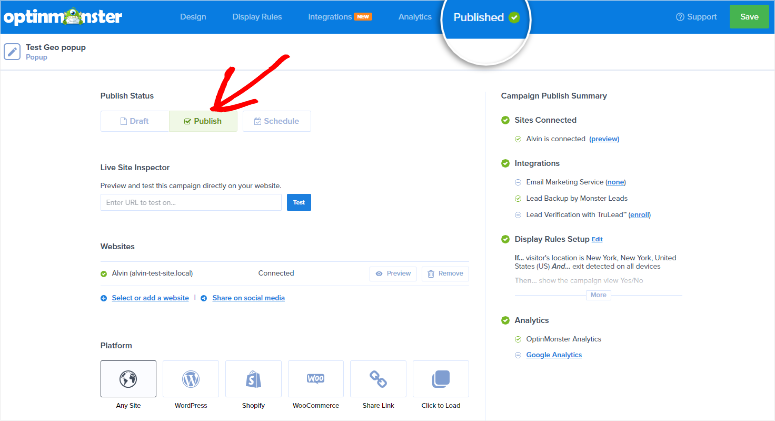
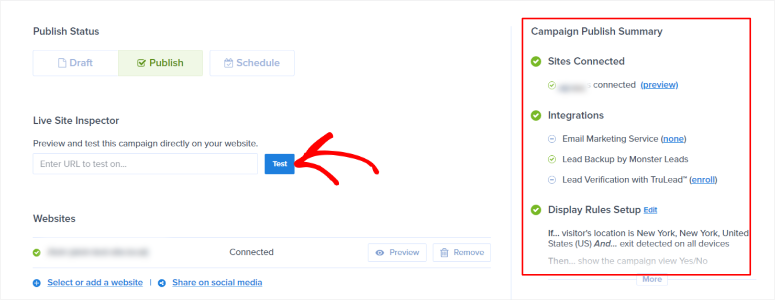
On the same page, you can also test the popup and check the status of site connections, integrations, and display rules.
To test the popup, type in the page’s URL and select the Test button.
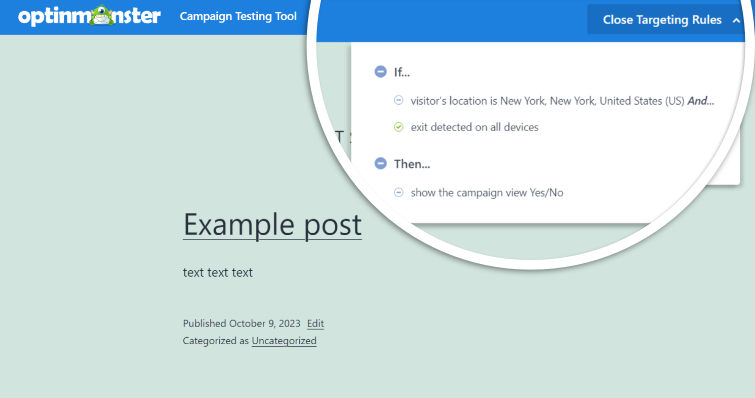
Next, a new tab will open on the page where the popup is located. On the far right, the page will display the rules for the popups so you can review them again.
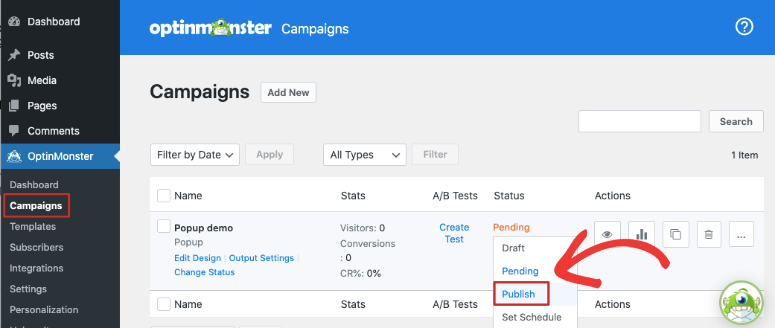
Since you’re using the WordPress plugin to connect your OptinMonster account to your site, you want to also make sure that the campaign is set to “Published” back in your WordPress dashboard.
Congratulations! You have just created, set up, and published a geo-targeting popup through OptinMonster.
Set Up Email and Marketing Integrations
One of the best features of OptionMonster is that you can integrate it with almost any email marketing or CRM tool.
At the top, next to the ‘Display Rules’ tab, go to the Integrations tab. You will see a long list of tools and apps you can integrate with OptinMonster.
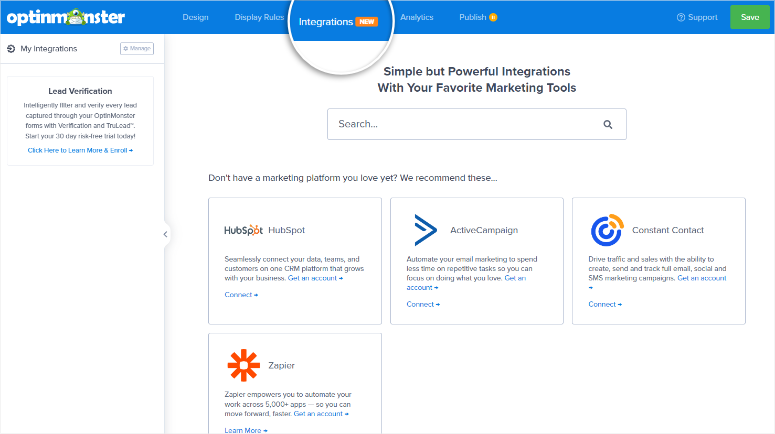
Let’s do one integration as an example.
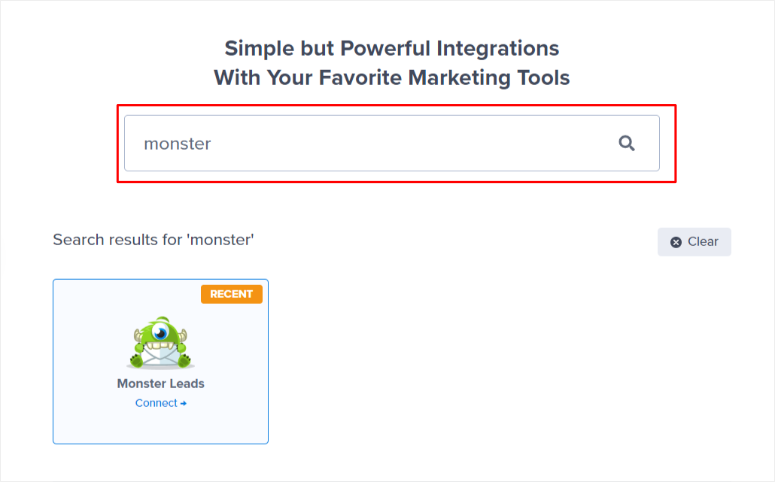
On the search bar, find Monster Leads, the best way to collect and segment your email list. Hit Connect to start the process.
On the next page, add the Form Name, Notifications, and Tags. You will also carry out ‘Field Mapping,’ where you will connect corresponding Field IDs from your Monster Leads account, such as the names and email addresses of your mailing list.
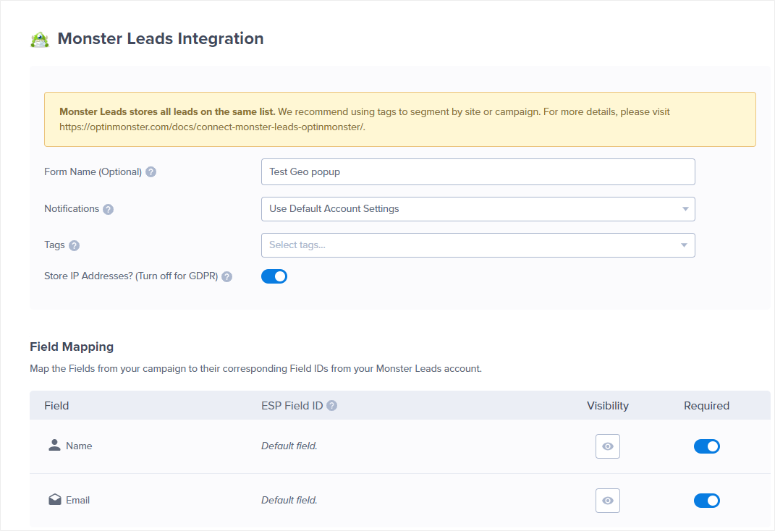
Integrations with other tools and apps are just as easy. All you need to do is add the needed details for the connection, like the API key or the account name. OptinMonster will let you know what you need for that particular integration.
Track Your WordPress Geo-Based Popup
No effective campaign is complete without proper tracking. With OptinMonster, you won’t have to set up UTMs in Google Analytics and follow complicated processes. The tool comes with powerful built-in analytics to see exactly how your campaigns are performing.
In the Analytics tab, you can either view OptinMonster Analytics or connect to your Google Analytics account.
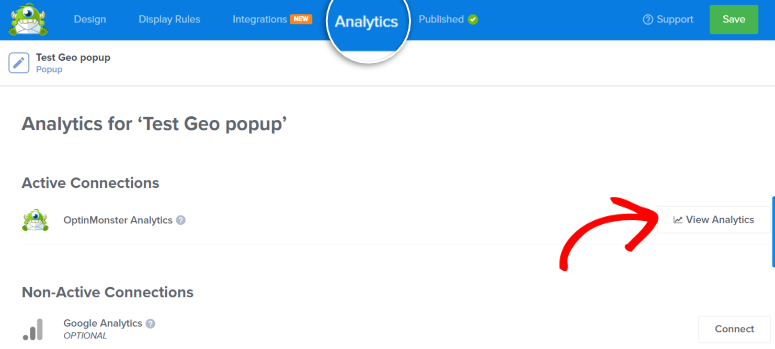
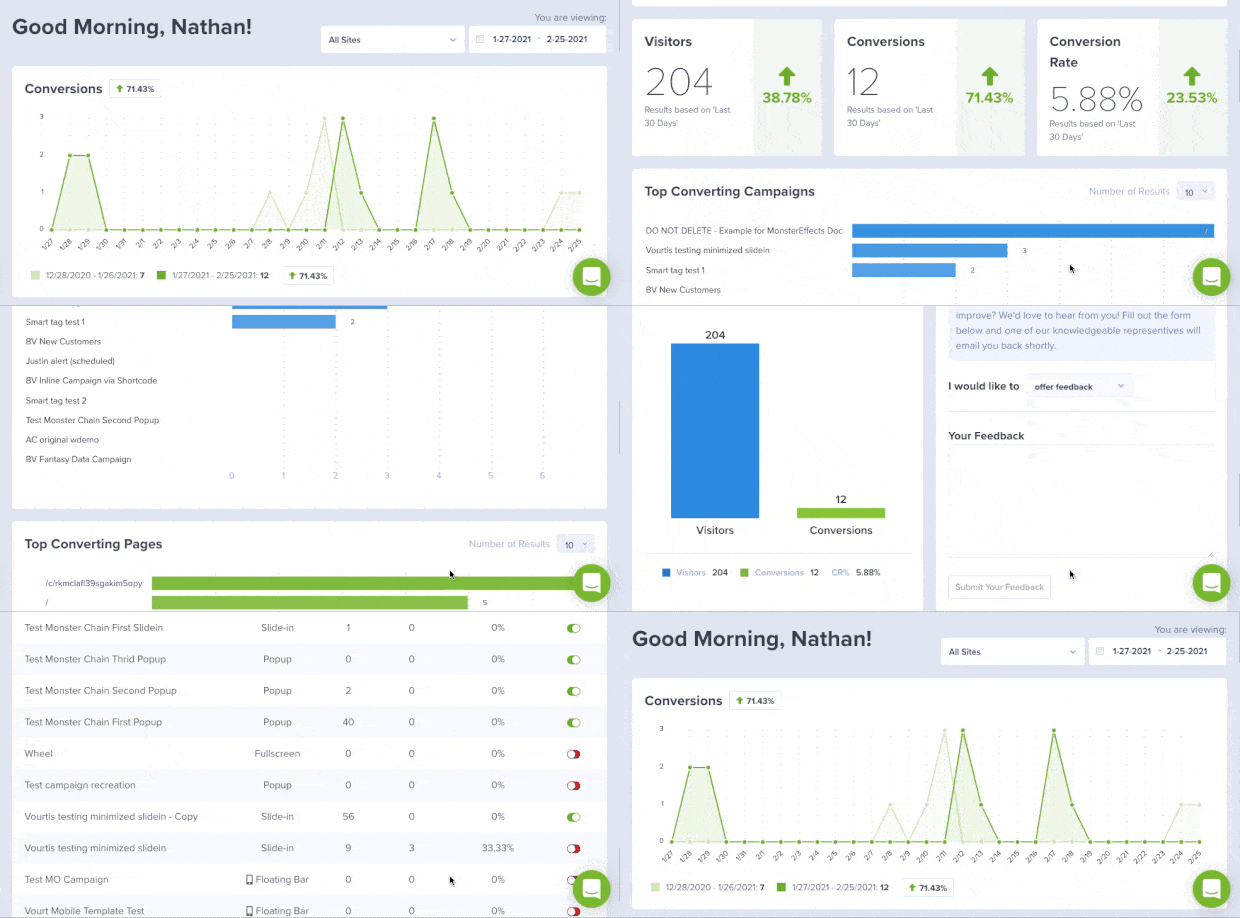
With OptinMonster Analytics, you check out individual campaign analytics from the dropdown menu. You can monitor the conversion rate, number of visitors, conversions, and split tests.
Speaking of Split Tests, this is another impressive feature from OptinMonster that can help you create better geo-targeting campaigns.
This feature can help you compare and test different campaign elements and adjust them for better performance.
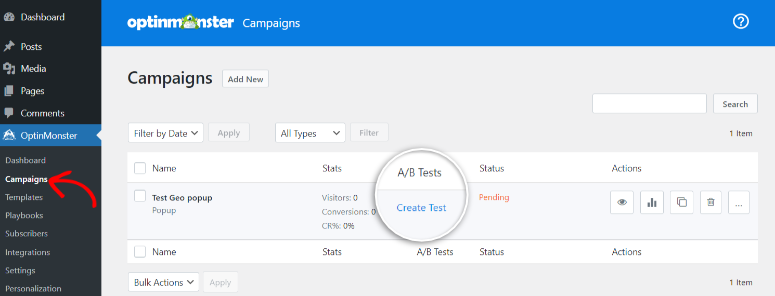
To access split tests, go to the OptinMonster » Campaigns. Then, under A/B Tests, select ‘Create Test.’
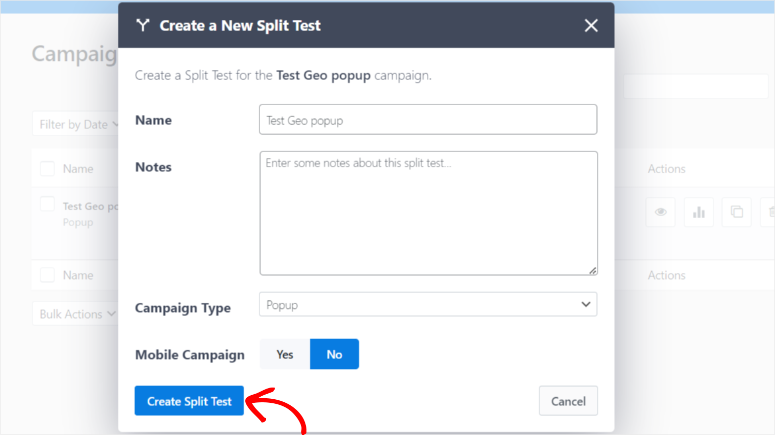
A popup window will appear, asking you to name and describe the test. Then, select the campaign type for the test and if it is a mobile campaign. Finally, hit Create Split Test.
You will be redirected to the OptinMonster campaign builder. Here, edit different but specific elements of the campaign so that you can see and compare how the campaign will perform with the changes.

Once you are done, go back to the Campaigns submenu. On the specific campaign you were working on, you will see all the split tests you have done, their conversion rate, number of visitors, and number of conversions.

As you can see, using OptinMonster is incredibly easy and effective. Most importantly, you do not need any coding experience to set it up. So, what else can you do with OptinMonster?
What Else can OptinMonster do?
OptinMonster is the most powerful lead generation and conversion tool. Through its beautiful campaigns, you can persuade your audience to take action better on your site.
This tool ensures that your campaigns are not intrusive while using psychological elements to make your marketing approaches more fruitful.
Other ways you can use OptinMonster include:
- Create Eye-catching Opt-in Forms: Design and customize different campaign types, such as opt-in forms, such as popups, slide-ins, floating bars, and more. These forms can capture email addresses, promote special offers, or encourage newsletter sign-ups.
- Exit-Intent Popups: Detect when a visitor is about to leave your site and display a targeted popup or message to encourage them to stay or take a specific action, like subscribing or purchasing.
- Timed Popups: Set specific time intervals for when opt-in forms appear, helping you engage visitors at the right moment.
- Campaign Scheduling: Plan when your optin forms appear on your site. This can help promote time-sensitive offers or events.
- Segmentation: Divide your audience based on user behavior, allowing you to show specific messages to different groups of visitors.
- Lead Magnet Delivery: Deliver lead magnets like eBooks, PDFs, or other digital resources automatically to subscribers.
- E-commerce Integration: Display targeted offers or discounts to visitors based on their behavior and browsing history.
- Recover Abandoned Cart: Reduce cart abandonment rates by displaying exit-intent popups with special offers when visitors are about to leave the checkout page.
That’s all we have for today! Below, we answer some commonly asked questions on the topic.
FAQs: How to Create a Popup Based on Location
How many countries can I target with OptinMonster?
OptinMonster doesn’t have a fixed limit on the number of countries you can target. The choice is yours on who and where you target. You can customize your campaigns and messages flexibly depending on who you are targeting.
How do I change the targeted location with OptinMonster?
- Edit the campaign and go to Display Rules tab.
- Edit the Physical Location (visitor’s location) rule and choose the new region, country, or state.
- Customize the content to fit the new location
- Save your changes and publish the campaign
Why does Google discourage popup campaigns?
Google discourages popups because they can sometimes provide a poor user experience. They may make websites harder to navigate on mobile devices or disrupt the content. Google wants to ensure a better user experience for its users. You should have no trouble if your popups do not disrupt the user’s experience.
What are the best types of popup campaigns that convert?
The best popup campaigns that tend to convert well are:
- Exit-Intent Popups: These appear when a user is about to leave your site, grabbing their attention before they go.
- Timed Popups: Show them after a specific time on your website so visitors have had a chance to engage.
- Scroll-Triggered Popups: Display when a user scrolls down a certain percentage of the page.
- Content Upgrade Popups: Offer relevant content upgrades in exchange for email addresses.
- Gamified Popups: Use games or quizzes to engage visitors and collect leads.
Now that you have a better understanding of how to create location-based popups with OptinMonster, you may also be interested in learning about how to create a lead capture page in WordPress. To add to that, here are additional resources you may find helpful.
- 10 Best B2B Lead Generation Tools for Small Businesses
- Thrive Leads Alternatives: OptinMonster vs. Thrive Leads
- 15 Conversion Rate Optimization Tools to Skyrocket Growth
The first two articles focus on lead generation and alternatives to OptinMonster, while the last focuses on converting these leads to customers.

Comments Leave a Reply