I’ll never forget the morning I woke up to dozens of panicked emails.
Every single one of my subsites was down. Gone. A failed plugin update had corrupted my entire multisite network overnight.
I rushed to my best backup solutions, only to discover that it had been backing up just the main site. Not the network tables, or the subsites. Just one site out of twelve.
I spent three days rebuilding everything from scratch, from the client sites, content, to user accounts. Everything!
That’s when I learned the hard way:
WordPress Multisite backups are completely different from regular WordPress backups. Miss one component, and you lose everything.
In this guide, I’ll show you two ways to back up your multisite network. First, the manual method, so you understand what’s actually involved.
Then, the plugin method I now use to protect my entire network in minutes instead of hours.
What You’ll Need Before We Start
Before we dive into backing up your multisite network, let’s make sure you have everything ready. This will save you from stopping halfway through the process.
Access Requirements:
- You’ll need super admin access to your WordPress Multisite network. This is different from regular admin access. Super admins can manage the entire network, not just individual sites.
- Plus, you’ll need access to your hosting control panel (cPanel, Plesk, or similar). This is where you’ll find File Manager and phpMyAdmin.
For the Manual Method:
- FTP client like FileZilla, or hosting File Manager access
- phpMyAdmin access through your hosting control panel
- Enough storage space on your computer for large files – your backup could be several GB
For the Plugin Method:
- For this tutorial, we will use Duplicator Pro – You need a license
- Important: The free version does NOT support multisite
- Ability to Network Activate plugins (super admin permission)
Time Estimates:
Here’s what to expect time-wise:
- Manual backup: 1-2 hours for your first attempt (30-60 minutes once you’re experienced)
- Duplicator Pro setup: 15-20 minutes one-time setup
- Duplicator Pro backup: 5-30 minutes, depending on network size (or automated while you sleep)
Skill Level:
- Manual method: Intermediate. You should be comfortable with FTP and databases.
- Duplicator Pro: Beginner-friendly. Its wizard guides you through everything.
Ready? Let’s start by understanding exactly what makes multisite backups so different.
Understanding What You’re Backing Up
Here’s the thing about WordPress Multisite: it’s way more complex than a regular WordPress site.
Think of it like an apartment building instead of a single house. Everything is connected through ONE database and shared files. Which means you can’t just back up one piece and call it done.
What you’re actually backing up:
- ONE database containing data for ALL your sites (not separate databases)
- Network tables that track which sites exist (wp_blogs, wp_users, wp_site)
- Individual site tables for each subsite (wp_2_, wp_3_, wp_4_*, etc.)
- All WordPress files (themes, plugins, core files)
- Media uploads for every subsite (separate folders: uploads/sites/2/, uploads/sites/3/, etc.)
- Configuration files (wp-config.php and .htaccess)
The critical point: Miss even one component and your backup won’t work. Lose the network tables? WordPress won’t know your subsites exist. Skip a subsite’s uploads folder? All their images disappear.
This is why regular backup plugins often fail with multisite. They’re not designed for this structure.
How to Back Up WordPress Multisite
As mentioned, I will be showing you both the manual and plugin method of backing up your multisite. This way, you can pick the option that suits your needs.
Below is a table of contents that you can use to skip to either method or any step you want to read about.
With that out of the way, let’s start with the manual method so you can see exactly what’s involved behind the scenes.
How to Back Up Your Multisite Manually
Let me be honest with you upfront: The manual way to back up a multisite is complex and can easily break your site.
But it is important that you understand the basics so that you know what happens behind the scenes when you use a plugin. I do not recommend this method for a beginner.
When the manual method makes sense:
- You’re on a tight budget – it’s free except for your time
- You need a one-time backup before migrating servers
- You want to learn how multisite actually works
- Your backup plugin is broken, and you need an emergency backup
The manual process has two parts: backing up files AND backing up the database. You need both. One without the other is useless. So the manual process will be a two-part tutorial.
Let’s start with the files.
Part A: Backing Up Files Manually
Step 1: Access Your File Manager 5 minutes | Get to your WordPress files
First, log in to your hosting control panel. This depends on your hosting provider. So it could be cPanel, Hostinger dashboard, SiteGround, and so on. For this tutorial, I am using Bluehost.
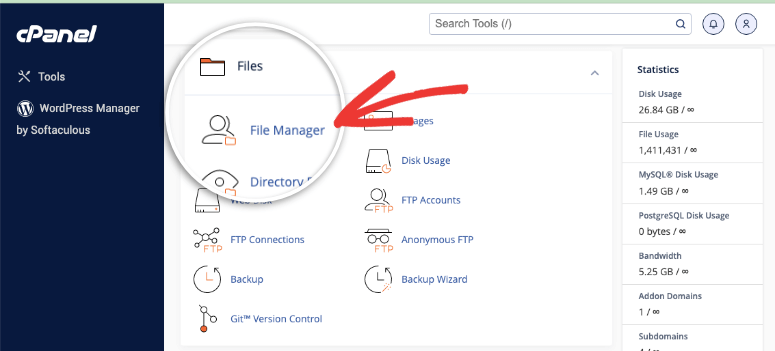
In your cPanel, select “File Manager” and let it open in a new tab.
Step 2: Locate Your WordPress Root Directory 2 minutes | Find the right folder
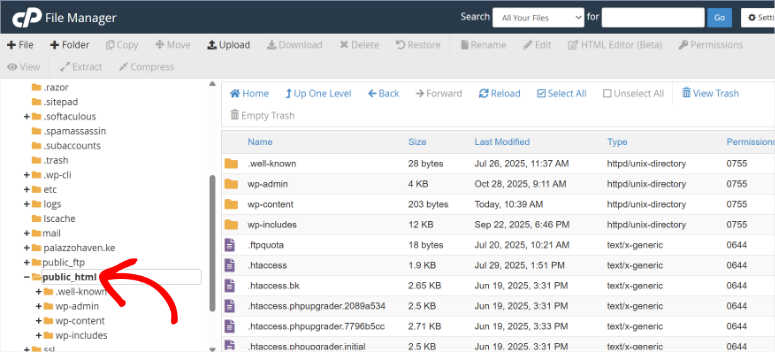
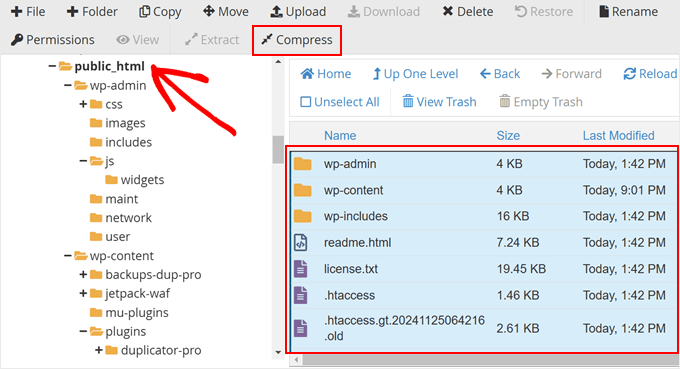
In File Manager, you’ll see a list of folders on the left side. Here, select “public_html.” This is your WordPress root directory where everything lives.
You’ll know you’re in the right place when you see folders like:
- wp-admin
- wp-content
- wp-includes
- wp-config.php
- htaccess
Understanding what’s here:
The wp-content folder is huge. It contains:
- /uploads/ – Main site’s media files
- /uploads/sites/2/ – Site 2’s media files
- /uploads/sites/3/ – Site 3’s media files
- /uploads/sites/4/ – Site 4’s media files (and so on)
Each subsite gets its own uploads folder. You need ALL of them.
Apart from that, you have wp-config.php, which contains your database connection details and multisite settings. This file is critical.
The .htaccess file contains multisite rewrite rules. Without it, your URLs won’t work after restoration.
Step 3: Select All Files 1 minute | Prepare for compression
Click inside the public_html folder to view its contents.
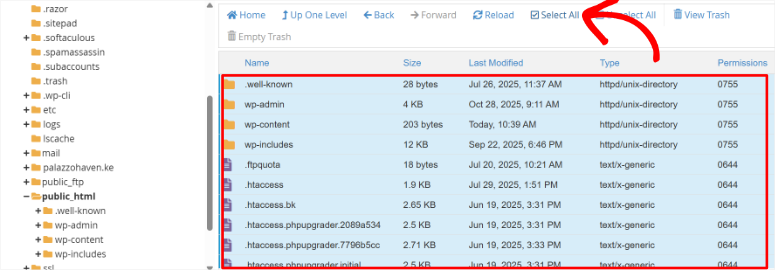
Now select EVERYTHING. You can:
- Press Ctrl+A (Windows) or Cmd+A (Mac)
- Or click the checkbox at the top that says “Select All”
It is important to ensure you select everything inside public_html, not public_html itself. After this, you should see all files and folders highlighted.
Step 4: Compress the Files 5-60 minutes | Create a downloadable backup
With everything selected, click on the “Compress” button at the top of the page.
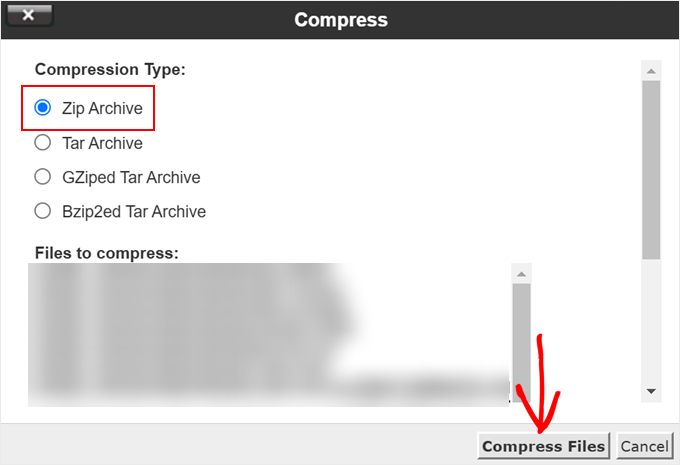
Next, a popup appears asking you to choose the compression format. Select Zip Archive since this is the most compatible format. Then hit “Compress Files” at the bottom of the popup.
Now wait. File Manager will compress everything into one ZIP file.
The time this takes depends on your network size:
- Small network (under 1GB): 2-5 minutes
- Medium network (1-10GB): 10-30 minutes
- Large network (10GB+): 30 minutes to 2+ hours
Don’t close your browser during this process. Instead, use the progress bar to see how long it takes.
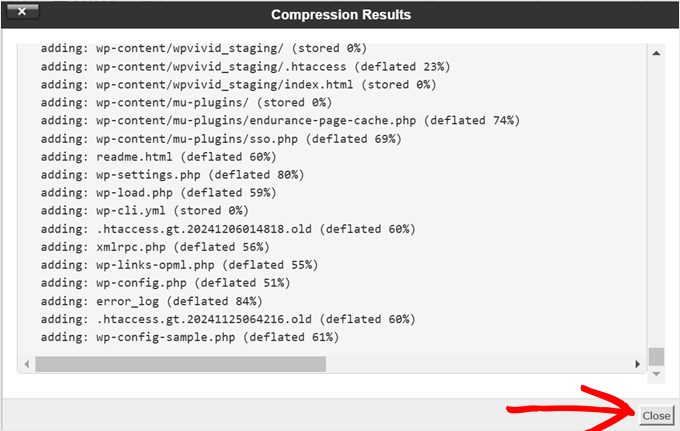
When it’s done, you’ll see a popup saying “Compression Result” with a success message. Click “Close”.
Step 5: Download Your Backup Varies | Save to your computer
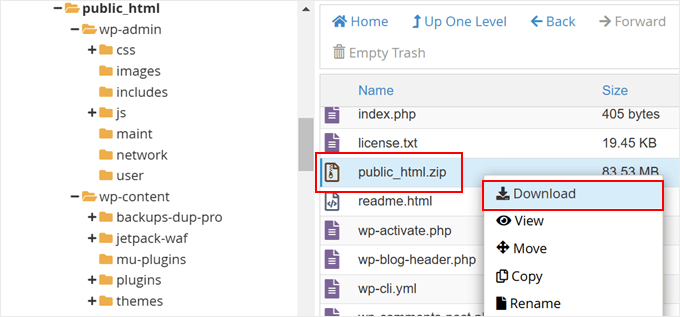
Now, your new ZIP file now appears in the public_html folder. Right-click on it to select it and select Download from the options you see.
After this, your browser will download the file. This could take a while if your backup is large.
⚠️ Pro tip:
I recommend you save the file to a dedicated backup folder on your computer with today’s date in the folder name. Something like: Multisite-Backup-October-2025
Once the download completes, you’re halfway done.
👉Alternative Method: Using FTP
If you prefer, you can use an FTP client like FileZilla instead of File Manager.
All you have to do is connect to your server using your FTP credentials. You can get these from your hosting provider.
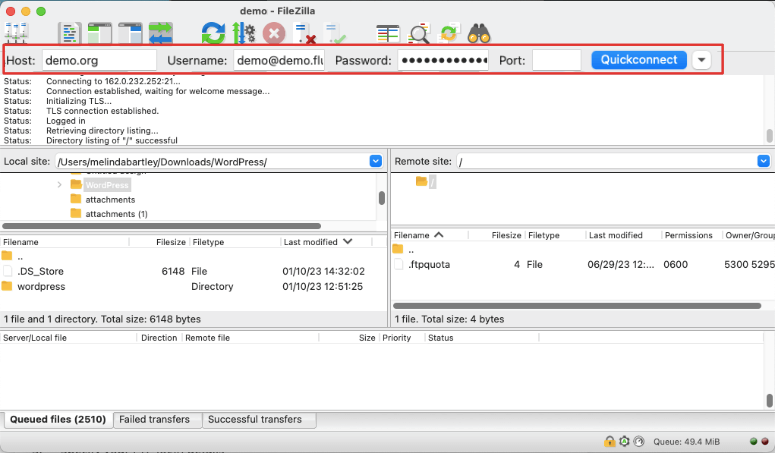
Then, navigate to public_html on the right side (server). On this page, select a location on the left side (your computer). Right-click the public_html folder and select “Download”.
FileZilla transfers all files directly to your computer. This takes longer than downloading a compressed file, but some people prefer it.
Part B: Backing Up Database Manually
Now for the second critical part: your database. Remember, your database contains ALL content for ALL sites in your network.
Step 1: Access phpMyAdmin 2 minutes | Open database manager
Go back to your hosting control panel.
Look for “phpMyAdmin” in the Databases section. It might also be under “Advanced” or “Tools,” depending on your hosting provider. Click it to open phpMyAdmin in a new browser tab.

Step 2: Identify Your Database 1 minute | Find the right database
On the left sidebar in phpMyAdmin, you’ll see a list of databases. Just so that we are on the same page, your WordPress database is usually named something like:
- username_wordpress
- yourdomain_multisite
- wp_multisite
👉Not sure which one? Here’s how to check:
Open your “File Manager” again and find the wp-config.php file in public_html. Then, right-click it and select “View” or “Edit”.
Look for this line:
define('DB_NAME', 'database_name_here');
Whatever is in the quotes is your database name.
Step 3: Select Your Database
Back in phpMyAdmin, click on your database name in the left sidebar, which will show all your database tables in the main area.
Scroll through and verify you see multisite tables:
- wp_blogs
- wp_site
- wp_users
- wp_posts (main site)
- wp_2_posts (site 2)
- wp_3_posts (site 3)
If you see these, you’re in the right place.
Step 4: Export the Database 5 minutes | Create database backup
At the top of phpMyAdmin, click the “Export” tab.
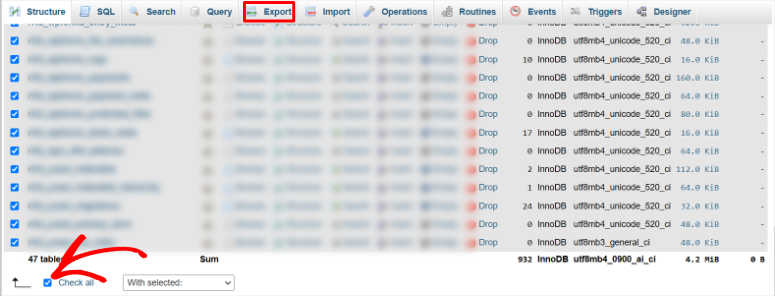
You’ll see two export options:
- Quick (uses defaults)
- Custom (more control)
Important settings to configure:
- Format: Keep “SQL” selected (this is correct).
- Tables: By default, all tables are selected. This is what you want. Don’t uncheck anything.
Once you confirm everything is correct, select “Custom” by clicking its radio button.
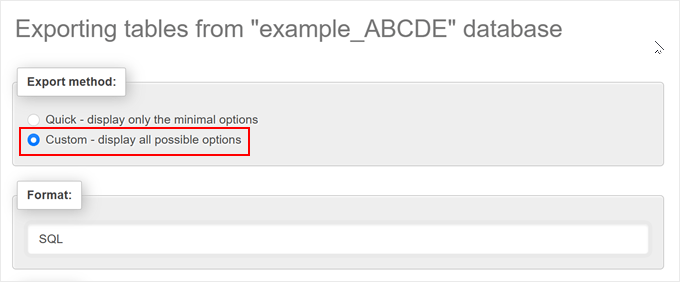
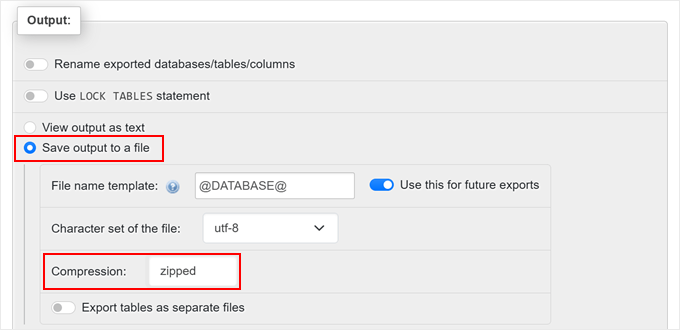
Next, scroll down and verify you see ALL your multisite tables in the list. Then, change from “View output as text” to “Save output to a file.”
On this page, confirm that:
- The filename template appears. You can add today’s date to it:
multisite_db_2025-10-30 - Compression: Find the dropdown and select “gzipped” or “zipped”. This is important as it reduces a 10GB database to 1-2GB. Always compress.
- Advanced options: Look for a checkbox that says “Add DROP TABLE”. Check this box.
- This makes restoration cleaner by removing old tables before importing new ones.
Leave everything else at default settings.
Step 5: Download Database Backup 30 seconds to 5 minutes | Final database step
Once the file is ready, scroll to the bottom of the export page and click the “Export” button.
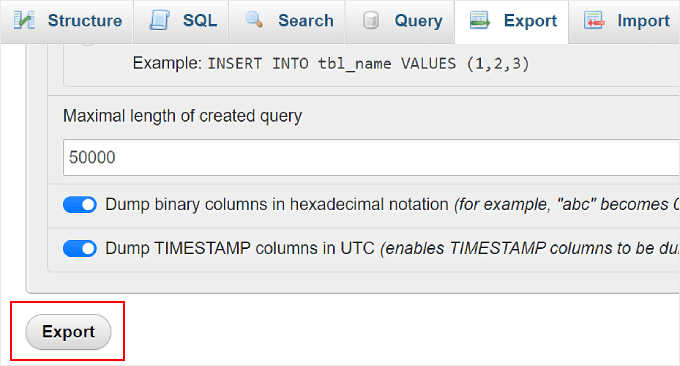
Once done, phpMyAdmin processes your request. This takes a few seconds to a few minutes, depending on the database size.
Your browser automatically downloads the compressed file and names it something like: multisite_db_2025-10-30.sql.gz
Save this file in the SAME folder where you saved your files backup.
Great! Now you have both parts of your backup. At this point, you should have your manual multisite backup ready. Just to make sure you have everything, use the checklist below.
Manual Method: Verification Checklist:
Before you consider your backup complete, verify you have:
✅ Compressed ZIP file of all WordPress files downloaded
✅ Database SQL export (compressed) downloaded
✅ wp-config.php included in file backup
✅ .htaccess included in file backup
✅ All uploads/sites/ folders included
✅ Both files stored in the same dated folder on your computer
Now, as you can see above from the step-by-step guide on how to back up your multisite manually, the process is challenging.
I used to manually back up my site, and even with my years of experience, it was still overwhelming. I switched to Duplicator Pro and now I can back up any site or multisite in minutes.
Now let me show you the method I actually use…
How to Back Up a WordPress Multisite with a Plugin – Duplicator Pro

Duplicator Pro is the most powerful backup plugin for WordPress. In fact, this is more than just a backup plugin. Duplicator Pro can do so much more while keeping everything simple.
What makes it beginner-friendly:
- Wizard-based setup walks you through everything
- Automatically detects all your subsites (no manual table hunting)
- One-click restoration when disaster strikes
- Disaster recovery URL that works even when your site is completely down
- Built-in cloud storage (Dropbox, Google Drive, Amazon S3, OneDrive)
- Scheduled automated backups (daily, weekly, monthly)
As you can see, it is built for beginners, so anyone can back up and restore their site in minutes. For a full breakdown, check out my Duplicator Pro review for more details.
Now, as mentioned, the free version of Duplicator does NOT support WordPress Multisite.
But you can use this plugin to easily migrate, transfer, or clone, back up, and restore your single site, either locally or through a cloud solution of your choice.
You can access the free version of Duplicator from your plugin repository before committing to the pro version.
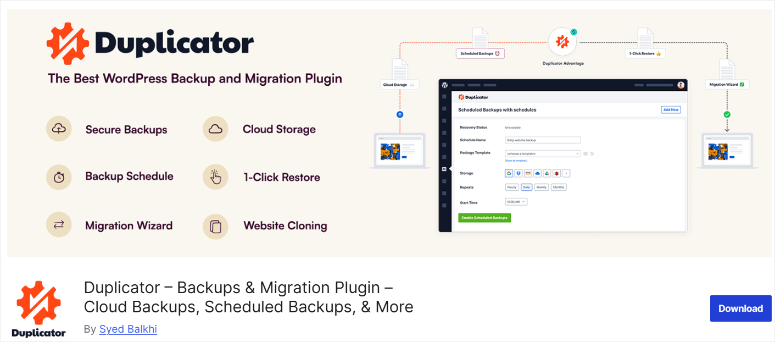
With that out of the way, let me show you how to use Duplicator Pro to back up your multisite.
Step 1: Install Duplicator Pro
While the plugin has different levels of the premium version so that you can choose one according to your needs, you need Duplicator Pro, which starts at $199/year and covers 5 sites.
But the reality is that Duplicator Pro pays for itself in time saved and disasters avoided.
Plus, it handles that complex multisite structure automatically. You don’t need to know which tables to back up or where subsite uploads are stored. Duplicator Pro does everything for you.
Now, before you do anything else, you need to purchase this backup plugin. It is a simple process, and all you need to do is go to the Duplicator homepage and hit Get Started.
After you buy it, go to your Duplicator Pro dashboard and navigate to “Downloads.” Here, download the duplicator file and copy the License Key; you will need it later to activate the pro version.
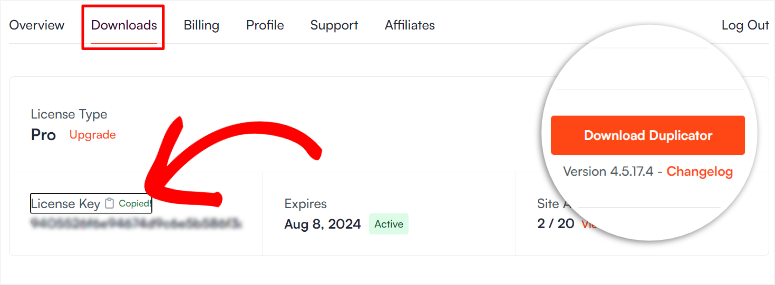
Next, go to your WordPress dashboard and install it as you would any other plugin. If you face any difficulties, here is a tutorial on how to install plugins.
Regular activation only enables it on your main site. So you will need to use the License Key you copied earlier to proceed with the Pro version.
If you need some help, here is a detailed tutorial on how to install and activate Duplicator Pro.
Step 2: Create Your First Backup
10 minutes | Your complete network backup
In order to create your first backup, you need to navigate to Backup Creation. So, in your WordPress dashboard, go to Duplicator Pro » Backups.
Then, click the “Add New” button at the top to open the backup wizard.

At the very top, you’ll see a field to name your backup. Give it a descriptive name with today’s date:
MainNetwork-October-2025-Full
Pro tip: Duplicator Pro supports dynamic tags that automatically add information to your backup names. You can use tags like:
- [domain] – Your site domain
- [month] – Current month
- [year] – Current year
This way, every backup automatically gets dated without you typing it manually.
Once done, scroll down and choose a storage location. By default, backups save to your local server. This works, but it’s not ideal because if your server crashes, your backups crash with it.
The better option is to connect to cloud storage.
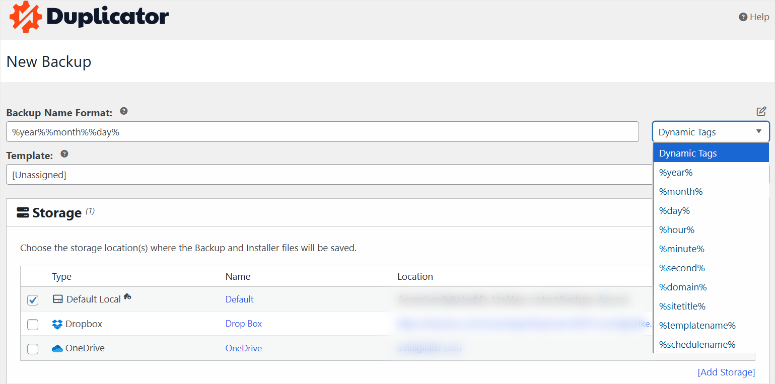
Click “Add Storage” and select your preferred service:
- Dropbox
- Google Drive
- OneDrive
- Amazon S3
- FTP/SFTP
- And more
Follow the prompts to connect your account. Duplicator Pro walks you through the authorization process.
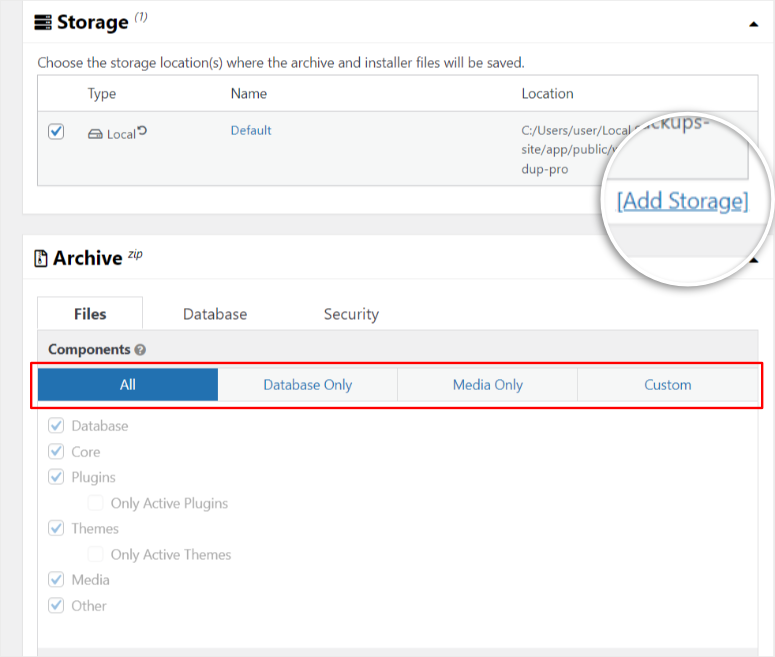
The best practice is to select BOTH local storage AND cloud storage. This gives you two copies automatically.
⚠️ Configure Backup Settings (3 Critical Tabs)
Now comes the important part. You’ll see three tabs at the top of the backup wizard.
A. FILTERS Tab
This controls what gets included in your backup.
Backup Type:
- Full website backup (everything – recommended for first backup)
- Media-only backup (just uploads folders)
- Database-only backup (just database tables)
Select “Full website backup” for now.
File Filters:
Below that, you can enable filters to exclude certain files.
Common things to exclude:
- Cache files (they rebuild automatically)
- Log files (usually not needed)
- Temporary files
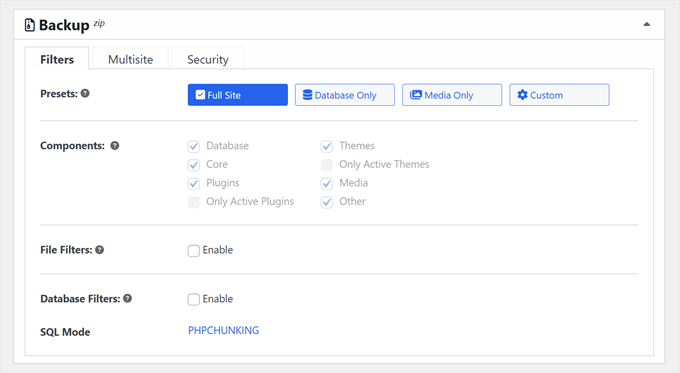
My recommendation for beginners: Don’t enable any filters on your first backup. Back up everything so you have a complete copy.
You can get fancy with filters later once you understand what’s safe to exclude.
B. MULTISITE Tab (The Game-Changer)
Next, click the “Multisite” tab.
This is where the magic happens. This tab only exists in Duplicator Pro, and it’s specifically designed for multisite networks.
You’ll see a list of ALL subsites in your network:
- Site 1 (Main Site) – yourdomain.com
- Site 2 – subsite1.yourdomain.com
- Site 3 – subsite2.yourdomain.com
- Site 4 – subsite3.yourdomain.com
By default, ALL sites are included in the backup. This is what you want.
But here’s the cool part: You can exclude specific subsites if needed.
When would you exclude a subsite?
- Inactive or archived subsites you don’t need anymore
- Test subsites you created for development
- Very large subsites you want to backup separately
To exclude a site, simply move it from the “Included Sub-Sites” box to the “Excluded Sub-Sites” box.
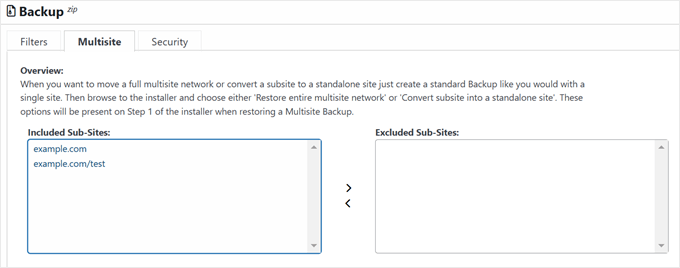
Warning: Be careful here. If you accidentally exclude an active site, it won’t be in your backup. Review this carefully before proceeding.
Again, for your first backup, leave everything included.
C. SECURITY Tab
After this, click the “Security” tab. This tab lets you add extra protection to your backup files.
Password Protection:
You can require a password to open the backup file. Anyone who downloads it needs the password to extract it.
Encryption:
Enable AES-256 encryption to secure your backup data. This is important if your backup contains:
- Customer payment information
- User personal data
- Sensitive business information

My recommendation:
- E-commerce sites: Enable both password and encryption
- Membership sites: Enable both
- Basic blog networks: Password protection is enough
- Personal projects: Optional
For now, you can skip this and come back to it later.
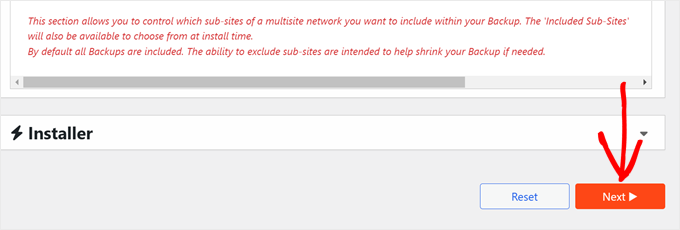
Finally, review the installer settings and select “Next” at the bottom of the page. The next screen shows installer settings. These control how the restoration process works.
For beginners: Leave all default settings unchanged. They’re configured correctly for most situations.
Once you confirm everything, click Next again.
Pre-Backup Scan
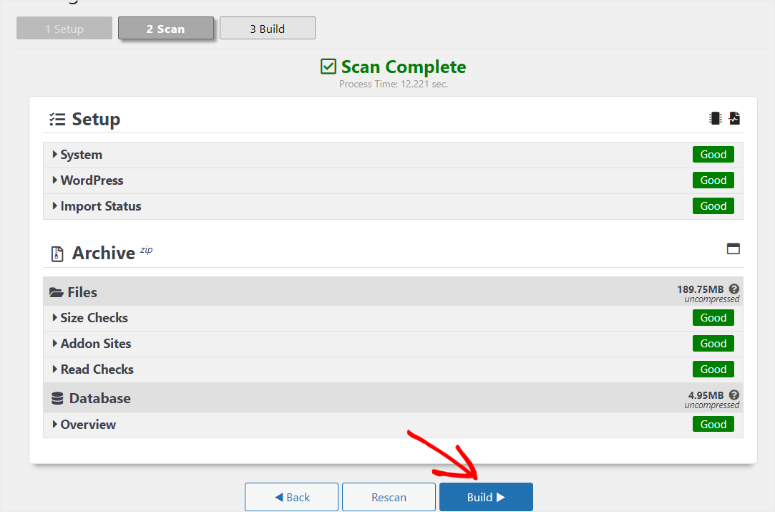
Now, Duplicator Pro will run an automatic Pre-Backup Scan on your entire multisite network. On this step, it checks for potential problems BEFORE starting the backup.
You’ll see a scan results page with status indicators:
- “Good” with a green checkmark – No issues, safe to proceed
- “Notice” with a yellow warning – Review this, but usually not critical
- “Warn” with an orange alert – Should investigate before proceeding
In case you see any warning, click the arrow next to it to see details and recommendations.
Make sure you pay close attention here so that you can catch issues before your backup fails. Better to know now than two hours into the backup process.
If everything shows “Good” or minor “Notice” labels, hit the Build button at the bottom of the page.
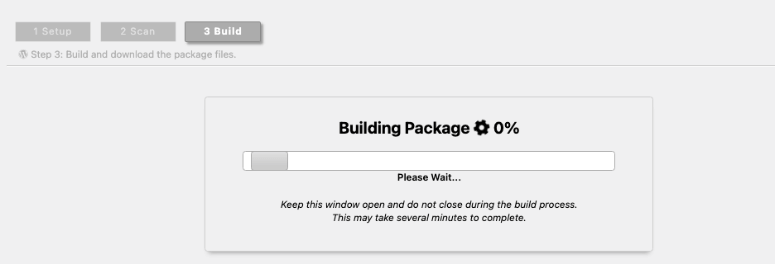
Now wait. Don’t close your browser.
Time estimates:
- Small networks (1-10 sites): 5-30 minutes
- Medium networks (10-100 sites): 30 minutes to 2 hours
- Large networks (100+ sites): 2+ hours
The best part is that you’ll see a progress bar showing the backup building. When it completes, you’ll see a success message.
Download Backup Files
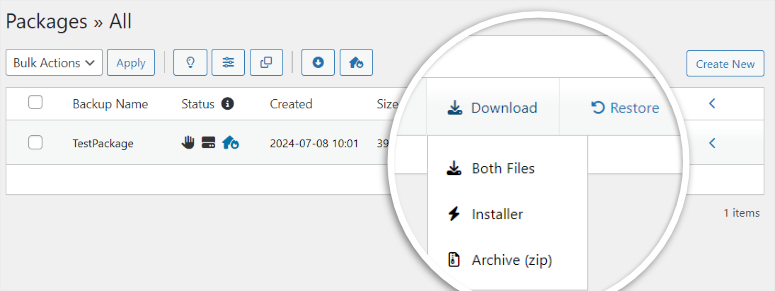
Once the packages have been built, navigate back to Duplicator Pro » Backups. Here, you’ll see your new backup listed at the top with today’s date.
On the right side of the backup, click “Download” and select “Both Files”.
This downloads:
- The archive file (.zip or .daf format) – This is your actual data
- The installer file (.php file) – This handles restoration
Important: You need BOTH files to restore. Keep them together.
Remember to save both files to a safe location on your computer. This way, you can easily access them in case of anything.
Now, I am sure you are asking yourself, “Why download locally even though I have cloud storage?“
Again, it’s all about security. If you ever lose access to your WordPress dashboard (site crashes, can’t log in), you can manually upload these files via cPanel or FTP to restore your site.
Step 3: Set Up Disaster Recovery
5 minutes | Emergency access when WordPress is down
This is one of my favorite Duplicator Pro features because it can save you when your entire site goes down and you can’t access the dashboard.
What is it?
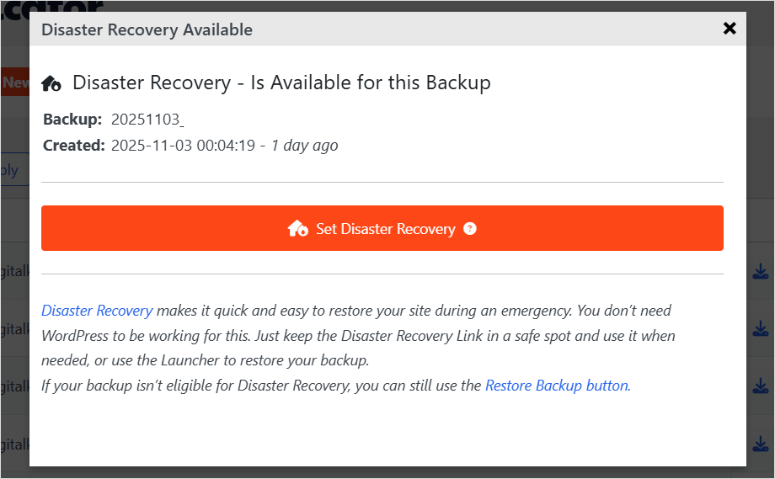
A special recovery URL that lets you restore your site even when WordPress is completely broken.
Most backup plugins require dashboard access to restore. But what if your dashboard doesn’t work? You’re stuck.
Duplicator Pro’s disaster recovery gives you a backdoor.
How to Set Disaster Recovery with Duplicator Pro
On your Duplicator Pro » Backups page, find your completed backup. Here, select the disaster recovery icon. It looks like a lifebuoy or life preserver.

Next, you’ll see a popup explaining what disaster recovery is. Click “Set Disaster Recovery”.
Now you have two options:
Option 1: Copy the recovery link
Duplicator Pro generates a special URL for this backup. Copy it and save it somewhere safe:
- A password manager like 1Password, LastPass, Bitwarden, and so on
- Secure notes app
- Encrypted file on your computer
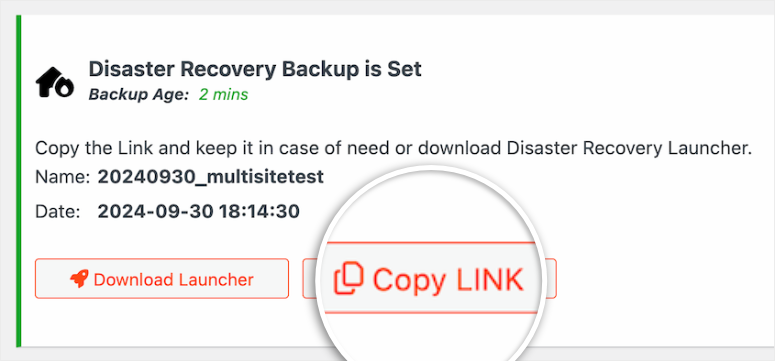
Option 2: Download the launcher file
Click Download Launcher to save the file to your computer.
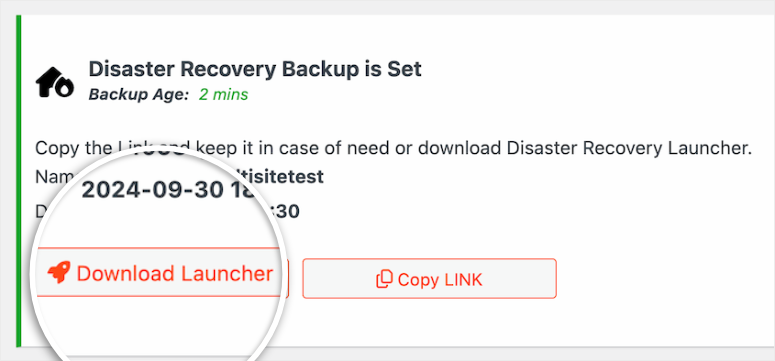
When disaster strikes, you just open this file, and it guides you through recovery.
Both the link and the saved file work the same way. All you have to do is paste the recovery URL in your browser, OR open the launcher file.
After this, Duplicator Pro loads a step-by-step recovery wizard that works even when your site is down.
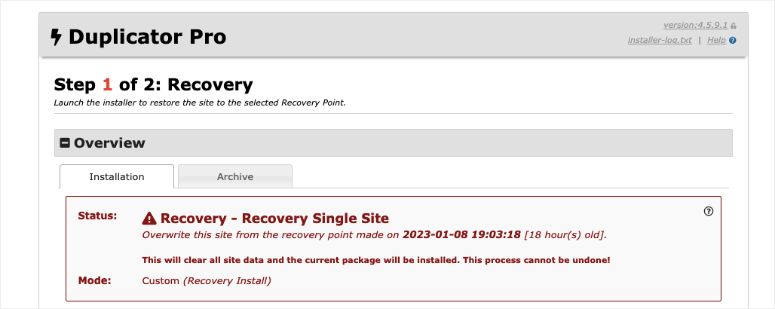
Here is a step-by-step tutorial on how to recover your site with Duplicator Pro.
Congratulations! At this point, you can now back up your multisite with Duplicator.
But I also want to show you how to ensure that you never experience a site disaster again because you did not have the latest backup.
To help you with this, Duplicator Pro allows you to set up automated and scheduled backups. Let me show you how to set up both.
Step 4: Automate and Schedule Your Backups
10 minutes | Set it and forget it
With this backup and restoration plugin, you can schedule backups to run automatically without lifting a finger.
Why automate?
Because manual backups are easy to forget. Life gets busy. You skip a week. Then something breaks, and your last backup is three weeks old.
Automation removes the human element and errors. It ensures your backups… just happen.
How to Create an Automated Schedule with Duplicator Pro
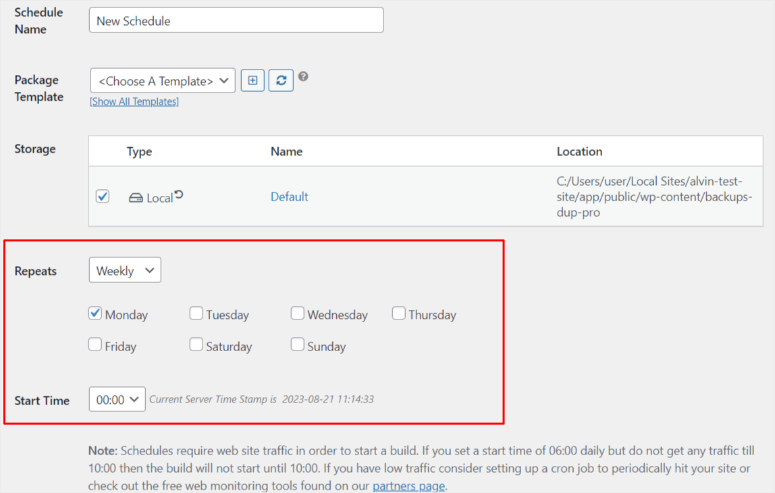
First, navigate to Duplicator Pro » Schedule Backups and click “Add New” at the top.
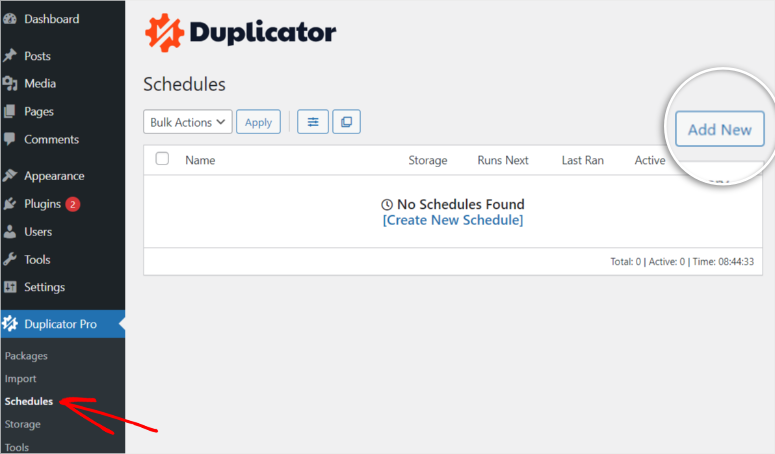
On the next page, name your scheduled backup and give it a descriptive name like: Daily Network Backup or Weekly Full Backup
Select backup template:
Remember those backup settings you configured earlier (filters, multisite settings, security)? Duplicator Pro saves those as templates. So, select which template to use for this schedule.
The “Default” template includes everything (files, database, all subsites).
Choose storage location:
Select where automatic backups should save:
- Local server (fastest recovery)
- Cloud storage (disaster protection)
- Both (recommended)
You can send backups to multiple destinations at the same time. I send mine to local server AND Google Drive.
Set backup frequency:
This is important. Choose how often backups run:
- Hourly – For high-traffic networks or e-commerce with frequent transactions
- Daily – Standard recommendation for most multisite networks (this is what I use)
- Weekly – For low-traffic networks that rarely change
- Monthly – For stable networks with minimal updates
My recommendation: Daily backups for active networks. Weekly, if your network is mostly static.
Select start time:
Choose what time the backup process begins.
⚠️ Important to Know:
Scheduled backups require website traffic to trigger. They don’t run on a timer exactly.
Here’s what this means: If you schedule a backup for 6 AM, but your site doesn’t get any visitors until 10 AM, the backup actually starts at 10 AM.
With that in mind, the best practice is to schedule during low-traffic hours. I schedule my backups between 2-3 AM, when your site is less busy.
In a nutshell, avoid scheduling during your peak traffic hours because backups use server resources.
Once everything is set up, check the box next to “Enable this schedule”. Then, click “Save Schedule” at the bottom.
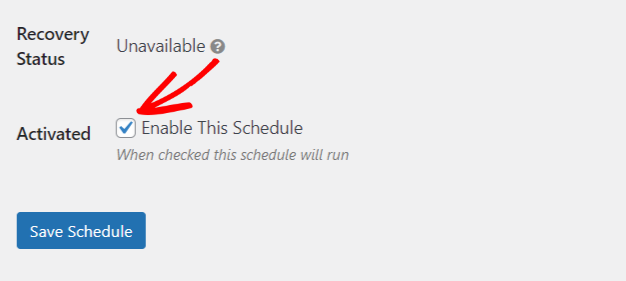
Done. Your backups now run automatically.
Pro tip: You can create multiple schedules with different frequencies. For example:
- Daily database-only backups (quick, captures content changes)
- Weekly full backups (complete network backup)
Step 5: Restoring from Backup
15-30 minutes | When you need to recover
Eventually, you’ll need to restore a backup. For example, a plugin may break your site, you may need to undo changes, or, unfortunately, maybe disaster strikes.
Here’s when to restore:
- Site hacked or infected with malware
- Failed plugin/theme update broke the network
- Need to roll back major changes you regret
- Migrating to a new server
- Testing changes in a staging environment
How to Quickly Restore Your Site with Duplicator Pro
First, navigate to Duplicator Pro » Backups and find the backup you want to restore.
I recommend you select the most recent one, since it has everything already backed up. But you can choose any backup.
Then, click the “Restore” button next to it.

Next, a popup appears showing you details about the archive and installer files.
Review the warnings carefully:
- What’s included in this backup
- What will be overwritten
- Any special notes
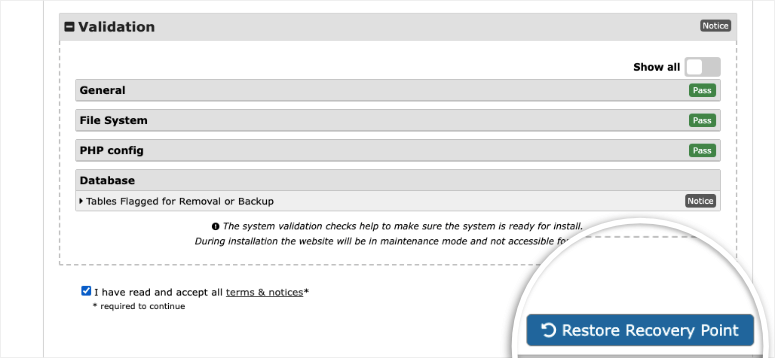
Then, check the box that says: “I have read and accept all terms & notices.” Once done, click “Restore Recovery Point”.
A second popup appears asking you to confirm your database settings. These are usually correct, so you can just click “OK”.
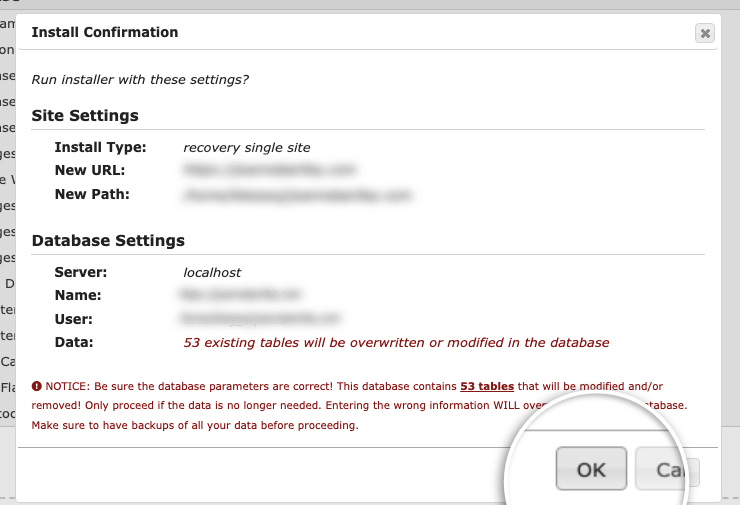
Duplicator Pro will then:
- Upload the backup files
- Extract the archive
- Import the database
- Replace current files
- Update URLs if needed
This takes 15-30 minutes, depending on backup size.
Post-Recovery Cleanup
When restoration finishes, you’ll see a cleanup screen. Here, check the box: Auto delete installer files after login (recommended for security).
After this, click “Admin Login” to be redirected to Duplicator Pro » Tools.
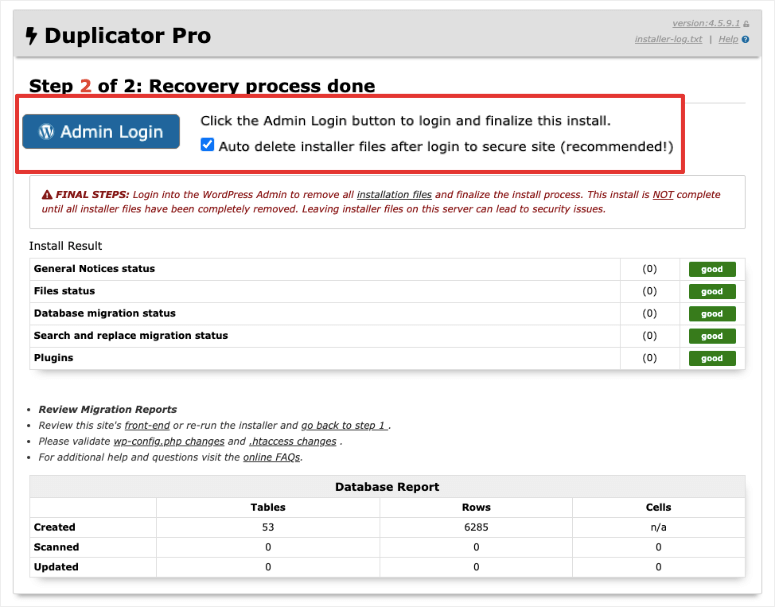
Here you’ll see recommended cleanup actions:
- Delete installation files
- Remove backup orphans
- Clear build cache
Click the buttons to complete the cleanup.
Final verification:
- Visit your main site and 2-3 subsites to confirm everything loads correctly.
- Test logging in with your admin account.
- Check that media files display properly.
That’s it. You can now restore your WordPress multisite network with a plugin or manually.
Which Method Should You Use? – Quick Table
I have created a quick table comparing the manual and plugin ways of backing up your WordPress multisite.
| When to Use Manual Method | When to Use Duplicator Pro |
|---|---|
|
|
Common Mistakes to Avoid – Quick Table
Let me save you from the painful lessons I learned the hard way. Check out the quick table below.
| ❌ Critical Mistakes | ✅ Success Habits |
|---|---|
❌ Using plugin without verifying multisite support Always check before installing. Free Duplicator and WPvivid Free don't support multisite. | ✅ Use multisite-compatible backup solution Duplicator Pro, UpdraftPlus Premium, or BlogVault. Verify support before purchasing. |
❌ Backing up only database OR only files Both are required. One without the other is useless for restoration. | ✅ Automate your backups Set it up once, then forget about it. Manual backups are easy to skip. |
❌ Storing backups only on the same server If server crashes, backups crash too. Always store off-site. | ✅ Store backups in multiple locations Local server, cloud storage, and personal computer. Follow the 3-2-1 rule. |
❌ Never testing restoration If you never test, you don't know if backups work. Test monthly. | ✅ Test restoration monthly Pick first Saturday each month. Takes 30 minutes. Ensures backups work. |
❌ Not backing up before major changes WordPress updates, new plugins, theme changes. Ten minutes now saves days later. | ✅ Always backup before changes Make this automatic. Before updating anything, create a backup. No exceptions. |
❌ Forgetting wp-config.php and .htaccess Critical multisite configuration files. Without them, restoration fails. | ✅ Document your backup procedures Write down your process, storage locations, and disaster recovery URLs. |
I hope you enjoyed reading about how to back up your multisite on WordPress. If anything is unclear, check out the commonly asked questions below.
FAQs: How to Back Up WordPress Multisite
Do I really need Duplicator Pro for multisite WordPress backup?
Yes, the free version of Duplicator does NOT support WordPress Multisite. You must use Duplicator Pro for multisite backups. You can use the free version of Duplicator Pro to back up and restore a single site either locally on your PC or on cloud storage.
How often should I back up my multisite network?
Daily backups minimum for active networks. Every 12 hours for eCommerce or high-traffic sites where you’re processing orders and registrations constantly. Weekly backups work for low-traffic networks that rarely change. Plus, always create a manual backup before any major changes like WordPress updates or plugin installations.
Can I back up just one subsite instead of the entire network?
No. With Duplicator Pro, you can exclude specific subsites from a backup. But you can’t back up a single subsite independently because they all share the same database tables. The network tables (wp_users, wp_blogs, wp_site) are shared across everything. Backing up one site without the network infrastructure doesn’t work.
What if I can’t afford Duplicator Pro for multisite backups?
Use the manual method temporarily as a stopgap solution. It’s time-consuming (1-2 hours per backup), but it works and costs nothing except your time. Set a goal to upgrade to Duplicator Pro within 3-6 months. The time savings and reliability are worth prioritizing in your budget.
How long do backups take?
Manual backups: 1-2 hours of active work each time. Duplicator Pro: 15-20 minutes initial setup, then 5-30 minutes per backup depending on network size (or automated overnight while you sleep). Small networks (1-10 sites) backup fastest. Large networks (100+ sites) can take 2+ hours even with Duplicator Pro.
What happens if my backup fails halfway through?
With manual backups, you start over from scratch. With Duplicator Pro, check the scan results before building. The pre-backup scan catches most issues before they cause failures. Common problems include server timeouts (switch to DupArchive format) or insufficient disk space (use cloud storage instead).
Can I restore my multisite to a different domain or server?
Yes, Duplicator Pro handles this automatically during restoration. It updates all URLs and paths for you. This is called migration. Manual restoration to a different domain requires find-and-replace in the database, which is complex and error-prone. Another reason Duplicator Pro is worth it.
Do backups slow down my site?
During the backup process, yes, slightly. Your server is compressing files and exporting databases, which uses resources. That’s why you should schedule automated backups during low-traffic hours like 2-3 AM. Visitors during the day won’t notice any slowdown because backups run overnight.
Final Verdict: Should I Back Up My Multisite WordPress?
Absolutely, yes.
Your multisite network is like an apartment building. One disaster takes down every site simultaneously. Without backups, you lose everything.
Here’s what I know now: Manual backups take 1-2 hours every time. Duplicator Pro takes 15 minutes once, then runs automatically while you sleep.
You can start with the manual approach but migrate to the easier and faster plugin method as you grow.
My advice is to set up your backups today and test them monthly. Most importantly, store WordPress backup files in multiple locations. This way, you have a backup of your backup.
One good backup could save you hundreds of hours and prevent data loss.
Your future self will thank you.
Resource Hub
Now that you know how to back up your WordPress Multisite, here are other tutorials to help you maintain and protect your network:
- Now, if you are looking for more multisite plugin options, here is a comparison article on Duplicator Vs. UpdraftPlus Vs. Solid Backups.
- WordPress Security Checklist – Secure your entire multisite network with this comprehensive security guide.
- How to Optimize Your WordPress Database – Clean your database before backing up to reduce backup size and improve performance.
- How to Remove Unused Files from Your WordPress Media Library – Delete unnecessary media files to keep your backups smaller and faster.
- Best Staging Plugins – Find the right staging plugin to test your multisite backups safely.
- How to Move WordPress to a New Domain Name – Restore your multisite backup to a new domain with this migration guide.
- Theme Migration Mistakes – Avoid common mistakes when changing themes (and always backup first).
These guides will help you maintain a healthy, secure, and optimized multisite network that’s easy to back up and restore.
The more you protect and maintain your sites now, the easier recovery becomes if disaster strikes.

Comments Leave a Reply