Are you looking to add live chat to your site?
Live chat is one of the best ways to communicate with your users because they do not need to log in or open a new page or website. The communication is done right then and there, live on your site, making it more efficient.
But at the end of the day, the goal is to make the communication channel both easy for your customers and your team.
In this article, we will walk you through how to set up live chat for WordPress. We will discuss how to add your team members and assign them chats. We will also see how to customize live chat to fit your branding.
Why Should You Add a Free Live Chat to WordPress?
Live chat allows for back-and-forth communication. This ensures your users get the answers they need on the spot, increasing customer satisfaction. As a result, a free chat for website software can increase your conversion rate and even allow you to upsell your products more directly and without being pushy.
Here are other reasons to add chat for websites.
- Improved Customer Engagement: Live chat encourages visitors to interact with your website, increasing engagement and trust. This convenient online communication channel can help you build stronger relationships with your audience and encourage repeat visits.
- Quick Problem Resolution: Live chat enables you to address customer inquiries quickly and resolve issues in real time. This can help prevent frustrations and negative experiences, leading to happier customers and positive word-of-mouth referrals.
- Valuable Customer Insights: Live chat interactions provide valuable insights into customer needs, preferences, and pain points. Analyzing chat transcripts and feedback can improve your marketing strategies and product development efforts.
- Cost-Effective Solution: Many live chat solutions offer free or affordable plans for small businesses, making it a cost-effective way to provide excellent customer support and drive conversions. To add to this, it can help reduce support costs associated with phone calls and emails.
- Reduced Cart Abandonment: Live chat is great for addressing potential customers’ concerns or questions during the checkout process. This instant communication can allow you to address any concerns about the product, reducing cart abandonment rates.
- 24/7 Availability: Unlike traditional customer support channels that operate within specific business hours, your team can work remotely and does not need to be in the same time zone. This ensures visitors can get help whenever needed, even outside of regular office hours.
- Lead Generation: Live chat can be a powerful lead generation tool. By engaging with website visitors in real time, you can capture leads directly from your site and nurture them through personalized conversations, increasing the likelihood of conversion.
Now, offering live chat on your WordPress site can easily set you apart from competitors who may not provide this level of support. It shows your commitment to customer service and can help you stand out in a crowded market.
But to enjoy the benefits, you need to select a chat for websites tool that meets your needs. There are plenty of software you can use out there. Here is a list of the best live chat plugins to get you started.
But for this tutorial, we will use LiveChat. Let’s see why we chose this live chat WordPress plugin instead of the rest.
Why LiveChat is the Perfect Solution

LiveChat is the best live chat plugin because it is easy to set up and use, making it perfect for beginners. You do not need any coding experience. It allows you to have a team and assign them individual chats to handle.
Plus, it integrates with popular messaging apps like Facebook Messenger and WhatsApp to ensure your users can communicate on the most convenient platform for them. But since it comes with a chat history feature, you can move the chat to another platform, such as from Facebook Messenger to WhatsApp and continue the conversation without breaking the message chain.
LiveChat offers a highly customizable dashboard for personalized messages and chat support settings. Because of this, you can set it up so that you and your team can easily communicate with your clients without stepping on each other’s toes.
To add to this, it comes with +130 integrations you can make with popular CRMs, email marketing tools, and more. This allows you to streamline your marketing, customer relationships, and business operations.
Here are other reasons to use LiveChat.
- Message Sneak Peek: You can preview what the customer is typing before they send it. This allows you to prepare a more detailed response better and answer quickly.
- Canned Responses: It provides pre-written replies for common questions. This streamlines communication and saves time for live chat support agents. This also ensures uniform responses regardless of the agent handling the chat, helping you create brand consistency.
- Pre-Chat Forms: LiveChat offers pre-chat forms to gather relevant information from users before initiating a chat, allowing agents to provide more personalized assistance and support.
- Chat History Preservation: LiveChat stores chat history unless cleared by the visitor. As a result, it ensures continuity of support and enables agents to understand customer needs better.
- File Sharing: LiveChat allows direct file sharing between agents and customers, enabling clearer communication and faster issue resolution by enabling users to share screenshots or other media files.
- Google Analytics Integration: LiveChat can be integrated with Google Analytics, allowing you to measure and analyze live chat metrics effectively and providing insights into customer behavior and interactions.
If you are looking for more information, check out our latest LiveChat review here.
Now that you have seen why we picked LiveChat for this tutorial on how to add live chat to WordPress let us walk you through the process.
Step 1: Create a LiveChat Account
Setting up a LiveChat account is super easy. Plus, you get a free 14-day trial to test out all the features before you make your decision.
You do not have to provide your credit card information when signing up for the free trial. This ensures you have no obligations to buy the tool or risks of your personal information leaking. If you want LiveChat Pro, Check out the pricing of the plugin here.
So, first head to the LiveChat official site and select “Sign Up Free.”
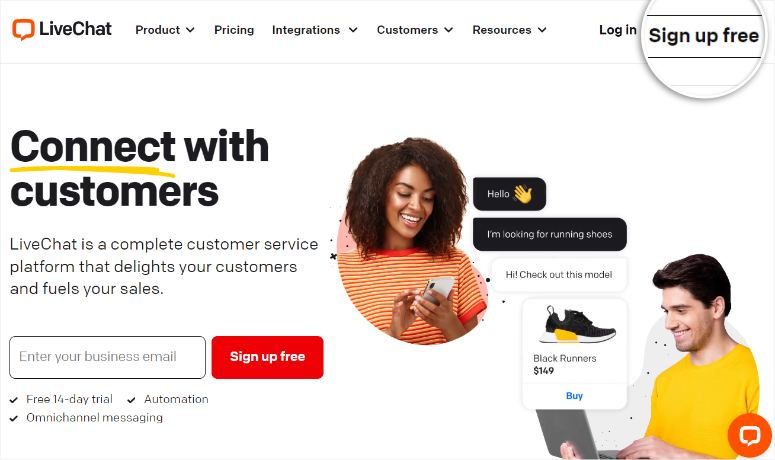
Next, provide the email address you want to sign up with, and you will receive a confirmation email. Copy the code provided in the confirmation email and paste it into the LiveChat signup page.
Once you are redirected to the LiveChat dashboard, you will be asked a few questions about your company, your role, and the number of team members you have.
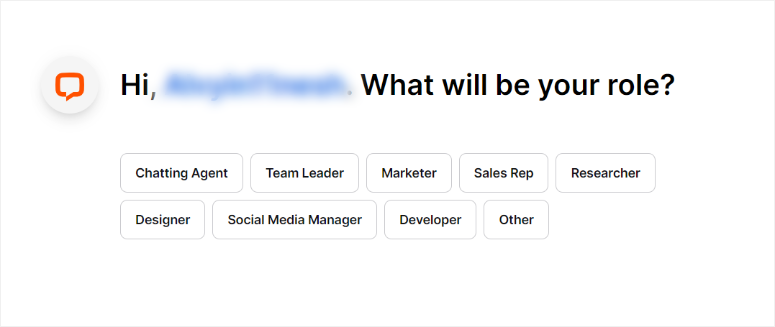
Once you answer these questions, the next step is to connect WordPress with LiveChat.
Now, LiveChat offers plenty of connection options based on your site type. If you run a WordPress site, you can connect it through a manual code, Google Tag Manager, or a free plugin.
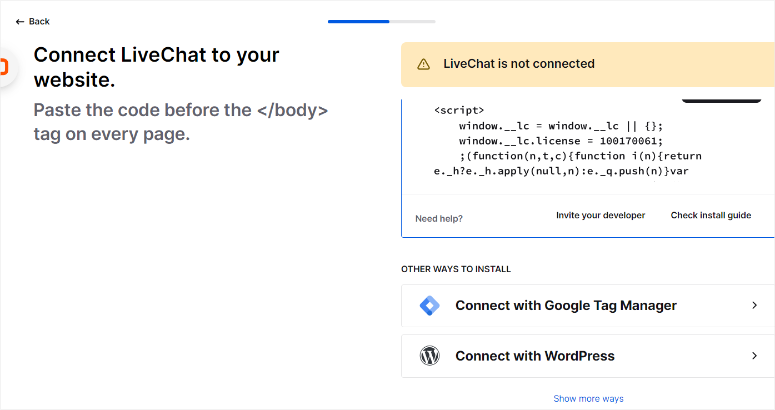
You can also connect it to Shopify, BigCommerce, Ecwid, SquareOnline, and more.
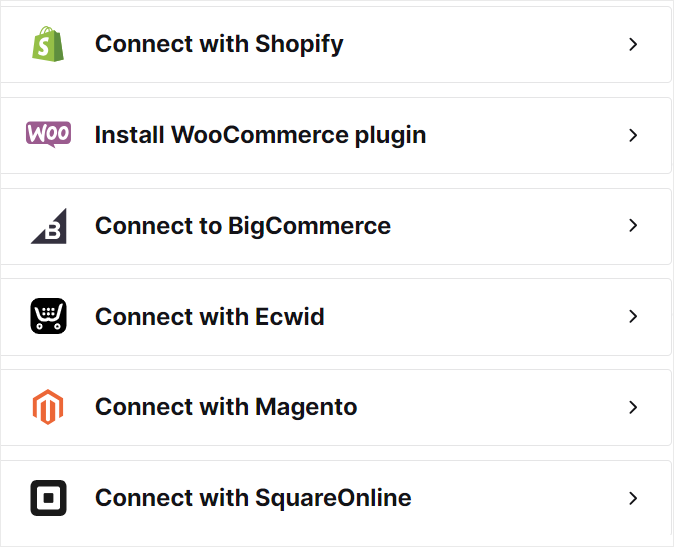
But for this tutorial, we will show you how to add LiveChat to WordPress using 2 methods.
1. Using Custom Code
Now, we should point out that this manual method requires coding experience, which can make it difficult for beginners. In fact, because of its difficulty level, LiveChat gives you a guide and also the option to send the instructions directly to your developer.
But we will use WPCode to do this, which makes it super simple. WPCode is the best Snippet plugin as it allows you to add code to your site without breaking it or having developer experience.
But before installing this code plugin, first copy the connection code from LiveChat. You will need it later.
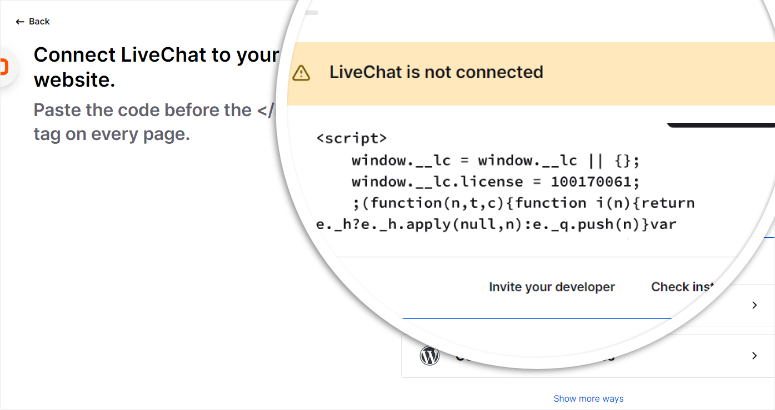
Next, head to your WordPress dashboard and proceed to your plugin repository by going to Plugins » Add New Plugin. After this search for “WPCode” to find the free version of the plugin.
If you experience any issues, check out this tutorial on how to install a plugin.
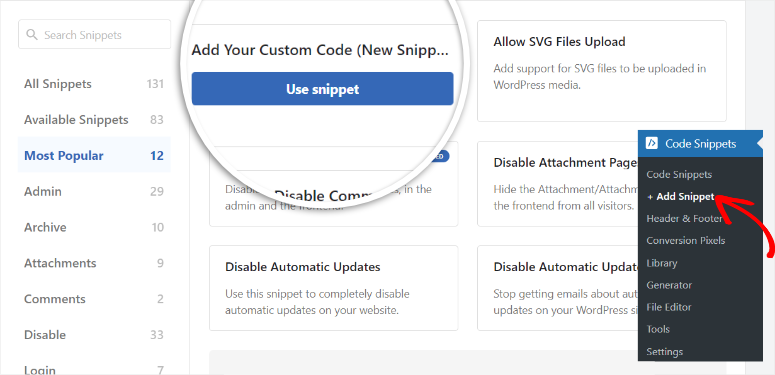
Then, once you install and activate the plugin, go to Code Snippets » +Add Snippet. Next, select “Add Your Custom Code” to open the code preview screen.
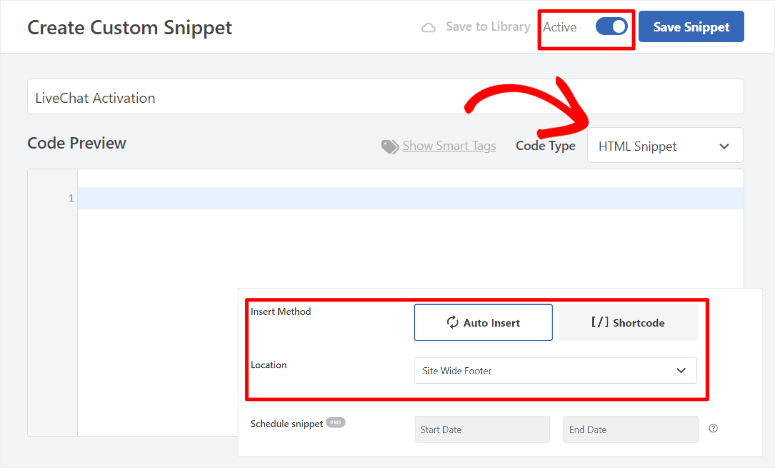
Here, Name your snippet first. Then, make sure that the Code Type is set for “HTML Snippet,” and the toggle button is set to “Active.”
After this, go below the Code Preview area and set the Insert Method to “Auto Insert,” and Location to “Site Wide Footer.”
Once this is done, paste the code you copied earlier from your LiveChat dashboard into the Code Preview area, and select “Save Snippet.”
Remember, you can use WPCode for more than just creating the manual LiveChat connection with your WordPress website. You can add different types of custom CSS, JavaScript, HTML, or PHP codes. You can also use it to integrate Google Analytics, Facebook Pixel, or other tracking services.
After this, reload your LiveChat dashboard, and you should now see that the connection was a success.
2. Connect with a Plugin
Even though WPCode makes adding LiveChat manually with a code easy, using its WordPress live chat plugin is even simpler.
First, navigate to your WordPress repository by selecting Plugins » Add New Plugin. Then, search for the LiveChat plugin, install it, and activate it.
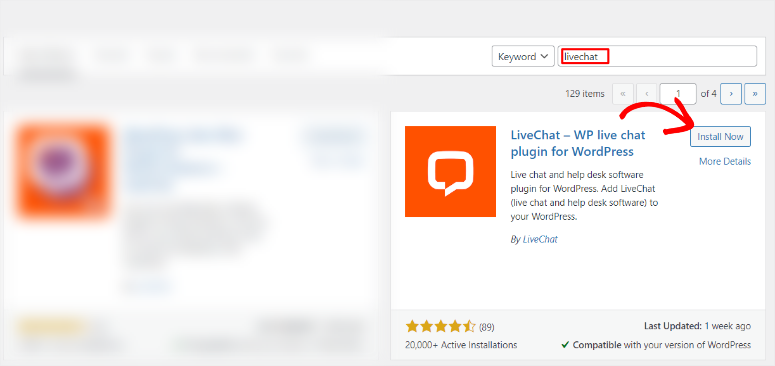
Once done, you should see a new menu option in your WordPress dashboard called LiveChat.
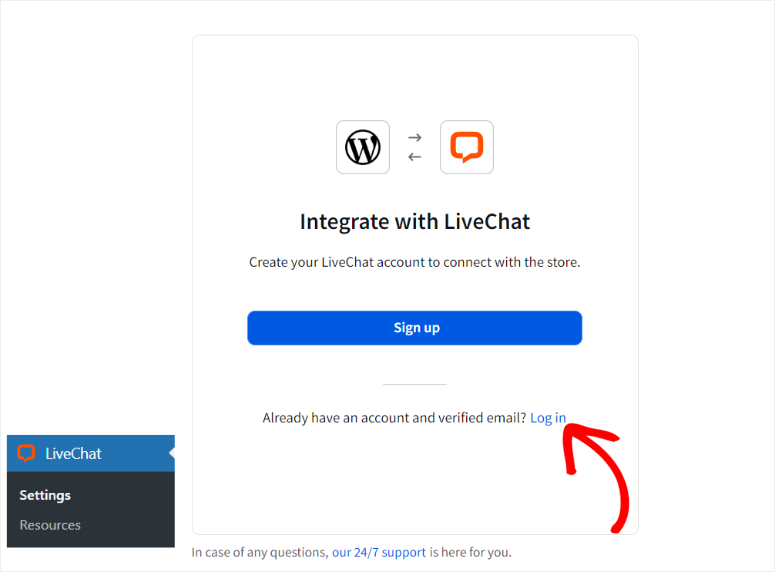
Then, select this menu option and hit the “Log In” button in the popup window that will appear next. If you did not create an account earlier, hit the Sign Up option.
If LiveChat is successfully added to your WordPress site, you will see another popup. Select Go To LiveChat to be redirected back to your LiveChat Dashboard.
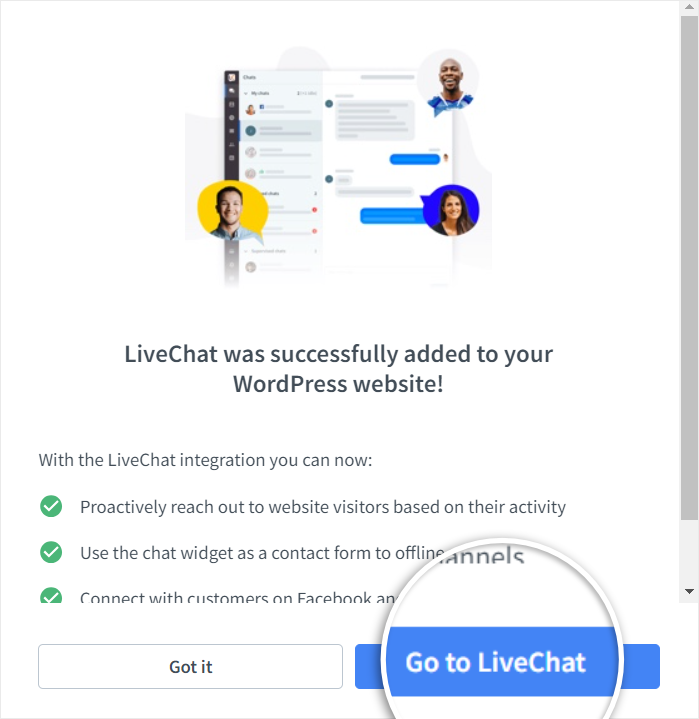
Congratulations! You have just created and connected your LiveChat account to WordPress.
Step 2: Customize LiveChat
With the free LiveChat plugin installed and activated with WordPress, let us see how to customize it.
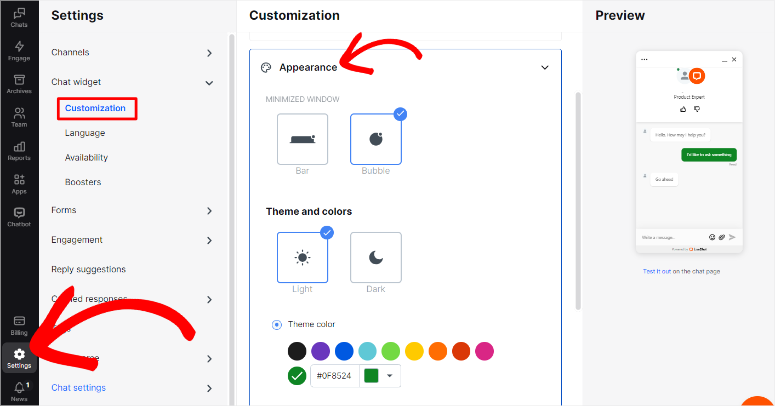
First, select Settings » Chat Widget in your LiveChat dashboard to start your customization journey.
In the “Customization” sub-menu, head to the “Appearance” tab.
You should see a preview section on your far right. This will show you how your chat widget will appear on the live chat window.
Here, decide if you want your chat widget to be a bar or a bubble. Then, set it to a Dark or Light theme. Finally, set the widget’s color.
Next, go to the “Position” tab below the “Customization” tab.
Here, set whether you want your widget on the right or left. After this, decide on the side and bottom spacing you want. Complete this step by setting the widget’s visibility to Always Visible, Hide Widget Until it Gets Activated, or Always Hide minimized Widget Icon.
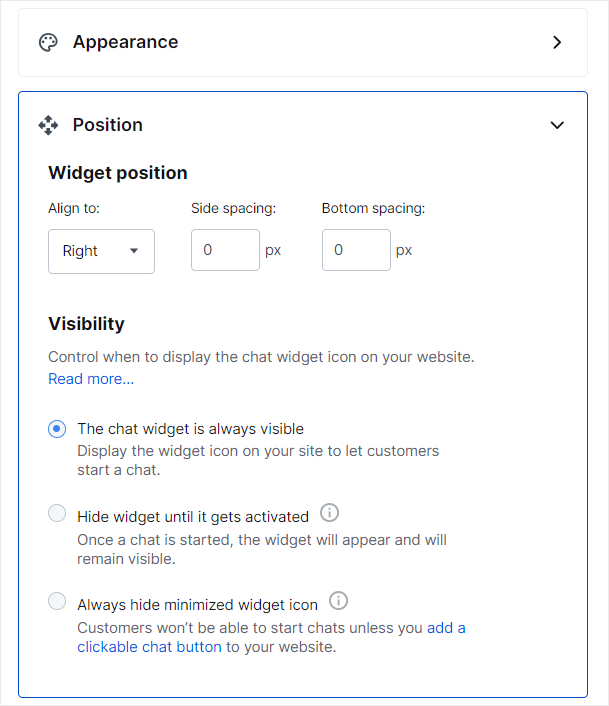
Next, set up your “Mobile Chat Widget” on the next tab.
You can use the same settings for the desktop or customize them using options like the ones above.
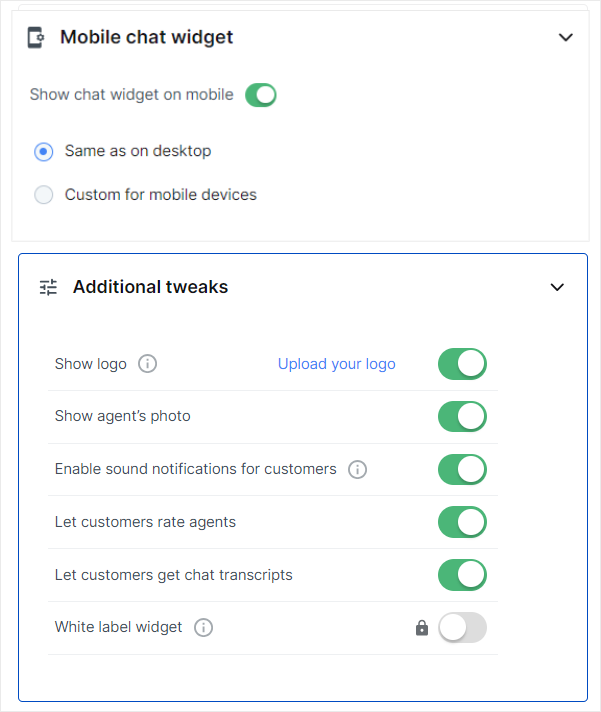
After this, move to “Additional Tweaks” on the following tab and set the following.
- Show logo: Help improve your branding
- Show agent’s photo: Makes the conversation more personal
- enable sound notifications for customers: Alert them in case they are in another window
- Let customers rate agents: Learn more about the customer experience
- Let customers get chat transcripts: Allows your users to have a written form of the conversation
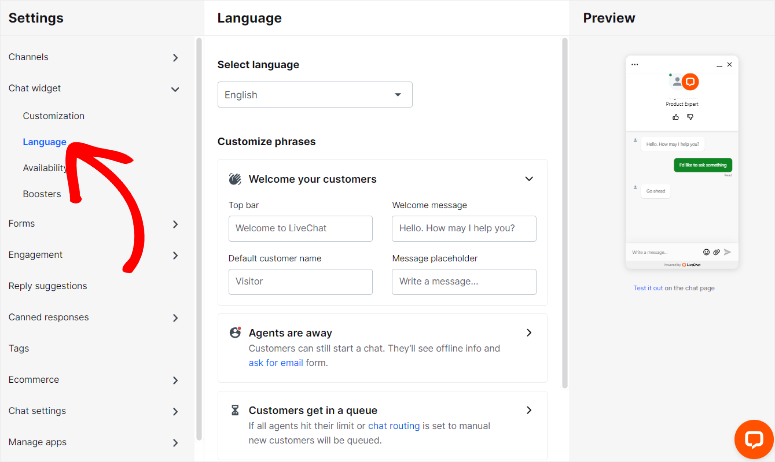
Then, below the “Customization,” head to the “Languages” sub-menu next.
Here, first, set the language you want to use from the drop-down menu. If you change the language, you will notice that the Customize Phrases section will adjust to the language.
But also personalize the “Customize Phrases” here to make them more engaging with your customers.
Below this, set up the “Agents are Away” and “Customers Get in a Queue” texts to communicate how your customers should reach you outside business hours or if your agents are already serving other people.
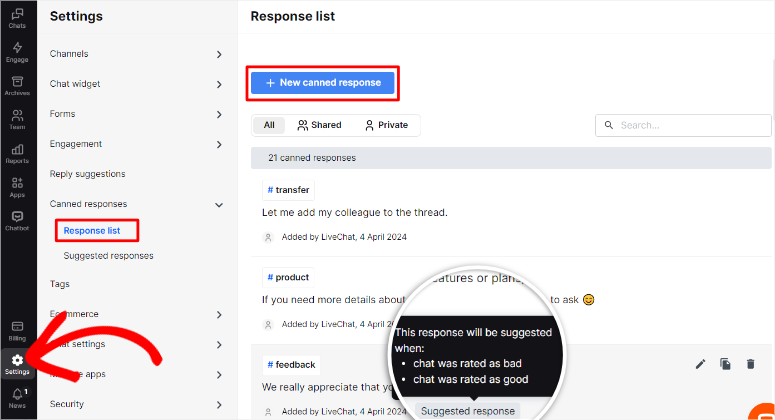
Next, let us look at how to set up canned messages.
To access this live chat feature, head to Settings » Canned Responses » Response List.
Apart from the templates provided, you can create new canned messages here, allowing your agents to have personalized pre-written responses. You can then categorize these canned messages using tags such as #transfer, #product, and more.
To add to this, also set “Suggested Response.” In this case, LiveChat will suggest a response to your agents when a customer uses certain phrases to reply to messages.
Now, let’s see how to configure LiveChat forms.
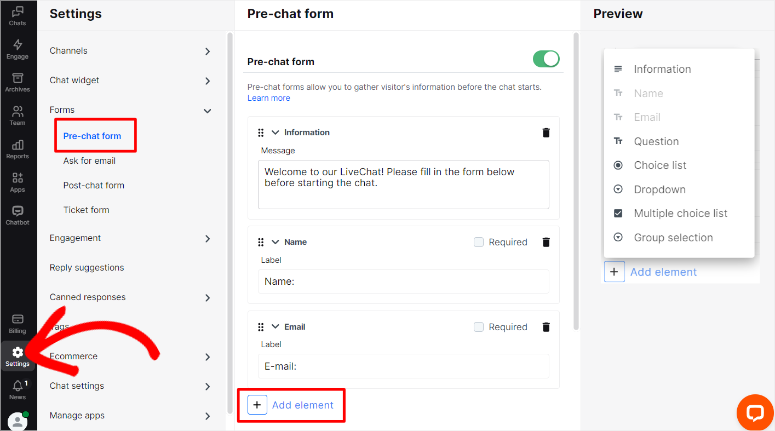
To do this, go to Settings » Forms.
First, configure “Pre-Chat Form” by personalizing the welcome message and adding text bars to ask for the customer’s name and email.
To to it off, if you want to gather even more information about your user, add additional elements, including Information, a Multiple-Choice List, a Dropdown, a Choice List, a question, and a Group Section.
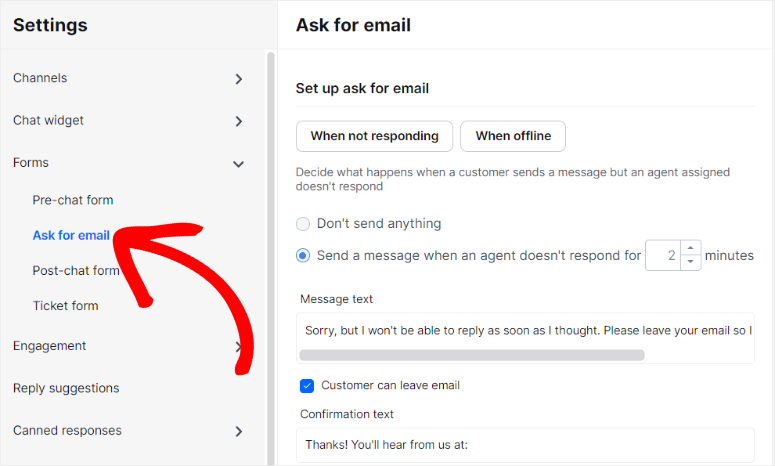
Still, on the Forms Sub-menu, set up “Ask for Email.”
This allows your customer to provide an email when your agents are not responding or are offline. Here, add how long the customer has to wait before they get the option to give you an email. Also, set a message to direct them on what to do when you are offline.
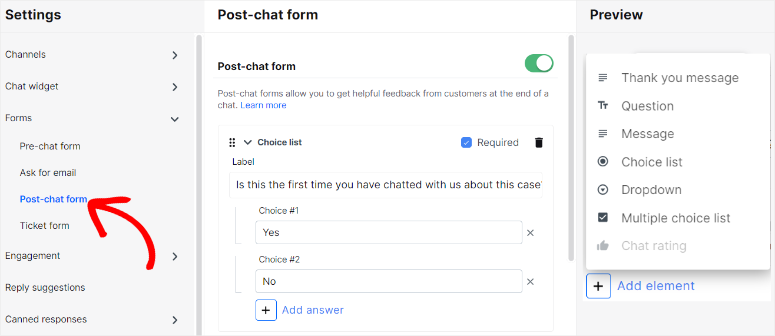
Next, LiveChat allows you to add a “Post-Chat” Form as well.
You can use this form to run a survey to gauge customer satisfaction. To add to this, you can also use this post-chat form to get a rating of the chat or send a thank you message. This can help you build trust and grow your customer relationship.
Now, to ensure your customers communicate in the best way for them, set up “Channels.”
Here, add Facebook Messenger, Apple Messages, WhatsApp, and emails to give your users more communication options.
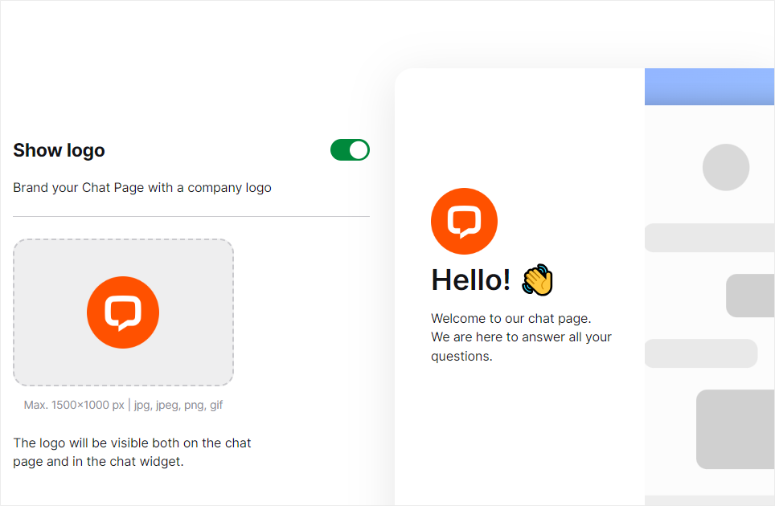
To add to this, you can customize the chat WordPress page without any coding experience. All you have to do is go to Set Up in the chat page sub-menu.
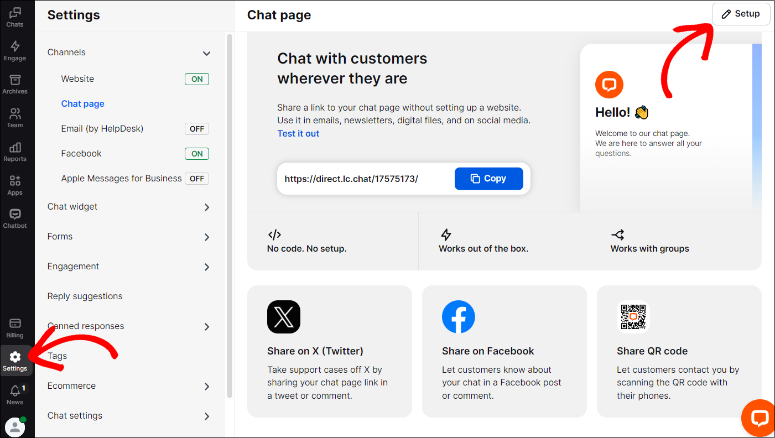
You can also add your logo and a short welcome message for your customers. Once this is ready, simply copy the chat page URL and share it anywhere you want, such as in newsletters, comments, social media, and so on.
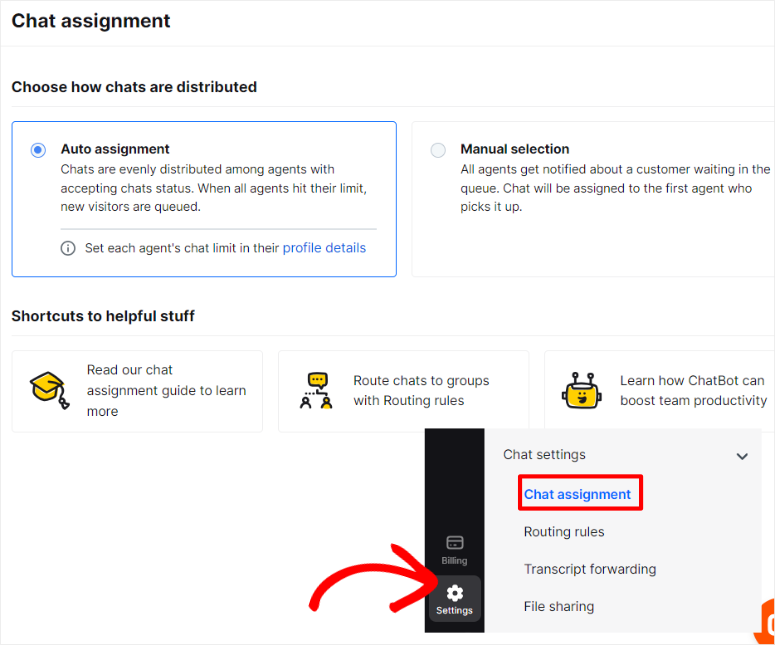
Finally, let’s go to “Chat Settings.”
Here, decide if you want the customer messages to be assigned to your agents manually or automatically.
If you set Auto Assignment, you can limit the number of customers an agent can handle. This will help you distribute the workload and avoid burnout.
With Manual Selection, all agents will be notified when a new customer reaches out. Then, the chats will be assigned based on the first agent picking them up. This can help your customers get served faster.
Even though customizing your LiveChat widget like this is easy, there is one problem you will find.
Because all these settings are made in the backend of your WordPress dashboard, it can be difficult to understand how your customers will experience the LiveChat widget on a live page.
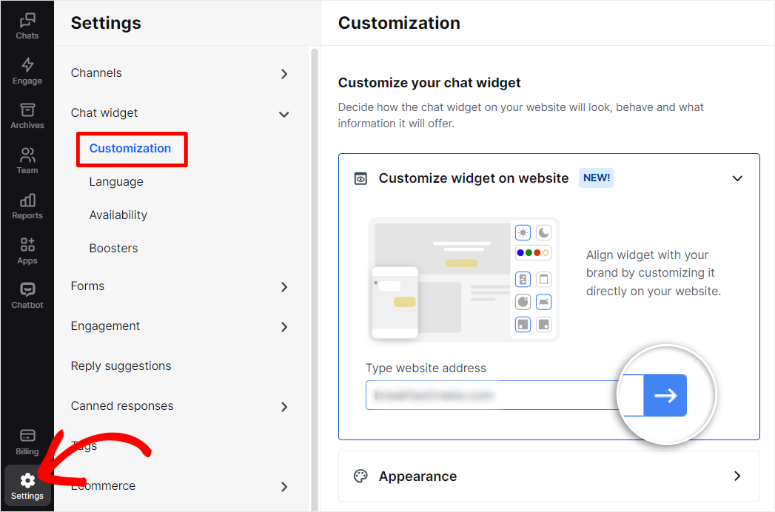
To help with this, LiveChat has a NEW front-end editor feature.
To access the LiveChat front-end editor, go to Settings » Chat Widget » Customize in your LiveChat dashboard. Then, on the “Customize Widget on Website” tab, enter your website URL in the text bar and hit the “Forward Arrow.”
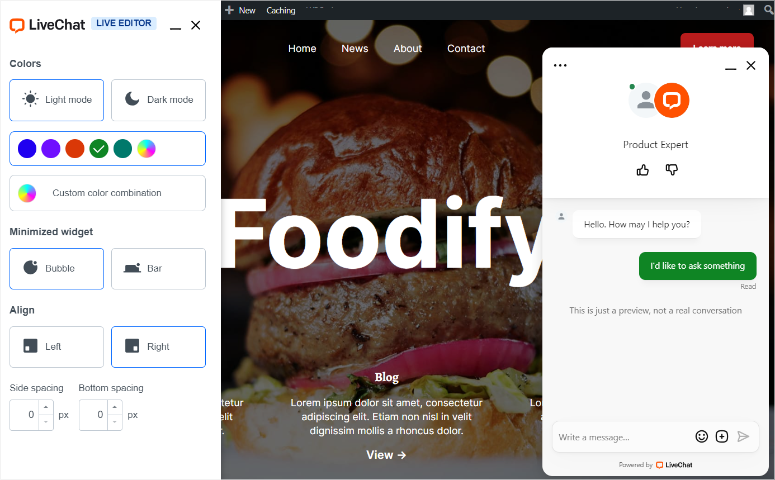
Once in the Live Editor, customize the colors, minimized widget, and alignment. Most importantly, you can now experience how the chat widget will appear live on a page.
Step 4: Display WordPress Live Chat Box on Your Site
Now, displaying your live chat widget on your WordPress site is super easy.
In fact, it will display automatically if you completed step 1 of this tutorial and already have the free WordPress LiveChat plugin installed.

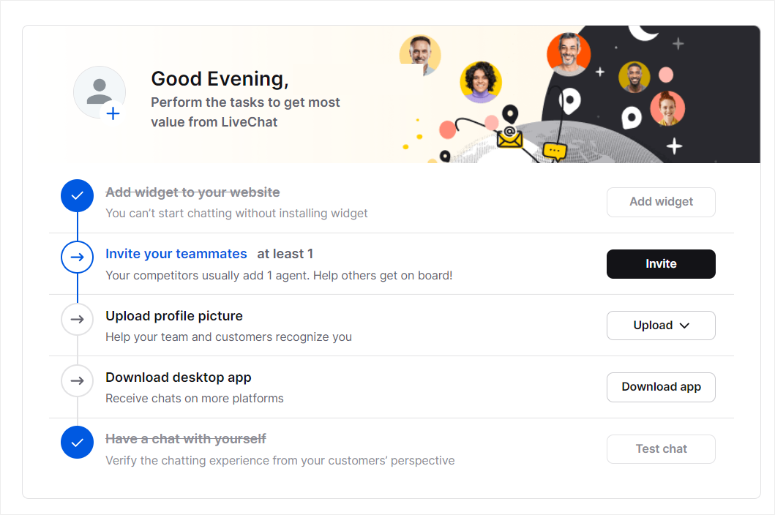
The only other thing left is to follow the checklist on your LiveChat dashboard home page. If you haven’t already done so, it will ask you to add team members and a profile picture.
Finally, you can download the desktop app to access more chat platforms.
To see your live chat analytics, go to “Reports” on your LiveChat dashboard.
Here, you will see metrics for total chats, chat engagement, missed chats, campaign conversions, and more. You can also see agent performance, such as their response time and agent activity.
Plus, you can monitor customers and measure metrics like Queued Customers and Queue Abandonment. If you set up post-chat forms, LiveChat allows you to see the reviews in your reports and share them on social media as social proof.
Step 5: Hire Professional Live Chat Agents
Now that your site’s live chat box is ready, you need to hire agents who can answer users’ questions in real time.
For this, you’ll have 2 options to consider for your business website:
- Hire agents and build your sales and support team. But, it’ll take time and require a lot of patience, especially for training them.
- Outsource the live chat to a professional company like LTVPlus, and they’ll handle everything.

LTVPlus provides live chat experts for 24/7 sales and support. If you hire these agents, you will not need to train them, and your live chat will start functioning right away. This live chat service will also save you time and money so you can focus on growing your business instead of handling your site users on your own.
Congratulations! You can now set up live chat on your site for free. If you have any more questions, check out our FAQs below.
FAQs: WordPress Live Chat: How to Set Up for FREE (Step by Step)
Is LiveChat free?
LiveChat offers a 14-day free trial with no credit card required. After the trial, pricing plans start from $20 per month per agent.
Can I track my agents and customers in live chat?
Absolutely! LiveChat is the best live chat to do this. It provides detailed reports on agent performance, chat engagement, and customer behavior. Monitoring these metrics can help you optimize support and enhance user satisfaction.
Can I brand my live chat widget?
Yes, LiveChat allows extensive customization of chat widget appearance, including branding elements like logos, colors, and themes. This can help your customers trust your website more and improve brand awareness.
Does LiveChat offer multi-language support?
Indeed! LiveChat supports multiple languages, enabling customization of chat phrases and interfaces to cater to your audiences. By providing localized support you can enhance user experience for global users.
We hope this article helped you learn how to add a free live chat to WordPress. You may also want to check out our guide on how to greet WordPress users with a custom welcome message.
To add to that, here are additional articles you may be interested in reading.
- 11 Best Live Chat Software Plugins Compared
- How to Easily Add a Call Now Button to WordPress (Step by Step)
- 7 Best Team Chat Apps for Group Communication
The first article lists and compares 11 of the best live chat plugins. The next post walks you through how to add a “Call Now” button to your WordPress site. While the last article discusses 7 of the best team chat apps for group communication.

Comments Leave a Reply