
I have always used Meta ads to run my social media campaigns. They are affordable, and if done correctly, they can be great.
But with the recent Meta Andromeda ads AI, things have been going downhill for me. My conversions have tanked, and I needed options.
That is why I turned to TikTok ads. But like any good ad campaign, you can only know if they are working with proper analytics tracking.
The problem is that setting up TikTok pixel tracking through Google Analytics 4 requires Google Tag Manager knowledge, custom event configurations, and hours of technical setup.
So in this article, I will show you how to track TikTok ads in a simple way using MonsterInsights. No coding required. No complicated GA4 exploration reports.
Here’s Exactly What We’ll Cover:
- How to set up TikTok ads tracking without touching code
- The simple way to view TikTok campaign performance in WordPress
- Which campaigns drive sales versus empty clicks
- How to calculate your true cost per conversion
- All data viewable from your WordPress dashboard
What You’ll Need Before We Start
You can track WordPress data for your TikTok ads using Google Analytics 4. In fact, I’ll show you how to set this up in GA4 first so you understand the process.
But I’ll be honest – it can be overwhelming with custom event configurations, Google Tag Manager setup, and manual pixel installation.
That’s why I’ll also show you how to use MonsterInsights instead, which automates the entire process.
You need MonsterInsights Pro because it includes the PPC Tracking addon for TikTok ads tracking. If you don’t have MonsterInsights Pro yet, you can grab it from the MonsterInsights website.
Before we dive into the setup, let’s make sure you have everything ready. Getting these pieces in place first will save you time later.
Required Tools:
- WordPress site with admin access
- MonsterInsights Pro
- Active Google Analytics 4 account
- TikTok Ads Manager account (free to create)
Time Estimate: 20-25 minutes total setup
Skill Level: Beginner-friendly. No coding required.
Why TikTok Ads Matter for Your Business

TikTok isn’t just for dance videos anymore. It has become a serious advertising platform that businesses can’t ignore.
With over 1 billion active users worldwide, TikTok offers access to audiences you won’t find anywhere else. Plus, users spend an average of 52 minutes per day on the app.
That’s a lot of eyeballs on your potential ads.
Is TikTok Overtaking Meta Platforms?
The short answer is no, but it’s getting close.
TikTok isn’t replacing Facebook and Instagram. Instead, it’s becoming equally important for a different reason.
Meta platforms excel at connection. That is, keeping up with friends, family, and brands you already know. TikTok excels at discovery. Finding new products, brands, and trends you didn’t know existed.
Apart from that, user behavior differs between platforms. On Meta, people scroll past ads quickly. On TikTok, users actually watch video ads because they blend naturally into the content feed.
Smart businesses use both platforms, not either/or. Meta handles remarketing to existing customers and TikTok brings in new customer acquisition.
How TikTok Ads Work
TikTok offers several ad formats to fit different goals:
- In-Feed Ads appear directly in users’ For You feed as they scroll. These look like regular TikTok videos but include a call-to-action button. Users can like, comment, and share them just like organic content.
- TopView Ads are the first thing users see when opening the app. You get full-screen, sound-on attention for up to 60 seconds. These cost more but deliver maximum visibility.
- Branded Hashtag Challenges encourage users to create content around your product. This creates user-generated content and viral potential.
- Branded Effects let users interact with your brand through custom filters and effects. Think Instagram filters but for TikTok.
Ad Targeting Options
TikTok’s targeting helps you reach the right people:
- Demographics – Age, gender, location down to zip code level
- Interests – Based on content users engage with most
- Behaviors – Shopping habits, device usage, video interactions
- Lookalike Audiences – Find people similar to your best customers
- Custom Audiences – Retarget website visitors or email lists
The platform uses these signals to show your ads to people most likely to buy. But here’s the catch – without proper tracking, you won’t know which campaigns actually work.
Now, I will walk you through both manual and plugin methods. So you can use the table of contents to view all the steps in one go, or skip to where you want to read.
That’s where tracking comes in.
Manual Way to Track TikTok Ads with Google Analytics 4 (GA4)
Most businesses use Google Analytics 4 to track their advertising campaigns. It’s the industry standard, and it’s free.
GA4 shows you which ads drive traffic to your site. Plus, it tracks conversions so you can see which campaigns actually generate sales.
If you haven’t already, here is a step-by-step tutorial on setting up Google Analytics.
But setting up TikTok ad tracking in GA4 requires multiple steps and technical knowledge. Let me walk you through the process so you understand what’s involved.
Here’s what you need to do to track TikTok ads through Google Analytics 4, formerly Universal Analytics:
Step 1: Get Your TikTok Pixel ID
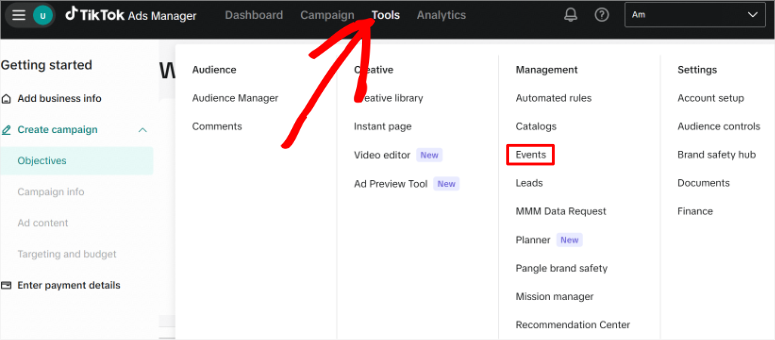
First, log in to your TikTok Ads Manager account at ads.tiktok.com. Then, go to Tools in the top navigation menu and select Events from the dropdown options.
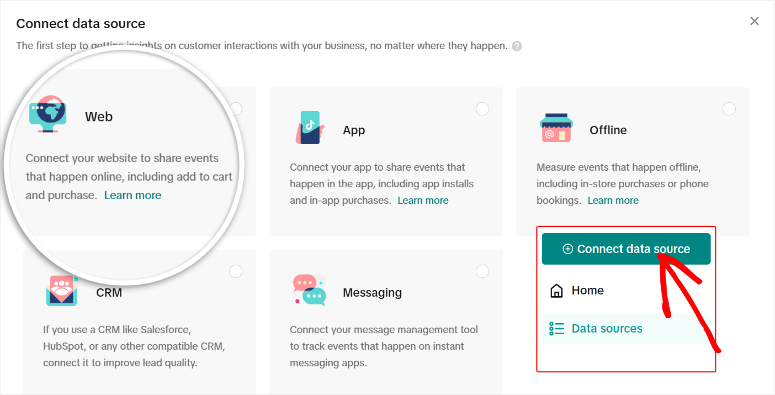
Then, at the top left of the next screen, select the Connect data source. From the list of Data Sources, select Web and click Next
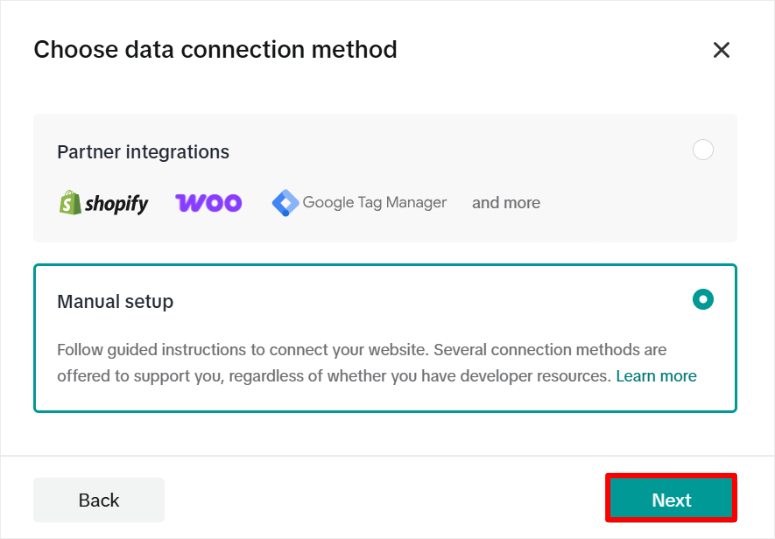
Next, enter your website domain URL in the field provided and select Next to continue. On the next screen, choose Manual Setup as your installation method and hit Next.
Now select TikTok Pixel + Events API as your connection method and click Next again. After this, TikTok asks you to name your pixel.
Use something simple that you’ll remember, like your website domain or business name. Click Create to generate your pixel.
Next, you will need to actually add the pixel code created to your website.
Here’s where TikTok walks you through several setup screens you can skip for now. Just keep clicking Next through each of these sections:
- Install base code
- Manage configurations
- Set up events
- Testing
- Set up your business funnel
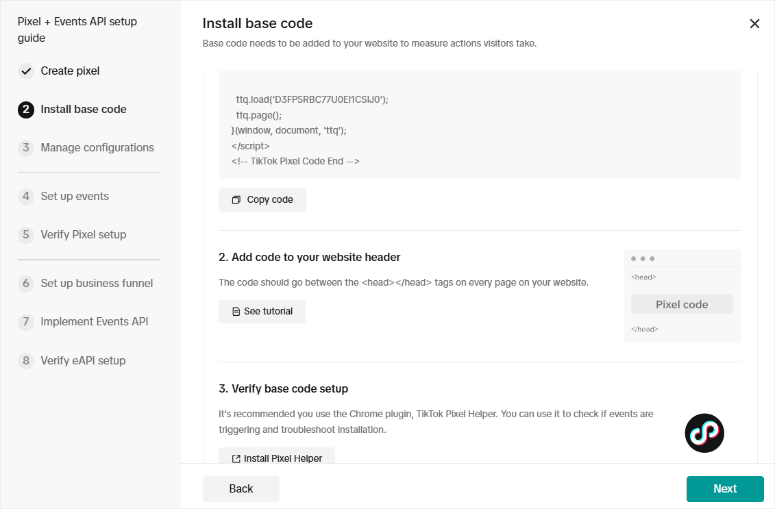
When you reach the Implement Events API screen, click Next one more time. Finally, click Finish to complete the setup wizard.
Your Pixel ID now appears in your Events dashboard as a 13-digit number. Copy this entire number carefully without adding any spaces before or after it.
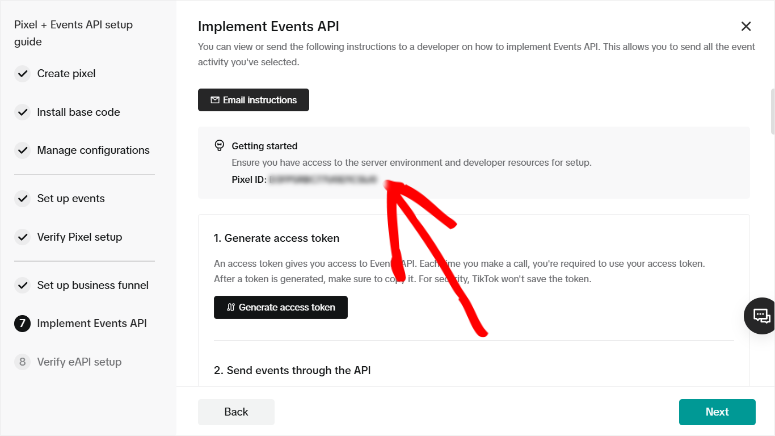
Keep this number handy. You’ll need it in just a minute.
Step 2: Install Pixel
This is where things get technical.
You need a Google Tag Manager account to proceed. If you don’t have one, you’ll need to create it first at tagmanager.google.com.
Once inside GTM (Google Tag Manager), you have to create a Custom HTML tag. This tag will contain your TikTok pixel base code.
Next, you configure triggers to fire this tag on all pages of your website. Getting the trigger settings wrong means your tracking won’t work.
After that, you need to set up event-specific tags. These track actions like adding products to the cart or completing purchases. Each event requires its own tag configuration.
The tag sequencing matters here. Your base code must fire before event-specific tags. If you get the order wrong, nothing tracks properly.
A Simpler Semi-Manual Option:
If you want to use the manual method but skip Google Tag Manager’s complexity, WPCode offers a middle-ground solution as the best Google Tag Manager plugin.
WPCode is a code snippets plugin that lets you insert the TikTok pixel into your site without editing theme files or learning GTM.
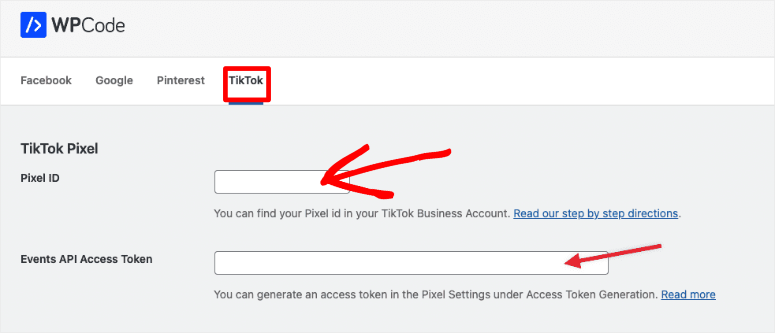
You still need to manage the pixel setup manually, but WPCode handles the code injection part safely.
The downside is that this feature is not available on the free version of WPCode. It is only available on the Plus plan or higher.
But there is a workaround so that you can use the free version of WPcode to add TikTok Pixel to your site. Though this process is a bit more manual and requires you to understand how to use WPCode.
Once you install WPCode Lite, go to Code Snippets » Headers & Footer.
Here, paste the TikTok Pixel code into the header and save. This will add the TikTok Pixel globally so you do not have to add it to every page.
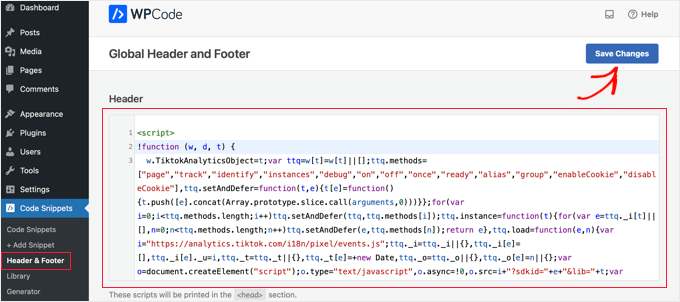
That’s It! To see how to use the Header & Footer feature, check out my WPCode review here.
Step 3: Test Your Implementation
Install the TikTok Pixel Helper Chrome extension from the Chrome Web Store. It should show your Pixel ID and confirm the pixel is firing correctly.
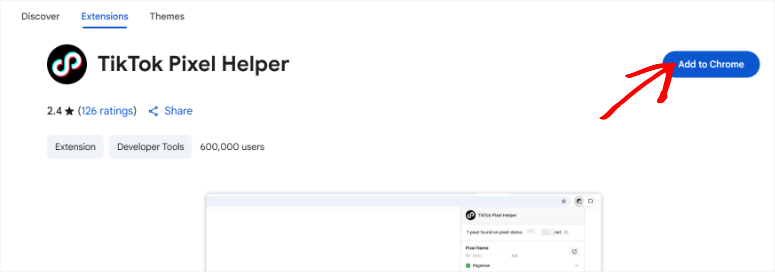
To verify your TikTok pixel is working, go back to TikTok Ads Manager and navigate to Tools » Events » Test Events. Enter your website URL and click through your site to verify that all events appear.
The Reality of Manually Setting Up TikTok Ad Tracking
Here’s what you’re actually signing up for:
- Manual setup takes 4-8 hours for experienced developers. If you’re learning as you go, expect 2-3 days.
- You need JavaScript knowledge to write custom event codes. Plus, you need to understand how data layers work between platforms.
- Tag sequencing is easy to misconfigure. One wrong setting and your entire tracking stops working. You won’t know until you notice missing data weeks later.
- Apart from that, revenue data requires additional eCommerce tracking setup. That’s another layer of complexity on top of basic event tracking.
- The biggest problem is platform switching. Your data lives in Google Analytics. Your ads run in TikTok Ads Manager. You constantly jump between platforms to see the complete picture.
Most beginners hire developers at $100-200 per hour just for the initial setup. Then you pay again whenever TikTok updates its pixel requirements.
There’s a simpler way.
Easy Way (Plugin) – Track TikTok Ads with MonsterInsights

MonsterInsights changes everything about tracking setup. Instead of spending hours in Google Tag Manager, you paste one Pixel ID and click save. That’s it.
This Google Analytics plugin automatically tracks important events like page views, add to cart actions, and purchases. You don’t configure anything manually.
Apart from that, revenue data gets captured automatically when someone buys from your store. MonsterInsights detects WooCommerce or Easy Digital Downloads and starts tracking immediately.
The best part is viewing data without leaving WordPress. Your TikTok campaign performance appears right in your dashboard alongside everything else.
Check out my latest MonsterInsights review to see all it can do.
MonsterInsights offers a free version with basic Google Analytics connection. It’s great for simple traffic tracking.
But for TikTok ads tracking, you need MonsterInsights Pro, which includes the PPC Tracking addon.
On top of that, Pro includes eCommerce tracking for revenue data and the Cart Abandonment reports we’ll set up later.
For this tutorial, you need the Pro version. The free version won’t work for what we’re doing.
How to Set Up MonsterInsights to Track TikTok Ads
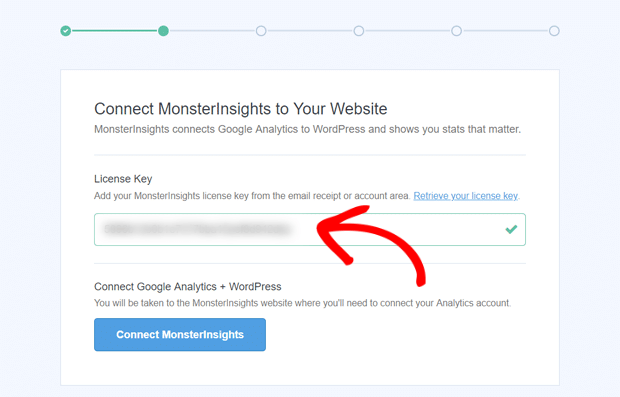
Once you purchase and install MonsterInsights Pro, a setup wizard appears automatically.
The wizard walks you through connecting your Google Analytics account. You simply click “Connect MonsterInsights” and choose your Google account in the popup.
The plugin handles the OAuth authentication for you.
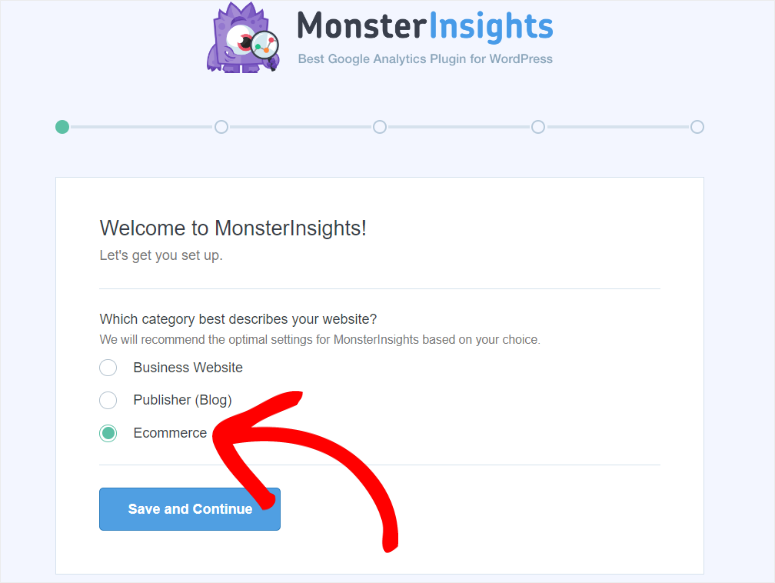
During setup, you’ll choose your website type from the available options. Pick the category that best matches your site – this helps MonsterInsights optimize tracking settings.
In my case, I picked “eCommerce.”
That’s the complete Google Analytics connection. The wizard handles everything else automatically.
For a full breakdown, check out my complete step-by-step MonsterInsights installation instructions.
Now let’s add TikTok tracking.
Step 1: Get Your TikTok Pixel ID
Log in to your TikTok Ads Manager at ads.tiktok.com and navigate to Tools » Events Manager » Data Sources. If you already created a pixel as described above, you’ll see it listed here.
Your Pixel ID appears as a 13-digit number. All you have to do is Copy this entire number.

Keep this browser tab open. You’ll need it for testing later.
Step 2: Activate PPC Tracking Addon
In your WordPress dashboard, go to Insights » Addons and scroll down until you find the “PPC Tracking” addon box. After this, hit the toggle switch to activate it.
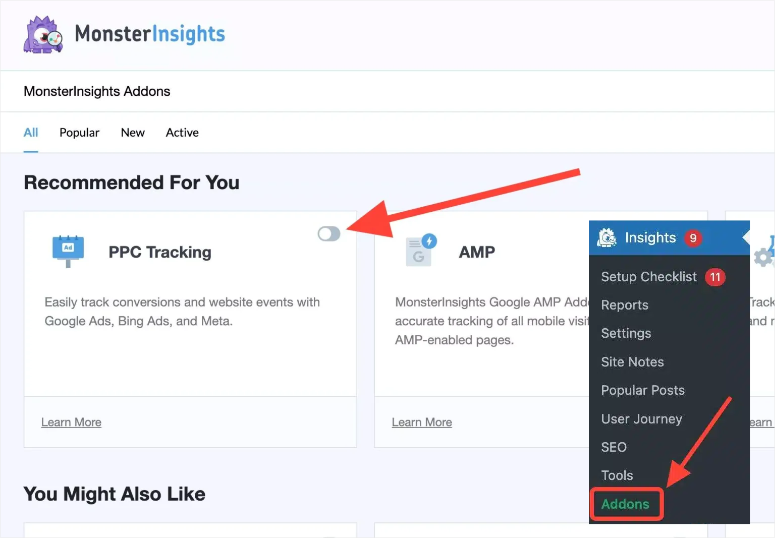
The activation takes 10-30 seconds, depending on your server speed. You’ll see a success message once it’s active.
Step 3: Add Your TikTok Pixel
Now navigate to Insights » Settings » Conversions in your WordPress menu. Scroll down the page until you see a section called “PPC Ads Pixel Tracking.”
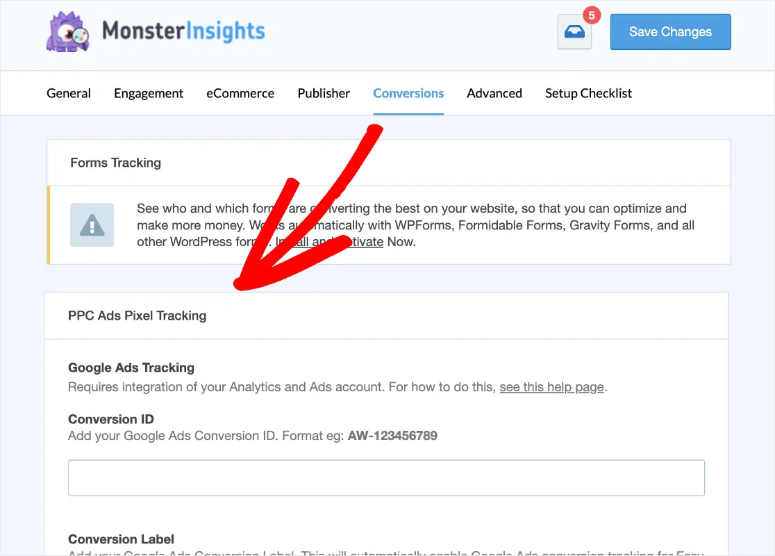
Keep scrolling to find the “TikTok Ads Tracking” field. It’s near the bottom of this section. Here, paste your TikTok Pixel ID into this field. Make sure you paste the entire 13-digit number with no extra spaces.

Click the Save Changes button at the top or bottom of the page.
That’s it. Your TikTok pixel is now installed and tracking.
Understanding Your TikTok Ads Reports
Now that tracking is set up, let’s look at where your data lives and what it means.
MonsterInsights collects all your TikTok campaign data and displays it right in WordPress. No more jumping between platforms.
All you have to do is navigate to Insights » Reports » Traffic » Campaigns in your WordPress dashboard.
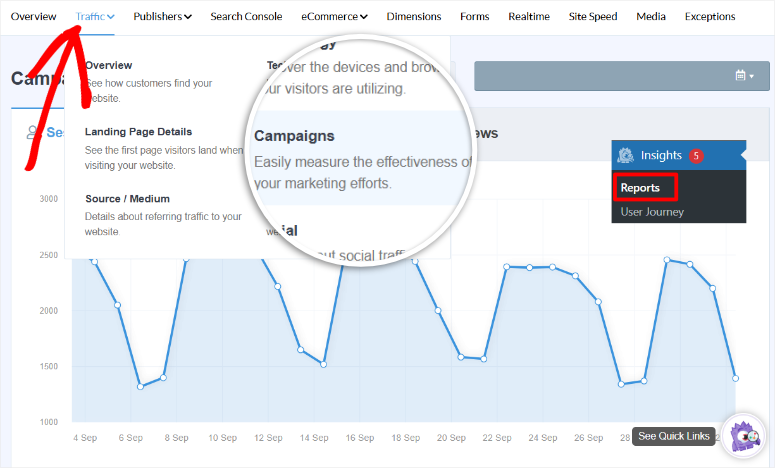
This is the Campaigns report. It shows performance data for all your marketing campaigns, including TikTok ads.
But here’s the thing – TikTok campaigns only appear here if you use UTM parameters in your ad links. Without UTM tags, the traffic shows up as generic referral traffic instead of organized campaign data.

Let me show you how to create proper tracking links.
Creating Trackable Campaign Links
MonsterInsights includes a URL Builder tool that creates properly formatted tracking links for you. To do this, go to Insights » Tools » URL Builder in WordPress.
You’ll see a form with several fields. Here’s how to fill them out:
Website URL: Enter the page you want people to land on. This could be a product page or your homepage.
Campaign Source: Type “tiktok” in lowercase. Always use lowercase for consistency.
Campaign Medium: Enter “cpc” for cost-per-click or “paid_social” if you prefer. Pick one and stick with it for all TikTok campaigns.
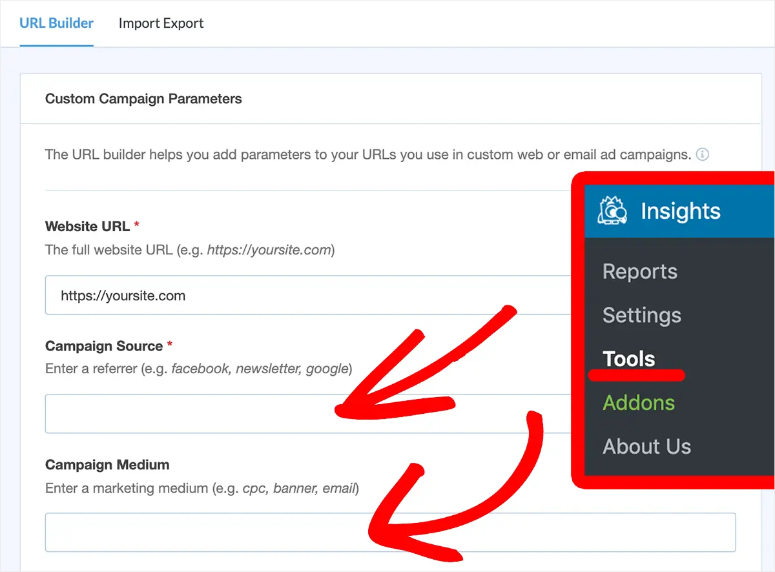
Campaign Name: Use a descriptive identifier like “spring_sale_2025” or “new_product_launch”. This helps you tell campaigns apart in reports.
Campaign Content (optional): Use this to test different ad creatives. Try values like “video_a” or “carousel_ad” to compare performance.
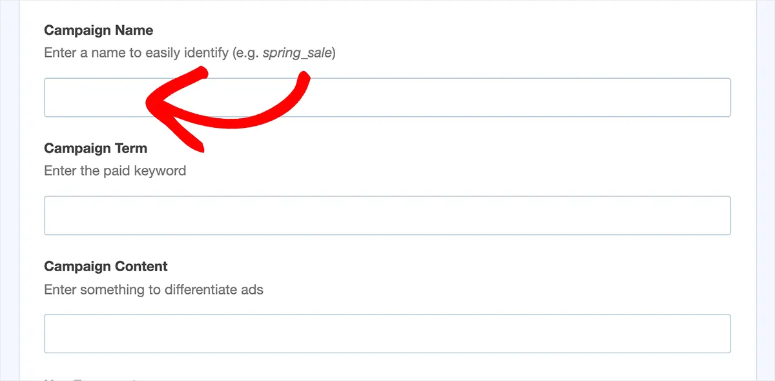
Click the generate button, and MonsterInsights will create a URL with all parameters added correctly.
Copy this entire URL and paste it into your TikTok ad campaign settings. Use this tracked link instead of your regular website URL.
Here is a complete breakdown of how to create UTMs with MonsterInsights.
Key Metrics to Monitor
The Campaigns report will now show several important numbers for each TikTok campaign:
- Sessions: How many people clicked your ad and visited your site. This shows traffic volume.
- Conversions: How many visitors completed a goal like making a purchase. This is the number that actually matters.
- Revenue: Total dollar amount generated from each campaign. Only appears if you have eCommerce tracking enabled.
- Conversion Rate: Percentage of visitors who converted. Higher percentages mean better-quality traffic.
- Bounce Rate: Percentage who left immediately without viewing other pages. High bounce rates suggest your ad promises don’t match your landing page.
Real-Time Monitoring
MonsterInsights also includes a real-time report for immediate verification. Go to Insights » Reports » Realtime to see active visitors right now.
This report is perfect for testing new TikTok campaigns. Launch your ad, then check the Realtime report within minutes. You should see visitors appearing with TikTok as their source.
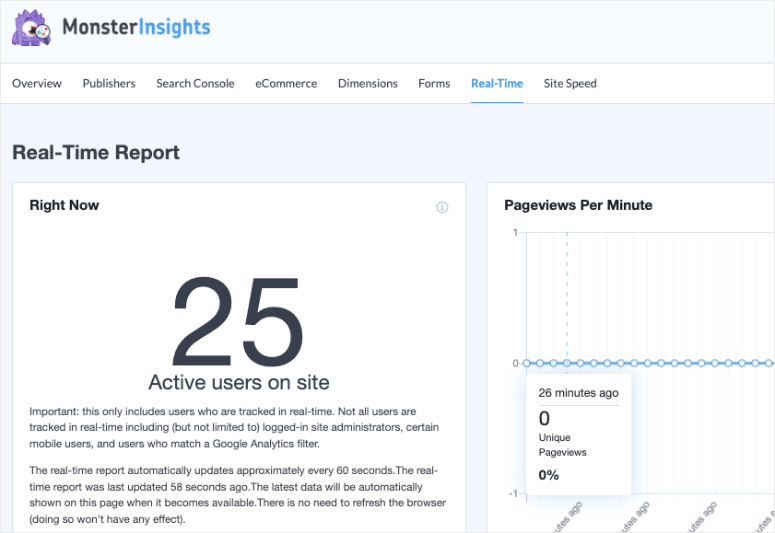
If you don’t see traffic within 30 minutes of launching a campaign, something is wrong with your ad setup or targeting.
Congratulations! You can now track your TikTok ads directly in your WordPress dashboard. Apart from that, you can also track the TikTok data in your Google Analytics 4 account.
If anything is unclear, check out the commonly asked questions below for more details.
FAQs: How I Easily Track TikTok Ads on WordPress
Do I need a TikTok Business account to track ads?
Yes. You need a TikTok for Business account to access Ads Manager and create your pixel. The account is free to create at ads.tiktok.com. Personal TikTok accounts can’t run ads or generate tracking pixels.
Can I track TikTok ads with the free version of MonsterInsights?
No. The free version doesn’t include the PPC Tracking addon needed for TikTok pixel integration. You need MonsterInsights Pro, which includes tracking for TikTok, Pinterest, Facebook, Google Ads, and other platforms.
How long does TikTok pixel data take to appear in reports?
Allow 24-48 hours after setup for initial data to populate. Google Analytics processes data with built-in delays. Real-time reports show user activity faster, but complete campaign reports need the full waiting period.
Will tracking slow down my TikTok ad campaigns?
No. The pixel tracks visitor behavior on your website after they click your ads. It doesn’t affect ad delivery speed, audience targeting, or campaign performance in TikTok Ads Manager itself.
What if my TikTok Pixel Helper shows errors?
First, clear all caches (WordPress, CDN, browser) and test in incognito mode. Verify your 13-digit Pixel ID has no extra spaces in MonsterInsights settings. Check that the PPC Tracking addon shows as active at Insights » Addons. If errors persist after 24 hours, contact MonsterInsights support.
Can I track TikTok organic posts or only ads?
MonsterInsights tracks all traffic from TikTok, including both paid ads and organic posts. But, without UTM parameters, organic traffic appears as general TikTok referral traffic rather than organized campaign data. Use UTM tags even on organic posts for detailed tracking.
Do I need Google Tag Manager if I use MonsterInsights?
No. MonsterInsights handles all code injection automatically. You don’t need Google Tag Manager, theme file editing, or any manual code insertion. Just paste your Pixel ID, and MonsterInsights does the rest.
Final Verdict: Should I Track TikTok Ads on WordPress?
Absolutely yes, especially if you’re spending money on TikTok advertising.
Without tracking, you’re guessing which campaigns work. You see clicks in TikTok Ads Manager but have no idea if those clicks turn into actual sales.
Tracking TikTok Ads, especially with MonsterInsights, connects the dots. You’ll know exactly which campaigns generate revenue versus which ones waste your budget.
The reports answer critical questions: Which campaigns drive sales versus empty clicks? Which ad creatives convert best? What’s your cost per conversion? Are customers actually engaging or bouncing immediately?
Curious about what else you should track?
- Start by comparing MonsterInsights vs ExactMetrics to understand the key differences between these two popular Google Analytics plugins and choose the right one for your needs.
- Beyond ad tracking, set up form tracking in WordPress to monitor form submissions, conversion rates, and user behavior across your contact forms and lead generation tools.
- Track file downloads in WordPress with Google Analytics to see which PDFs, images, or documents visitors download most from your TikTok campaign landing pages.
- Measure user engagement by enabling scroll tracking in WordPress with Google Analytics to understand how far visitors scroll through your content before bouncing.
- If you’re running affiliate offers alongside TikTok ads, track affiliate links in Google Analytics to monitor click-through rates and commission-generating traffic sources.
- For simpler analytics without WordPress dashboard access, check out our OnePageGA review to see if this lightweight alternative fits your basic tracking needs.
Tracking TikTok ads is just the beginning of understanding your website performance.
These related guides help you monitor every aspect of visitor behavior, from form submissions to scroll depth, giving you complete visibility into how users interact with your content after clicking your ads.

Comments Leave a Reply