Want an easy way to notify your subscribers of new WordPress posts?
With the help of push notifications, you can reach out to your audience and inform them as soon as a new post is published. This helps to drive traffic back to your WordPress site and gain a following of loyal readers.
The best part is you can automate it and that means less admin work for you while you keep your subscribers engaged in the best possible way.
In this tutorial, we’ll show you how to automatically notify subscribers of new posts in WordPress in a few simple steps.
How to Notify Subscribers of New WordPress Posts
There are many ways you can notify subscribers of new WordPress posts that you’ve published. The top 3 ways that bring the best results are:
1. Push notifications:
The reason we pick push notifications as #1 is that your visitors will never have to enter their personal information and email addresses to subscribe to get notifications from your site.
These notifications are delivered to the subscribers’ devices even if they are not active on your website. This way, you can bring your readers back to your blog whenever you publish a new post.
2. Email:
You can send automated notifications to email subscribers as soon as a new blog post is published. This might be your best option if you’re using WordPress.com as you won’t be able to install plugins to send push notifications.
To create automated new post notification emails, check out our list: Best Email Automation Tools to Improve Your Email Marketing.
You’ll find tools that make email automation easy with drag and drop builders, email templates, eCommerce blocks, social media icons, and more.
Our top picks are Constant Contact and Sendinblue to create weekly email newsletters and email campaigns to notify subscribers of latest posts. You can create custom email subject lines and headers to better engage your audience.
Both platforms let you create and display subscription forms on your site and will make sure your emails hit the inbox and not the spam folder.
If you want to automate processes in WordPress and create workflows that run on their own, then Uncanny Automator is the tool for you. This lets you set up a trigger and action to follow. So when you publish a new blog post, you can trigger an email to be sent to your inbox like an admin notification.
You can also trigger a templated newsletter email to be sent to subscribers and alert them of new content with a link they can follow that leads the right to the new blog post. See our full review: Uncanny Automator Review.
3. RSS feed:
An RSS feed lets users subscribe to receive updates from websites and blogs. So instead of bookmarking favorite sites, users can simply add the website to their RSS feed and stay up to date on the latest news, posts, and more.
To set this up, we recommend using one of the many apps available. See our list of the best WordPress RSS feed plugins.
In this tutorial, we’ll show you how to use push notifications to update subscribers about new posts. It’s the easiest way and is completely automated so you won’t have to do much. Plus, it’s proven to get much higher open and click-through rates.
That said, let’s get started.
Notifying Subscribers of New WordPress Posts Using Push Notifications
The easiest way to create push notifications is by using a powerful WordPress plugin like PushEngage.
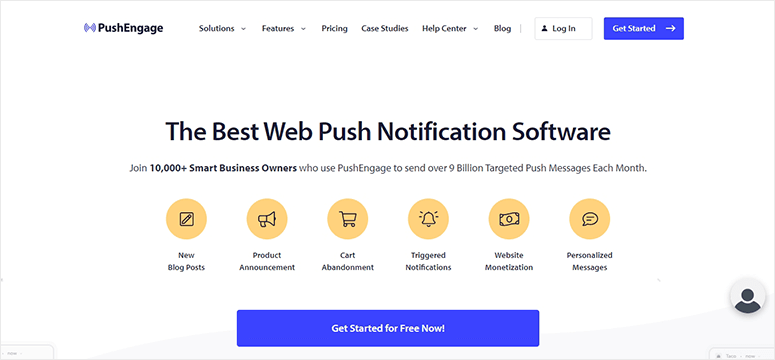
PushEngage is the best push notifications software on the market. It allows you to send notifications to your website visitors through their browsers.
You can add a customized optin popup to ask the visitors for their permission. Once they click on the “Allow” button, they’ll be subscribed to your website notifications.

After that, you’ll be able to send notifications to subscribers about new blog posts, new products, sales, price drops, and more.
The best thing about PushEngage is that it comes with seamless integration with WordPress. So you can set up automated notifications for new WordPress posts in no time.
Along with this, PushEngage comes with powerful features like:
- Set up local timezone to send push notifications
- Segmentation to target the right subscribers
- Autoresponder drip campaigns
- Trigger notifications based on user behavior on your site
- Built-in analytics to track views and interactions
PushEngage is designed to be incredibly helpful to just about any site owner including bloggers, eCommerce stores, and business sites. To learn more, you can check our complete PushEngage review.
Now that you know which push notifications tool to use, let’s learn how to easily notify subscribers about new WordPress posts.
Step 1: Create a PushEngage Account
First, you’ll need to sign up for a PushEngage account. You can start with a free plan that lets you send notifications to up to 200 subscribers. For more advanced features and a higher subscriber limit, you’ll want to upgrade to a pro plan.
After you sign up, you can access your account dashboard and set up your website.
Then, navigate to Site Settings » Site Details page from the left menu panel. Here, you can change your details such as site name, URL and even add a site logo.
To connect your website, you need to click on the Generate a new API key button there.
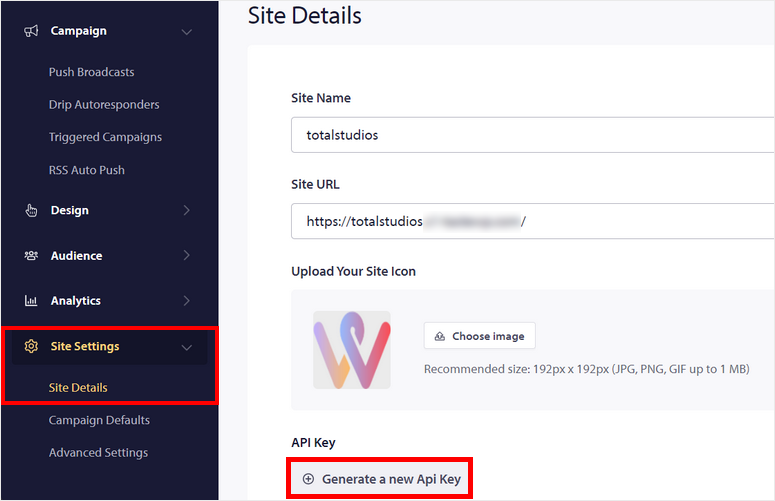
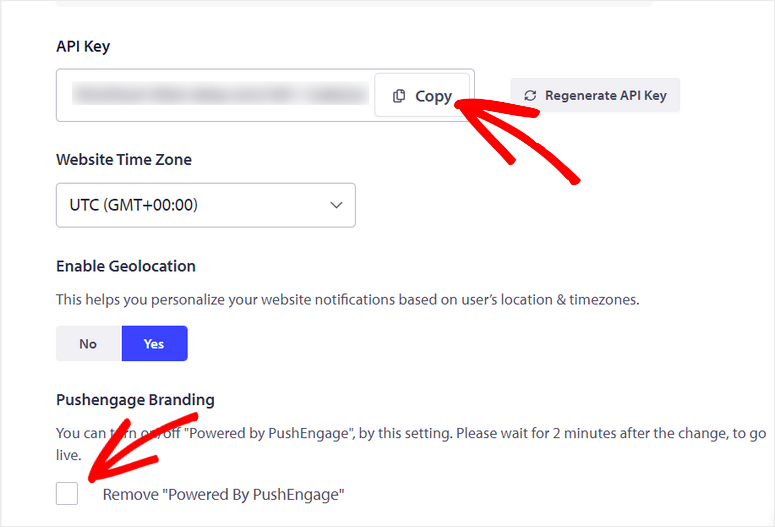
Once you see a new API key, click on the Copy button as you’ll need it in the next step.
If you scroll further down, you’ll see the options to select the website time zone and geolocation. This will allow you to send push notifications to subscribers based on their local time so they’ll get it at a time when they are most likely to be active online.
You also get the option to remove the PushEngage branding if you want.
Now, you’ll need to connect your PushEngage account with your WordPress site.
Step 2: Install the PushEngage Plugin
To send push notifications about new posts, you need to install the PushEngage plugin on your site. This plugin is available for free in the WordPress.org repository. You can simply install it from the Plugins » Add New page in your WordPress dashboard.
Here, you can search for PushEngage and click on the Install Now button.

After you install and activate the plugin, open the PushEngage page on your admin dashboard.
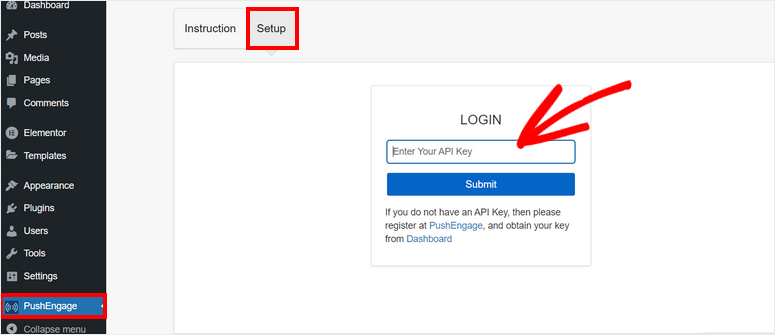
The first thing you’ll see is the instruction to connect your account. You need to go to the Setup tab and enter your API key here. Then, click on the Submit button.
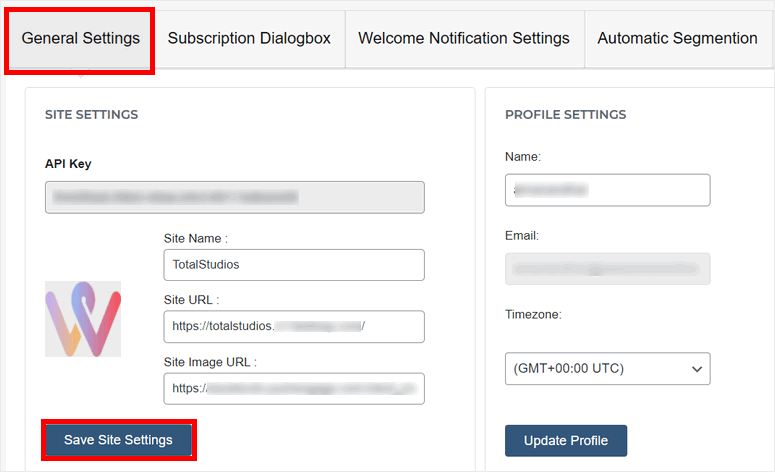
Now, you’ll be able to see all the plugin settings on the page. On the General Settings, you can edit site details and update your profile.
When you move down the page, you’ll see the option to set up automated push notifications for your WordPress posts. You can trigger a notification for all types of posts.
Also, there are options to automatically add the featured image of the post to your notifications.
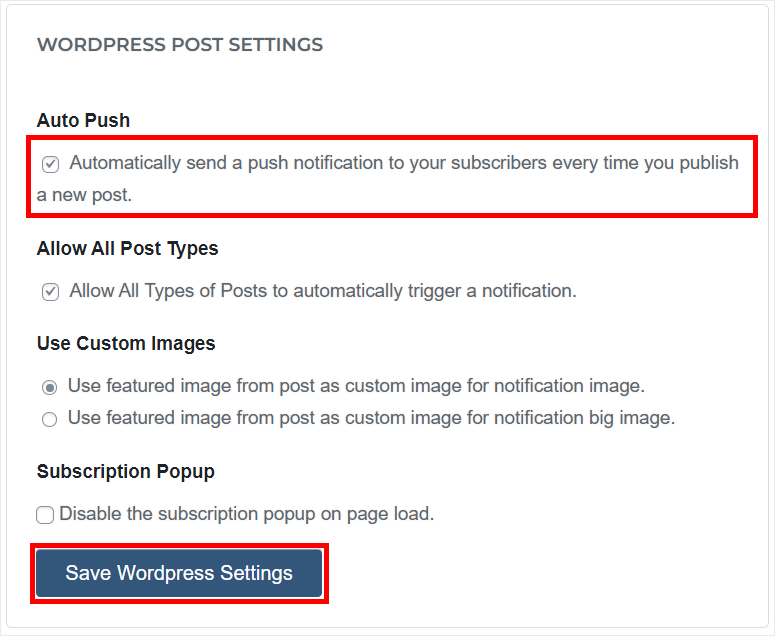
Once you’re done with the settings, click on the Save WordPress Settings button.
Step 3: Configure Subscription Dialog Box
If you want to send notifications to your website visitors, you need to get them to subscribe first. With PushEngage, you can easily do this by showing a subscription popup on the users’ browsers.
In your PushEngage dashboard, open the Subscription Dialogbox tab from the top menu and you’ll see all the settings. Here, you can select the layout for the popup.
There are many options to choose from such as safari-style box, bottom-placed bar, push single step optin, and more. You can also see the preview on the right-hand side.
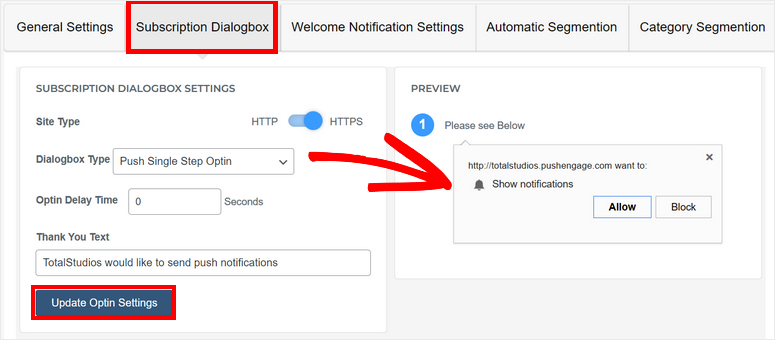
When you’re done customizing, click on the Update Optin Settings button. The users will now be able to see a popup like this when they visit your WordPress website.
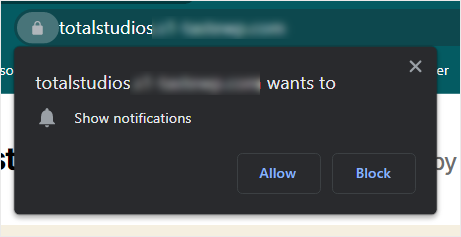
Next, you’ll want to set up the welcome message. PushEngage lets you display a custom message to thank the users for subscribing and welcome them to your brand.
Step 4: Customize Welcome Notification
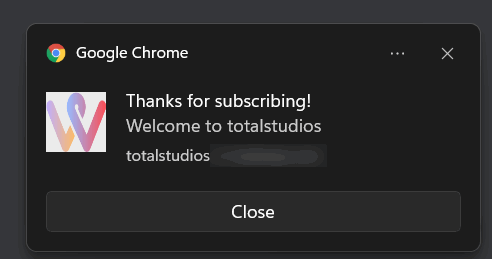
Welcome push notifications are sent to the users after they click on the allow button on the subscription box.
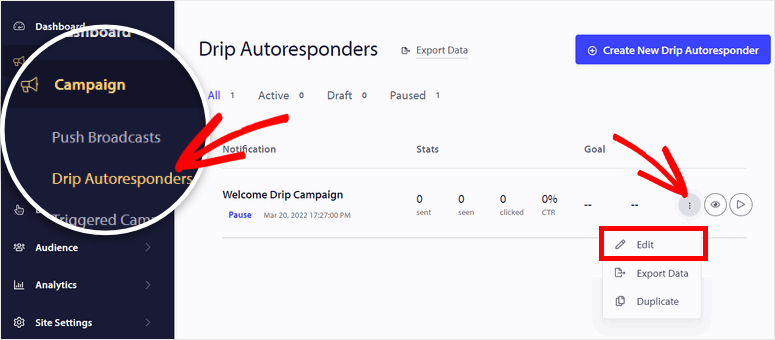
If you want to customize the default text for your welcome notification, head over to your PushEngage dashboard. Then, open the Campaign » Drip Autoresponders page from the left menu.
Here, you can see the Welcome Drip Campaign. To edit this notification, select the three dots option as shown in the image below and click on the Edit button.
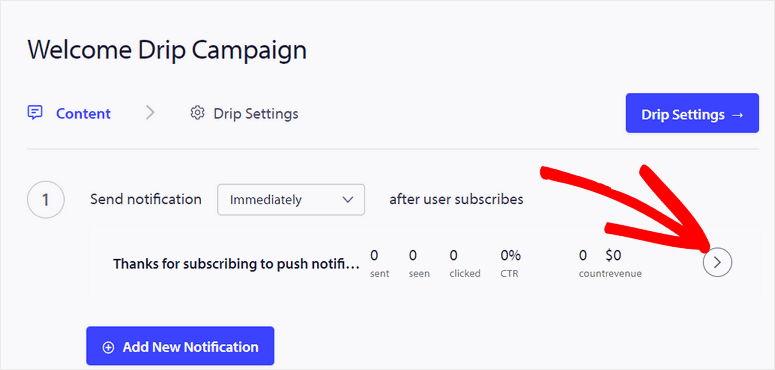
This will open the notification editor where you can decide when this notification is sent. To make changes to the text, click on the arrow on the right-hand side of the page.
This will display options to change the notification title, message, URL, and icon image. On the right side of the page, you’ll see the live preview of how your notification will appear in different browsers and devices. This lets you design your message template visually making it easier to get it looking the way you want it to.
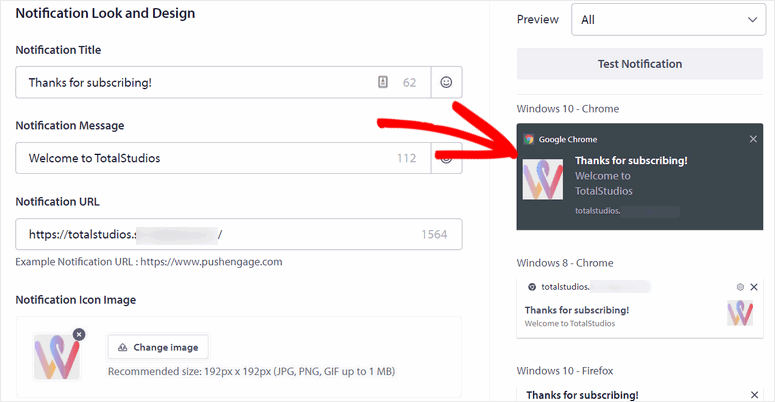
After that, you can test the notification if you’d like. Then all you need to do is activate this welcome autoresponder for all your subscribers. The notification will look something like this.
Now, you need to set up push alerts to notify subscribers of new posts in WordPress.
Step 5: Enable Notifications for New Posts
PushEngage lets you set up push notifications for individual posts and pages. Whenever you create a new WordPress post, you’ll see the checkbox option to enable PushEngage notifications on the post editor.
This gives you control over which posts are sent as notifications. So if there’s ever a post you don’t want to send as a push notification, you simply can leave this box unchecked.
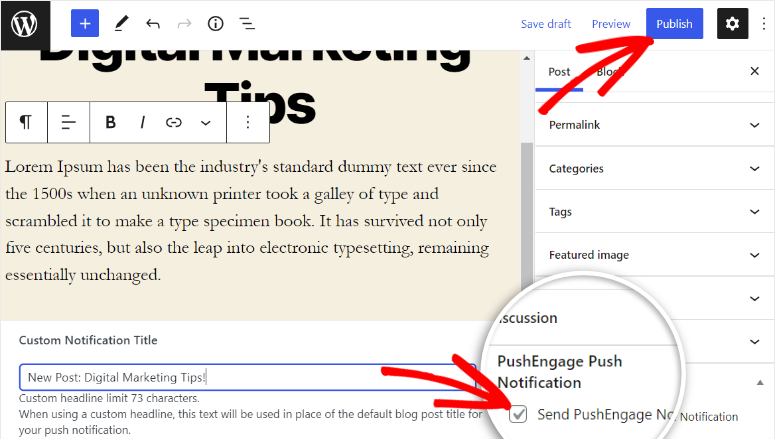
You’ll also get the option to add a custom title for your post notifications. You can enter a custom text to grab the attention of the subscribers.
If you don’t add custom text, the blog post title will be used as the notification title.
Once you enable the notification, you can publish the post on your site.
Now, PushEngage will automatically notify your subscribers about the new content published on your site.
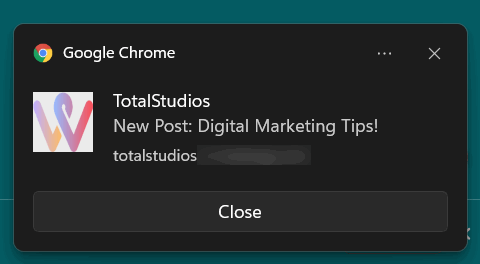
And you’re done! You’ve successfully learned how to send push notifications for new posts using the PushEngage app.
PushEngage can be used in so many more ways to drive conversions, viewership, and even sales on WordPress blogs, WooCommerce sites, and any other WordPress site.
With PushEngage, you can also send notifications about different events on your site such as new product purchases, back-in-stock products, number of site views, and more.
See our tutorial: How to create recent sales notifications in WordPress
You may also want to check out other tools that help you keep your audience engaged in your brand. These include Thrive Suite, OptinMonster, and SeedProd.
That’s all for today! We hope this article helped you easily notify subscribers of new WordPress posts.
Next, you’ll definitely want to check out these resources:
- Best Social Proof Plugins for WordPress (Compared)
- Best Email Marketing Services for Small Businesses
- How to Set Up the Right Form Notifications & Confirmations
These posts will help you use social proof to boost your conversion and grow your email list. The last one will help you learn how to set up automated email notifications for form submissions on your site.

Comments Leave a Reply