Push notifications give you access to site visitors even when they aren’t actively browsing your site. As a result, you can drive traffic back to your website and boost conversions.
That means bloggers, store owners, online publishers, and others can greatly benefit from push notifications. At IsItWP, we use push notifications as well to share alerts, updates, and more. This has helped us connect better with our users and grow our audience.
In this article, we’re going to show you how to set up push notifications on your WordPress site using PushEngage.
But first, let’s clarify what push notifications are and why they’re so important.
What Are Push Notifications?
Push notifications are popups that appear in a user’s browser while they’re visiting your website. If your users consent, they can receive future notifications from your brand that lead them back to your website.
Plus, once users allow push notifications, they don’t have to be on your site to receive these messages. Whether they’re on desktop or mobile, they’ll see a popup appear in the corner of their screen.
Here’s an example of a push notification in action:

But the question remains: what do push notifications accomplish, and are they effective? Let’s take a look at how push notifications can grow your business.
Why Use Push Notifications on Your WordPress Website?
Using push notifications on your WordPress site can greatly affect conversions and growth. Let’s look over some of the benefits of using push notifications.
1. Drive Traffic Back to Your Website

One of the most difficult parts of any conversion strategy is bringing customers back to your site after they leave. They need an incentive to take action, and with push notifications, that’s easy.
Whether you have a blog or an eCommerce business, notifications are a great way to redirect users’ attention to your site and increase sales.
It’s also a reminder that they opted into your brand’s notifications and are likely interested in your offers.
2. Send Marketing Messages to Interested Customers
Because users have to give consent to receive notifications, this tells you they’re already interested in hearing from you in the future. They want to know more about your online store, offers, or products.
This makes it easier to market to your audience and increase conversions effectively.
3. Give Users Control
Users can choose how they want to interact with your notifications, which gives them more power and freedom. No one wants to be bombarded with message after message from a brand. So, when you give users more options, it makes them more likely to take action and engage with your content.
4. Improve Customer Retention
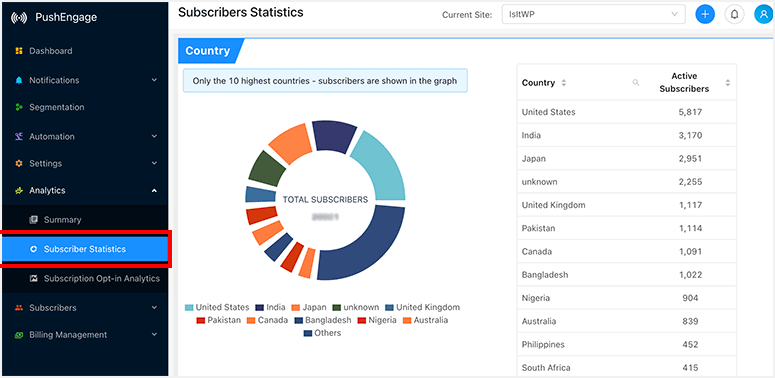
Repeat customers add a lot of value to your business because they’re likely to spend more and spend more often. Push notifications are a simple way to remind visitors about your website and encourage them to navigate back to it.
Plus, it helps improve your lead generation strategy. Sending exclusive offers and discounts also drives traffic back to your website.
Now that we know what push notifications are and why they’re so important, let’s see how you can use them today.
Adding Push Notifications to WordPress With PushEngage
The best tool to add push notifications to your website is PushEngage.
PushEngage comes with tons of powerful features to help site owners drive more traffic to their site and engage with their audience. These include:
- Goal tracking: Use specific goals to track the progress of your push notification campaigns and optimize them for your audience.
- Dynamic segmentation: Segment the users who opt into your notifications to send them tailored messages that convert.
- Trigger notifications: Create triggers for customers based on their actions.
- A/B testing: Send different notifications to customers to see what produces the best outcome.
PushEngage is the perfect solution for site owners who want to connect further with their audience by adding push notifications to their website.
If you want to know more about the features, check out our PushEngage Review.
On top of that, at IsItWP, we believe in giving you options and all the information you need to make an informed decision when selecting a WordPress tool. With that said, if you are looking for alternatives to this push plugin, here is a comparison article on PushEngage vs OneSignal.
Now, let’s look at how to create push notifications on your website using this user alert plugin.
Step 1: Sign Up for a PushEngage Account
Now, to use PushEngage, you need to select a plan. The good news is that this web push notification plugin offers a free plan to test it before making a purchase.
On the free plan, you can use it with upto 200 subscribers and make 30 monthly notification campaigns. You also get features like Android and IoS mobile push notifications, Smart Opt-in Trigger, and more.
With PushEngage, you can choose from 3 premium plans to ensure you find one that fits your budget. The Pro Plans offer features like audience groups, geo base targeting A/B testing, and more.
For this tutorial, we will use a Pro Plan to ensure we show you all you can do with PushEngage to set up push notifications. Unlike many plugins, with PushEngage, you can set up both the free and premium plugins using the same process.
So, how do you sign up for a PushEngage account?
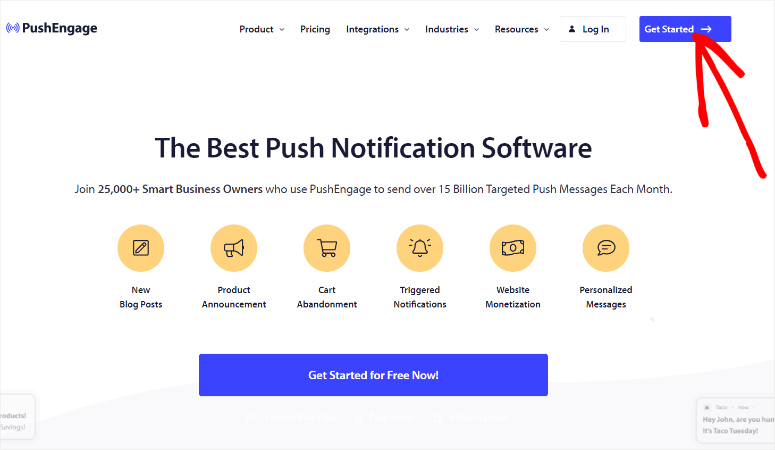
First, go to the official PushEngage website and select “Get Started.” This redirects you to the pricing page, where you can select the plan you want, including the free package.
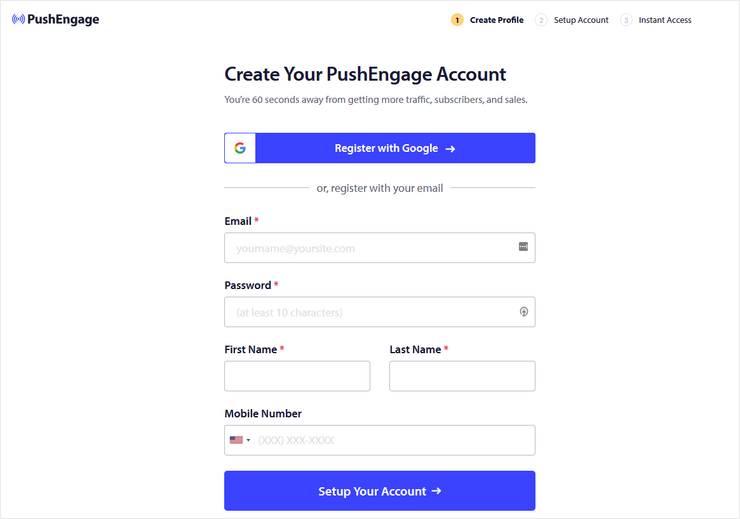
On the next page, provide your information to register your PushEngage account.
This web push plugin makes this process super easy, as you can add the information manually or use your Google account to sign up.
Then, on the next page, provide your Website Address and create a PushEngage subdomain.
The subdomain should be your company name to ensure consistency and branding, which can help improve conversion rates.
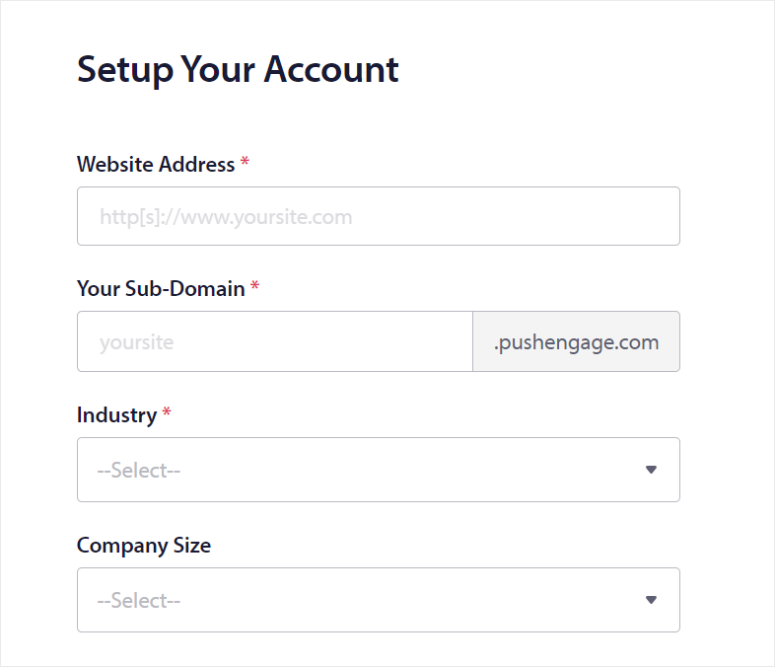
Below this, enter your company details which include Industry and Company Size. Once done, enter your credit card information to allow for billing. If you select the free account, don’t worry; PushEngage will never pull funds from your account unless you upgrade.
Finally, hit “Complete Registration & Get Instant Access.” That’s It, you are ready to set up PushEngage.
Step 2: Install and Set Up PushEngage
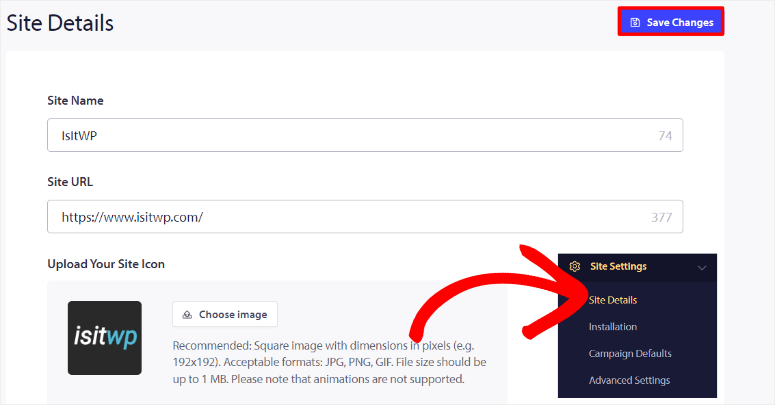
After registering for your account, log in to your PushEngage dashboard and navigate to Site Settings » Site Details. Then, in the Site Details section, enter your Site Name and Site URL.
While here, also upload your Site Icon from your PC. Alternatively, you can upload your site icon using an Image URL. PushEngage recommends that the icon image be 192 px x 192 px. On top of that, you can add image formats like JPG, PNG, and, interestingly, GIF.
Now, let’s see how to install the plugin.
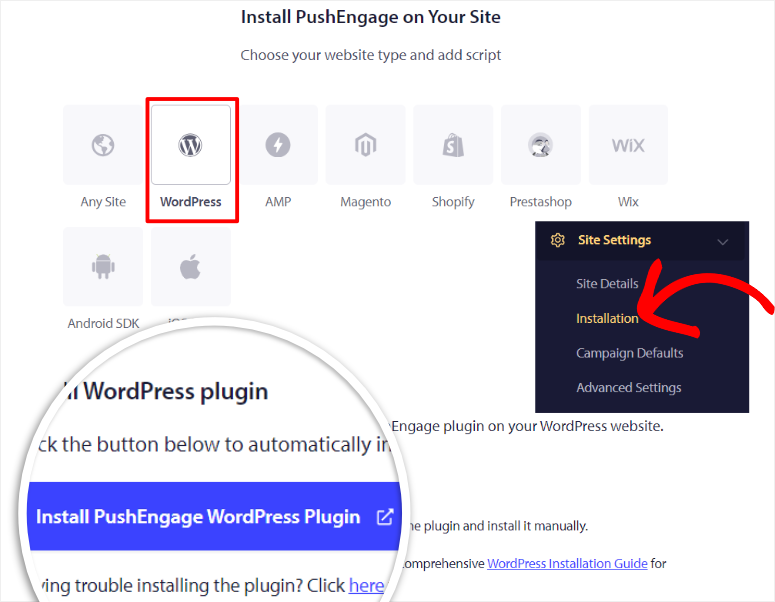
To do this, go to Site Settings » Installation in your PushEngage dashboard. What we like about PushEngage, is that it does not limit you on the type of website you can install. On this page, you can choose your website type from the icon tabs.
You can connect PushEngage to Shopify, Wix, Magento, Android SDK, iOS SDK, and more. If you do not see your website type listed, select “Any Site” and you will get a script that you can use to add PushEngage manually to your site header.
For this tutorial, we will add PushEngage to WordPress.
All you have to do is select the WordPress icon tab to open its options. After this, hit the “Install PushEngage WordPress Plugin.”
Since you should have already connected PushEngage to your website during signup, you will automatically be redirected to your WordPress dashboard. Here, the PushEngage plugin will be installed automatically in WordPress.
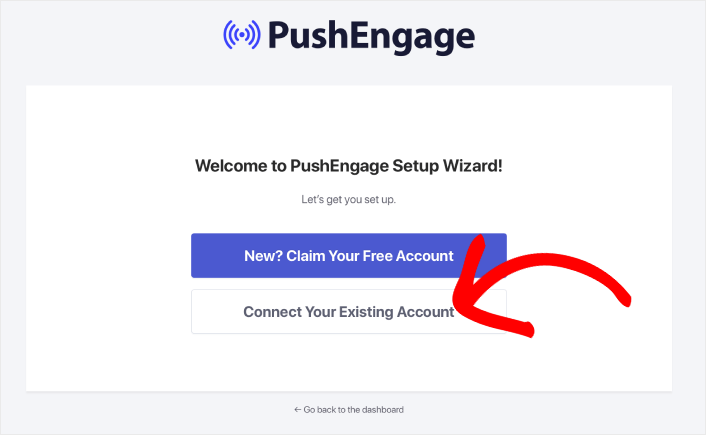
After this, activate the plugin as you would any other, and you will be redirected to the PushEngage setup wizard placed on a welcome mat.
In case you face any problems, check out this article on how to install plugins.
Then, on the welcome mat of the setup wizard, select Connect your Existing Account. If you do not have a PushEngage account, you have the option on this page to create one.
On the next page, choose “Connect a Registered Site” with a checkbox. Below this, select your website from the dropdown menu and proceed to the next page by selecting “Let’s Get Started.”
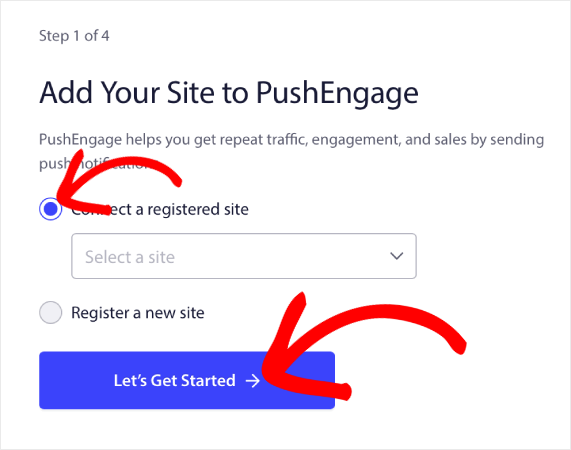
The PushEngage setup wizard is very easy to use and will walk you through everything you need to do. You will use checkboxes and toggle buttons to enable recommended and configuration settings quickly.
Once you run the setup wizard successfully, the final screen will display a congratulatory message. Below this, you have the options to Create a Campaign, Auto Push Settings, and PushEngage Dashboard.
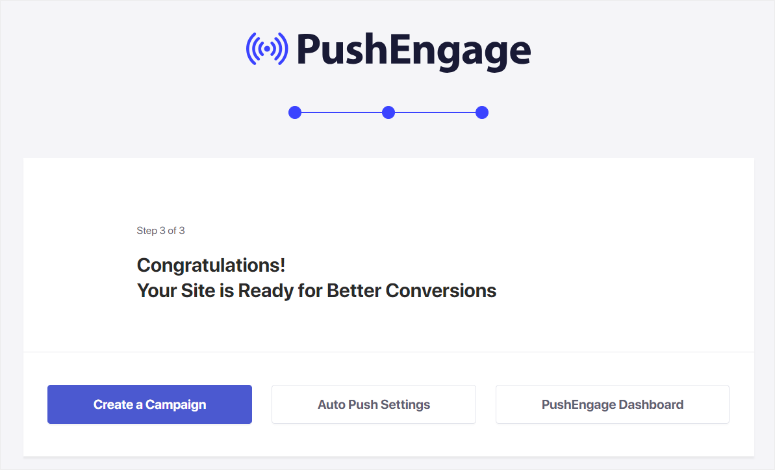
For this tutorial, we will select PushEngage Dashboard to allow us to set up push campaigns.
That’s it! You are now ready to create campaigns with PushEngage.
Step 3: Set Up PushEngage Popup Modals
Now, to send any web or mobile notifications with PushEngage, you need to have a subscriber list.
You can do this by allowing users to sign up for your push notifications when they visit your site. This way, you get consent from them to receive your push notification and, at the same time, comply with GDPR (General Data Protection Regulation.)
To do this, PushEngage allows you to create different types of optin forms and customize them to suit your branding.
To get started, head to PushEngage » Design in your WordPress dashboard. Here, select one of the popup templates displayed, which include Sleek Opt-in Box, Safari Style Box, Bell Placed, and more.
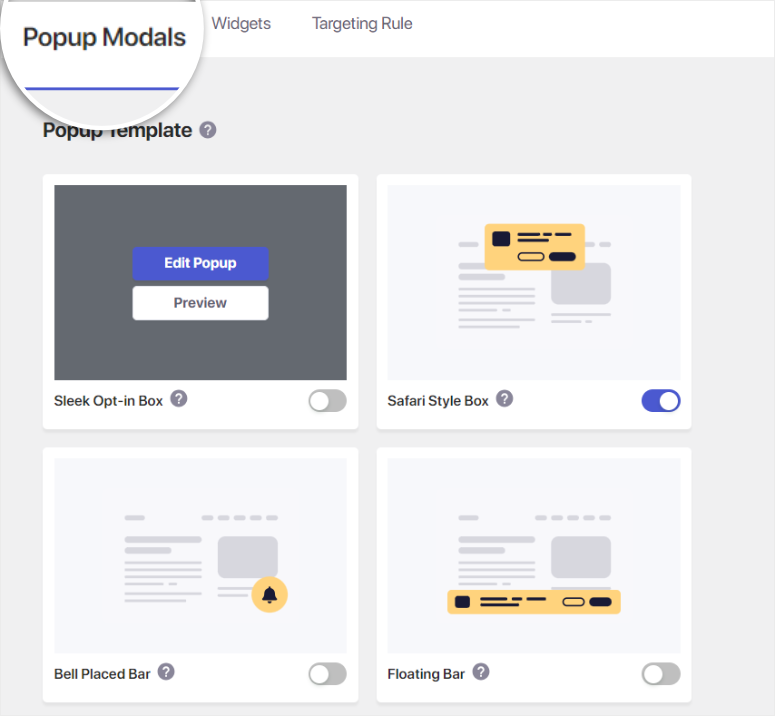
The good thing about PushEngage is that all templates provide a quick preview image to show you how the popup will look like. But it goes further when you hover over the option you want and select Preview.
This opens the template on a popup demo page, showing you how the optin form will look on different devices and browsers from the user’s point of view.
Once you identify the optin template you want, enable it with its toggle button. After this, hover over it and select “Edit Popup” to customize it from your PushEngage account.
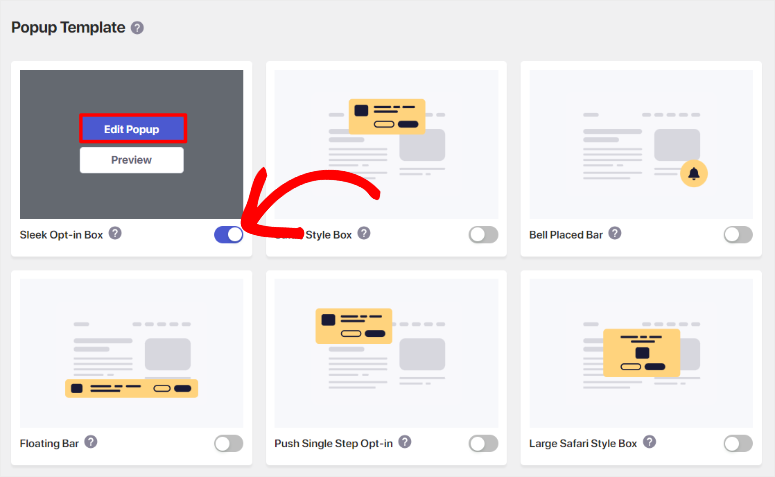
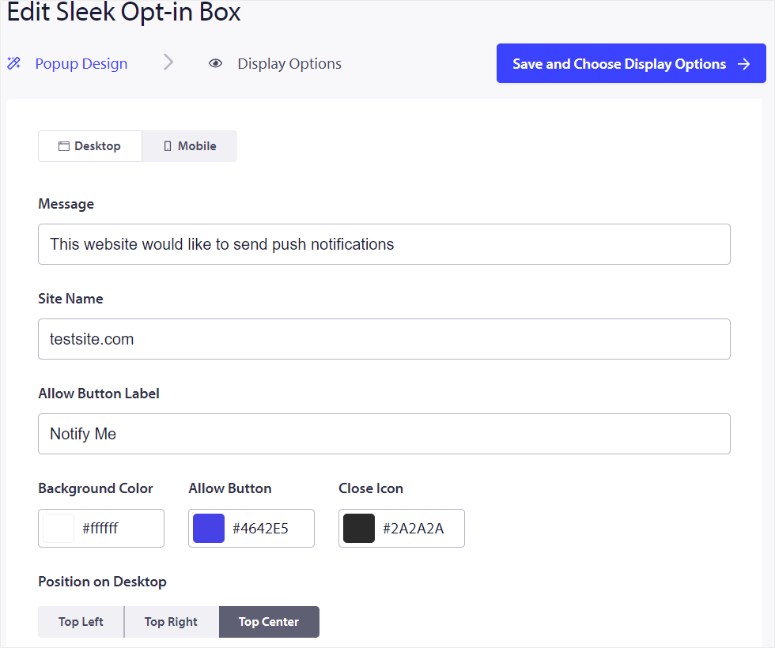
Then in the Edit page in your PushEngage account, you will first notice the Desktop and Mobile tabs. This allows you to customize your optin forms for different devices. On the far right, you will see a preview window displaying how the popup looks in real time as you customize it.
Now, on this page, create the optin Message, then add the Site Name and Allow Button Label. Next, personalize the background, allow button, and close icon colors using the color charts provided.
Follow this up by setting the position of the popup modal. You can choose between Top Left, Top Right, and Top Center. Finally, select “Save and Choose Display Options” to go to the next page.
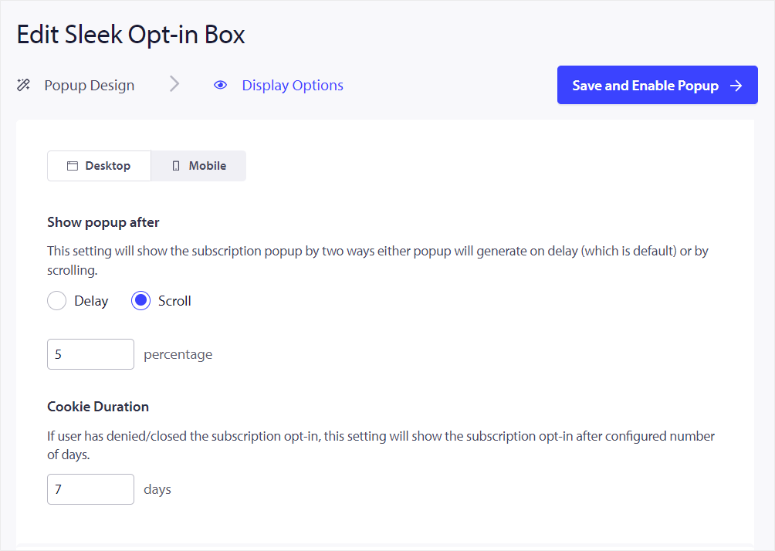
On the next screen, go to the “Show Popup After” section, where you will see 2 options you can select with checkboxes.
If you select Delay, you will set the number of seconds the optin form should delay before appearing. On the other hand, if you pick Scroll, you will set the percentage of the page the user needs to scroll before the optin form appears.
The reality is that users may not optin to your push notification on the first visit. To help with this, you can set up Cookie Duration in days. This way, if the user denies or closes your optin form the first time, PushEngage will show them the popup after the specified days you place here.
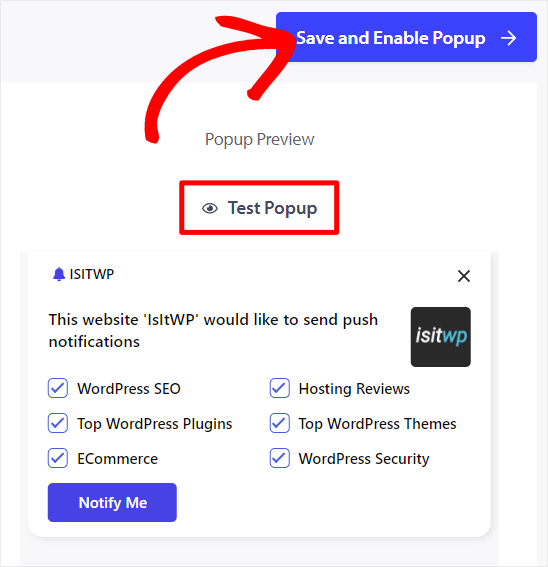
Once you are happy with the optin popup, select “Test Popup” to see how it will appear on the users’ side. Finally, hit Save and Enable Popup.”
With these settings in place, the popup optin will appear when every user visits your site. To add to this, with PushEngage, you can create, customize, and add multiple optin popups on your site.
All you have to do is enable the optin templates from PushEngage » Design in your WordPress dashboard. Once here, activate all the optin templates you want on your site with their toggle buttons. And then follow the steps you used above to create and customize the optin popup above.
But, apart from adding multiple optin forms and customizing, when users see the optin form, you can also personalize who sees a specific optin form.
To do this, head to your WordPress dashboard, then navigate to Design and select the “Targeting Rules” tab.
Here, first, use the toggle button to Enable Rules. Then, on the new options displayed, you can decide to target specific regions, or specific pages.
To target a region, select “+ Add Country Rule.” Then, from the first dropdown, hit “Country” and select the country you want to target from the dropdown menu.
To target specific pages on your site, select “+ Add Site URL Rules.” Then, on the first dropdown menu, select between Site URL Start With, Site URL Contains, and Site URL Exact Match. After this, move to the next text bar, and manually type in the URL or keyword you want the optin to display.
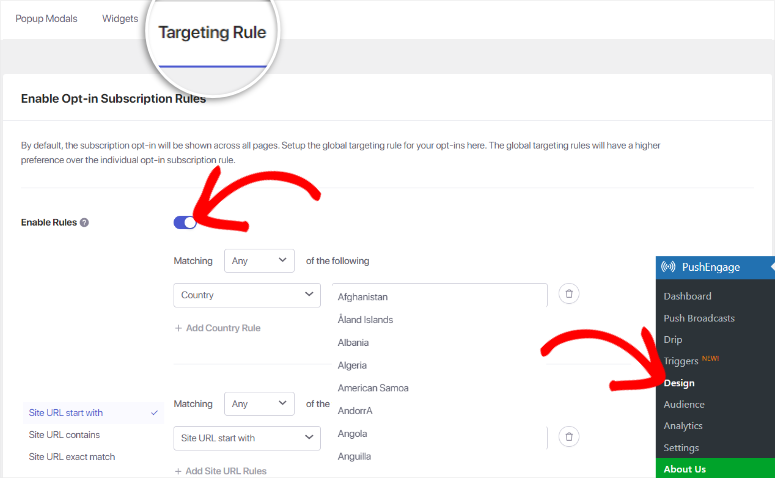
To add to that, PushEngage allows you to use both rules if you want to get highly specific. All you have to do is select the +Add Country Rule or Add Site URL Rules buttons, depending on what you want.
Well done! You can now create and display your push notification optin form on your entire site or specific pages.
Now that you know how to allow users to become subscribers to your push notifications let us see how to broadcast your notifications.
Step 4: Send a Broadcast Push Notification
Broadcast push notifications are a powerful way to reach your audience with important updates, promotions, and news. PushEngage makes it easy to create and send these notifications as we will walk you through below.
First, go to your WordPress dashboard and navigate to PushEngage » Push Broadcast to start designing your push notification. Remember, you can create your design from scratch or use a pre-made template.
For this tutorial, we’ll use a template to simplify the process. So, on this page, select “Choose from Templates” at the top.

On the next page, you’ll see a variety of templates categorized for different purposes, such as flash sales, seasonal offers, new blog posts, re-engagement, and more.
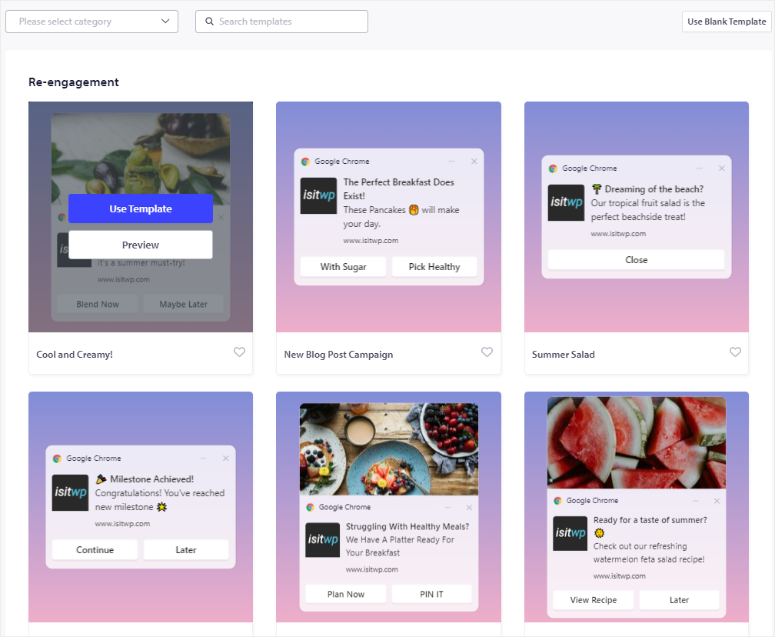
PushEngage offers a filter and search function to make it easier to select a template. On top of this, when you hover over a template and select Preview, you open a page where you can see how the template appears on different browsers and devices.
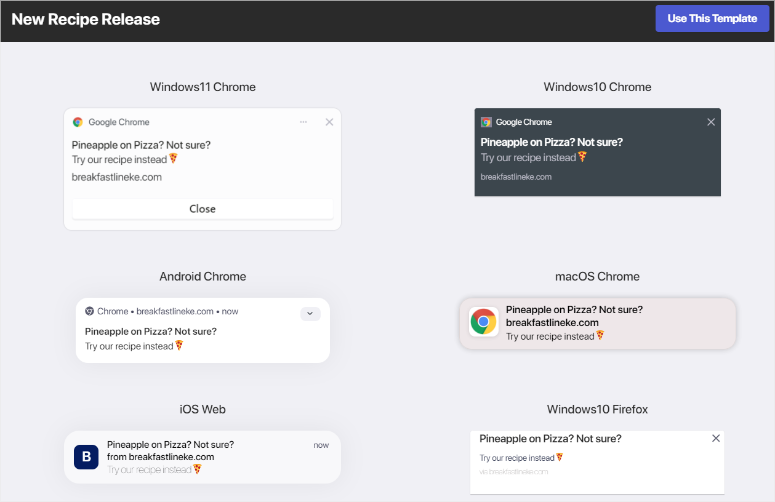
To use a template, hover over it and select “Use Template.”
After selecting a template, you’ll be taken to the New Push Broadcast Create page. This page resembles the layout you used to design your optin forms, meaning you won’t experience a learning curve.
Since you’re using a template, many sections will come prefilled with placeholder text. So all you need to do is replace the example text with your own.
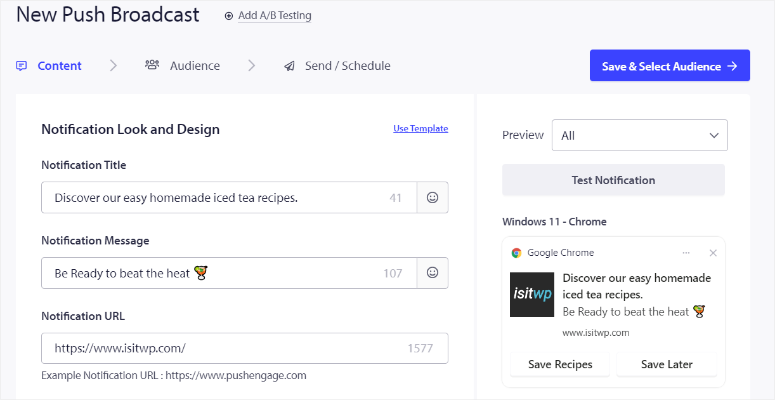
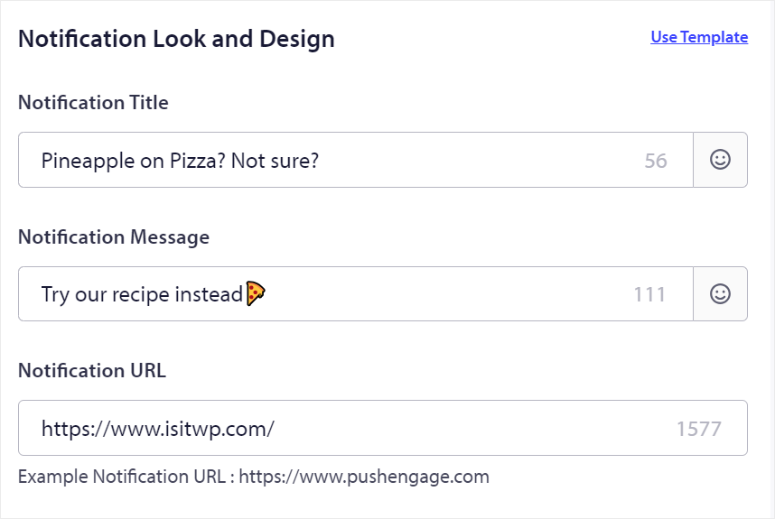
Now, go to the “Notification Look & Design” section and add your Notification Title and Message.
This is the main body of the alert. To help your push message be effective, PushEngage provides a character count to ensure your message isn’t too long. You can also add emojis directly within this section to grab your users’ attention.
Below the Message field, enter the page URL in the Notification URL bar to direct your users when they click on the notification.
Then, in the “Notification Icon” section, you should already find your site icon if you placed it during the setup process. If not, PushEngage allows you to add it at this point.
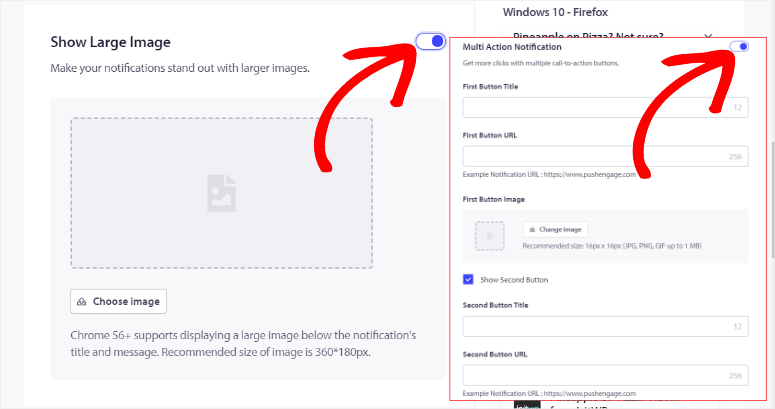
Once done, use the toggle button to enable the “Show Large Image” option.
This will open an upload area where you can select and upload an image or use your recent files. PushEngage also lets you pull images from Unsplash or add an image URL.
To increase engagement, enable “Multi-Action Notification” with a toggle button.
This feature allows you to add multiple call-to-action buttons. After this, fill out the First Button Title and First Button URL. Optionally, you can also upload the First Button image. Once done, activate “Show Second Button” and fill them out as you did in the First Button section.
Below this, you will find the Notification Duration section.
Here, use the checkbox to enable “Keep Notification Open until interaction.” Then, use Expire In to define how long the push alert should stay active before it is retired.
Once you’ve customized your notification to your liking, review all the details to ensure everything is correct by selecting “Test Notification.” After this, hit Save & Select Audience.
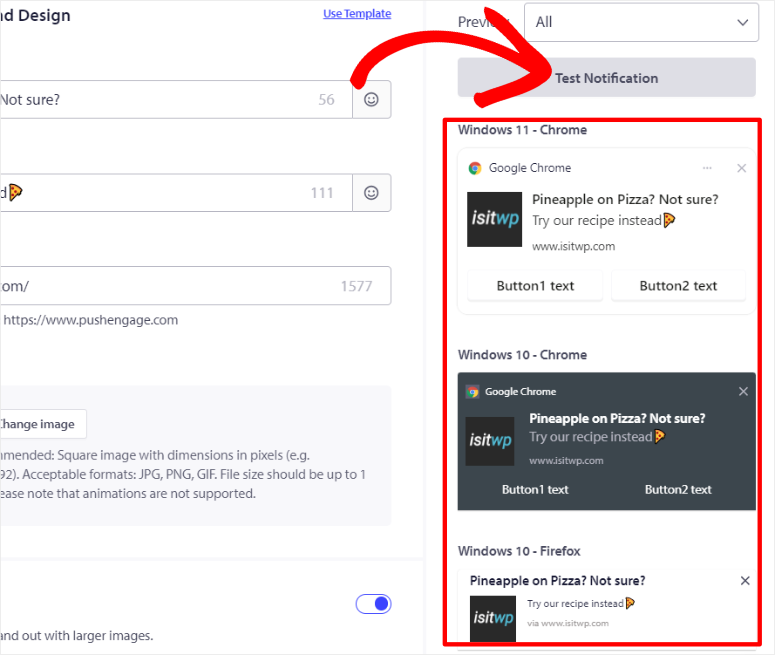
On the next page, you can either Send to All Subscribers, Send to Audience Group, or Send to Custom Audience and hit Send/ Schedule.
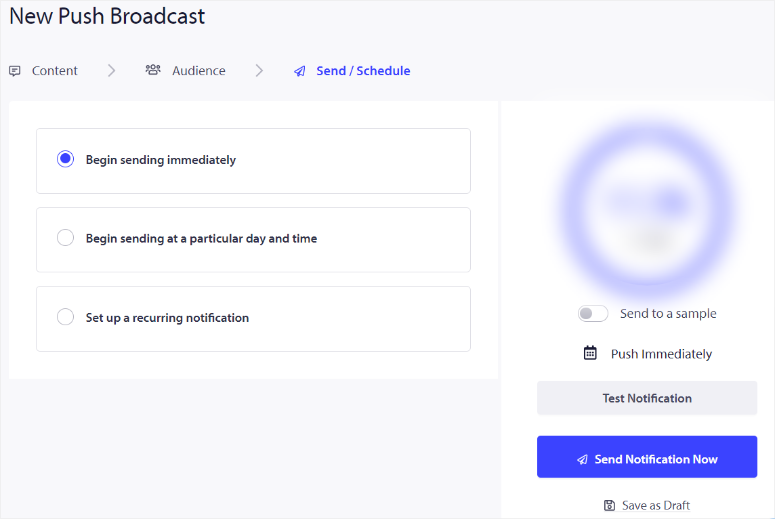
Then, on the last page, select if you want to Begin Sending Immediately, Begin Sending at a Particular Day and Time, or Set Up a Recurring Notification.
Check out the screenshot below for an example of how your web push notification will look.
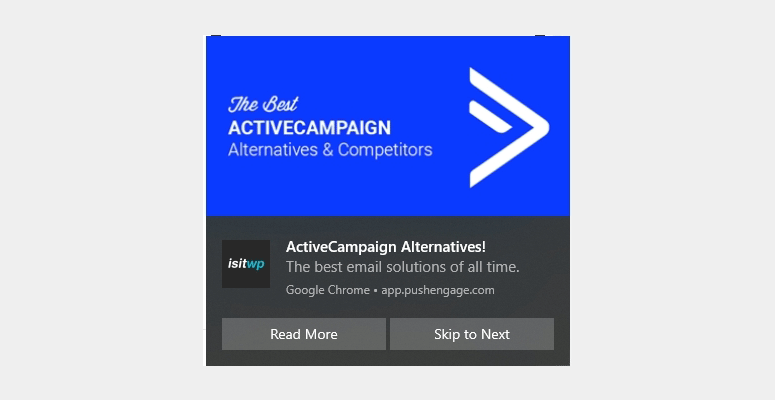
That’s it! You can now send out a push broadcast with PushEngage.
Bonus: Automate Push Notifications with PushEngage
Now, with PushEngage, you can create different types of push notifications to help you connect and communicate with your users better. On top of that, you can automate these push notifications to ensure a smooth experience for both you and your users.
1. Automatically Send Push Notifications for New Posts
Sending push notifications every time you publish new content is a great way to keep your audience engaged and instantly drive traffic to your site.
With PushEngage, you can automate this process, providing a great experience for both you and your audience.
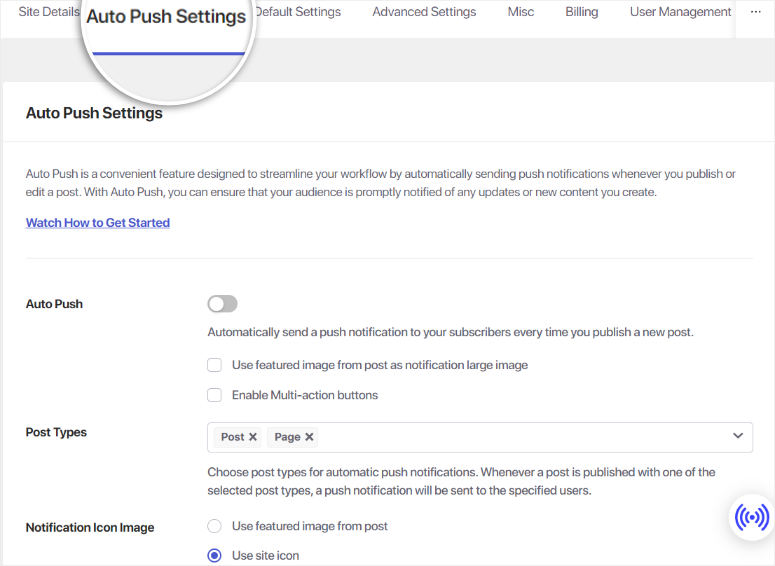
First, navigate to your WordPress dashboard, then go to PushEngage » Settings and select the “Auto Push Setting” tab.
In the Auto Push Setting section, use the toggle button to activate the auto-push feature. After this, PushEngage allows you to customize the notification content.
So, use the checkbox to enable “Use featured image from post as notification large image.” This visual element can make your notifications more engaging and appealing to your audience.
Below this, use another checkbox to “Enable Multi-action buttons.”. This allows you to add multiple call-to-action buttons to your notification, increasing interactivity and engagement.
Below the Auto Push settings, you’ll find the “Post Types” dropdown menu. Use this to select the types of posts to which you want the auto-push feature to apply.
For example, you might want to send notifications for blog posts but not for pages. You can also send a notification for both new posts and pages.
Finally, set the Notification Icon Image.
Here, use the checkbox to decide whether to use the site icon or the featured image from the post as the notification icon. This can help in making your notifications instantly recognizable to your audience.
Once you’ve configured all the settings, don’t forget to save your changes to ensure your push notifications are automatically sent whenever you publish new content.
If you want a more detailed tutorial, here is an article on how to notify subscribers of new posts.
2. How to Set Up Drip Campaigns with PushEngage
Creating a drip campaign with PushEngage is a strategic way to nurture leads, improve conversions, and maintain consistent engagement with your audience.
PushEngage drip campaigns can help you create groups and segmentations that improve engagement and build consistent value and trust with your users. Plus, they are fully automated, ensuring a hands-free leads nurturing experience.
To begin, navigate to your WordPress dashboard, go to PushEngage » Drip, and select “Add New.”

Then, go to the “Send Notification” section. Here, you can select “Immediately” from the dropdown to send the first drip message instantly.
To schedule the first drip message, select “After,” which will send the notification a specified number of days after the user subscribes.
You can also select “Next” to send the notification on a particular day instead. With both options, PushEngage allows you to set the specific time you want the push message to go out.
Once you decide when to send the first drip message, select the arrow on the far right of the tab.
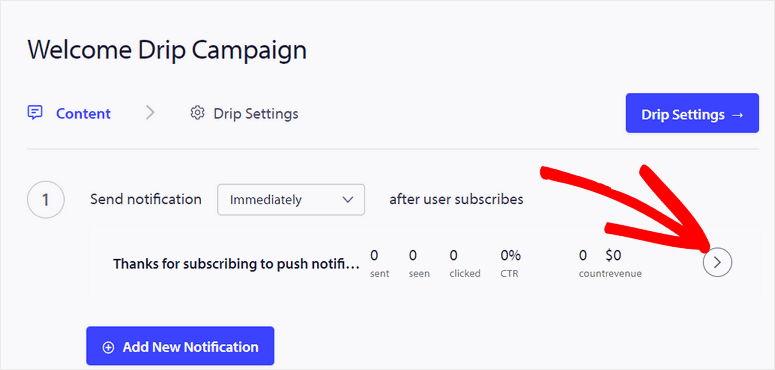
This will open the “Notification Look & Design” section. Here, you will:
- Title: Enter the title of your notification.
- Message: Write the main message you want to convey.
- Notification CTA: Add the call-to-action that directs users to a specific page or action.
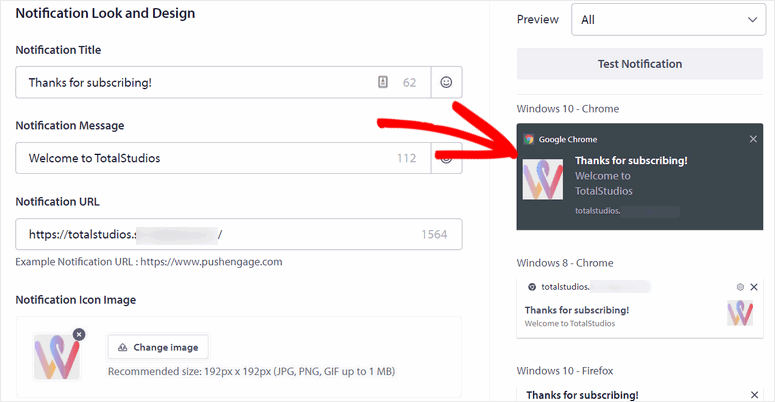
After this, you can add the engagement elements like a large popup image, multi-action buttons, and more. Again, this section is similar to creating a broadcast or customizing popup modals, ensuring you can easily design engaging notifications without a learning curve.
Next, it is time to add more push notifications for your drip campaign.
To do this, select “Add New Notification” and follow the same process you did above to add more notifications to your drip campaign.
You can add as many notifications as necessary to keep your audience engaged and maintain a continuous connection with your subscribers over time.
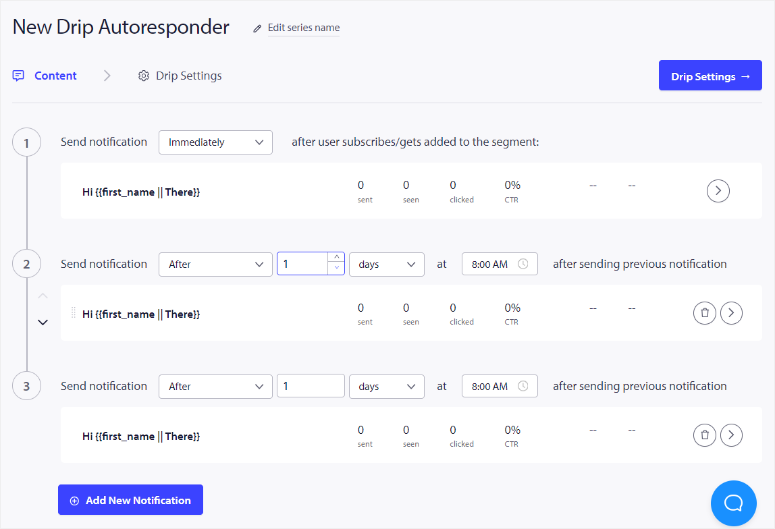
Once satisfied with your drip notifications, select Drip Settings. Here, set your campaign to “Send to All Subscribers” and select Activate Autoresponder.
Well done. You can now create a drip campaign with PushEngage.
3. How to Create Groups and Segments with PushEngage
Creating segments and groups in PushEngage allows you to target your audience more effectively, ensuring your push notifications reach the right users. While they may sound similar, they can help you achieve different goals and run different campaigns.
Creating Segments
Segments in PushEngage are important for creating a specific user base by targeting their behavior or attributes. This push plugin enables you to add users to segments automatically as they sign up, streamlining the segmentation process.
To create a segment, first go to your PushEngage dashboard. Once there, navigate to “Audience” and select Segments from the dropdown menu. This will take you to the segment management area.
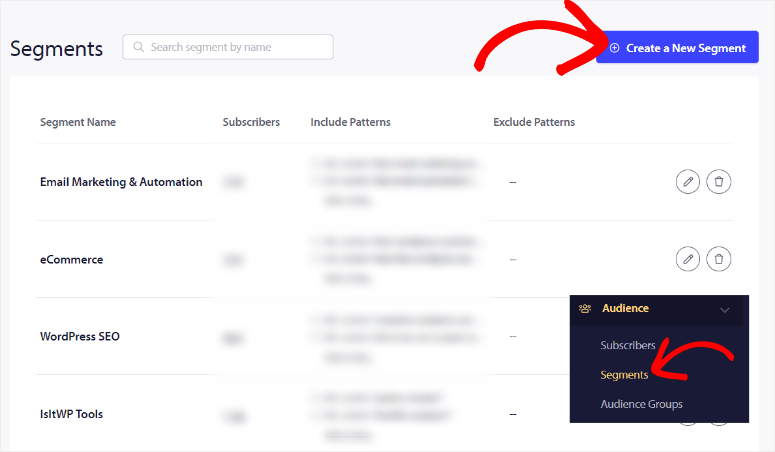
On this page, select Create a New Segment to start the creation process.
Next, create a name for your segment, giving it a clear and descriptive title that reflects its purpose. After this, move to the Choose Segment Criteria tab, where you can define its rules.
In this section, you’ll use the Add URL Filter Rules to determine which users should be included in this segment.
PushEngage offers various filtering options such as Contains, Starts with, and Exact Match. These filters allow you to specify key phrases that must be present in a user’s activity or behavior to qualify them for this segment.
For instance, if you want to target users who visit a particular page on your site, you can enter that page’s URL or a portion of it.
If you need to refine your segment further, you can create additional rules. This helps make the segment as precise as possible, ensuring that only the most relevant users are included.
Once you’ve set up your filters and are satisfied with the criteria, all you have to do is Save Segment.
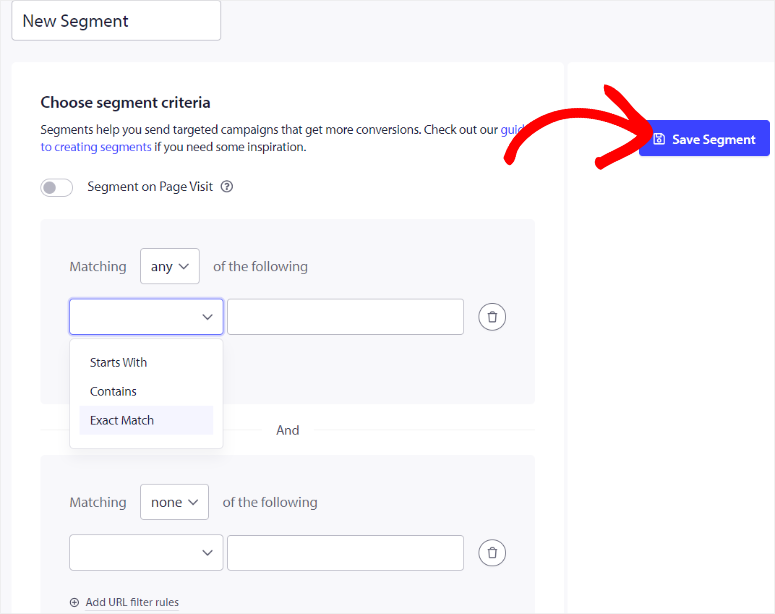
Great! Your new segment is now ready to use in your push notification campaigns.
Creating Groups
Groups in PushEngage, unlike segments, are created manually by you after users have already signed up. This feature is particularly useful when categorizing your audience based on more static criteria, such as location or device type.
To create a group, navigate to the “Audience” section in your PushEngage dashboard and select Audience Groups. Then, select Create New Audience Group from the top of the page.
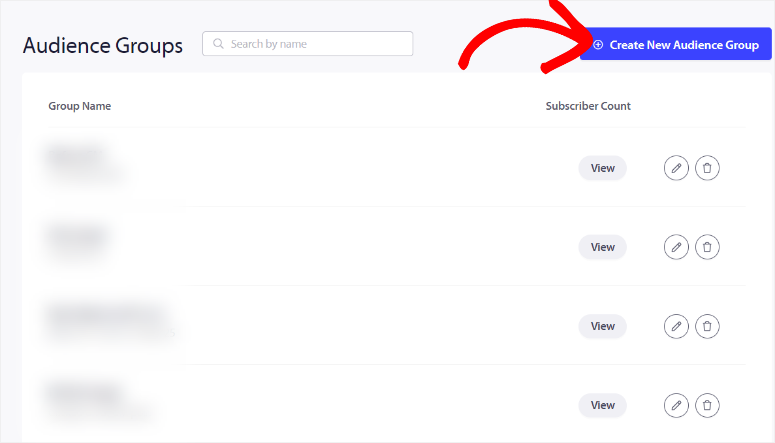
Next, begin by giving your group a name and a brief description. This will help you easily identify the group when selecting audiences for your campaigns. After this, define the criteria determining which users belong to this group.
PushEngage provides several options for grouping users. You can group users based on their Browser, Device, Segment, Attribute, Country, State, City, and more.
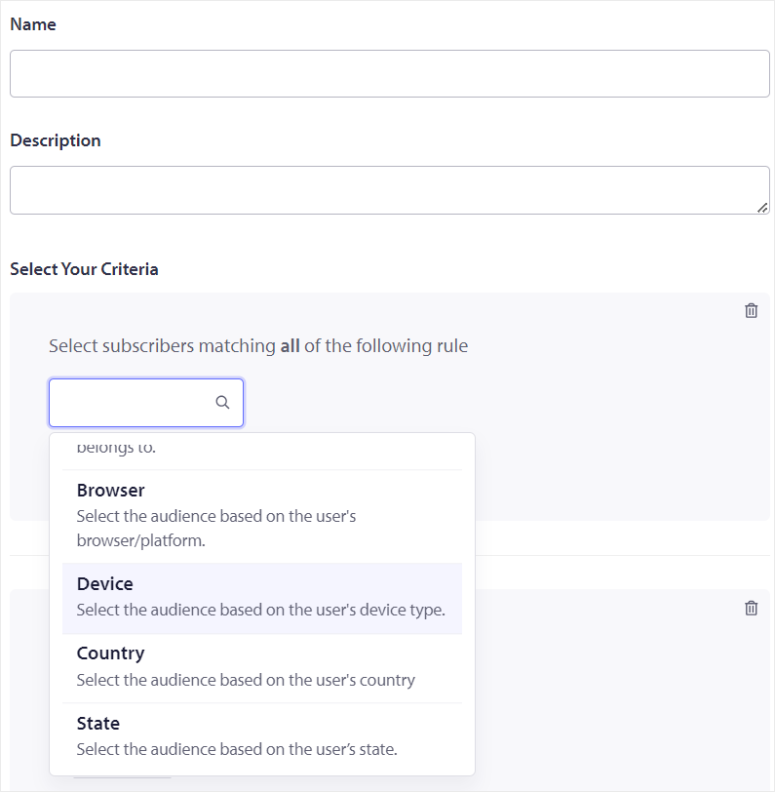
To add to this, you can expand the criteria by adding multiple rules to create a more refined group. For example, you can create a group of users from a specific country who use a particular type of device.
By adding multiple criteria, you can ensure that your group is highly targeted.
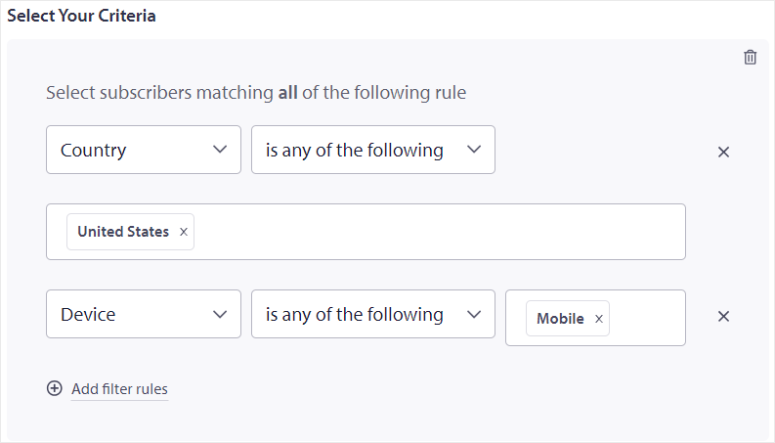
Once you’ve set all the necessary criteria and are satisfied with the configuration, select Save Audience Group.
That’s It! Your new audience group is now ready to be used in your push notification campaigns.
Remember, it is important to be precise when creating and managing your segments and groups in PushEngage. This is because you can significantly enhance the effectiveness of your push notifications, ensuring they reach the users most likely to engage with your content.
Congratulations! You can now set up push notifications with PushEngage. If you have any more questions, check out the FAQs below.
FAQs: How to Add Push Notifications to WordPress to Drive Traffic
Which is the best free web push plugin?
PushEngage is the best free web push notification plugin for WordPress. It offers features up to 200 subscribers and 30 monthly campaigns on the free plan. This makes it an excellent choice for small websites and those new to push notifications. On top of this, PushEngage Lite also allows you to send Android and iOS push notifications.
Can I use push notifications to display ads?
Yes, you can use push notifications to display ads to your subscribers. With PushEngage, you can design any type of push notification, including ad alerts. You can go as far as targeting who and when the ad is seen. But it’s important to do so strategically. Overloading users with too many promotional messages can lead to higher opt-out rates. Instead, focus on delivering valuable and relevant content to keep your audience engaged while subtly integrating ads.
Do I need consent to send push notifications?
Yes, you need explicit user consent to send push notifications. When visitors land on your website, they’ll be prompted to allow notifications. Only those who opt-in will receive your push notifications, ensuring compliance with privacy regulations like GDPR.
Are web push and mobile push notifications the same?
Web push and mobile push notifications serve similar purposes but differ in their platforms. Web push notifications are sent through browsers and can reach users on both desktop and mobile. While mobile push notifications are delivered via apps on smartphones and tablets.
We hope you enjoyed reading about how to add push notifications in WordPress. If you are looking for PushEngage alternatives, here is an article on the Best Push Notification Tools for Your WordPress Website.
Apart from that, here are other articles you may be interested in reading.
- How to Notify Subscribers of New WordPress Posts
- How to Create Automated Recent Sales Notification Popups
- Best WordPress Banner Plugins to Boost Conversions
The first article will teach you how to notify subscribers of new WordPress posts. The next educates you on how to create automated recent sales notification popups. While the last post lists the best WordPress banner plugins to boost conversions.

This blog is a source of amazing knowledge and wonderful information, where you can extract topic-related content easily, and you can find it according to the media of interest.
Thank you for your assistance us the easiest way to set up a push notification plugin on WordPress sites.
Hey Jasen, you’re welcome. If you have any other questions about web push notifications, please feel free to reach out.
Also, if you like to read more interesting articles, please follow us on Facebook and Twitter. 🙂