Are you looking for the best FormStack alternatives? WPForms and FormStack are two of the most popular form builders today, and for good reason.
They are both easy to use and come with many powerful features that, not only help you build forms, but also collect leads to help market your products.
But even though they are both form builders, they are different in design and functionality.
For starters, WPForms is a WordPress form plugin that excels at creating custom forms exactly as you envision. While FormStack is a cloud-based tool for creating forms, documents, and virtual signatures.
After testing both these form builders ourselves, we have created an in-depth article to help you determine whether WPForms is the best FormStack alternative.
What is WPForms
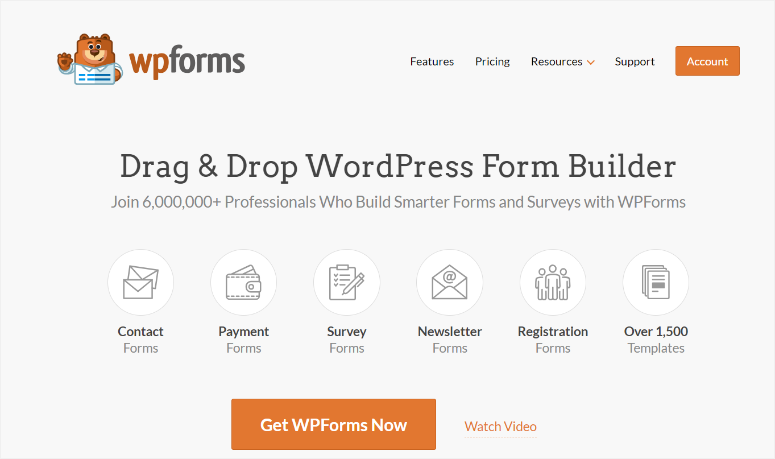
WPForms is the most powerful form builder. This beginner-friendly WordPress form plugin allows you to easily create powerful custom forms such as contact, payment, survey, newsletter, order forms, and more. The best part is that you can create these different types of forms without any CSS or coding experience.
This is because it comes with a drag and drop form builder that can help you place different form elements exactly where you want them to appear.
Plus, if you do not want to build forms from scratch, WPForms provides 1,500+ ready-to-use templates, like an order form template, to help you create a customizable form even quicker. With the drag and drop builder, you can customize these pre-built templates to fit your style and branding.
WPForms not only helps you build beautiful web forms but also ensures they are user-friendly. For example, you can add Rich Text with a click of a button, which allows your respondents to style their responses and add links, images, and more.
If you want to learn more about this form builder plugin, check out our WPForms review here.
What is FormStack?
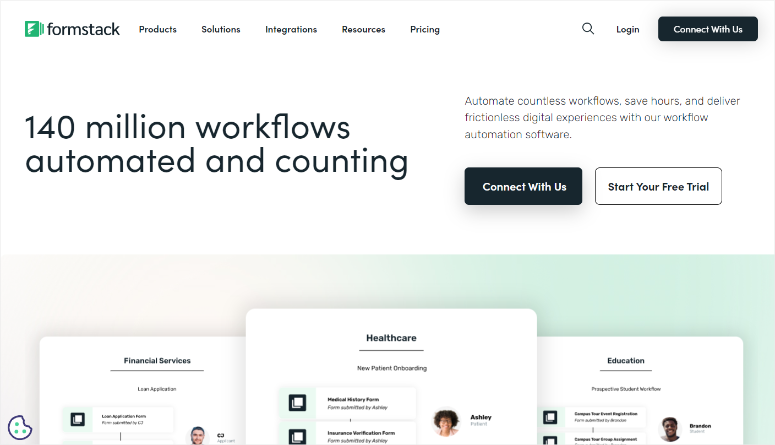
FormStack is an online form builder that helps users collect information through online forms like surveys, job applications, event registrations, and more.
This tool comes with a variety of pre-designed templates to help you build an online form quickly.
You can also build forms for WordPress sites using a drag and drop builder, ensuring you create a fully customized form. And, you can then transfer these forms to your site in different ways, such as a URL, a QR code, or a form embed.
To add to this, FormStack also offers metrics reporting, the ability to collect payments and more. This online form builder easily integrates with other popular tools and platforms such as Google Sheets, email marketing services, Facebook, and more.
Now that you understand these form builders a bit better, it is time to look at what they can do in-depth.
To do this, we have broken down each form builder into different categories to ensure we cover every aspect of them.
- Installation & Setup
- Customization
- Ease of Use
- Features
- Support & Documentation
- Pricing
- Pros & Cons
- Final Verdict
Installation & Setup
WPForms
As mentioned earlier, WPForms is the best WordPress form plugin. It can be conveniently installed and set up on your site. We should add that WPForms has a free version you can install and test before purchasing a plan.
But whether you want to use WPForms Lite or WPForms Pro, they are both super easy to install and can allow you to build the perfect form.
For “WPForms Lite,” all you have to do is go to your WordPress repository.
To do this, go to Plugins » Add New Plugin and use the search bar to find “WPForms.”
Since there are so many free form builders you can access in your WordPress repository, make sure to install the one created by WPForms. It has over 13000 reviews, a 5-star rating, and over 5 million active installs.
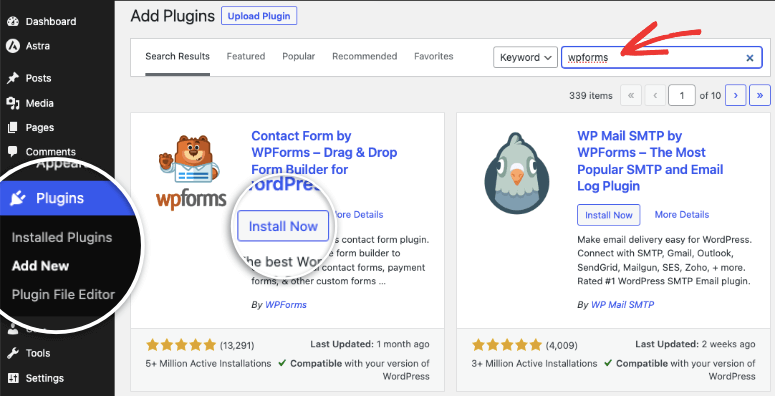
Once you install WPForms Lite, activate it. That’s it; you’re ready to use this free form builder plugin.
Now, to install WPForms Pro, go to its official site.
Then, according to your needs, select one of the 4 plans the plugin offers. Once you purchase a plan, go to your WPForms dashboard and navigate to the Downloads tab.
Here, download the plugin ZIP file to your PC. While you are on this page, copy the license key; you will need it to activate the pro version later.
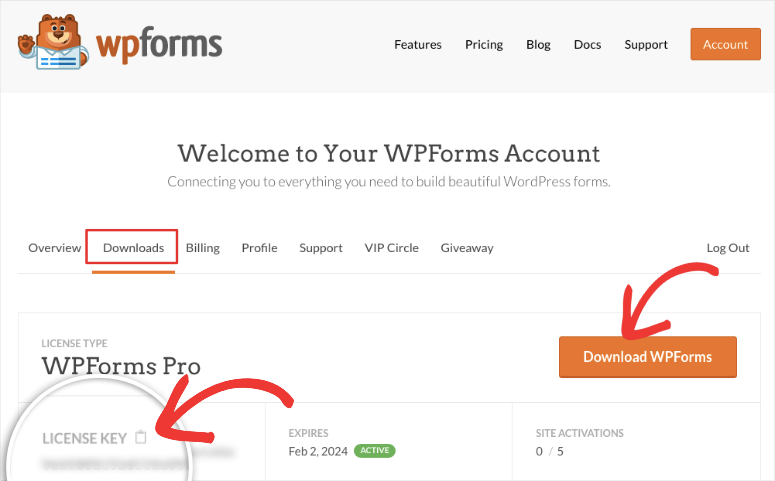
Next, in your WordPress dashboard, go to Plugins » Add New Plugin. Unlike with the free version of the plugin, when you are installing the pro version, select “Upload Plugin” on this page.
Then, drag and drop the WPForms plugin ZIP file and install it. Once installed, activate it, and the menu option “WPForms” will appear on the left of your WordPress dashboard.
Now, go to WPForms » Settings and proceed to the “General” tab. Here, find the License Key bar and paste the code you copied earlier from your WPForms dashboard.
Finally, hit Activate, and WPForms Pro is ready to use.
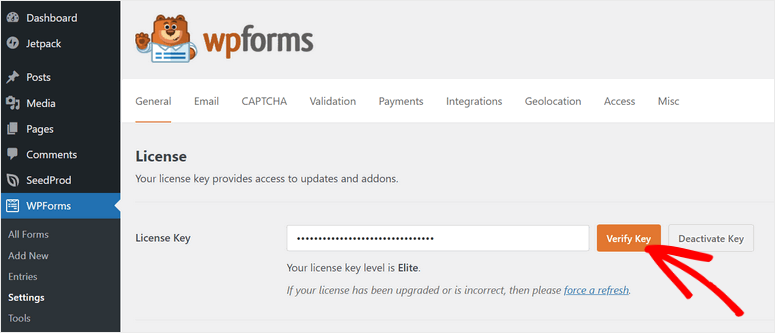
As you can see, it takes less than 5 minutes to get your version of WPForms up and running.
Now, let’s talk about the installation and setup of FormStack.
FormStack
As mentioned earlier, FormStack is not a plugin, so you will not install it on WordPress. Instead, you will sign up for their cloud platform.
We are sure you are curious to know if FormStack has a free version like WPForms. The reality is that FormStack does not have a free version like WPForms. But, it does offer a 14-day free trial, during which you can test all its advanced features before making your final decision.
The best part about the FormStack free trial is that you do not need to give them your credit card or payment information. All you have to do is sign up, and you are good to go.
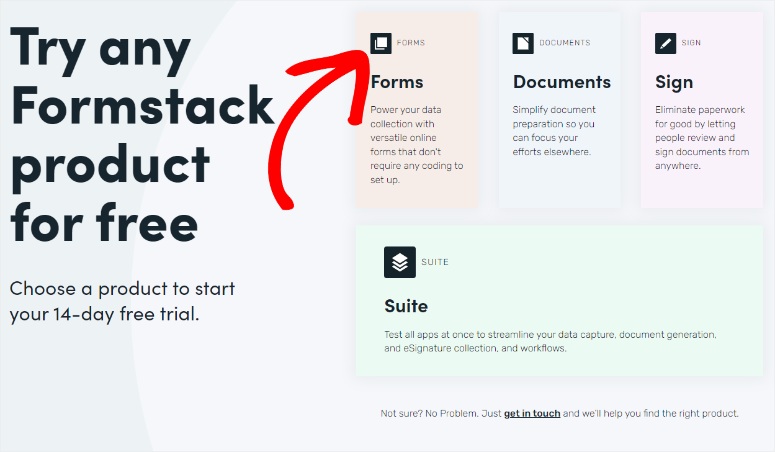
So, to get started, head to FormStack’s official website and select Start Your Free Trial.

In the next screen, choose the free plan you want from the options Forms, Documents, and Sign. If you want to try out all the FormStack apps, go with Suite.
But, for this comparison article, we will choose “Forms” so that we can test out this tool specifically.
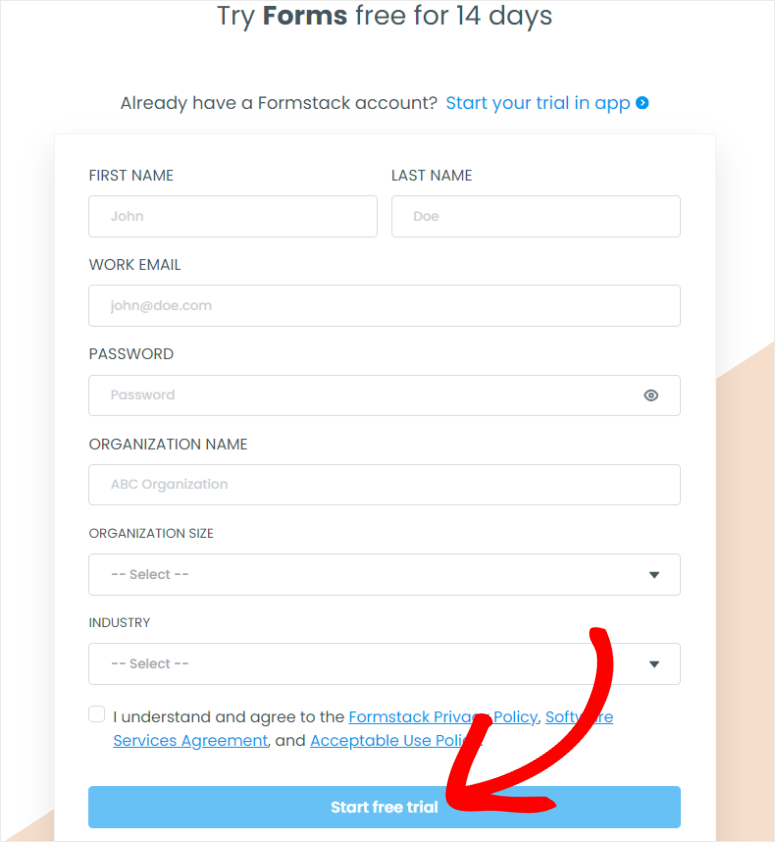
On the next page, fill out your personal and company information in the spaces provided.
While filling out this information, you should remember two important things.
The first is that you can only add a company email address. If you do not have one, check out this article on how to create a free email address.
The second thing is to ensure you start with fewer employees when filling out the “Organization Size” section because this can affect your billing after the free trial expires.
Once you fill out the required information, simply select “Start Free Trial.”
Finally, check your email inbox to verify FormStack, and that is it! You are ready to use this online form builder tool.
Installation & Setup Winner: FormStack
FormStack is incredibly easy to set up. In fact, you do not need to install anything, as you will be working on their online cloud platform. Unlike most online tools, which require payment information to access their free trial, with FormStack, all you have to do is sign up, and you are ready to use it.
Even though WPForms took less than 5 minutes to install and was very simple to set up, FormStack just edges it in this round.
Customization
WPForms
Once you install and set up WPForms, this forms plugin allows you to customize it to make it easier to use and more personalized.
First, let us first see how you can restrict access to certain WPForms features.
This feature can be handy for a large team with everyone having different roles and tasks.
Giving specific access ensures that only people holding certain positions in your company or skillset can access advanced features. This also ensures that your team is more accountable and that there is less risk of anything breaking.
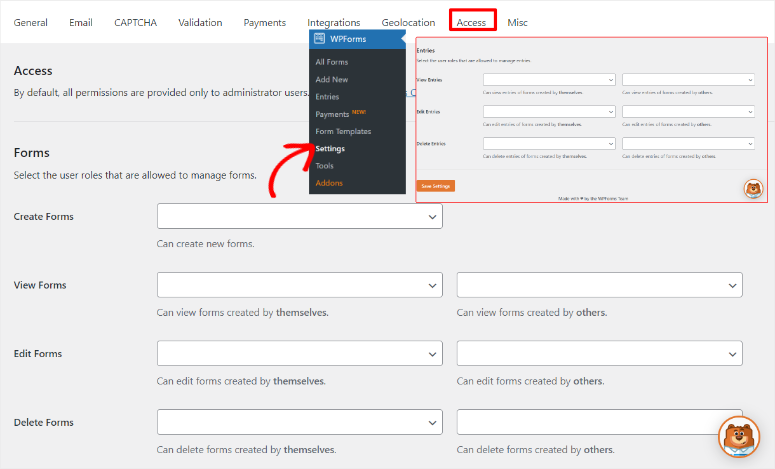
So, to set specific access in WPForms, head to Settings » Access.
First, you can select who can manage Forms by setting up who can create, edit, view, and delete them. Here, you can also set up who can view, edit, or delete forms created by others.
Still, on the same page, you can decide who manages Entries in the same way. Use dropdown menus to select who can view, edit, and delete entries.
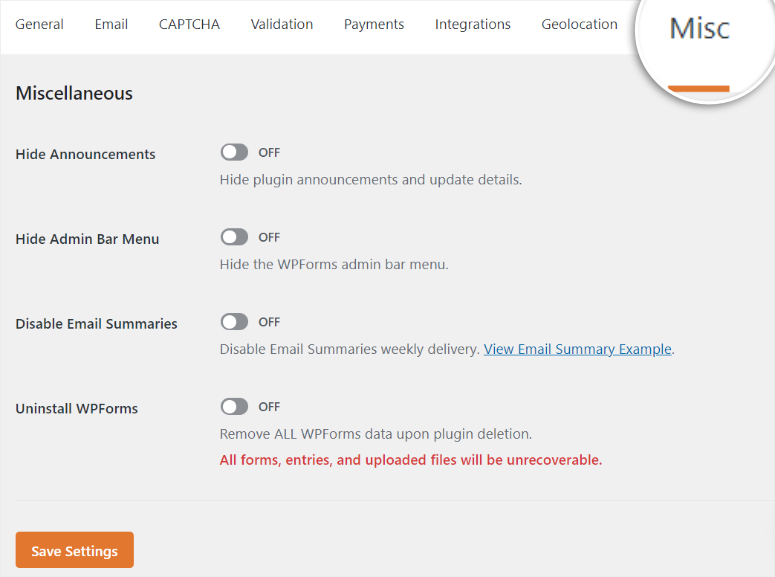
You can also personalize your WPForms further by heading to Settings » Misc. Here, you can decide to hide announcements, hide the admin bar menu, or disable email summaries.
FormStack
Now, with FormStack, you will primarily create your forms using a dashboard.
So, the first customization option you have is to edit FormStack Administration, which allows you to manage your and your team members’ profiles. Here, you can add or remove FormStack dashboard tabs like Recommended, User Management, Billing, and Usage.
You can also add and edit “Quick Paths” for your profile and your team members, allowing you to quickly access the features you mostly use.
This can help you and your whole team better use and navigate the tool. As a result, team members with less expertise will not experience a learning curve, as all they have to do is use the quick paths set up for them.
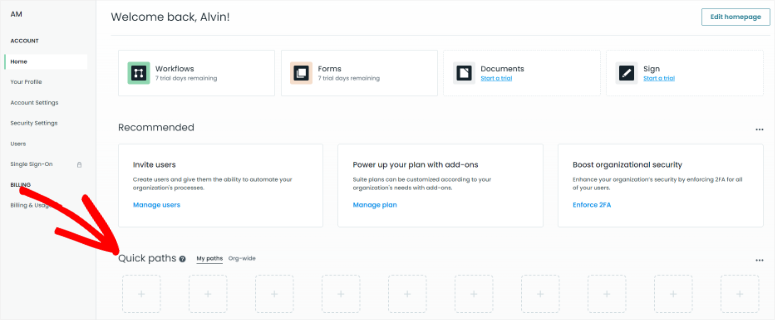
On top of this, Formstack allows you to add users and customize their profiles.
You can give them access to only the features they need and even reset their passwords to improve security. To help uphold security even further, you can also set a minimum character requirement and the complexity of your team members’ passwords.
The team behind FormStack understands that remembering passwords can be a headache. So, many people use simple passwords to prevent them from forgetting.
To help with this, FormStack allows you to set up Single Sign-On (SSO).
This feature allows your team members to log into FormStack using login credentials from other platforms they commonly use such as Google Workspace, Microsoft Azure, and more.
If you feel SSO is not secure enough, you can also set up 2-factor authentication as part of your FormStack login process. These features ensure your company’s FormStack account has many layers of security.

Now, FormStack allows you to brand your dashboard by adding a logo, custom domain, and colors. This can be a great way to personalize your company dashboard.
Plus, you can add your branding to forms you create with Formstack, making it great for a white-label business. As a result, you can give your clients specific user access to your FormStack dashboard and share branded forms, entries, and surveys with them.
This can help you run a white-label business without building or buying additional software.
Customization Winner: FormStack
For this round, we will also give the win to FormStack because it has many customization options. You can personalize how your dashboard and those of your users appear. As a result, these dashboard customization options can also be used to run a white-label business as you can brand forms and entries as well.
To add to that, you can also set up several security protocols, such as 2-factor verification and SSO. So, whether you are using FormStack for your business or your clients, you can always be sure that your dashboard is secure and unique.
Ease of Use
WPForms
Another reason WPForms stands out is its ease of use. We have already demonstrated this above in the installation and customization sections. But now we will look at how easy it is actually to build the perfect forms using this plugin.
So, to get started with form building, go to WPForms » Add New which will redirect you to the form builder.
You can name your form on the next page, making it easy to find it in your dashboard. Then, you can also decide whether to start creating your form from scratch or select a template.
Because WPForms comes with over 1500 templates, it makes it easier for you to find the form template you want through a search bar. You can also use the form filter on the left to find what you want.
On top of this, WPForms has arranged the templates in different categories to make the filter easy to use. These categories include Business Operations, Event Planning, Customer Service, and Marketing. You will also see the number of templates created for each category so that you quickly know the options you have available.
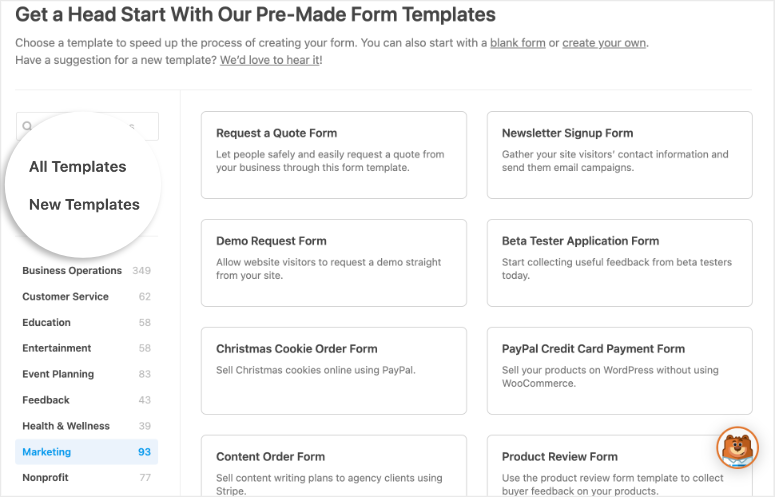
Now, when you see a template you want to use, WPForms allows you to view a demo of it before you select it. All you have to do is hover over the template and choose View Demo. You will see a complete sample form created using the template on the demo page.
Then, below it, WPForms explains how to use it. If it meets your needs, you can use the template straight from the demo page.
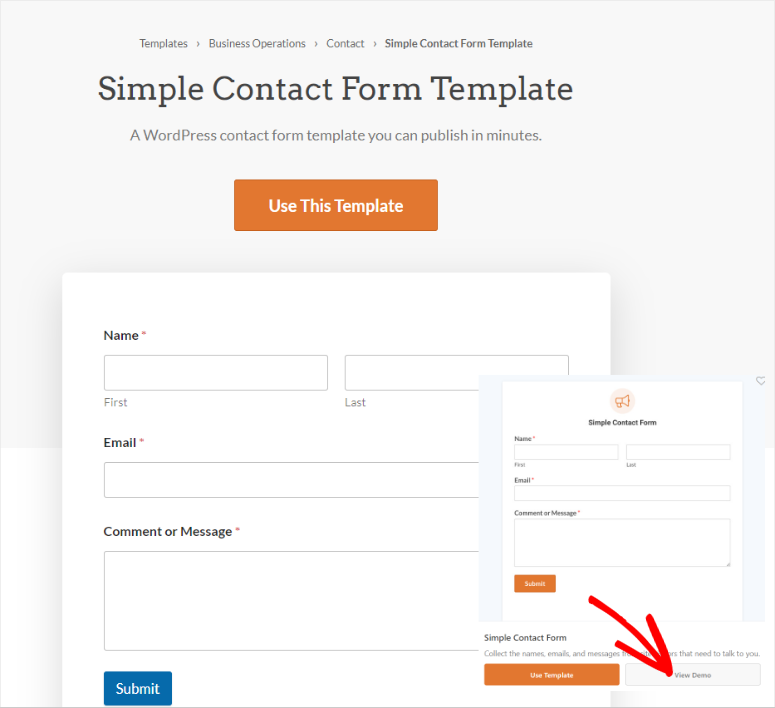
But if you do not want to view the demo, you can simply hover over the template you want on the template page and select “Use Template.”
This will redirect you to the WPForms drag and drop form builder.
On this page, you will first notice different fields placed on the left side of your screen. Since WPForms offers many field options, it has categorized them into Standard Fields, Fancy Fields, and Payment fields. This can help you quickly find the field you are looking for so that you can build your custom form faster.
To move any of these fields, all you have to do is drag and drop them to the preview window on the right. After this, they will appear in the exact location you placed them on the live form.
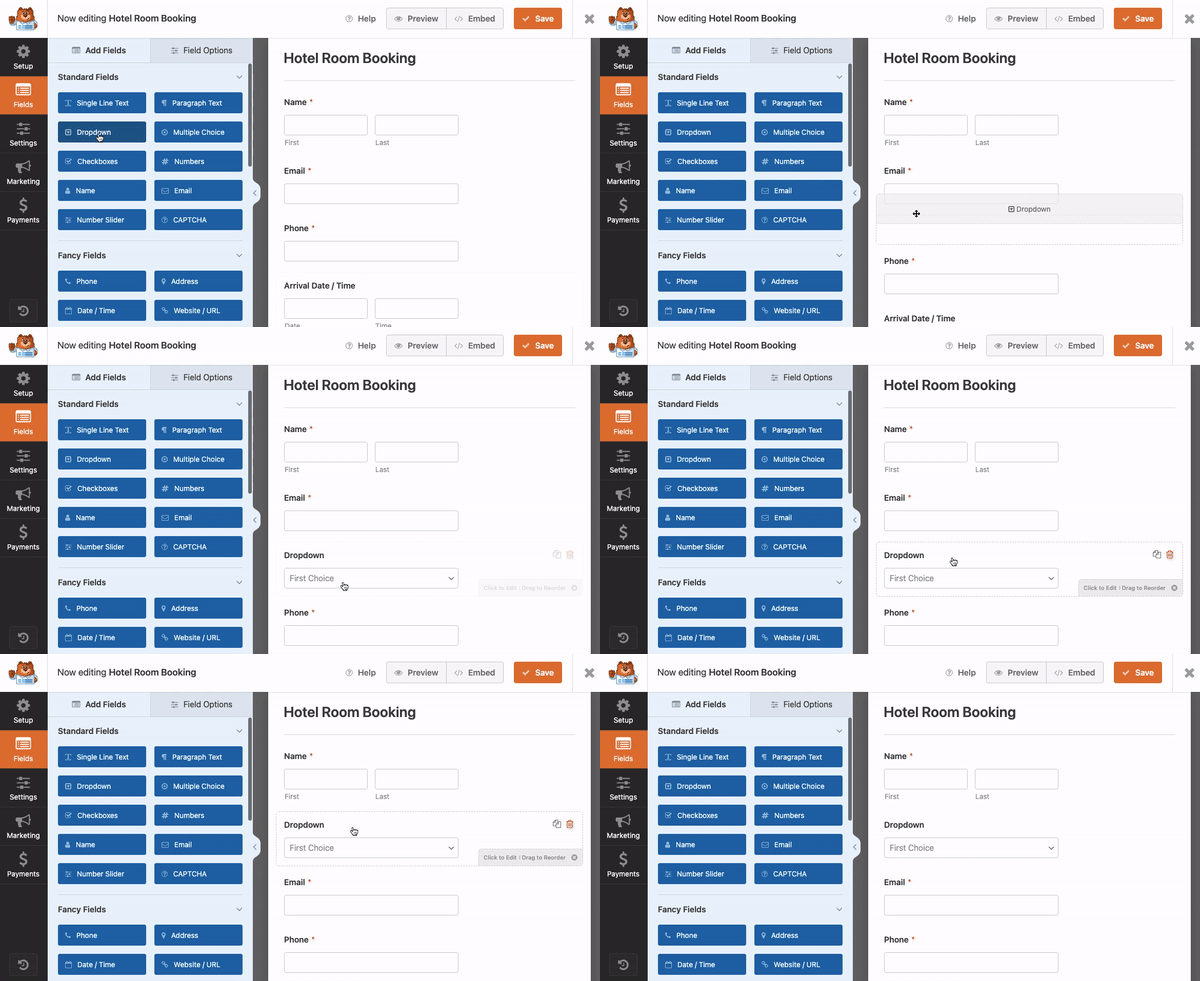
Now, in case you make an error while building your form, WPForms allows you to easily roll back to a previous version with the Form Revisions button. You can roll back your form-building process by 20 steps, ensuring you return to the exact point you want.
You can also check out how the form will appear on a live page without the editing section by clicking the preview button at the top right corner of your form builder page. Once you are happy with your form, simply hit “Save.”
WPForms also make it super easy to add your forms to your site.
To do this, select the Embed button in the far right corner of the form builder page.

You will have the option to either add it to a new page or an existing page using a WPForms block. You can also add to this through a shortcode. Since WPForms has many ways to add a form to your site, you can choose one that is most convenient for you.
Once you start receiving submissions, WPForms lets you quickly view them by going to WPForms » Entries.
On this page, you will see your entries visually displayed by a graph.
The best thing about the WPForms entry page is that you can customize it. For starters, you can personalize it to match your WordPress or WPForms color scheme. Then, you can easily set the date range of submissions you want displayed with a click of a button. To top it off, you can view the data in a line or bar graph, whichever is most convenient for you.
Below the graph, WPForms will break down the entries further for you in list form. You can see which form the entry is coming from, when it was created, the last entry, and more.
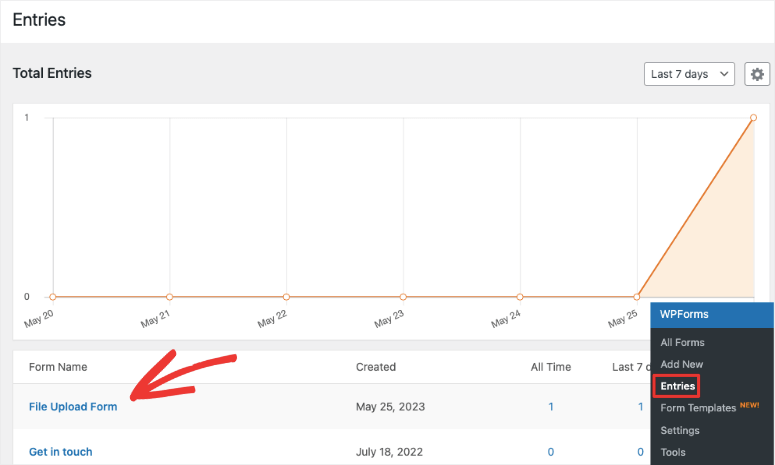
If you select any entry on this page, WPForms will open another page with a list detailing all the information about entries from that particular form.
FormStack
Even though you will work in the FormStack dashboard, it is still easy to use. The most significant difference in working in the FormStack dashboard is that you must manually transfer your forms to your website. This creates an additional step that can make it more difficult to use.
But, all the same, to start form building with FormStack, you have to select the “Forms” tab in your dashboard.
On the next page, you will see a tab for all your FormStack forms. If you have many forms and would like to see only specific ones on your dashboard, select “Edit List” at the top of the tab. After this, you can modify the order in which the forms appear on this list.
Next, you will find the Quick Links tab, which will give you options to create a new theme, edit your profile, and more.
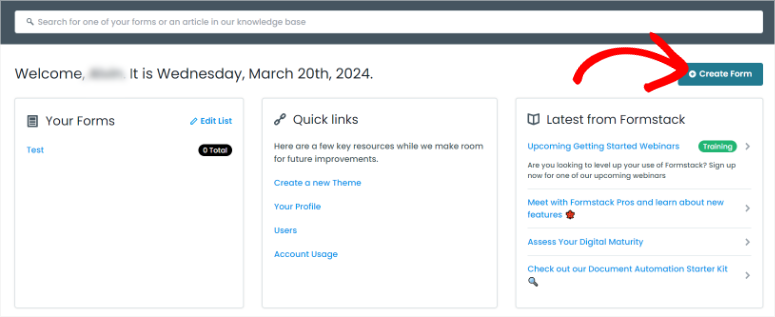
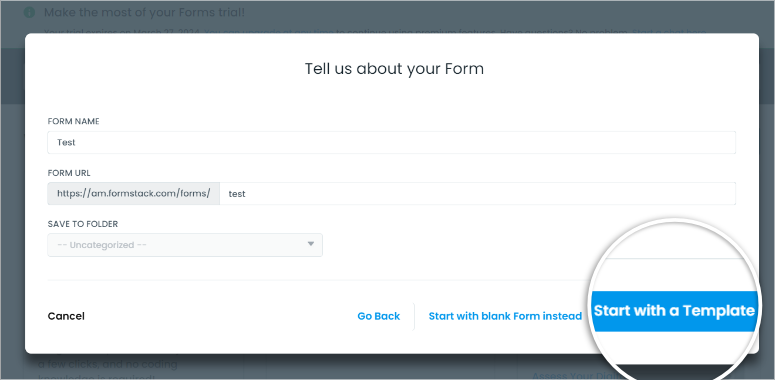
FormStack makes it easy to get started building a form, as all you have to do is select “Create Form.”Then, a popup will appear next, asking if you want to create a form, survey, or workflow.
On the following popup, FormStack will also ask you to name the form, create a URL for it, and select the folder in which you want to store the form. By naming and storing the form correctly, you can easily organize your forms and avoid confusion. On the other hand, creating a URL for your form allows you to create a user-friendly and SEO-ready page.
Now, just like with WPForms, you can start your form creation process from scratch or use one of the many templates provided by FormStack.
And similar to WPForms, you also get a list of templates arranged by category. You can also find the one you want using the search bar, making it easier for you.
But instead of checking the demo of the template on a different page like with WPForms, you can view the preview on the same screen.
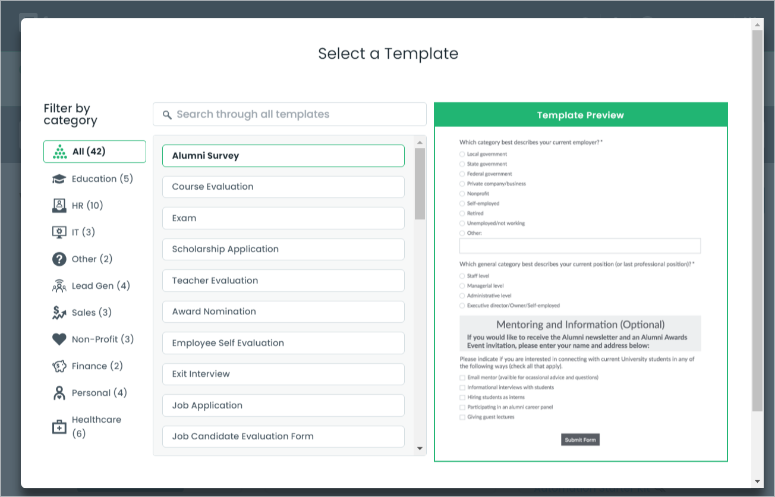
After you select a template, you can also choose a theme for your form, such as Light, Dark, Calm Zig Zag, Blue Afterglow, and more. This can help you personalize your forms even more, ensuring you create a unique form just for your site.
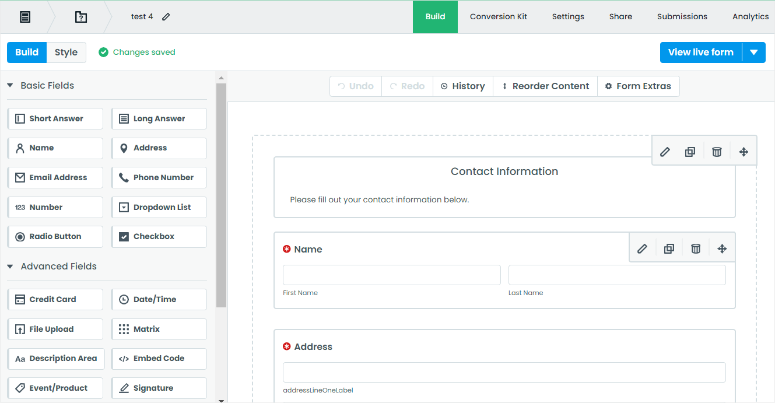
Once you select the template and theme for your form, you will be redirected to FormStack’s drag and drop builder.
On this page, the form fields on the left are arranged in different categories. These categories include Basic Fields, Advanced Fields, and Layouts and sections.
But, you will also notice that FormStack does not have as many field options as WPForms.
To move the different fields, drag and drop them to where you want them in your form.
A feature that we thought made it very simple to build FormStack forms is Reorder Content. When selected, a popup displaying all the fields will appear on the right. On this popup, you can easily see the order of each field. You can also quickly rearrange them by dragging and dropping them.
On top of that, with the Form Extras button, you can easily edit how many columns you want and also place the form label where it is best suited for your audience.
FormStack also comes with History, Redo, and Undo buttons to help you easily switch between steps during the form-building process. As a result, it can make the process easier and faster.
Once you are happy with your form, you can use the preview button to check how the form will appear on a live page.
To do this, select the “View Live Form” button at the far right of the form editor. A small arrow next to this button allows you to check how the live form will appear on a smartphone or tablet.
Now, you can add the form from FormStack to your website in several ways.
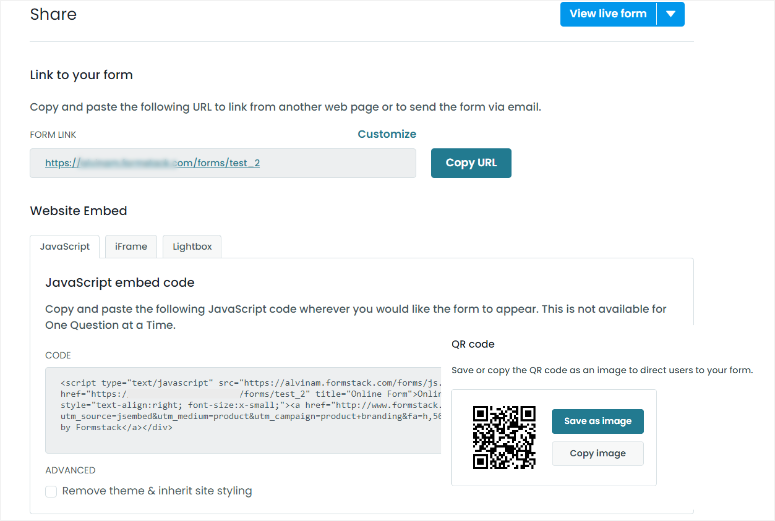
First, you can simply copy the form URL and share it on social media, on another web page, or as an email. This is the simplest method, but it requires you to physically share the form with your users.
Plus, sometimes, sharing a form using a URL can reduce the user experience and trust of your site, because naked links often look spammy when shared directly. A good way to avoid this issue is by using a URL shortener. This way, you can make your shared links shorter, branded, and more professional.
Another way to avoid this problem is to share the link as a QR code which makes it more convenient for your users. The good news is that FormStack allows you to create with your dashboard.
But, you can also embed the form on a page on your site using Javascript, iFrame, or Lightbox. You just need to copy the code displayed and paste it onto the page where the form will appear.
But as you can imagine, adding a form using codes can be a little tricky for beginners. You can easily break your site if you make a small error while adding even simple codes to your site.
The best solution is to use a code snippet plugin like WPCode. With this free plugin, you paste the code in your WordPress dashboard, and it will take care of the rest. Check out our WPCode review to learn more about why it is the best snippet plugin and how you can use it to add codes like the ones from FormStack.
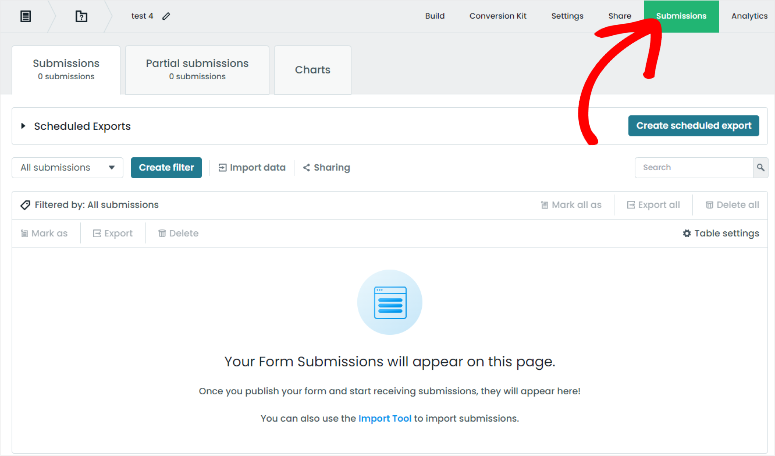
You can also view form submissions in your FormStack dashboard.
The Submissions tab displays the total number of submissions, partial submissions, and charts.
Below this, you can filter your form entries by whether they contain or do not contain a keyword, or by a unique ID.
To add to this, you can share your data collection from FormStack with people within and outside your organization. It will first ask you whether you want to share the charts, Tables & Charts, or Everything. Then, it will create a publicly accessible URL or an RSS link, which you can share where you want.
FormStack also allows you to create scheduled exports to help you with your records and ensure you do not lose any data. You can specify which submissions you want and which email address you want to share the data to. Then, you can set up the file format and which day and time you want the scheduled export to start every week.
Ease of Use Winner: WPForms
This was yet another close battle, but WPForms came out on top as the best WordPress form plugin when it comes to ease of use. First, as a plugin, you can use WPForms in your WordPress dashboard. As a result, you can streamline your work better. You do not need to go back and forth between tools to create, edit, post, or see your entry submissions.
To add to that, creating, editing and posting forms with WPForms is very straightforward. You can use its many templates to start building a form. Then, edit it to exactly what you want with a drag and drop form editor. Finally, you can also embed the form to your site without ever leaving the form builder page.
In summary, using WPForms is easy to use, as it only takes a few clicks to complete any process.
Even though FormStack has some interesting features, they are more suitable for advanced users or agencies than for beginners or small businesses.
Features
WPForms
WPForms is more than just a simple contact form builder. It comes with many awesome features right out of the box. As we mentioned earlier, not only can you create contact forms, but you can also create engaging surveys and polls for your WordPress website.
To add to this, it also helps you create beautiful survey and poll reports that allow you to analyze the form data easily.
This means you can analyze your form results and display them to your website visitors in real-time, too.
Some of the other great features that you get with WPForms include:
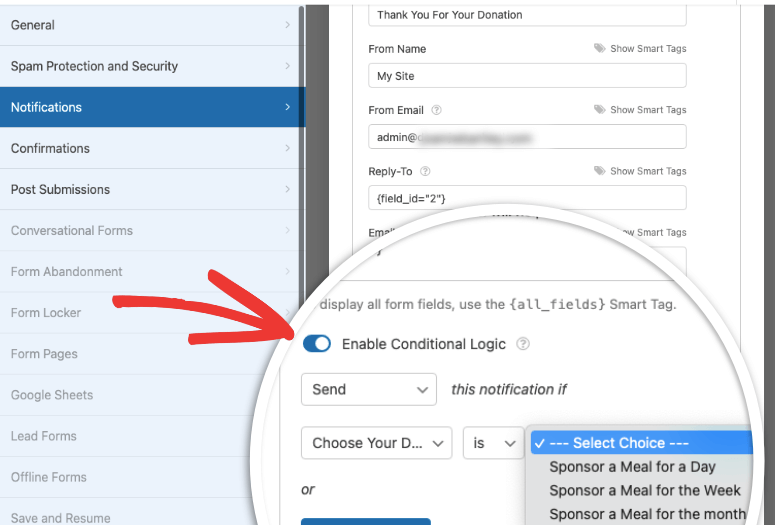
Smart Conditional Logic
One of the main reasons many people do not complete forms is that they are too long. Some questions may also feel irrelevant, making your users not complete the form.
You can avoid these problems and declutter long forms by creating smart conditional logic rules that show or hide questions based on the user’s selection.
This leads to the form feeling more conversational and less structured.
Unlimited File Uploads
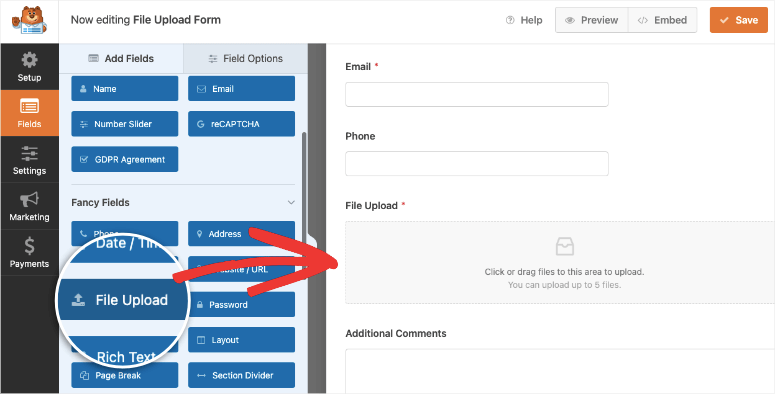
Another reason WPForms is so popular is that, with any plan, users can upload unlimited files on your forms. This allows them to engage better with your forms and offer you better feedback.
It is also very easy to add the file upload option to your forms with WPForms. All you have to do is select the field in the form editor and drag and drop it where you want it on your form.
You can also set the type of files your users can upload, such as:
- Video: .mov,.wmv,.mpg
- Images: .gif, .jpg,.png
- Audio: .mp3, .mp4,.wav
- Documents: .xls,.ppt,.doc,.pdf
To add to this, you can also restrict specific types of files that you feel can compromise site security. You can also set the maximum file size to ensure your site does not bloat or slow form submissions.
Responsive Mobile Friendly
First, WPForms’ templates are built to be cross-browser compatible which can help you build the perfect forms. So, regardless of the browser or device your user is using, they will still get the best experience.
Even though WPForms uses a drag and drop builder, its Smart and Adaptive system automatically generates a mobile-friendly layout when your visitors use a device with a smaller screen.
This means that, even if your form respondents need to upload a file or create detailed responses, they will still enjoy a great user experience on smaller screens.
As a result, all forms built with WPForms are 100% responsive and work on mobile, tablets, and browsers.
Partial Form Saving
Sometimes, a user can stop filling out a form so that they can complete it when they have more time. This is especially a problem for multi-page forms which can take time to fill out.
But when they actually have the time to complete it, they are discouraged to continue because they have to start over again.
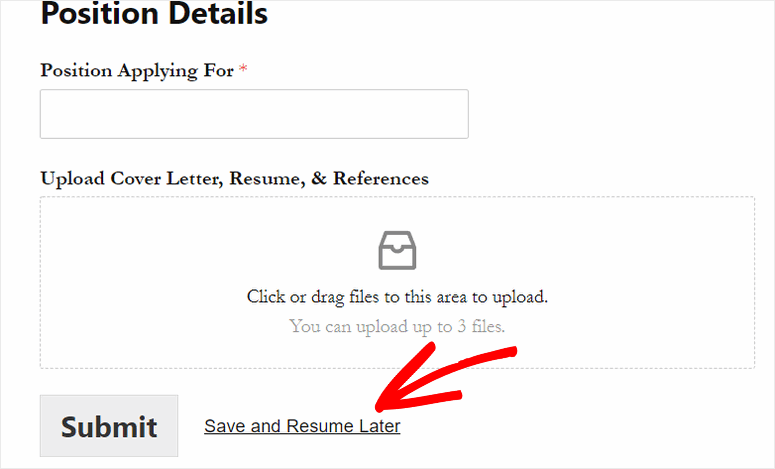
Luckily, WPForms is the best forms plugin to help your users save partially completed forms. You will need to download its “Save and Resume” addon to unlock this feature. After this, your users can access their partially filled-out form from a link, through email, or both.
You can also send the user an automatic email with the link to their partially complete form, reminding them to complete it, helping you reduce form abandonment even further.
Form Abandonment
Even when your users save partially filled-out forms, they may never get around to completing them. This can be very frustrating to you because you know you have most likely lost that lead.
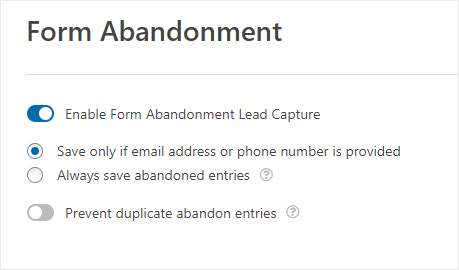
But WPForms allows you to save partial entries in WordPress before the user abandons the form through an addon. As a result, you can collect information like their name and email address, which will allow you to follow up with them.
In addition to these, here are other WPForms features you can use.
- Spam Protection: Smart captcha and honeypot automatically prevent spam submissions of your forms.
- Automatic Form Confirmations: Users will know their form submission was a success with 3 form confirmation types including Message, Show Page, and Redirect.
- Online Signature Capability: Users can sign your online form with their mouse or touchscreen.
- User Registration: You can create custom WordPress user registration forms.
- Online Payment Integration: WPForms allows you to make different types of third-party integrations with payment gateways like PayPal and Stripe so you can accept online payments.
- Geo-location Tracking: Learn more about your site visitors and their locations so you can send them more targeted emails.
- Email Marketing Integration: WPForms uses APIs to integrate with all the popular email marketing services like Constant Contact, AWeber, and Mailchimp.
- Form Permissions & Access Controls: Passwords protect your form, limit the number of entries you’ll accept, limit form entries to logged-in users, and more.
Apart from the advanced form features offered by WPForms, it also allows you to make different types of connections with other tools.
Some of the integrations you can make with WPForms include:
- Stripe
- AWeber
- Mailchimp
- Constant Contact
- GetResponse
- ConvertKit
- HubSpot
- Brevo
- Salesforce
- Drip
- PayPal
- Zapier
FormStack
With FormStack, you can create custom forms such as payment forms, surveys, event registration, and more. But as mentioned, you will need to use a separate dashboard to use this form builder.
But, having it on a different platform allows its creators to add some interesting features as they are not limited by space, as in the case of plugins.
With that said, let’s see some of the features you can expect from FormStack.
Portals
FormStack Portals act like an access point for all your forms. You can share single or multiple forms with people in your company or outside.
If you send multiple forms at the same time, the user can easily view all of them in the same place. This can help them easily see which ones they need to fill out and which ones they already have.
On the other hand, you can see who has filled out the forms and who hasn’t, allowing you to send them scheduled or automatic reminders.
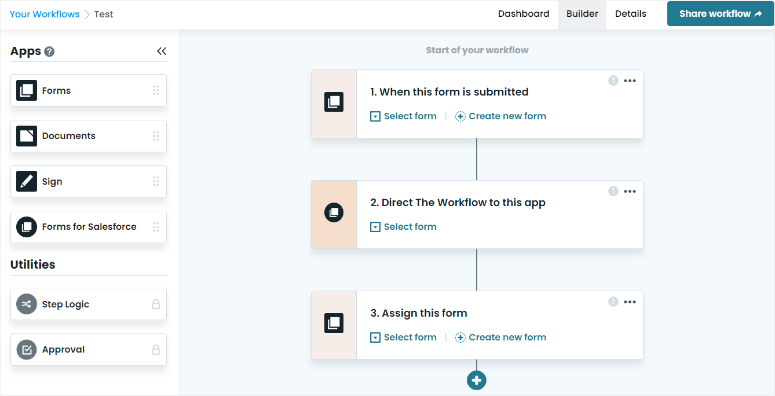
Workflow Forms
With this feature, FormStack allows multiple people to collaborate on the same form. It can help you collect, review, and edit information in an easy-to-follow and streamlined way, ensuring you avoid repeated tasks.
You can decide which sections each person can edit or view with these forms. This can help improve data management and communication between employees and managers.
For example, a team member can fill out the initial section, which then becomes visible to their manager for further input. After that, the form can be forwarded to another department for the next step of the process such as approval.
The best part is that all the collected data submitted by each person is collected into one record and stored as single submission, making it easier for your team to store the information.
FormStack makes it super easy to build Workflow forms. All you have to do is use a drag and drop builder to indicate each action and what follows next.
Field Prefill
Formstack can help your user automatically populate commonly used form fields with their user data from a Single Sign-On (SSO) provider.
As mentioned, some popular SSO providers are Google Workspace and Microsoft Azure. This means the forms will be partially filled out for your users with information from these platforms.
This not only ensures data consistency across all forms your users fill out but also reduces form abandonment. As a result, you can easily create personalized form experiences for every user.
On top of that, Field Prefill can help improve site security by requiring your users to use SSO login access. This can further protect your site from users who do not regularly update their passwords.
Saved Fields
Saved Fields allows you to save the settings of commonly used form fields globally across your account. This ensures uniformity, consistency, and accuracy so you can build your forms faster and better.
You can easily standardize fields such as Name, Email, or Phone Number, streamlining your form-building experience. You can also automate the fields setup for every user across your account, regardless of the form they’re working on.
In addition to these, here are other FormStack features.
- Conditional Logic: Display one question at a time for easier mobile surveys.
- Save & Resume Forms: Users can save and complete resume forms effortlessly.
- Reports & Analytics: Gain insights into form performance and user behavior through data analysis.
- File Uploads: Enable users to submit files alongside form responses.
- Recaptcha: Prevent spam and ensure data integrity with reCAPTCHA.
- Payment Processors: Seamlessly collect payments through your forms.
- Email Integration: Automate email notifications and confirmations for forms.
- Import forms from anywhere: Quickly import existing forms into Formstack.
- Smart Lists: Easily manage dynamic field options across multiple forms.
Apart from these features, FormStack allows you to connect with other tools to further streamline your workflow.
Some of the integrations you can make with FormStack include:
- Airtable
- PayPal
- Salesforce
- AWeber
- 123FormBuilder
- 24Files
- Act-On
- ActiveCampaigns
- Adobe Sign
- Agile CRM
- BambooHR
Features Winner: WPForms
While both these form builders come with many amazing features, we will give the win to WPForms.
This is simply because WPForms features are user-friendly, allowing even a beginner to use them. As a result, WPForms are great for businesses looking to improve communication with their customers making it the best WordPress form plugin.
On the other hand, FormStack features focus more on internal organization communication. Even though some of their features can be used by a business to communicate with customers, they are more complex to set up and implement.
Support & Documentation
WPForms
WPForms offers excellent customer support and detailed documentation to help its users.
For starters, its website’s homepage has a detailed video guide at the top that showcases its features.
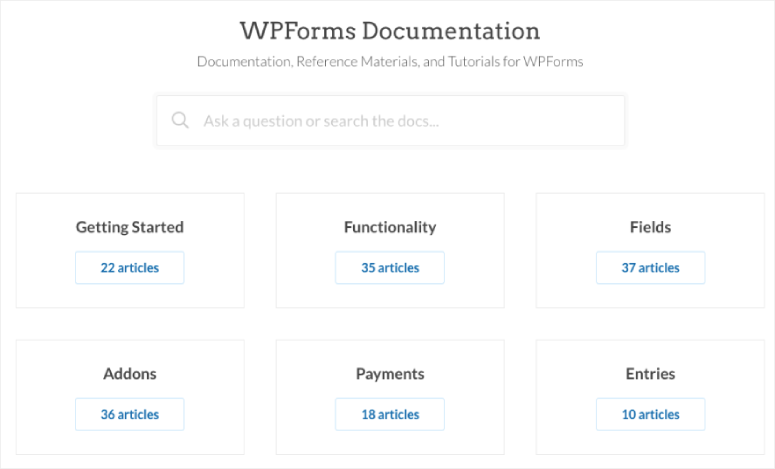
To add to that, you can also access the Resources tab on the home page, which you can use to access Docs and Blogs. These sections contain organized articles and documentation in a tile format, making it simple to find the information you need.
On the Resource tab, you will also get a link to their Facebook, where you can get assistance from users and air your views about the tool.
Plus, you will also find the Developers menu option in the Resource tab. Here, you can access detailed guides on how to add custom codes to the WPForms plugin.
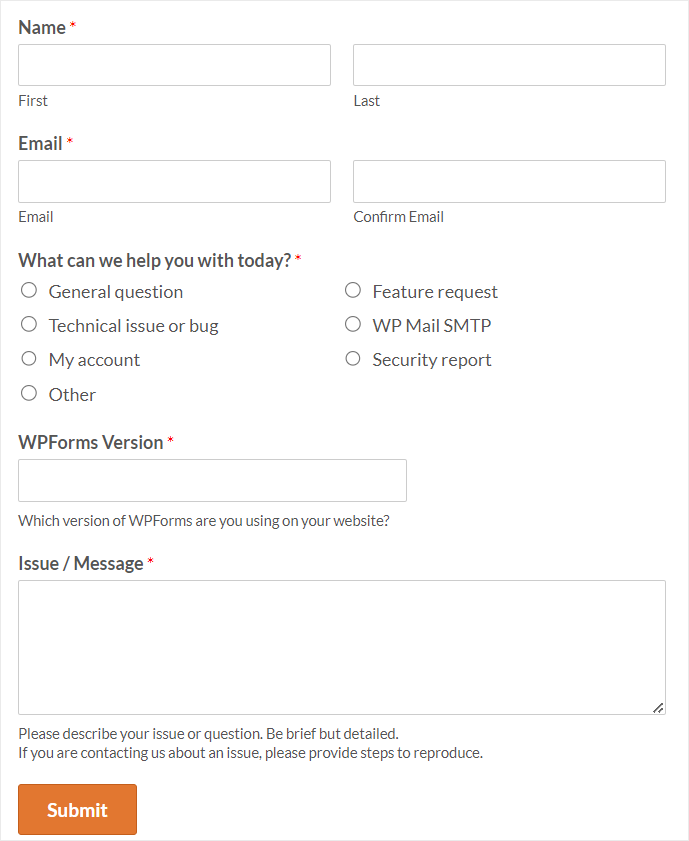
Now, you can contact support through two channels: submitting a ticket for technical issues or using a simple form for general inquiries.
Both methods are short and to the point, ensuring you do not have any trouble completing the process.
For example, when you send a ticket, you will need to fill out your name, email address, and version of WPForms you are using. Then, using a checkbox, let the support team know what area you need help with. This information will help the team assist you better and faster by directly sending you to the relevant department. Finally, you will add a message in the text box explaining your issue.
If logged into your WordPress dashboard, don’t worry; you do not need to leave your backend to access documentation or support.
From your WordPress WPForms menu options, you will see a floating support widget. When you select this icon, you have the option to open Support and Docs, Join Our Community, or Suggest a Feature.
FormStack
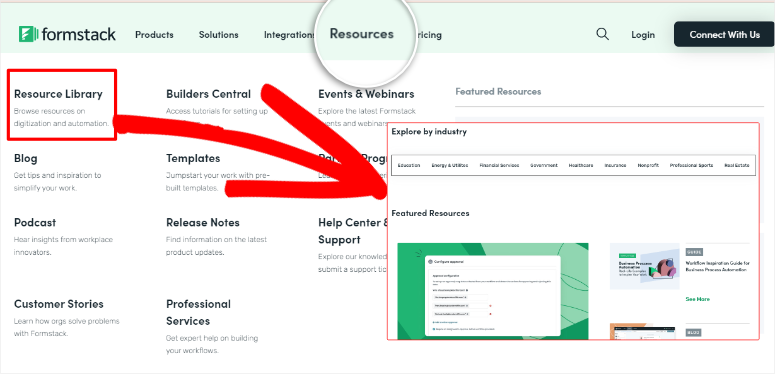
Just like with WPForms, Formstack also has a Resource tab on its homepage.
It opens to display links to various resources, such as the Resource Library, Blog, Builder Central, Customer Stories, Podcast, Webinar & Events, and more.
If you select “Resource Library,” the main help resource, you will be redirected to a page with many tabs, such as Explore, Trending, Featured Resources, and Blogs.
This page also includes a filter that narrows the documentation by topic, industry, and product.
When you go to Help Center & Support, you will first see a search bar that you can use to find articles related to your problem before contacting FormStack support.
Below this section, you will find articles and additional resources arranged in tile and list format to help you quickly get the necessary documentation.
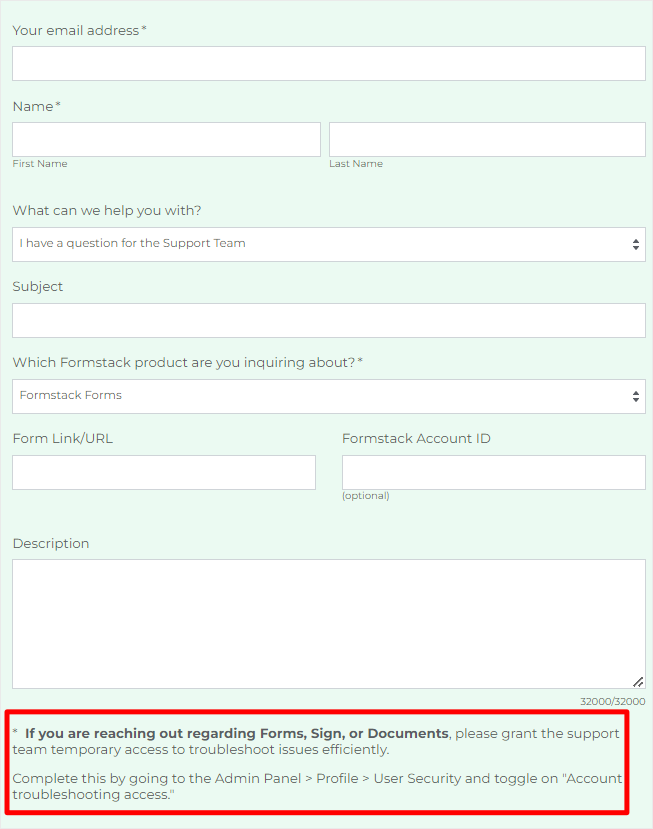
But if all else fails, you can select the Contact Support button at the bottom of the page. This will redirect you to a contact form, where you will need to fill out the email, name, form link, FormStack account ID, subject, product, and the team you want to contact.
After this, you will explain the problem to the FormStack support team using the text box provided.
They also say, you will need to grant support temporary access if you have a problem with Forms, Sign, or Documents so they can assist you.
Support & Documentation Winner: WPForms
When it comes to support and documentation, simpler is always better. WPForms clearly understands this. The clean support and documentation pages make it easy to know exactly where each resource is.
To add to this, the WPFomrs Contact Us form is short and straight to the point.
On the other hand, FormStack just has too many links and tabs on every support or help page. For example, the numerous links on the Resource tab on the front page may be overwhelming for many.
On top of this, their Contact Us form is long and requires you to give a lot of information. Then, there is also the additional disclaimer that their support team can request temporary access to help you. This can be worrying for some since it may lead to security concerns.
Pricing: WPForms vs. FormStack
WPForms Pricing
WPForms offers free and premium versions of their form builder plugin. If you want to use WPForms for free, you can download the WPForms Lite WordPress plugin from the official WordPress Plugin Directory, install it directly on your WordPress dashboard, and start using it right away. But, if you want access to their more powerful features, you need to upgrade to a premium plan.
WPForms offers 4 different pricing plans, and you get unlimited form creation with each of them. If you’re just starting out building a website and your budget is tight, the Basic plan starts at only $49.50 per year for 1 site. The Basic plan comes with unlimited forms, unlimited entries, advanced fields, form templates, email integration, and more.
On the other hand, to access all of WPForms’ premium features, such as payment integration, surveys and polls, user registration, form abandonment, premium support, and more, you need to upgrade to the Elite plan for $299.50 per year.

FormStack Pricing
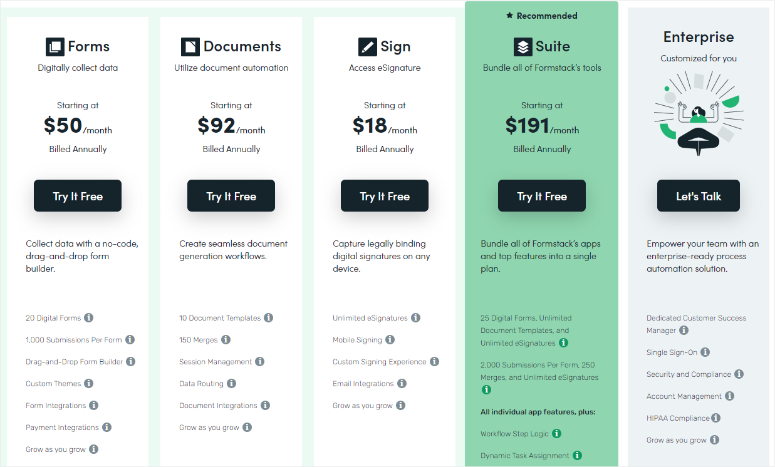
FormStack offers 4 different plans depending on the tools you want to use.
For Forms, the pricing starts from $50 a month. But if you want to use all of the tools, go with Suite which is priced at $191 a month.
FormStack also limits the number of entries you can receive with each plan. If you go over the number of entries you’re allowed on your plan, they don’t charge you a fee for it, but all entries will go straight to your email instead. This makes your form entries difficult to manage and has the potential to take over your inbox and become very annoying.
Pricing Winner: WPForms
First, as mentioned, WPForms offers a free plan, which is great for beginners. To add to this, you can select a plan according to your needs. Each plan also offers unlimited entries, forms, users and submissions, allowing you to easily scale with any package.
On the other hand, FormStack offers a flat rate for each of its tools. Each feature in the plans has a set limit, meaning you will have to contact support if your needs exceed them.
Pros & Cons
WPForms
Pros:
- Offers free version
- User-friendly
- Excellent support
- Drag and drop form builder
- Flexible pricing
- Real-time analytic reports
- practical features
- Ideal for small businesses and freelancers
Cons:
- Can only be used in WordPress
- To access all features you need a premium plan
FormStack
Pros:
- The free trial does not need payment details
- User-friendly dashboard
- Offers many practical advanced features
- Ideal for internal collaboration
Cons:
- Works from a separate dashboard from WordPress
- Can be difficult to add forms to WordPress sites
- No free version is available
Final Verdict: WPForms vs. FormStack: Which is Better?
If you want to add forms to your website, we recommend using WPForms. WPForms is great for beginners and experienced website owners alike. You’ll get access to all the features you need to grow your website or business without paying expensive monthly fees. With its drag-and-drop interface, you can create powerful forms in minutes, and you can create as many forms as you want.
For more details, check out our full WPForms review.
FormStack is a good online form builder. But, due to its price and somewhat complex feature approach for website visitors, this form builder might be more suitable for larger businesses. It might be great for companies looking to create internal forms for Human Resources, IT, and Finance, as well as for receiving applications.
We hope you enjoyed this post on WPForms vs. FormStack. If you have any more questions, check out our FAQs below.
FAQs: FormStack Alternatives: WPForms vs. FormStack
Does WPForms have an order form template?
Absolutely! WPForms offers various templates, including order form templates, to streamline the process of creating forms for your website. With WPForms, you can easily customize and tailor order forms to suit your specific business needs, making it convenient for customers to place orders directly through your website.
What is the best free online form builder?
The best free online form builders include Jotform, Zoho Forms, Typeform, and Google Forms. You can use these tools to build a form online without connecting your website first. But if you want to build the best free WordPress forms, WPForms is the solution for you. WPForms Lite is a forever free plugin that allows you to build the perfect form from scratch or from the over 1500 templates it comes with.
Who are the biggest FormStack competitors?
Some of the biggest competitors of FormStack include WPForms, Google Forms, JotForm, Typeform, and Wufoo. Each of these form builders offers unique features and capabilities, catering to different needs and preferences of users.
Can I edit a FormStack form theme?
Yes, you can customize the appearance of your forms in FormStack by adjusting the theme settings. You can modify elements such as colors, fonts, backgrounds, and more to create a form that fits your needs and brand.
How to use WordPress Forms Lite on a website?
All you need to do is install the WPForms Lite plugin on your WordPress dashboard. Then, you can easily create and customize forms using the intuitive drag-and-drop interface. Finally, embed the forms on your website pages using shortcodes or the Gutenberg block editor.
That’s it! You can now make a decision on whether WPForms or FormStack is the right Form Builder for you.
If you liked this post and want to learn more about WPForms and how to use it, check out our article on How to Create a Contact Form on WordPress (the Easy Way).
To add to that, here are additional articles you may be interested in reading.
- How to Add ‘Save and Continue Later’ Option to WordPress Forms
- How to Set Up the Right Form Notifications & Confirmations
- How to Add Google reCAPTCHA to Your Contact Form
The first article will show you how to add a save-and-continue option for your users. The next post will walk you through how to set up form notifications and confirmations. While, the last article will teach you how to add Google reCAPTCHA to your contact form.

Which one feeds into Salesforce or another CRM? You have to be able to do something with the data you collect.
FormStack has native Salesforce integration. With WPForms, you can integrate your forms with Salesforce via Zapier.