
Are you looking for a simple way of adding a quiz to your WordPress site?
Quizzes are a great way to improve engagement, conversions, and social media buzz. But more than that, they’re just fun to have on your site. Now, quizzes can be simple to create if you use the right tool.
In this tutorial, we’ll show you how to create an interactive quiz on your site in just 10 minutes. We’ll use a plugin, so there’s no coding involved.
What You Need To Create a Quiz in WordPress
When it comes to WordPress, you’ll find a plugin or tool to help you add any feature you want. There are a handful of good WordPress plugins that you can use to create and host quizzes on your site.
Our top pick is the Thrive Quiz Builder.

Thrive Quiz Builder is by far the best quiz builder for WordPress. You can choose from 5 quiz types that include displaying the result as a number, percentage, personality, right/wrong, or a survey.
You get premade templates to make quiz creation simpler, allowing you to focus on the creative side of things. Then you can easily customize the templates using a simple drag-and-drop process.
This quiz builder lets you add multiple-choice as well as open-ended questions. You can also create different results for every variation of your quiz or send them to a different URL.
There are tons of elements that you can add to your quiz, like progress bars, share buttons, and calls to action. You can even make your quiz look stunning by adding images and GIFs.
Thrive is user-friendly and beginner-friendly, so you’ll find it easy to create any quiz you need, no matter your WordPress skill level. There’s even a setup wizard that walks you through each step.
Here are the main highlights of the Thrive Quiz Builder:
- 5 quiz types
- Optin gate before viewing the result
- Social shares to increase quiz popularity
- Powerful image tools to edit, set background, add text, and resize them
- Quiz workflow to see all the questions and answers and how they flow
- Branching quizzes to ask different questions based on the previous answer
- A/B testing at different quiz stages
- Built-in analytics to know your audience better
Now that you know why we’ve selected Thrive’s Quiz Builder for this tutorial, let’s get started.
Step 1: Install Thrive Quiz Builder
To get started, sign up for the Thrive Quiz Builder. You can get it as a standalone plugin or as part of the Thrive Suite that comes with a host of conversion-optimization tools.
Once you sign up, you’ll be logged into your Thrive account. Here, you’ll see an option to download the “Thrive Product Manager.”
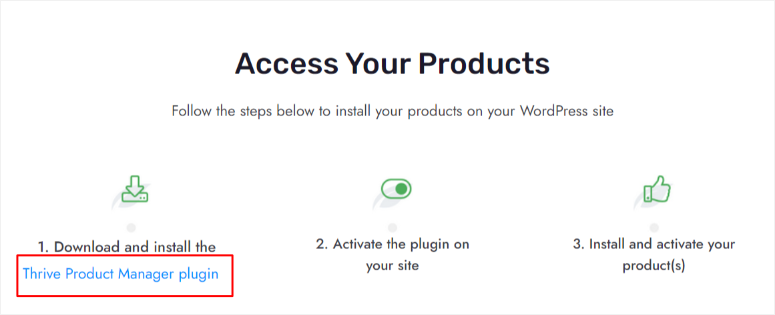
Next, upload and install the plugin in your WordPress dashboard. If you need help with that, follow our tutorial on how to install a plugin in WordPress »
Once installed, a new menu titled ‘Product Manager’ should appear in your WordPress dashboard menu; click on it.
Here, enter your Thrive Themes password and username to log in to your account.
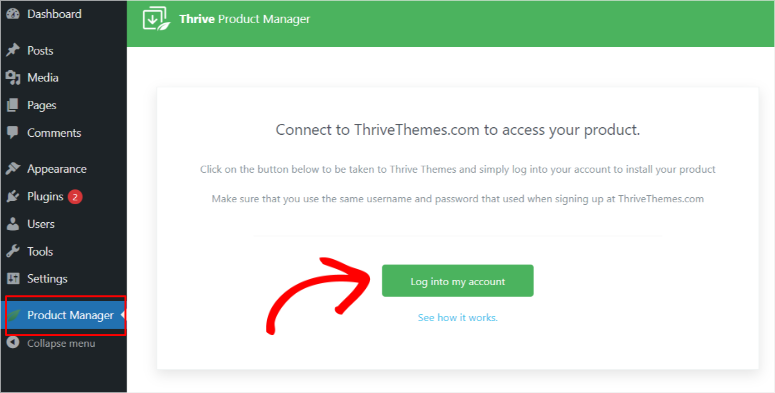
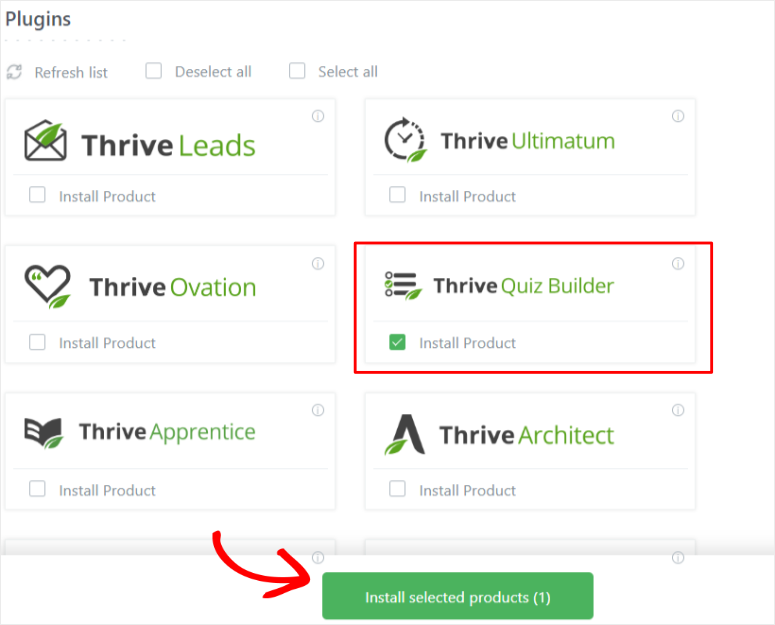
After logging in, you’ll be automatically redirected to the ‘Thrive Product Manager’ page, where you can install Thrive products and activate the license. Locate Thrive Quiz Builder, check the ‘Install Product’ box and then proceed to ‘Install Selected Products.’
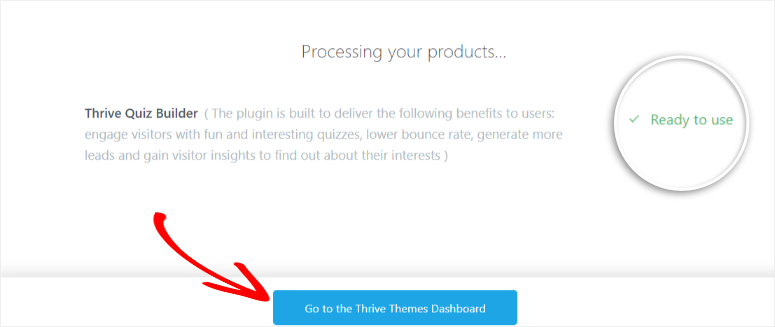
You should be redirected to a processing page. When the plugin says it is ready for use, proceed by going to the ‘Go to the Thrive Themes Dashboard’ button.
Step 2: Create a Quiz with Thrive Quiz Builder
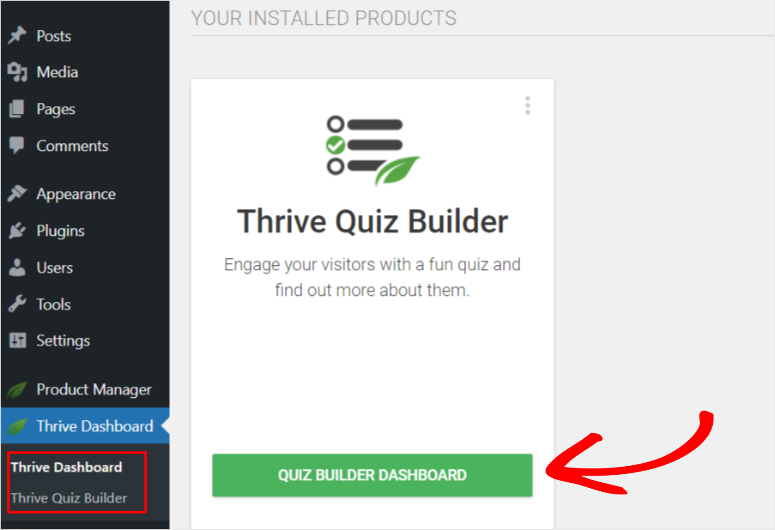
Now that you have correctly installed this quiz plugin, a new submenu called ‘Thrive Quiz Builder’ should appear under Thrive Dashboard.
To create your first quiz, go to Thrive Quiz Builder » Quiz Builder Dashboard to get started.
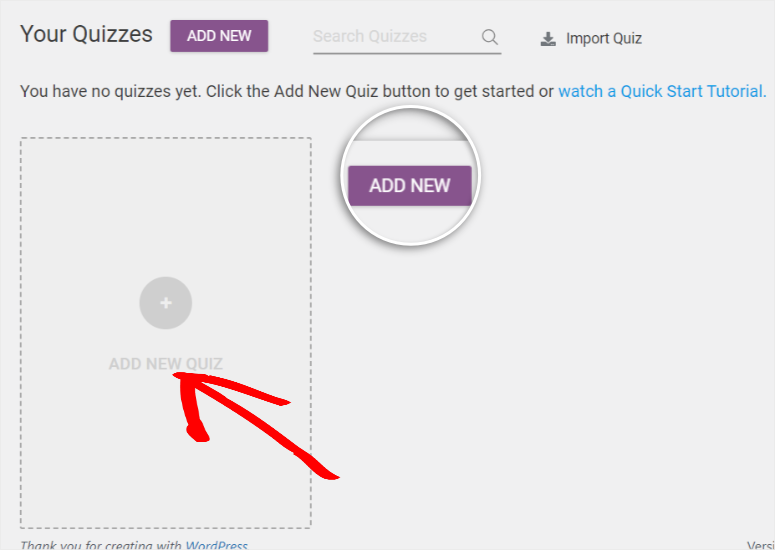
Next, go to the ‘Add New’ button or simply click on the section with the plus icon that says ‘Add New Quiz.’
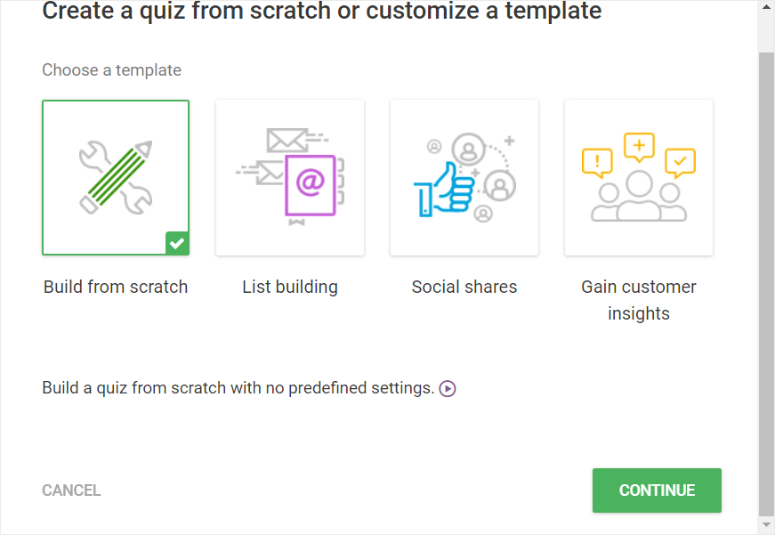
A popup menu will appear, and you will see 4 options:
- Build From Scratch: This is a blank template to customize your quiz how you like.
- List Building: The result page will only appear if the user has subscribed. It is a great way to build an email list with quality, engaging leads.
- Social Shares: Includes social share buttons. This is a great option if you are looking to increase organic traffic and brand exposure.
- Gain Custom Insights: This is a survey quiz template to help you understand your audience better and make data-driven marketing decisions.
Now that you have a better understanding of what these 4 templated options can offer select the one you want. For this tutorial, we will ‘Build From Scratch.’
A new popup window will appear. Here, enter the name of the quiz.
You can name the quiz anything at this stage since it will not be displayed to your users. It is simply to help you differentiate the quizzes you create. Continue, and you will be redirected to the Quiz Builder Dashboard.
On this new page, go to Quiz Type and select Change Type.
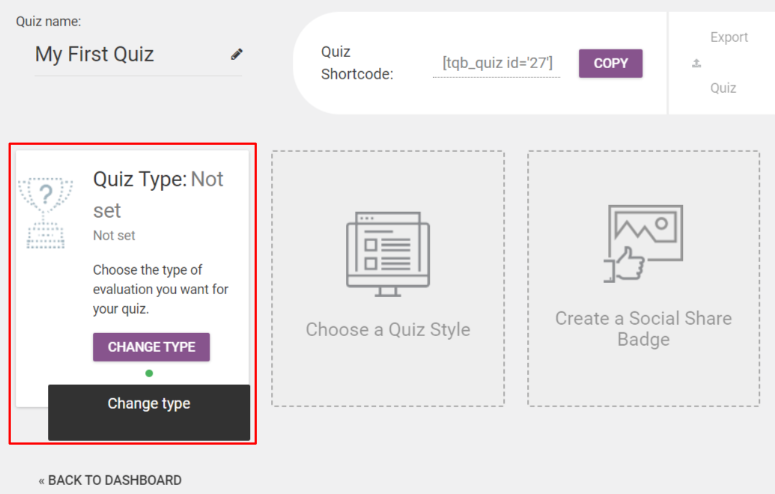
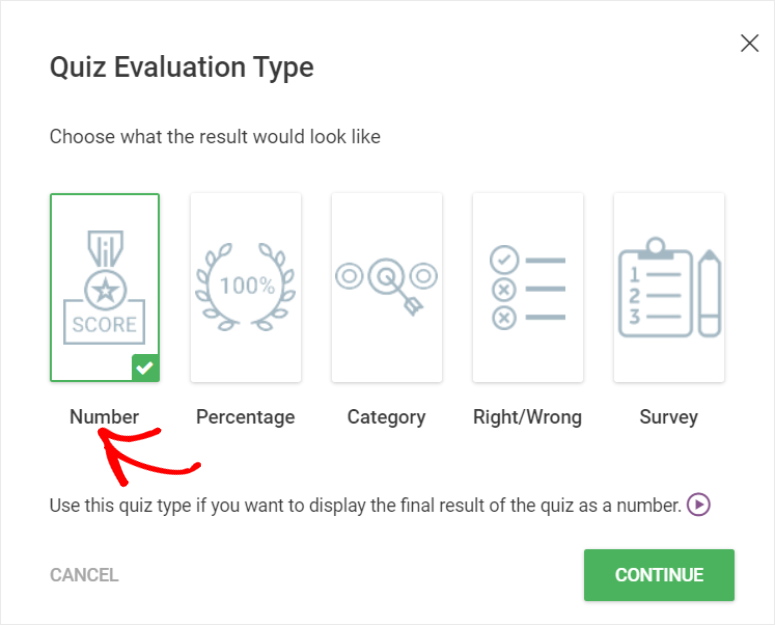
Another popup window will appear with the 5 types of quizzes you can create.
- Number: The quiz result will be a number. It offers your audience a simple, straightforward result. Basically, the higher the number, the higher their score.
- Percentage: Gives the quiz result as a percentage. Percentage results are easy to remember, helping users gauge themselves without knowing other participants’ results.
- Category: These are great at trait quizzes, which is why they are popularly used in personality quizzes like those found in Buzzfeed. Such quizzes help create an emotional response.
- Right / Wrong: Great for quick-fire assessment quizzes. It also helps readers retain more information.
- Surveys: Surveys do not offer results like the rest of the entries on this list. But they are great for user feedback which can help you with market research.
Let’s pick the number choice for this tutorial.
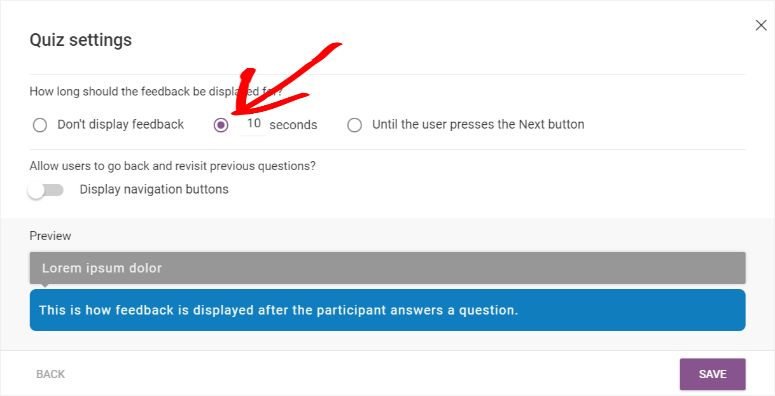
With this quiz builder plugin, you can display a message after every question; Thrive Quiz Builder calls this message Feedback.
From the options, you can choose not to display any feedback, display the feedback for 10 seconds, or until the user clicks on next.
We will go with display feedback for 10 seconds.
To add to this, you can also decide if you want the users to go back and revisit questions. For this tutorial, we will not activate this feature.
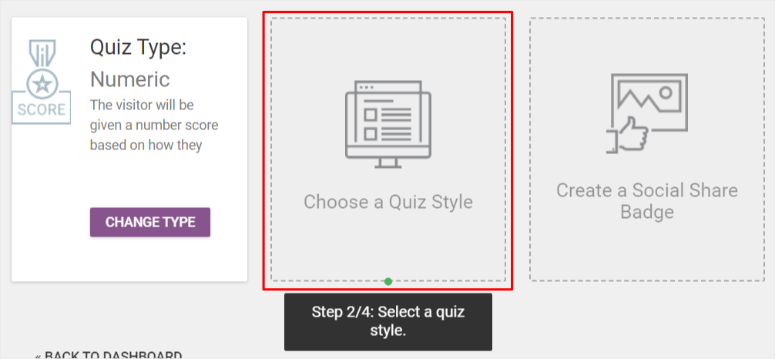
After that, let’s pick how the quiz will appear to users by going to ‘Quiz Style.’
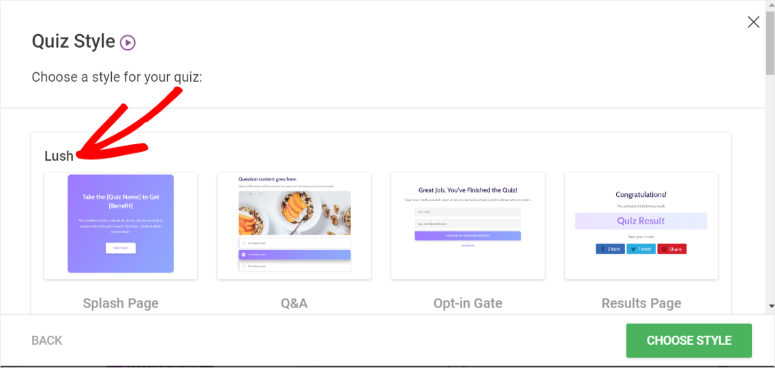
Thrive Quiz Builder offers various pre-designed style options you can select. Scroll through the list until you find one you like. To give you an example of what this can do, let’s select ‘Lush.’
Lush quiz style includes;
- A splash page that introduces your readers to the quiz in an exciting way.
- Q&A where users will actually do the quiz.
- Opt-in Gate so the user can only receive their results if they provide their email.
- The quiz results page where users can see how they did.
Once you select the quiz style, go to the new tab created called Questions and select ‘Manage.’
You will be directed to the Thrive Live Questions Editor where you will create the questions and answers for your quiz.
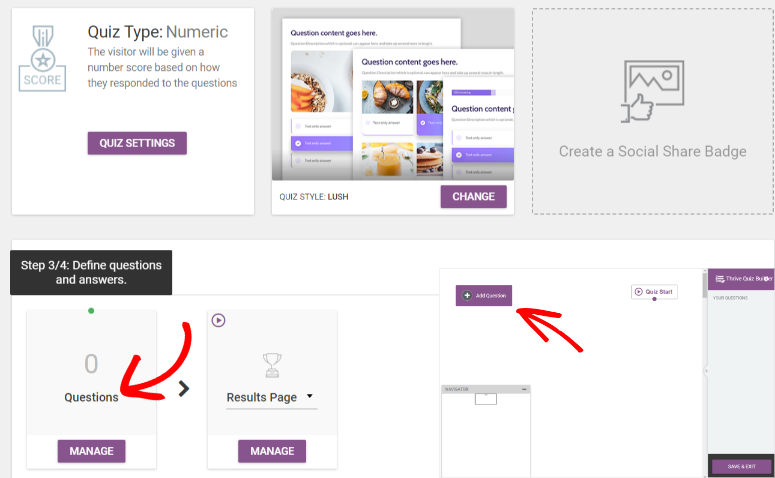
Step 3: Add Quiz Questions and Answers
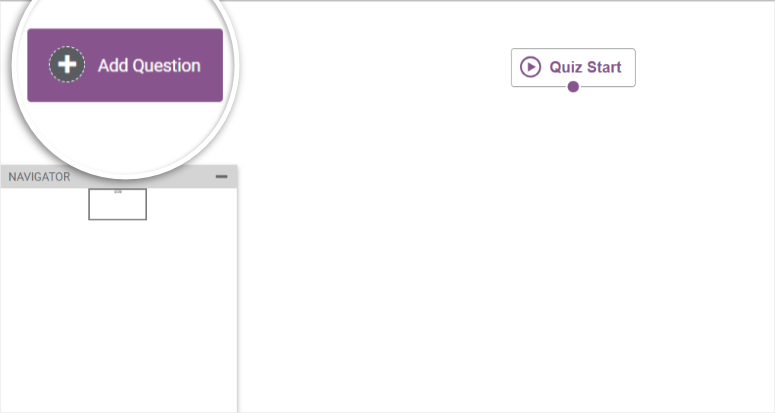
In the editor, you will see an ‘Add Question’ tab at the top left side of the page. This tab will lead you to a popup window.
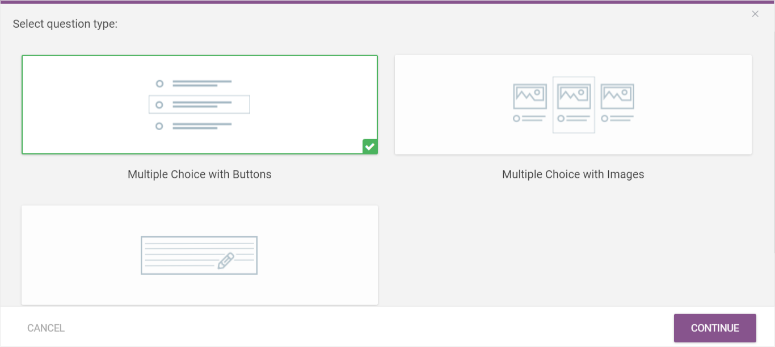
The popup window has three options you can choose from:
- Multiple choice with buttons: This leads to simple, straightforward, and clear quizzes.
- Multiple choice with images: Helps with better engagement and visual context.
- Open-ended question: This helps if you are looking for expressive answers.
Since we want to create a basic and simple quiz, we will select ‘Multiple Choice with Buttons’ for this tutorial and continue.
In the next popup window, you will add the questions and answers for your quiz.
First, type in a question. You can add a description for the question if you need to offer more detail. You may also choose to enable the ‘Add Feedback’ feature if you want a message to be displayed to the user after every question.
You can also enable tags that divide quiz takers according to answers. The tags offer the perfect way to send specific follow-up content, emails, and offers tailored to the interests and preferences of your users.
If you feel the question needs visual context, you can also add an image on the left-hand side of the question.
Finally, decide how many answers the user can pick for the question.

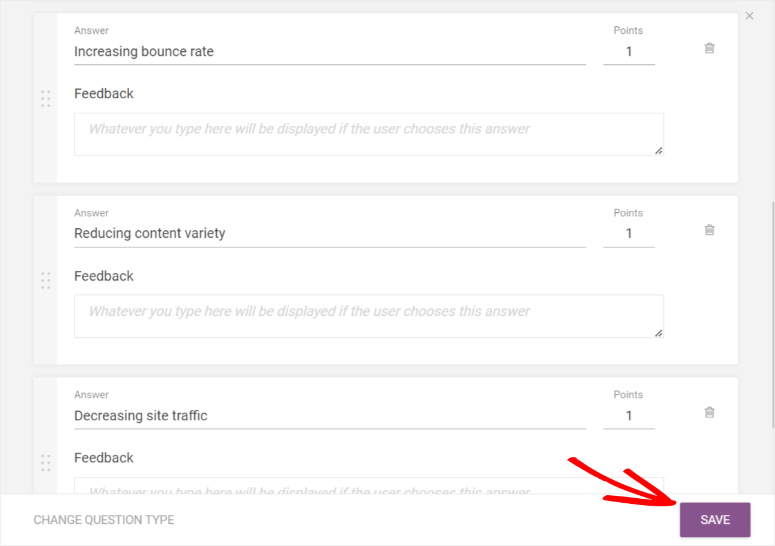
Next, type in the first answer, indicate if it is right or wrong, and define how many points that answer carries.
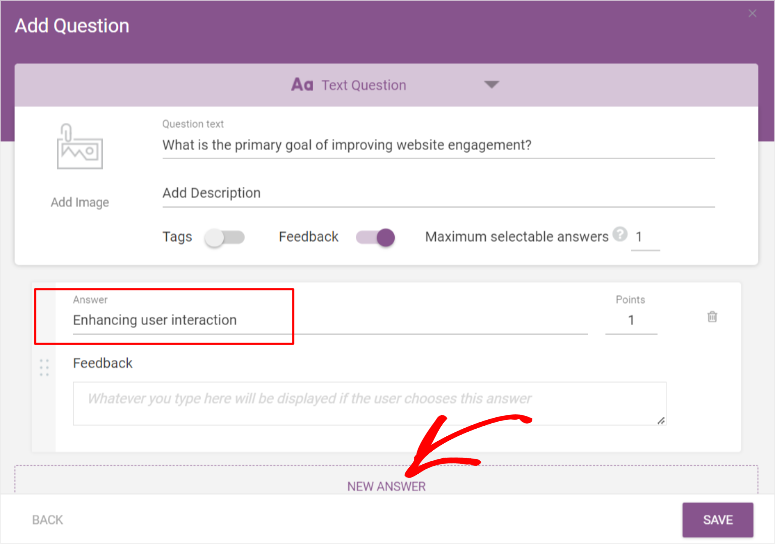
Add more answers so that you can make the quiz more interesting for the taker. Then, hit Save.
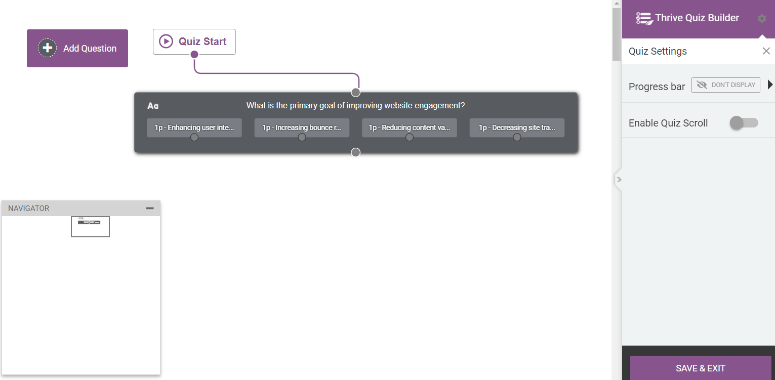
You will be redirected back to the Live Questions Editor, where you will see your first question and its set of answers in a rectangular gray block.
Add more questions and answers by repeating the steps above.
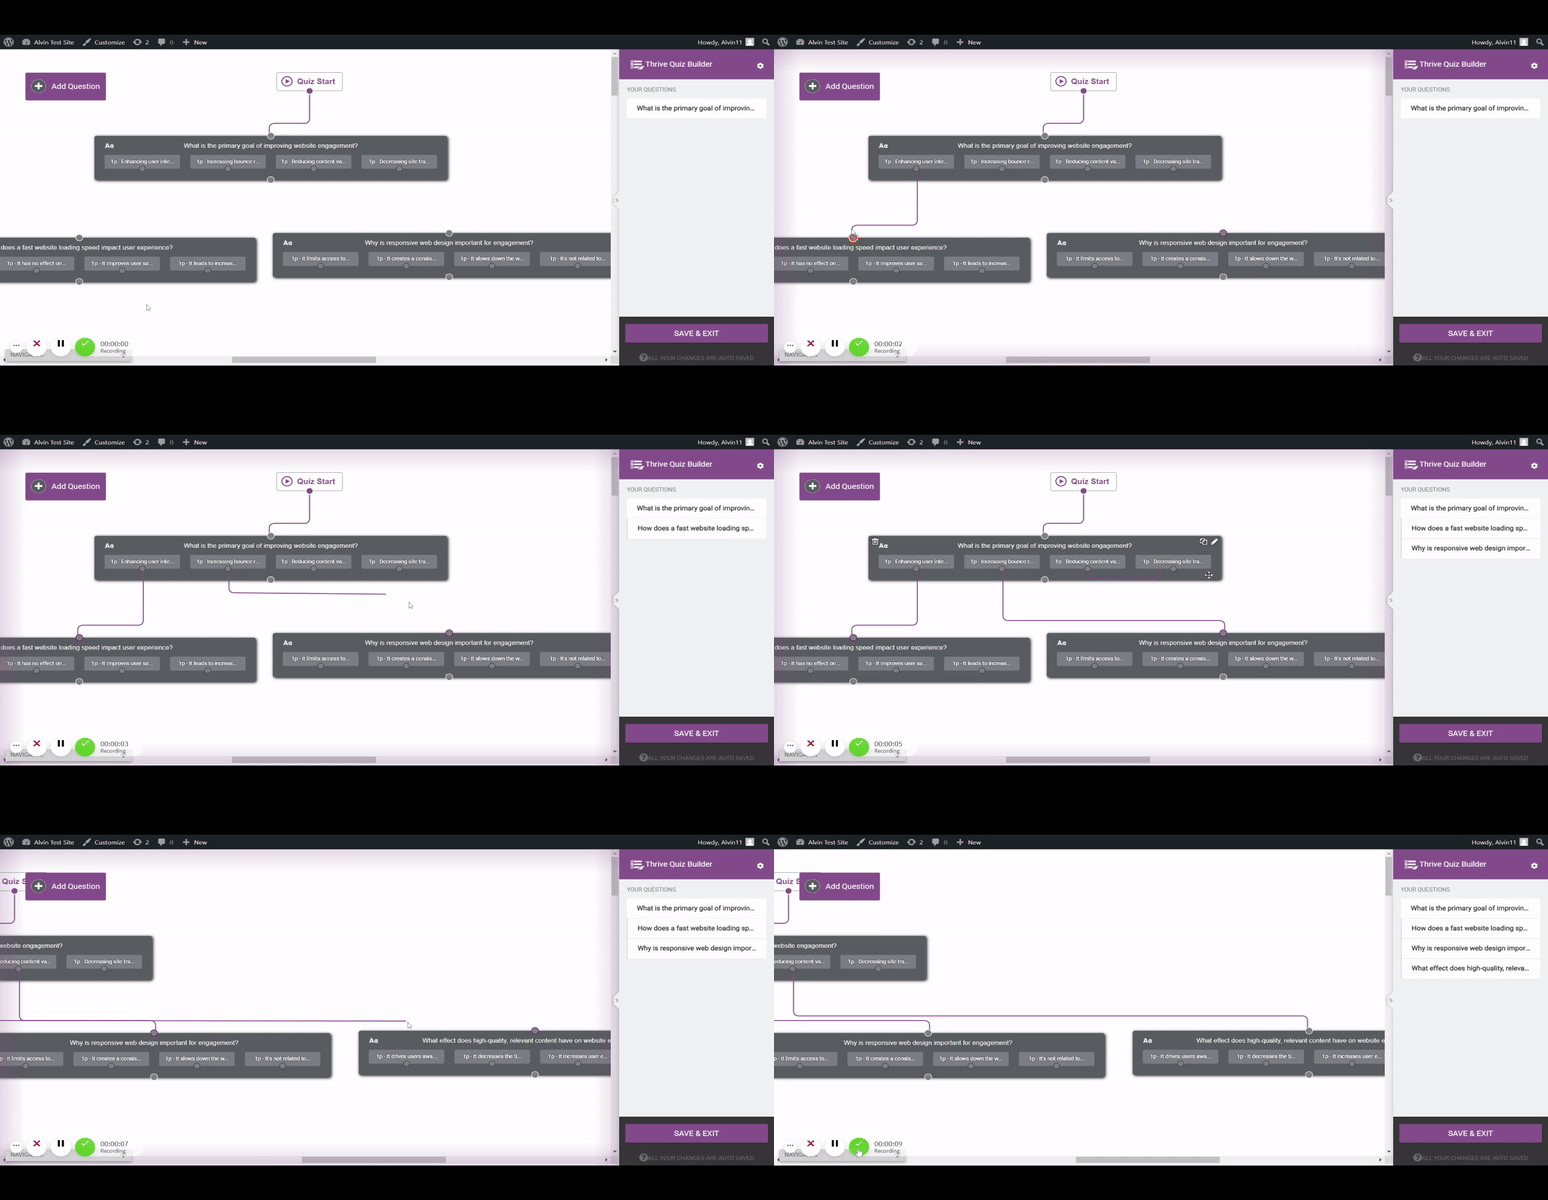
After you’ve added all the questions and answers, your Live Questions Editor will look like a board with many gray blocks. This workflow makes it easier to manage how your quiz flows.
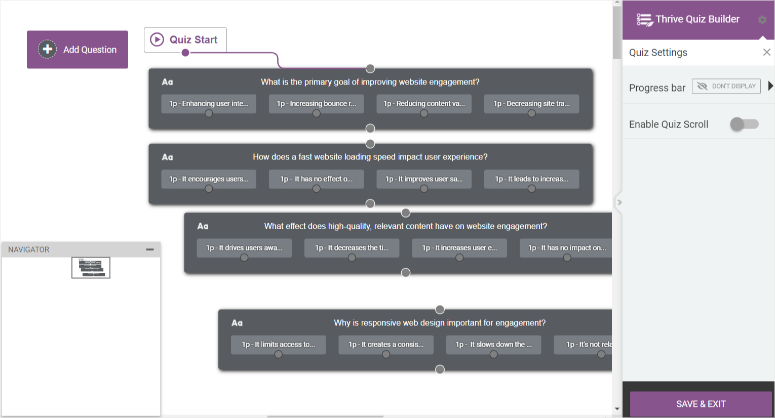
You can drag these blocks anywhere in the Live Questions Editor to better connect them to each other for the quiz flow.
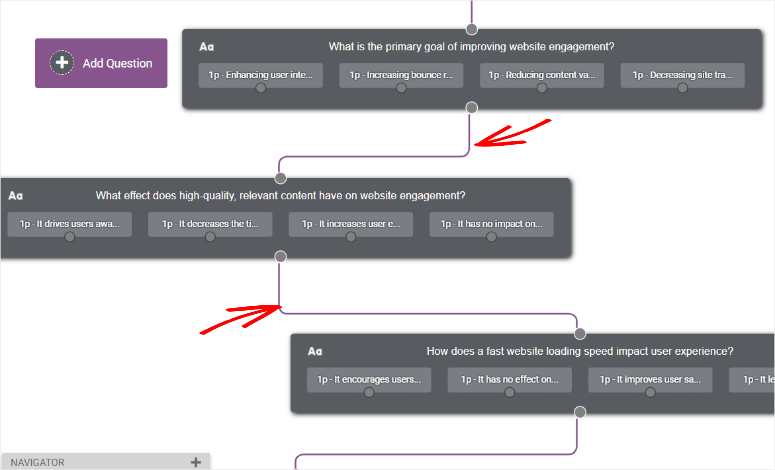
To link the questions, locate the little gray circle in the middle of the boxes.
When you click your mouse and start dragging it, a line will appear. Connect this line to the center of another rectangular question box.
Now, when a user answers the first question, they will be directed to the next, and so on.
Quick Side Quest: Create Conditional Quizzes
Thrive Quiz Builder lets you create conditional quizzes. With these quizzes, users go to the next question based on their answers.
Conditional quizzes help you make quizzes personal, learn more about your audience, and offer useful customized content when you want to market.
To create a conditional quiz, click the gray circle underneath an answer- and not underneath the question like with normal quizzes.
Next, click your mouse to drag the circle to the gray circle at the center of the question you want to be displayed next after a user gives that particular answer.
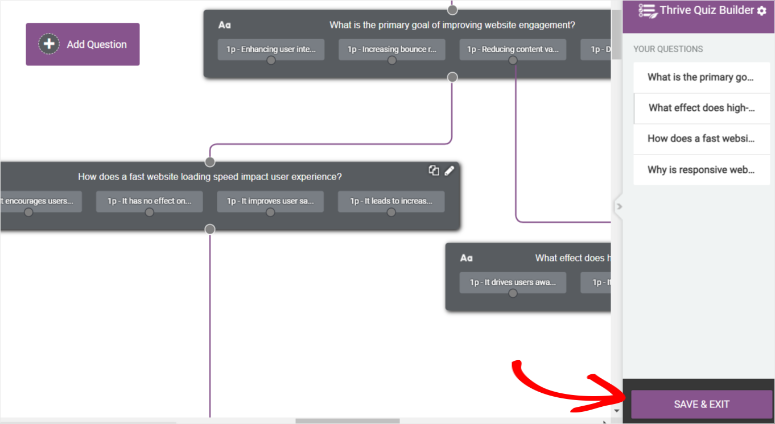
Now that you have created your questions and answers and defined how they will appear to the user, ‘Save & Exit.’
At this point, your quiz is ready, and you can add it to your site. However, we will add a few more adjustments to make it even better.
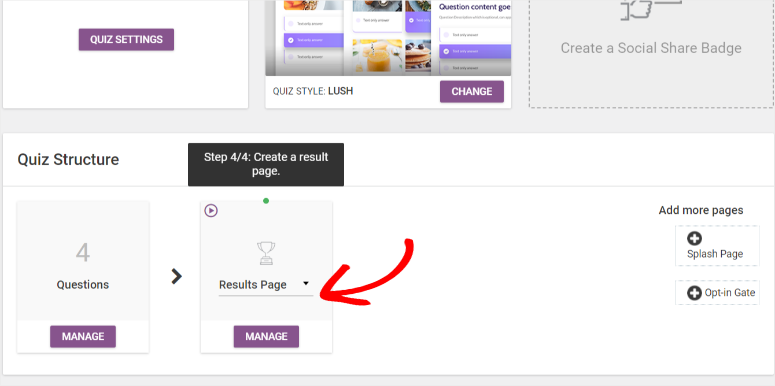
Under ‘Quiz Structure,’ go to Results Page » Manage.
You’ll see a blue pencil icon to edit the quiz results page. This will take you to the ‘Thrive Quiz Builder’ page.

On this Thrive Quiz Builder page, edit your result page through the elements in the left menu. Change the color, size, layout, and background to your liking.
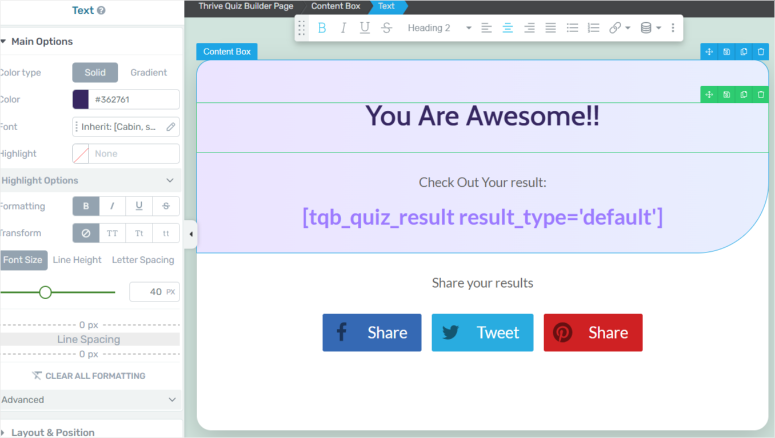
At the bottom of the page, preview how the page will look with different screen sizes and adjust to offer your users the best experience. Finally, ‘Save Work.’
Next, let us personalize the Splash page and Opt-In Gate page by first going to Quiz Structure.
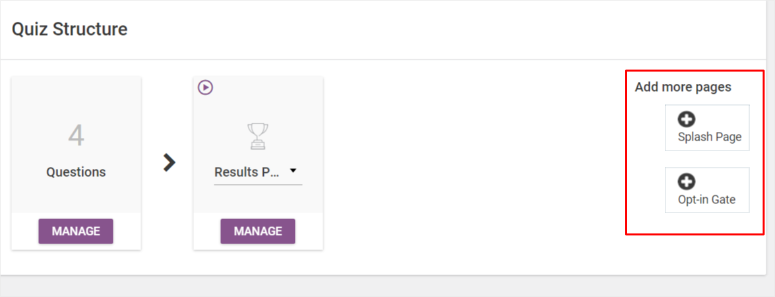
Then, select the Splash and Opt-In Gate pages on the far right. Both these pages use the same process, so we will guide you through how to make the Splash page.
Go to the Splash Page and proceed to ‘Manage.’ On the next page, find our handy blue pencil tool.
You will be taken to the Thrive Quiz Builder page, but this time, you will be editing the Splash page. Make the changes you want, and ‘Save Work.’
Another great feature that comes with the Thrive Quiz Builder plugin is creating a Social Share Badge. A Social Share Badge is great at helping people share their results on social media.
After creating a new quiz, you will see the ‘Social Share Badge’ tab on the far right.
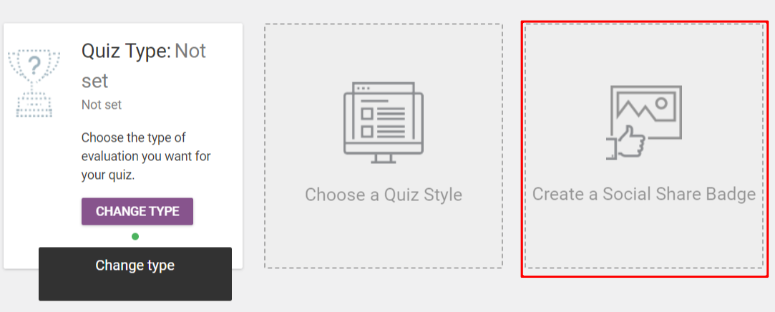
On the next page, select a template to start with or a blank template. We suggest you start with a template to make it easier for you.
Once you are on the Thrive Quiz Builder, edit the page by changing the colors, background, and other elements.
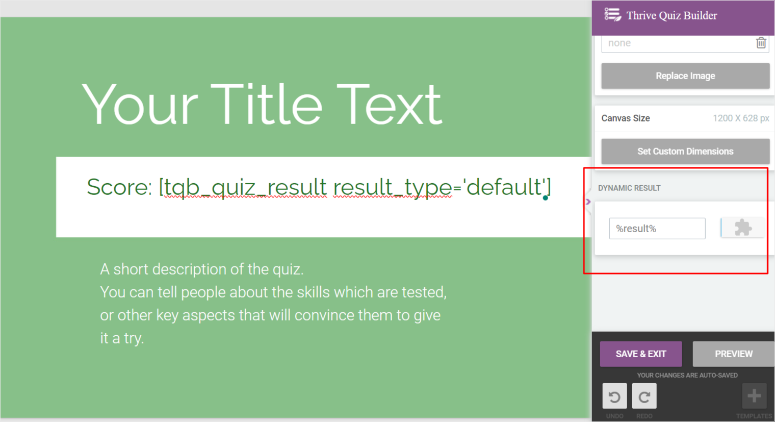
Social Share Badges have a Dynamic Result feature that changes the score depending on what the user got in the quiz.
As a result, you do not need to do anything else other than customize the page design; the plugin will take care of the results and scores.
And just like that, you have a new quiz ready to add to your site.
Step 4: Display A Quiz on Your WordPress Site
With Thrive Quiz Builder, you can display your quiz on a page, post, or any widget-ready area.
You will add the quiz with the help of a shortcode.
For this article, we will add our quiz to a page, but remember, the process is the same for posts and widget-ready areas.
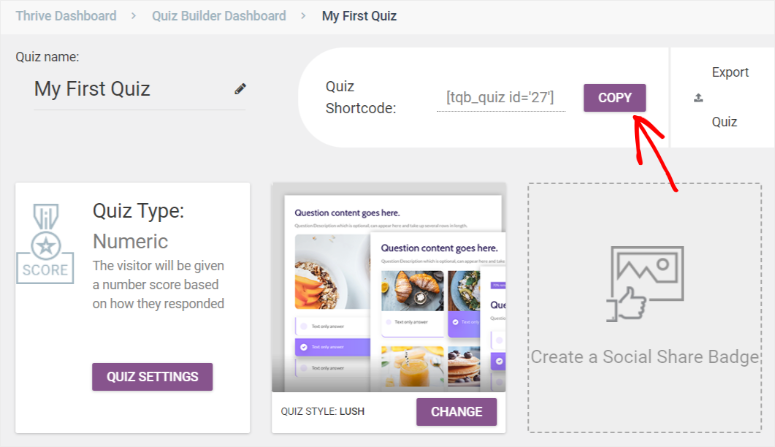
To get started, copy the quiz shortcode displayed on the top right of your Thrive Quiz Builder dashboard.
Go to Pages » Add Page in your WordPress dashboard. On the New Page, add a block by using the plus icon.
In the block search bar, type in “shortcode,” and add it to the page.
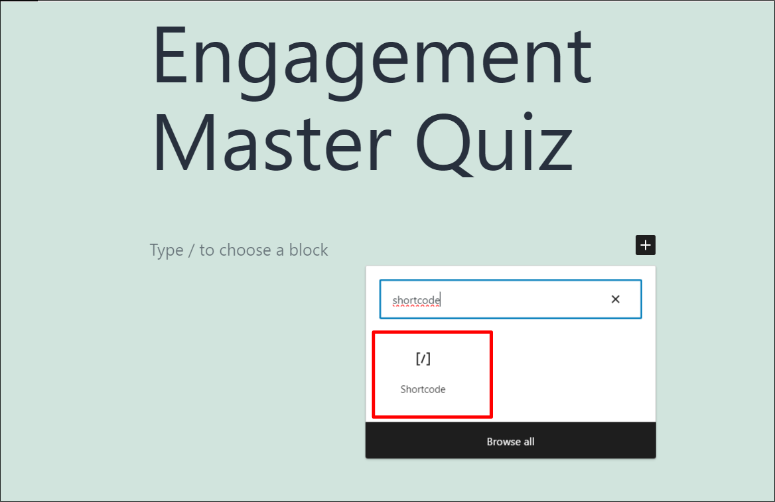
Paste the shortcode you copied earlier. Next, Save and Publish.
Finally, go to your site and view your quiz live!
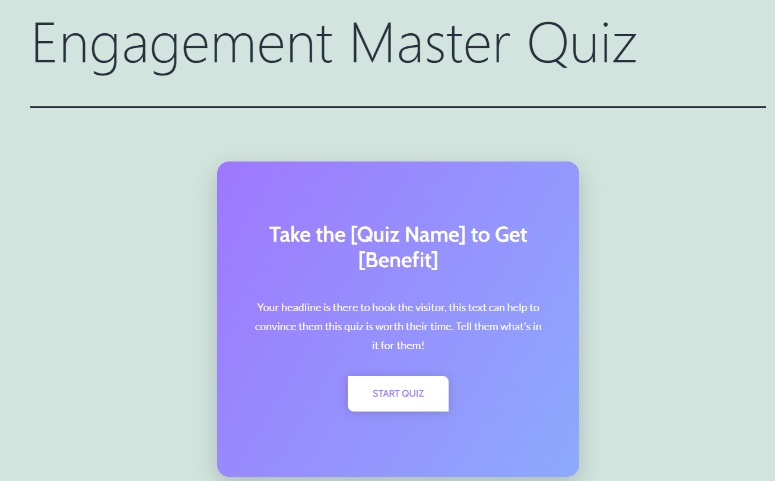
You now have an engaging and detailed quiz to help you grow your audience.
That’s it! We hope you liked this tutorial. Thrive is a powerful suite of tools. Learn more about what you can do with this plugin here: Thrive Leads Review and Thrive Architect Review.
Next, check out some commonly asked questions about quiz building below.
FAQs: How to Make a Quiz in WordPress
What types of quizzes are popular for engagement on WordPress sites?
The most popular quizzes for engaging visitors on WordPress sites include personality quizzes, trivia quizzes, and knowledge assessments. Personality quizzes allow users to discover more about themselves, while trivia quizzes test their knowledge. You can make all these types of quizzes with Thrive Quiz Builder and encourage users to share their results on social media, driving more traffic to your WordPress site.
Is it possible to create quizzes that generate personalized results for users?
Yes, it’s absolutely possible to create quizzes that generate personalized results for users on WordPress with highly customizable plugins like Thrive Quiz Builder. With this plugin, you can tailor outcomes, messages, or recommendations according to the answers users provide. Personalized results make the quiz experience more engaging and relevant, increasing user satisfaction and the likelihood of sharing their results.
Are there any best practices for optimizing quizzes for search engines on WordPress?
Yes, there are several SEO practices you can use to optimize quizzes for search engines on WordPress. Firstly, ensure your quiz content is relevant and valuable to your audience. Use descriptive titles and meta descriptions for your quiz pages. Add ALT texts to images within quizzes for accessibility and SEO. Consider adding relevant keywords naturally in your quiz questions and results. Additionally, use a quiz builder like Thrive Quiz Builder to make sure your quiz is mobile-responsive, as Google favors mobile-friendly content. Lastly, promote your quiz on social media and other platforms to increase engagement, which can positively impact SEO.
Is it possible to create timed quizzes with the theme builder?
Yes, you can create timed quizzes using the Thrive Theme Builder. The theme builder provides flexibility in designing and structuring quizzes, including adding timed elements. You can set specific time limits for answering quiz questions, creating a sense of urgency and excitement. Timed quizzes can be engaging and challenging for users, enhancing their experience on your WordPress site.
Up next, you may also want to see more ways to gamify your website apart from quizzes. To add to that, here are a few articles you can visit to learn more about quizzes:
- 12 Best WordPress Quiz Plugins to Boost User Engagement
- Crowdsignal Review: Surveys, Polls, and Quizzes
- 10+ Best WordPress LMS Plugins Compared
The first two articles above will walk you through alternative quiz and survey plugins. The last article will educate you about Learning Management System (LMS) plugins, which also offer a great way to interact with your audience.

Can I use it with a different theme eg divi or astra and how do I tie it up with a freebie or a newsletter?