
Do you want to get raving reviews for your online business?
Online reviews either make or break your business because studies show that 89% of people read reviews before they buy. So by getting more customer reviews and testimonials, you can drive sales and revenue higher.
In this post, we will show you how to get more positive reviews for your business in a few easy steps.
How to Get More Online Reviews for Your Business
There are many ways to gather customer testimonials and product reviews for your business. One of the must-haves for every business is their very own business profile on Google My Business. This will help you rank on SERPs (Search Engine Results Page) especially if you’re targeting a local audience.
Now many guides online will give you marketing strategy tips and tricks to get good reviews. This includes word-of-mouth, refer a friend, email review requests and more.
We’re here to give you actionable steps you can take to boost your online reputation.
We’ll show you how to actually collect online reviews and not just on review platforms – Google, Amazon, TripAdvisor, and Yelp Reviews. You can take control over how you get customer feedback and personal recommendations, and you’ll also be able to use this data to improve customer experience.
The best way to do that is to use WordPress review plugins that allow you to collect online reviews in a few clicks.
First, we’ll show you how to create a smart review form to where current customers can fill out their ratings and reviews.
Then, we’ll also show you how to target customers to get them to leave reviews. We’ll use 3 tools to do this: WPForms, OptinMonster and TrustPulse. Both are really powerful in helping you target users at the right time and place so that they are encouraged to leave you a review.
You can follow these steps one by one:
- WPForms: Create a smart review form
- OptinMonster: Optimize review responses targeting individual users
- TrustPulse: Maximize reviews targeting a broader audience
If you want to showcase reviews on your site from third-party review sites like Google, Zomato, Facebook Page, and Yelp, then you can sync your website to the platform using WP Business Reviews.
This plugin understands just how important good reviews our for local businesses, eCommerce, and small companies. You can filter by star rating and hide unfair negative reviews too. You can assess every review and connect with customers who leave bad reviews to resolve the problem behind the scenes without making it public.
So you get full control over your online reputation.
You’ll want to hop over to this guide: How To Embed Google Reviews on Your Site To Boost Conversions.
With that cleared up, let’s get started!
Create a Review Form with WPForms
First, you’ll need to find a form builder plugin that lets you create review forms with ease.
We recommend using WPForms.
WPForms is the best form builder for WordPress sites. It offers tons of powerful features that let you create any type of form including a review/testimonial form.
The plugin comes with a collection of 1,200+ form templates for all purposes such as contact forms, signup forms, testimonial forms, and review forms. So, you can get started without touching a line of code.
With its drag and drop feature, you can easily add and remove required fields to your review form. You can add fields that allow your users to enter their review content and add ratings as well.
What really stands out is its conditional logic feature. This lets you ask follow-up questions based on a user’s rating. So if they rate you below 3 stars, you can ask them what went wrong, but if they rate you 5 stars, then you can ask them what they found great about your product/service.

Also, WPForms allows you to send automated email notifications to your team members and customers. For example, whenever a user submits a review form on your site, you can send an email to the admin. And, you can send a follow-up email to the user to thank them for their honest feedback.
All the forms you create with WPForms are 100% responsive which means they work well on any mobile device. Plus, you can prevent bots and hackers from submitting reviews on your site with its built-in spam protection feature.
WPForms has a free and paid version so everyone from bloggers and small businesses to large companies can find a suitable plan.
Now, let’s create a user review form in WordPress using WPForms.
Step 1: Install and Activate WPForms
To create a review form, you need to sign up for a WPForms account.
There is also a lite version available for free in the WordPress repository. But, you’ll need to upgrade to the premium version for advanced features and extensions.
After you sign up, you’ll find your download file and license key from the Downloads tab on your account.
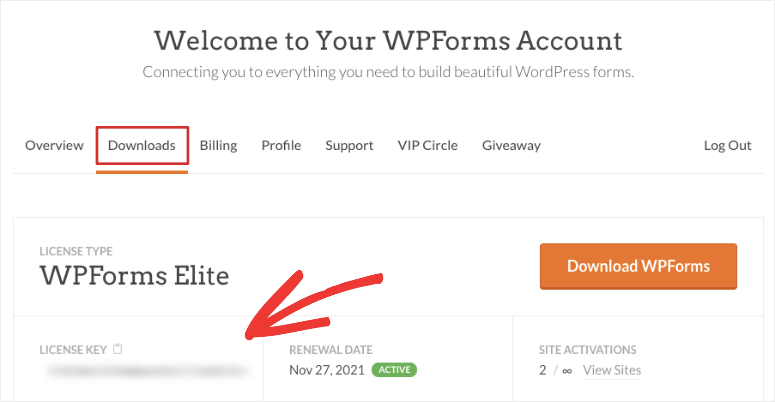
Now, you need to install the plugin on your WordPress site. If you want more details, you can check out our guide on how to install a WordPress plugin.
Once you install and activate WPForms, you have to enter the license key on the WPForms » Settings tab.
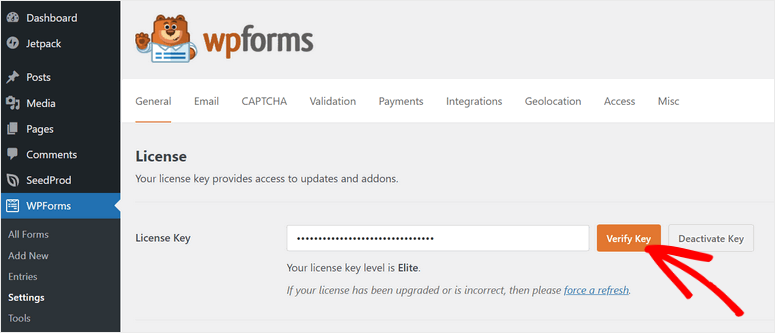
Click on the Verify button and you’re all set to create a review form.
Step 2: Create a Custom Review Form
WPForms makes it really easy to create a review form in under 5 minutes. All you have to do is navigate to the WPForms » Add New tab from the admin dashboard. Then, you’ll see the form templates library in a popup window.
You can search for an apt template like User Review Form or Testimonial Form.
We’re going with the User Review Form for this tutorial. It comes with all the necessary form fields for collecting reviews.
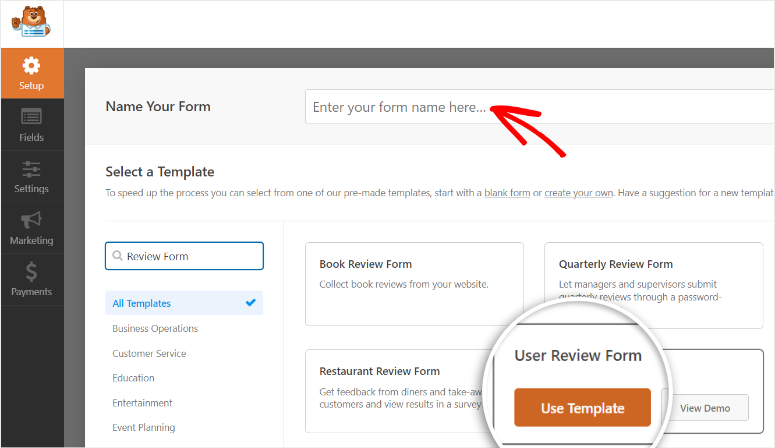
Select a template by clicking on the Use Template button. This will launch the drag and drop form builder.
Here, you’ll see all the form fields on the left menu and a preview of the form on the right side of the builder.
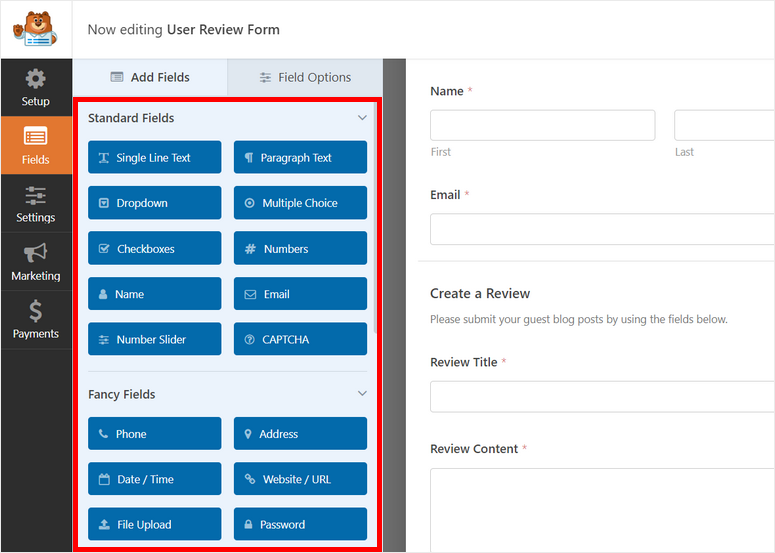
If you want to add more fields, you can drag and drop them from the left panel. For instance, you can add the Rating field to make your form more interactive.
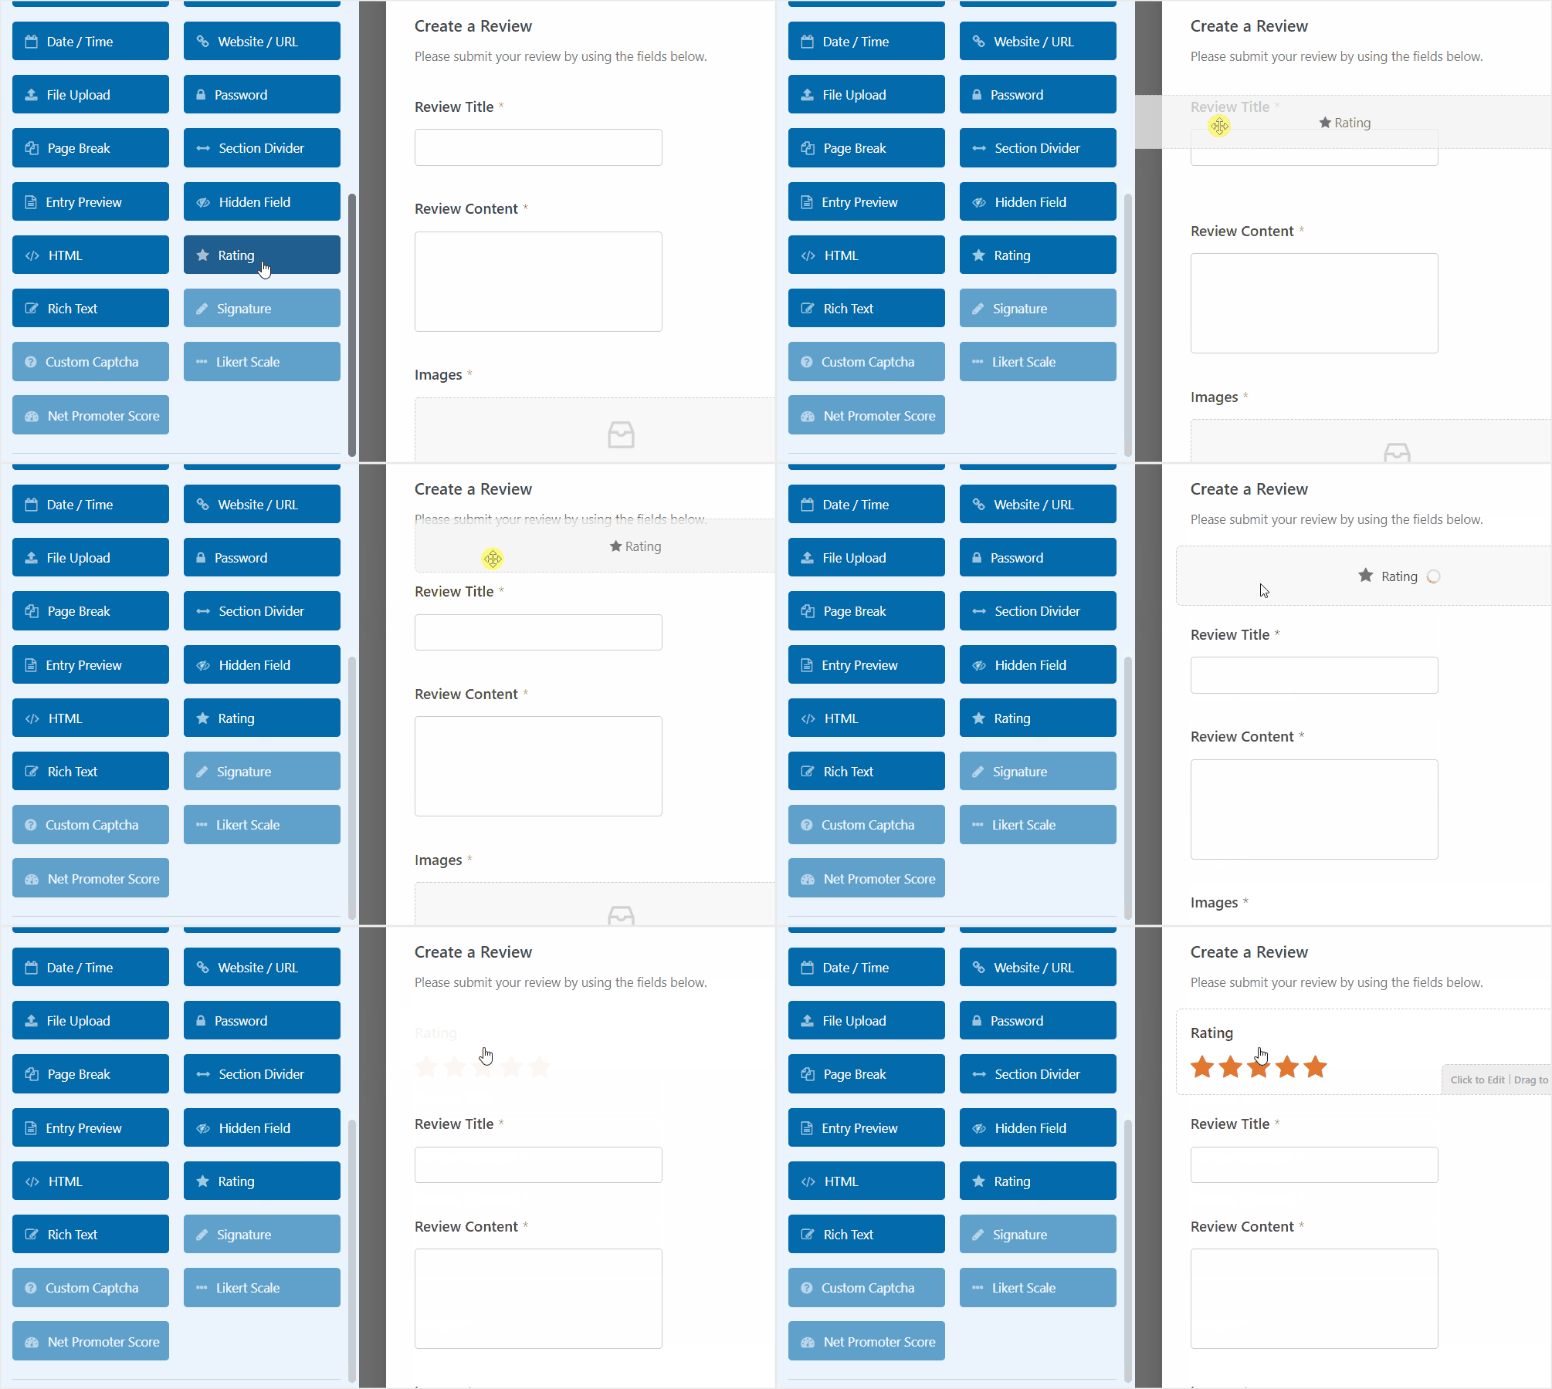
You can edit any form field by simply clicking on it and you’ll see the field settings open on the left. For the Rating field, you’ll be able to change the field label, description, and more.
In the Advanced settings tab, there are more options to change the rating icon to heart, thumbs up, or a smiley face. You can also change the color of the rating icon.
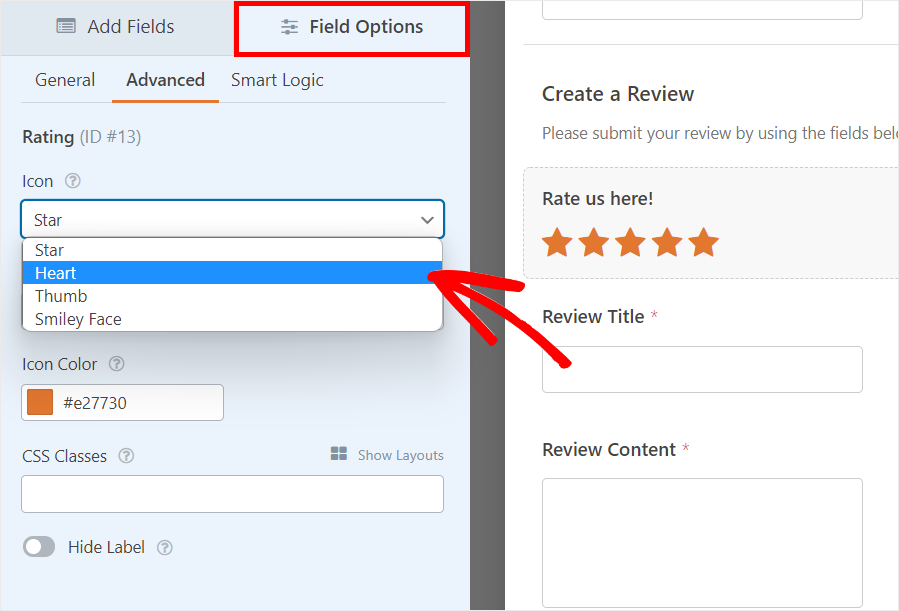
The next tab lets you set up Smart Logic. This lets you decide which question to show/hide based on a user’s response.
Once you finish customizing your form, click on the Save button.
Step 4: Set Up Form Notifications and Confirmations
Next, you can set up form notifications so you’ll be notified whenever a review is submitted on your site.
On the Settings » Notifications tab, check the Enable Notifications option and you’ll see the default settings. You can customize the notification settings and add the email addresses of the admin and the team members.
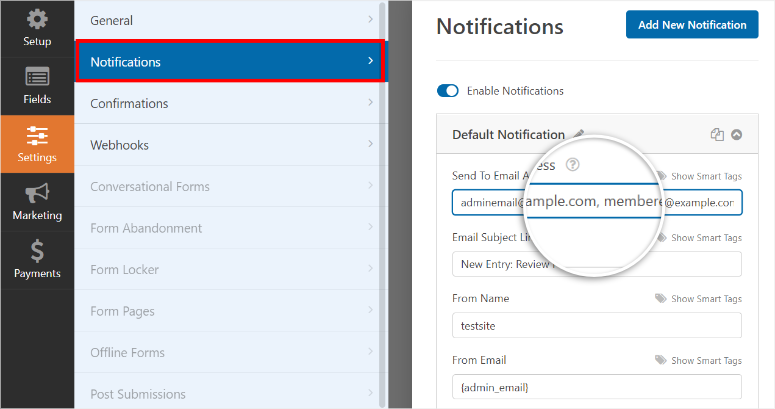
You can also create a form notification to thank the user for submitting a review. To create a user notification, click on the Add New Notification button at the top-right corner and enter a name.
Now you need to add the user email address to the Send to Email Address field by using the smart tags. Click on the Show Smart Tags option and select the Email option. This automatically fetches the users’ email addresses from the form.
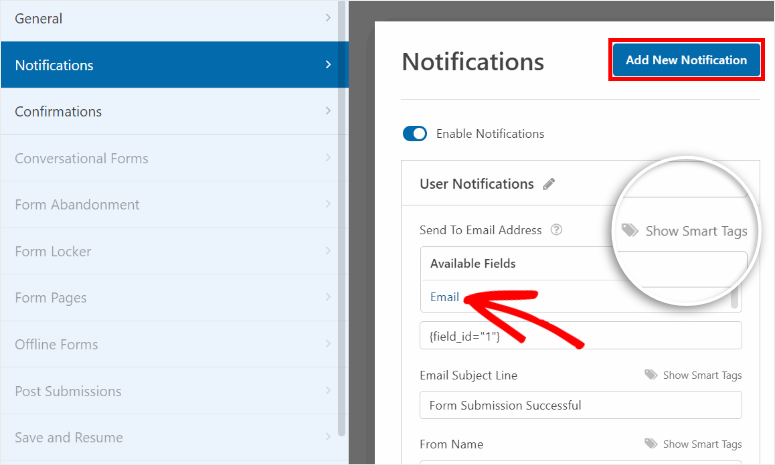
You can add a custom email subject line and message to personalize the user notification as you want. You can also use the {all_fields} smart tag to show users the details of their review form submission.
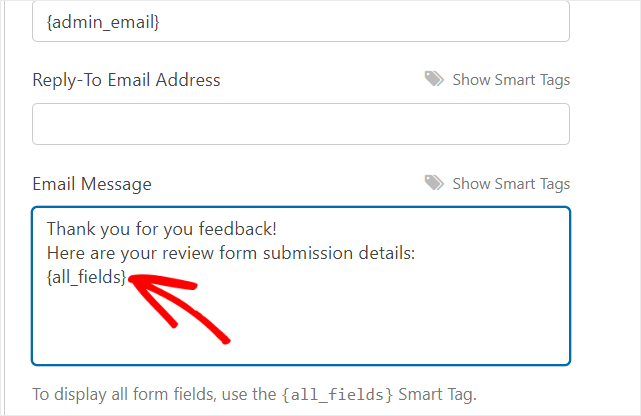
When you’re done, click on the Save button.
With WPForms, you can also add a confirmation message to thank the users upon submitting the form. For this, open the Confirmations tab on the settings page.
Here, you’ll see the default settings that you can change as per your needs. On the Confirmation Type option, you’ll see 3 options:
- Message: Add a confirmation message which is displayed on the front end after customers submit their order.
- Show Page: Redirect your users to any page on your site.
- Go to URL (Redirect): Add a specific URL and send users to a different website.
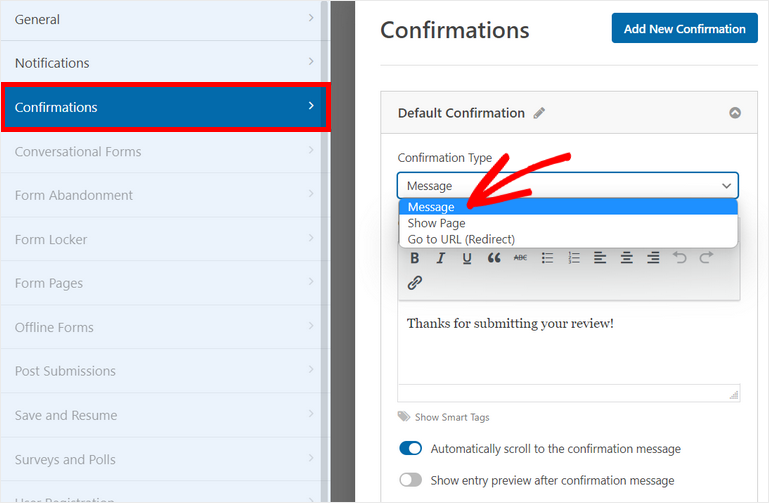
You can choose the Message option to show a thank you message to the reviewers.
Lastly, click on the Save button to save your progress.
Step 5: Publish Review Form on Your Site
After you save your online review form, you can add it to any page or post. To add your online review form on a new page, go to Pages » Add New.
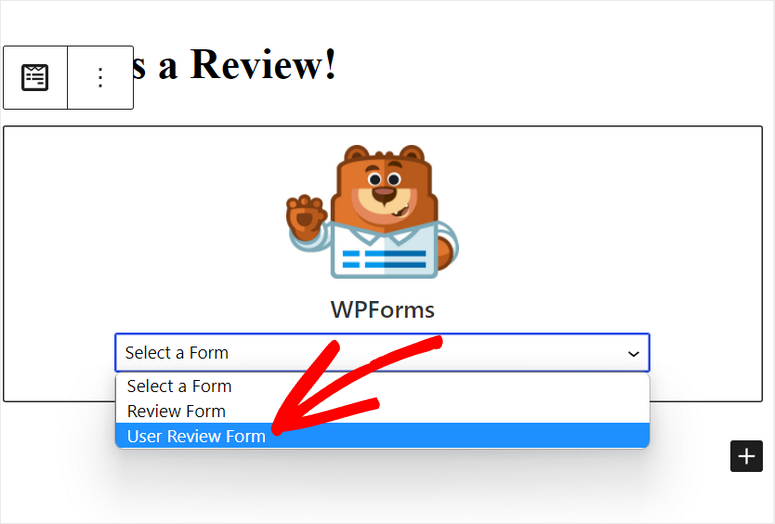
Then, search for the custom WPForms block on the text editor.
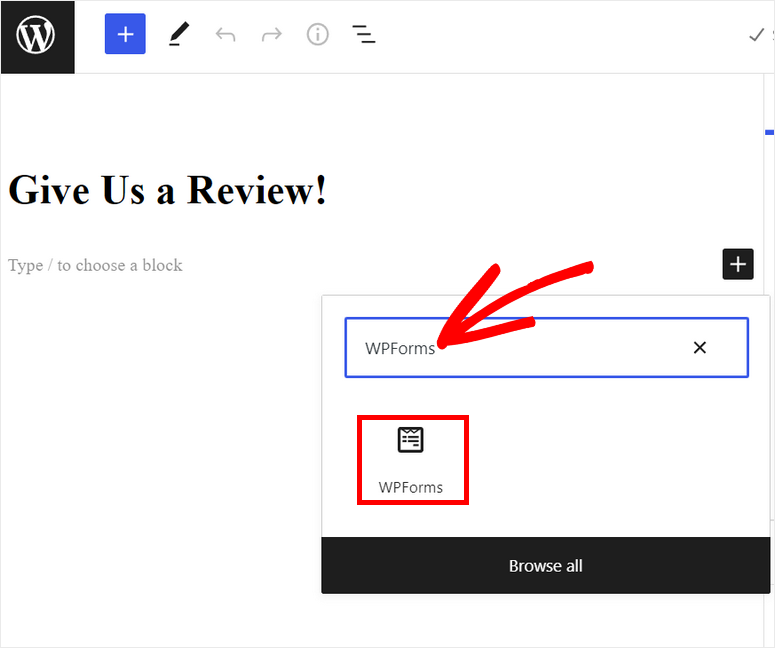
After you add the block, select your review form from the drop-down menu.
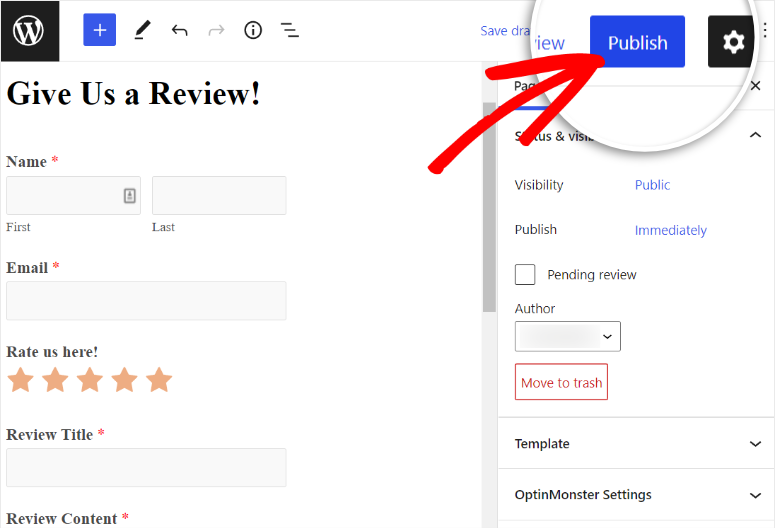
Now, you can publish your page or post and start collecting online reviews for your business.
If you’d like to showcase your form on a dedicated review page, you’ll want to use SeedProd for that. It’s the best page builder for WordPress with readymade templates. It comes with a premade widget for WPForms so you can easily embed the form in any page.
Next, we’ll show you how to get more online reviews for your business with the help of two lead generation plugins, OptinMonster and TrustPulse.
Add Review Form to a Popup or Email Using OptinMonster
Having a review form on your site is great but getting users to fill it out is a challenge. One of the best ways to get more customers to leave a review is by targeting them at the right time and place with a stunning popup.
For instance, you can get them to review their experience right after a successful checkout or maybe just before they exit your site.
The easiest way to create these popups is by using the best popup builder tool on the market, OptinMonster.
OptinMonster is the #1 lead generation tool for all types of websites. It lets you create professional marketing campaigns like floating bars, popups, fullscreen mats, inline forms, and more.
To make things easier, OptinMonster offers 50+ pre-designed campaign templates so you don’t need to create a campaign from scratch. With its intuitive campaign builder, you can simply drag and drop blocks to customize your campaigns and add more elements as you like.
Here’s a glimpse of some of the eye-catching campaigns you can create with OptinMonster:

The best thing about OptinMonster is its smart targeting rules which help you display your popups and other campaigns to the right people and at the right time on your site.
With this, you can make your campaigns appear to the website visitors who are about to exit your site or to those users who visit certain web pages. You can also retarget visitors and follow up with them to improve user engagement.
Added to that, OptinMonster also offers a built-in analytics dashboard that allows you to track and view detailed stats about your campaigns. It shows the number of visitors who viewed and clicked on your popups and even the revenue generated from these campaigns.
That said, let’s learn how to create a popup campaign in OptinMonster.
Step 1: Install OptinMonster Plugin
First, you’ll need to sign up for an OptinMonster account. OptinMonster offers premium plans that are tailored to fit your requirements. The pro plans start at $9 per month.
To connect your WordPress site with your account, you’ll need to install the OptinMonster free plugin from the admin dashboard.
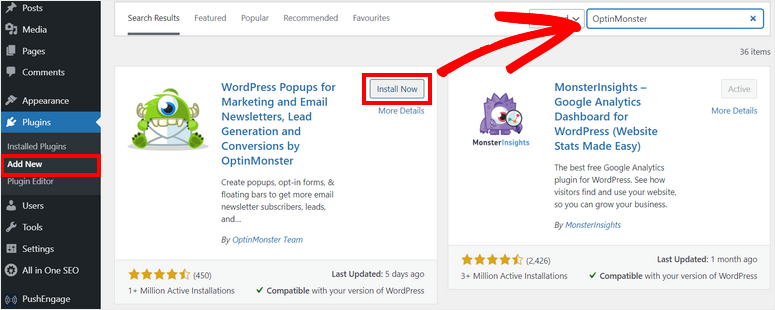
After you install and activate the OptinMonster plugin on your site, it will automatically launch a setup wizard to connect your account.
If you’re already signed in to your OptinMonster account in another tab, the plugin will auto-detect it and sync your website.
Now, you’re ready to create your first popup campaign to collect online reviews.
Step 2: Create a New Campaign
OptinMonster offers templates and a drag and drop builder to create beautiful popup campaigns.
Open the OptinMonster » Campaigns page on the WordPress dashboard. Then, click on the Create Your First Campaign button there.
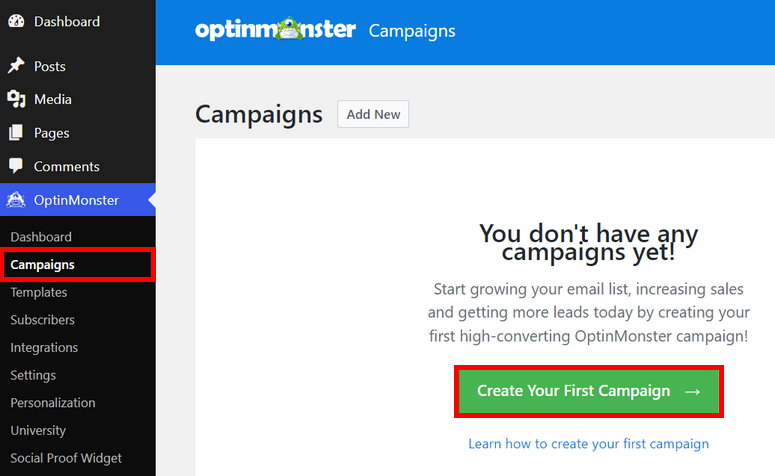
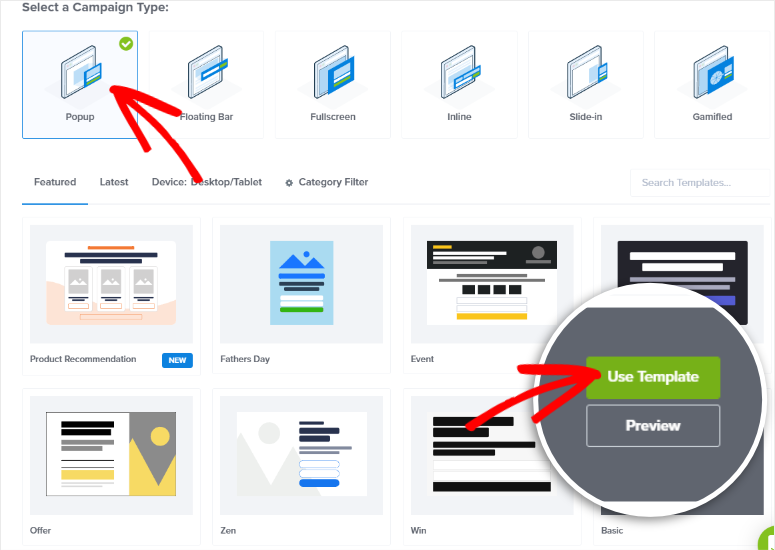
Next, you’ll get the option to choose the campaign type: Popup, Floating Bar, Fullscreen, Inline, Side-in, and Gamified.
For this tutorial, we’ll choose the Popup campaign. OptinMonster offers tons of pre-made templates so you can preview them and choose any one that you prefer.
Here, we’ll select the Basic template. Click on the Use Template button to get started.
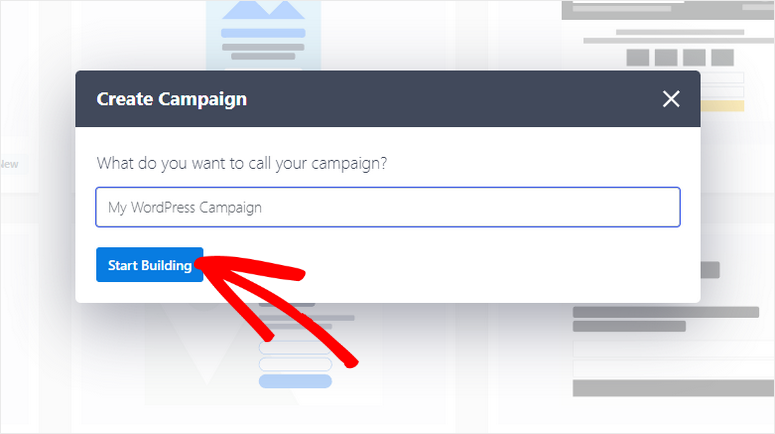
Then, you’ll have to enter a name for your campaign and click on the Start Building button. This will launch the OptinMonster campaign builder in the next window.
In the campaign builder, you’ll see the live preview on the right side of the page and the campaign blocks on the left side.
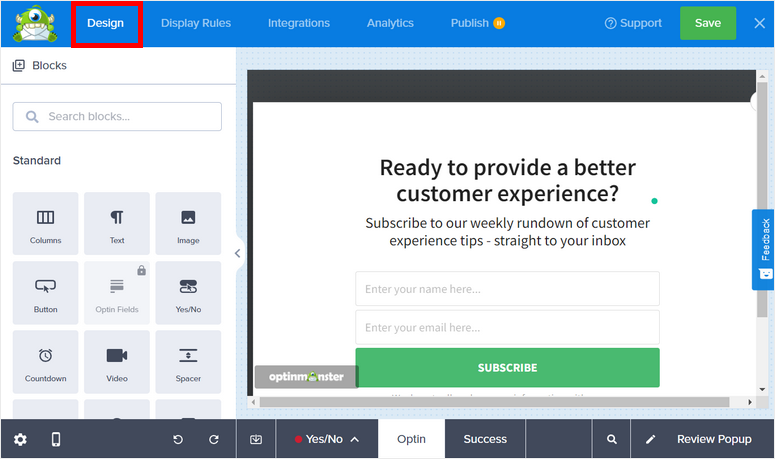
By default, there’s an optin form on the template.
Because we’re going to add our review form in this popup, you can remove the optin form by hovering over it and clicking on the trash icon.
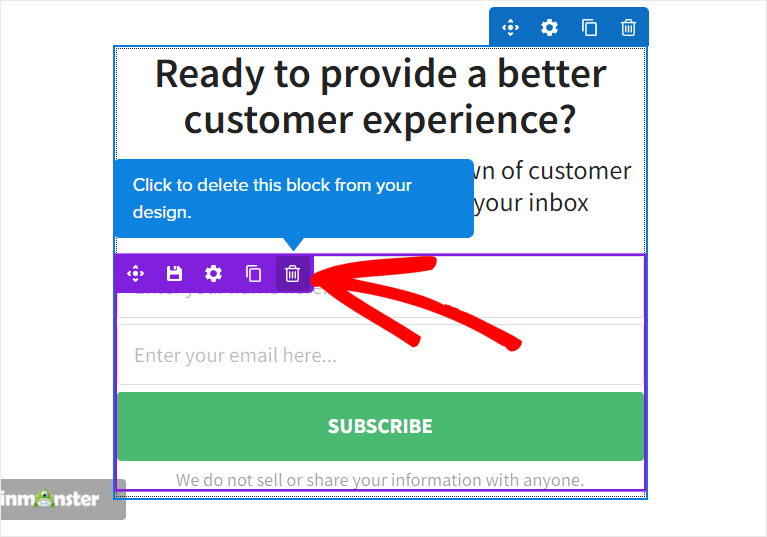
Then, you can edit the title text of the popup to match your review form. You can simply click on the field on the live preview to edit it.
You’ll also see other designs and advanced settings on the left menu.
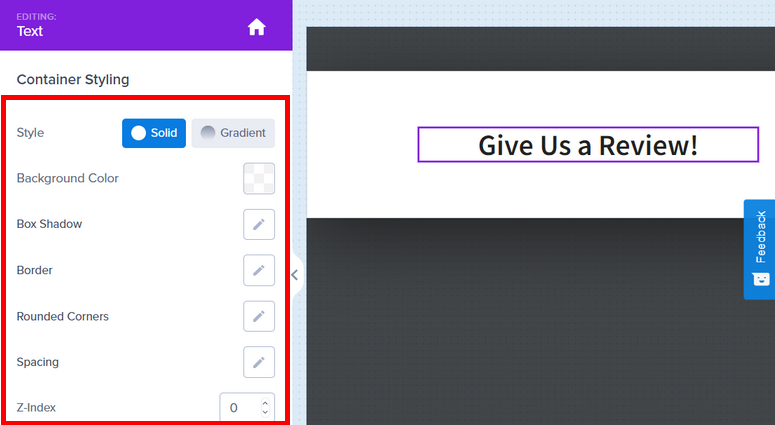
After you’re done, click on the Save button in the top-right corner of the builder.
Step 3: Add Your Review Form
Now, you can add your review form to your popup campaign. To do this, you’ll need to copy the shortcode of the review form you created in WPForms.
So, navigate to the WPForms » All Forms tab on your admin dashboard and open the review form. Then, click on the Embed button right next to Save.
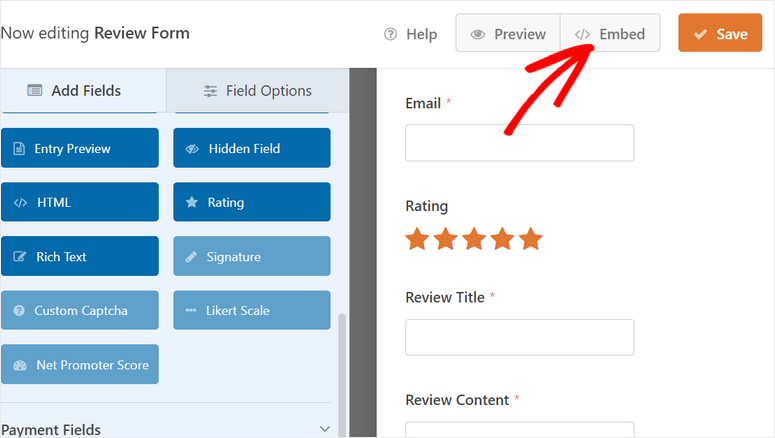
Now, you’ll see a popup to embed your form on an existing or new WordPress page. Below that, there is the ‘use a shortcode‘ option.
When you click on that, you’ll see the form shortcode so you can simply copy this.
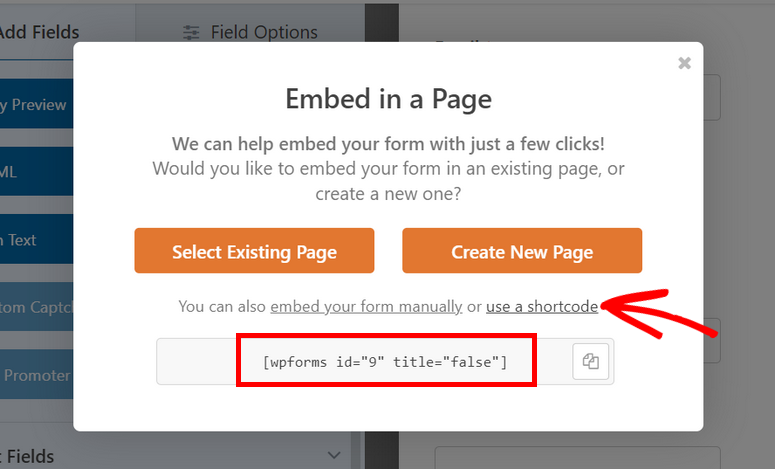
Now, head back to your OptinMonster campaign builder and insert the HTML field on your popup.
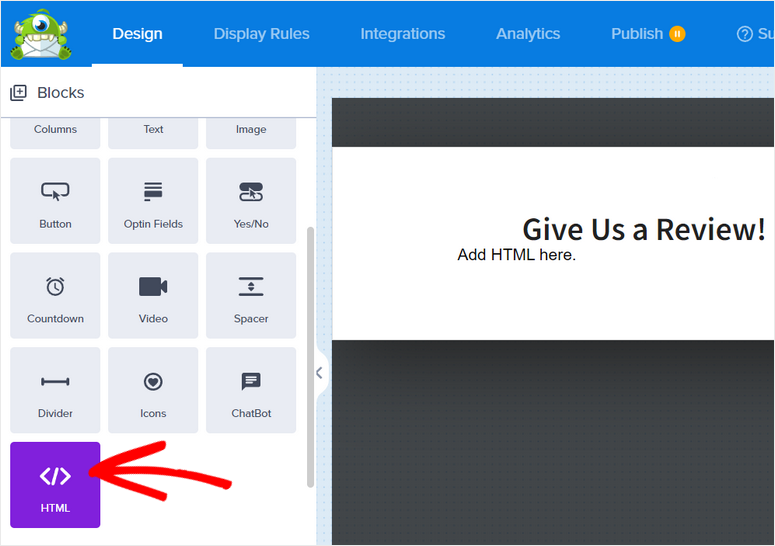
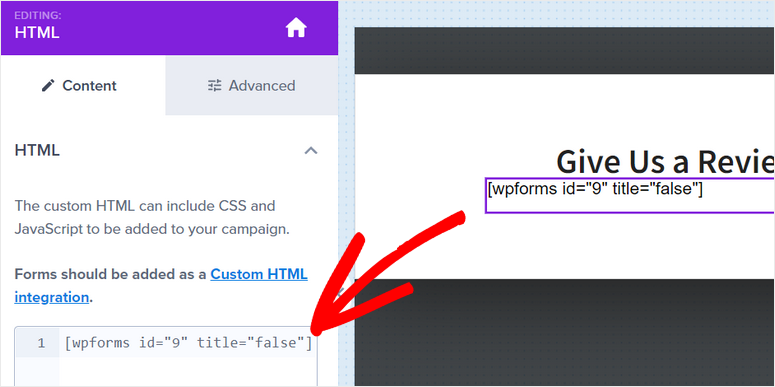
Select the HTML field to open the settings on the left. You’ll see an editor block with placeholder code. Simply remove that code and paste the form shortcode here.
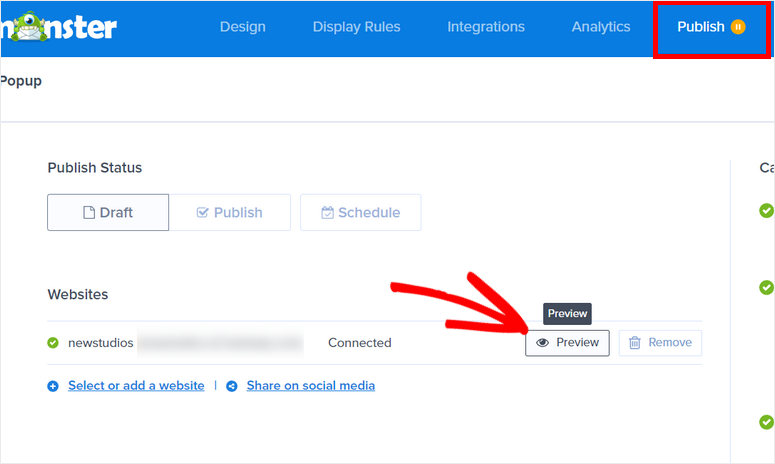
You’ll not be able to view the review form on the builder, but you can see how it will look by opening the Publish tab and clicking on the Preview button there.
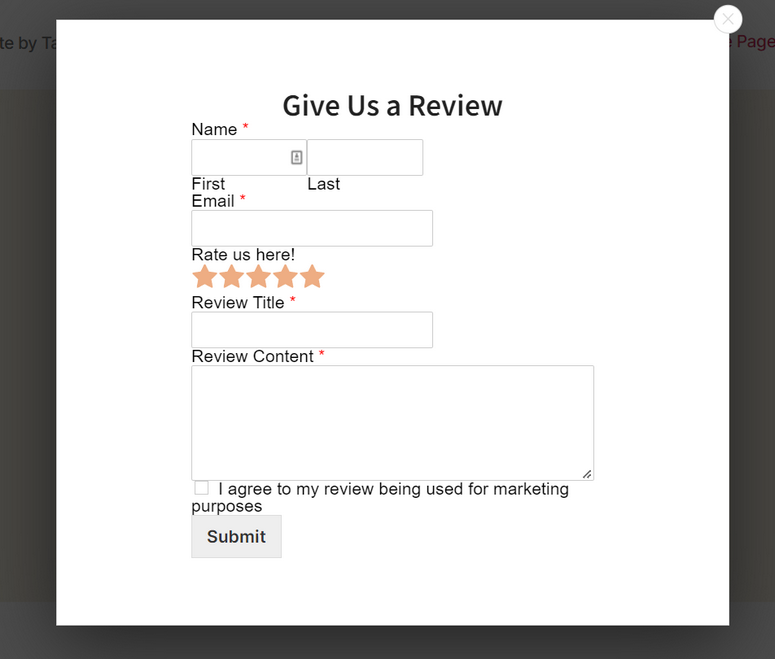
Your review form popup will look something like this.
Next, you’ll need to set up rules to choose where and how to display your review popup campaigns.
Step 4: Set Up Display Rules
OptinMonster offers tons of targeting options to help you generate more leads from your campaigns. You can use this to collect reviews from website visitors and customers.
All you have to do is select the rule you want and OptinMonster will take care of the rest.
For our tutorial, we’ll learn how to display our review popup in 2 steps using MonsterLinks™. With this, you can display the popup to the users when they click on a link, button, or image.
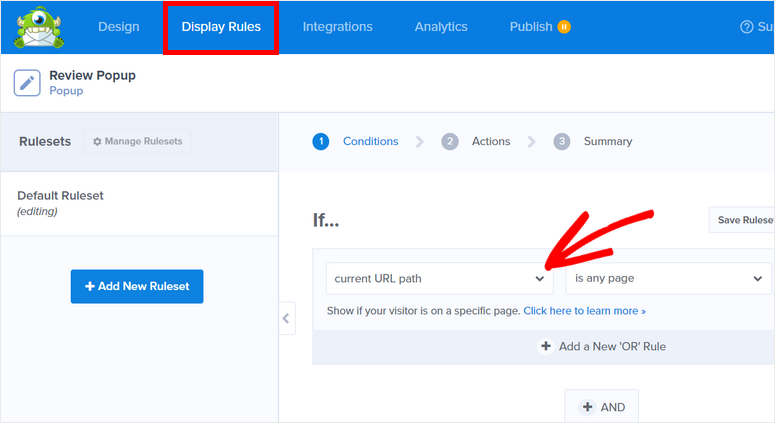
To add this rule, go to the Display Rules tab on the campaign builder and click on the current URL path drop-down menu from the If condition.
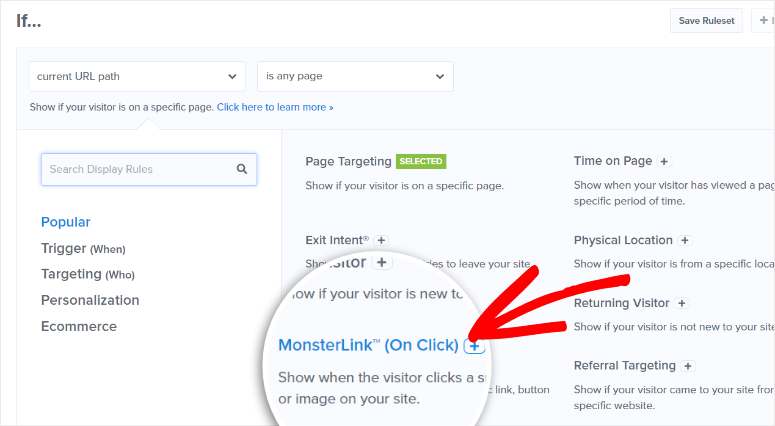
Then, you’ll see the list of display rules offered by OptinMonster. Here, you need to select the MonsterLinks™ (On Click) option.
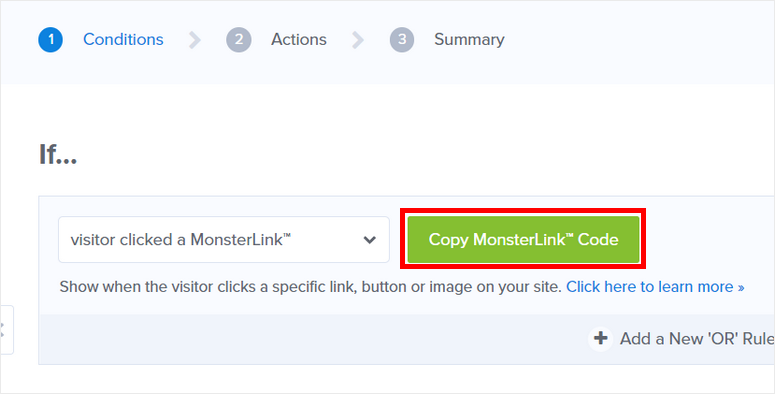
Now, you’ll see the Copy MonsterLinks™ Code button. Clicking on this button copies the code on your clipboard. You can paste the code to any page where you want to display the popup.
So if you want to display the review form popup on a page, simply edit the page and paste the code into the text editor.
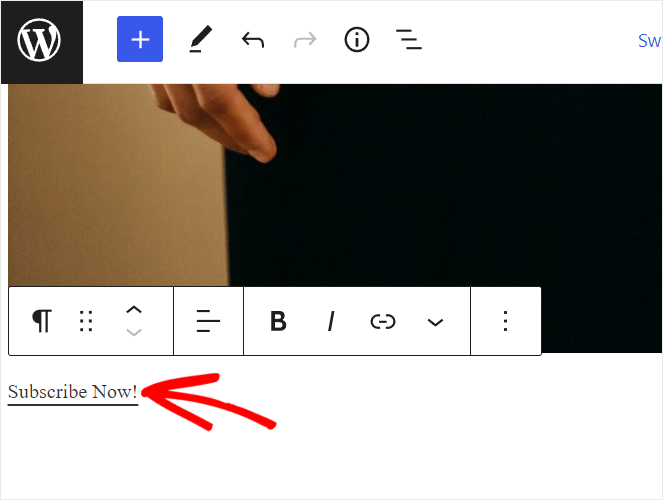
After you paste the code, you’ll see the default text link is “Subscribe Now!”. You can edit the link text and add a custom message.
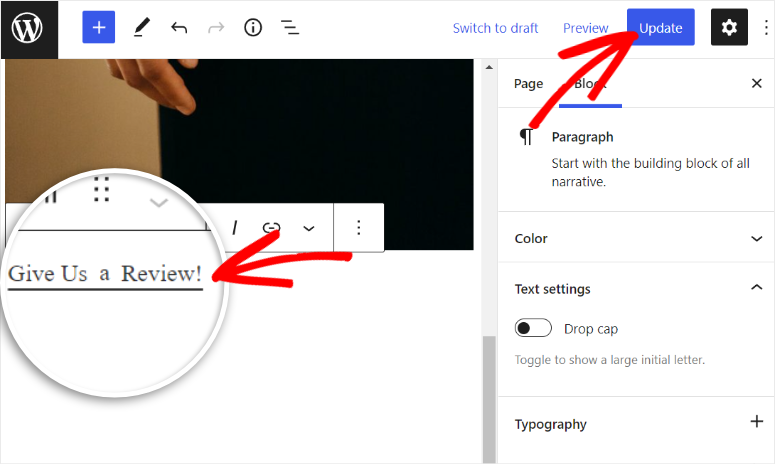
That’s it, all you have to do is update the page.
Step 5: Publish Review Popup
Go to the Publish tab from the top menu of the builder and you can see the status of your campaign as Draft. You need to click on the Publish button to activate the popup.
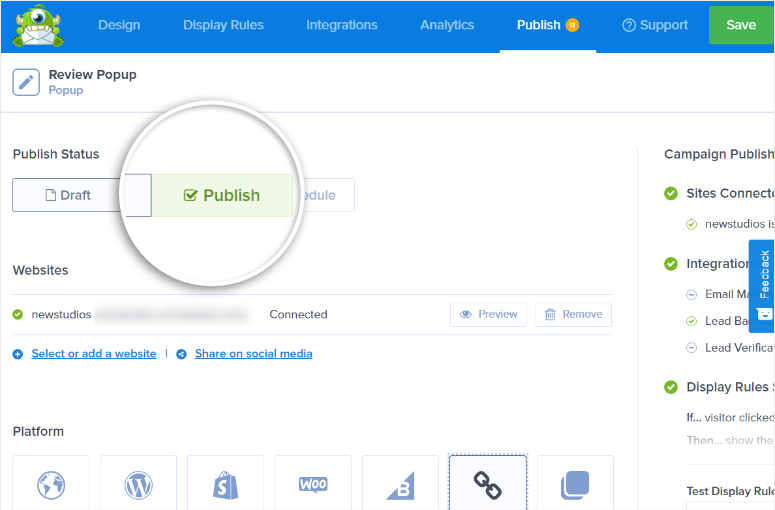
Now, your review popup will be visible to the users who click on the link you added earlier.
To get even more reviews from users, you can share your review form popup through social media and emails as well.
On the Publish tab, you’ll see the Share Link option. When you click on it, it creates a URL link to the popup campaign on your site. This is the URL to a separate page that only displays your campaigns and collects the information from users.
You also get the option to add the title and meta description for this standalone campaign page.
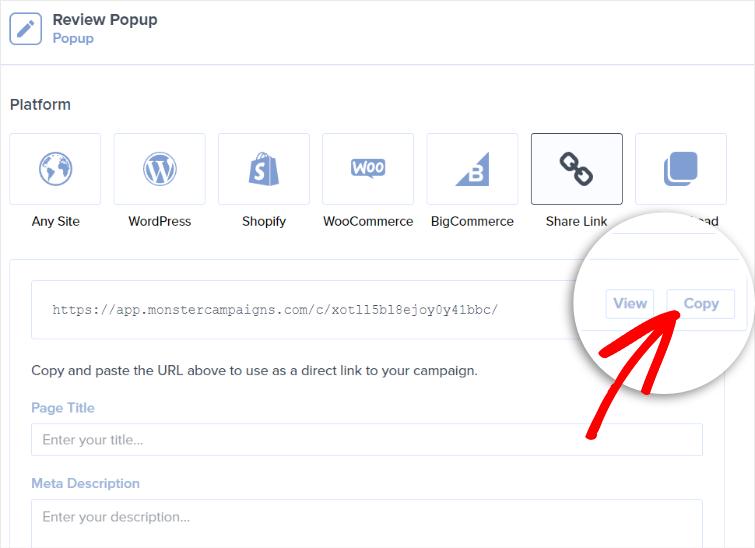
You can add this URL to your emails and social media posts so even users who are not browsing your site can leave a review for your business.
Next, we’ll show you how to get more online reviews for your business with the help of popup notifications.
Use TrustPulse to Get More People to Leave a Review
Popup notifications are on-site notifications that appear to the website visitors when they are browsing your site. You can use these notifications to show live sales on your site or ask users for reviews.
And the best tool for creating these popups is TrustPulse.

TrustPulse is the best social proof notification tool for all types of websites. It lets you add on-page notifications and action messages on your website to engage your visitors.
Once you install TrustPulse on your site, it automatically tracks user activities on your site like registrations, signups, purchases, and more. You can create non-intrusive popup notifications and display this data to the new site visitors.
When potential customers see other people taking action on your site, they’ll trust your brand more and want to take action too. This creates a FOMO (fear of missing out) effect. It helps to boost the credibility of your website and makes visitors trust your products.
At the same time, you can also use TrustPulse to show custom action messages. You can create popups that persuade happy customers to leave a review for your business.
Now, we’ll show you how to get more online reviews with these popups using TrustPulse.
Step 1: Create a New Campaign
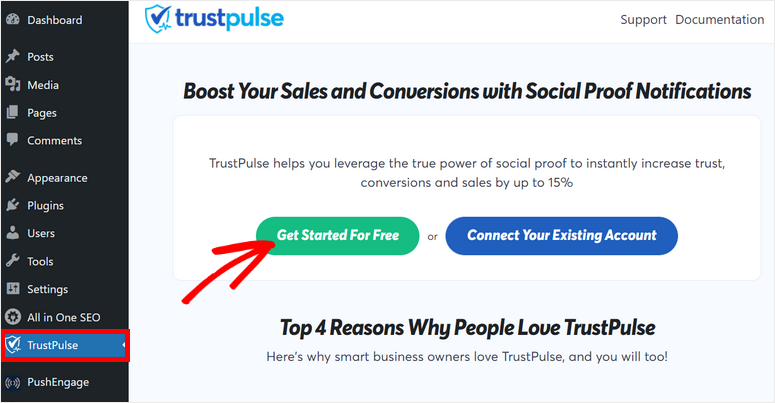
First, you need to install the TrustPulse plugin on your site. It is available free on the WordPress repository so, you can directly install it from your admin dashboard.
On the Plugins » Add New tab, search for the TrustPulse plugin and install and activate it.
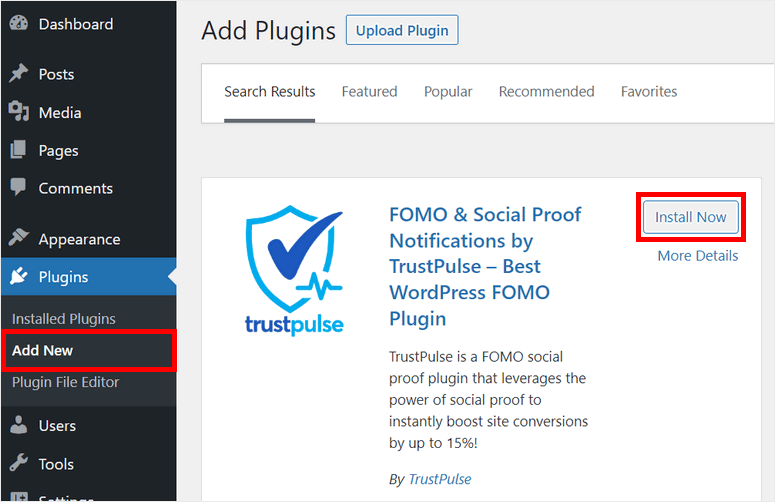
Then, you’ll need to connect your TrustPulse account with your site. If you haven’t created an account yet, you can click on the Get Started for Free button.
Step 2: Create a New Popup Notification
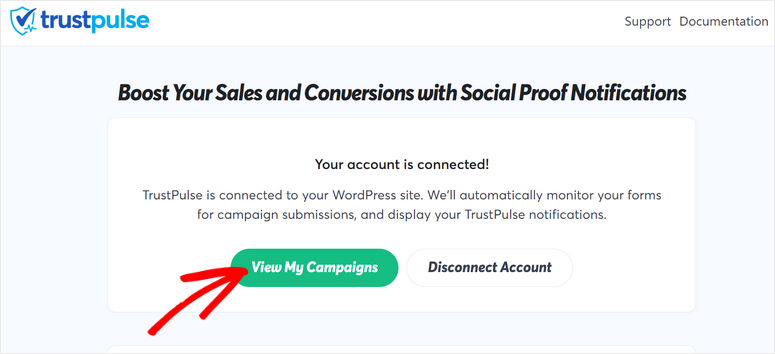
Once your TrustPulse account is connected, you’ll see the success message on your WordPress dashboard. To create a new popup notification, click on the View My Campaign option there.
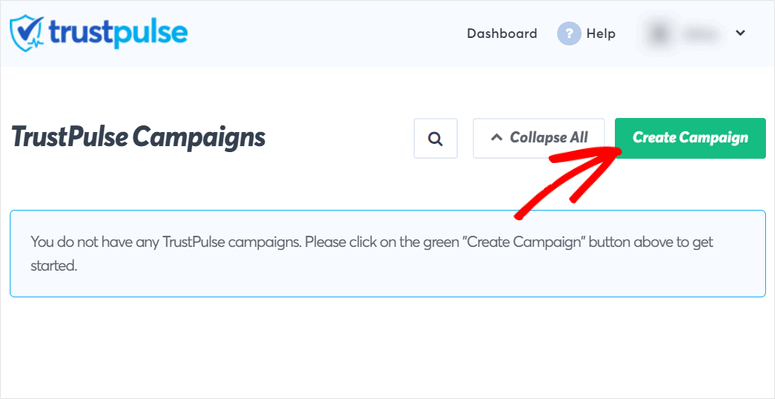
This will take you to your TrustPulse account dashboard. To get started, click on the Create Campaign button.
Now enter a name for your campaign, select your site, and select a campaign type.
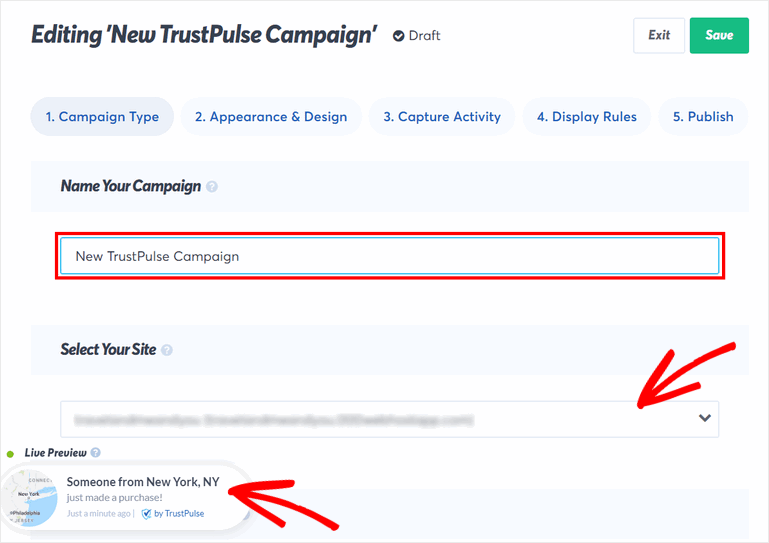
There are 4 options for creating campaigns for your site. They are:
- Recent Activity: Displays the live activities on your site like recent orders, registrations, form submission, and more. It shows a notification like “Someone just purchased new pair of shoes”.
- On-Fire: This shows the number of people taking action on your site in a given period. So, your visitors will see a notification like “150 people purchased new shoes in the last 24 hours”.
- Visitor Analytics: Showcases the page views on your site to increase conversions.
- Action Message: Static notifications with customized messages that trigger visitors to take action like sign up, grab a discount, give a review, and so on.
You can use the Recent Activity campaign to show a notification whenever a user submits a review on your site like this:

For this tutorial, we’re going to use the Action Message campaign. This way, you can create a popup notification with a custom message and ask users to leave a review for your business.
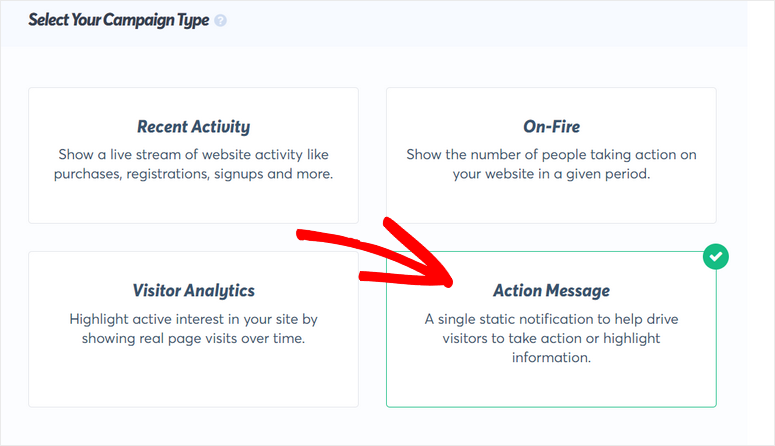
After you choose the campaign type, click on the Next Step button at the bottom of the campaign builder. Now, you can edit the notification message and design.
Step 3: Customize Your Review Notification
On the Appearance & Design tab, you can see all the options for customizing your popup notification.
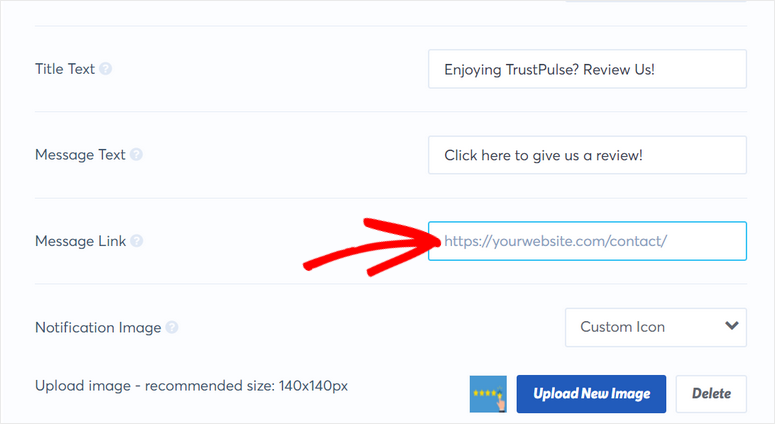
The default title text is “Hello! Thanks for visiting today!”. You can change the text to something like “Enjoying TrustPulse? Review Us!” to ask users to leave a review.
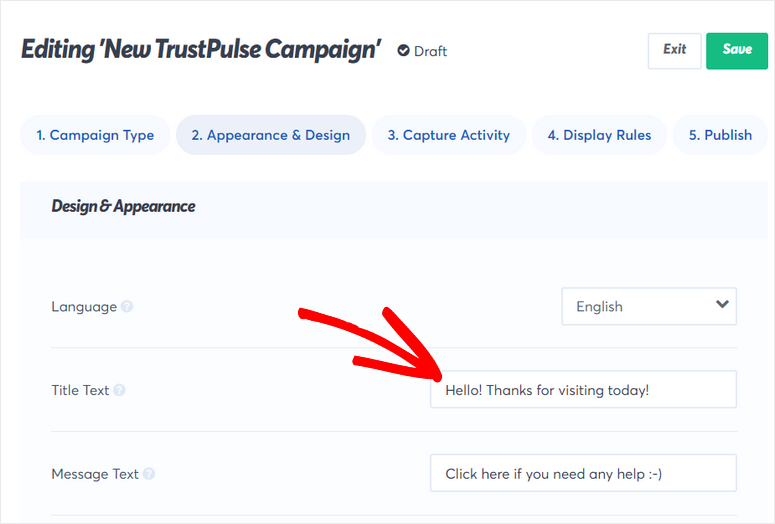
Most importantly, it gives you the option to add the message link to redirect your visitors to any page. So you can add the URL to the review from page that you created earlier with WPForms.
Aside from this, you can also add icon images, text colors, and font for your notification.
As you make your customizations, you can see the live preview of your notification on the bottom-left corner of the campaign builder.
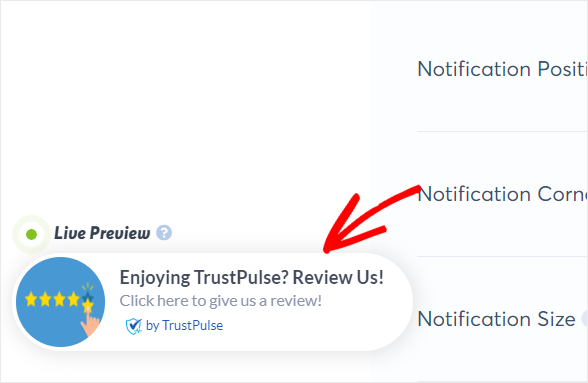
After you finish customizing the notification popup, you can click on the Next Step button at the end.
Now, you can set up display rules to control where and when this action message appears on your WordPress site.
Step 4: Set Up Popup Display Rules
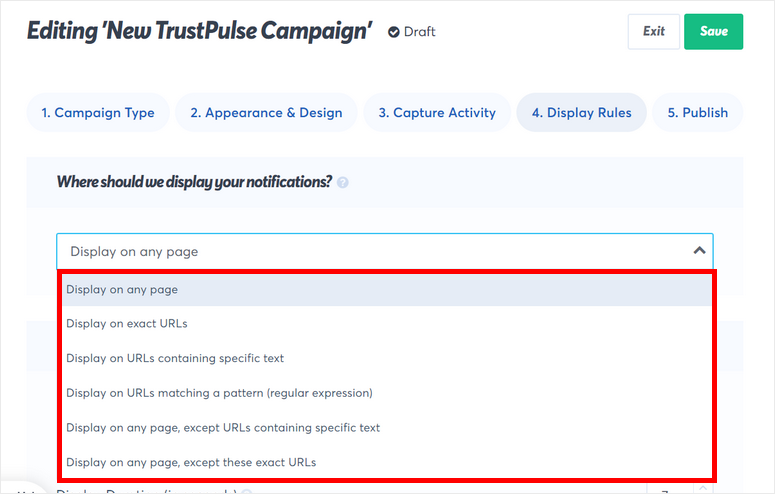
In the Display Rules tab, you can set up where you want to show your notifications. TrustPulse offers many display options so you can access them from the dropdown menu.
If you choose the Display on any page option, the notification will appear on every page or post of your website. If you want the users to leave a review for a particular product on your site, you can choose the Display on exact URLs option and add the URL of the product page there.
Next, you can configure other notification settings. There are options to set the amount of time to delay showing the notification, the display duration, and more.
You can also choose to enable or disable showing notifications on mobile devices.
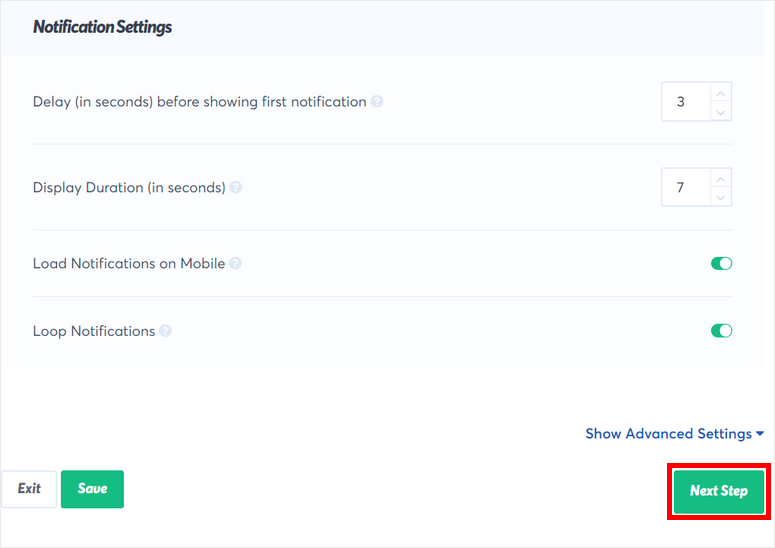
After you’re done, click on the Next Step button.
Step 5: Publish Your Review Popup Notification
Now, you need to publish your review popup notification on your WordPress site. If your site is already connected, you can simply click on the Launch your TrustPulse campaign button.
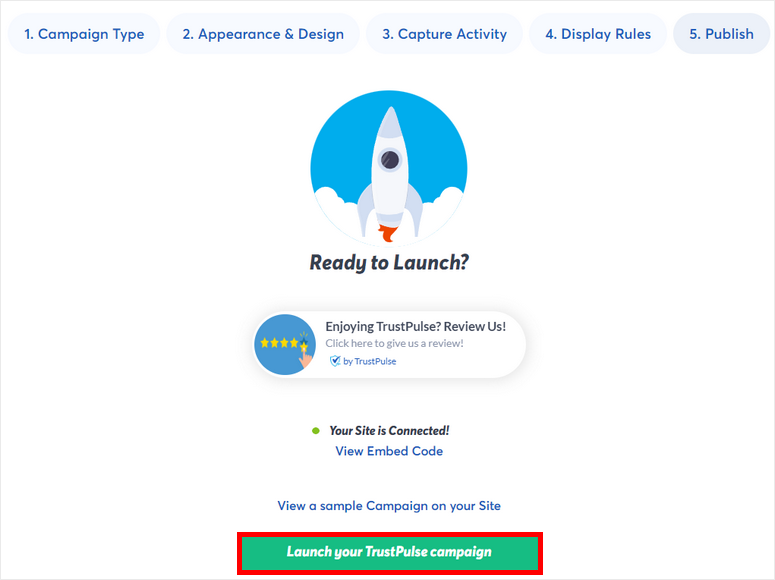
Once the campaign is active, your website visitors will be able to see the review popup on your site.
TrustPulse is a powerful tool and you can use it for much more than online reviews. You can create recent sales campaigns, live vistor stats, and more to influence purchasing decisions of new customers. Since you can’t be an in person salesperson online, TrustPulse will act on your behalf convincing customers to buy.
And there you have it! You’ve learned how to get more online reviews for your business using WPForms, OptinMonster, and TrustPulse.
With WPForms, you can easily create a review or testimonial form to collect user reviews on your WordPress site.
To gather more reviews, you can use OptinMonster and TrustPulse. These plugins will help you maximize the responses you get from customers.
If you want to send review requests via email to customers, check out Constant Contact. It’s the best email marketing service for business owners to run automated email campaigns. You can add a direct link to your review page to the email so customers can quickly fill out the review form. You can also offer incentives to get them to leave a review such as a discount on their next purchase.
That’s all for today! With that, you can now manage your online presence better and make reputation management much easier.
We hope this article helped you easily collect more online reviews on your WordPress site.
For your next steps, you can check these resources out:
- Best WordPress Banner Plugins
- How to Add Push Notifications to WordPress
- Best WordPress Survey Plugins
These posts will help you create banners and push notifications for your site to boost your conversion rates. The last post will help you collect user feedback about your products and brand.

Comments Leave a Reply