
Are you looking to add AdSense ads to your website?
One of the easiest ways to make money online is by selling ad space on your website or blog through AdSense.
AdSense is managed by Google and offers an extensive network of advertisers. This makes it a great way to make money online without worrying about sourcing publishers.
In this article, we will explore how to add AdSense ads to your site, increasing your earnings while sticking to Google’s policies.
How You Earn with AdSense
One way AdSense helps you make more money from your ad space is through its bidding system. With this module, companies compete to display their ads on different sites and blogs by making an offer. This means the highest bid often wins, resulting in better quality ads displayed and improved returns for you.
Google crawls and scans your site to detect what your site is about and what content you have. Armed with this information, AdSense displays ads most relevant to your audience.
There are 2 main ways you can earn money through AdSense.
- PPC (Pay Per Click): This method lets you get paid every time someone clicks on your ads.
- CPM(Cost Per Mille): With this method, you are paid per every 1000 impressions you get.
Even though the above are the two main ways to make money with your site and AdSense, you can also monetize your YouTube channel with Custom Search Ads. These allow you to get paid for displaying native ads on Google search results through your site or blog.
The good news is that you can earn from all the methods mentioned above at the same time, ensuring you maximize your returns.
But to ensure you actually increase your earnings, you need to place the ad space in the right location on your site. This is because the better placed they are, the more likely your visitors will view or click on them.
But, at the same time, you need to be careful to make sure the ads don’t overshadow your site content, as this can make your website look and feel spammy. The moment site visitors see too many ads, they can quickly get disinterested and leave your site.
With that said, let us walk you step by step through how to add Google AdSense ads to your WordPress website without bloating it up. These methods will also help you easily position your ads so as not to affect your SEO.
Manually Add AdSense Ads to your Site
Step 1: Set Up AdSense
The first thing you will do is go to the AdSense website and sign up by selecting the Get Started button.

You will then select the email address you want to sign up with from the list of Google accounts signed in to your computer, or you can add a new Gmail account.
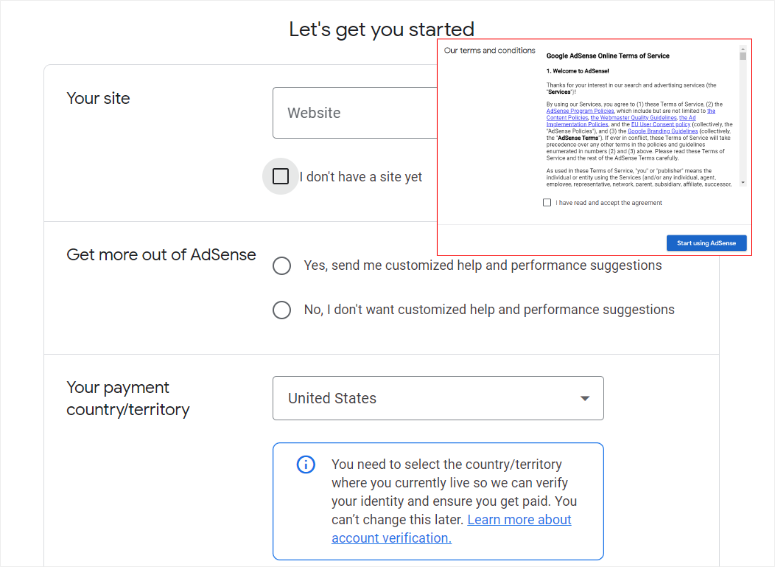
Next, you will fill out your website information and country, and then, you will mark the Terms and Conditions checkbox. Once you do this, select Start Using Adsense to proceed.
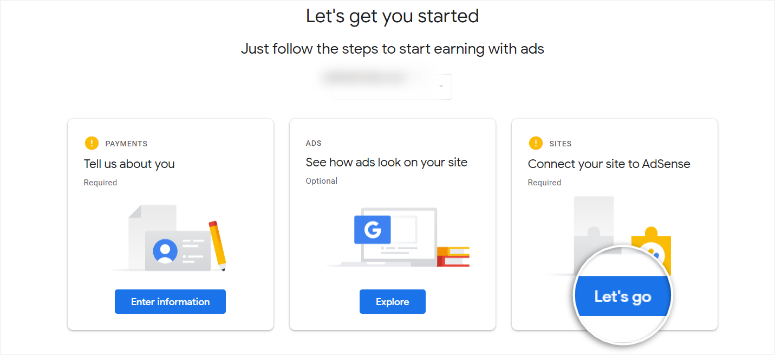
After that, you will be asked to offer more information about yourself, explore how AdSense ads will look on your site, or connect your site with AdSense.
For this tutorial, we will start by connecting the site to AdSense. To do this, select Let’s Go under the “Connect your site to AdSense” tab.
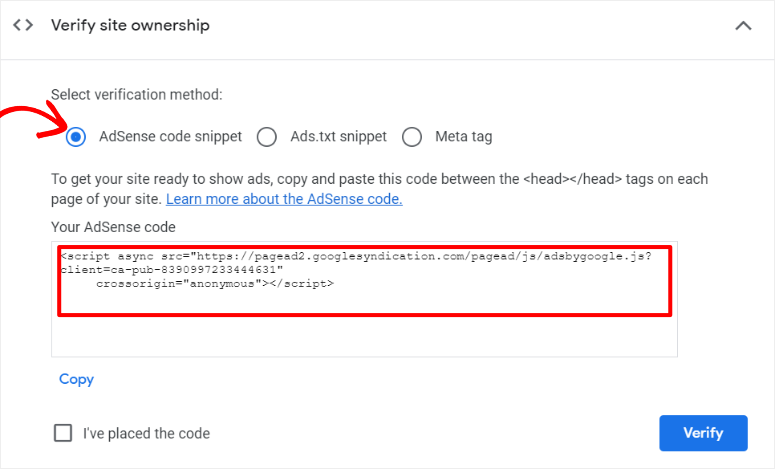
On the next page, you will see 3 ways you can verify that the site is yours to AdSense. These methods are through a code snippet, Ads.txt snippet, or a meta tag.
We will go with the “AdSense code snippet” method for this tutorial. So, to proceed, select this option and copy the code displayed.
With the code snippet copied, head back to your WordPress dashboard.
From the menu option, go to the Tools » Theme File Editor to edit your header or footer manually in 2024. Here you will select the theme you are using from the dropdown menu on the far right and then look for the “header.php” file.
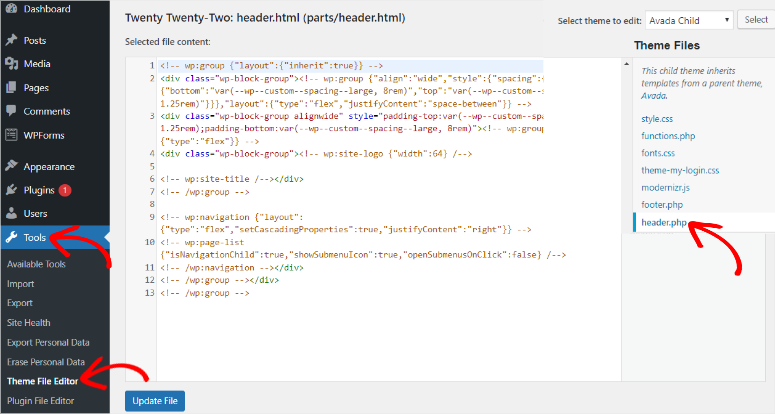
Then, on the editor box on the left, paste the code you copied earlier between the <head></head> tags of the theme header. Finally, select Update File to save challenges.
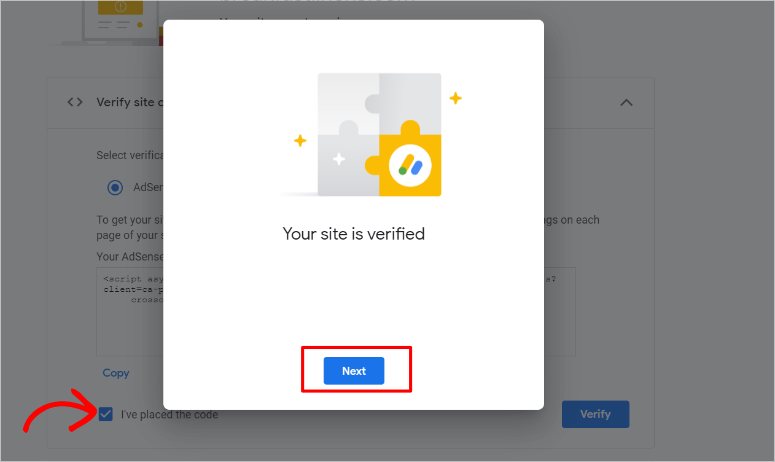
Once this is complete, head back to your AdSense account and check the box that says “I’ve placed the code,” and click “Next.”
AdSense will follow this by running a quick scan to see if you actually placed the code correctly. If you have, you will get a message stating that “Your site is verified.”
To proceed, select “Next.”
Finally, on the next page, select Request Review so that AdSense can see if you are a good fit for their program.
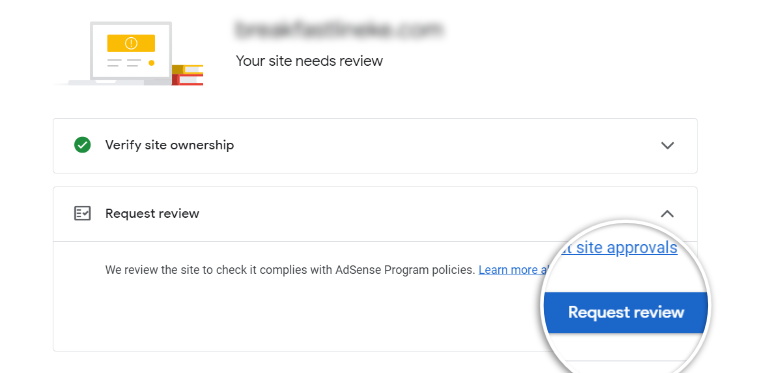
That’s it; you can now complete your application for a Google AdSense account.
Depending on how much backlog AdSense has to review, it can take anywhere from a few hours to a few weeks for them to check out your submission.
Use a Plugin to Help with AdSense Verification
As you have seen, adding the AdSense verification code can be a little tricky without coding experience.
To add to this, your WordPress layout may be a little different, depending on the theme you are using, making it even harder to find the different theme files.
To help with this you can use WPCode.
WPCode is the best WordPress code snippet plugin. It can help you add the AdSense verification code, or any other code for that matter in the footer or the header without coding experience.
To add to this, you can do this without needing to find the exact location within the site’s code to add the snippet, making it super easy even for beginners and bloggers.
For this tutorial, we will use the free version of this headers and footers plugin. While the premium versions have many amazing features, such as auto-insert snippets and scheduled snippets, the lite version can help you quickly add simple code snippets.
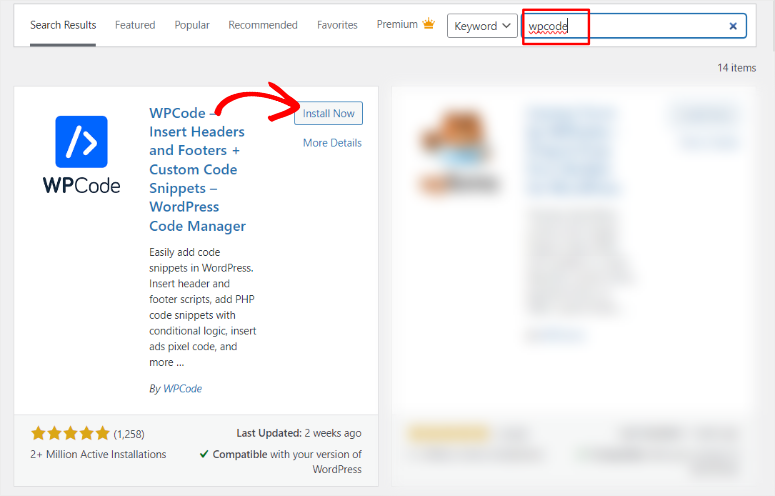
So to get started setting up WPCode, head over to your plugin repository in your WordPress dashboard to install it. The first thing you will do is find “WPCode” through the plugin search bar. Next, you will install and activate it like you would any other plugin.
If you need help, here is an article on how to install a plugin.
When you complete the installation and activation of the plugin, go to Code Snippets » Header & Footer. Then, on the code editor page, locate the Header section, which should be at the top.
Next, you will paste your AdSense verification code and select Save Changes.
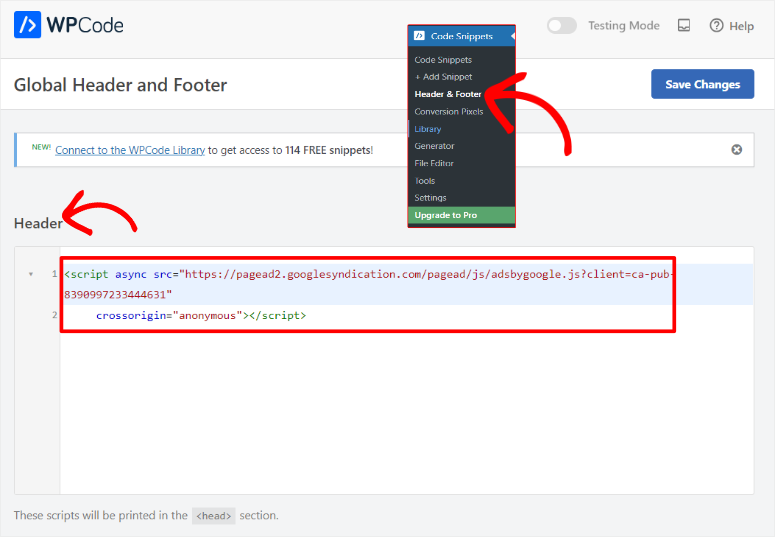
That’s it! You have completed the AdSense program verification process without coding experience or even without knowing where to find the header.php file.
To learn more about how this code snippet plugin can help you, check out our WPCode review here.
Step 2: Add the Code to your Site
Once Google AdSense accepts your request, you can then proceed to step 2 where you will first select the type of ads you want to run on your site.
In your Google AdSense account, go to Ads. Here, you will find 3 options: By Site, By Ad Unit, and by Global Settings.
Next, you will select the By Ad Unit tab, where you will see options to create a new ad unit. For this tutorial, we will go with Display Ads, the recommended way by AdSense.

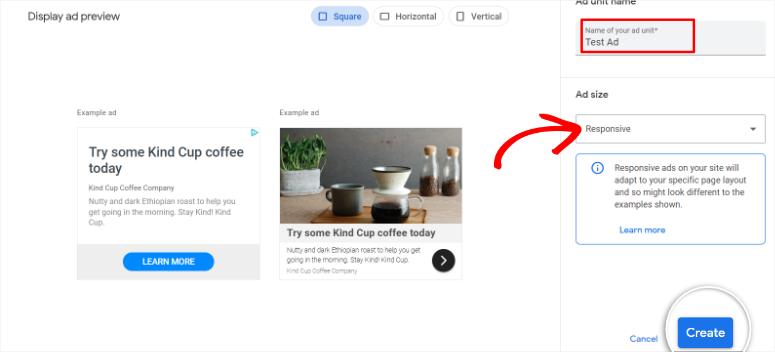
In the next screen, name your ad so that you can differentiate it from other ad units. This name is only for internal purposes and will not be displayed to your audience.
Then, from the Ad Size option, select if you want to use “Responsive” or “Fixed” ads.
With Fixed, you can state the exact dimensions of how you want the ad to appear. Due to this, the ad units are limited to where they can appear.
But if you go with Responsive, the ad unit will adjust its size depending on the location of the display. This ensures your ad can be placed anywhere on your page automatically. To add to this, if you select Responsive, you can see the preview of how the ad will appear in vertical, horizontal, or square ad spaces.
With everything set on this page, hit Create to move to the next page.
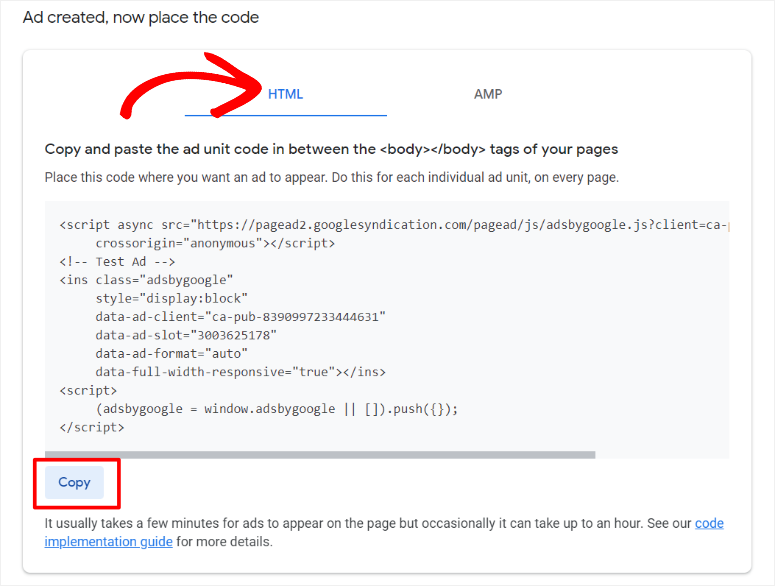
Once your ad is ready, you will proceed to the code generator page. Here, Google will create a special HTML code that contains a unique ad unit ID and your publisher ID. All you have to do on this window is copy this code.
With this code, you can place ads anywhere and display them only on the specific pages you want on your site.
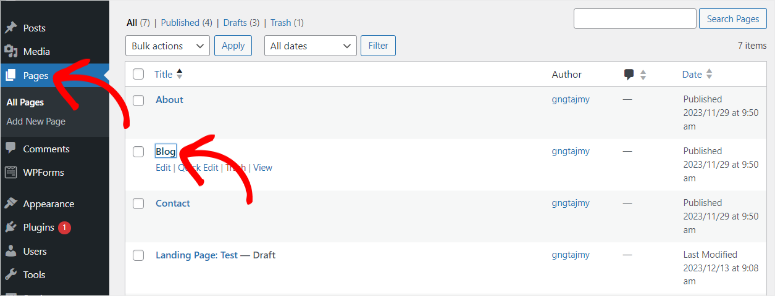
Next, move to your WordPress dashboard and go to Pages. Then, go to an existing page or create a new one where you want to display the ad.
For this tutorial, we will use the existing Blog page as an example.
Once the page opens, use the search bar to find the Custom HTML block. Next, drag and drop this block to where you would like to add the ad unit on the page.
When the custom HTML text box appears, paste the ad unit code you copied earlier to the widget space provided.
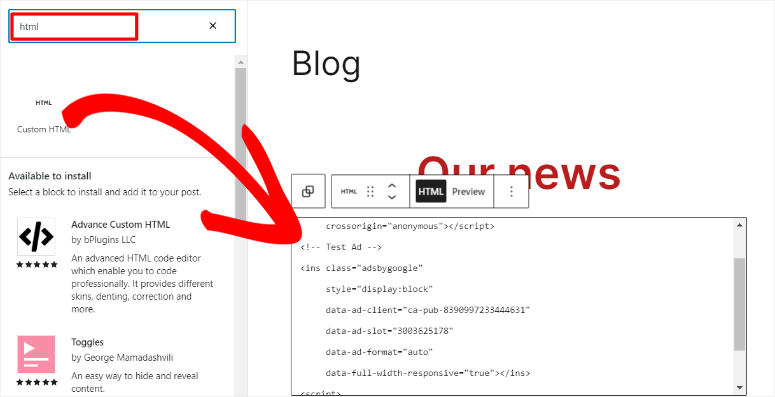
Finally, hit Update on the top right corner of the page. Ads from the Ad unit should appear in your header, footer, sidebar, or any other specified location on the page now.
Remember, this method only adds one ad unit at a time. To add new ads using this method, you will have to repeat this process again for each unit.
However, you can use an AdSense plugin such as AdSanity to help make the placement process easier.
Automatically Add AdSense Ads to your Site
If you want to automate your ads, you will first generate a single ad code in your AdSense account. This ensures the ads display everywhere on your site without you placing them manually by their individual codes.
To do this, go to your AdSense account and select Ads. But this time, go with the “By Site” tab.
Next, you will select Get Code.

Once again, AdSense will generate a special HTML code containing a unique ad unit ID and your publisher ID. Once you locate this code, copy it.
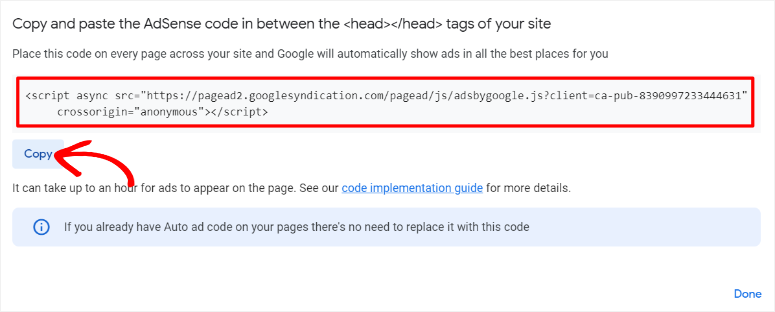
Now, there are 3 ways to add this automatic ad code to your site.
- Header tag
- WPCode plugin
- AdSanity plugin
Using the Header tag method is the default way of adding this code.
To use this method, you will paste the single ad code from your Adsense account between the <head></head> tag of every page you want the ads to display.
That’s it! You can now activate automatic ads without a plugin’s help.
But, using a manual method to add a header tag or code can present a few problems, as discussed earlier. For starters, it can be hard to find the exact location to place the code. But even worse, one wrong move and you could mess up your website’s entire coding.
Because of these limitations, WPCode is the perfect solution.
This plugin can help you place the automatic ad code to your header without you touching your site code. It can also help you quickly insert ad code in the right location without the risk of breaking your site.
To use WPCode, begin by going to your WordPress dashboard, and heading to the Code Snippets menu. Here you will select the Header & Footer menu like you did before.
In the header section of the plugin’s coding area, paste the Google AdSense code and Save Changes.

Congratulations! You can now display AdSense ads on your site automatically.
Google will handle everything else from here. It will show the best ads, using the best ad format in the best location on your site.
But with the 2 methods mentioned above, you have very little control over ad management, where they will appear, and how they appear.
So, Next, let us look at how you can use AdSanity to automate and manage your Adsense ads.

AdSanity is the best plugin to help you with auto ad management and optimization without interfering with your SEO. It is designed not only to help you streamline ad management but also with the placement and tracking of ads on WordPress websites.
You can use it to create templates that allow you to easily place your advanced ads quickly and uniformly across your site. This WordPress plugin can also help you schedule ad placement to ensure you better automate the whole process.
So, if you want to use Adsanity to automate your ads, you will first install and set up the plugin.
Once you do this, you will go to Adsanity » Create Ads » External Ad Network.
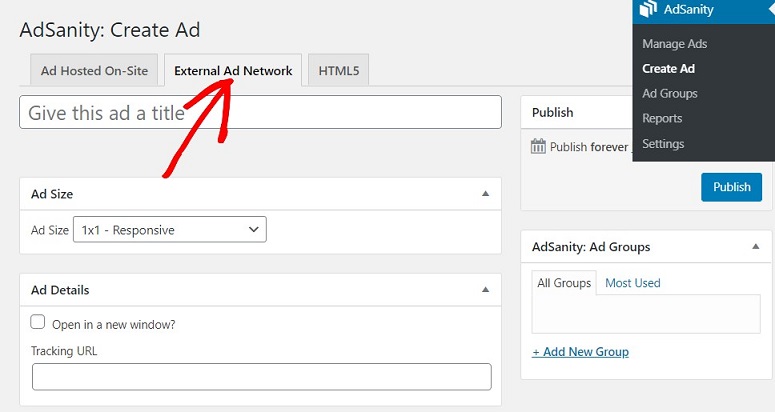
Here, you will name the ad and choose an ad size.
Then, you will scroll down the page to the “Ad Code” area. In the text box provided, paste the single ad code you copied earlier from your AdSense account.
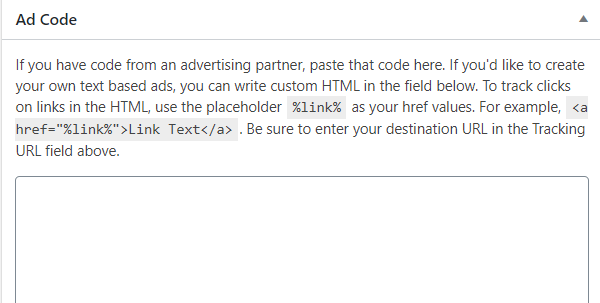
When you add the code, hit Publish to save changes.
Now, Adsanity allows you to display your ads in 3 different formats.
- AdSanity Ad Group
- AdSanity Random Ad
- AdSanity Single Ad
To access these ad formats, you will create a new post or edit an existing one. Then, you will use the search bar provided to locate the Adsanity ad block you want from the 3 available.
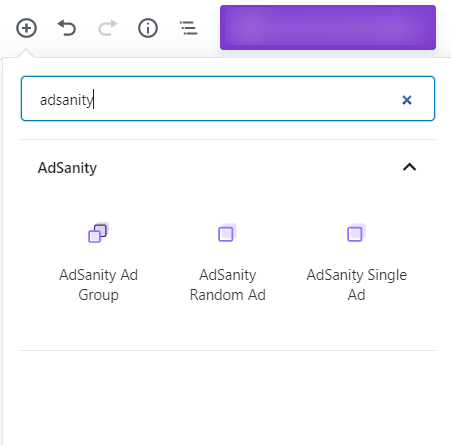
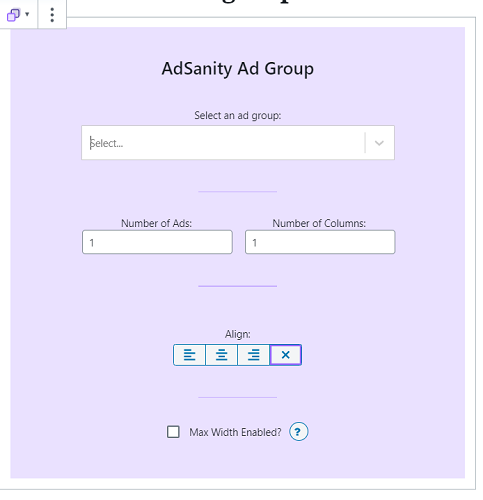
Once you select an ad format you can further customize it to suit your site and audience. For example, if you select Adsanity Ad Group, you will first choose the ad group you want to use.
Then, you will specify the number of ads you want to display, the number of columns, and the alignment. This can be helpful when you want to display different smaller ads together, helping you increase your revenue.
Apart from this, Adsanity also allows you to decide when the ad will expire or if you want it published forever. This can help you keep your ads fresh and give you better control over them.
If you want to learn more about this plugin, check out our complete review on Adsanity here.
Now that you understand how to add Google ads to your site, let’s look at a quick overview of what AdSense is and what it is all about.
What is Google AdSense?
AdSense is a network run by Google that can help you make money online by showing text, video, images, and interactive ads to your audience.
Since AdSense is owned and run by Google, a global tech leader, you will get to display ads from some of the best-known companies in the world.
Google vets all companies before adding them to their roster, meaning you are more likely to get better contextual ads ideal for your niche, fetching better returns.
Because of Google’s vetting process, AdSense can also help you safeguard your brand. This is because, only respected publishers will display ads on your site, meaning your users will not be shown shady or inappropriate ads.
If you use AdSense, you remove the problems of finding ad publishers for your site. Instead, Google will take care of all the financial aspects for you. They will then automatically take their cut and send you the rest, making the process easy and quick.
However, apart from the bids placed by companies vying for ad space, the amount of money you earn on AdSense depends on several factors.
- Niche: More competitive subjects often lead to higher bids and, therefore, better returns.
- Traffic: the more your traffic, the more potential ad clicks and views per a thousand impressions you get.
- Ad placement: Placing your ads in a more prominent location on your site increases the chances of clicks and views.
- Location: advertisers often pay a better rate for ads targeting a particular location in line with who they are targeting.
- Ad format: AdSense offers different formats, such as text, images, and video. Depending on your type of content, you may see better results depending on the ad type.
- Ad relevance: Google focuses on contextual ads; therefore, the more relevant the ads are, the more likely they will get clicks and views.
Even though Google AdSense is popular because of how flexible they are to you and your audience, you should still follow Google’s ad policies. Here are things to avoid when using AdSense.
- Deceptive ad placement: Ensure you clearly separate your content and ads so your audience is not confused or misled
- Fake clicks: You should never click on your ads yourself, ask some people to click on them, or pay for your ads to be clicked.
- Auto ads Refresh: Google may also term auto-refresh ads intrusive or fake.
- Ad blockers message: Some sites may block users from seeing their content if they have an ad blocker. Google discourages site ad blocker warnings as they may lead to a poor user experience.
- Number of ads: Do not place too many ads on your site; Google will term this as spamming.
- Intrusive ads: You may be penalized if you force your audience to view or click on your ads, especially with popup or slide-in ads.
That’s it! Now you know how to place AdSense ads manually and automatically. Plus you also have a clear understanding of what AdSense is and what to expect from them. If you have any more questions check out our FAQs below.
FAQs: How to Add Google AdSense Ads to WordPress
How much does AdSense pay per 1,000 views?
Adsense pay per 100 views ranges from $0.1 to $2.5. There are many reasons for the big difference in pay, top of which include location, niche, and time spent on your website.
How do I receive money from AdSense?
AdSense sends out payments to website owners once a month via wire transfer to their bank accounts. But, you will first provide your bank details and go through a bank account verification process so you can access payment by AdSense.
Does AdSense money expire?
AdSense checks expire after six months. They will place a stop payment, and a line that states ‘Check Expired – Earnings credited back’ will appear on your payment history page.
Which niches pay the most with AdSense?
The highest-paying niches with AdSense include insurance, personal finance, real estate, and the auto industry. This is because they are highly competitive spaces. So companies will need to spend more and compete with other companies to get noticed in ads, raising the pay in the niches.
Finally, if you are looking for other ways to make money with your site, here are 9 of the best Google AdSense alternatives you can check out. To add to that, here are other articles you may be interested in.
- How to Submit Your WordPress Site to Google News
- Affiliate Marketing Made Simple for Beginners: Step by Step
- 8 Best WordPress Banner Plugins to Boost Conversions
The first article will teach you how to submit your site to Google News to increase your visitor numbers. The second one simplifies affiliate marketing, which is a great alternative way to make money on your site other than displaying ads. While the last post lists the 8 best banner plugins to help boost conversions.

Hi, I have different question
Can I scroll my website for checking
if there is adsense ads or it will cause invalid activity? If so. how can I check? my website?
Hey Sami, can you please elaborate on your question? What do you mean by scrolling on your own website for checking Google AdSense?
thank you for an informative guide. I have created a blog and want to monetize with Google Adsense. Your guide helps me a lot
Glad to be of help 🙂