
I used to spend entire weekends managing product attribute SEO.
Every time my client added new colors or sizes to their WooCommerce store, I had to manually configure SEO settings for each one. Title tags, meta descriptions, robots settings – all done individually.
For a store with 200 products and 8 attributes per product, that’s over 1,600 pages to optimize. My solution was to automate some of the on-page SEO with AI.
But with so many eCommerce pages, it can be overwhelming.
In the end, it was exhausting.
Then AIOSEO released version 4.7.8, and everything changed. Now I can set up attribute SEO once and apply it across the entire store.
Plus, I can track which attributes actually rank without paying for expensive tools.
In this guide, I’ll show you exactly how to:
- Automate product attribute SEO with global settings
- Include attributes in your XML sitemap automatically
- Export and import settings for multiple stores
- Track attribute rankings without extra tools
Plus, use the table of contents below to skip to any section of this article you want to read.
- What You'll Need Before We Start
- What We'll Accomplish in This Tutorial
- The Old Way vs. The New Way of Managing WooCommerce Product Attributes
- How I Manage WooCommerce Product Attributes at Scale
- Common Mistakes to Avoid with Product Attributes
- Quick Recap: Your Action Plan
- FAQs: About Managing WooCommerce Product Attributes
Let’s get started.
What You’ll Need Before We Start
Before we dive in, make sure you have these ready:
- WordPress site with WooCommerce installed – Your store should be up and running
- AIOSEO Pro plugin – Version 4.7.8 or higher (the free version doesn’t include these features)
- Google Search Console connected – You’ll need this for importing keyword data
- Admin access to your WordPress dashboard – You’ll be changing plugin settings
Time estimate: 20-30 minutes for complete setup
Skill level: Beginner-friendly – I’ll walk you through every click
Most of the work is one-time setup. After that, your attribute SEO runs on autopilot.
What We’ll Accomplish in This Tutorial
By the end of this guide, you’ll have a complete system for managing WooCommerce product attribute SEO at scale.
Here’s what you’ll set up:
- Global SEO settings that automatically apply to all product attributes (no more repetitive work)
- XML sitemap inclusion so Google finds and indexes your attribute pages faster
- Export/import capability for managing multiple stores or backing up your settings
- Built-in rank tracking to see which attributes drive traffic without paying for separate tools
The result? Hours saved every week and better rankings for your attribute pages. On top of that, you’ll manage hundreds of attribute pages as easily as managing one.
The Old Way vs. The New Way of Managing WooCommerce Product Attributes
Let me show you exactly what’s changed.
Traditional Way:
In the past, I had to configure SEO settings for each product attribute individually.
To do this, I would open the attribute section in my WooCommerce settings, write a title, add a meta description, and set robots meta settings. Then repeat for the next attribute. And the next. And the next.
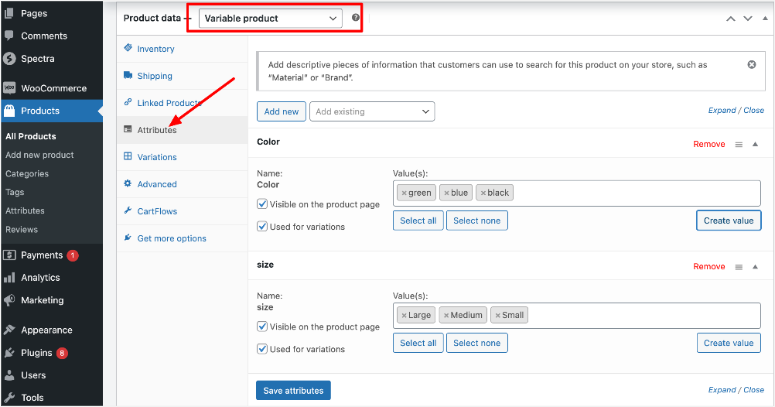
For a store with 50 attributes, that’s 50 separate configurations. The worst part is that any changes meant updating all 50 manually.
On top of that, tracking which attributes ranked required expensive tools like SEMrush or Ahrefs. That’s $99+ per month just to see what’s working.
With AIOSEO Pro:
One global setting controls all attributes. All I have to do now is change my title template once, and it updates everywhere instantly. Need to track rankings? It’s built right into your WordPress dashboard.
Here’s the difference:
- Time to optimize 50 attributes: 4 hours → 15 minutes
- Monthly rank tracking cost: $99 → $0
- Consistency across attributes: Hit or miss → 100%
The time and cost savings are massive.
How I Manage WooCommerce Product Attributes at Scale
While using WooCommerce attribute settings to optimize each product manually is fine for a small store, as you grow, you need a more consistent solution.
And that is what I will walk you through today.
Step 1: Set Up Global Product Attribute Settings
Estimated time: 10 minutes | Automates SEO for ALL your attributes
First, you will need to purchase the All in One SEO plugin from their website. They offer four plans, so pick one that suits your needs. After that, you will need to install and activate the AIOSEO plugin.
If you face any issues here, check out my post on how to install plugins. After this, you will also need to activate the Pro plan using the License Key. Once done, use the wizard to complete the setup process.
If you face any issues, here is my guide on how to set up AIOSEO.
Once this SEO plugin is ready, you can now use one setting to affect every product attribute on your store.
Here’s exactly what to do:
First, navigate to AIOSEO » Search Appearance in your WordPress dashboard. Then click the Product Attributes tab at the top.
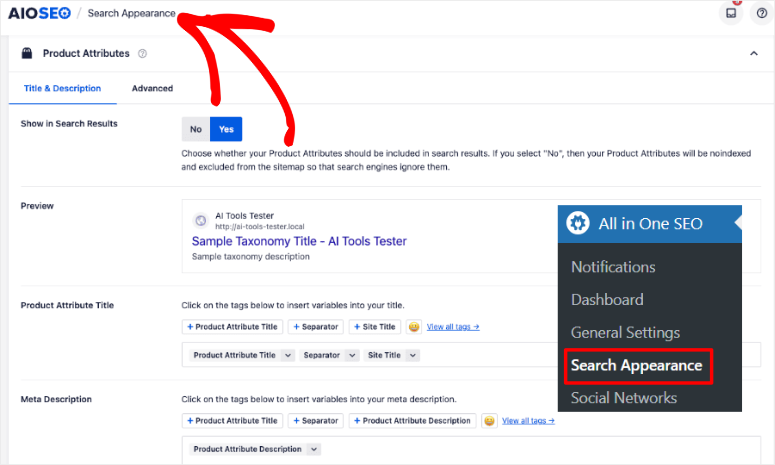
Then on the next screen, you’ll see the global settings panel. This is your control center for all attribute SEO. Now, All in One SEO uses tags to help you automate your metadata.
For example, {{Product Attribute Title}} grabs the actual attribute name, while {{site_name}} pulls your site’s title.
As a result, you write the template once using these tags, and AIOSEO fills in the specific details for each attribute page automatically.
Let me show you exactly how this works with screenshots to drive the point home.
Set up your SEO title template:
Go to the “Product Attribute Title” section and select one of the tags in display or click on See All Tags to open all your options.
Here you will see tag options like Site Title, Separator, Product Attribute Title, and many more.
Plus, you can also combine these dynamic content tags with your own wording to make it sound better. For example, you can have something like.
Shop for {{Product Attribute Title}} {{Separator}} {{site_name}}
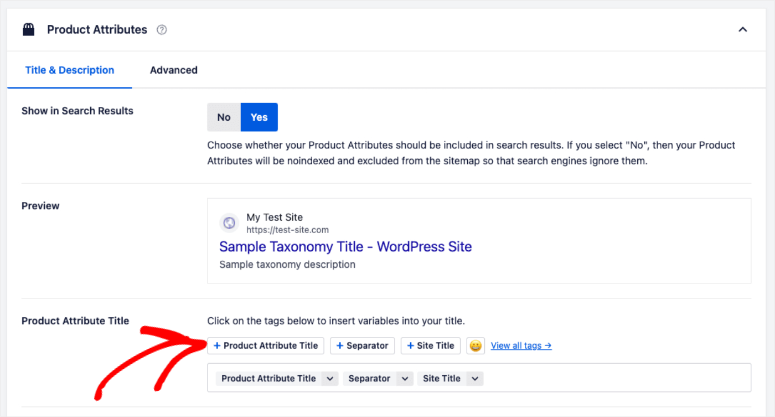
So this will read like “Shop for Product Attribute Title > Site Name.” Assuming the site name is IsItWP and the Product name is AIOSEO Plugin. The full Product Attribute Title would be:
"Shop for AIOSEO Plugin > IsItWP.com"
As you can see, the variables automatically fill in for each attribute. You no longer need to manually change the product meta title after this.
Create your meta description template:
The meta description product attribute settings work the same way. All you have to do is click the “Meta Description” field. You can create something like
{{Product Attribute Name}} {{Separator}}{{Product Attribute Description}} items with fast shipping.

Remember, keep it under 160 characters so it doesn’t get cut off in search results.
Check out the GIF below to see the AIOSEO WooCommerce Product Attribute feature working at full flow.
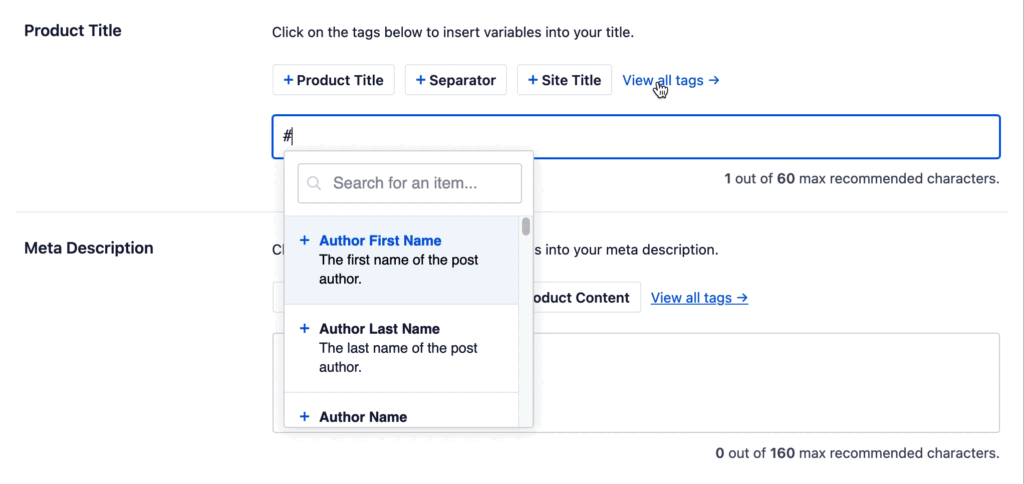
Plus, here is a screenshot of how your All in One SEO Product Attribute page should look after setup.
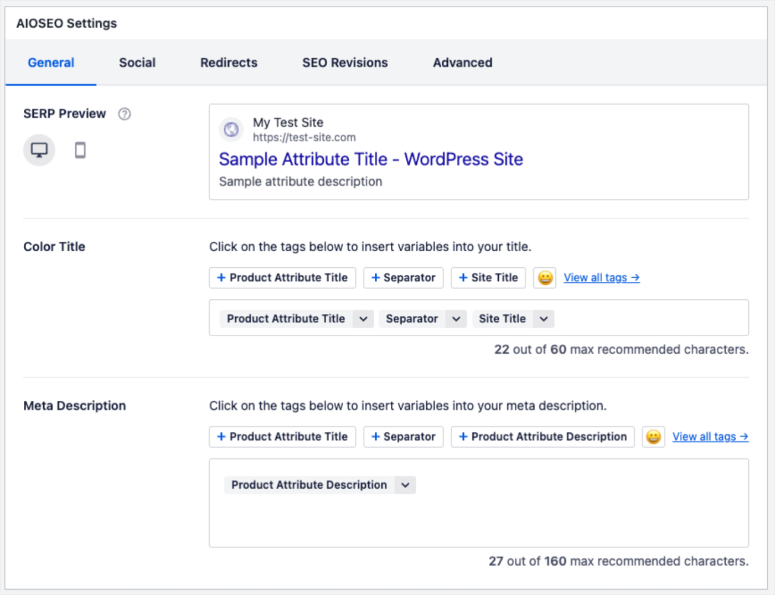
Configure robots meta settings:
Please, do not skip this step as it is important.
Next, still in your AIOSEO » Search Appearance go to the “Advanced” tab. Then, use the “Robots Meta Settings” toggle button to activate these settings.
Alternatively, you can switch it off and manually use checkboxes to turn on what you want.
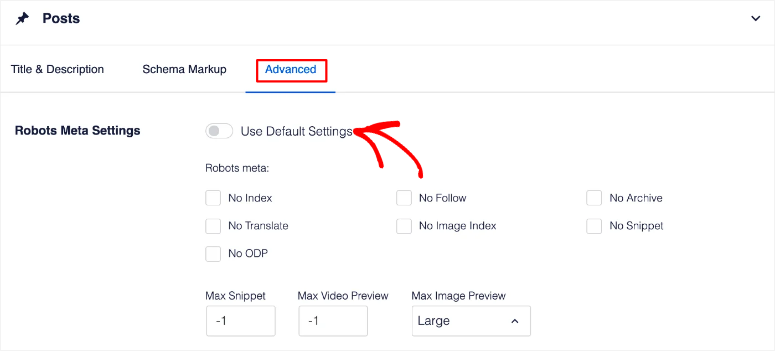
Finally, hit the “Save Changes” button at the top right. And just like that, you have automated your product attributes for WooCommerce.
👀 Quick Check: Visit any product attribute page on your site. Then, right-click and select “View Page Source.” After this search for your title template. You should see it in the <title> tag with the attribute name filled in.
⚠️Pro Tip: Start with one template and test it on a few attributes first. You can always come back and refine it later based on what ranks best.
Step 2: Add Attributes to Your XML Sitemap
Estimated time: 5 minutes | Helps Google find your attribute pages faster
Normally, submitting your sitemap to Google Search Console requires a few steps.
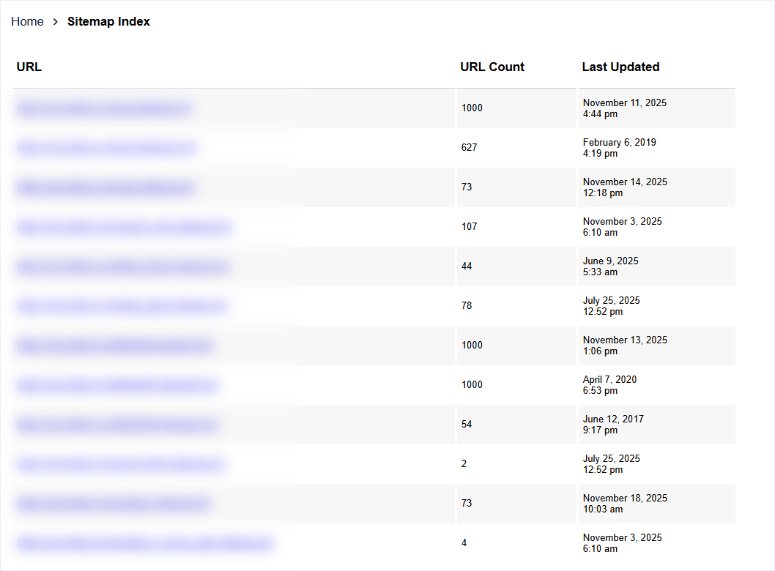
First, you’d need to find your sitemap. To do this, go to your browser and type: yourdomain.com/sitemap.xml (replace “yourdomain.com” with your actual domain).
This opens your main sitemap page. Look for a line that says “productattribute-sitemap.xml” in the list and click it.
You should see all your product attributes listed with their URLs. This confirms your attributes are in the sitemap.
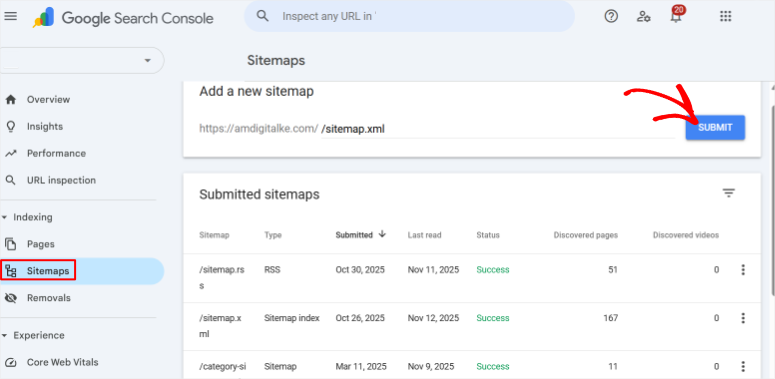
Next, head over to Google Search Console and navigate to Sitemaps in the left menu. Paste your sitemap URL (yourdomain.com/sitemap.xml) into the field and click Submit.
The AIOSEO Way – Automatic and Much Easier
AIOSEO handles sitemap submission automatically once connected to Google Search Console through its setup wizard.
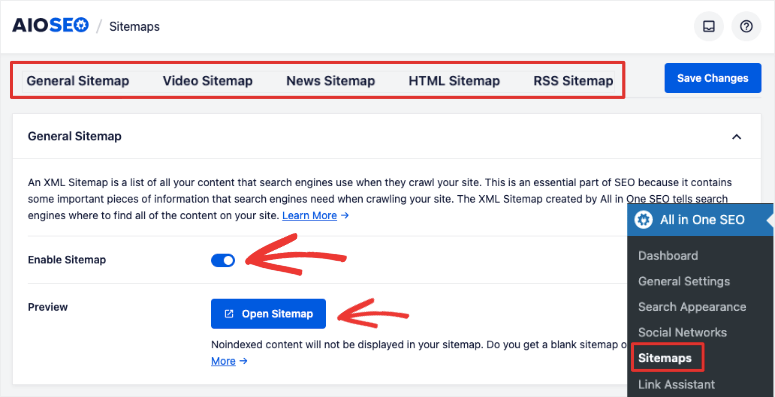
All you have to do is navigate to AIOSEO » Sitemaps in your WordPress dashboard and select the General Sitemap tab at the top.
On this page, “Enable Sitemap” with the toggle button, and that’s it!
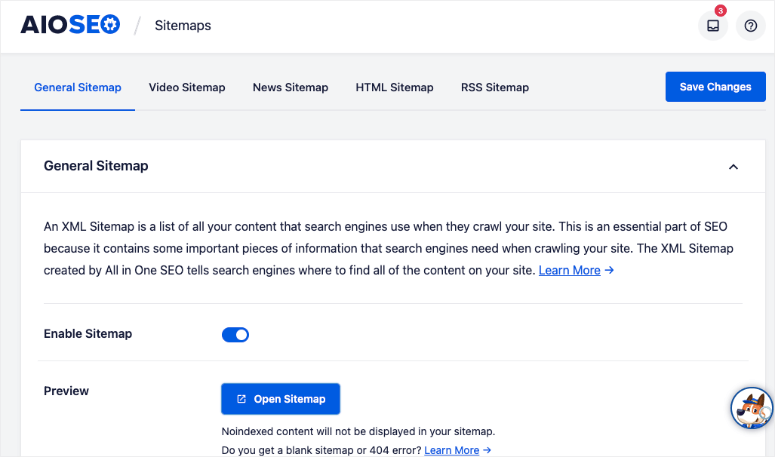
Once enabled, AIOSEO automatically keeps your sitemap updated and synced with Google Search Console.
To verify your product attributes are included, click the Open Sitemap button under “Preview.” Your sitemap opens in a new tab, and you can see all the links included.
Look for “productattribute-sitemap.xml” in the list and click it. You’ll see all your product attributes listed with their URLs, ready for Google to crawl.
But you can customize your sitemaps settings even further.
Below the preview, you’ll see Sitemap Settings with options like “Enable Sitemap Indexes” and “Links Per Sitemap.” The defaults work perfectly for most stores.
But you can switch the features you need with simple checkboxes if you need to.
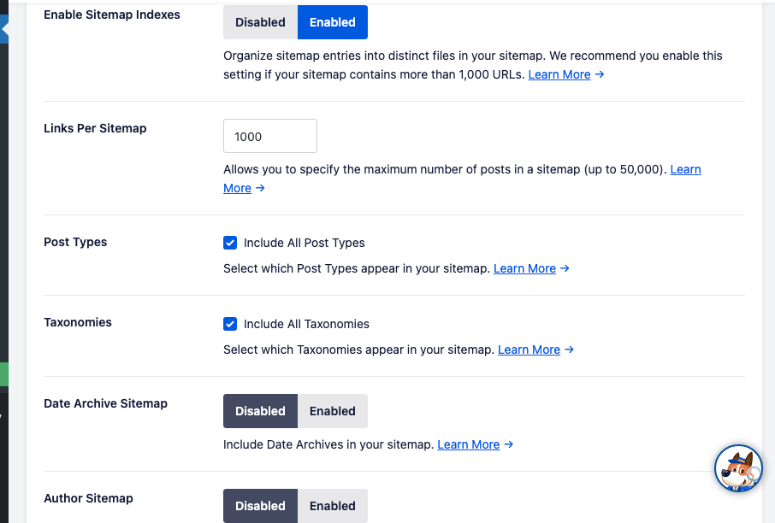
Check out my tutorial on how to set up sitemaps with AIOSEO for full details on how to customize this section.
⚠️What this means for you: Your attribute pages get indexed within 48-72 hours. Google discovers new attributes automatically as you add them, with no manual work required.
Step 3: Export & Import for Multiple Stores
Estimated time: 5 minutes | Perfect for agencies or multi-store owners
If you manage several WooCommerce stores or want to back up your settings, this feature is a lifesaver.
This is because this feature helps you replicate your attribute SEO settings across different stores. It can also help you create a backup for your multisite before making major changes.
How to Export your Attribute Data with AIOSEO
First, navigate to AIOSEO » Tools in your WordPress dashboard and select the Import/Export tab at the top.
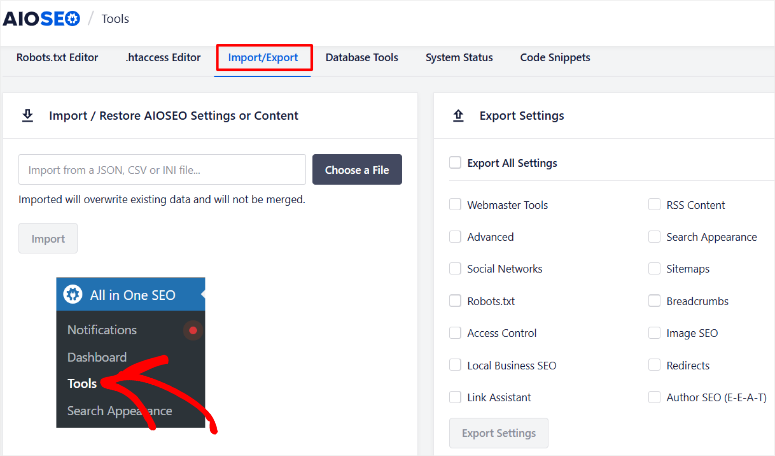
Under “Export Settings,” scroll down until you find the “Product Attributes” option. After this, click the “Export Settings” button.
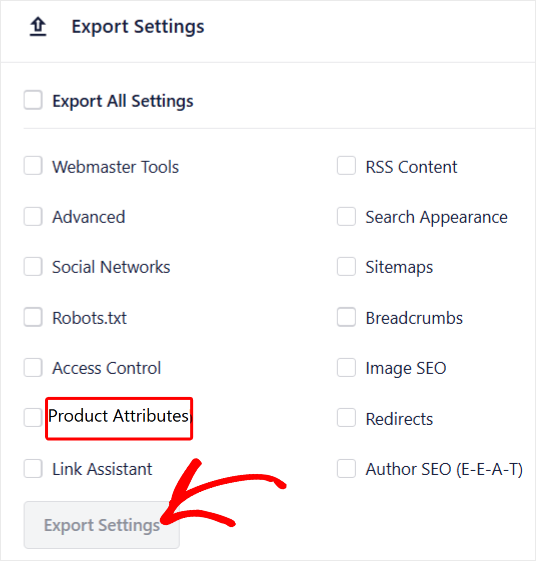
After this, a JSON file downloads to your computer, containing all your SEO templates and settings.
How to Import Product Attributes to Another Store
On your second store, first make sure you have AIOSEO installed and activated. Then, go to All in One SEO » Tools » Import/Export. The same steps you took above.
Then, under “Import Settings,” click the “Choose File” button and select the export file you just downloaded.
Once added, click “Import” and wait for the success message.

After this, all your attribute SEO settings copy over instantly with no manual reconfiguration needed.
Step 4: Track Your Attribute Rankings (No Extra Tools Needed)
Estimated time: 10 minutes setup | Finally know what’s working
Here’s the problem most people face: You optimize your attributes but have no idea if they actually rank. What’s more, your best option is to set up expensive rank tracking tools.
AIOSEO solves this with four built-in features that we will discuss below.
Feature 1: Import Keywords from Google Search Console
I always start here because it’s the smartest approach.
First, you need to make sure that your website is connected to Google Search Console through All in One SEO.
You should have already done this through the setup wizard, but you can go to AIOSEO » General Settings to confirm this. Just select the “Webmaster Tools” and see if Google Search Console is connected.
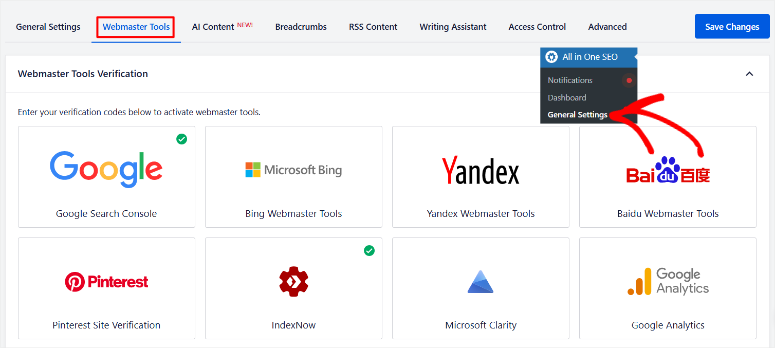
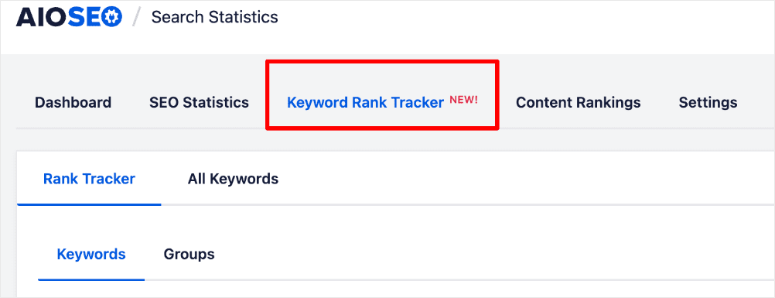
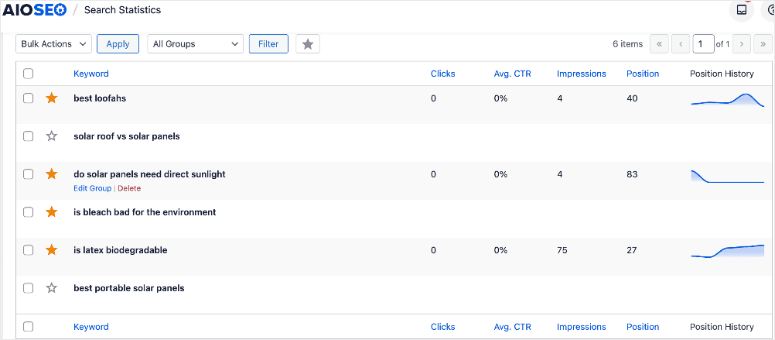
Then, go to AIOSEO » Search Statistics and navigate to “Keyword Rank Tracker” in your WordPress dashboard.
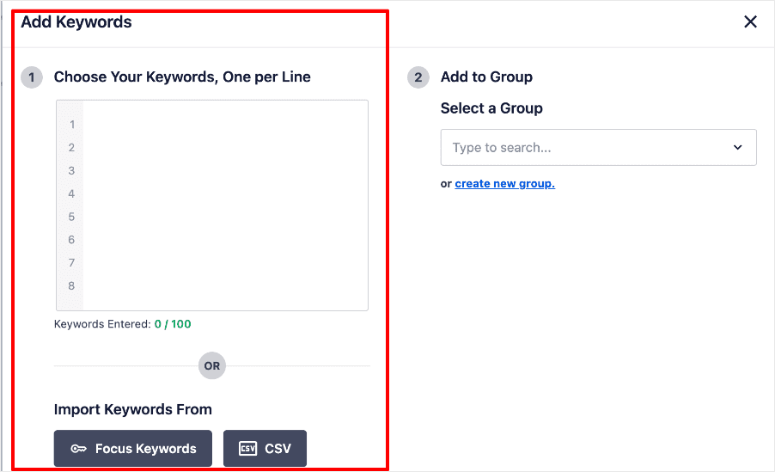
Next, click the “Add Keywords” button at the top and select “Import from Google Search Console” from the options.
Once done, you’ll see an easy-to-follow graph that includes your top keywords, search impressions, clicks, average CTR, and more.
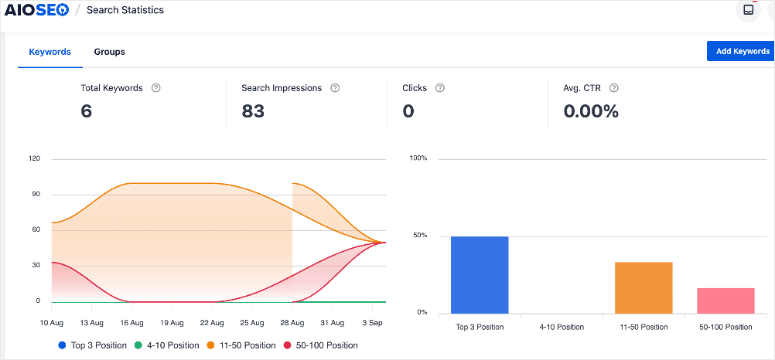
⚠️ Why this works: You’re tracking keywords you already rank for right in your WordPress dashboard, ensuring no guessing is involved.
Feature 2: See Which Pages Rank for Each Keyword
In the Keyword Rank Tracker, click the “>” arrow at the end of any keyword line to expand the row.
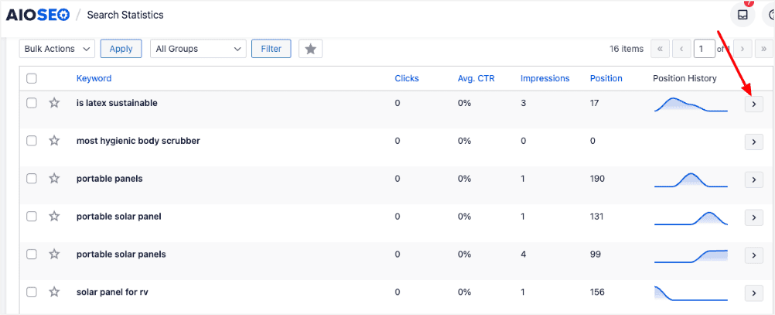
Next, select the “Keyword Ranking Pages” tab. Here, you’ll see exactly which attribute pages rank for that term, along with clicks, impressions, and position data.
⚠️ The insight: You make keyword discoveries that allow you to push them higher up the search results. For example, your “Organic Cotton” attribute may be ranking at position 8.
That’s close enough to optimize and push into the top 5.
Feature 3: Discover Related Keywords
Still in the expanded keyword view, click the “Related Keywords” tab, where you’ll see 8-9 keyword suggestions based on Google search data.
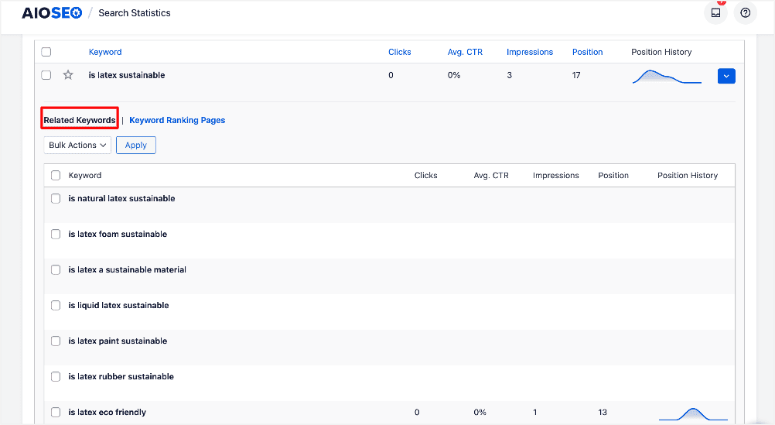
These show opportunities to expand your attribute page content and rank for even more keywords.
Feature 4: Check Rankings While Editing Products
To use this All in One SEO feature, open any product in the WordPress editor. Then, scroll to the AIOSEO settings section below the content editor and click the “Keyword Rank Tracker” icon.
Here, you’ll see ranking data specific to that product’s attributes without leaving the page you’re editing.
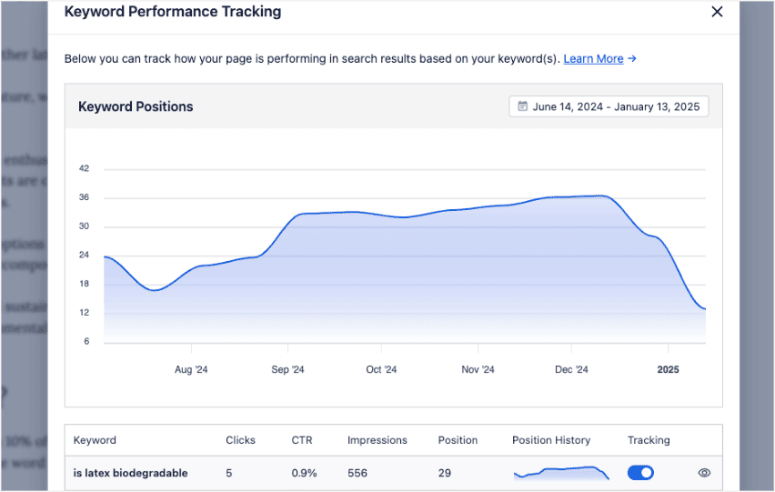
👀 Quick Check: Your rank tracker should show data within 24 hours. Check back tomorrow if you see “No data yet.”
That’s it! As you can see, I use AIOSEO to set up automatic WooCommerce product attributes and also track them. All in one simple eCommerce SEO plugin.
But even with the best tools, the best SEO experts still can make mistakes.
To help you with this, here are common mistakes to avoid when setting up and tracking product attributes for your WooCommerce store.
Common Mistakes to Avoid with Product Attributes
Mistake 1: Indexing Low-Value Attributes
Don’t let Google index attributes that only have 1-2 products attached. Use the “No Index” robots meta setting for these. Google penalizes thin content, and empty attribute pages hurt your overall site rankings.
Mistake 2: Using Generic Attribute Names
It is important to add keywords in your URLs, titles, and meta descriptions. Remember, descriptive names help you rank for long-tail searches.
Mistake 3: Ignoring Your Best Performers
Use the “Keyword Ranking Pages” feature to find attributes ranking in positions 8-15. These are low-hanging fruit. So, a little content optimization pushes them to page 1 fast.
Mistake 4: Not Using Google Search Console Import
If you’re manually guessing which keywords to track, you’re wasting time. Google Search Console shows what already works. With this in mind, start there and expand from proven winners.
Mistake 5: Setting It Once and Forgetting
Check your rank tracker monthly. While doing this, look for new related keyword opportunities and update underperforming attributes with better content.
Mistake 6: Skipping the Sitemap Verification
Always confirm that your attributes appear in your sitemap and submit it to Google Search Console. Without this, Google might take months to discover your attribute pages.
Now, check out this post if you need a complete guide on WordPress SEO in one place. While at it, check out how to improve your E-E-A-T signals to rank even higher.
Great! Now that you understand how to set up product attributes, how to track them, and what to avoid, let’s run a quick recap.
Quick Recap: Your Action Plan
Check out the quick recap table below for all the steps we have discussed above, summarized for you.
| Task | Time Required | Benefit |
|---|---|---|
| Step 1. Set global attribute SEO settings | 10 minutes | Automates SEO for all attributes site-wide |
| Step 2. Enable sitemap & verify attributes | 5 minutes | Faster indexing (48-72 hours vs. weeks) |
| Step 3. Export/import settings | 5 minutes | Replicate settings across multiple stores |
| Step 4. Set up rank tracking | 10 minutes | Track performance without expensive tools |
Here’s what you just learned to do:
- ⚙️Set global SEO settings for all product attributes (10 minutes)
- 🤖 Automatically include attributes in your sitemap (5 minutes)
- 📥 Export/import settings for multiple stores (5 minutes)
- 📈 Track attribute rankings without expensive tools (10 minutes)
Total setup time: Under 30 minutes
Time saved per month: 10-15 hours
Cost saved: $99+/month on rank tracking
Your next steps:
- Update to AIOSEO Pro today
- Configure your global attribute settings
- Import keywords from Google Search Console
- Check back in 30 days to see your rankings improve
The competitive advantage is huge. Most WooCommerce stores ignore attribute SEO completely. You now have the tools to dominate this space.
FAQs: About Managing WooCommerce Product Attributes
Can I use different SEO settings for specific attributes?
Yes. The global settings act as defaults, but you can override them for individual attributes. Just edit the specific attribute directly and customize its SEO settings. The global template won’t overwrite your custom changes.
Do I need AIOSEO Pro for Product Attributes features?
Yes, the Product Attributes features and Keyword Rank Tracker are Pro-only. The free version doesn’t include them. But the time and money saved make it worth the investment. You’re replacing expensive rank tracking tools.
How long until I see ranking improvements?
Most stores see attribute pages start ranking within 30-60 days. Focus on attributes that already show in Google Search Console first for faster wins. These are easier to push into top positions.
Will this work with variable products?
Absolutely. Variable product attributes like size and color work perfectly with these features. The global settings apply to all WooCommerce attributes automatically.
Final Thoughts: Managing WooCommerce Product Attributes with AIOSEO
Managing product attribute SEO used to mean hours of repetitive work. Not anymore.
AIOSEO Pro gives you automation and tracking in one place. No expensive tools needed or technical skills required.
I use this exact setup on every WooCommerce store I manage. The results speak for themselves.
Ready to scale your WooCommerce SEO? Get AIOSEO Pro here and set up your attributes in under 30 minutes.
Resource Center
- Now, apart from AIOSEO, here is a list of the best WooCommerce plugins you can use to grow your sales
- If you are still looking for options, check out my comparison of BigCommerce vs. WooCommerce, and also compare Shopify and WooCommerce
- If WordPress is your choice, here are WooCommerce themes you should consider for your online store.
- While at it, check out the best WooCommerce hosting as well
- Need better conversions? Here is my guide on how to set up WooCommerce cart conditions and plugins to help you upsell and cross-sell
- Want to improve your security? Check out my guide on how to protect your WooCommerce site
These guides walk you through everything WooCommerce. From setting it up to improving conversions. When you combine it with automatically adding product attributes, that’s when you can really scale.

Comments Leave a Reply