
Want an easy way to create a one page website in WordPress?
One-page scrolling websites are extremely popular now as they allow users to see all your content on a single page.
Visitors can understand what your website is about and what you have to offer in lesser time and in bite-sized pieces which is exactly what they want. Plus it’s easier to create and manage. So it’s a win-win for both you and the visitor.
In this tutorial, we’ll show you the easiest way to make a stunning one page website in WordPress.
Before we start, let’s be clear on what a one page website is.
What is a One Page Website?
A one page website displays all your website content in a concise and neat format on a single page.
In this day and age, users want to consume content fast rather than spend time navigating through different pages. This has made one page scrolling websites successful.

Normal websites usually include multiple pages such as homepage, contact page, about page, and more. You’ll see a navigation menu that gives you access to important pages on the site. However, you don’t need to create these pages if you have a one page site. Your website content is presented in a neat layout, divided into different sections.
When a user clicks on a menu item, the page scrolls down to the content section on the same page instead of opening a different webpage.
One page websites help:
- Reduce page load time
- Increase engagement with a continuous flow of content
- Improve user experience
- Optimize for mobile user
Not to mention their much easier to customize and maintain.
One page websites work great for any business that has straightforward and easy-to-understand offerings. They also are ideal if you want to create a simple online store or portfolio to showcase your skills.
Before we learn how to make a one page website in WordPress, you should know which content sections you need to add.
What to Include in your One Page WordPress Website?
When creating a one page website, you need to make sure visitors can find all the information they need about you but you need to be careful not to overdo it by adding too many elements.
That being said, these are some of the elements you must ideally include in your one page WordPress website:
- Brand logo and tagline: The logo and tagline for your website help to increase brand awareness among the visitors
- Compelling Call to Action (CTA): You must add a CTA button with an attention-grabbing message and color
- About us section: The about us section gives the visitors a brief introduction about you or your business
- Products/Services section: A section that shows the products or services that you offer
- Reviews and testimonials: Customer reviews and testimonials helps you gain the trust of your visitors
- Social media links: Link your social media profiles to get connected with the users
- Contact information: Contact us section that allows users to communicate with you
This list isn’t exhaustive. The elements you add will depend on what type of website you’re creating such as a small business website or online store.
Now that you know what to include in a one page site, let’s learn how to create one.
How to Make a One Page Website in WordPress?
Before we get started, you’ll need to have a basic WordPress install. In case you don’t, follow our guide to quickly set it up: How to Create a Website in 5 Simple Steps.
In WordPress, you can create a one page site using a theme or a landing page builder. If you’re a beginner, you’ll find free WordPress theme options to get started. But customizing the theme can be challenging.
We recommend using a landing page builder to make a one page website in WordPress. It’s easier and you can have your site up and running in a matter of minutes.
Our go-to landing page builder is SeedProd.
SeedProd is beginner-friendly and lets you build any type of landing page without touching a single line of code.
It offers a built-in library of stunning templates so you don’t have to create your one page website from scratch. With its easy drag and drop builder, you can add page blocks and customize your design effortlessly.
You’ll find over 40 content blocks including testimonials, countdowns, CTA buttons, and more. So you can customize the one pager to match your brand perfectly.
Plus, you can connect with major email marketing services like Constant Contact, Mailchimp, AWeber, and more. This helps you automate your lead generation efforts and keep your email list updated.
Aside from that, here are some of the features that make SeedProd the best choice for creating one-page websites:
- 150+ pre-built templates let you create professional-looking pages
- Fully responsive which means your one page website looks good on all screen sizes
- Integration with the search engine optimization tools like All in One SEO and Google Analytics
- Built-in Coming soon page, 404 pages, login page, and maintenance mode
- reCAPTCHA feature helps you protect your site and get authentic leads
SeedProd offers the most powerful features yet it is very lightweight. So, your one page website will perform well and have a faster load speed.
Now, we’ll show you how to make a one page website in WordPress using the SeedProd page builder.
Step 1: Install and Activate SeedProd Plugin
First, you need to sign up for your SeedProd account. You can download and install the plugin for free. They also offer a premium plugin at affordable pricing plans.
There are different plans so depending on whether you’re a freelancer, small business, or large corporate, you can find one that best suits your website needs.
After you sign up, you can access your SeedProd dashboard where you’ll find the plugin file to download along with a license key.
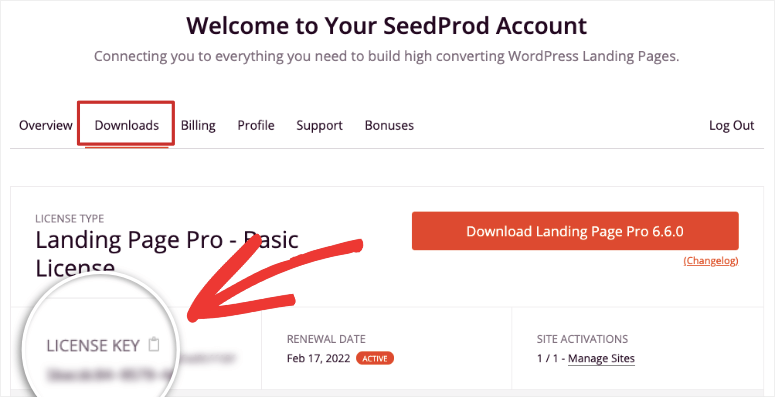
You need to install and activate the SeedProd plugin on your WordPress site. If you want more details, you can check out our tutorial on how to install a WordPress plugin.
Once you install and activate the plugin, open the SeedProd » Settings tab and enter your license key here.

Then, click on the Verify Key button to see a ‘verification successful’ message.
Now, you can start making a one page website in WordPress.
Step 2: Create a New Page
To create a new one page site, navigate to the SeedProd » Pages tab in the WordPress dashboard.
Here, you can see the section where you can set up Coming Soon Mode, Maintenance Mode, Login Page, and 404 Page.
If you want to hide your website while you create it so that no one accidentally visits it, you can activate Coming Soon mode here.
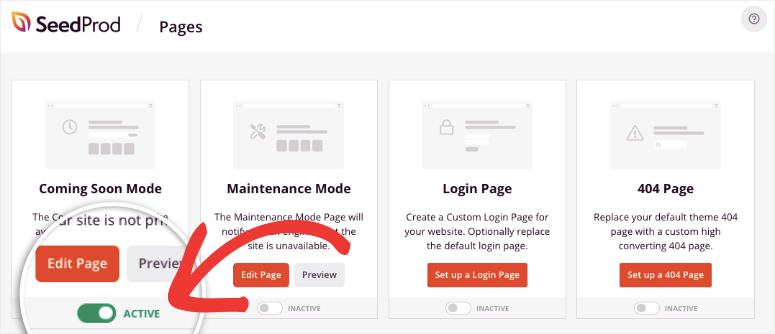
SeedProd has a default page that displays to visitors but you can create a custom coming soon page. There are pre-made templates that you can quickly edit and publish.
The cool thing about SeedProd’s coming soon mode is that you can add optin forms and countdown timers. This helps you build momentum for your site and you can start building your subscriber and customer list before you even launch your site.

Now that your site is safely out of public view, you can set up your site behind the scenes. On the same page, under the Landing Pages section, click on the Add New Landing Page button to get started.
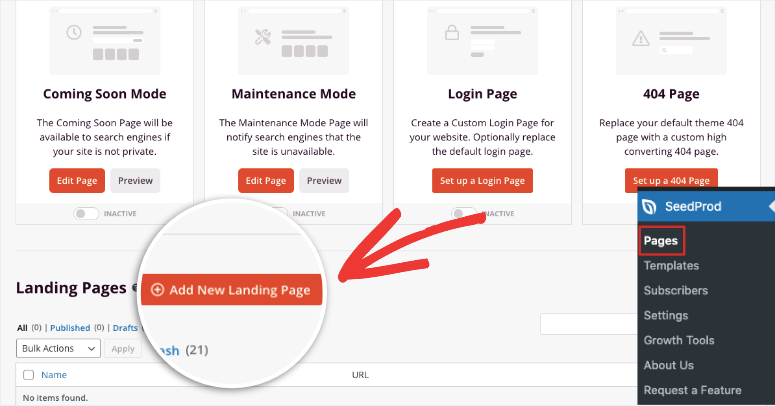
This will open up the template library that includes 100+ multipurpose page templates. SeedProd offers filters that help you easily browse the templates. We recommend checking out the Sales and Lead Squeeze templates that are more suitable for a one pager.
However, SeedProd is incredibly user-friendly and makes building a one page website a piece of cake. So we are going to use the Blank Template to show you how to make a completely unique one page design in WordPress from scratch.
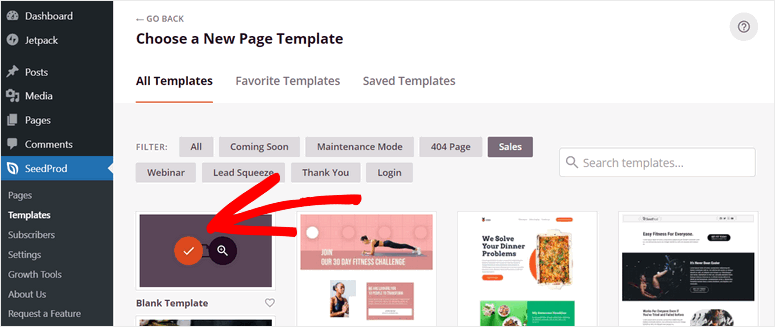
After you select the black template, you’ll see a popup window where you need to enter your page name and page URL.
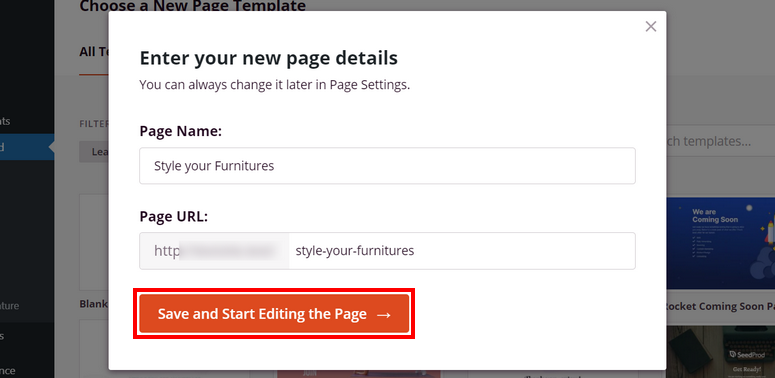
Click on the Save and Start Editing the Page button to open SeedProd’s visual page builder.
Now you can start building your one page WordPress website.
Step 3: Set Up your One Page Website
In the drag and drop builder, you can see the content blocks on the left side and the page preview on the right.
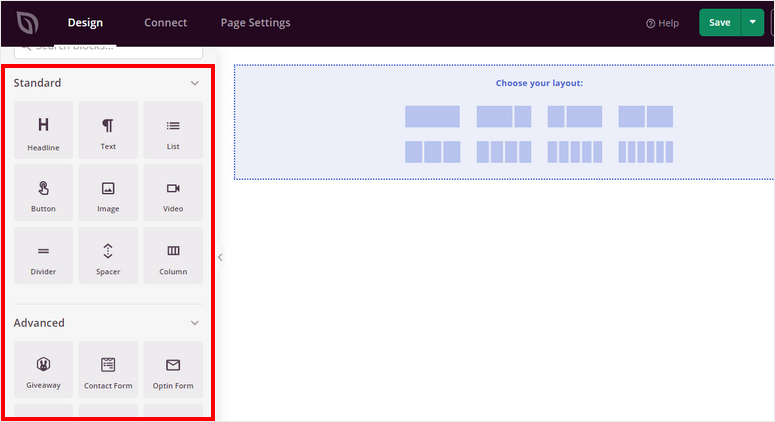
On the left, the content blocks are divided into three segments: Standard, Advanced, and WooCommerce. You can add these essential content blocks to optimize your one page website for more functionality:
- Headlines
- CTA buttons
- Optin forms
- Contact forms
- Testimonials
- Star rating
- Social sharing
You’ll notice that SeedProd comes with built-in widgets for popular WordPress plugins like WPForms, RafflePress, and WooCommerce.
Along with this, you can see the Sections tab on the left-hand side of the builder. Here you’ll get options to add premade smart sections such as headers, calls to action, FAQs, and more.
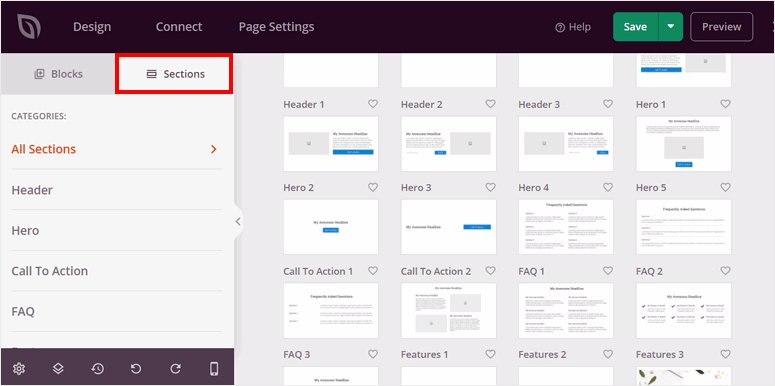
These page layouts are ready to use and look stunning out of the box. Now we’ll learn how to make a one page website in WordPress using these sections and customization options.
1. Add a Hero Section
To begin, you can add a Hero section to your page.
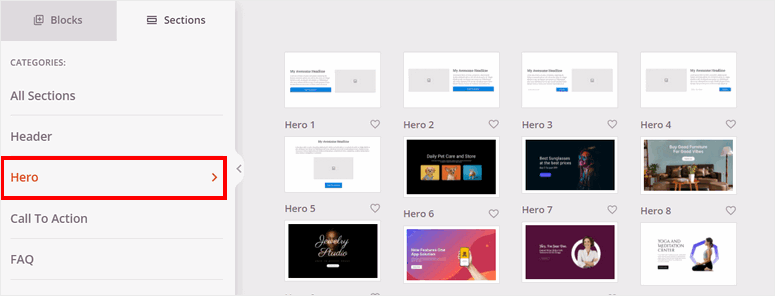
A hero section is the first thing your visitors see when they land on your site. So you need to create an attractive hero heading.
On the Hero tab, you’ll find many built-in hero templates that you can choose from. You can hover around a template and click on the magnifying glass icon to preview it.
Click on the plus icon to add a hero heading to your page.
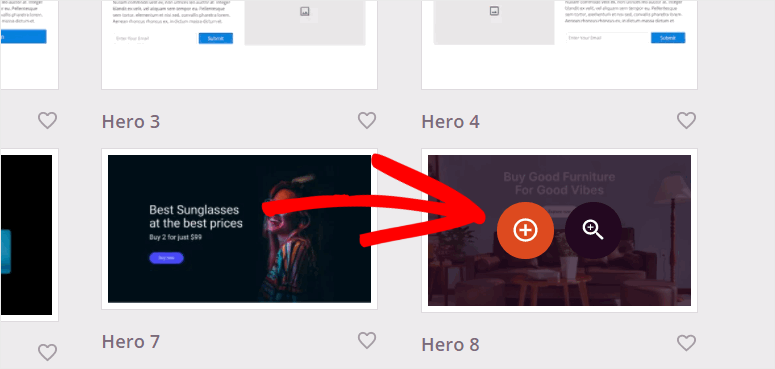
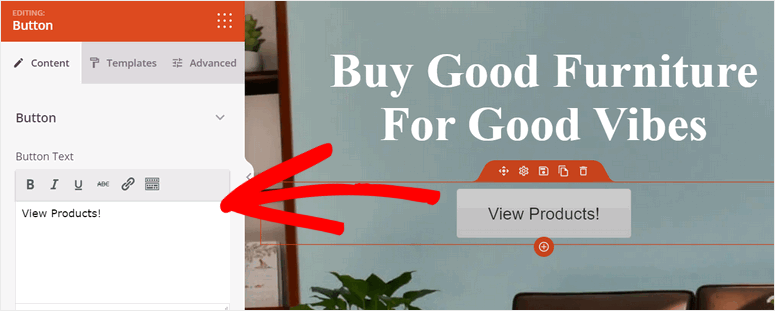
Then, you can customize your hero section. All the settings are in the left customizer panel so you can make changes and see the live preview on the right.

You can change the background settings for the hero settings. It also allows you to edit the text for the heading and the CTA button.
2. Add your Products
Now, you can introduce your products on the one page WordPress website.
To add a product section, hover over the bottom of the page builder and click on the Add Columns option.
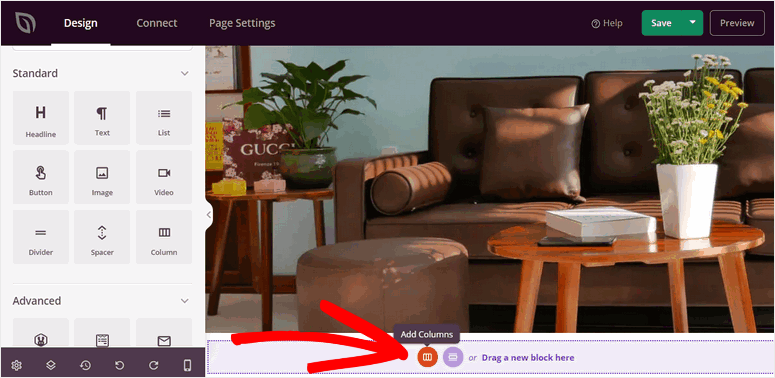
Here, you can insert headline and text content blocks to explain your products. You can also add a new column with multiple layouts.
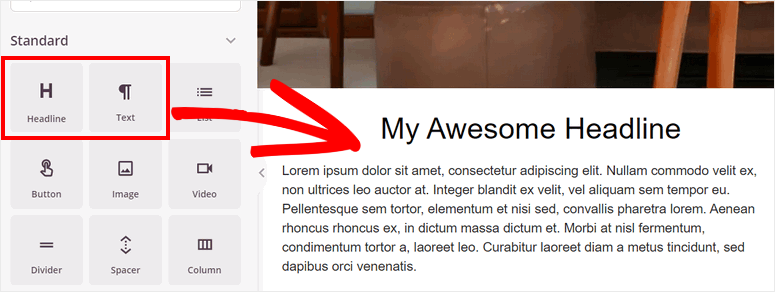
Then, you can add the images to showcase your products. You can drag and drop the image content blocks to display the product images.
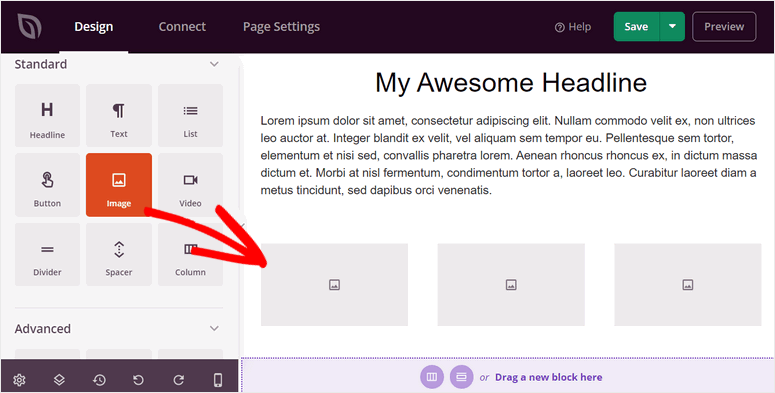
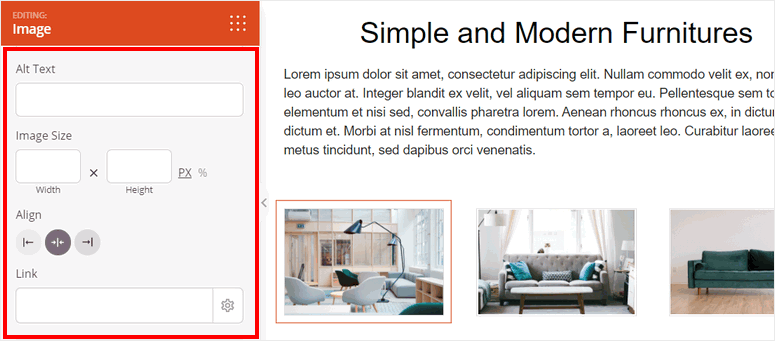
You can upload your images and edit the image settings in the Advanced option. You can make them full width or reduce them to a size you feel looks best.
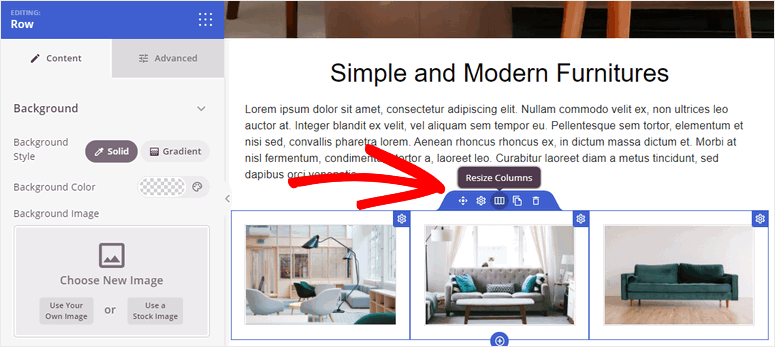
If you have more products to add, simply duplicate the row and change the product details.
3. Add Customer Testimonials
Adding reviews and testimonials of products on your site will help you build trust with visitors.
For this, head over to the Sections tab on the page builder. Open the Testimonials options and you can see all the pre-designed testimonials section.
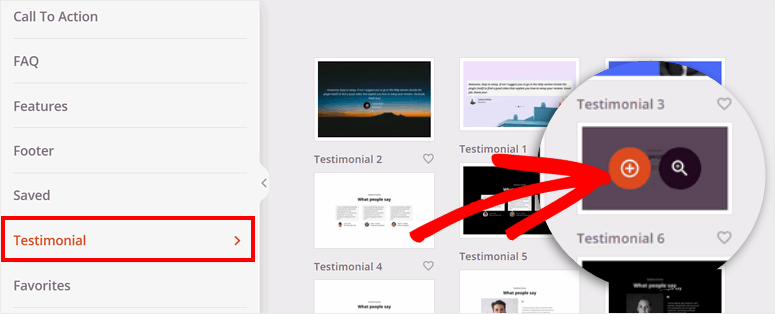
You can customize the section and change the look and feel of the testimonials. It allows you to add multiple reviews and testimonials from your customers.
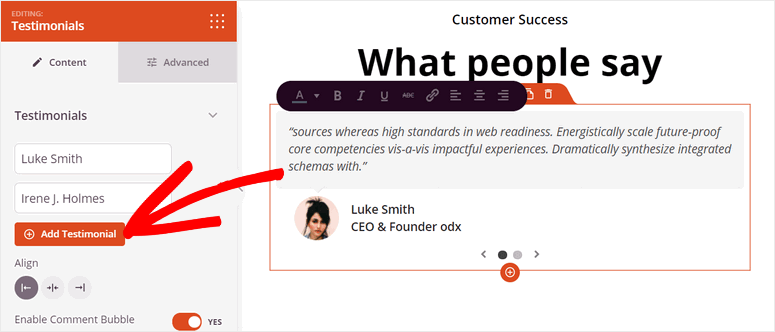
Now, you need to add a call to action (CTA) section to make your visitor purchase or sign up on your one page website.
4. Add CTA Section
A CTA button encourages visitors to take action on your site such as buying, signing up, registering for an account, and more. A good call to action will help you boost conversions, sales, and revenue.
You’ve already added a CTA button at the beginning of your site. But we recommend adding a CTA near towards the end of your scrolling site as well. This will give visitors easy access to take action during their browsing journey.
To add a CTA section, open the Sections » Call To Action tab and choose any design that you like.
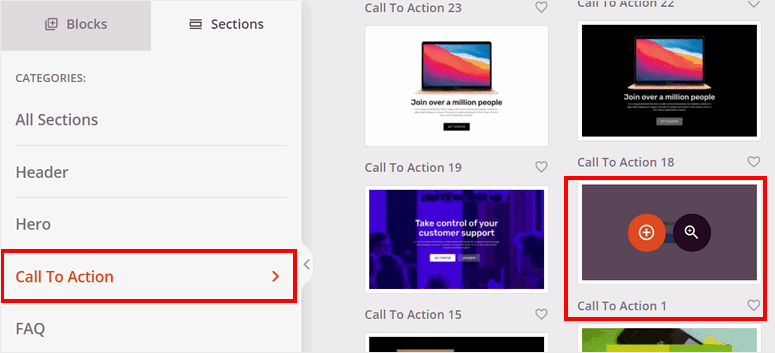
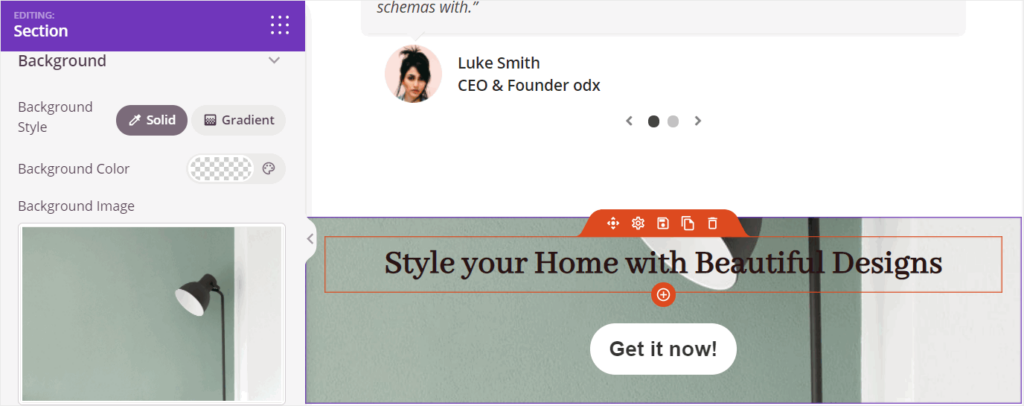
To match your website, you can customize the section by adding a background image and changing button templates.
5. Add Footer
Next, you need to add a section to add your contact information and other links. You can find many pre-built footer sections in the SeedProd builder.
To add a footer, go to the Sections » Footer tab and select the footer web design that is best for your site.
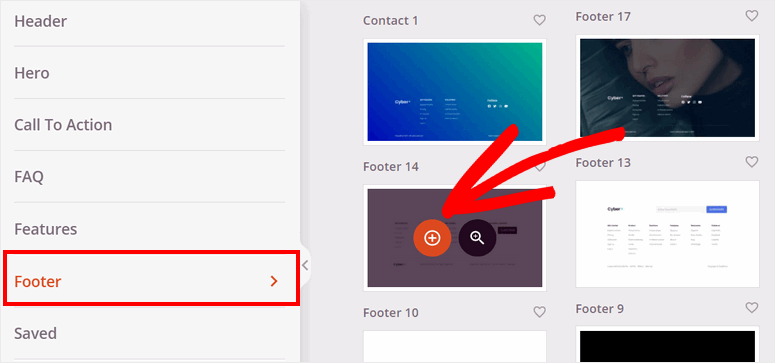
SeedProd lets you add your own links and product information to the footer. Also, you can edit and add your social media profiles so your visitor can get connected with you.
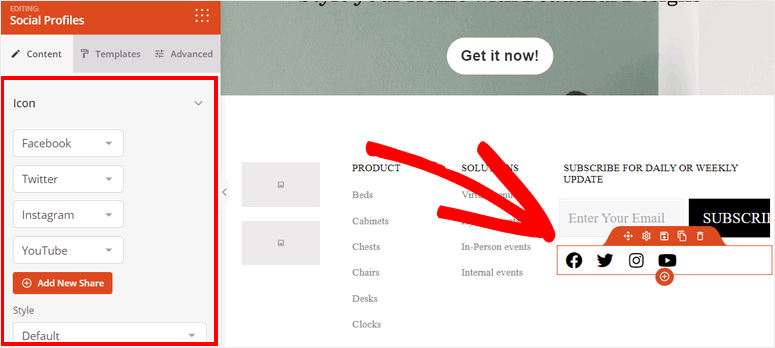
Now if you were building a multi-page website, SeedProd lets you add a new menu to your header so visitors can navigate to other pages. But since this is a one page website, you won’t need a navigational menu. If the template you selected has one, be sure to delete it since you don’t need to redirect visitors to other pages.

Once you set up the content sections and content blocks, hit the Save button at the top-right corner of the builder.
Now, your one page site is ready but before you go live, there are a few settings you’ll want to configure on the back end. First, you can connect it to an email service provider to sync the website to your email account.
Step 4: Integrate with Email Service Provider
SeedProd allows you to integrate your one page site with all the popular email marketing services like Constant Contact, AWeber, ConvertKit, and more.
To connect with your email marketing account, navigate to the Connect tab on the page builder.
Then, choose your email service provider.
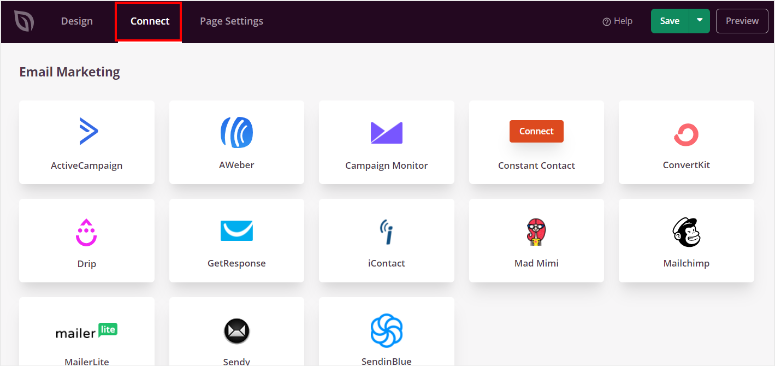
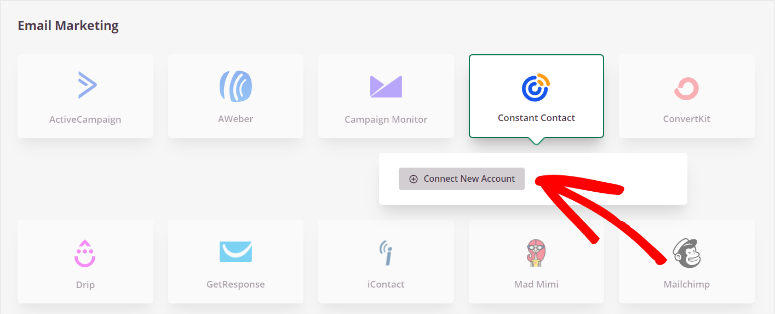
Click on the Connect New Account button and follow the instructions given on the screen to connect your account. Most services require you to enter an API key to make a connection. So you get it from your email account.
Now you can ask visitors to subscribe to your email list and import the lead information automatically to your email list.
Next, you need to make sure the page settings have your preferred settings.
Step 5: Configure Page Settings
To configure your page settings, open the Page Settings tab on the form builder.
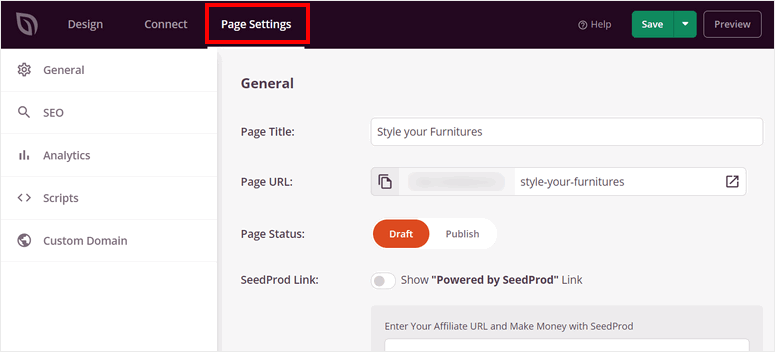
Here, you can see these page settings:
- General Settings: Change your page title, page URL, and page status. You can choose to show or hide the “Powered by SeedProd” link on the page.
- SEO: Optimize your one page website for SEO (Search Engine Optimization) with powerful SEO plugins like All in One SEO.
- Analytics: Integrate with an analytics plugin like MonsterInsights and track the performance of your one page site.
- Scripts: Add custom code to change the page style and settings even more. You can leave this field empty if you are not familiar with coding.
Once you make changes to the settings, hit the Save button at the end.
You’re almost done! All you need to do now is publish your one page website and set it is as the homepage.
Step 6: Publish Your One Page Website
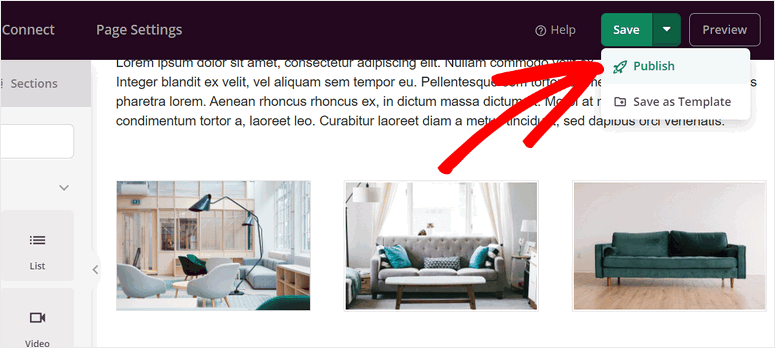
To publish your one page site, click on the dropdown menu next to the Save button at the top-right corner of the builder. Select the Publish option to make your page go live.
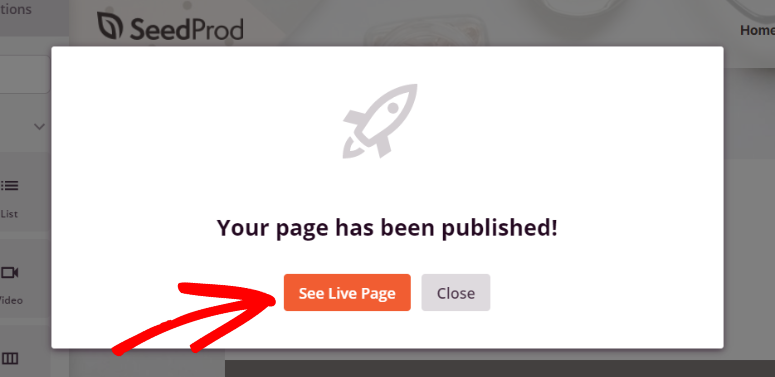
After that, you’ll see a popup window that notifies you that your page is published. You can see how your one page WordPress site looks by clicking on the See Live Page button.
Congrats! You’ve successfully created a one page website in WordPress.
Now, you need to assign this page as the main homepage of your site.
Step 7: Set Your Homepage
In the last step, you need to set the one page website you created as your homepage. For this, you can open the Settings tab in the WordPress admin dashboard.
Then, go to the Reading option and set the Your homepage displays setting to A static page. You can select your one page website name from the Homepage option and save the changes.
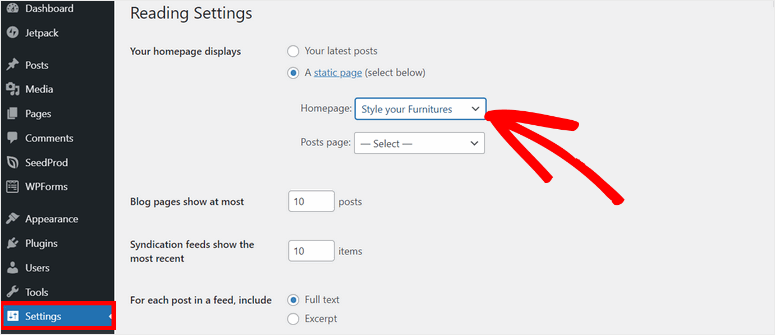
This will turn the front page of your WordPress site into the single-page website.
In case you turned on Coming Soon mode in the first step, you’ll need to head over to SeedProd » Pages and use the toggle switch to deactivate it.

SeedProd will remove the coming soon page and your website will go live. Now everyone who enters your website URL can see the one page website you created.
That’s it for today! We hope this tutorial has helped you learn how to make a one page website in WordPress.
With SeedProd’s user-friendly page builder, you can create any type of landing page in a few clicks. You can create dedicated product and service pages, sales pages, and more.
You could even create a lead capture page where visitors can sign up to be subscribers. This will help get more leads and subscribers.
If you want to grow your website traffic and increase conversion rates, you can check out OptinMonster. It allows you to create attractive slide-ins, floating bars, popups, welcome mats, and more.
This tool will help you optimize conversions with powerful targeting rules and campaign triggers so that you can reach out to your visitors at the right time.
OptinMonster also makes it easy to add these campaigns to any page, post, or sidebar of your website.
To learn more, you can go through our OptinMonster Review.
Now that your one page site is live, you’ll find these resources helpful:
- The Complete Beginner’s Guide to WordPress SEO
- Conversion Rate Optimization Tools to Skyrocket Growth
- How to Sell a Product without eCommerce
These posts will help you drive traffic and increase your conversion rates. The last one will help you sell your products straight from your site without creating an online store.

Comments Leave a Reply