
Looking to create a job application form in WordPress? Great idea! If you’re hiring, using your website to gather information from potential candidates is a great way to get the ball rolling.
In this article, we’ll share how you can quickly and easily create a job application form in WordPress.
Step 1: Install and Activate the Plugin
In order to create a job application form in WordPress, you’ll need to utilize the right plugin for the task. We highly recommend using WPForms for this. We use it on our own websites, and it’s the best plugin on the market for job application creation.
So, start by downloading the WPForms plugin. Then, install and activate it. Not sure how? No problem. You can hop over to our guide on how to install a WordPress plugin real quick. We’ll wait.
All done? Awesome.
Next, you’ll need to install and activate the Form Templates Pack Addon. With this, you’ll gain access to the ready-made job application form templates, which include industry and niche-specific tools for creating a fully-customized job application form for your WordPress website.
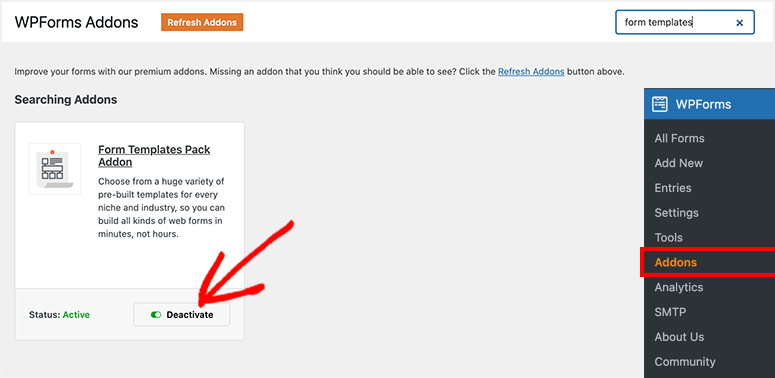
With the addon now activated, go to WPForms » Add New to create a fresh form.
Name your form, and then scroll down to where it says Additional Templates at the bottom of the templates screen. We typed in ‘file upload’ and got a few options to create forms that allow users to upload resumes and cover letters. You can also try searching for ‘job’ to find more template options.
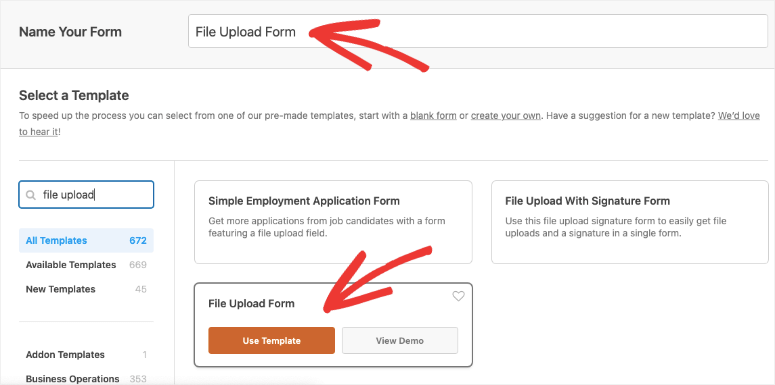
You can add a name for your form and then choose a template. Then WPForms will open the form editor.
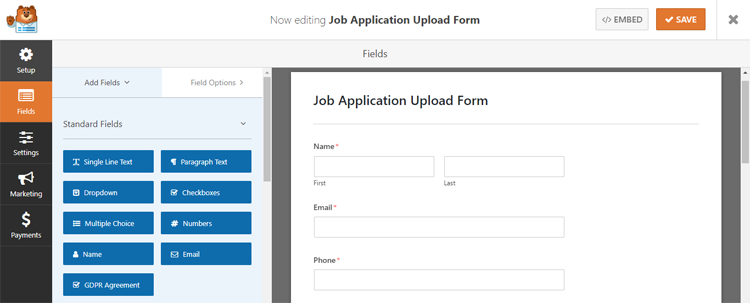
The ‘hard’ part is over. Now the real fun begins!
Step 2: Customize Your Form
WPForms is known for its amazing customization options. And, using its intuitive drag and drop builder, you’ll never have to touch a single line of code in order to make your forms look stunning.
The standard job application form template comes with fields for Name, Email, Address, and Phone Number; however, you can easily add options for File Upload, Single Line Text, Paragraph Text, or Multiple Choice.
Simply drag, drop, and rearrange the fields you want to add by using your mouse to drag them from the left-hand column to the application form on the right. Easy peasy!
Not sure what those options would be good for? No worries. Here are some suggestions to make your life easier:
- Multiple Choice: This is a great option for allowing candidates to choose which position they’re applying for, if you have more than one job to fill.
- Single Line Text: Need to know a candidate’s preferred start date? Or if they were referred by someone? A single line text option is perfect for this as it allows candidates to give you needed details without getting overly wordy.
- Paragraph Text: Sometimes you actually do want candidates to get a little wordier. By allowing them a full paragraph, you can ask them about their educational background, their interests, their reason for leaving their current job, and so much more.
- File Upload: Perfect for when a candidate needs to attach a resume, or a cute photo of their cat.
On that last note, it’s important to adjust the File Upload field so that job seekers on your site can upload their resumes and whatnot to the job application form without any hiccups.
Simply click on the File Upload field and do the following:
- Change the name of the label, if needed, so candidates know what to upload.
- Add additional instructions, if needed.
- Share what types of files candidates are allowed to upload (.doc, .docx, .pdf, etc.)
- Change the maximum file size, if you think it’s too large. The default is 128MB.
- Check the Required option if everyone applying has to upload a file to be considered.
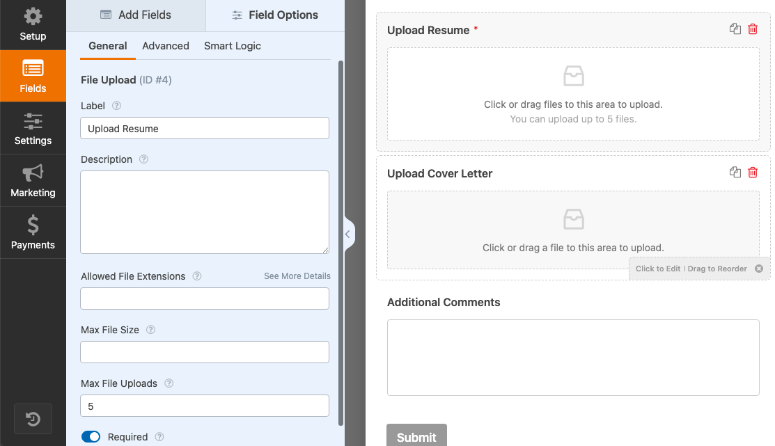
After you finish those steps, head to the Advanced Options section and select the option to Store File in WordPress Media Library. That way, you can easily find the files candidates have uploaded within your site’s Media Library on your WordPress dashboard.

All done customizing your form? Then, click Save and head to the next step.
Step 3: Enable Conditional Logic
No one likes overly long job applications forms. To prevent your forms from getting out of hand, while still gathering all the information you need, you’ll need to enable conditional logic.
With conditional logic, more form options appear only if your candidate has chosen a response that requires additional information. If their answer doesn’t require this information, the field for it won’t appear; keeping things neat and tidy.
For example, if you want to know if a candidate was referred by one of your existing employees. If they say ‘yes,’ then an additional option will appear for them to say who referred them. If they say ‘no,’ then they simply move onto the next question. Pretty neat, huh?
To set this up, drag a Multiple Choice field over to your job application form and place it where you want it to appear. Click on it to edit it.

Label it how you like, and then add the choices you want candidates to select from. Then, click on Advanced Options and choose the two column option for Choice Layout.
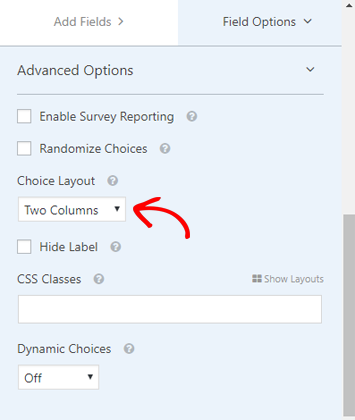
From there, drag a Single Line Text field directly underneath the question on your form. Click on it to edit it.

Change the label to your preferred question (ex: “Were you referred by an existing employee?”).
Next, head down to the Conditionals section, and click on Enable Conditional Logic.
To customize it, click Show this field if “Were you referred by an existing employee?” is “Yes.”
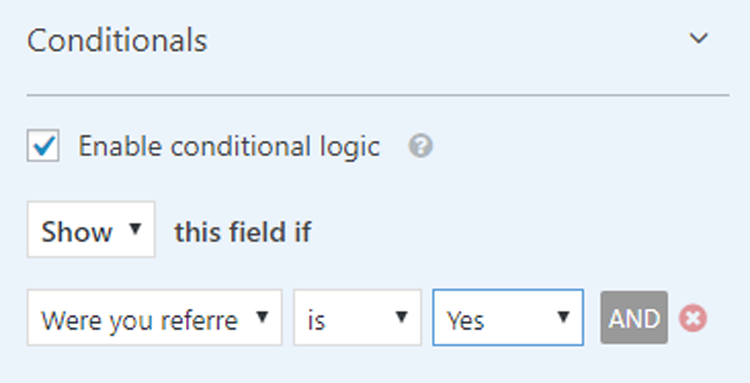
Because of this, whenever a candidate answers “Yes” to the question “Were you referred by an existing employee?” on your job application on WordPress, a single line text field will appear for them. That way, they can write in who referred them.
All done? Then click Save and move on to the next step.
Step 4: Configure Your Settings
Head on over to Settings » General to get started.
From this page, you can change your form’s name, give your form a description, customize the “Submit” button’s text, and enable spam prevention.
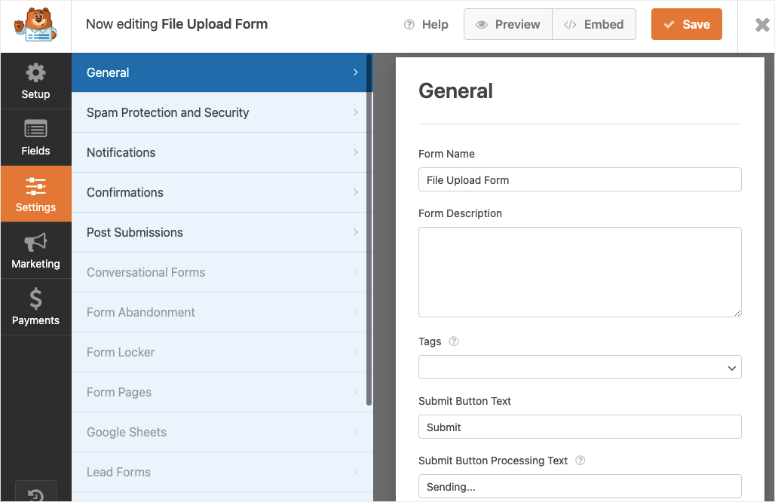
You can also activate GDPR Enhancements. With this, you can disable storing user details and IP addresses in order to comply with GDPR regulations.
Once you’re finished, click Save.
Also check: The Best GDPR Plugins for WordPress.
Step 5: Configure the Notifications
By enabling notifications, you’ll be able to have your website send an email whenever a candidate submits an application. And, unless you disable notifications, you’ll be getting an email whenever a candidate submits and application too!
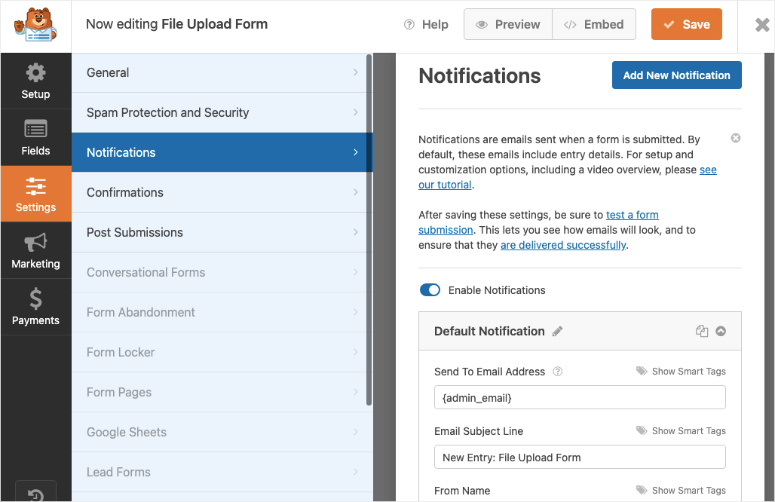
Sending an automated email to an applicant after they submit their job application form on WordPress is a great way to let them know that their application was, indeed, received and that you’ll get to it soon. This prevents applicants from second-guessing your website and applying more than once.
We highly recommend turning your notifications on. But, if you choose to, you can turn them off from this panel.
Step 6: Configure the Form Confirmation
A form confirmation is what’s displayed to let an applicant know that their application has gone through. You can also use these confirmation messages to tell candidates what their next steps are.
WPForms offers 3 types of confirmations:
- Message:This is the default confirmation. After an applicant submits their job application form on WordPress, a message will appear confirming their action.
- Show Page: If you choose this option, candidates will be taken to a specific confirmation page you’ve created within your own site. This is a great option if you have additional steps you’d like the candidate to take after applying.
- Go to URL (Redirect): If you want to send applicants to a different website than yours after applying, this is the option you should choose.
For the sake of this tutorial, we’ll show you how to do the most commonly-used option: Message.
In the Form Editor under Settings, click on the Confirmation tab. Then, click Message.

Customize your message. Then, click Save. Bam! Easy as that.
Now you’re ready for the final step!
Step 7: Add Your Job Application Form in WordPress
Now that you’re finally done fiddling around and tweaking your job application form, it’s time to add it to your WordPress website.
You can add your form pretty much anywhere, thanks to WPForms’ flexibility. You can make it a part of a post, a page, or even have it tacked onto your sidebar as a widget.
For this tutorial, we’ll add it to a page; since that’s the most common placement for a job application form in WordPress.
Create a page like you normally would from your WordPress dashboard. Once you have it looking the way you want, add a new block and select WPForms. Then you’ll get a dropdown menu from which you can choose the form.
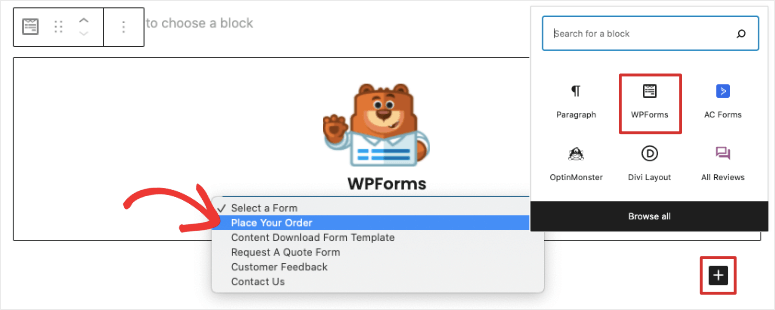
Select the job application form you just made. From there, click Publish and…viola! Your job application form is now live and ready for submissions. Great job!
If you’d like, you can also use the Zapier addon to automatically save file uploads to cloud services like Google Drive, Basecamp, and Dropbox.
Best of luck to you and your company. We hope you find the right person for the job, and that this article helped you add a job application form in WordPress.
Looking for other ways to use WPForms on your website? Check out our article on how to add a survey to your WordPress site. And don’t forget to check out our complete WPForms review.

Comments Leave a Reply