
Want to easily create a custom search form in WordPress without any coding?
A custom search form allows visitors to easily search and filter your website content in a few clicks.
When users quickly find what they are looking for, they are more likely to stay on your site longer. They’re also more likely to take action to buy a product, read your blog, sign up for a newsletter, and more.
In this post, we’ll show you how to easily create a custom search form in WordPress to enhance user experience and boost conversions.
Before that, let’s see if you really need to create a custom search form for your site.
Why Create a Custom Search Form?
A custom search form is ideal for sites that have a lot of content, products, documentation, and FAQs. It’s a must-have feature on eCommerce stores, online business directories, school/college sites, and similar sites.
The search option will help users find what they need without spending minutes or even hours looking for it.
So here’s why you should create a custom search form for your WordPress site:
- Helps users navigate through your content
- Saves time by finding things faster
- Boosts conversions and sales
- Optimizes your site for mobile users
- Reduces bounce rate
Now, we’ll show you how to create a custom search form in WordPress using a form builder plugin.
How to Create a Custom Search Form in WordPress
There are 3 methods that you can use:
- Adding code to your WordPress site
- Installing the SearchWP plugin – (Easiest method)
- Creating a form using Formidable Forms
We’ll take you through all 3 of them.
1. Adding code to your WordPress site
The first method you can use is the default search option offered by WordPress.org. You can enable a basic WordPress search that lets you search for pages and posts on your site.
This method is a bit complicated though. It involves coding and editing WordPress core files like the functions.php file which are highly sensitive. You need to be familiar with javascript, PHP, and other coding languages to make this work. One wrong step and you could break your website.
You’ll need to use the “get_search_form()” function to display the search form on your site. This will help you get the searchform.php file in your WordPress theme. If it can’t be found, then the WordPress core default search option will be used.
But, to customize the WordPress search box, you’ll need to add some more code to the file.
We do not recommend this method especially if you are not comfortable with coding. Instead it’s best to use a reliable WordPress search plugin to enable a site search. And that’s exactly what we are going to do next.
You’ll find several plugins in the market that let you customize the WordPress search form.
Make sure you choose a WordPress plugin that will not only allow you to create a custom search but also add filters and show the right results to your visitors.
We recommend using SearchWP, the #1 search plugin for WordPress that lets you search EVERYTHING on your site. You can also use Formidable Forms to create a custom search form. Below, we’ll show you how to create a custom search form using these 2 plugins.
Install the SearchWP Plugin (Recommended)

SearchWP is hands-down the best custom search plugin for WordPress. It’s easy to use, displays accurate results, and gives you control over your search form.
SearchWP is really awesome and has incredible premium features, therefore, it is a premium plugin. You can sign up for a plan starting at $99 a year. And though you won’t be disappointed, there’s a 14-day money-back guarantee.
This will allow you to enable a search for everything. Search your product details, custom fields content, shortcode output, custom database table content, cross-site multisite search, and more on your site.
You’ll get access to features including:
- PDF and Office document indexing
- Automatic integration with Native WP Search, no coding!
- Multiple search engines
- Keyword stemming
- Advanced custom fields support
- WooCommerce integration
- Exclude or attribute results
- Search statistics and insights
- Easy algorithm customization
The plugin also integrates with bbPress, WP Job Manager, Easy Digital Downloads, and more. Also, you’ll get access to committed support and detailed documentation.
And everything we’ve mentioned is just on the base plan so the plugin is totally worth its price at just $8.25 per month. You’ll get much more features on the higher-end plans.
Once you sign up for an account, you can get started with the step-by-step tutorial below.
Step 1: Activating SearchWP
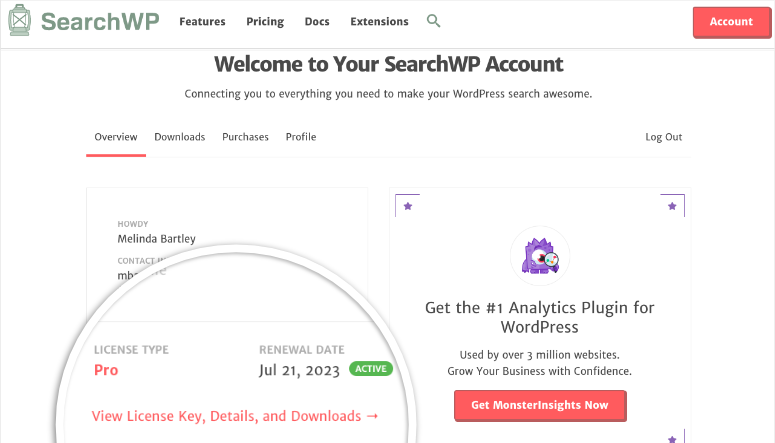
Inside your SearchWP account, you can access your license key, account details, and downloads. You’ll need to download the plugin file. And you’ll also want to copy your license key as you’ll need it in just a bit.
Then, head over to your wp-admin panel and navigate to Plugins » Add New » Upload Plugin.
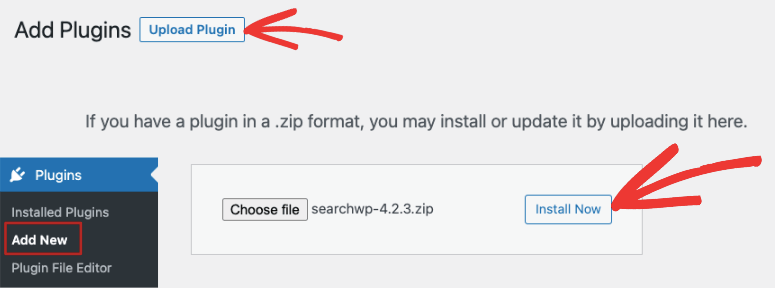
Select the plugin file that you downloaded to your computer and click on the Install Now button.
Once you’ve installed and activated it, you need to visit the Settings » SearchWP page and then click on the ‘License’ menu option.
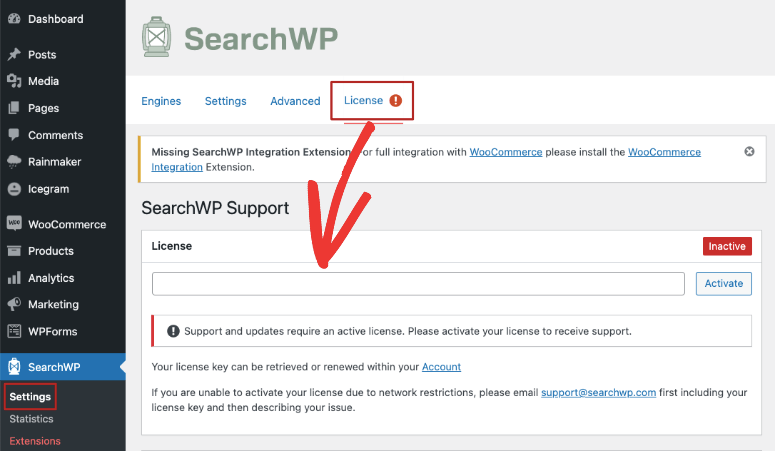
Fetch your license key from your SearchWP account and paste it here in the License box.
Click on the Activate button and you’re ready to set up the search engine.
Step 2: Customizing the Search Engine
Inside the SearchWP tab in your wp-admin panel, select the ‘Engines’ menu option. Once inside, click the ‘Add New’ button to create a new search engine.
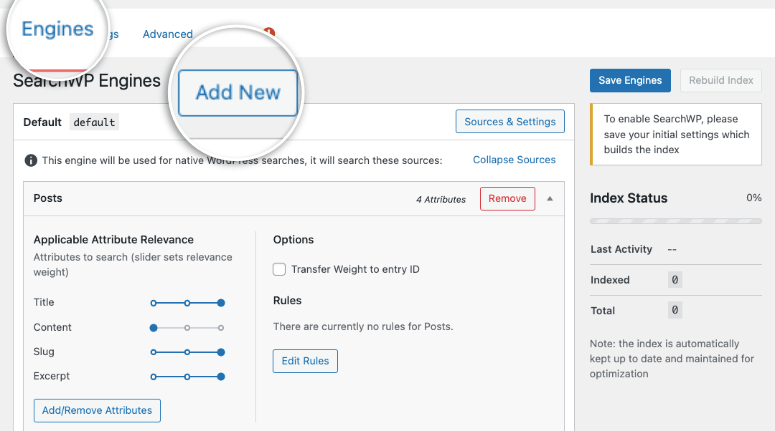
This will create a new search engine called ‘supplemental’. To change the name, you need to click the ‘Sources & Settings’ button.
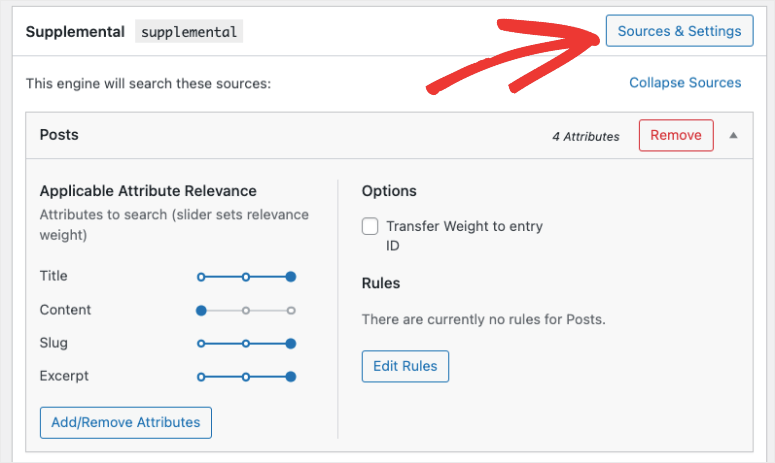
Now you’ll see an option to choose whether to search posts, pages, media files, comments, and users. The recommended settings are already added here so you can leave it as is.
To identify the search engine later, let’s name it ‘Custom’ under the ‘Engine Label’ field.
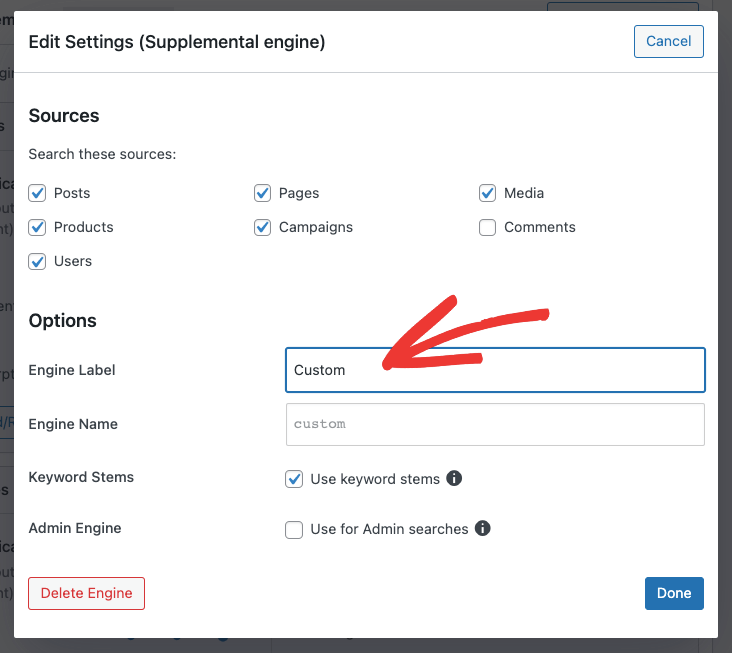
Here, you can see that the ‘Keyword Stems’ option has been selected. This will disregard word endings when your users make a search so that the most relevant search results will be displayed.
When you’re ready here, hit the ‘Done’ button to store your changes.
Now back on the engine’s page, you can see a section called ‘Applicable Attribute Relevance’ under each subheading. This lets you prioritize different post attributes, or include only certain categories or tags in your search results page.
All you have to do is use the sliders to adjust the ‘Attribute Relevance’.
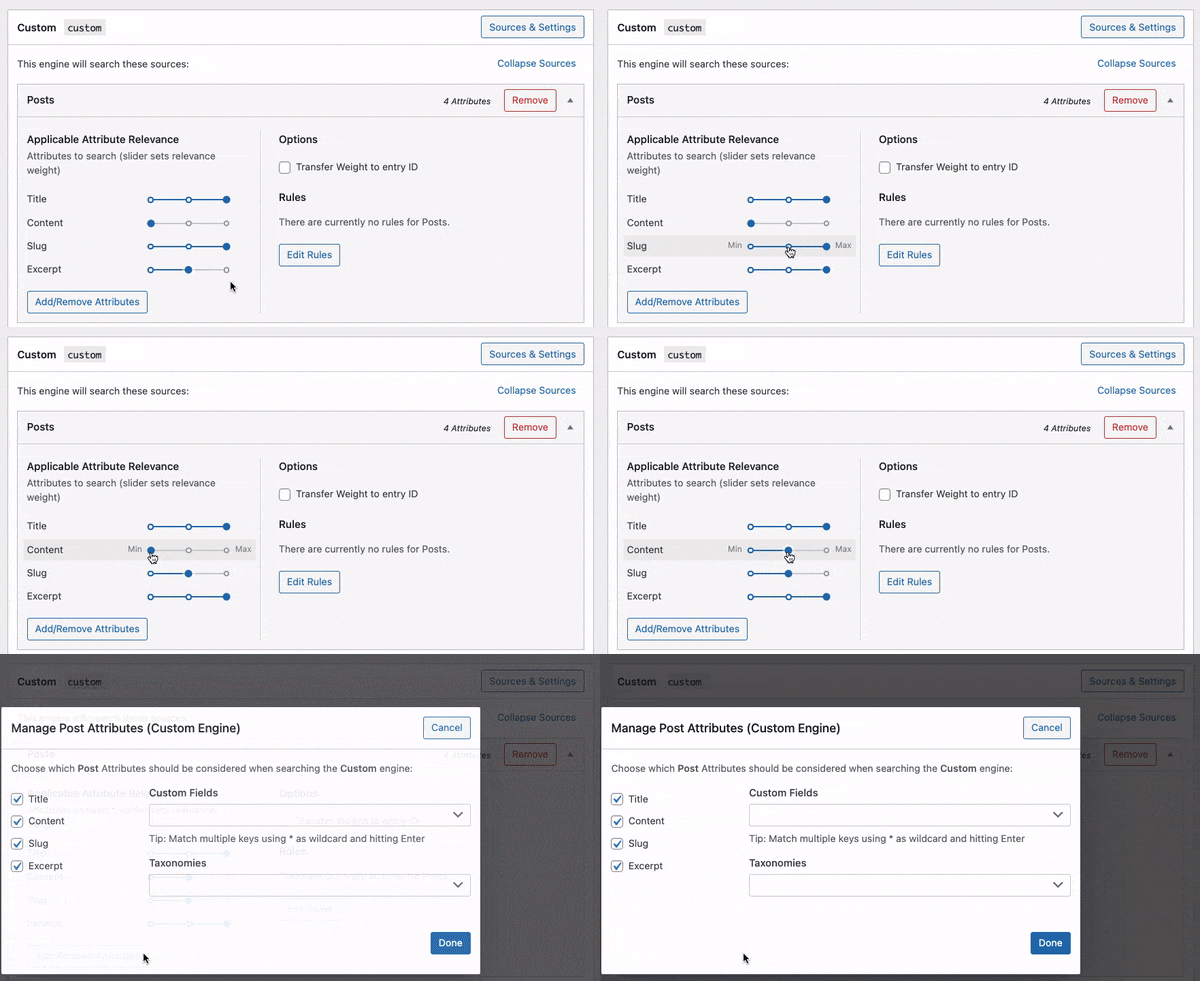
This will impact how search engines value and rank content on your site. So for instance, if you want Google to pay more attention to the post title than the content, you can give the title more importance here.
Next, SearchWP gives you control over whether certain content is included or excluded from the search results. For this, you can create rules.
This could be to let customers quickly find products in the same category they’re browsing. Or allow visitors to search for content about the same topic as they were just reading about.
To set rules, there’s an ‘Edit Rules’ button in each section.
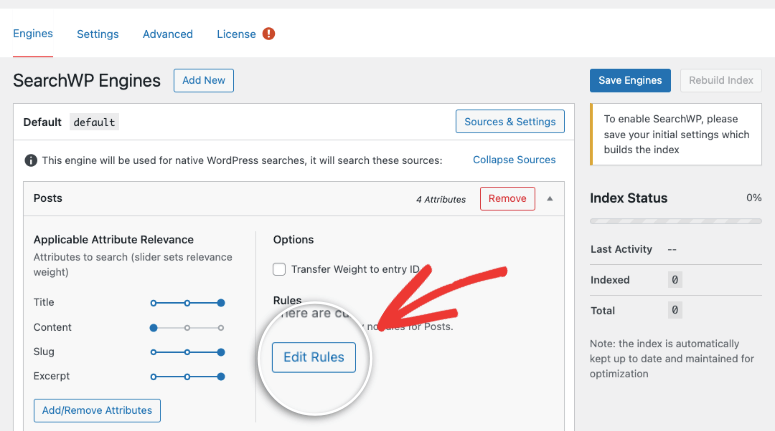
When you click on this, you’ll see a popup with settings for categories, tags, format, the publish date, and the post ID.
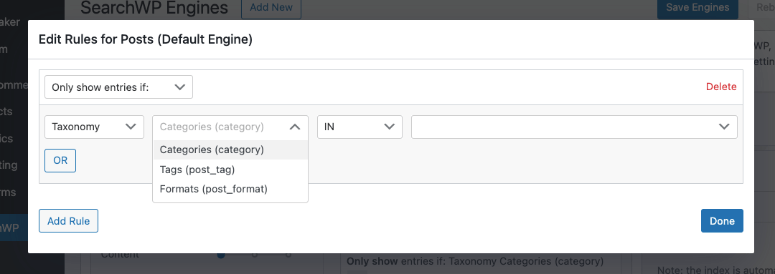
You can create rules as you like here to control how your search engine behaves.
And once you’re done, make sure to click the ‘Save Engines’ button at the top of the page to create your custom search engine.
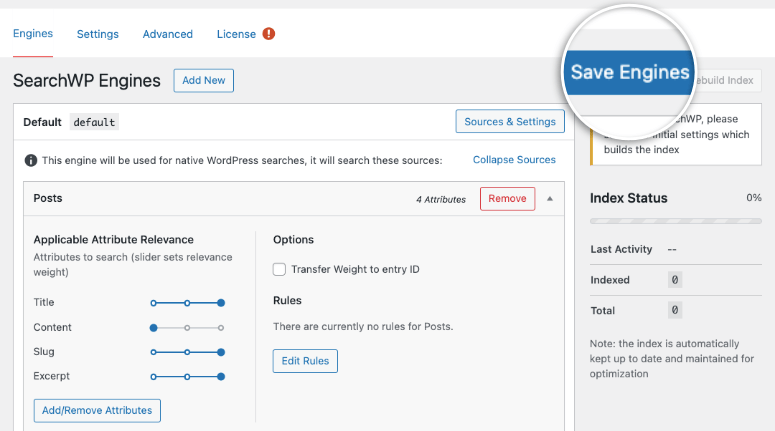
Now you’ve set up your WordPress search engine successfully. It’s ready to be added to your website.
Step 3: Adding the Search Form with Shortcode
Usually adding a search engine to your website requires a lot of coding but SearchWP has kept that to a minimum. You only need to paste a shortcode to embed your search engine, and this is so simple that it’s easy even if you’re a beginner.
Simply visit the SearchWP Shortcodes Extension and then click the ‘Download Extension’ button.
After that, you need to install and activate the extension on your WordPress site the same way you installed the plugin above.
Once activated, you’ll be able to add a simple shortcode inside your posts, pages, and widgets.
All you need to do is edit a post in the Block Editor and add a new block called ‘Custom HTML’.
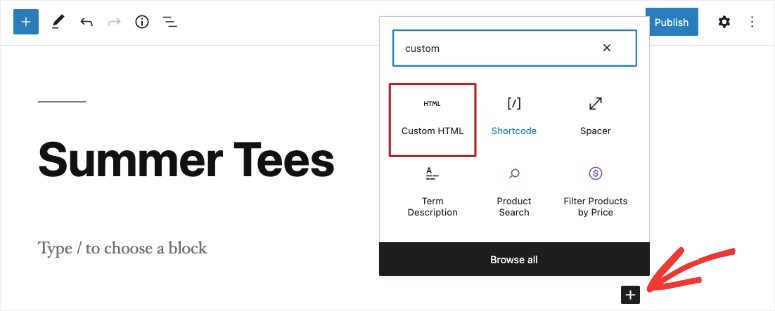
Inside the block, you can copy and paste this shortcode:
[searchwp_search_form engine="custom" var="searchvar" button_text="Custom Search"]

<div class="search-results-wrapper">
 [searchwp_search_results engine="custom" var="searchvar" posts_per_page=4]
  <h2>[searchwp_search_result_link direct="true"]</h2>
  [searchwp_search_result_excerpt]
 [/searchwp_search_results]
</div>

<div class="no-search-results-found">
 [searchwp_search_results_none]
 No results found, please search again.
 [/searchwp_search_results_none]
</div>

<div class="search-results-pagination">
 [searchwp_search_results_pagination direction="prev" link_text="Previous" var="searchvar" engine="custom"]
 [searchwp_search_results_pagination direction="next" link_text="Next" var="searchvar" engine="custom"]
</div>
We named our engine ‘custom’, if you’ve chosen a different name, then you’ll need to change engine=“custom” to your own engine name in four places inside this code snippet.
In this code, the button text will read ‘Custom Search’. If you’d like to change the text of the search button to something more creative, you can make the edit in the first line button_text=“Custom Search”.
This code will add the custom search engine to your WordPress post. It will also create a section to display the search results, show a no results message if necessary, and add pagination if the results go into multiple pages.
You can preview the post and you’ll see the search engine appear. You’ll see a search field along with the CTA button inside your post.

Then Publish or Update it and make the custom search form go live. If you need help with this, follow our easy guide on how to add a shortcode in WordPress.
You can test out your custom form by entering a few search terms to see the results the tool returns.
With that, you’ve learned how to add search bars to your WordPress website. SearchWP is an advanced search plugin that it’s worth exploring more of its features. Up next, we’ll show you how to enhance your website’s search function.
Step 4: Configuring Advanced Settings
There are 2 advanced options we’d like to cover to improve your custom WordPress search form.
- Adding Live Ajax Search: This automatically adds drop-down search results as the user is typing. It helps the user find their query faster. SearchWP offers a free Live Ajax Lite Search plugin in the WordPress repository for this.
- Using Advanced Settings for SearchWP: Under the Settings » SearchWP tab in your WordPress menu, there’s an Advanced tab. On this page, you can enable settings that will make it easier for your users to find what they are looking for.
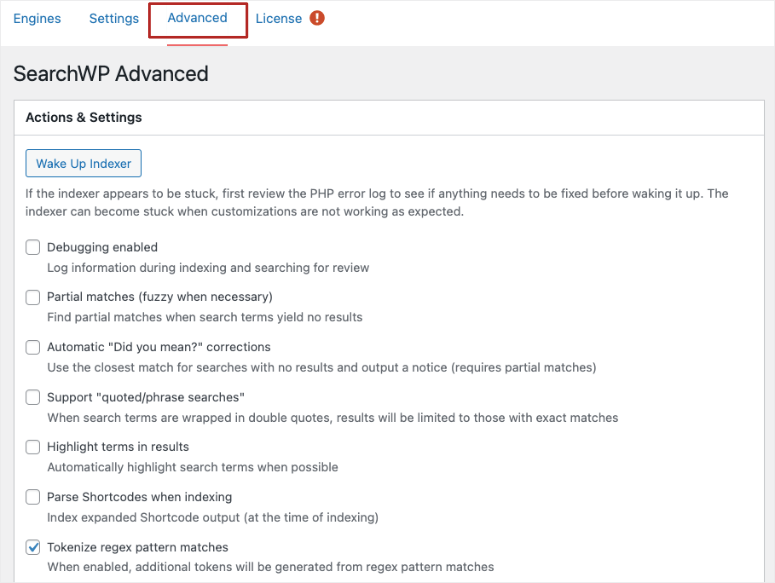
This gives you full control over how your search engine works. Next, we’ll show you how to customize how your search engine looks.
Step 5: Styling the Search Form and Results Page
If you aren’t happy with the way your new search bar appears, you can change that.
What you need to know is that your site’s theme controls the appearance of your homepage, header, sidebar, posts, search form, and search results. The formats and styles of your WordPress theme are stored in a CSS stylesheet.
You simply need to add your own custom CSS to change how your search bar and results page look.
If you haven’t done this before, we recommend making a backup of your website. It’s important to be able to restore your site in case things don’t go as planned. You can then use a staging site (a clone of your website) to try this out first.
Below is a custom CSS snippet that will work with most WordPress themes. The first section changes the style of the default search form and the second section customizes the search results.
You can copy paste the following code to style your site search feature:
.searchform {
font-family:arial;
font-size:16px;
background:#ace5e3;
color:#ffffff;
border:1px solid #61c3c0;
padding:10px;
height:90px;
width:600px;
}

.search-results {
font-family:arial;
font-size:16px;
background:#ace5e3;
color:#000000;
border:1px solid #61c3c0;
padding:10px;
width:600px;
}
Want to learn more about this? WPBeginner has the best guide: How to Easily Add Custom CSS to Your WordPress Site.
That’s all there is to it! You’ve created a fully customizable search form using SearchWP.
Next, we’ll show you one more way to create a custom WordPress search form.
Create a Custom Search Form using Formidable Forms
Formidable Forms is the only WordPress form builder plugin that comes with a fully integrated views feature. So you can not only collect form data but also show them on the front end of your site.
With Views, you can easily create a webpage to beautifully display the user-submitted data directly from your WordPress dashboard. You can use this to display business directories, member directories, listings, and more.
You can also connect your views with a search form and allow the visitors on your site to search for specific content.
That said, let’s start the tutorial.
Step 1: Install and Activate Formidable Forms Plugin
First, you’ll need to sign up for a Formidable Forms account. Make sure you get the plan which includes the Views feature.
After you sign up, head over to your WordPress admin dashboard and open the Plugins » Add New tab. Search for the Formidable Forms plugin and click on the Install button there.
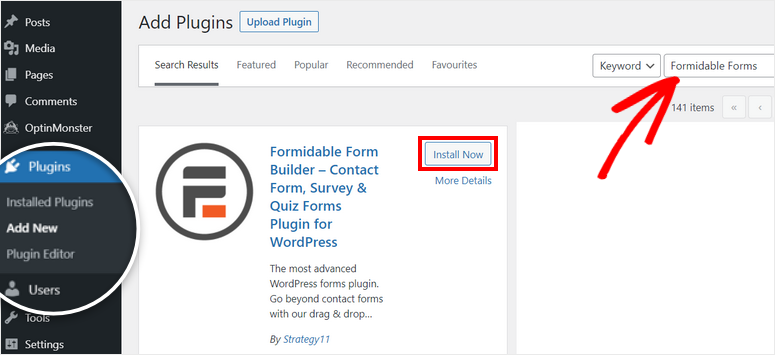
If you need more help on this, you can go through our guide on how to install a WordPress plugin.
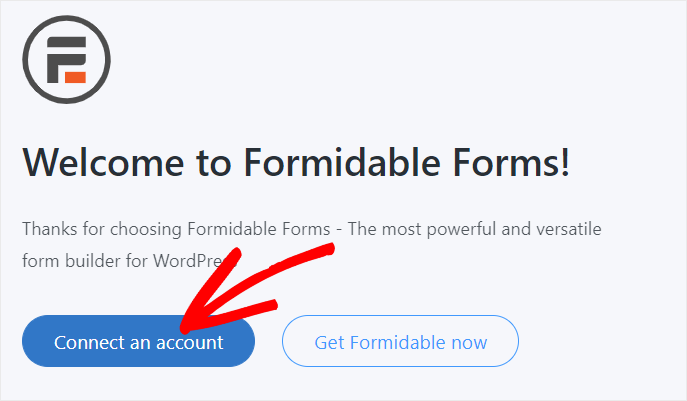
Once you install and activate the plugin, you’ll see a welcome page. Click on the Connect an account button to connect to your account and access all the premium features.
If you aren’t already logged in to your Formidable Forms account, you’ll need to login in again.
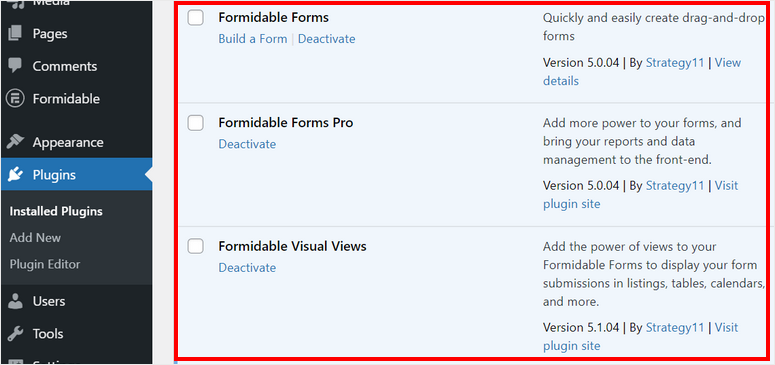
Next, you need to install the Formidable Forms Pro and Visual Views add-on on your site.
You can install them directly from the Formidable tab on your WordPress dashboard or download the plugin file from your account.
Now, you are all ready to create a custom search form in WordPress with Formidable Forms.
Step 2: Add Data for Your Search Form
Before you create a search form, you need to collect data for your search results.
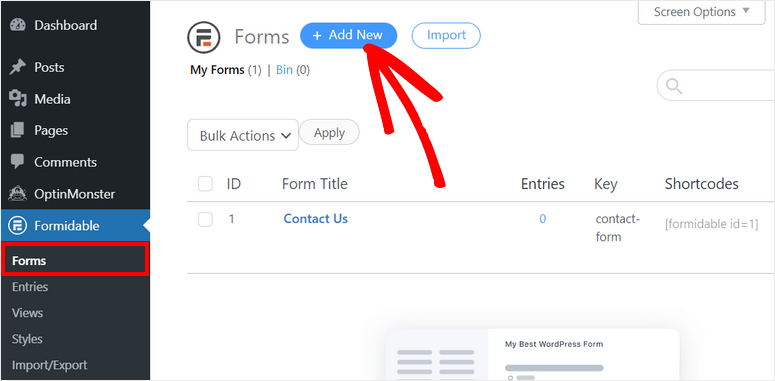
To create a new form, navigate to Formidable » Forms and click on the + Add New button.
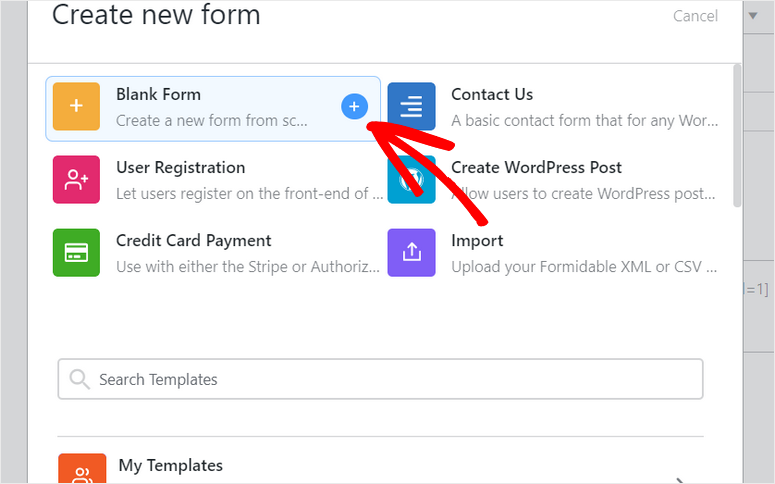
You’ll see a popup where you can choose a template for your form. We are going with the blank form template for this tutorial.
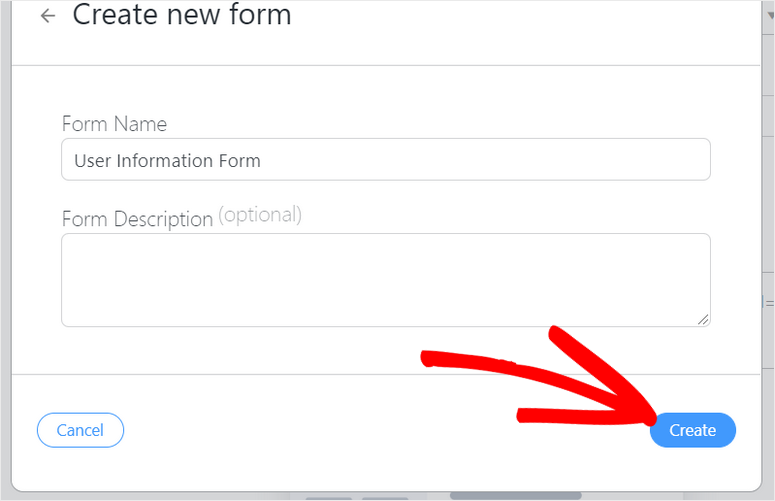
Then, you need to add the name and the description for your form.
Once you’re done naming your form, click on the Create button there to launch the drag and drop form builder.
In the form builder, you can see the form fields on the left side and the form preview on the right side of the page.
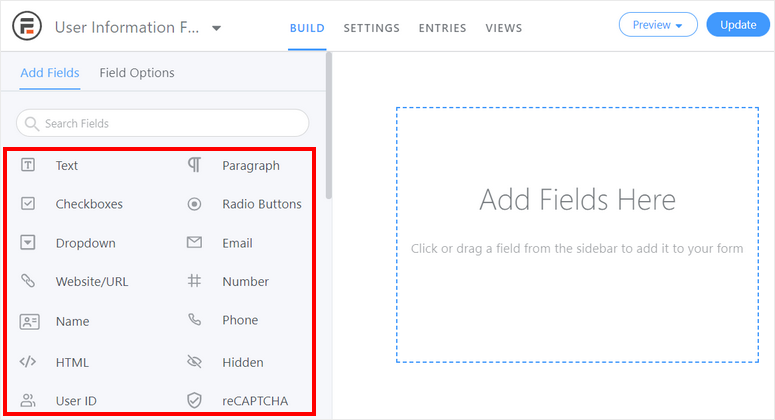
To insert any form fields, you can simply drag and drop them from the fields menu to the form preview.
Here, we are adding these fields: First Name, Last Name, Email, and Country. You can add any of the fields according to your requirements.
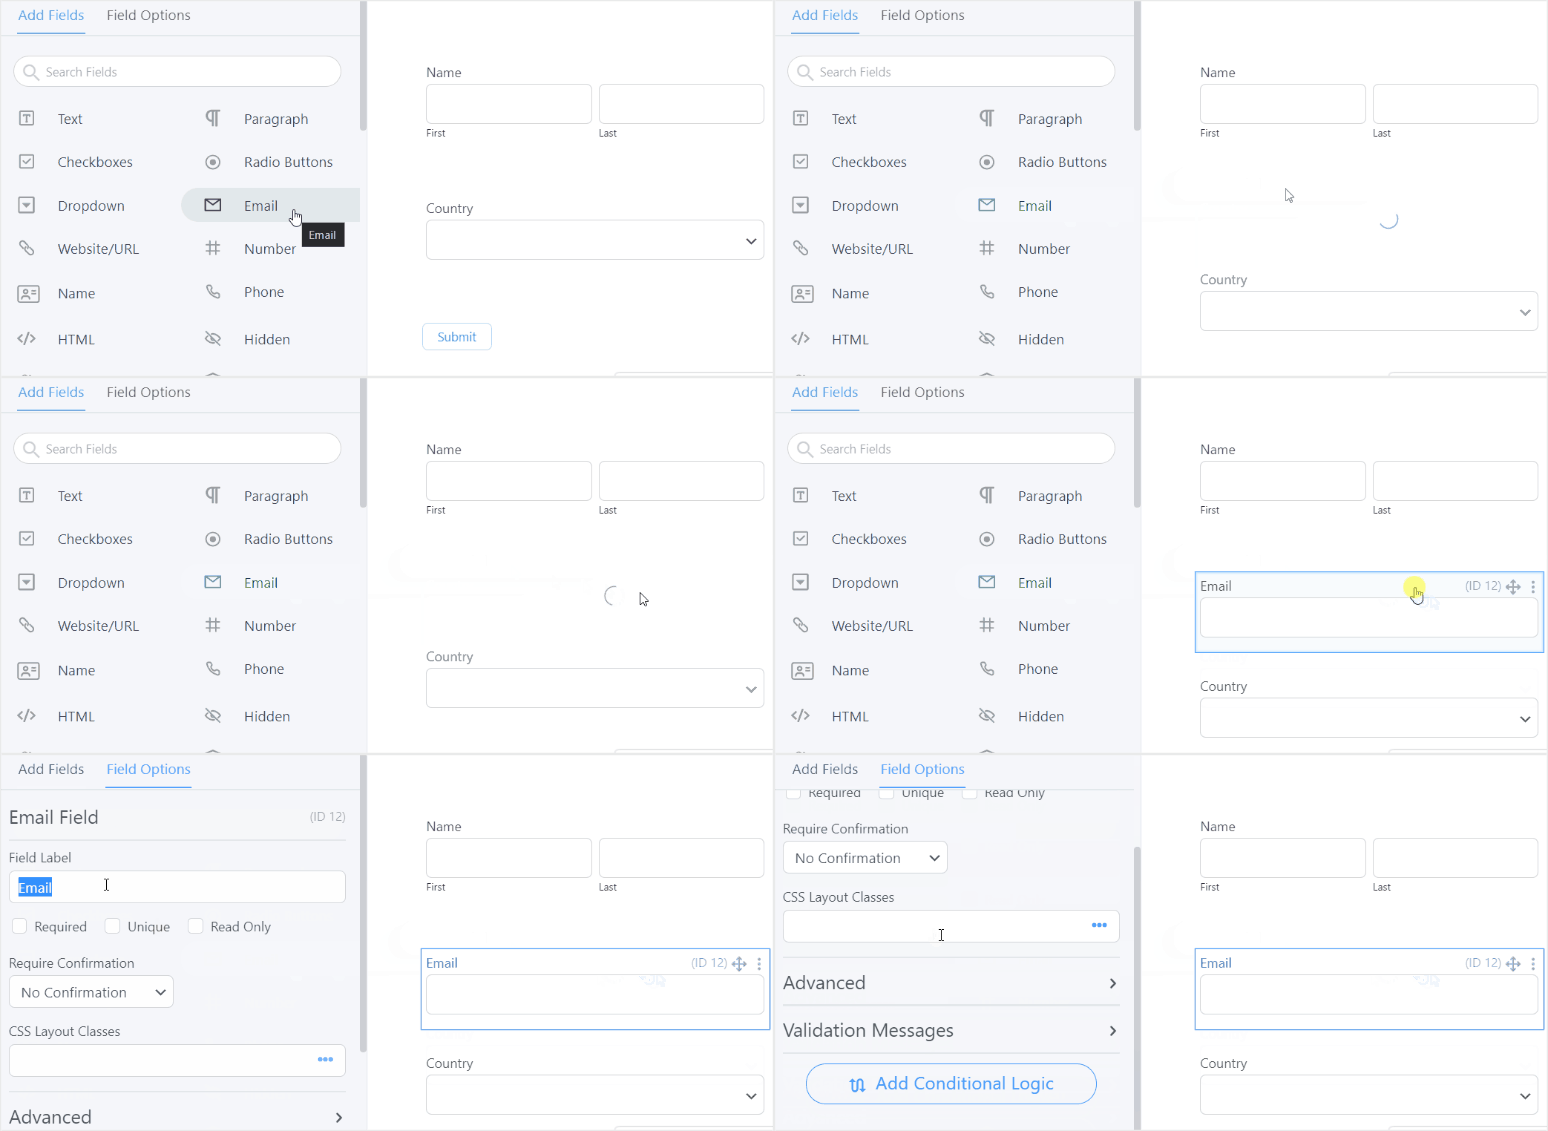
To customize any field, you just need to click on it and you can see the form settings. There are many options such as label, required option, custom CSS, and more.
You can even use the conditional logic option to show or hide form fields according to user input.
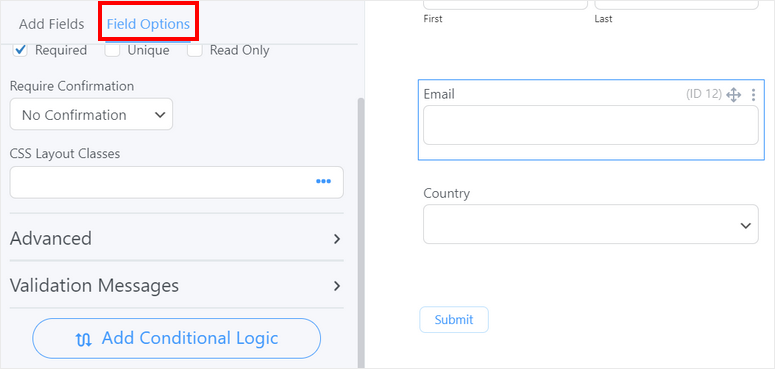
When you’re done adding fields, click on the Update button at the top-right corner of the form builder.
Now all you need to do is publish this form on your site to collect data from your users or website members.
Or, you can also import a data file from your computer. For this, open the Entries tab on the top of the builder and click on the Import button.
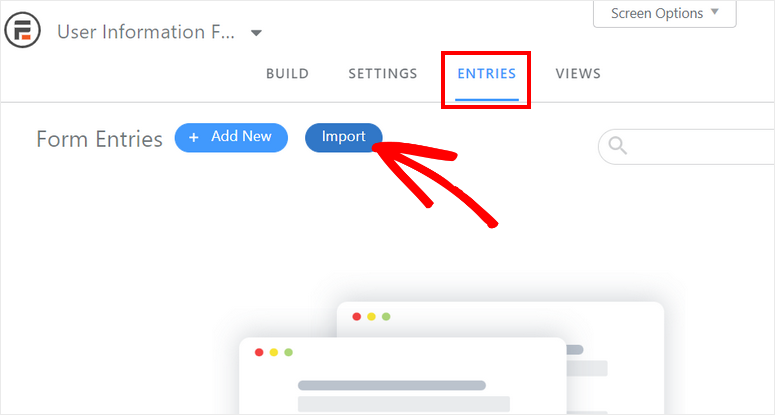
Then, you’ll see a window where you can upload any CSV or XML file to import data to your form. You can map the fields to the data in the file to import records.

After collecting the data, you’ll need to create a custom search form in WordPress to let users search on your site.
Step 3: Build Your Custom Search Form
To create a search form, you need to follow the same instructions in Step 2.
Go to Formidable » Forms » Add New and select a blank template. Then, give your custom search form a name and description.
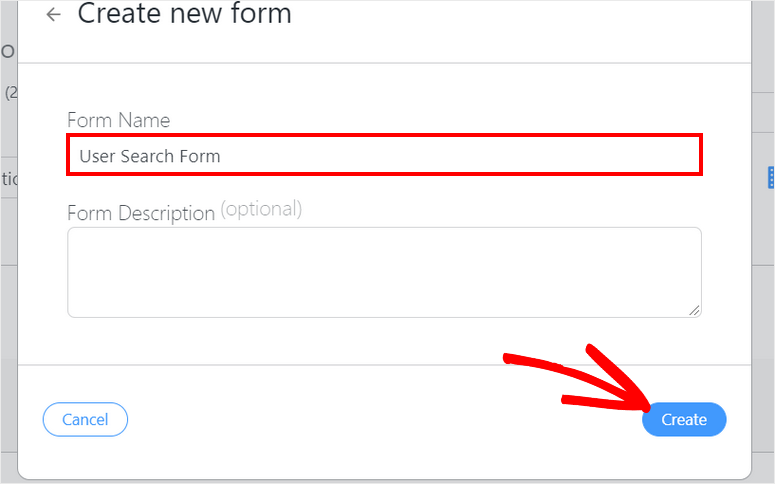
In this form, we are going to add 3 form fields to let users search the data on your site. The fields are First Name, Last Name, and Country.
You can use the text form field for the names and a search dropdown field for country search.
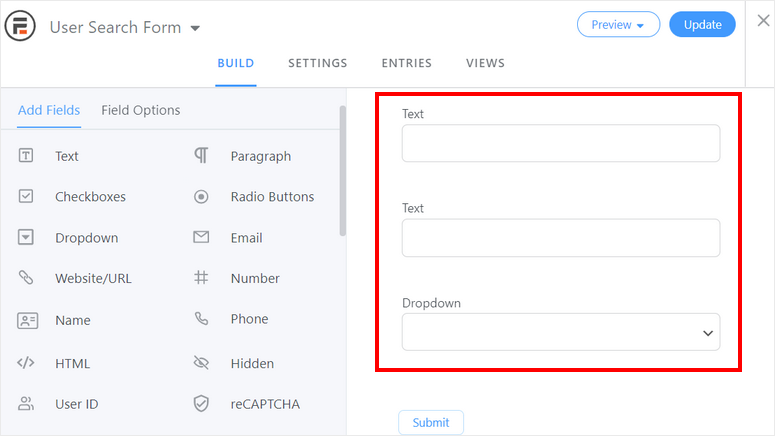
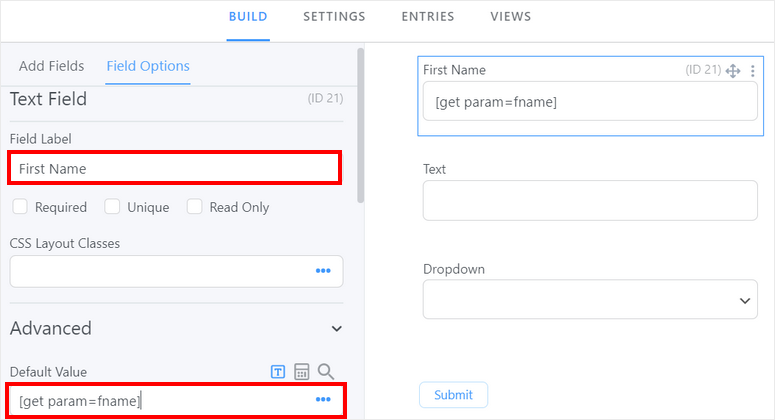
In the First Name field settings, you need to add the default value to connect your search form with a results view later on.
For this, add this shortcode on the Default Value option in the field settings:
[get param=fname]
Here, “fname” is the text we use for the first name field to connect with the view.
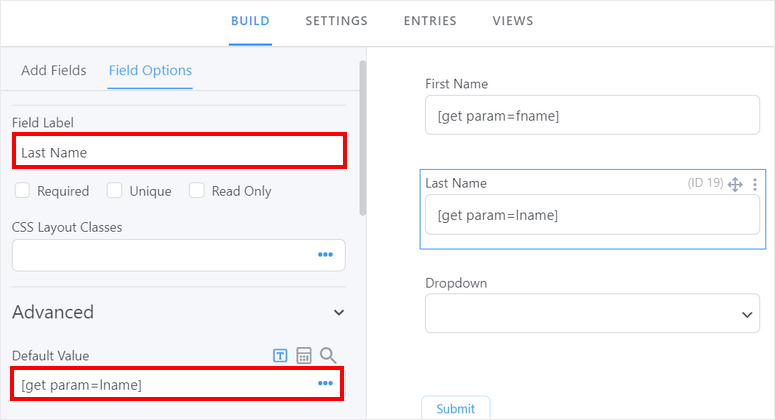
In the Last Name field settings, we are going to add the same shortcode:
[get param=lname]
Here, “lname” is the text we use for the last name field to connect with the view.
In the Country field settings, we need to add the country names in the dropdown option. Make sure you leave the first option blank.
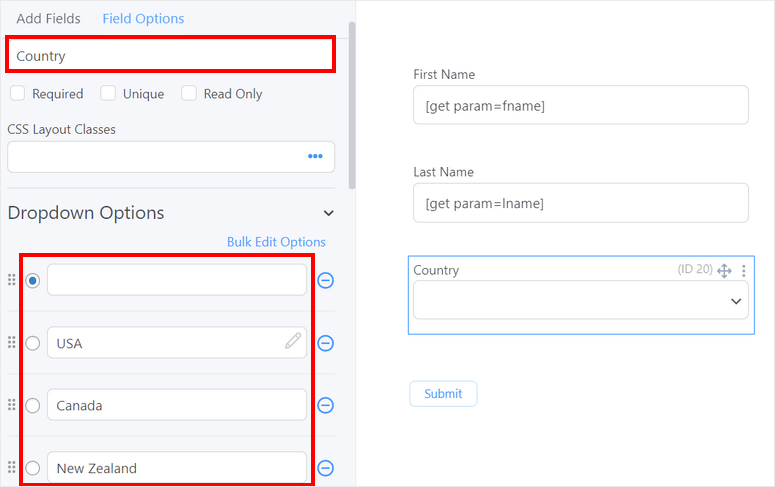
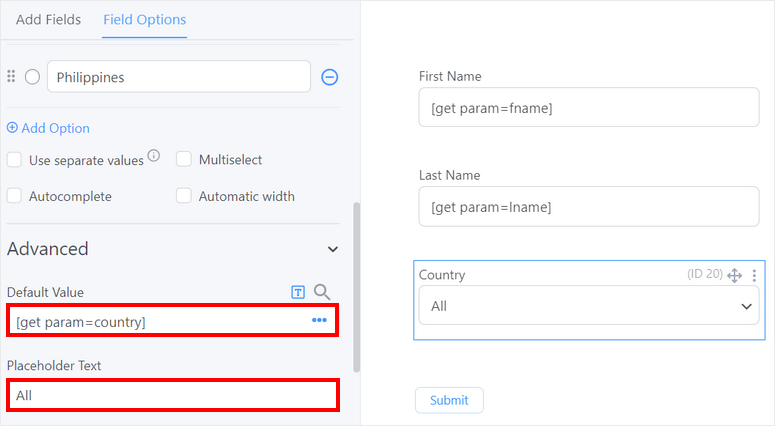
If you scroll down, you can see the option to add a placeholder text. And same as the other two form fields, you need to add a default value here. Insert the shortcode:
[get param=country]
Here, “country” is the text we use for the country field to connect with the view.
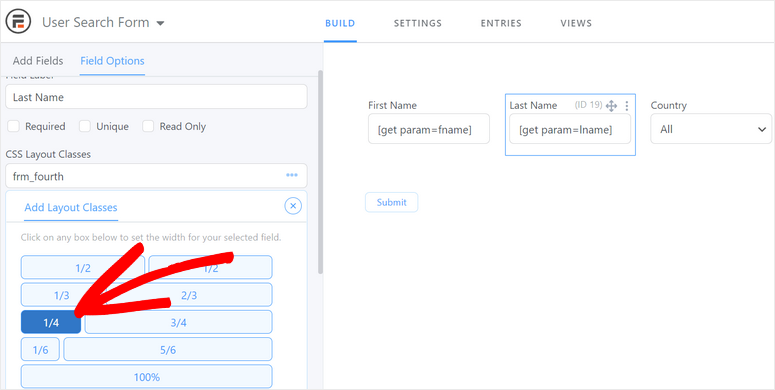
Once you are done adding the input types, you can change the layout of the form fields.
To make them show up in a single horizontal line, go to the CSS Layout Classes option for each field and select the 1/4 option.
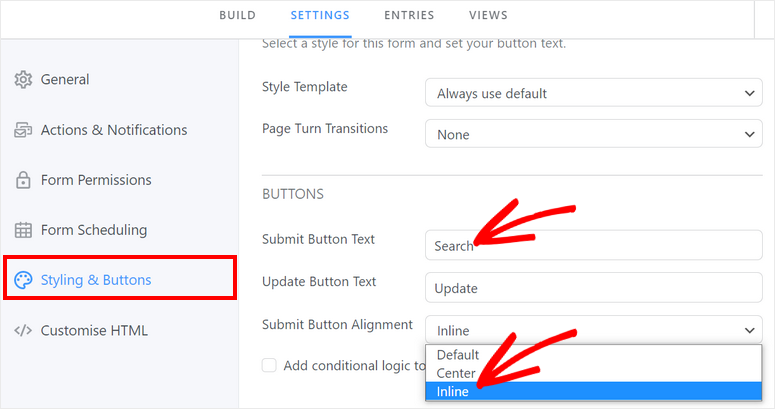
If you want to customize the button, navigate to the Settings » Styling & Buttons tab and go to the button settings.
Here, you can change the submit button text to Search and choose button alignment to Inline. This will make your search button appear in the same row as your form fields.
Now that you’ve learned how to create a custom search form in WordPress, let’s insert this form and the results on a webpage.
Step 4: Create a Search Results View
You need to create a view to display the search results and the search form on the same page.
To create a new view, open the Formidable » Views page and click on the + Add New button.
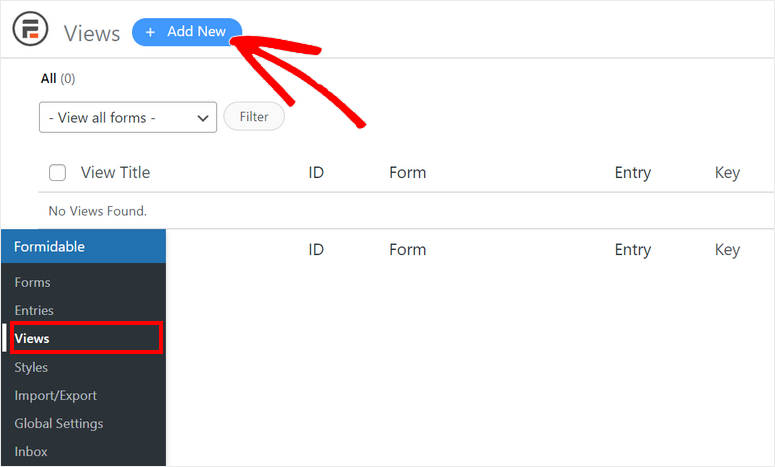
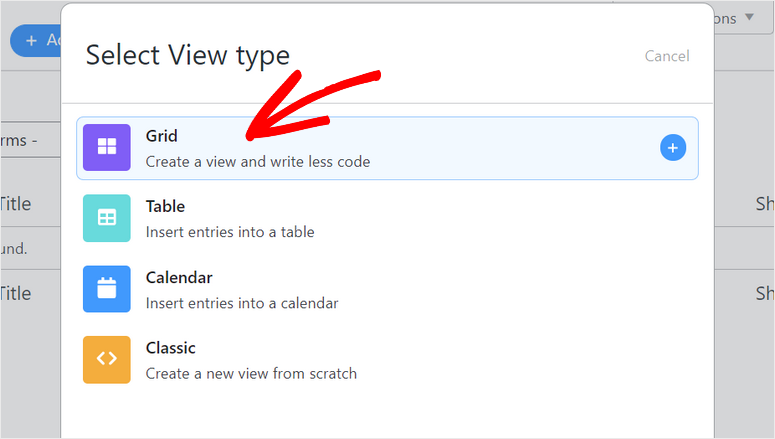
Then, you can see the popup that lets you choose between Grid, Table, Calendar, and Classic view types.
For this tutorial, we are going to choose the grid view for the search form results.
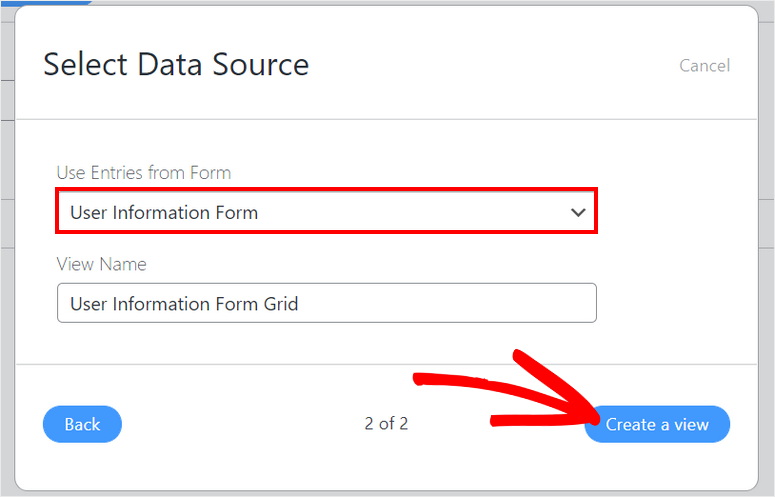
After that, you can see the options to select a form for entries and add the name for your results view. Make sure you select the data collection form that you created in Step 2.
Click on the Create a view button when you’re done.
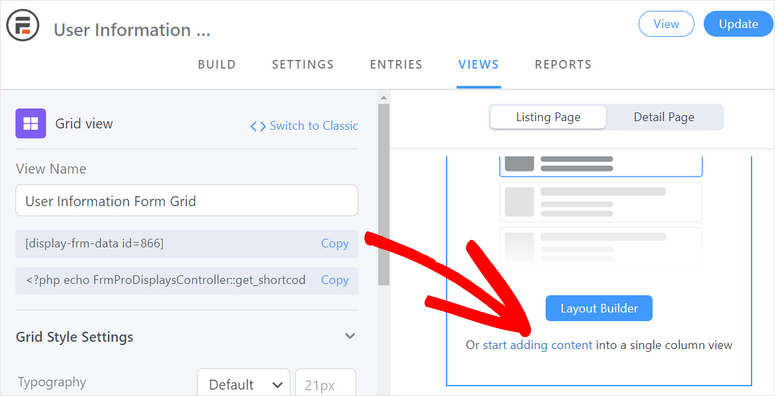
In the views builder, you can see the styling options on the left side and the view layout builder on the right side. Click on the start adding content link to add your entries.
Click on the “+” icon to start adding your listing to the views. This will open the listings content editor.
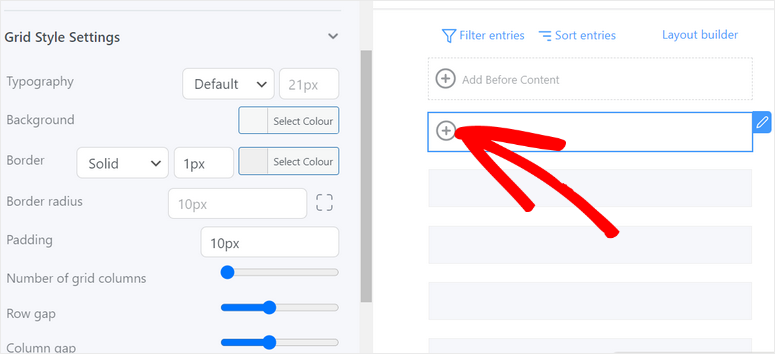
In the listing page content editor, you can add the form fields from the Customization option on the right side of the page. Just click on the form fields there to insert them into your results view.
Then, you can style the field keys to display the form fields in the layout you want.
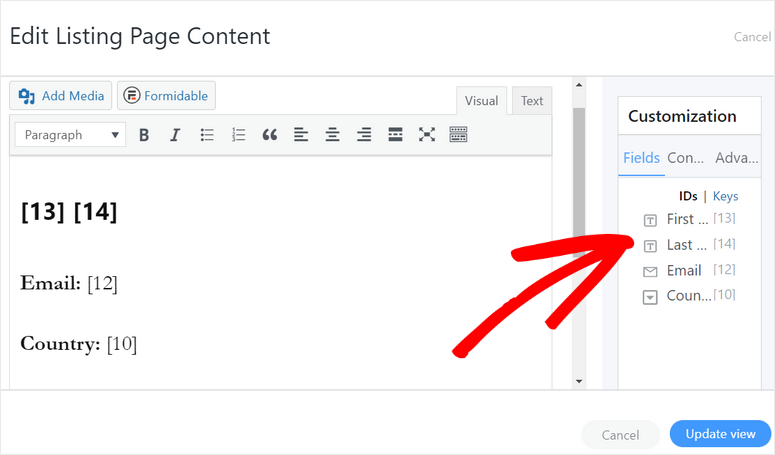
When you are done, click on the Update view button. Now you can see all the entries on the views page.
You need to add the search form on this page. For this, click on the Add Before Content option
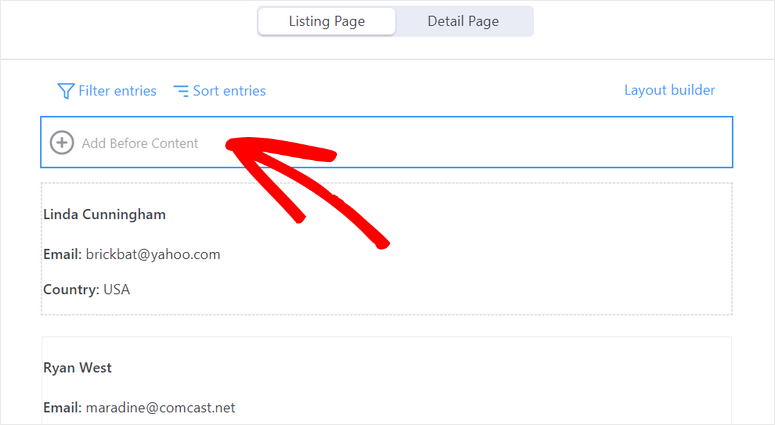
This will open the content editor where you can insert the custom search form you created in Step 3.
All you need to do is click on the Formidable button and select your search form to insert the form shortcode.
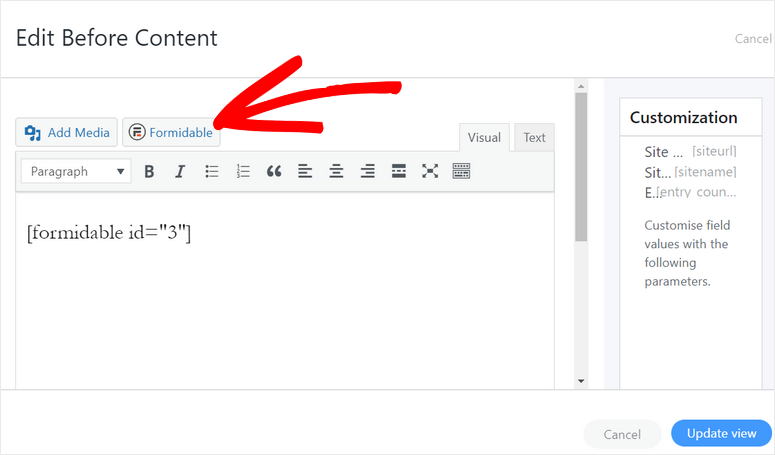
Click on the Update view button to your custom search form to the view.
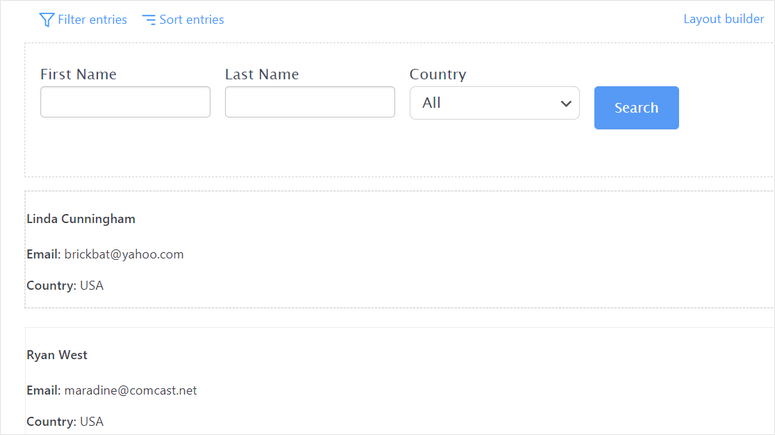
In the next step, we’ll show you how to publish the results view on your WordPress site.
Step 5: Publish Search Results View
To add the search results view on your site, you need to create a new page and search for the Formidable Views block.
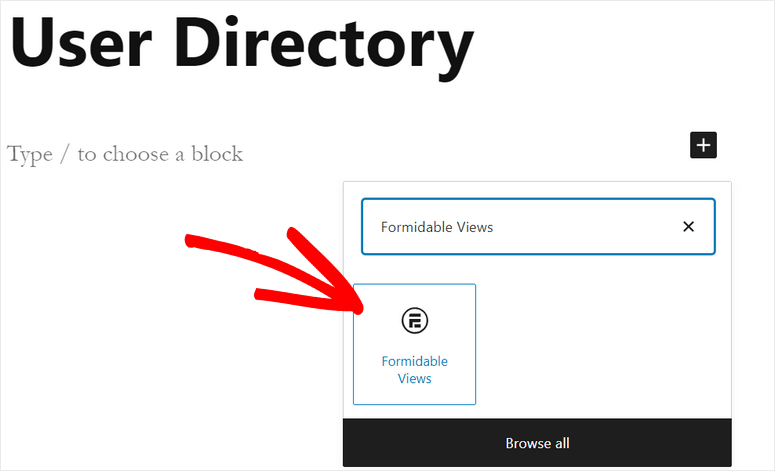
After you add the view, you can publish the page on your site. Your page will look something like this.
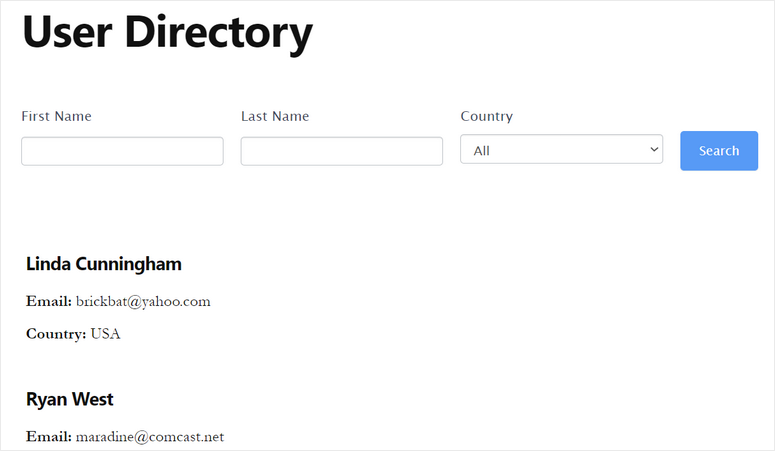
Wait! You’re not done yet. You need to connect your custom search form and the results view to let users search for content on your site.
Step 6: Connect Custom Search Form with the View
To connect your search form, go to Formidable » Forms and open the Settings option of the search form.
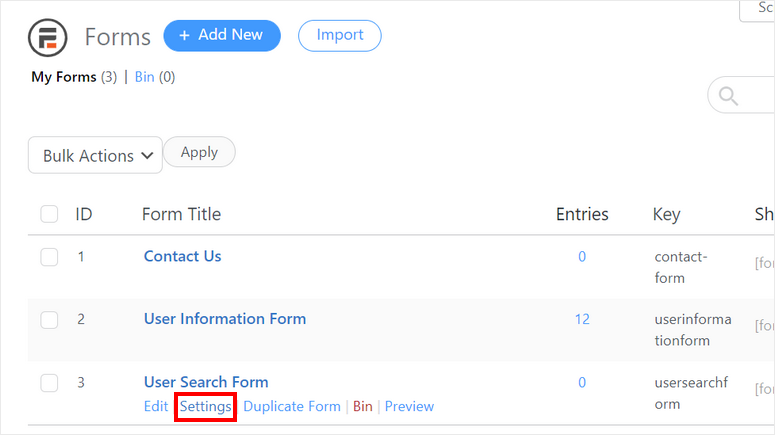
Here, you can go to the On Submit option and select the Redirect to URL option. Then, you need to add the link to the views page you created in Step 5.
For this, copy the page URL and add this part: “?fname[21]&lname=[19]&country=[22]”.
You can insert field text and keys so the redirection URL looks like this:
http://yoursitename/user-directory/?fname[21]&lname=[19]&country=[22]
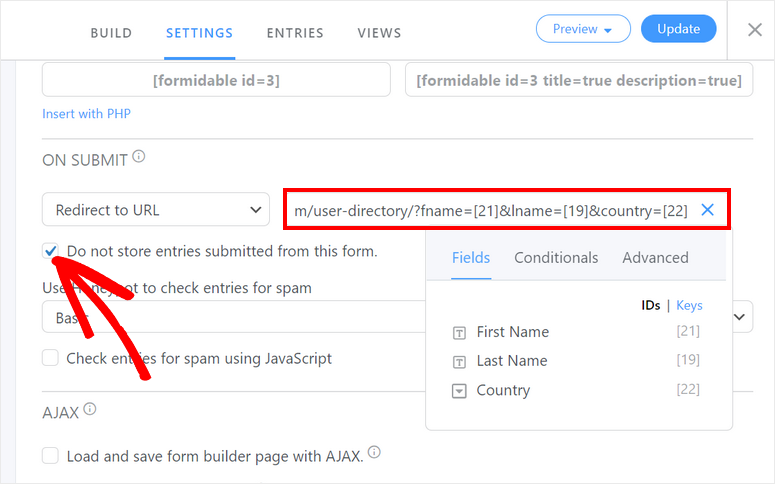
Remember to enable the Do not store entries submitted from this form option for this form.
Now, you need to add filters to your result views so that users can search the listing by the form fields you added.
For this, open the view you created earlier and click on the filters option at the top of the page.
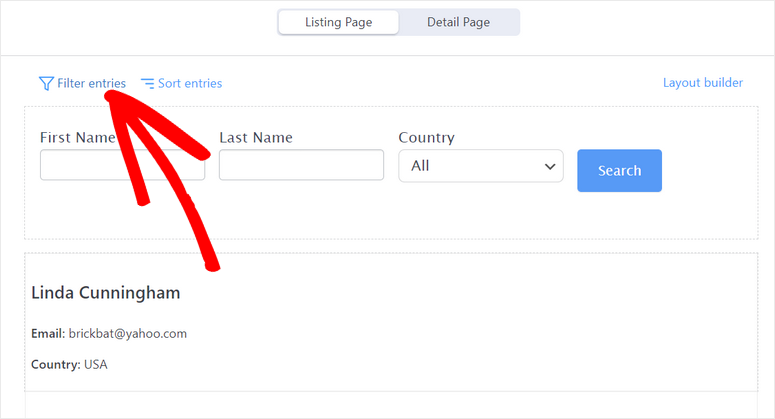
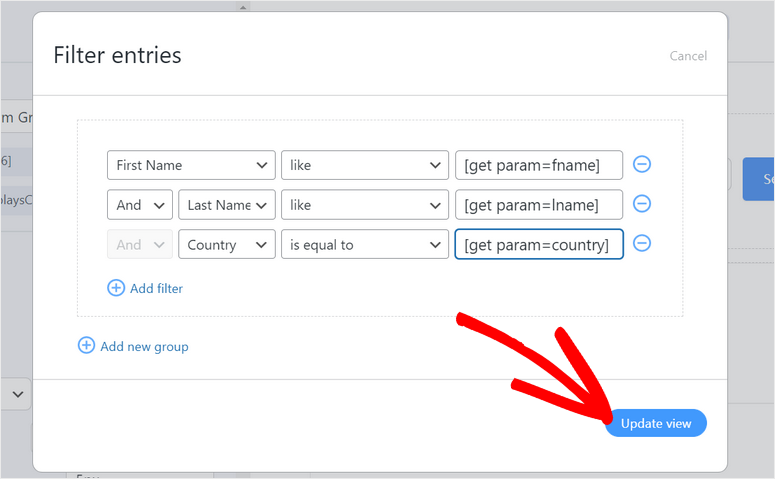
Then, you need to add the filters for the First Name, Last Name, and Country and enter the shortcode as your default value for each field.
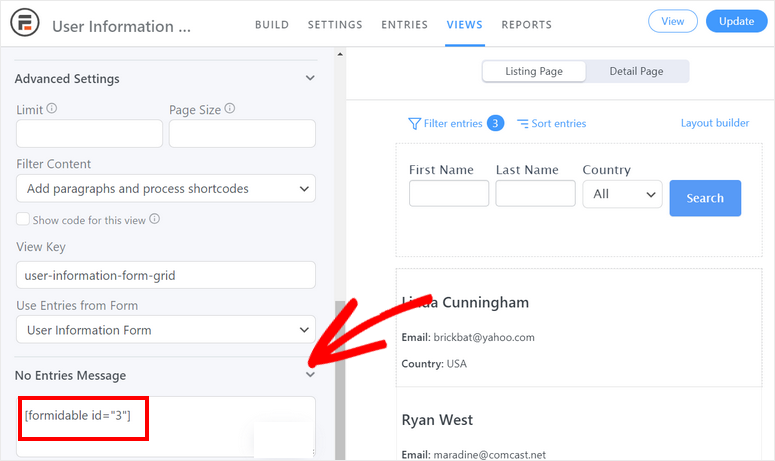
One last thing you need to do is insert the shortcode of your search form in the No Entries Message option on the left menu. This will let users search for more content after each search.
Don’t forget to update the view after you’re done with the settings.
Test Your Custom Search Form
To check if your search form is working correctly, reload your search page and use the filters to search for listings.
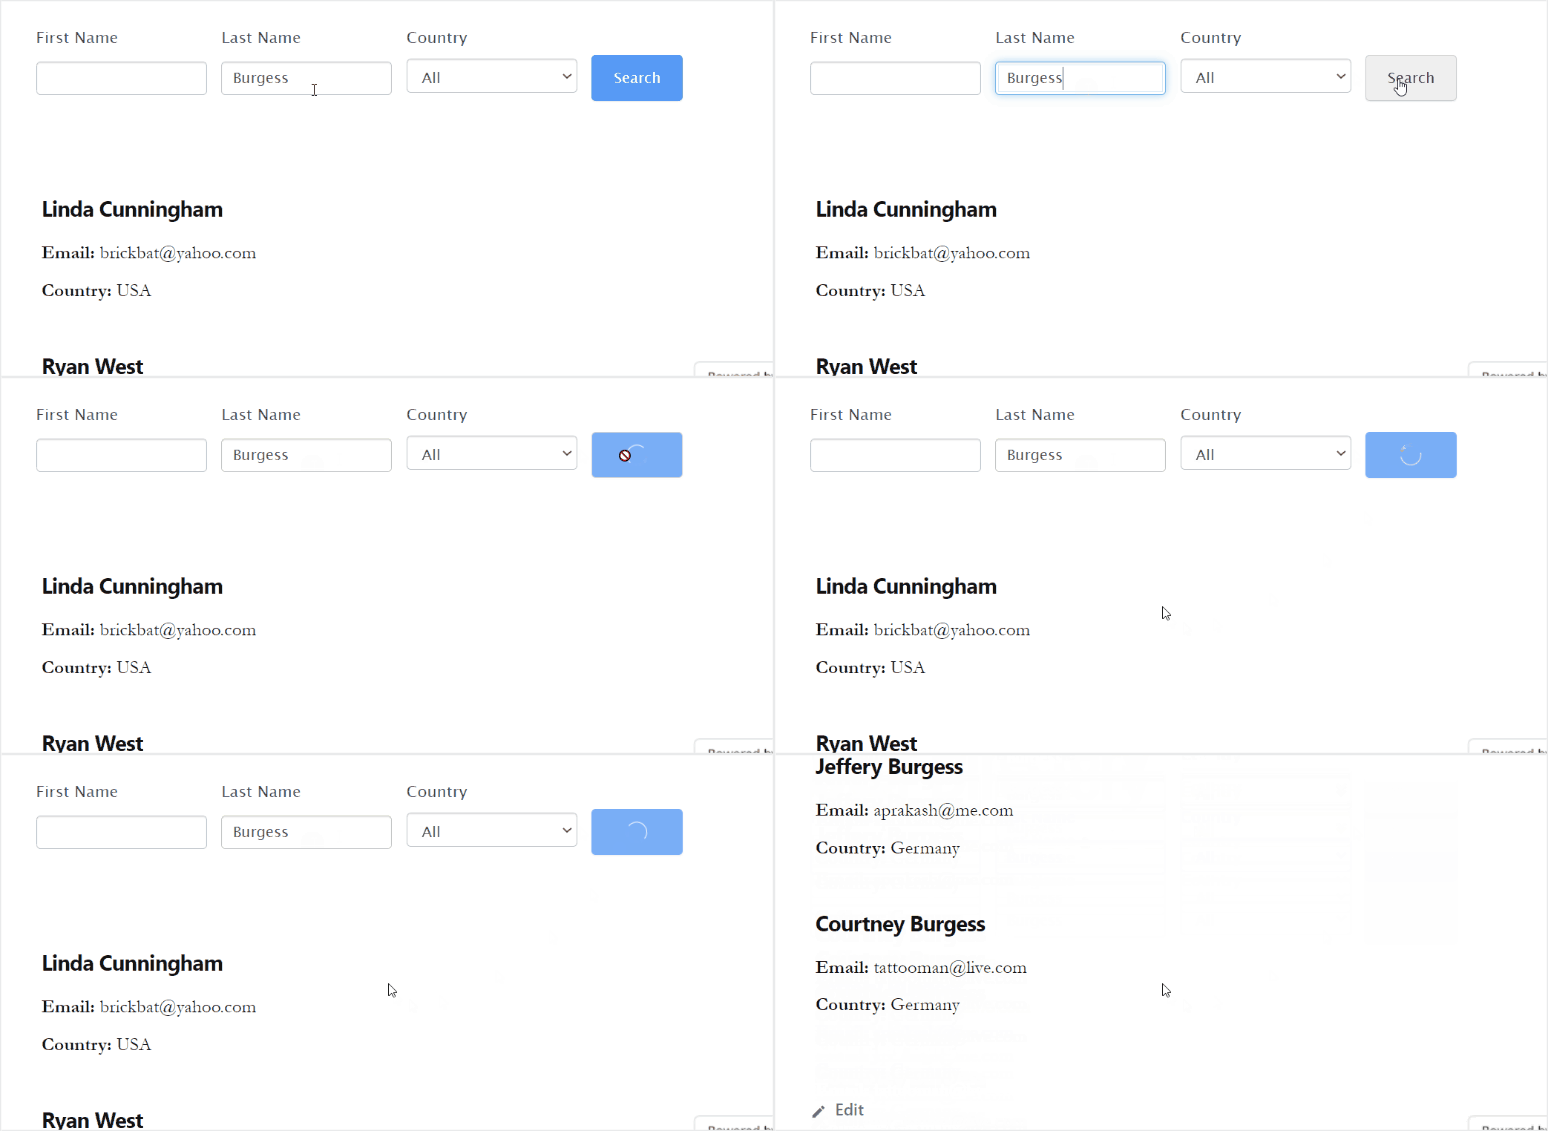
With that, you know 3 ways to add a search form to your site. While the default WordPress search option is free, we do not recommend it if you don’t know what you’re doing with code. The SearchWP plugin is by far our favorite method. It’s easy to use and adds a way more advanced search function to your site.
We hope this article helped you easily create a custom search form in WordPress with the help of the Formidable Forms plugin.
For your next steps, you can check out these resources:
- How to Add a Custom Booking Form to Your WordPress Site
- The Best Form Builders Compared (Free and Paid)
- How to Create a Registration Form with PayPal Payments in WordPress
These posts will help you add more functionalities to your WordPress site with the help of the best WordPress form builders.

I need to add a searchform on my website, in particular I need 3 select for category+subcategory1+subcategory2 other selects for custom taxonomies, checkboxes for tags, 2 number fields for the “distance from the sea” (min.-max), to start with- Which is the best solution?
awesome blog post very usefull