
Looking to boost engagement on your WordPress site with a powerful thank you page?
We’re excited to explore how this simple yet effective tool can transform your visitor interactions, nurture leads, and turn prospects into loyal customers.
Creating a thank you page can help you express more than just gratitude.
It’s a strategic opportunity to deepen connections and drive conversions.
In this guide, we’ll walk you through the process of creating a thank you page in WordPress, no coding skills required.
From setting up the page to customizing it for maximum impact, our step-by-step instructions will empower you to enhance your site’s user experience effortlessly.
Whether you’re running a blog, an e-commerce store, or a service-based business, we’ve got you covered with practical tips to make your thank you page a game-changer.
Get ready to elevate your WordPress site and build stronger relationships with your audience!
Why You Should Build a Thank You Page
A thank you page is a web page where your visitors are sent after completing an action or task on your website. This can be signing up for a newsletter, placing an order, or registering for a webinar.

While most site owners see it as a way to thank users for performing any action, you can use it for so much more than that.
A thank you page can persuade them to connect with your brand on other platforms or direct them on what steps they need to take next.
Here are some of the ways you can use the thank you page on your website:
- Display Instructions: After a customer places an order on your site, you can redirect them to a thank you page where you tell them that they’ll receive an email updating them when the product is shipped. You can also link to customer support if they’d like to connect with you.
- Build Your Email List: Persuade your customers to sign up for your mailing list in exchange for an offer such as eBooks, guides, and more. This helps to build a good relationship with the existing customers in the future.
- Cross-Sell Related Products: Online stores can use a thank you page to promote related products that the customers are likely to buy. You can even grab their attention with discount coupon codes and time-limited offers.
- Drive More Traffic with Sharing Options: If you want to reach out to a wider audience, you can add social media sharing buttons on your thank you page.
- Get Referrals: You can let users know that if they refer a friend, they’ll get reward points, cashback, or a discount on their next purchase.
All in all, adding a thank you page is a great way to increase your sales and improve the user experience on your site. Whether you run a small business or an established eCommerce site, you’ll need an optimized thank you page to nurture new leads and recurring customers.
How to Make a Thank You Page in WordPress?
You may think building an interactive thank you page is not something you can do without the help of a developer.
But that’s not true. You’ll find many page builder plugins that you can use to make a thank you page in WordPress.
Our favorite page builder plugin is SeedProd.

SeedProd is the best website builder for WordPress that lets you create themes and all types of pages such as thank you pages, landing pages, coming soon pages and so much more.
With SeedProd, you can create a thank you page from scratch or start with a pre-designed template. It comes with an easy-to-use drag and drop builder that lets you add and remove any page element as you prefer.
Also, you’ll find tons of customization options that you can use to change the design and layout of your thank you page.
Not convinced? Here are some of SeedProd’s top highlights:
- 300+ responsive and beautiful templates
- Built-in modes for maintenance, coming soon, 404, and login pages
- WooCommerce blocks such as add to cart, best selling products, featured product, and more.
- High converting blocks like giveaways, contact form, optin form, countdown timers, and social sharing
- Pre-built smart sections for header, call to action, FAQ, and more
- Integration with all the popular email marketing services such as Constant Contact, AWeber, ConvertKit, and other services
- Protect your website from spam and malicious attacks with Google reCAPTCHA
Now that you know which page builder to use, let’s learn how to make a thank you page in WordPress in a few easy steps.
Step 1: Install and Activate SeedProd
First, you’ll need to sign up for a SeedProd account. SeedProd offers different pricing plans that are tailored to fit the requirements of all types of business.
After you sign up, access your SeedProd account dashboard. In the Downloads tab, you’ll find the download file along with the license key.
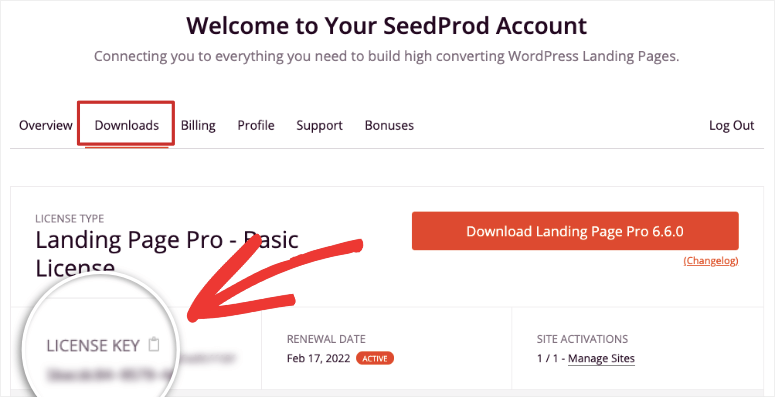
You need to install this plugin file on your WordPress site. For more information on this, see our guide on how to install a WordPress plugin.
Once you install and activate SeedProd, open the SeedProd » Settings tab and enter your license key here.

Then, click on the Verify Key button and you should see a message that the verification was successful.
Now, you’re all set to build your thank you page in WordPress.
Step 2: Create a New Thank You Page
To create a new page, head over to the SeedProd » Pages tab from your admin panel.
The first thing you’ll see here is the options for setting up the Coming Soon mode, Maintenance Mode, Login Page, and 404 Page for your site.
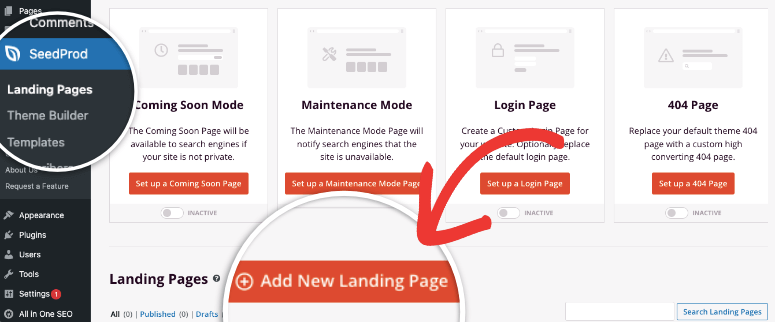
If you scroll down, you’ll see the landing pages section. Here, you can click on the Add New Landing Page button to create a new page.
Then, you’ll see the template library that consists of more than 100 landing page templates. You can use the Thank You filter to see all the thank you page templates available.
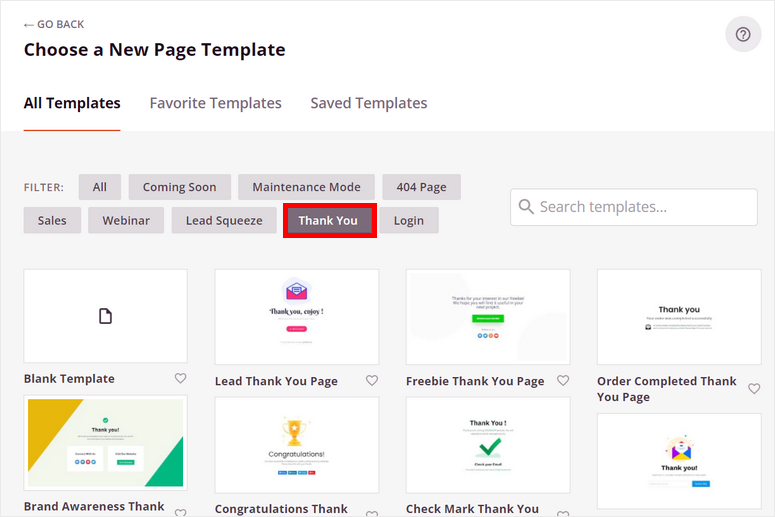
Click on the magnifying glass icon to preview any template and check how they look on the front end. If you find a template that you want to use, click on the tick icon.
For this tutorial, we are going to use the eCommerce Thank You Page template. However, you can choose any other template that matches your style or start with a blank template.
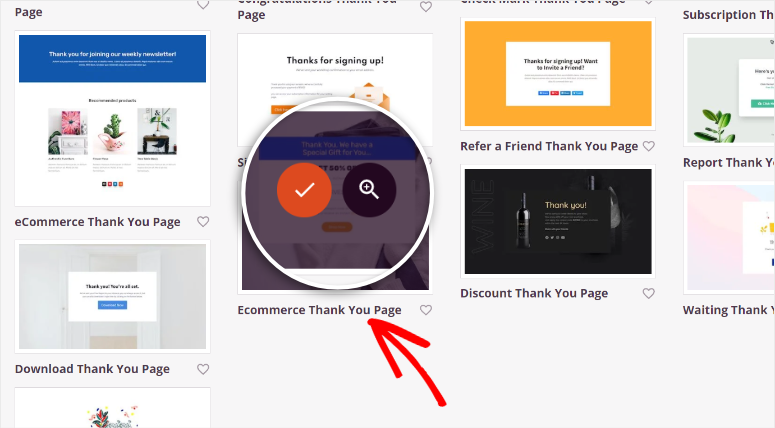
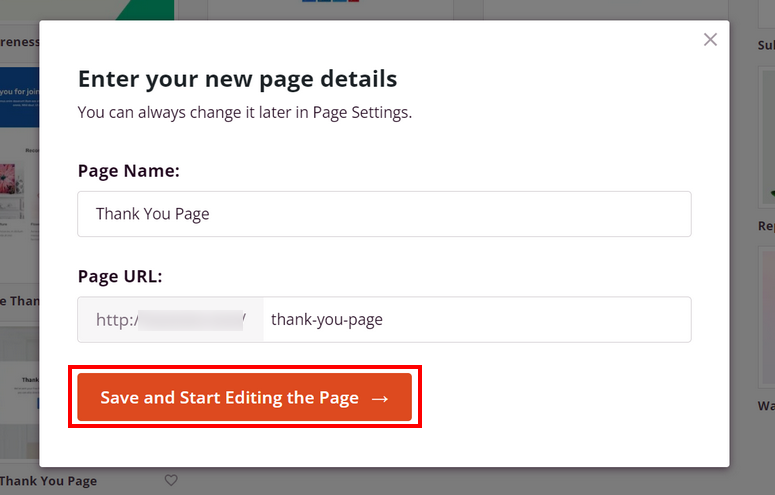
After you select a template, enter your page details and click on the Save and Start Editing the Page button. This will launch the SeedProd drag and drop builder.
Step 3: Customize Your Thank You Page
SeedProd’s templates are designed to be ready to use. All you have to do is change the text and images to suit your offer.
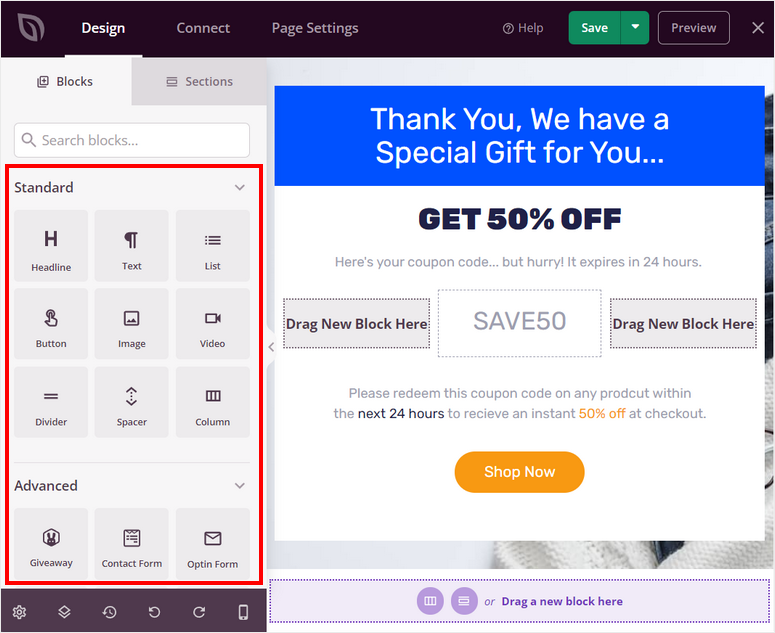
On the left side, you’ll see all the page blocks that you can use, and on the right side, you’ll see the page editing preview area.
The page content blocks are divided into 3 sections: Standard, Advanced, and WooCommerce. You’ll find all the basic page elements like headlines, images, videos, CTA buttons, and more in the Standard section.
The Advanced section includes more unique content blocks that help you convert better. Some of these blocks are:
- Giveaways
- Countdown timers
- Social sharing
- Testimonials
- Contact form
- Optin Form
- Star rating
- and more…
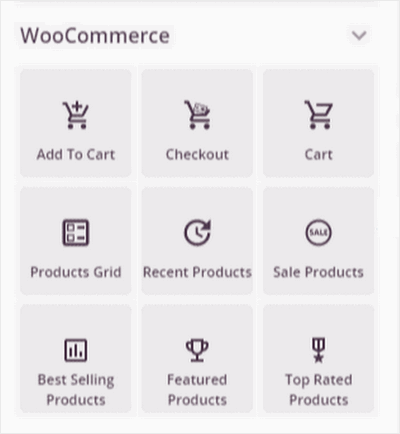
In the WooCommerce section, you’ll find content blocks related to WooCommerce such as add to cart, checkout, products grid, and more. You can use these blocks to promote and sell your products on your thank you page.
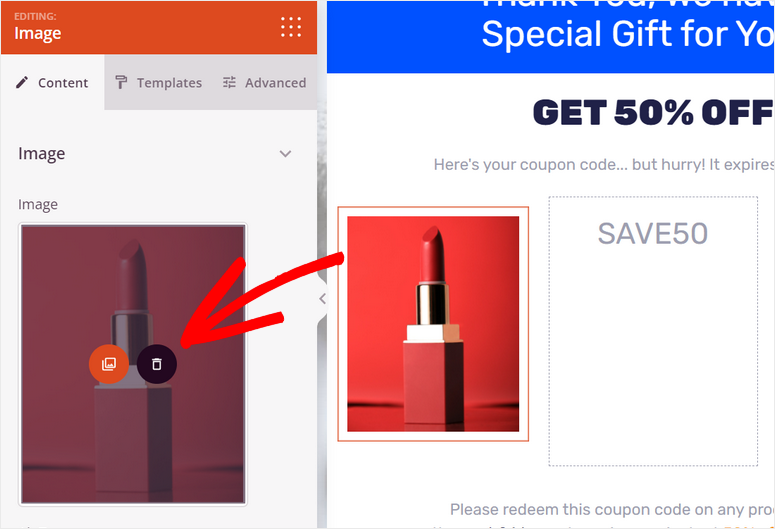
To add a new content block, you can simply drag and drop the required block from the left menu to the page preview. Here, we are adding the Image blocks on the empty space on the template.
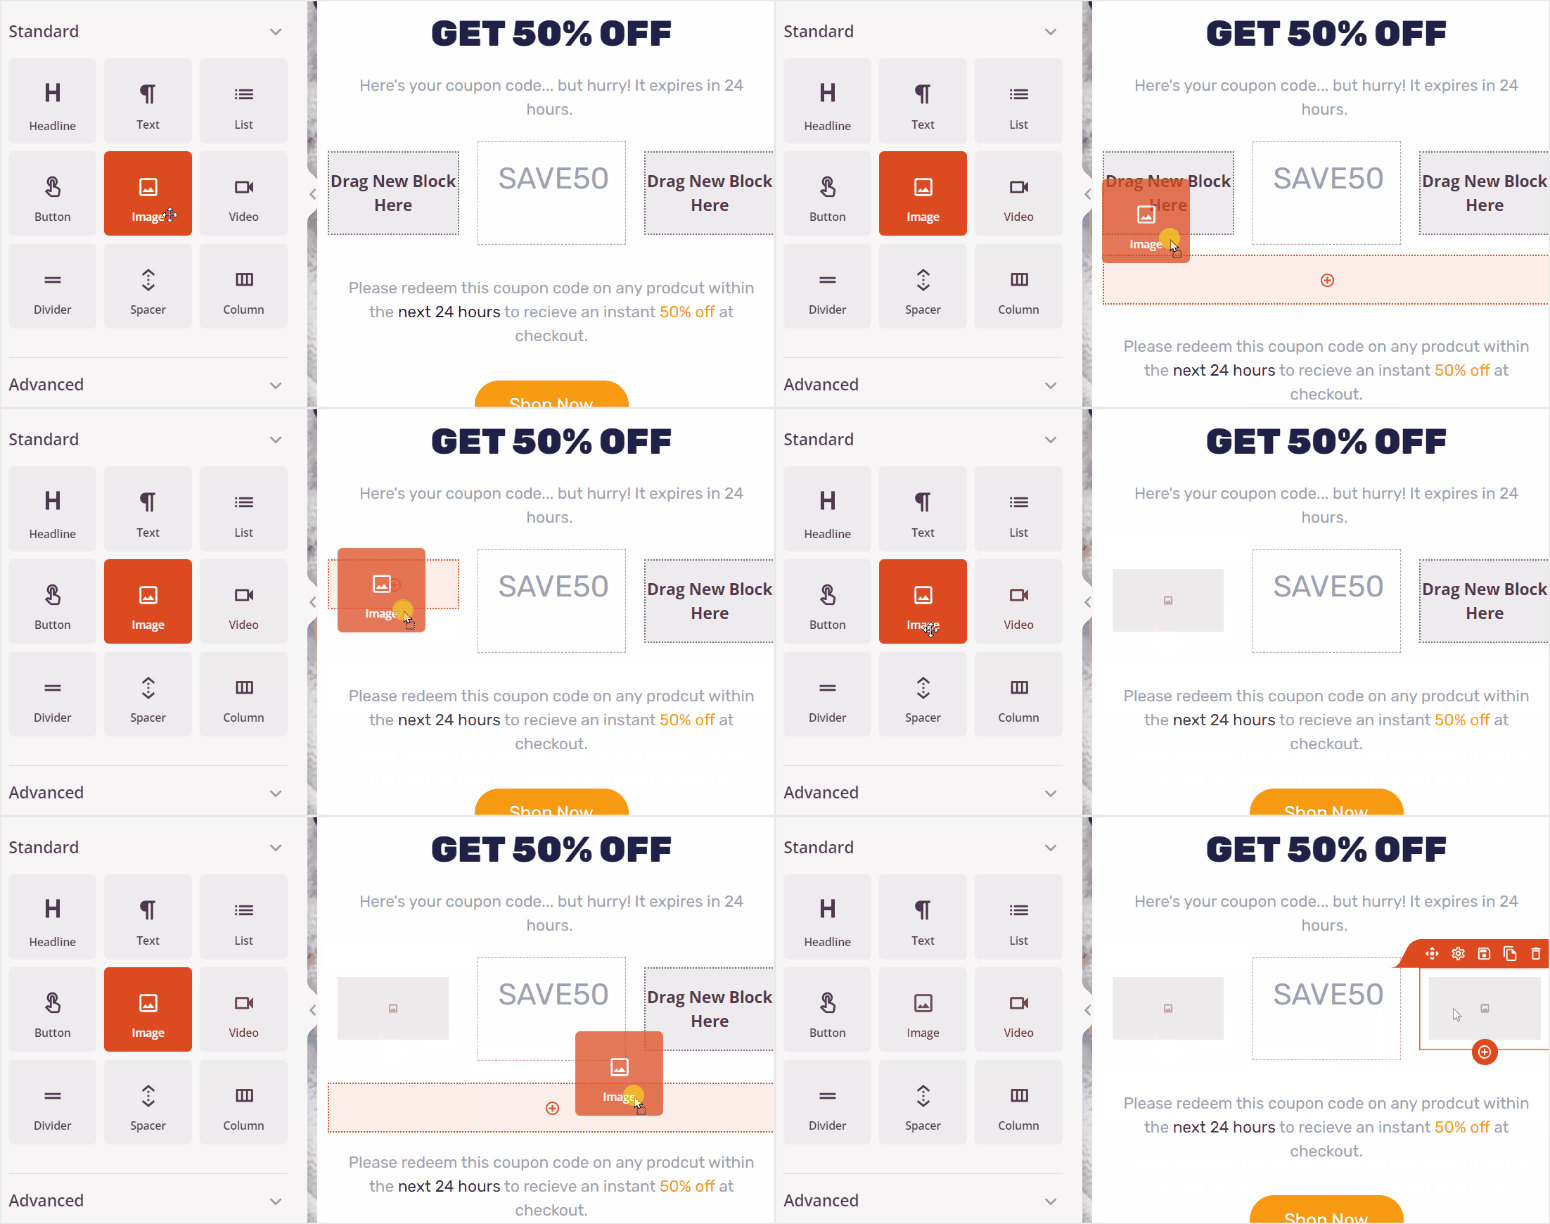
Then, you can upload your images and customize the styling so that they match your design ideas.
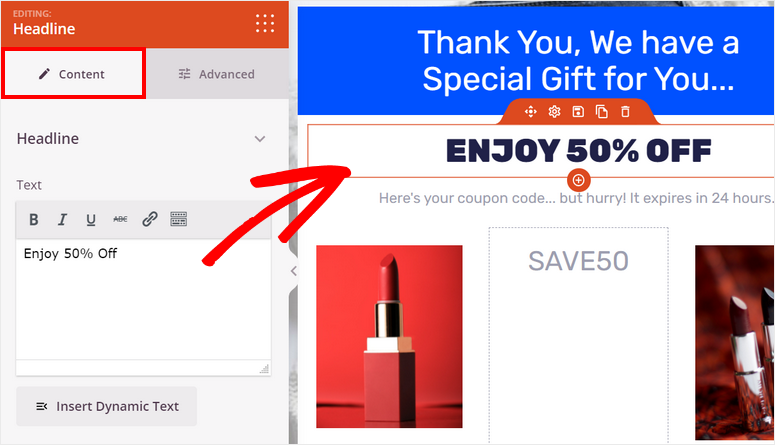
If you want to edit the existing page elements on the template, simply click on it and you’ll see the settings on the left side. You can edit the page headlines and text to add your own content.
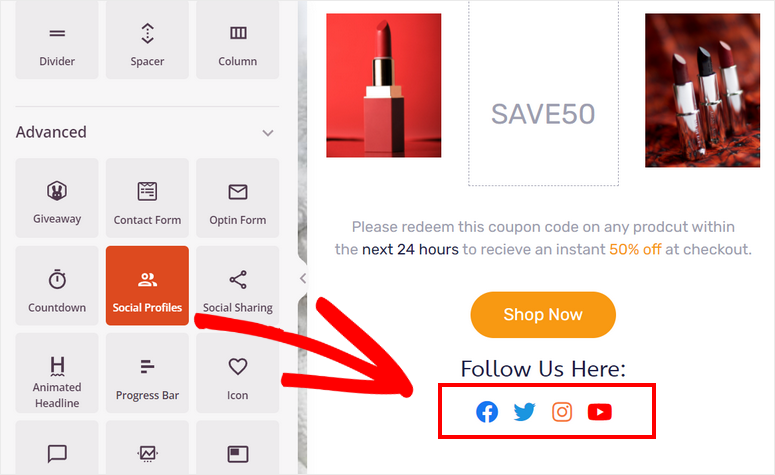
If you want your users to have easy access to follow you on social media, simply add the Social Profiles element on your thank you page. When you click on the social media icon, you’ll see an option in the left menu to add links to your social media accounts.
With that, you’ve learned how to make changes to individual elements of your page.
Now SeedProd lets you go a step further and apply universal settings to your whole page. This helps you keep the font, font size, color, and background consistent.
At the bottom-left corner of the page builder, access the Global Settings icon.
This will open up a menu with 4 options:
- Fonts
- Colors
- Background
- Custom CSS
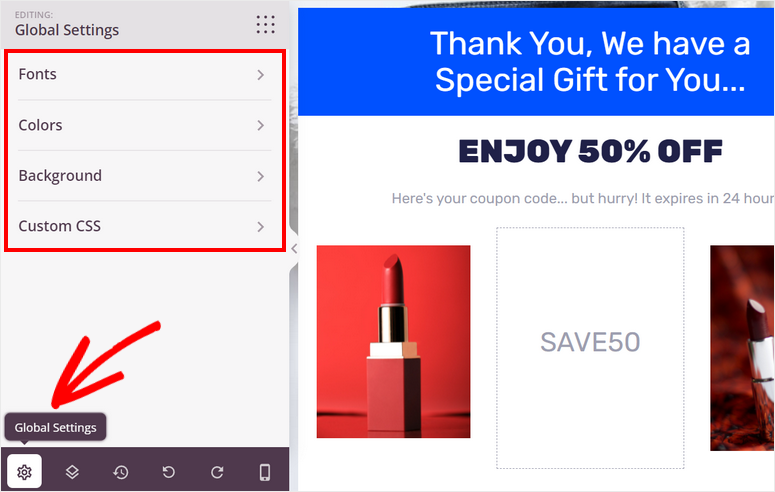
If you select a font here, it will apply itself across the entire page. SeedProd lets you set different fonts for headings, subheadings, and text.
You can also apply a background color or image to your page. One of the best things about SeedProd is that it gives you the option to upload your own image or search for a stock image directly from the page builder.
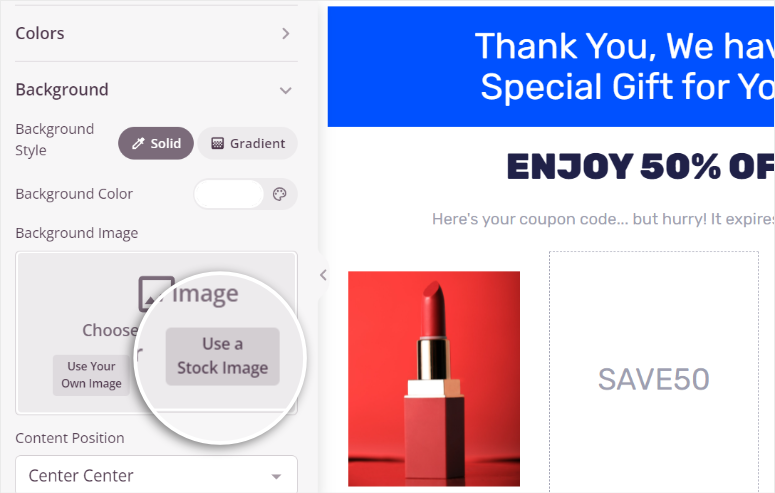
After you’re done customizing, click on the Save button. Now, we’ll show you how to connect your thank you page to your email service provider.
Step 4: Connect Your Email Service Provider
SeedProd offers integrations with all the major email marketing services such as Constant Contact, AWeber, ConvertKit, and more. So you can automatically import user information to your email account.
To connect your email service provider, navigate to the Connect tab at the top of the page builder. Here, you’ll see all the email service providers that you can integrate.
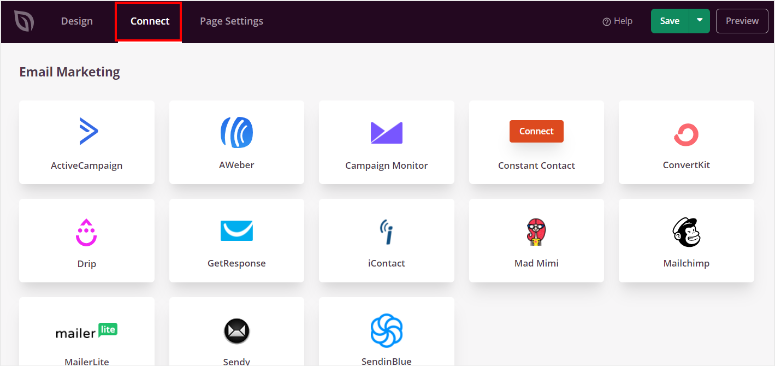
You can select the email marketing service of your choice and click on the Connect New Account button. Then, follow the onscreen instructions to connect your account.
Many email service providers will ask you to enter your API key to complete the connection. You’ll find this key in your email account dashboard.
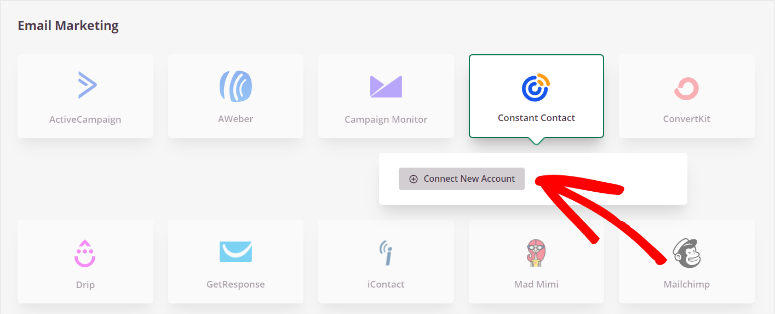
Once connected, make sure you save the settings. Now, you’ll be able to send automated emails to subscribers.
One last thing you need to do before you publish your thank you page is to configure the page settings.
Step 5: Configure the Page Settings
To optimize your thank you page and improve the search result rankings, you need to analyze many factors. SeedProd lets you easily monitor these factors on the Page Settings tab.
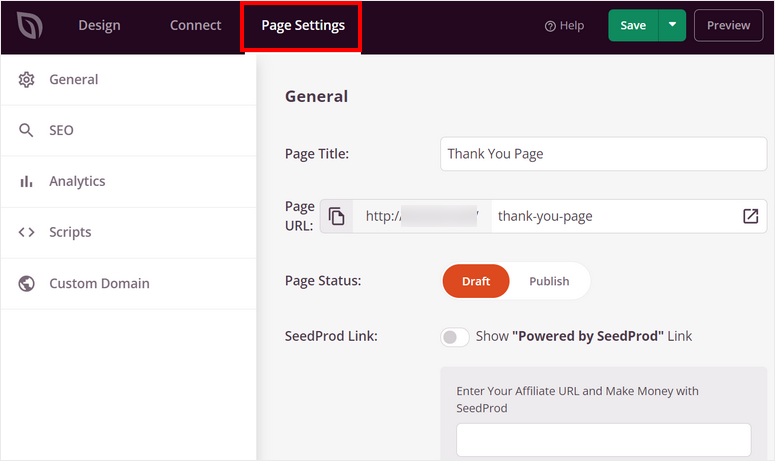
Here. you’ll see these options:
- General Settings: Edit the title, URL, and status of your thank you page. There is also the option to show or hide the “Powered by SeedProd” link.
- SEO: Connect with the All in One SEO plugin to optimize your page content and improve SEO rankings.
- Analytics: Integrate with MonsterInsights and get detailed reports on conversion rates and visitor traffic.
- Scripts: Add custom code to change the styling and page design. You can skip this part if you’re not comfortable with coding.
Don’t forget to save your settings at the end. Now, you can publish your thank you page on your website.
Step 6: Publish Your Thank You Page
To publish your page, click on the dropdown menu next to the Save button on the page builder and click on Publish.
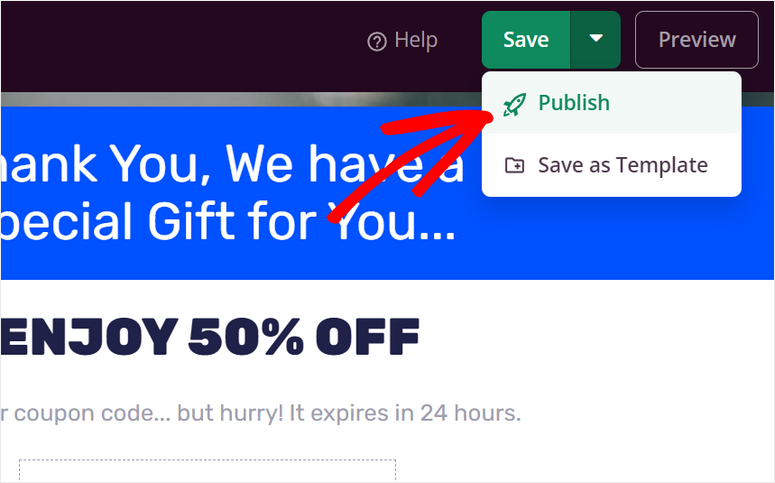
Then, you’ll see the message that notifies you that your page is published. You can click on the See Live Page button to see how your thank you page looks on the front end.

Congrats! In just a few steps, you’ve successfully created a thank you page. Now, you can show your gratitude to customers and encourage them to engage further with your brand.
Besides thank you pages, SeedProd can create all types of pages, such as a squeeze page, eBook landing page, webinar landing page, and more.
SeedProd is really the #1 landing page builder. It lets you create amazing web pages without any coding knowledge. Its drag and drop builder lets you customize your page and new page elements as you like. And there’s more!
SeedProd also comes with a theme builder, so you can customize your entire website, including the homepage, header, footer, sidebar, pages, and posts. There are readymade themes that you can enable on your site, and you can use SeedProd to manage your entire website’s design and customization.
Before we wrap up, we’d like to share a tool that will help you boost conversions on your thank you page. It’s an awesomely powerful plugin called OptinMonster.
OptinMonster is the best lead generation tool that lets you build high-converting marketing campaigns such as popups, floating bars, welcome mats, gamified coupon games, and more.
What makes it so powerful is its targeting rules that help you reach out to the right people at the right time on your site. Some of its most popular rules include targeting based on device, location, interests, referral source, and whether the user is about to exit your site.
And that’s it! We hope this tutorial helped you learn how to make a thank you page in WordPress without any trouble.
For your next steps, can check these resources:
- Powerful WordPress Lead Generation Plugins Compared
- Best Marketing Automation Tools for WordPress
- How to Track and Monitor User Activity in WordPress
These posts will help you automate your marketing campaigns and generate more leads on your website. The last one will help you analyze the user activity on your thank you page.

Comments Leave a Reply