Are you looking for a reliable way to add a Facebook feed to your WordPress site?
Adding a custom Facebook feed makes your site more engaging and interactive. At the same time, you also provide social proof of an active online presence, helping you turn your readers into your fans.
The easiest way to add a Facebook feed to WordPress is by using a plugin. It takes care of the technical stuff and lets you set up everything with just a few clicks.
In this tutorial, we’ll show you how to create a custom Facebook feed in WordPress in just 5 simple steps.
First, let’s be sure on whether you really need a Facebook Feed on your site.
Reasons You Need A Facebook Feed On Your WordPress Site
With over 2.9 billion monthly visitors, Facebook has global users interested in many things. As a site owner, you can take advantage of these numbers and grow your audience.
Connecting your Facebook to your site comes with many benefits that include:
- Boost content discovery and keep website content fresh
- Build a community
- Enhance your domain authority
- Cross-market between social media and your website
- Use resources in a cost-effective way
- Keep your audience updated with the latest info on your brand
- Increase engagement through comments, shares, and likes
Now, WordPress does not offer a default option to add a Facebook feed to your site.
Instead, you will need to find a reliable plugin to help you with this.
The best plugin to help you add your Facebook feed to your website is Smash Balloon, and we’ll tell you why.
Why Choose Smash Balloon?
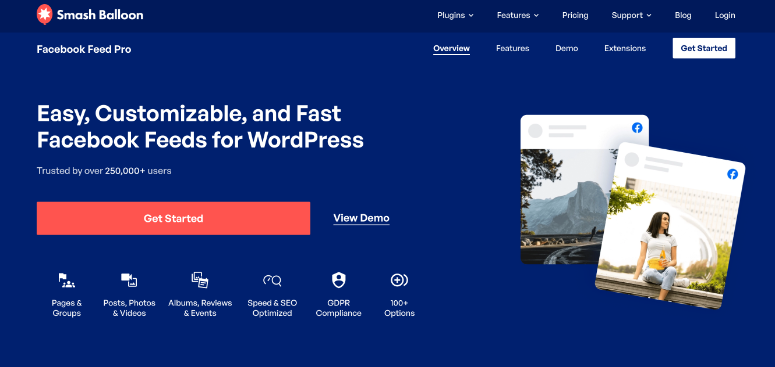
Smash Balloon is the best way to add a custom Facebook feed to your WordPress site because of how easy and flexible it is to use.
It’s a one-time setup, and then the plugin will run on its own, fetching new content from your Facebook feed and showcasing it on your site.
You can completely customize your feed to show the posts you want. Smash Balloon lets you do that by choosing specific content types, such as videos or events, filtering by hashtags, and using keywords to omit certain posts.
You can also set up multiple feeds to display different kinds of Facebook posts on specific pages. Each feed you create can have a different design and placement.
So if you have a product catalog, you can display product-related posts on that page. Or you can set your site’s Facebook feed only to display events if you run a local business. This way, you can use social media and your website to market your business offline better.
Here are just a few reasons why this plugin is our #1 pick for Facebook feeds:
- Easy integration with Facebook
- Set and forget configuration
- Fully customizable feed
- 4 different layouts to choose from
- Show/hide specific posts
- Speed and SEO-optimized
Now, let’s show you how to set up Smash Balloon on your WordPress site.
Adding a Facebook Feed in WordPress
In this tutorial, we’ll show you how to install the Smash Balloon plugin and configure important settings to help you showcase a beautiful Facebook feed added to your site.
Step 1: Install Smash Balloon
Get started by visiting the Smash Balloon website to sign up for an account. Then, you’ll get access to your own Smash Balloon account, where you can download the plugin and copy your license key.
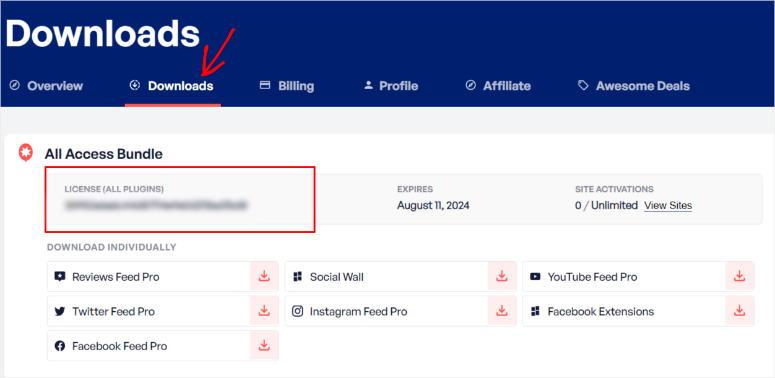
You’ll need to install and activate the Facebook Feed Pro plugin inside your WordPress dashboard. Not sure how to do that? Follow our guide on How to Install a WordPress Plugin.
Once activated, in the WordPress menu on the left, go to the Facebook Feed» Settings page. Here, you can paste your license key and activate the pro plugin.
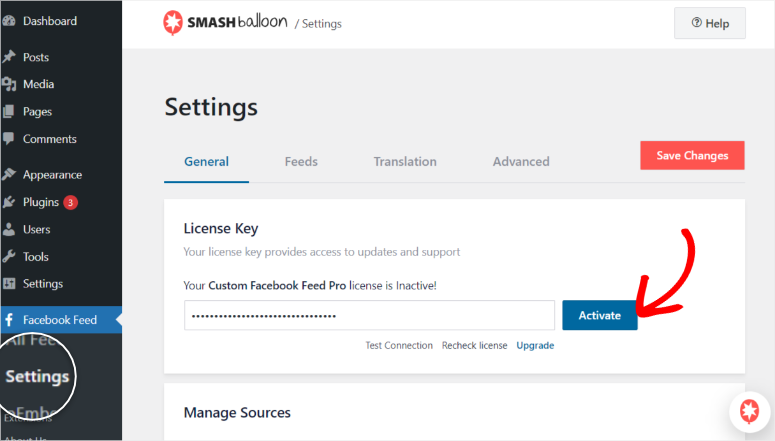
Now you should have Smash Balloon Pro set up. Next, we’ll connect your WordPress site to your Facebook page or group.
Step 2: Connect Your Facebook Group Or Page
Smash Balloon lets you connect your site to a Facebook group or page, whichever one you prefer.
A Facebook group can help your audience have more focused discussions privately, building engagement, while a Facebook page can help build your brand and your niche authority.
To top it off, you can have both your group and page embedded on your site at the same time, getting the best of both worlds.
For this tutorial, we will connect a Facebook Page Feed, but keep in mind, the steps will remain pretty much the same for a Facebook Group.
Head over to the Facebook Feed» All Feeds page in your WordPress dashboard to connect your first feed.
You’ll see an Add New button that lets you start the process.
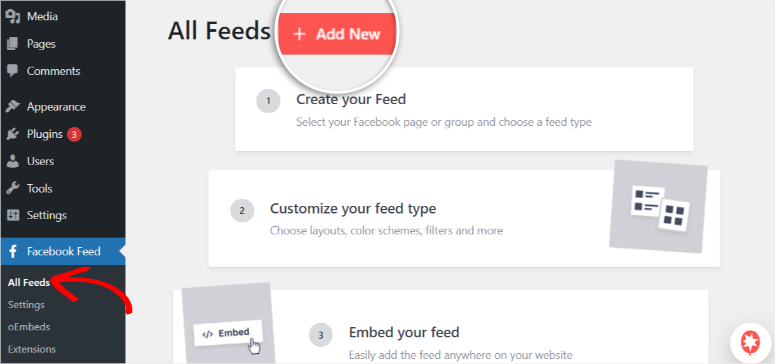
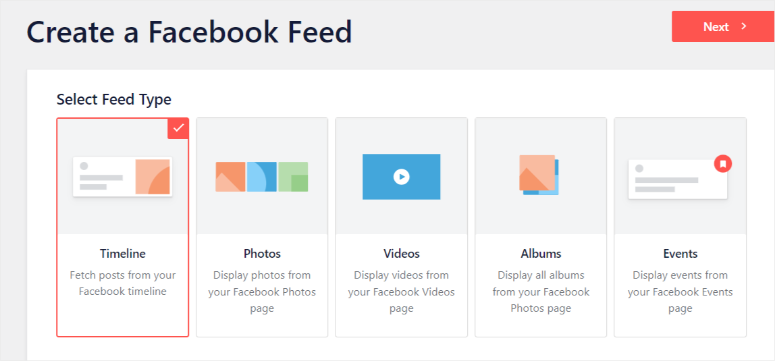
Smash Balloon allows you to add your entire Facebook feed or only specific types of content.
These content types can range from posts, videos, events, and images depending on the kind of reaction you want from your audience.
For our example, we will use the default setting, which allows Smash Balloon to fetch your entire Facebook timeline.
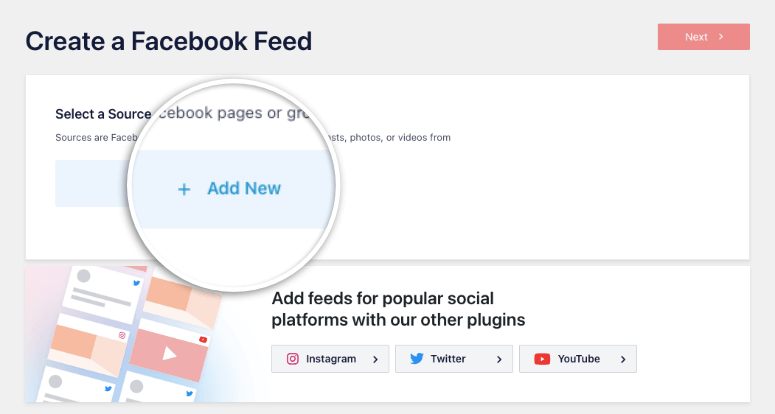
On the next page, choose the Facebook feed source by selecting ‘Add New.’
Now you should see a blue button that says ‘Connect to Facebook.’
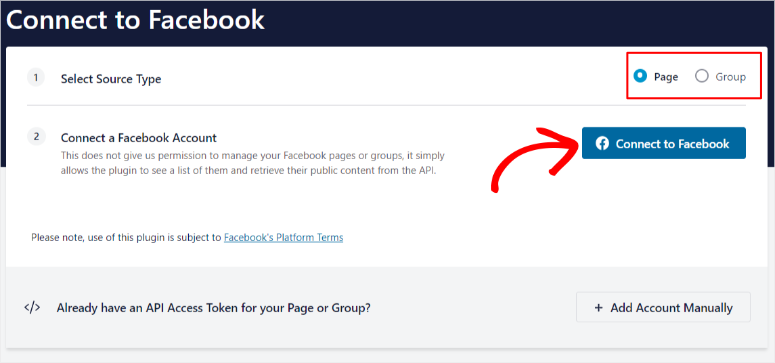
A new page will open where you will find another Add New button. This is also where you can connect to more pages later and start multiple feeds.
This will take you to Facebook, where you can quickly log into your account.
Once signed in, you’ll see a popup showcasing all the pages under your profile. Select the one you would like to display in the feed.
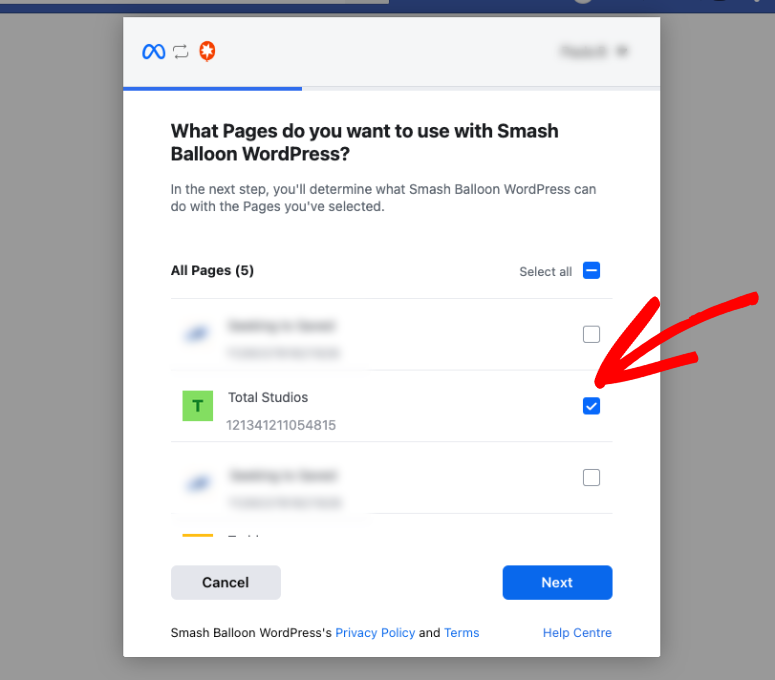
To ensure you have complete control of all the content accessible by Smash Balloon, you can either switch on or off what the plugin can access in the next window.
We suggest you set all these settings as ‘Yes,’ so that the Facebook content displayed on your site is not affected. Once you’ve granted the permissions, you’ll see a success message that you’ve linked your account.
And just like that! You have successfully connected Smash Balloon to your Facebook feed. The page should automatically reload and take you to your WordPress Dashboard.
Step 3: Customize Your Theme and Layout
Now that your Facebook page is connected, let’s customize the feed to match your preferences.
Smash Balloon will automatically redirect you to a popup where you can select the page you just connected and add it to your Smash Balloon dashboard. You’ll see it appear like so:
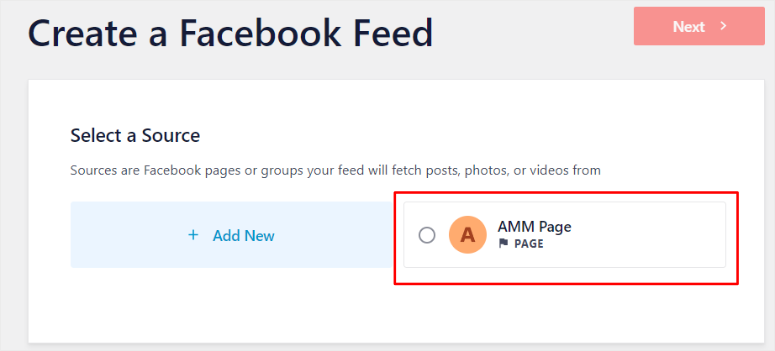
Choose the page and go to the Next step.
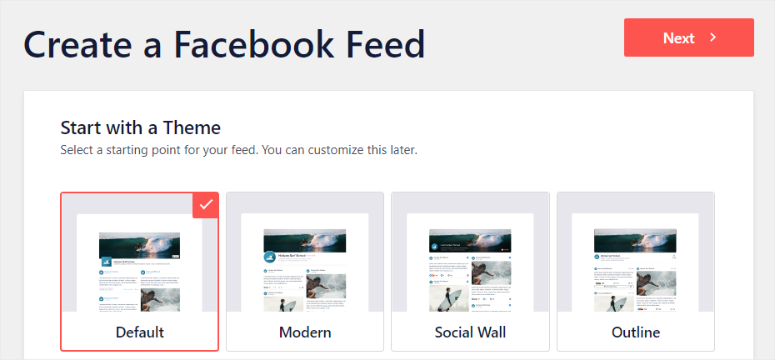
Now you can select the theme of the feed. You can leave it as default or change it to Modern, Social Wall, Outline, and Overlap. We will use the default theme.
In the next step, choose the template type. You can display your feed in a masonry grid, widgets, cards, or carousels. You can even display only the latest Facebook post.
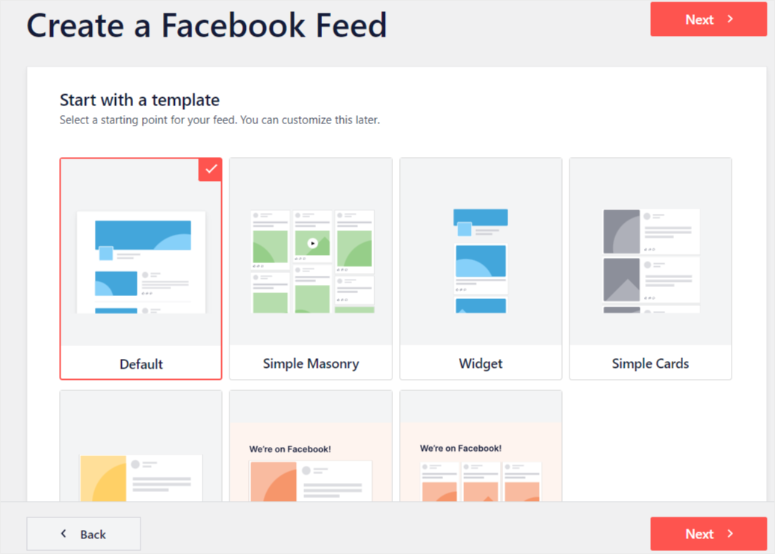
Once you make your selection, the page should reload and direct you to your All Feeds page.
Step 4: Customize Your Facebook Feed
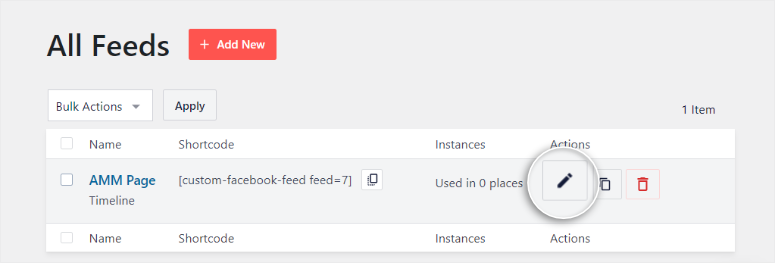
Now you can go ahead and edit the feed. Do this by choosing the pencil ‘Edit’ icon to the far right of the feed’s name.
After opening the feed editor, you should see the Customize and Settings menus on the left and a preview window of how they will appear on the right.
In this tutorial, we will focus on the Customize menu as it has all the essentials you’ll need.
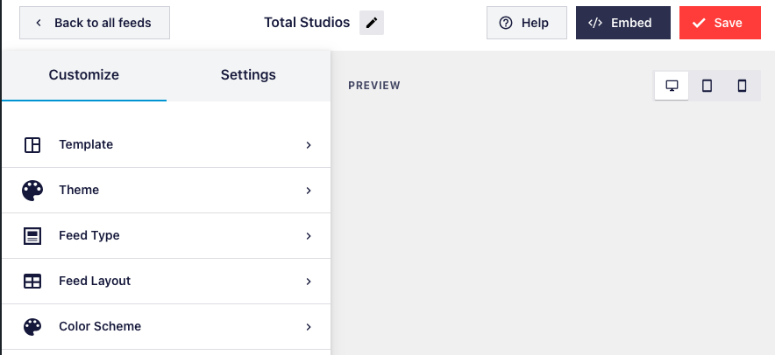
The preview window on the right will show you how the feed will look when embedded on your site. Use it to check for errors and formatting issues as you design your site’s Facebook feed.
Even though you may have chosen a template, feed type, and theme in your previous steps, this window allows you to change them as well.
Let us start by setting up how the custom Facebook feed will appear by going to ‘Feed Layout’ in the left taskbar.
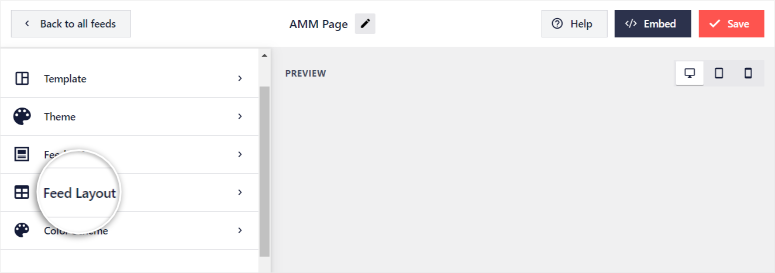
You can edit whether you want the feed to appear in list, masonry, or carousel format. Choose the post’s height so that it fits nicely on your site.
Since tablets, phones, and desktops have different-sized screens, select the number of columns and posts for the best user experience depending on your visitor’s device.
The preview screen on the upper right corner has icons for mobile, tablet, and desktop screens in the top right corner. Use this feature to check how the feed will appear in different screen sizes.
Experiment to see which ratio of posts to columns works best for each screen size before making a final decision.
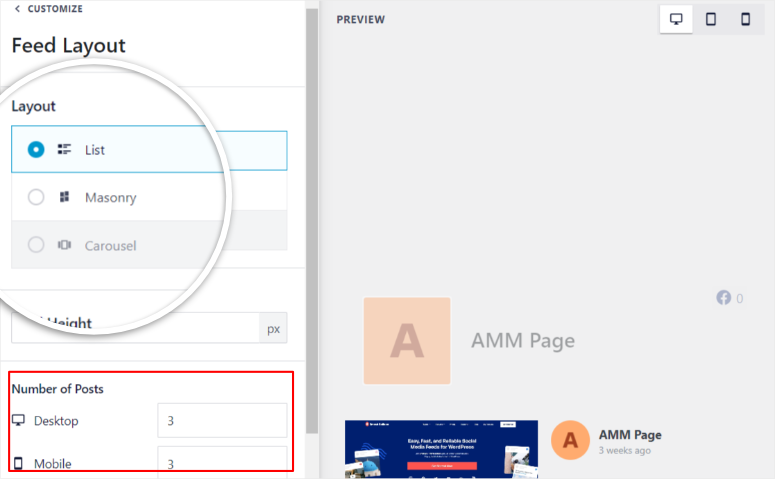
Even though we recommend you customize the number of posts, by default, Smash Balloon allows fewer posts on smaller screens to offer your audience a good experience even if you do not set them yourself.
Once you settle on the feed layout, go back to the main menu on the left.
Now let’s change the color scheme.
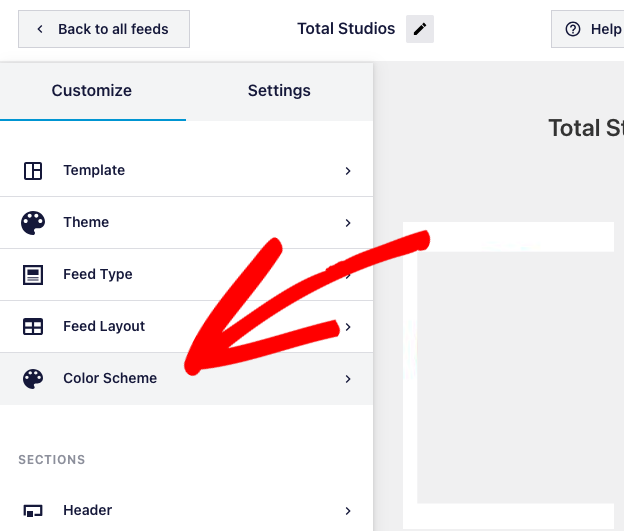
By default, Smash Balloon uses the colors from your theme so the feed blends seamlessly with the rest of your site. But you can customize it here to whatever you would like. You can also go for the more conventional design of a dark or light color scheme.
However, if you choose a custom color palette, you can select a different background, text, and link colors to suit your website design better.
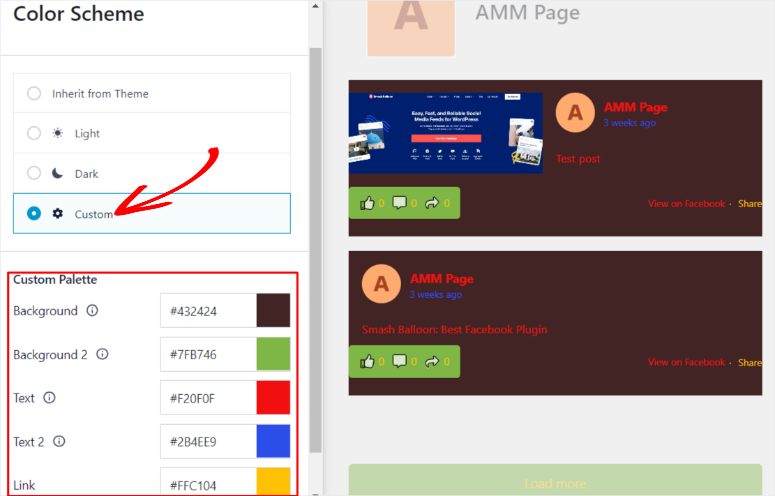
Once you settle on the color scheme, go back to the customize menu.
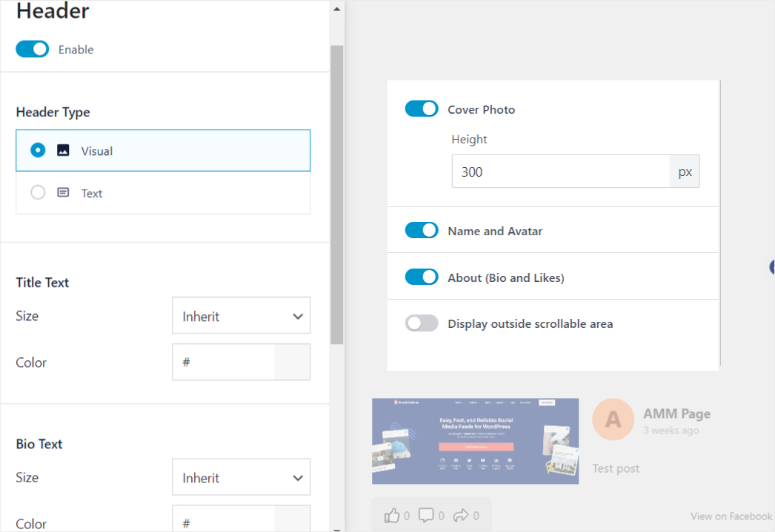
To edit your feed title and related elements, scroll down the Customize menu and find the ‘Header’ submenu.
Here, choose if you want the header to be in text or visual format, the size and color of the title text, the bio text size and color, and the dimensions of the cover photo.
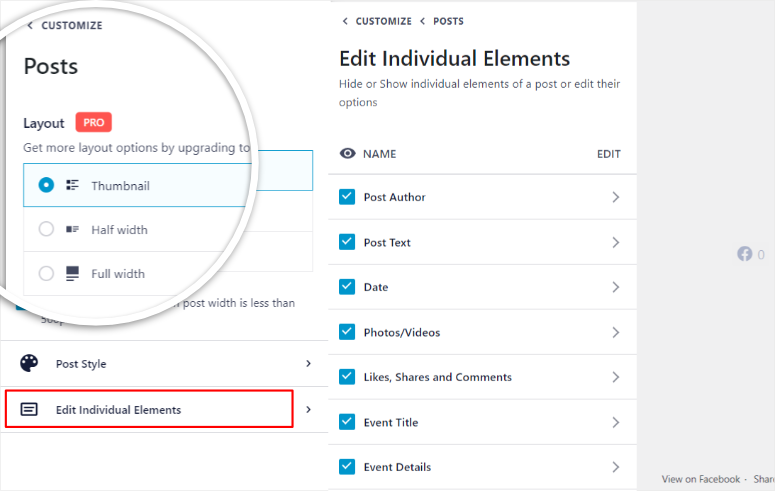
To change the post layout, go back to the Customize menu and select the Posts tab. Here, you can change the layout to Thumbnail, Half width, and Full width.
Then, under Post Style, select whether you want the posts to be ‘Regular’ or ‘Boxed.’ You can also customize the separating line’s color and thickness.
Also, Smash Balloon lets you check or uncheck the ‘Individual Post Elements’ you want to display.
A cool feature of Smash Balloon is that you can let users engage with your social media content from your website itself. To add a ‘Like’ button, scroll down the Customize menu, and go to Like Box.
First, enable the like button so it can appear in your feed. Then, you can customize its size and position.
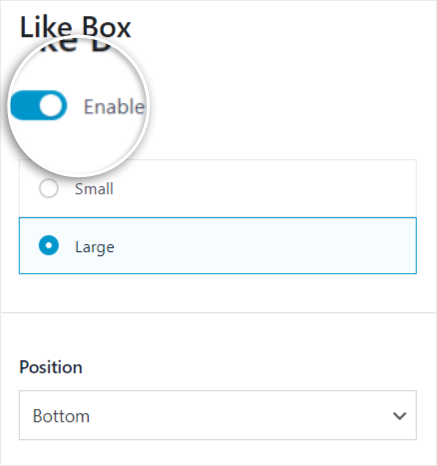
Next, you can decide the width of your feed. However, if you leave it at default, it will auto-adjust based on the screen size.
To add more weight to the call to action, you can show your website users their Facebook friends who also follow your page.
Now there’s a really cool feature of Smash Balloon we want to show you. You can move the like button outside the scrollable menu here. What this does is show your audience the ‘Like’ bottom regardless of where they are scrolling on the page.
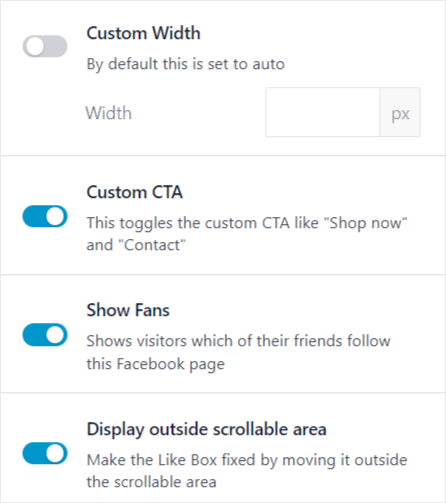
That way, you get a higher chance of getting them to click on the Like button.
Once you are done, go back to the Customize menu.
The last thing we want to show you here is the Load More button. This will display more feed content when clicked by a reader. You can either turn this option on or off.
One of the main reasons to disable the ‘Load More’ button is to improve user experience by reducing content overload and letting readers focus on the content that brought them to the page. On the other hand, turning on this button can increase site engagement and keep a reader on the page for longer, boosting your SEO metrics.
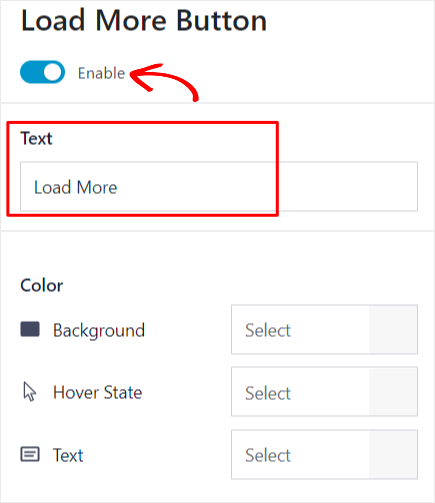
You can customize the Load More text to what you like. You can even change it to a language in your target region to communicate better to your audience. Or be more adventurous and write something catchy.
The end goal is to entice people to see more of your feed.
Once you have customized everything to your liking, don’t forget to Save your feed.
Step 5: Publish the Facebook Feed
Now that you have set up your custom feed’s appearance, it is time to display it on your website.
Like everything else with Smash Balloon, you do not need to have any coding experience to publish a feed.
There are 3 ways to add your custom feed to your WordPress website. You can use a block, widget, or shortcode. Each method is easy and straightforward but ideal for different situations.
- Block custom feed: This method makes it easy to customize the placement visually. With this method, you can easily see how the feed will appear on your site.
- Widget custom feed: You can fully optimize sidebar space, ensuring consistency with your feed throughout the site.
- Shortcode custom feed: Allows for flexible placement anywhere on your site without errors.
Feel free to choose a method that best fits your needs at the time.
To add the feed using a block, open a page or post on your WordPress Menu. For this tutorial, we will use a page.
On the page, locate where you would like the feed to appear and click on the Plus icon to add a new block. In the block’s search bar, type ‘Custom Facebook Feed,’ then add the feed block to the page.
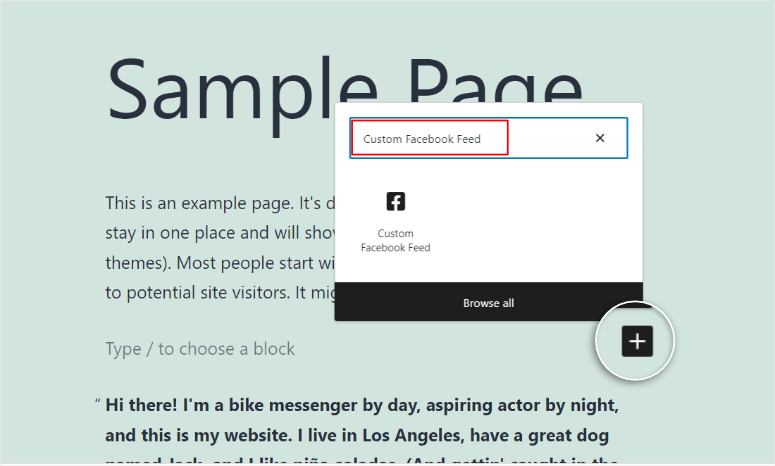
If you have only one feed added, it will show it by default. For accounts with more than one feed, Smash Balloon will either pick one by default or you will need to add the specific feed’s shortcode.
To get the shortcode, go to All Feeds, you will see the shortcode displayed next to the feed’s name.
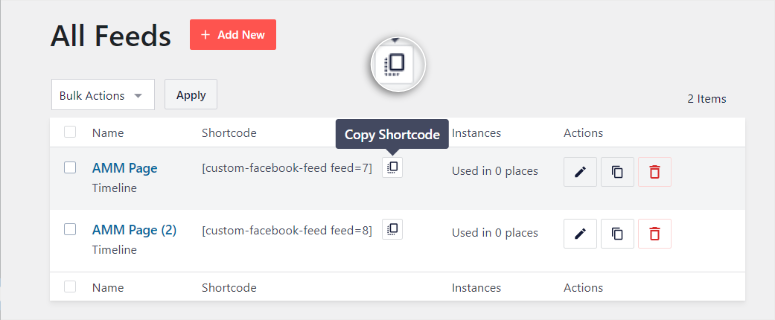
Copy the shortcode and go back to the page and block you created for the feed. On the right, go to Settings, you will see a text box called ‘Shortcode settings.’ Paste the shortcode here and Apply Settings to the feed block you previously created.
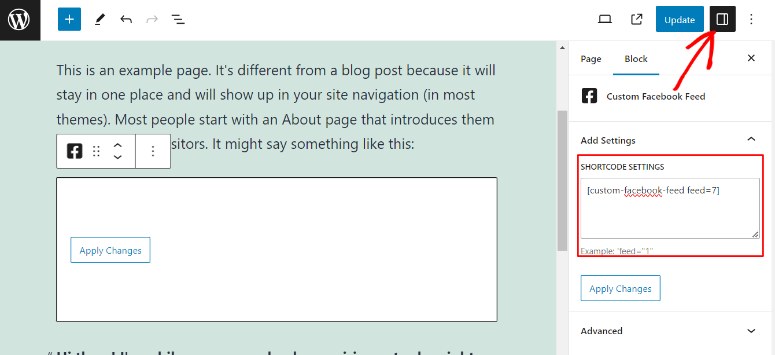
Your website should now display this specific feed automatically.
To add a Facebook feed through a widget, go to Appearance » Widgets on your WordPress dashboard.
Here, you need to add a new block through the plus icon. Then in the search bar, look for the ‘Custom Facebook Feed’ widget.
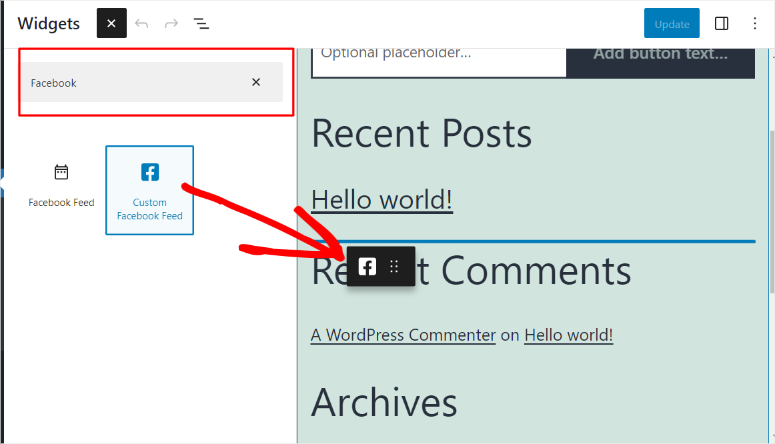
Next, drag and drop it to the exact location where you would want the Facebook feed to appear.
If you have multiple feeds, you’ll need to add the specific shortcode in the text box on the right, like with the previous process.
Once done, hit the Apply Changes button.
Lastly, to include the feed using a shortcode, begin by copying the Shortcode from the All Feeds Smash Balloon menu like in the step above.
Select any page or post you would like to add a feed. Add a new block through the Plus icon and search for ‘Shortcodes.’
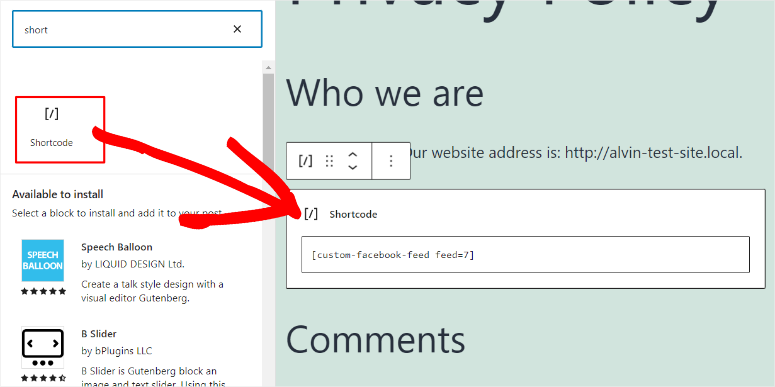
Drag and drop the Shortcode icon anywhere on the page or post you want the feed to appear.
All you have to do is paste the shortcode, and it should display automatically.
That’s it!
You’ve set up a Facebook feed on your WordPress site. It will now run automatically – fetching new posts from your page and displaying them on your site.
What’s Next? Do More With Smash Balloon
Smash Balloon is a powerful social media feed plugin. It can really boost engagement and your following.
One standout feature of Smash Balloon is that you can connect YouTube, Instagram, and Twitter feeds straight to your site.
You can even combine platforms to create an ultimate social wall.
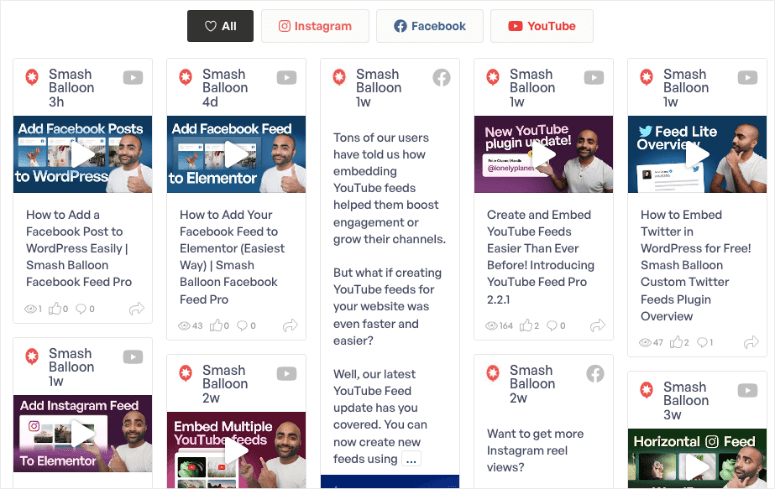
If you host YouTube livestreams, you can easily sync them to your WordPress site. That way, visitors on your site will also be able to watch your live stream. Interested in setting that up? Head over to our tutorial on How To Link Your YouTube Live Stream To Your Site.
To sum it up, Smash Balloon works like a social media content magnet. It will pull fresh content from your feeds and add it to your site. Think of it like a bridge between site content and social media content.
We hope you found this tutorial helpful. You may also be interested in learning How to Add Social Proof Notifications in WordPress. We also have these tutorials to help you set up more links between social media and your WordPress site:
- How to Embed a YouTube Feed in WordPress to Boost Engagement
- How to Embed Instagram Feed in WordPress (With Share-Button)
- How to Automatically Share WordPress Posts to Facebook and Twitter
The first 2 tutorials will help you get more from Smash Balloon while the last one shows you how to auto-generate social media content when you post a blog to your site.

Comments Leave a Reply