Are you looking for an easy way to add an Instagram feed to your WordPress site?
An Instagram feed helps you showcase your social media content right on your WordPress website. Visitors can view and engage with your Instagram content without having to leave your site.
In this step-by-step tutorial, we’ll show you how to connect your site to Instagram to display your content. This is an automated process and doesn’t require any coding knowledge. Let’s get started.
What You Need To Create an Instagram Feed in WordPress
You can add an Instagram feed to your site manually using code, however, this method is long and complicated.
A better solution is to use a WordPress plugin that lets you connect your website to Instagram. The best plugin for this is Smash Balloon.
Smash Balloon is a powerful social feeds plugin and it comes with a plugin that’s specifically designed for Instagram. It does not need any coding experience, making it easy to use.
Smash Balloon lets you connect your website to Instagram in a couple of clicks. Then you can personalize your feed in ways that target your audience in a specific way. Let us see how:
- Multiple Feeds: Add various Instagram feeds on the same page or different pages on your site.
- Using hashtags: Connect your feed to hashtags on Instagram so that your feed is automatically updated when anyone posts using those hashtags.
- Tags: Set up your feed so that anytime someone tags you on Instagram, it is added to your feed.
- Entire feed: Simply add your whole Instagram timeline to your site feed.
Besides these powerful Instagram feed customizable options, Smash Balloon still has many features to better your audience experience.
- Smart data cache: Ensures images do not directly load from Instagram but use a cache system. This means the media files will load faster, offering a better experience.
- Feed backup: Even if Instagram is down or experiencing issues, the smart data cache system offered by Smash Balloon ensures your feed is still displayed.
- Image optimization: All images will load at an ideal file size to the screen size. As a result, fewer resources are wasted while giving the user the best experience.
- SEO focus: The feed captions are crawlable by search engines, meaning your feed is rankable, making it a great SEO tool. Plus, since your site is constantly being updated with fresh content, your SEO further benefits as well.
For this tutorial, we’ll be using Smash Balloon’s Instagram Feed plugin.
That said, Smash Balloon is really powerful and supports other social media platforms including YouTube, Twitter, and Facebook.
Now that you know which social media feeds plugin to use, let’s go straight to the tutorial.
How to Create an Instagram Feed for Your WordPress Site
Step 1: Install And Activate Smash Balloon
Smash Balloon’s Instagram Feed has a free and premium version. The free version is a powerful plugin in its own right; you can use it until you decide to upgrade.
To access the free version, go to your WordPress Plugin Repository to download and install it. Set it up as you would any other plugin. If you need help with that, follow our guide on How to Install a WordPress Plugin – 4 Methods (Step by Step).
For this tutorial, we’ll be using the pro version so that we can show you just how powerful this plugin is.
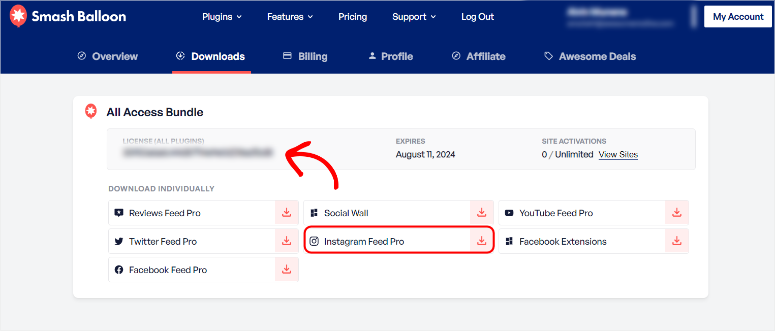
On the Instagram Feed website, sign up for an account and then proceed to ‘My Account.’
Here, download the ‘Instagram Feed Pro’ plugin file and copy the license key.
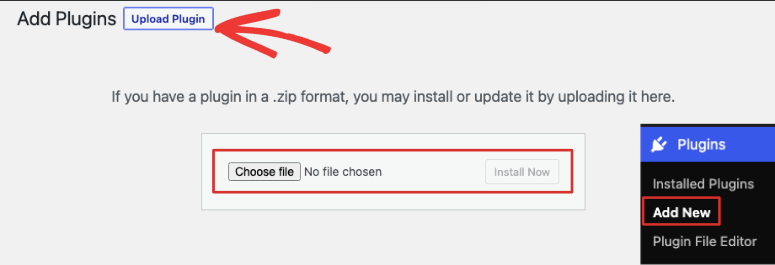
Go to your WordPress dashboard, then to the Plugins » Add New page. Here you can upload the plugin file.
Once Instagram Feed Pro is ready to use, a new item called Instagram Feed will appear on the left side menu on your WordPress dashboard.
Go to Instagram Feed » Settings and enter the license key you copied earlier.
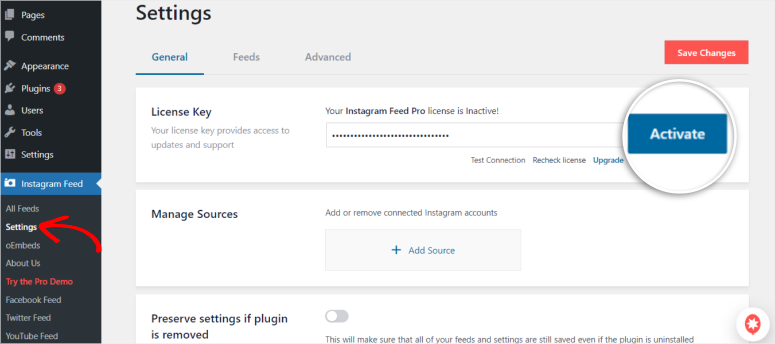
Activate the license and with that, you’ should be’re ready to use Instagram Feed Pro.
Step 2: Connect Your Instagram Account
With the plugin installed and activated, the next step is to connect your Instagram account. To do this, go to Instagram Feed » All Feeds. Here, go to the Add New button.
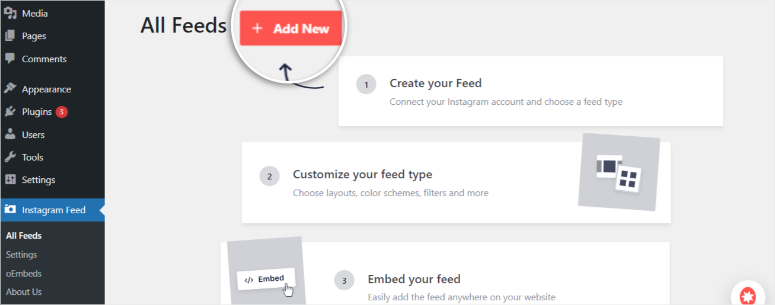
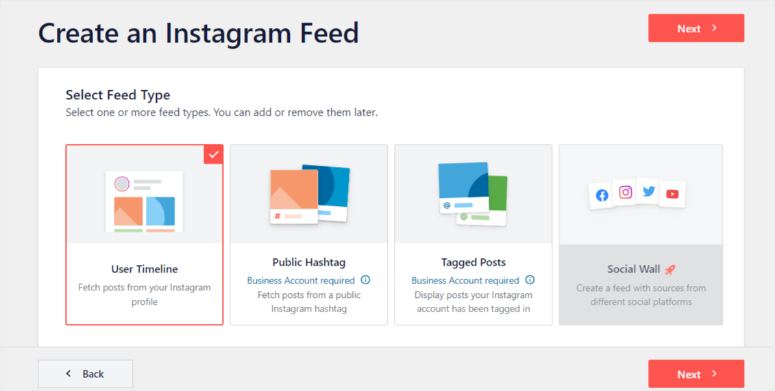
Next, Select Feed Type. You’ll see the following options available:
- Fetch posts from your Instagram profile
- Fetch posts from a public Instagram hashtag
- Display posts your Instagram account has been tagged in
Interestingly, Smash Balloon does not limit you to selecting one Instagram feed type; you can choose all of them at once. However, we will select ‘Fetch posts from your Instagram profile’ for this tutorial.
On the next page, you will be required to add a Feed Source. This is basically where your feed will fetch the content from.

After the Add Source page, you can either connect a personal account or a business account. We will select the business profile for this tutorial, which offers more features.
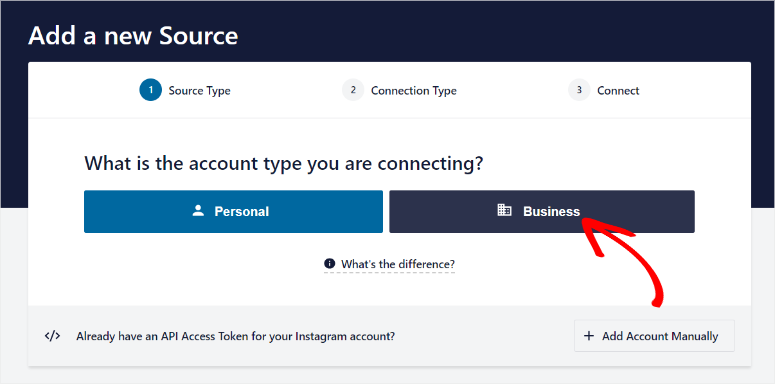
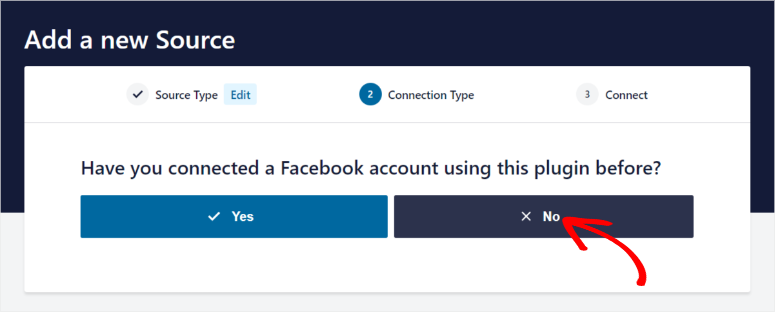
Another window will appear, asking you if you have ever connected Smash Balloon with Facebook before, assuming this is the first time you have used this feed plugin, you should go with ‘No.’
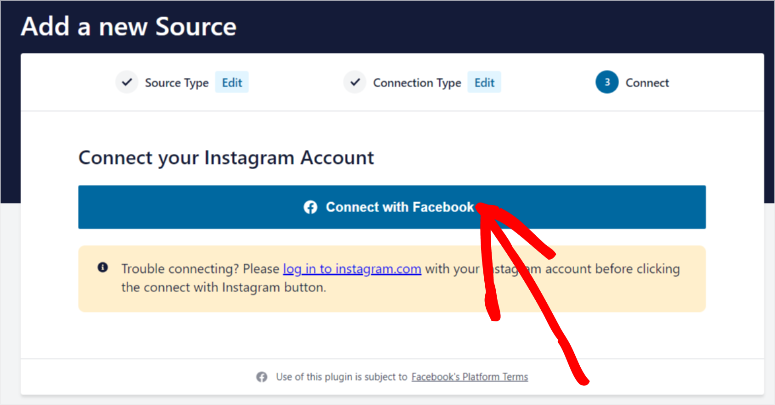
Next, you will be asked to connect through your Facebook page. Since Meta owns Facebook and Instagram, connecting through Facebook is the best way to give Smash Balloon access.
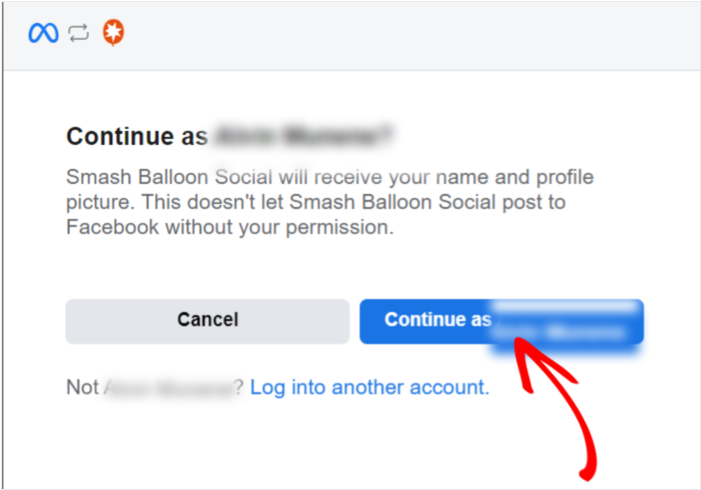
A popup window will appear next, asking you to continue with the Facebook profile logged in. Make sure you log in to the account tied to the correct Instagram and Facebook pages you want to use.
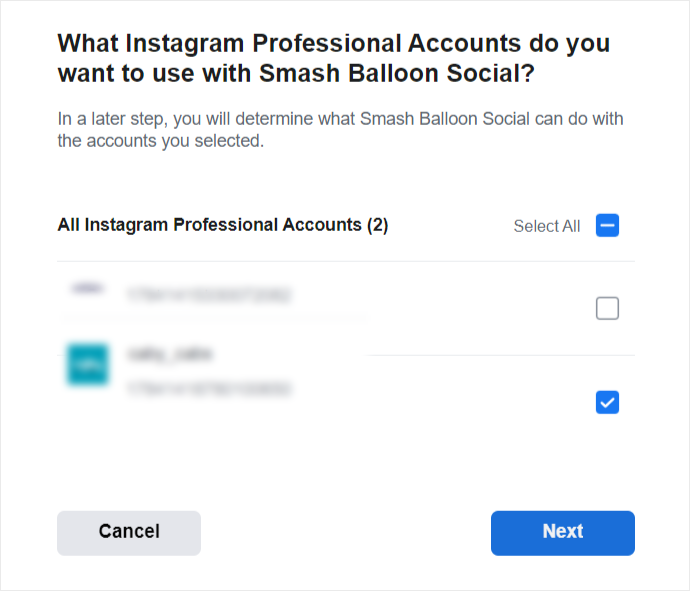
Another popup window will display next, this time, you will need to select the Instagram pages you want to connect to Smash Balloon. Check the box next to the profile(s) you want to use.
In the next popup, connect the Facebook page associated with the Instagram profile by checking the box next to it.
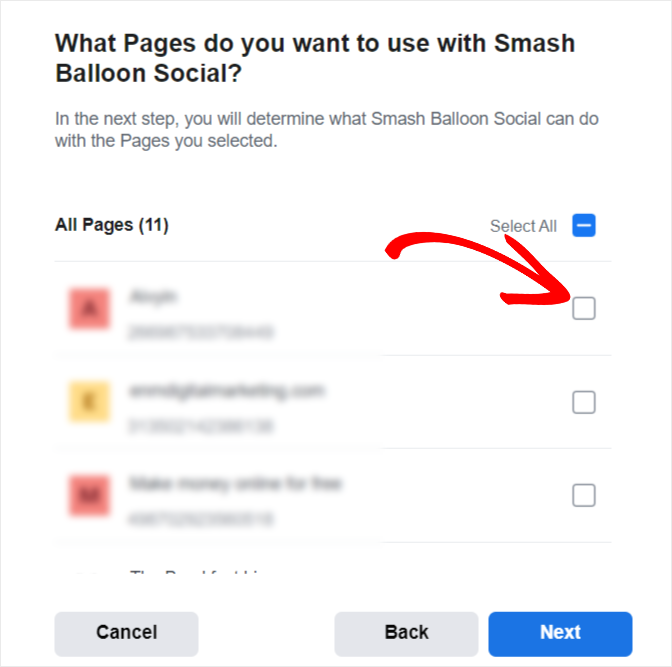
In the next window, grant Smash Balloon the permissions it needs. The company will not share your information with anyone. Giving the plugin data access ensures that your feed displays everything it should without issues.
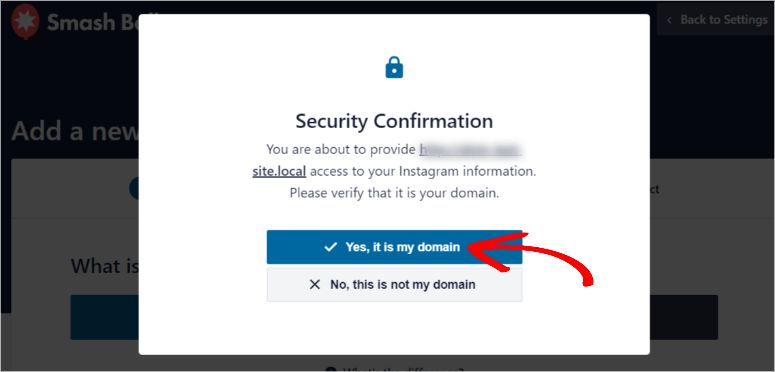
To complete the connection, verify that the domain you want to connect with Smash Balloon is yours. This is just to confirm that you are giving Smash Balloon access.
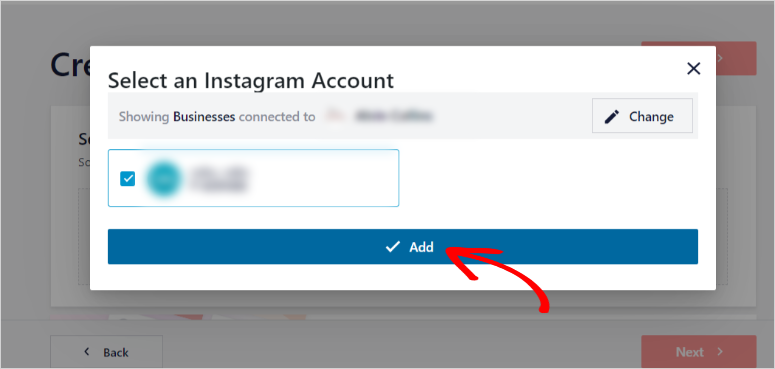
Finally, a popup window will display next with a list of Instagram profiles you have connected to Smash Balloon. Check the box next to the page and proceed by selecting the Add button.
And just like that, you have fully connected Instagram Feed Pro from Smash Balloon with your WordPress site.
Step 3: Create an Instagram Feed
With Smash Balloon connected, let’s create a new feed. On your WordPress menu, go to Instagram Feed » All Feeds. Select the source you have just added and proceed to the next page.
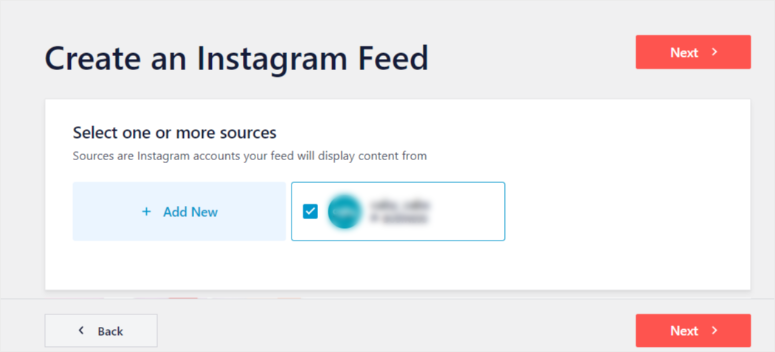
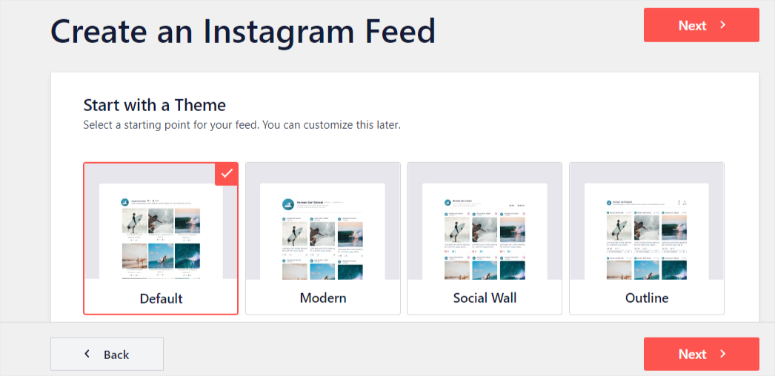
On this page, pick the Feed theme. Remember, this is just the base and a starting point to build on; you can always change the theme later.
Among the feed themes, select one of Default, Modern, Social Wall, Outline, or Overlap options. Keeping things simple, we will go for the Default theme.
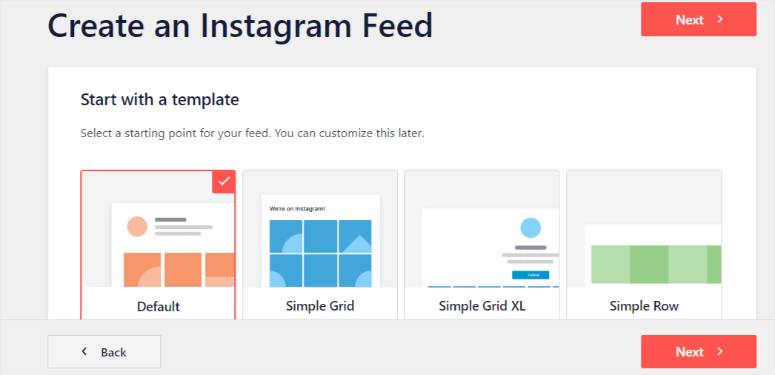
After you choose the theme, next, select the template you want to use. You have plenty of options to go for. From Simple Grid, Simple Grid XL, Simple Row, Simple Carousel, Single Post, and more.
Remember, with Smash Balloon, you can always change the template later as well, if you feel another option will offer your audience a better experience.
With all the basic configurations set, you will be redirected to the live feed editor, where you can customize the feed.
Step 4: Customize Your Instagram Feed
The live feed editor offers customization and setting options on the left and a live preview screen on the right. We will focus on the Customize menu for this tutorial. Select it, and you will see a list of customization options below it.
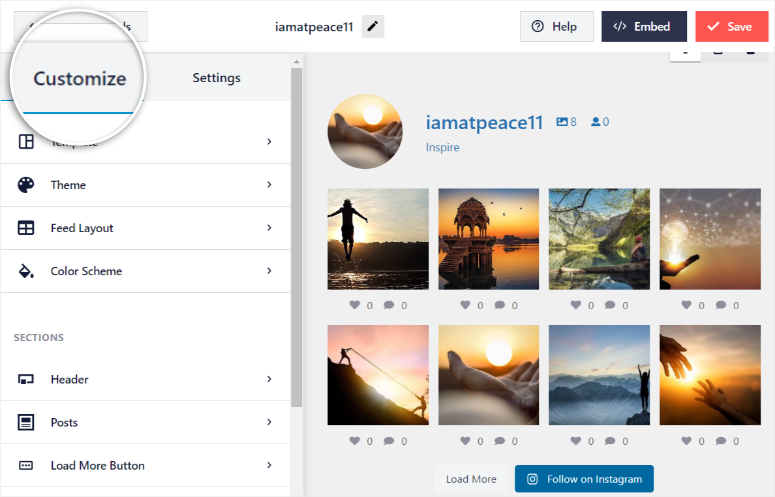
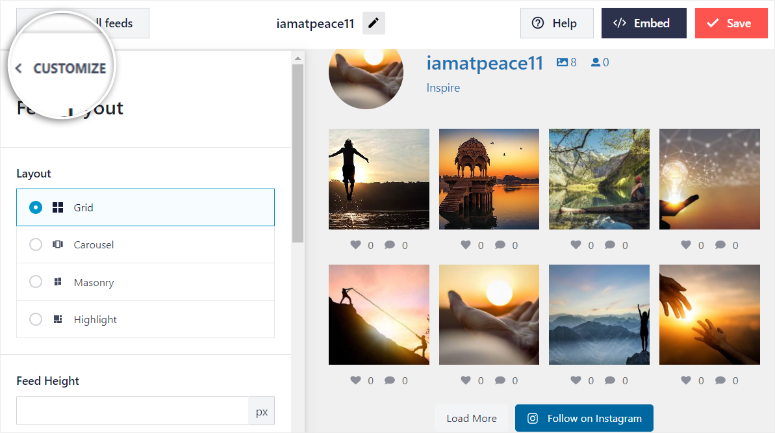
Each time you click on a live feed editor menu and complete the customization process, you will see Customize with a small arrow next to it. Select it to go back to the Customize menu.
To utilize the live feed editor properly, find the three icons on the far right upper corner: a desktop, tablet, and mobile. Here, you can see how the Instagram feed will appear for different screen sizes so you can offer your audience the best experience.
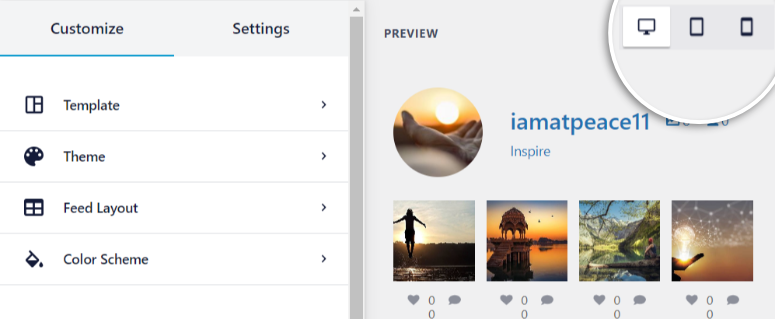
Remember, we already customized the theme and template in the previous steps. As mentioned, You can modify them here as well if you want to.
With that out of the way, let’s start with customizing the Feed Layout. You can go with Grid, Carousel, Masonry, and Highlights.
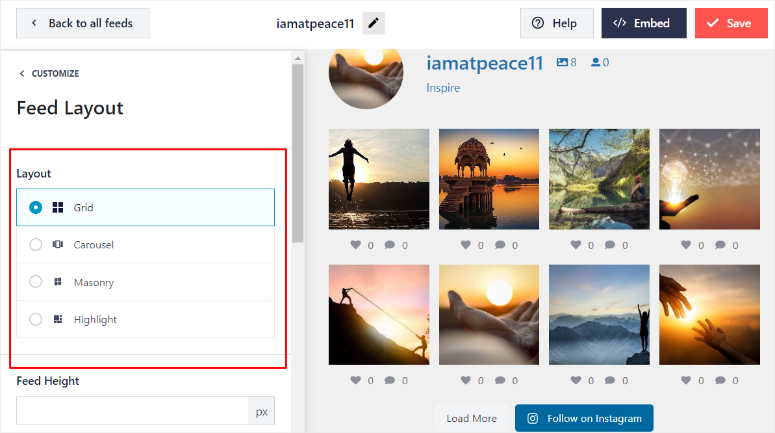
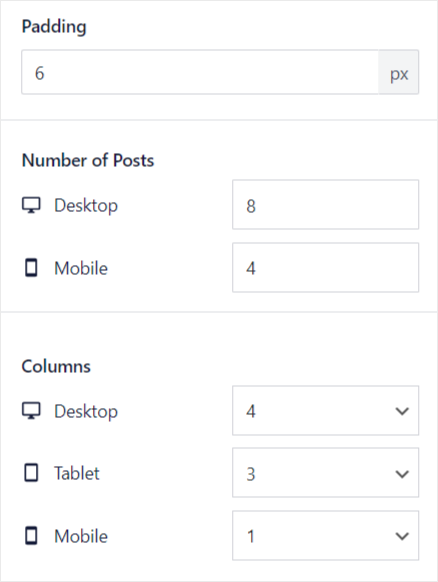
Scroll down the Feed Layout submenu to adjust the Feed Height, Padding, Number of Posts on different screen sizes, and finally, the number of columns for different screen sizes. Once you are satisfied with the layout, go back.
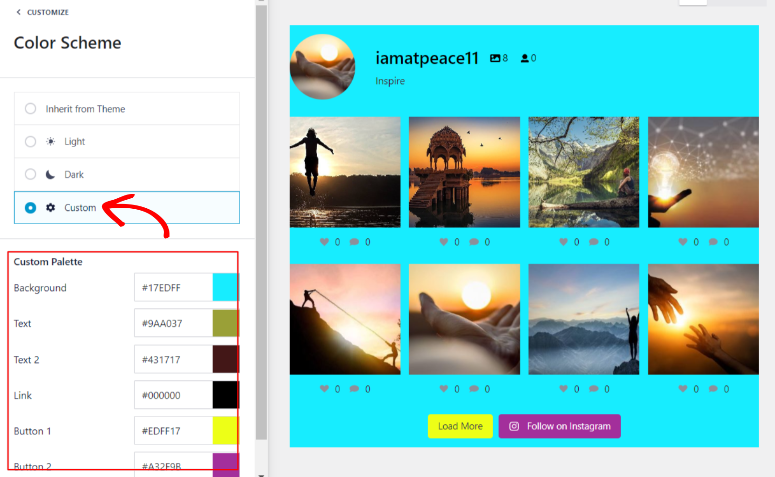
Next, let’s customize the Color Scheme. By default, your feed will inherit your theme colors. You can decide to go with a light or dark mode.
If you want to personalize the color scheme further, select Custom and use the Custom Palette to choose your desired colors. You can change the colors of the background, texts, links, and buttons.
Go back to the main menu when you are happy with the color scheme.
Now, let’s edit the Sections starting with the Header. First, enable the header if you want to display it on your feed.
Next, pick a Header Style from the options provided. Select Standard, Boxed, Centered, or Text. Each Header style can be edited slightly differently when you scroll further down the Header menu.
You can also edit the ‘Header Size.’ Then, decide if you want to upload a new Avatar to display in place of the default one from your Instagram account.
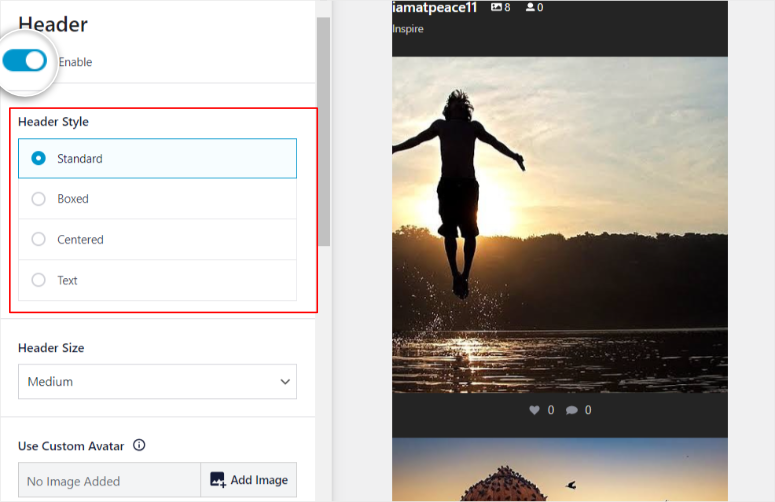
Next, choose a Text color and decide if you want to show your users how many Instagram followers you have.
You can then choose to have a bio. But, to give you more customization freedom, Smash Balloon gives you the option of writing a custom bio.
While you’re still on the Header menu, decide if you want to show the scrollable area outside the feed. Finally, determine if you want Instagram stories included in the feed and how long they should be displayed before moving to the next Insta Story.
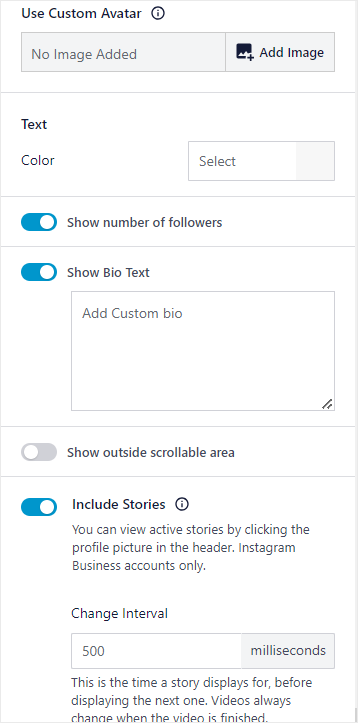
That’s it, you can go back to the main customization menu. Next, to customize the Posts, you can modify:
- Post Style to standard or boxed
- Images and Video resolution
- Caption length, text size, and color
- Like and Comment Summary size and color
- Hover State, background text, and information to display
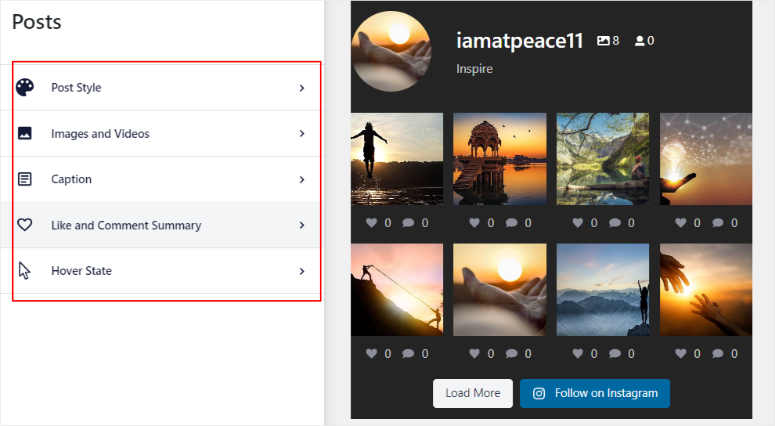
Once complete, go back to the primary Customize menu.
Smash Balloon also lets you choose if you want to display the Load More button. It doesn’t have to read ‘Load More.’ You can change it to whatever you want.
Then, customize the Background, Hover State, and Text colors. You can also decide to enable ‘Infinite Scroll’ so that users can view as many Instagram posts on your feed as they want.
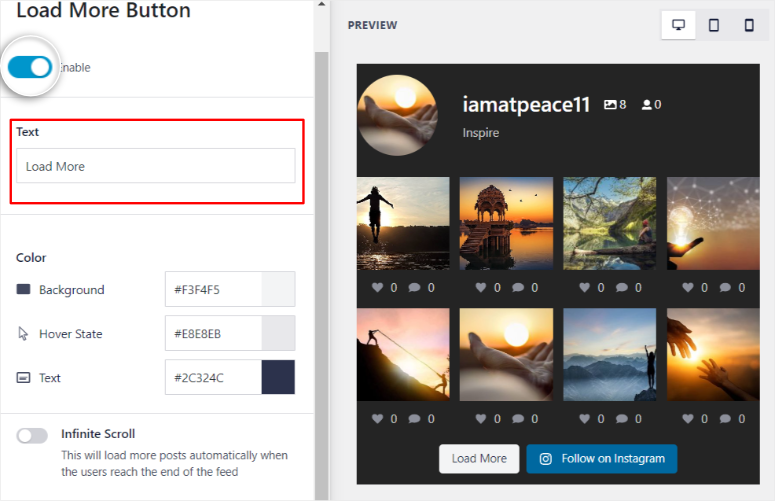
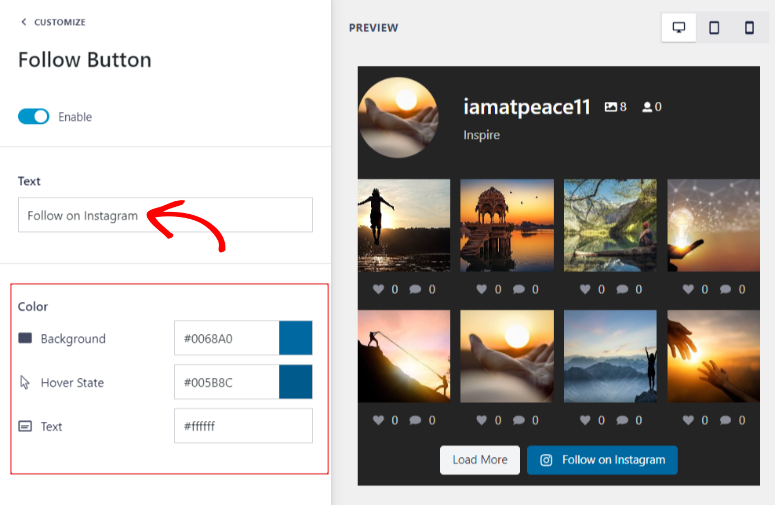
Need to change the ‘Follow Button’? There’s an option to customize the text first, background, hover state, and text colors.
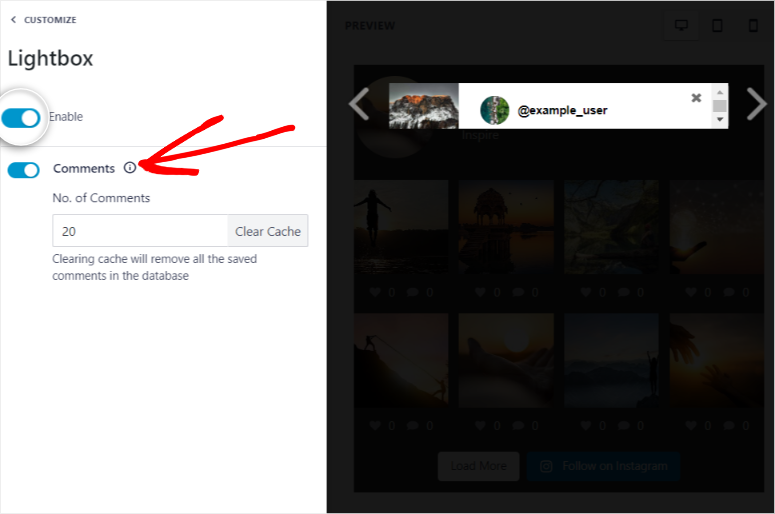
Finally, enable Lightbox and ‘Comments,’ so your feed can display comments from the Instagram page.
And with all these options customized, your feed is entirely personalized and ready to be added to your site.
Step 5: Display Your Instagram Feed
Smash Balloon allows you to display your feed in a number of ways.
- Add to a page
- Add to a widget
- Add feed via shortcode
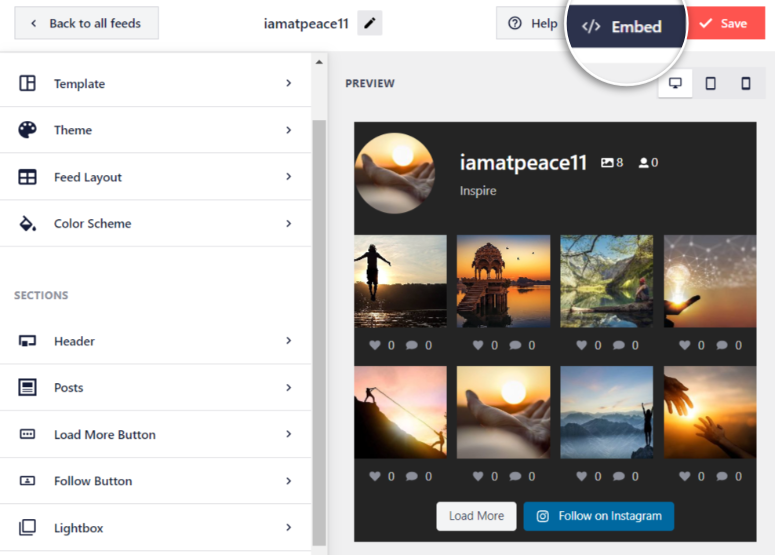
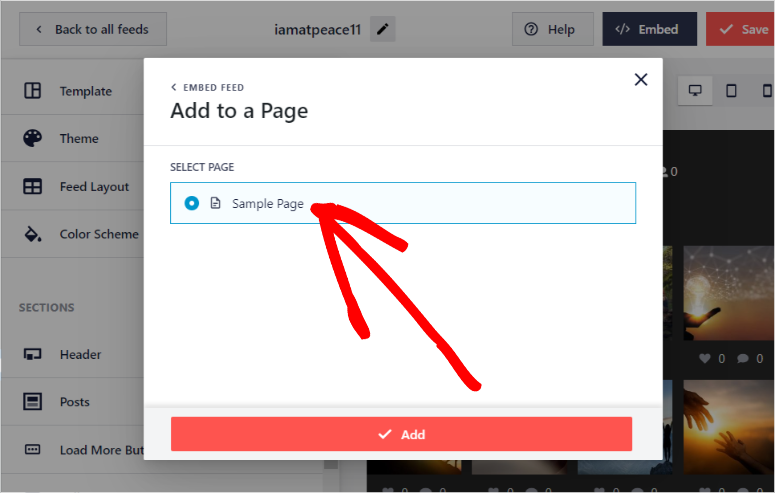
To add the feed to a page, click on the Embed button at the top-right corner of your live feed editor.
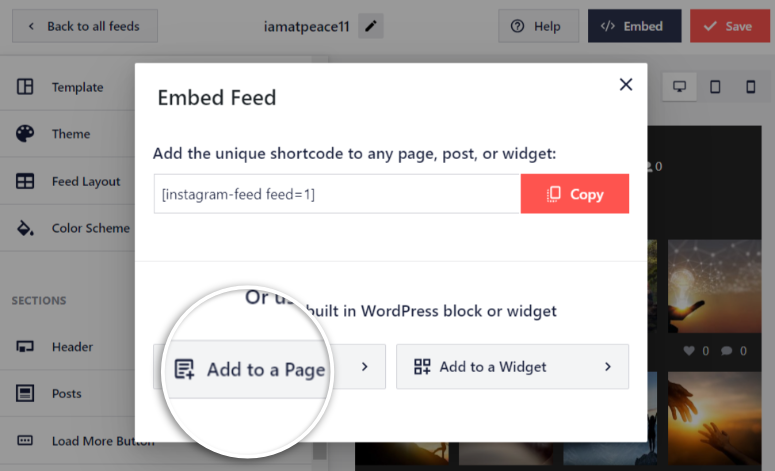
You will see the option to add the feed to a page on the next popup window.
Next, you will see a list of all the pages on your site, select the page you want to add the feed to. The page will open in a new tab so you can add your feed.
Alternatively, you can add the feed at any time to an existing or new page or post. Inside the Block editor, use the Plus icon to search for the ‘Instagram Feed’ block and add it to your page. You’ll see a preview of your feed appear.
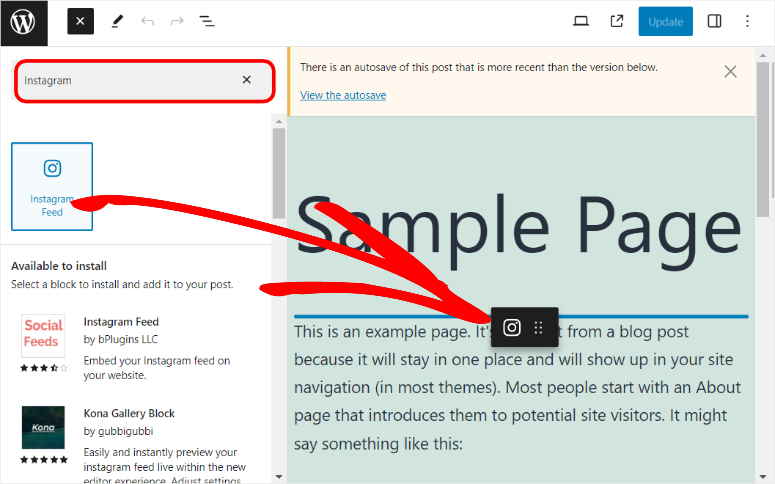
Update the page, and your feed should appear on the live page as well.
Next, we will add the feed through a widget. Again, find the Embed button on the far upper right corner of the live feed editor and select ‘Add to a Widget.’
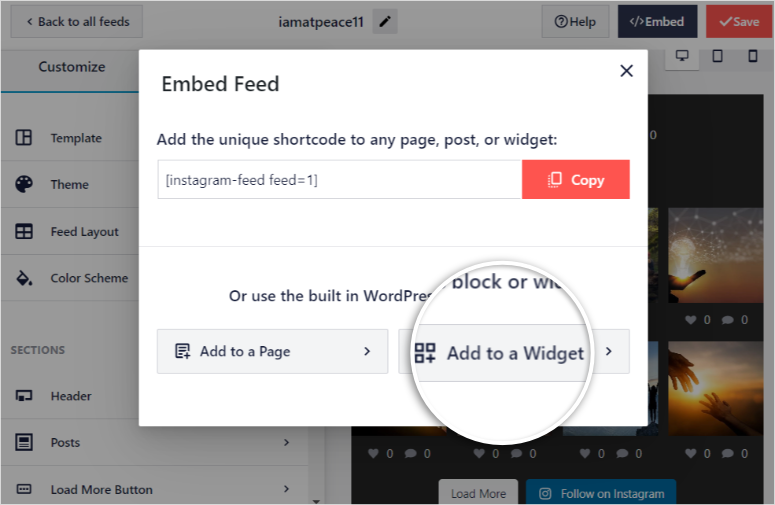
After being redirected to the widget page, decide if you want to add the feed to the footer or on other types of widgets.
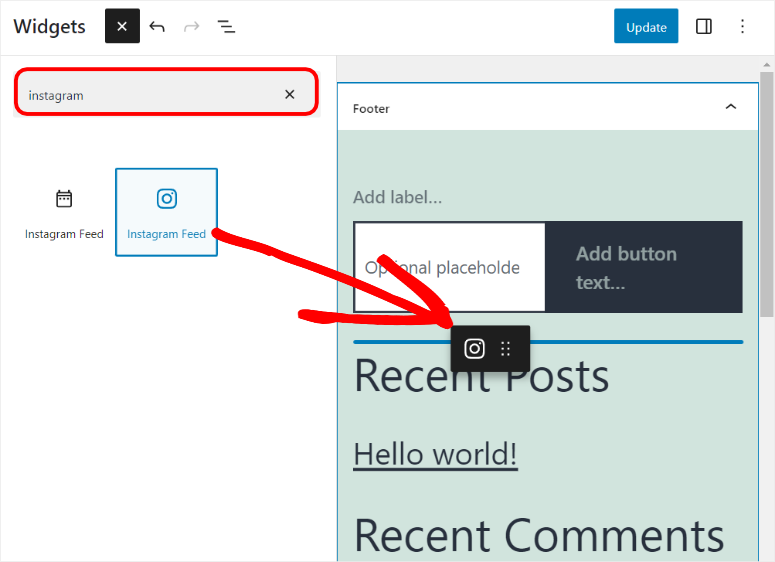
For this tutorial, we want to add the feed to the footer. Select the footer widget to expand it so you can view its properties.

Next, use the Plus icon and search for the ‘Instagram Feed.’ Drag and drop the Instagram Feed block to the location of the footer you want to display the feed. Hit Update to add it to your feed to the live page.
Finally, let’s add the feed through a shortcode. With a shortcode, you can add the feed on ANY page, post, or a widget-ready location.
The shortcode is particularly useful when you have multiple feeds to choose from or want to add many feeds to the same page or post.
You can locate the feed’s shortcode in two ways.
First, you can go to Instagram Feed » All Feeds. You will see all your feeds listed; copy the shortcode next to the feed’s name.
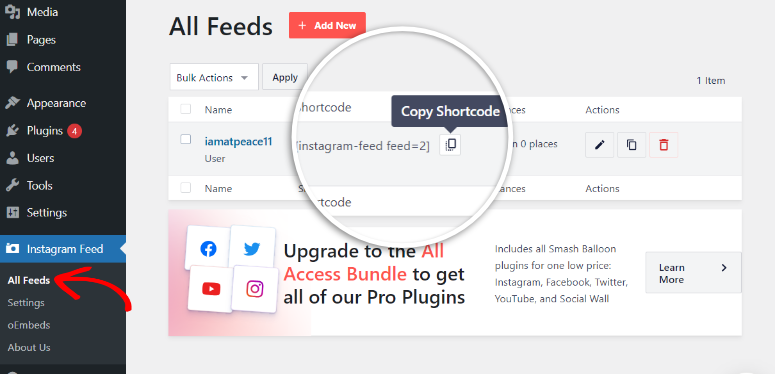
The other method of getting the shortcode is by going to Instagram Feed » All Feeds and opening the feed on the live feed editor.
On the top-right corner, find the Embed button. In the popup that appears, you will see the shortcode at the top of the window; copy it.
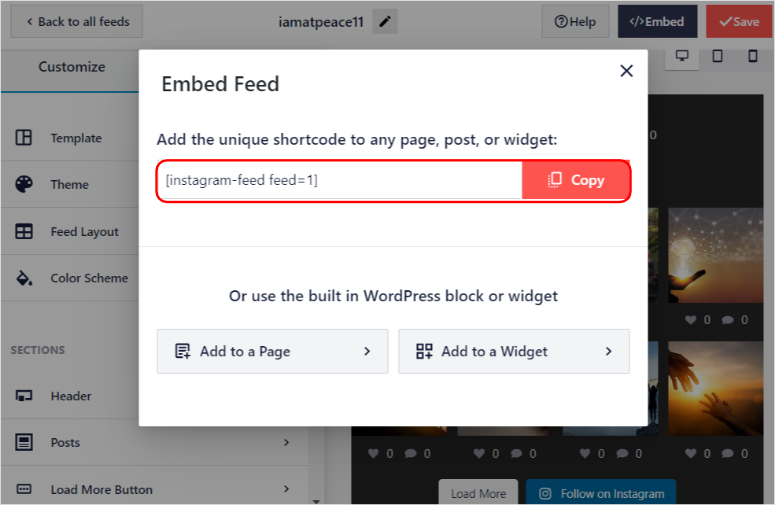
Now, with your shortcode at hand, open any page, post, or widget-ready location. For this tutorial, we will open a page.
Using the Plus icon, search for ‘Shortcodes’ and add the block to your page.
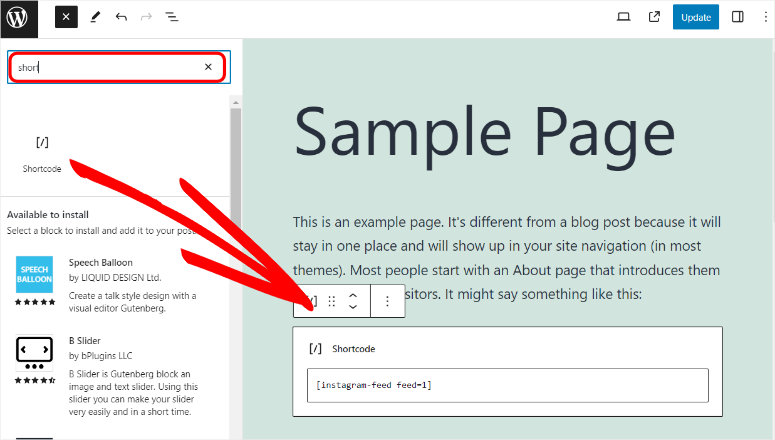
Finally, paste the shortcode and update the page; the live site should now display the feed.
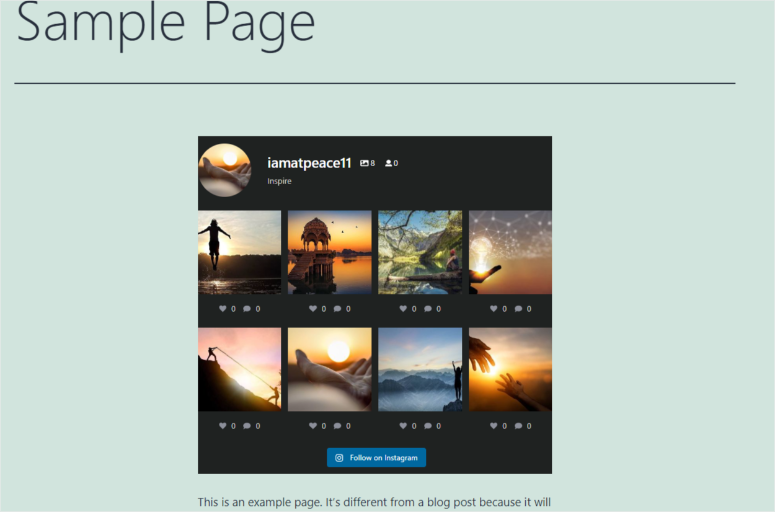
Well done! You have now added a highly customized and personalized Instagram feed to your WordPress site.
Now that you know how to use Smash Balloon to add an Instagram Feed, don’t stop there. There’s a lot more you can do with this plugin!
What Else Can Smash Balloon Do?
As you can see, adding an Instagram feed is not only easy with Smash Balloon but incredibly customizable and without any coding experience. Smash Balloon helps you capitalize on the full potential of Instagram’s engagement and user-generated content.
To add to that, you can create multiple feeds on the same or different pages, connect to specific hashtags, include tagged posts, or even seamlessly display your entire Instagram timeline on your site.
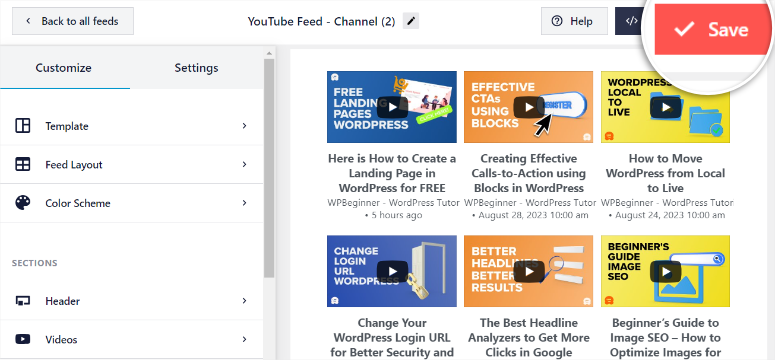
You can also add Facebook, YouTube, and Twitter feeds. Here’s a peak into what customize a YouTube Feed looks like:
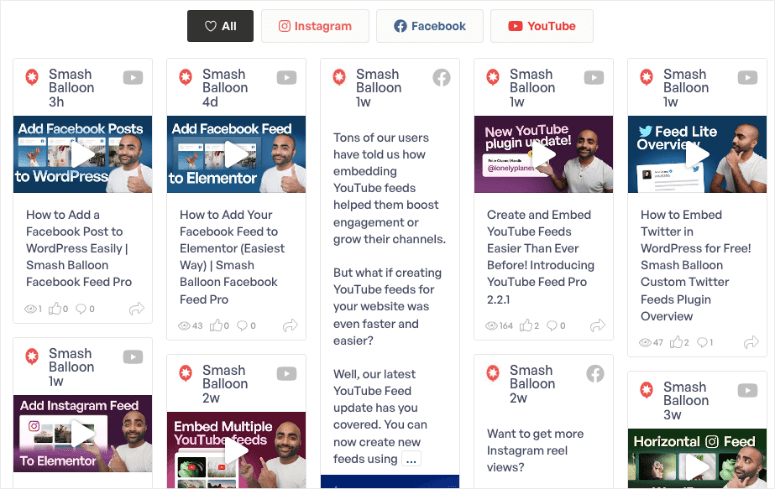
Smash Balloon also comes with a super powerful feature called the Social Wall. This lets you combine feeds from multiple platforms all in one place. Users can engage with your content from YouTube, Twitter, Instagram, and Facebook so they can stay updated with all your platforms.
We hope you found this tutorial helpful. You may also want to learn how to automatically share WordPress posts on Facebook and Twitter. Our aim is to empower and help you truly utilize your social media pages with your site. For this reason, check out these articles as well:
- How to Embed a YouTube Feed in WordPress to Boost Engagement
- How to Show a Facebook Feed in WordPress (5 Easy Steps)
- How to Add Social Proof Notifications in WordPress
The first two articles will help you use Smash Balloon to add YouTube and Facebook feeds. The last article will show you how to show social proof to potential customers.

Comments Leave a Reply