
A couple of years ago, I ran my first WooCommerce flash sale and did everything I thought I was supposed to. I picked a discount, updated the product prices manually, announced it to my email list, and waited.
The sale ran for 24 hours. Orders came in, but not as many as I expected. When I dug into the data, I found a lot of abandoned carts.
People had added products and then left without buying. There was nothing pushing them to finish. No visible deadline, no auto-applied discount, no reason to act now instead of tomorrow.
The problem wasn’t the offer. It was the setup. WooCommerce’s built-in tools are designed for ongoing promotions, not the kind of time-limited, high-urgency event that actually changes customer behavior.
After some research, I found that combining two plugins, Advanced Coupons and FunnelKit, covered everything I was missing: automated scheduling, a discount that applies without a code, and a real deadline customers could feel.
The next flash sale I ran with both tools active outperformed every manual sale I’d done before.
In this guide, I’ll show you how to set up a complete WooCommerce flash sale from scratch, step by step.
Key Takeaways
- A WooCommerce flash sale needs two things to work: a discount that applies automatically and a deadline that enforces itself. Advanced Coupons and FunnelKit handle both.
- The core setup (Part 1) takes under 10 minutes. The conversion-boosting tools in Part 2 are optional and independent of each other.
- Auto-apply requires Advanced Coupons Premium. Checkout expiry requires FunnelKit Basic ($99.50/year). The Part 2 tools each have their own plan requirements.
- Test the coupon and checkout expiry on a staging site before your live sale. It takes five minutes and prevents surprises.
What We’ll Accomplish in This Tutorial
By the end of this tutorial, you’ll have a fully automated WooCommerce flash sale: a discount that activates and expires on its own schedule, applies without a code, and locks the checkout page the moment the sale ends. No manual changes required during or after the sale.
If you add the Part 2 tools, you’ll also have product badges on sale items, an exit-intent popup to catch visitors who try to leave, and social proof notifications showing real order activity across your store.
Now, to help you skip to any section you want or see all the methods and steps at a glance, use the table of contents below.
What You’ll Need Before We Start
Skill level: Beginner Time to complete: ~10–15 minutes (Parts 1 & 2); ~35 minutes with all optional tools
Before we begin, make sure you have:
- WordPress with WooCommerce installed and at least a few products set up
- Advanced Coupons Premium (All Access Bundle, $249/year) — required for auto-apply; scheduling is available in the free version
- FunnelKit Basic ($99.50/year) — checkout expiry is included on all paid plans
- (Optional) aThemes Merchant, OptinMonster Growth plan or higher, TrustPulse
- Recommended: a staging site to test the coupon and expiry before going live
To help you quickly navigate to the step you want or skip ahead, use the table of contents below.
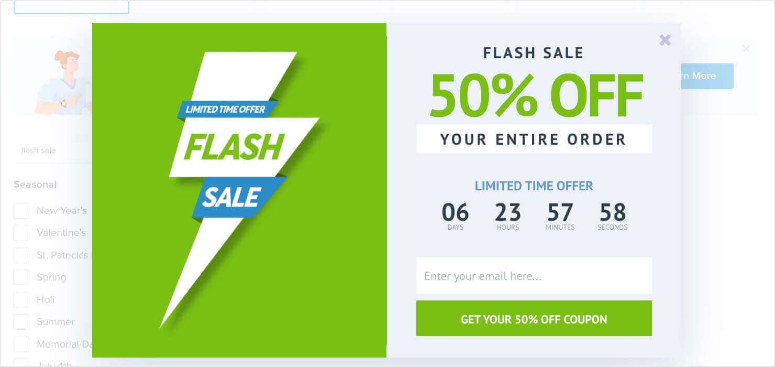
Why Flash Sales Work
Flash sales work because they combine two powerful motivators at once: a compelling discount and a real deadline. Customers who have been browsing without buying suddenly have a concrete reason to act now rather than later.
Here’s what makes them particularly effective for WooCommerce stores:
- Higher conversion rates: time-limited offers consistently outperform standard promotions because urgency overcomes hesitation
- Predictable revenue spikes: you control exactly when orders come in, which is useful for meeting monthly targets or moving inventory quickly
- List re-engagement: announcing a flash sale to your email list rewards subscribers and brings back customers who haven’t purchased in a while
- Inventory clearing: a well-timed flash sale is one of the fastest ways to move slow-selling stock before restocking
Part 1: Core Setup
These two steps give you a fully functional flash sale. Advanced Coupons handles the discount timing and auto-apply. FunnelKit handles the checkout expiry. You can stop here and have everything you need.
Step 1: Create the Flash Sale Discount with Advanced Coupons
Advanced Coupons extends WooCommerce’s native coupon system with scheduling and auto-apply. Those two features are what turn a basic discount into a hands-off flash sale: the coupon activates and expires on its own, and applies automatically so customers never need to look up a code.
First, install and activate Advanced Coupons for WooCommerce from the WordPress plugin repository. Once it’s active, go to Marketing » Coupons in your dashboard and click Add coupon.
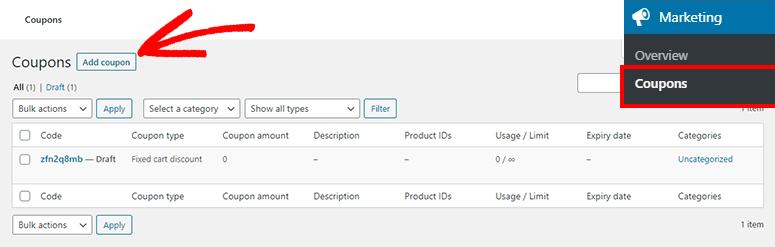
Give the coupon an internal name (something like “flash-june-9” works fine) and set the Discount type to Percentage discount in the General tab. Enter your discount amount. A 20-40% discount is a common range for flash sales, though the right number depends on your margins.
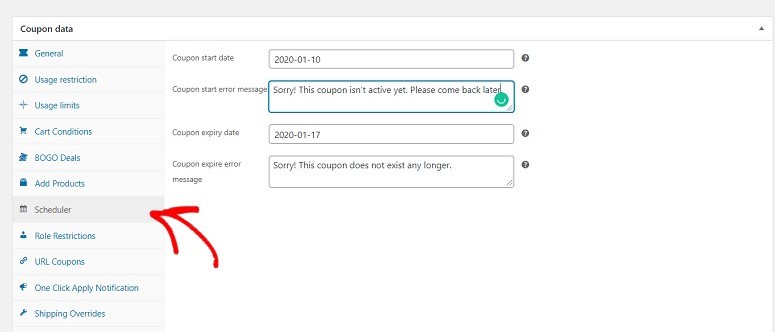
Next, click the Scheduler tab that Advanced Coupons adds to the coupon editor. Set a Start date and End date with exact times. The scheduling feature works down to the minute, so you can run a precise 8-hour blitz or a full 24-hour event.
Now go to the Cart Conditions tab. Auto-apply won’t work without at least one cart condition, so add a condition of Cart Subtotal with a minimum value of $0. This means the coupon will apply to any cart during the sale window.
Once that condition is set, scroll to the Auto Apply Coupon panel on the right side of the coupon editor and check the Enable auto apply for this coupon box. From this point on, the discount will silently apply to every qualifying cart without the customer needing to do anything.
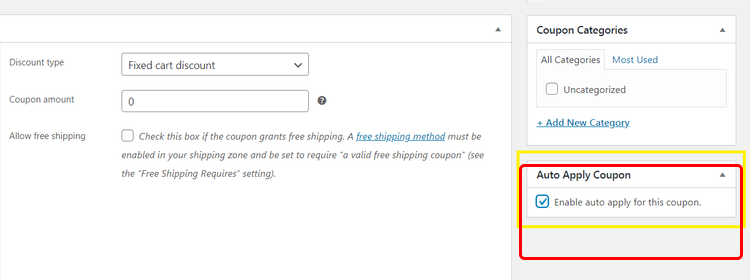
⚠️ Note: The auto-apply feature requires Advanced Coupons Premium, available as part of the All Access Bundle. Coupon scheduling is available in the free version.
Click Publish. Your flash sale discount is now scheduled, auto-applying, and will turn off automatically when the end date passes.
Step 2: Add Checkout Urgency with FunnelKit
Once a customer adds a product to their cart, the checkout page is the moment that matters most. FunnelKit lets you add a checkout expiry directly to the checkout experience, reinforcing that their deal won’t last if they leave without completing the order.
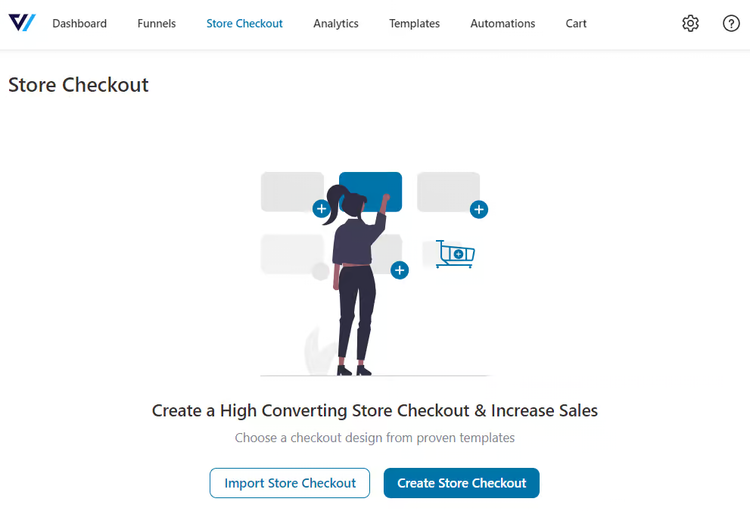
Install and activate FunnelKit Funnel Builder. The checkout features are available on all plans, including the Basic plan at $99.50/year. Then go to FunnelKit » Store Checkout in your dashboard and either create a new checkout or open your existing one.
In your Store Checkout, click the Optimizations tab and open the Time Checkout Expiry panel. Set Close Checkout After Date to Yes and enter the exact date and time your flash sale ends. When that moment arrives, the checkout page closes automatically, and any customer who tries to access it afterward will be redirected elsewhere.
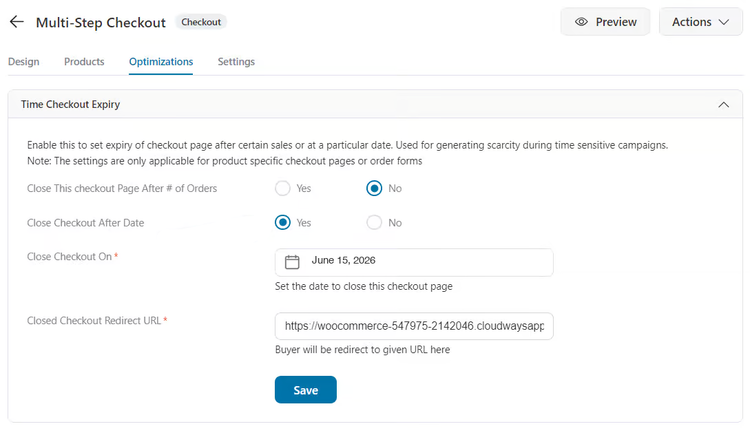
Save your changes. Shoppers who reach checkout during the sale window will complete their order normally. Once the end time passes, the checkout goes offline automatically, keeping the deadline real.
That’s the core flash sale setup. Advanced Coupons handles the discount timing, FunnelKit handles the urgency moment at checkout. You can stop here and have a fully functional flash sale. Or continue below to add the layers that push conversions further.
Part 2: Boost Your Results
The steps in Part 1 are enough to run a flash sale. The steps below are for store owners who want to extract more from their promotion. They’re independent of each other, so you can add any combination.
Step 3: Display Sale Badges on Products with aThemes Merchant
When customers browse your store during a flash sale, they should be able to see instantly which products are discounted. Merchant by aThemes has a Product Labels module that adds customizable badge overlays to product images automatically during the sale.
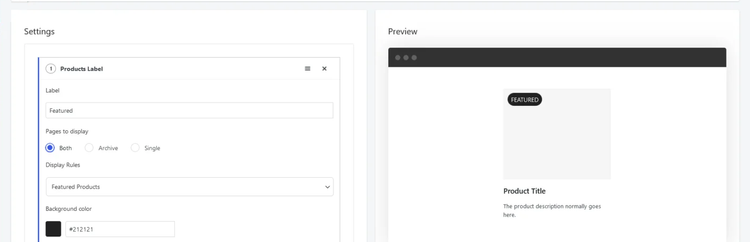
Install and activate Merchant. It works alongside any WooCommerce-compatible theme. Go to Merchant in your dashboard, find the Product Labels module under the Increase Order Value section, and enable it.

In the module settings, create a label with your sale text (“FLASH SALE” works well) and set it to apply to products that are on sale. You can customize the badge color and position to match your store’s branding.
While you’re in Merchant, it’s also worth enabling the Stock Scarcity module under the same section. It shows low-stock warnings like “Only 3 left” on product pages, which pairs naturally with flash sale urgency.
Step 4: Catch Abandoning Visitors with OptinMonster
Even with a discount and urgency timer, a portion of visitors will try to leave without buying. OptinMonster catches these visitors with an exit-intent popup that appears right as they move their cursor toward closing the tab.
Install and activate the OptinMonster WordPress plugin and connect it to your account. In the OptinMonster dashboard, click Create New Campaign, choose a Lightbox popup, and pick a template that works for a sale context. Customize the headline with your flash sale offer.
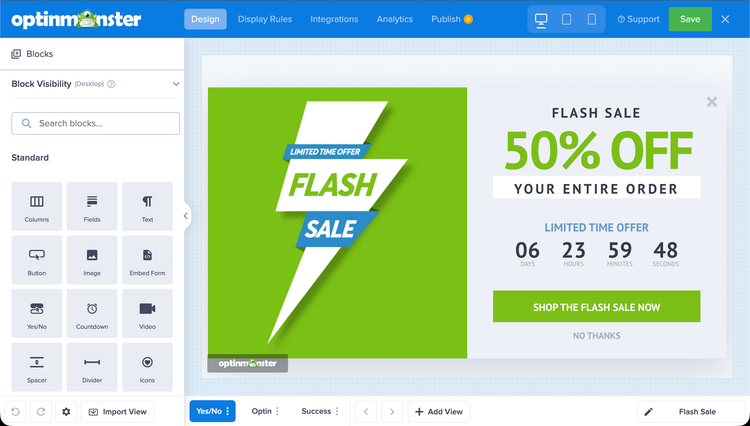
In the campaign’s Display Rules, target WooCommerce product pages and the cart page. Then add an Exit Intent trigger under the timing settings. This fires the popup when the visitor’s cursor moves toward the top of the browser window.
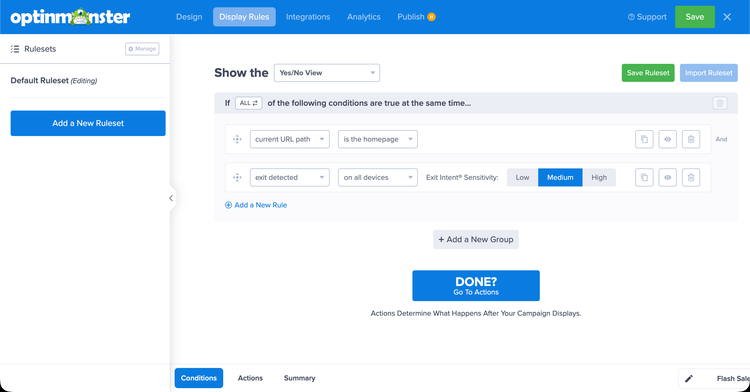
You can also drop OptinMonster’s built-in countdown timer block into the popup to show exactly how much time is left in the sale. This connects the popup directly back to the scheduled end time you set in Advanced Coupons, reinforcing urgency with a visible clock.
⚠️ Note: WooCommerce targeting in OptinMonster requires the Growth plan or higher.
Step 5: Add Social Proof with TrustPulse
This step works best when you’re actively driving traffic to the sale, for example, through an email blast or social media promotion. TrustPulse shows small notification bubbles at the corner of the page, like “Marie from Austin just purchased 4 minutes ago,” which signals to other shoppers that people are actively buying.
Install and activate TrustPulse and connect it to your account. Create a new campaign and choose Recent Activity as the campaign type. Then go to the Capture Activity tab and select WooCommerce Orders from the dropdown. This connects TrustPulse to your store and automatically captures new order notifications.
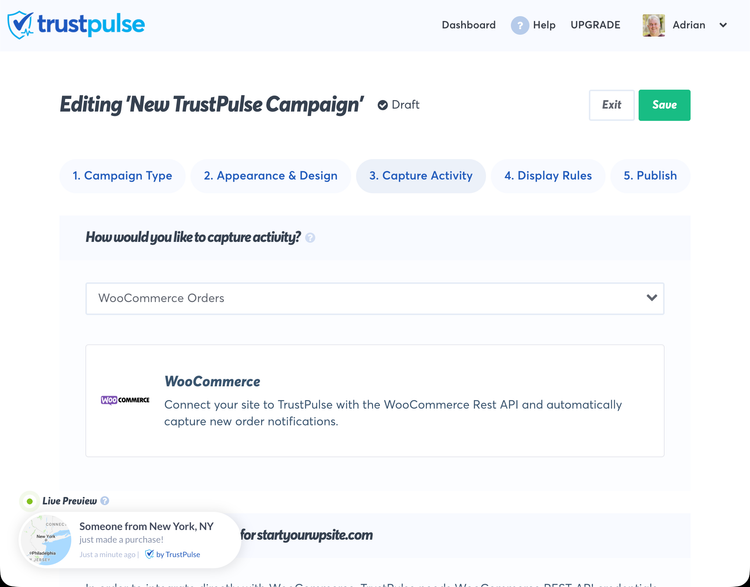
Set the campaign to display site-wide so it runs across your store during the sale. TrustPulse also has an “On-Fire Notifications” option that shows aggregate activity, for example “42 people purchased in the last hour.” This works particularly well when sale velocity is high.
⚠️ Note: TrustPulse is most effective when there’s real purchase activity to show. If your store sees lower traffic during the sale, the notifications may appear infrequently. In that case, the other steps above will carry more of the conversion weight.
How to Test Your Work
Before going live, take five minutes to run through the sale as a customer. This confirms the discount applies automatically and the checkout expiry is set correctly.
Test the auto-applying coupon:
Open your site in a private browser window. Browse to any product that’s in scope for your sale and add it to the cart. Go to the cart page. The flash sale discount should appear automatically in the order summary with no coupon code required.
If the discount doesn’t appear, check two things: confirm the sale start date has passed and the end date hasn’t, and make sure the Cart Condition is set to Cart Subtotal ≥ $0.
Test the checkout expiry:
In FunnelKit’s Store Checkout settings, temporarily set the Close Checkout After Date to a time a few minutes in the past. Then try to access the checkout page. FunnelKit should redirect you away from it. Reset the date to your actual sale end time before going live.
Quick verification checklist:
- ☐ Discount applies automatically in a private browser session
- ☐ The correct percentage is applied
- ☐ Checkout expiry date matches your actual sale end time
- ☐ (If using OptinMonster) Exit-intent popup fires when moving cursor to top of browser on a product page
- ☐ (If using TrustPulse) Campaign is active and displaying notifications
Other Options
If you prefer not to add a coupon plugin, WooCommerce does have a built-in sale price feature. You can set a sale price on individual products with scheduled start and end dates at Products » Edit Product » General tab.
This works for simple stores, but you’ll need to update each product manually and customers won’t get a code they can share.
You also lose the cart condition logic and auto-apply that Advanced Coupons provides. For anything beyond a basic single-product discount, the plugin is the better choice.
For most WooCommerce stores running more than the occasional promotion, Advanced Coupons is worth the upgrade.
Common Issues and Quick Fixes
Problem: “Auto-apply coupon isn’t applying at checkout”
What’s happening: Auto-apply requires at least one Cart Condition to be set. Without it, Advanced Coupons won’t trigger the coupon automatically.
Quick fix: Go to your coupon’s Cart Conditions tab and add a Cart Subtotal condition with a minimum of $0. Save and test in a private browser window.
My experience: This catches almost everyone the first time. The requirement isn’t obvious from the UI — the Auto Apply panel doesn’t warn you that a condition is needed.
Problem: “Checkout is still accessible after the sale ended”
What’s happening: The Close Checkout After Date setting in FunnelKit may not have saved correctly, or the wrong date format was entered.
Quick fix: Go to FunnelKit » Store Checkout » Optimizations » Time Checkout Expiry. Confirm the date matches your sale end time and the toggle is set to Yes. Save again and test by temporarily setting the date to a past time.
Problem: “Sale badges not showing on product pages”
What’s happening: The Merchant Product Labels module applies to products flagged as “on sale” in WooCommerce. A coupon-only discount doesn’t automatically set the on-sale flag, so Merchant may not detect those products.
Quick fix: In the Merchant Product Labels settings, change the display scope to all products (rather than just on-sale products), then limit it by category or tag to your flash sale items.
FAQs: WooCommerce Flash Sales
Do I need all five plugins for a WooCommerce flash sale?
No. The only essential plugin is Advanced Coupons, which handles the discount, scheduling, and auto-apply. FunnelKit adds checkout urgency and is a strong second step. The three tools in Part 2 are optional enhancements you can add in any order or skip entirely.
How long should a WooCommerce flash sale last?
Most flash sales perform best between four and 24 hours. Shorter windows create the most urgency but require an existing warm audience you can notify quickly, such as an email list. Longer windows up to 48 hours work better when you’re relying on organic or social traffic. I’d avoid running a single sale longer than 48 hours since the urgency element fades.
Is there a free way to run a flash sale in WooCommerce?
Yes. WooCommerce’s built-in sale price scheduling lets you set a start and end date on individual products at no cost. Advanced Coupons’ scheduling feature is also available in the free version. The main limitation with both free options is that you need to update each product manually, and auto-apply requires Advanced Coupons Premium.
Can I limit the flash sale discount to specific products or categories?
Yes. The Cart Conditions tab in Advanced Coupons lets you restrict the coupon to a specific product, category, or minimum cart subtotal for particular items. Add a Product Category or Specific Product condition alongside the cart subtotal condition, and the discount will only apply when those items are in the cart. This is useful for targeting clearance stock or excluding your highest-margin products from the sale.
Final Thoughts: Is This the Right Setup for Your Flash Sale?
If you’ve followed the steps above, you now have more than a basic WooCommerce discount. You have a flash sale that runs itself.
The combination of Advanced Coupons and FunnelKit handles the two things that make flash sales actually work: a discount that applies the moment a customer reaches checkout, and a deadline that’s real because the checkout page closes when it expires.
Every manual flash sale I ran before I set this up properly had abandoned carts because there was nothing stopping customers from waiting until tomorrow.
The Part 2 tools are worth adding when you’re driving significant traffic. For a small store or a quiet promotion, Part 1 alone is enough. For a high-traffic event, OptinMonster and TrustPulse can meaningfully recover revenue you’d otherwise leave behind.
Run this setup on a staging site first. Once you’ve confirmed the discount and expiry work correctly, the live sale becomes routine. You’ll spend more time on the announcement than the setup.
When you’re ready to improve conversions beyond sale periods, see our guide to the best WooCommerce checkout plugins to lift everyday results too.
Resource Hub: WooCommerce Flash Sales
Explore more WooCommerce and sales strategy guides on IsItWP:
- Best WooCommerce Plugins to Grow Your Store — Our tested roundup of the most useful WooCommerce add-ons across checkout, email, analytics, and more
- How to Reduce Cart Abandonment in WooCommerce — Strategies to recover customers who add products but don’t complete checkout
- How to Add a Countdown Timer in WordPress — Create visible urgency on product pages, landing pages, and popups
- Best Email Marketing Plugins for WordPress — Use email to announce flash sales and maximize revenue from every event
- How to Track WooCommerce Sales in Google Analytics — Set up ecommerce tracking to measure flash sale conversions and ROI
- Best WordPress Popup Plugins — Compare popup tools for capturing abandoning visitors during a promotion

Comments Leave a Reply