
I was drowning in a sea of email attachments, buried under the chaos of organizing client files for my WordPress site.
It felt overwhelming, like I was one misplaced file away from a total meltdown. Maybe you’ve been there too, desperately searching for a lifeline to pull you out of the digital mess.
Well, I found mine, and today, I’m here to share it with you.
Enter Dropbox.
A cloud storage tool that swooped in like a trusty assistant, tidying up my chaos in seconds. It’s more than just storage; it’s like a secure and reliable safe deposit box for your site.
And here’s the kicker: Dropbox and WordPress?
As a WordPress expert, this is a match made in heaven. Together, they unlocked a world of possibilities I didn’t even know I needed.
But the real magic happened when I discovered WPForms.
Let me tell you, it was love at first click. With the Dropbox WPForms Integration, connecting these two powerhouses gives me endless possibilities for customizing WordPress sites.
Suddenly, I could create forms that effortlessly zap uploads straight to Dropbox—no stress, no fuss. It is easy, secure file uploads with all the perks of cloud storage, wrapped up in a beginner-friendly package.
Now, if you’re just starting out with WordPress or Dropbox, don’t worry—I’ve got your back.
This guide is built for you, designed to take you step-by-step through the process so you can ditch the tech headaches and set up a smooth upload form without breaking a sweat.
Why I love the Dropbox WPForms Connection
I’ve tested countless WordPress tools, and trust me, WPForms and Dropbox stand out as my top picks for beginners.
For starters, WPForms makes form creation a breeze, while Dropbox keeps everything safe and accessible.
And speaking of unstoppable, let’s talk about the integrations that hooked me. Picture this trio of WordPress, Dropbox, and Duplicator Pro, the best WordPress backup plugin.
Duplicator Pro can automatically backup your site to Dropbox, saving you after a site. Then we have the Dropbox Embedder, which links your media library to Dropbox for seamless file access.
Finally, WPForms + Dropbox, which automates uploads with a flick of a switch. These aren’t just tools, they’re game-changers, and I can’t imagine running my site without them anymore.
So, where does this leave you?
By the end of this guide, you’ll have a slick, secure system that saves you hours and spares you the headaches.
Imagine a smooth workflow, you’ll wonder how you ever lived without it. Are you ready to transform the way you work? Let’s dive in and make it happen—together! Step by step!
To learn more about this visual form builder, check out our updated WPForms review here.
How to Create a Dropbox Upload Form in WordPress
Ready to set up a Dropbox upload form on your WordPress site?
It’s super simple, and I’m excited to walk you through it. One of the best parts? Installing WPForms on WordPress is a total breeze; I’ve done it myself in just a few minutes.
Whether new to this or a seasoned professional, you’ll be up and running in no time.
Now, a quick note: WPForms offers a free version that’s great for basic forms, but to connect it with Dropbox, you’ll need the Pro plan or higher.
But the pro version is totally worth it for what we’re about to build!
Step 1: Install WPForms
As mentioned, since we need the Dropbox WPForms Integration, we’ll go for the Pro version.
Here’s how to do it:
First, visit the WPForms website and grab a Pro plan.

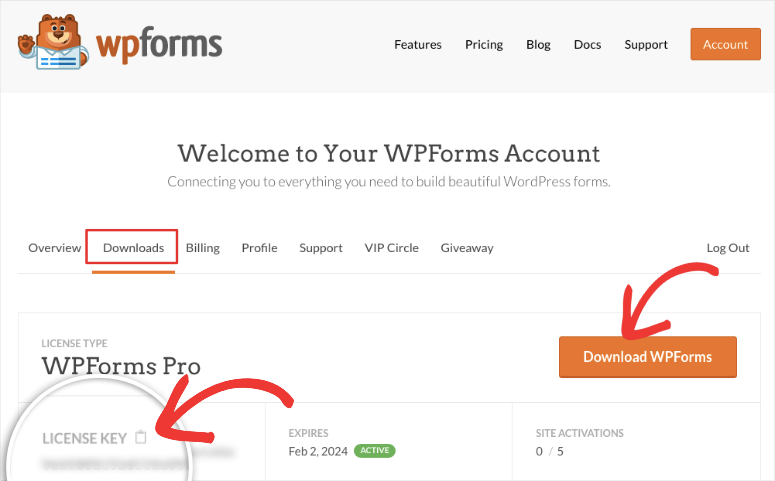
After purchasing, log in to your account, head to the Downloads section, and download the WPForms Pro plugin zip file. You’ll also get a “License Key,” so keep that safe.
Now, in your WordPress dashboard, go to Plugins » Add New. Here, select “Upload Plugin” at the top, select the zip file you just downloaded, and hit “Install Now.”
Once installed, click “Activate,” and boom—WPForms will appear in your dashboard menu.
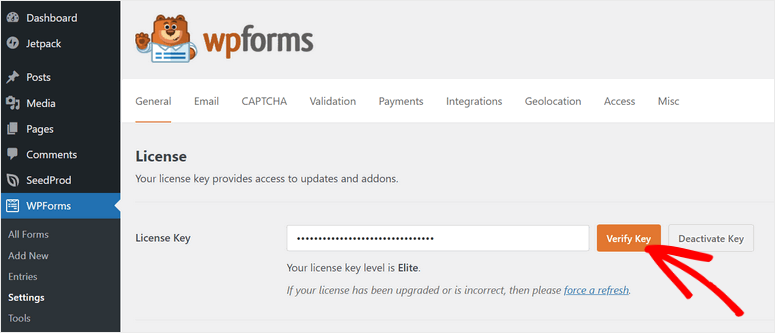
To unlock all the Pro version features, including the WordPress Dropbox features, go to WPForms » Settings.
Then, under the General tab, enter your License Key and hit “Verify Key.”
Done! You’re all set to move forward.
Step 2: Create a File Upload Form
With WPForms installed, let’s create the form that allows users to upload files straight to Dropbox. It’s a fun process, and WPForms makes it effortless with many options.
In your WordPress dashboard, head to WPForms » Add New.
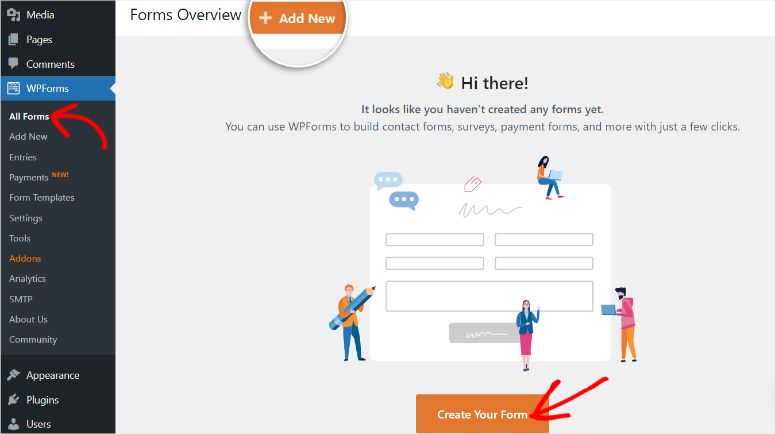
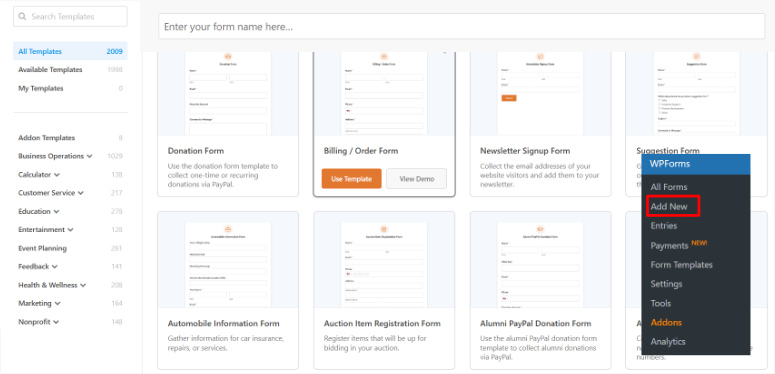
This opens the template page, where you’ll find over 2,000 templates. Alternatively, you can build a form with AI or from scratch.
On the left, there’s a category list showing the number of templates in each section—think contact forms, custom registration forms, or whatever else you need.
Looking for something specific?
The search function helps you find your form faster. Each template has a preview image so you can see what it looks like, or you can click “View Demo” to check it out on a separate page.
You’re free to pick any template that catches your eye.
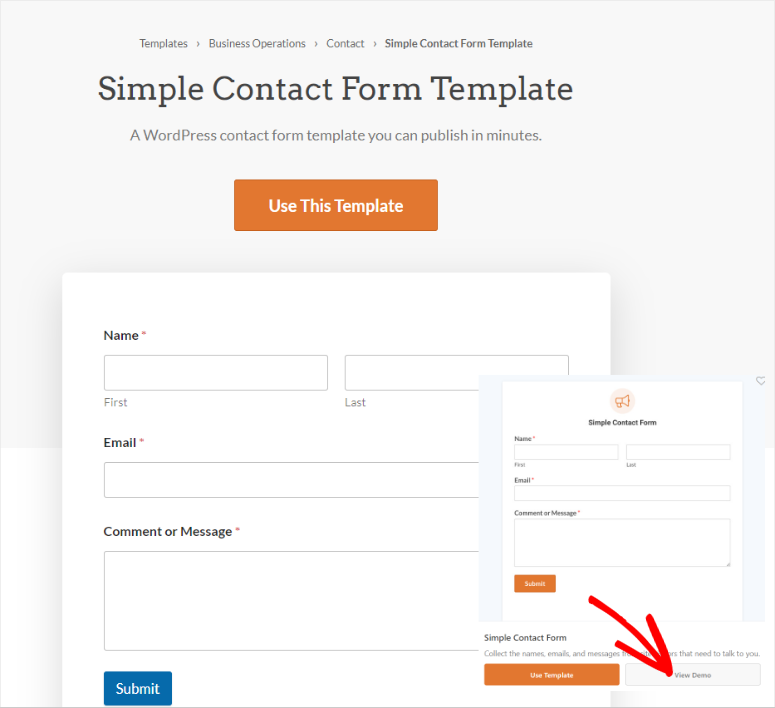
But, for this tutorial, we’ll select the “Simple Contact Form.” This is because it’s a simple yet detailed starting point for our Dropbox upload setup. Select Use Template to continue.
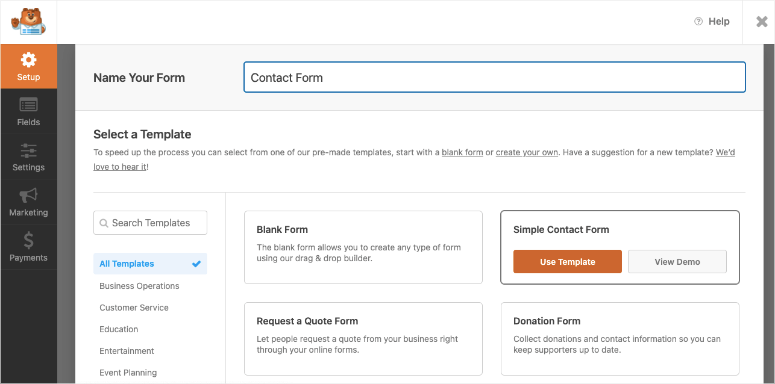
Once you select a form template, WPForms loads it into the form builder. From here, we’ll tweak it in the next steps to add that file upload magic!
Step 3: Add File Upload Field
Now that you’ve set up your form template in WPForms, it’s time to customize it to make it yours.
My favorite part of WPForms!
This is because this form builder has a slick and easy-to-use drag-and-drop builder that allows you to customize any form in minutes. It’s like playing with digital Legos—everything just clicks into place.
So, on the left side of your screen, you’ve got “Field Options,” all neatly lined up. Then, on the right, there’s a live preview of your form, waiting for you to shape it.
Want to add something? Just grab a field from the left and drop it into the preview. Need to tweak the order? Drag it up or down.
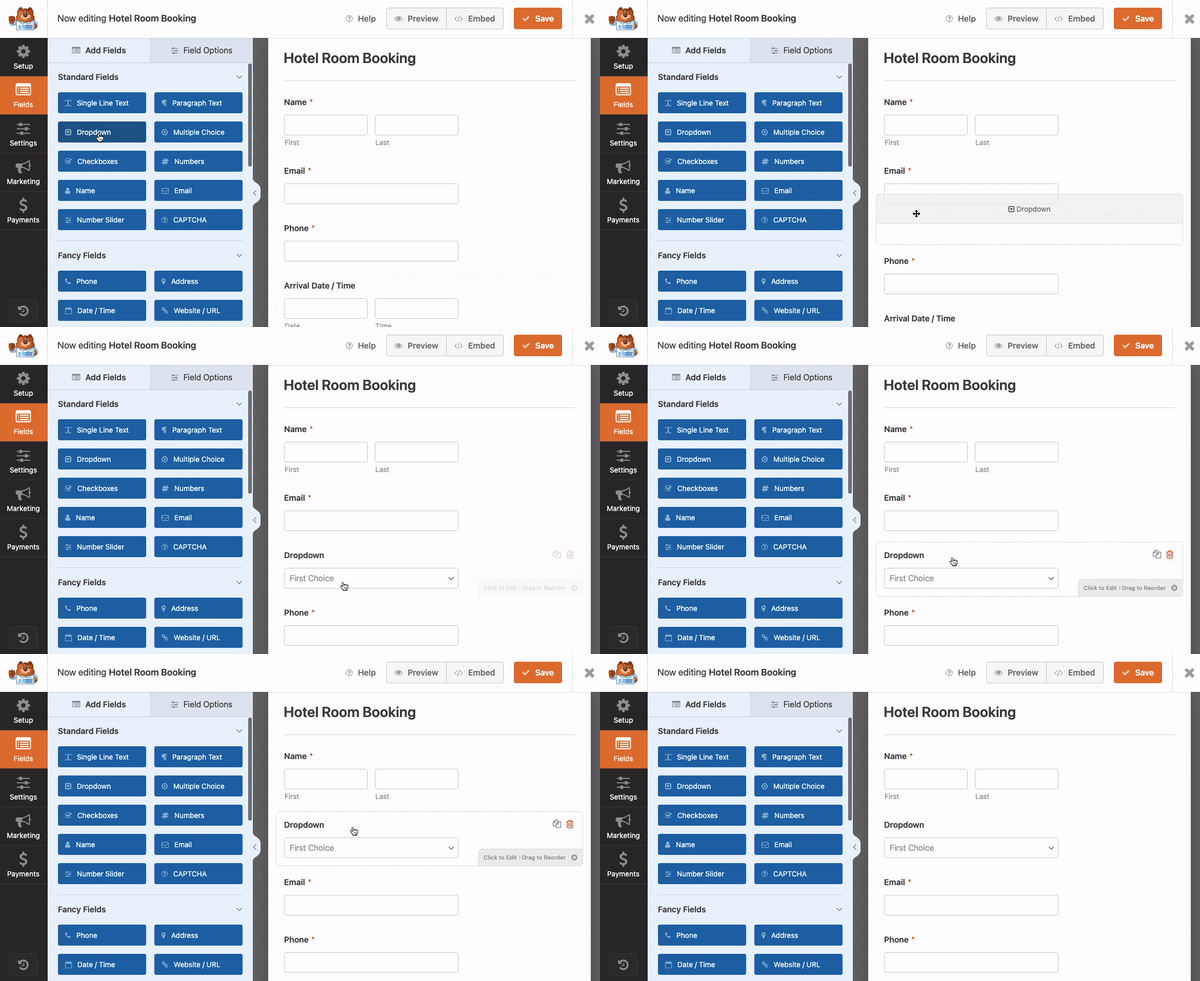
Once you are happy with the form design, you need to add a File Upload field to let users upload files to Dropbox right through your form.
So, head over to that left panel and scroll down until you spot “Fancy Fields.” This is where you find all the advanced WPForms fields.
Here, look for the “File Upload” field and drag it over to the preview on the right. Drop it wherever feels right, maybe after the name field, or tucked in at the end.
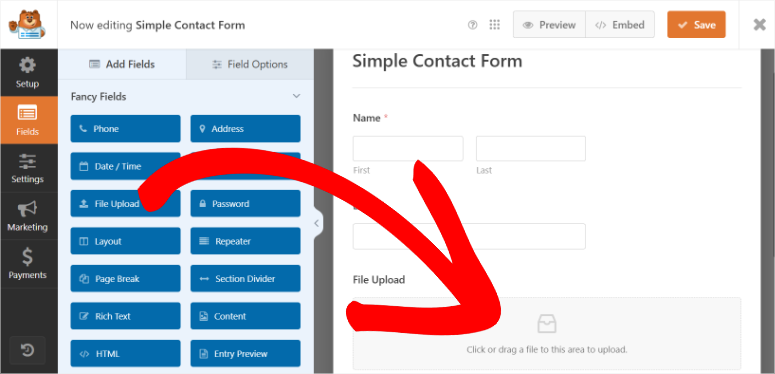
Once done, hit that “Save” button, and you are done.
Step 4: Test Upload Form and Set Up Dropbox
Before we set up Zapier in the next step, I’ve found it much easier to send a test form submission first, then set up Dropbox.
Why? Well, Zapier needs some data to set up a Zap, and submitting a test form submission gives it just that.
Plus, setting up Dropbox alongside means no annoying screen-switching later, it’s all about keeping the flow.
First, Let’s Send Out a Test Form.
Since you have saved your form in the previous step, leave the form builder page. Then, head to your WordPress dashboard and navigate to WPForms » All Forms.
Here, you will find all the forms you have created with WPForms. Find the upload file form you have just created, in draft. Once you’ve got it, hit the “Preview” button.
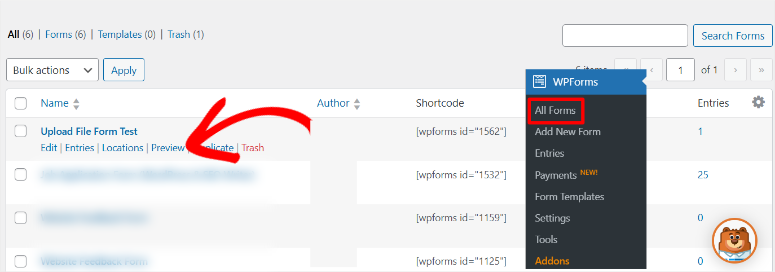
This pulls up a live version of your form, exactly as your users will see it. Now, fill it out like one of your users: name, email, and of course, the most important part, upload a test file.
Remember, it could be a photo of your cat, a quick PDF, anything you’ve got lying around.
Then, hit “Submit.”
Now, Let’s Set Up Dropbox.
To do this, open a new tab and log into your Dropbox account. If you do not have one, it takes a few minutes to set up and is completely free.
In your cloud storage space, create a new folder that’s easy to remember. I like something like “Form Uploads by WPForms”; it’s clear and simple and tells you exactly what’s inside.
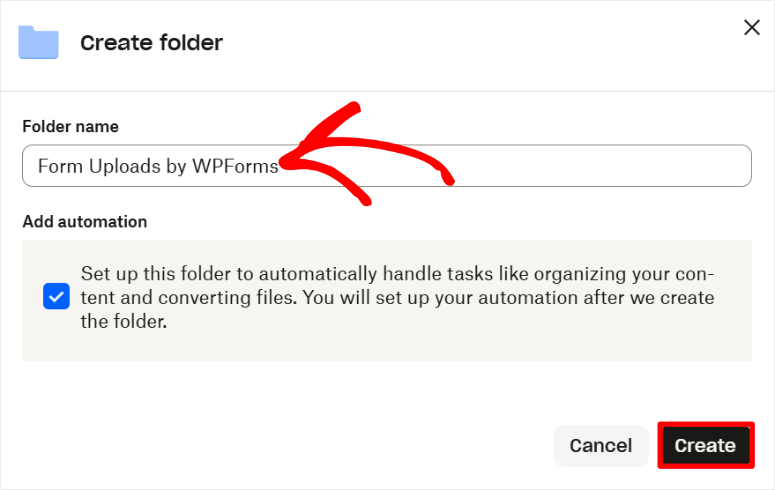
This folder is where all the files from your WPForms submissions will automatically go.
Make sure Dropbox is logged in the same browser as Zapier and WordPress to make the connection easier.
And there you have it! You’ve just tested your form and set up Dropbox. Now, you’ve got everything lined up perfectly to set up the Dropbox WPForms connection.
Step 5: Integrate Zapier with WPForms
To get started, you’ll need the WPForms Zapier Addon, the key that links these two tools. So, head to your WordPress dashboard, navigate to WPForms » Addons, and type “Zapier” into the search bar.
When it pops up, hit “Install” and “Activate.” And you have this WPForms addon ready.

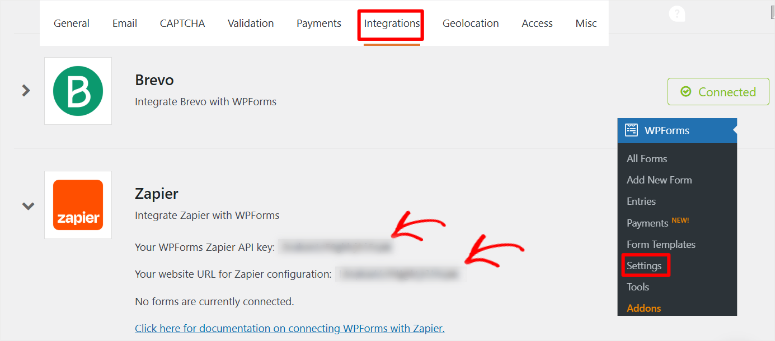
Next, you’ll grab your WPForms Zapier API key. The code that you will use to link WPForms and Zapier.
To get this code, select WPForms » Settings » Integrations. After this, scroll down to the Zapier section and copy that API key. Then, save it somewhere safe, you’ll need it in a moment.
Now, let’s dive into Zapier.
If you don’t have an account, sign up. It will only take you a few minutes.

Once logged in, select the “Plus+” icon at the top of the page, then hit the Zapier button to craft your automation.

Then, on the next page, select Trigger to open a list of over 7000 tools and apps you can connect with Zapier.
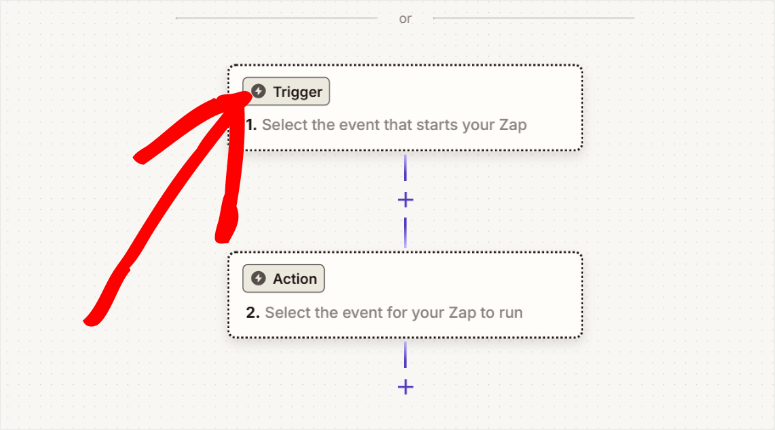
Because of this large number, search for “WPForms” as your trigger app.

Once selected, pick “New Form Entry” as the Trigger Event. This tells Zapier to jump into action every time someone submits your form.
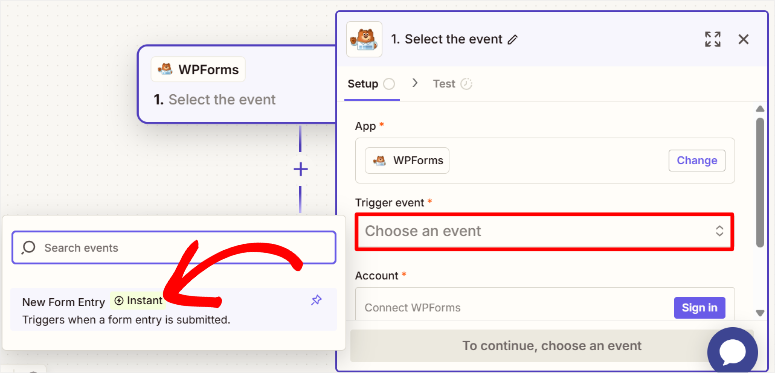
Next, in the Account tab, hit “Sign In” beside “Connect WPForms,” and a window will appear.
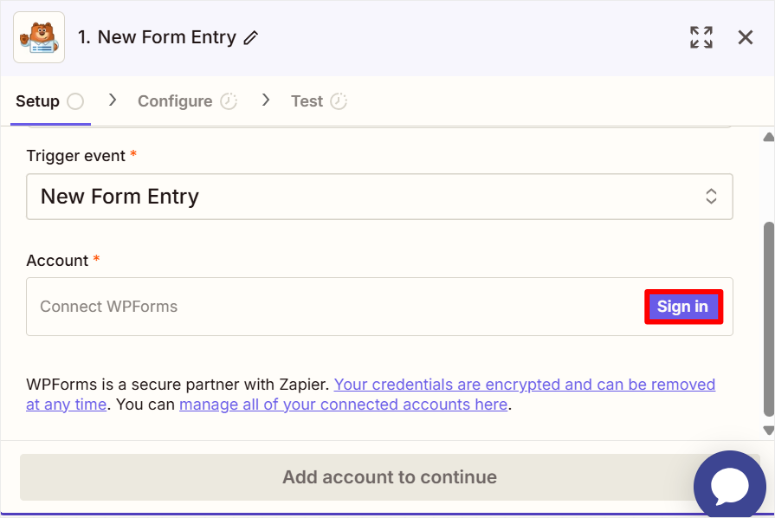
Here, paste your API key, add your website URL, and select “Yes, Continue to WPForms.” And that’s it, they’re linked, and you’ll zip back to the Zap setup. Hit “Continue” to go to the next step.
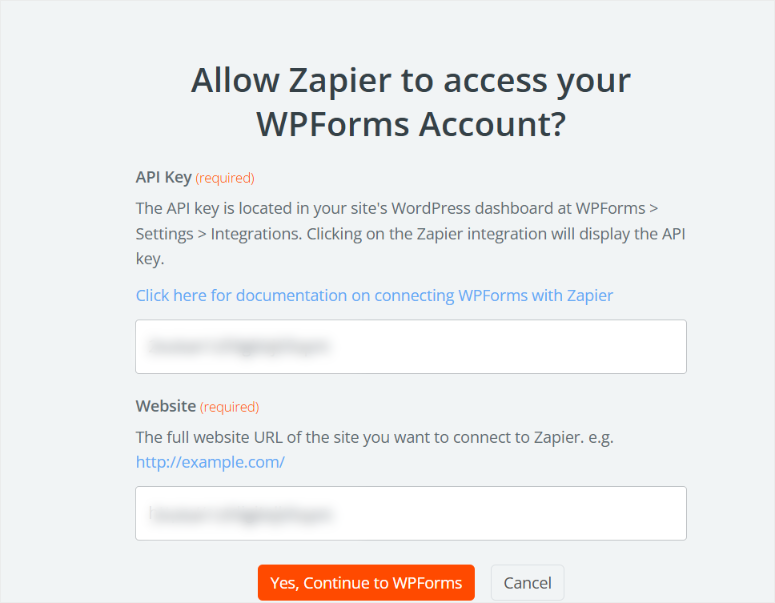
On the next page, under “Form,” choose the specific form you’ve built in WPForms from the dropdown, and select Continue.
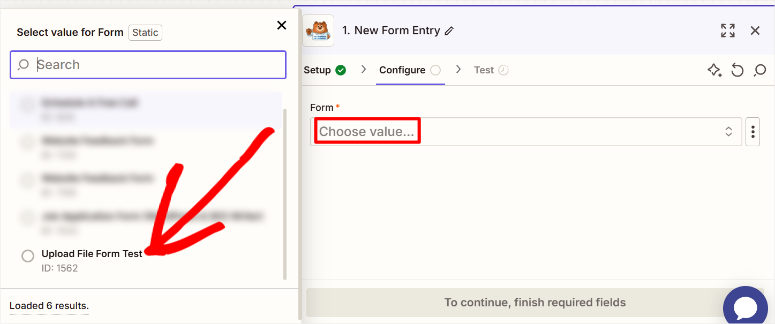
After this, select the field you want Zapier to focus on in the form. In our case, it is the “File Upload” section. This zeroes in on exactly which form Zapier should monitor.
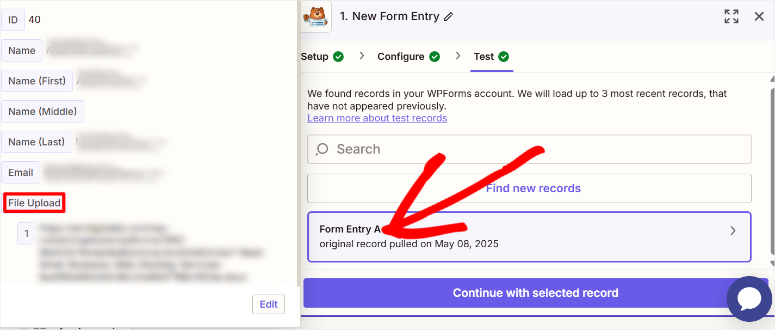
Then comes the test. Zapier will ask you to check the trigger by selecting “Test Trigger.”
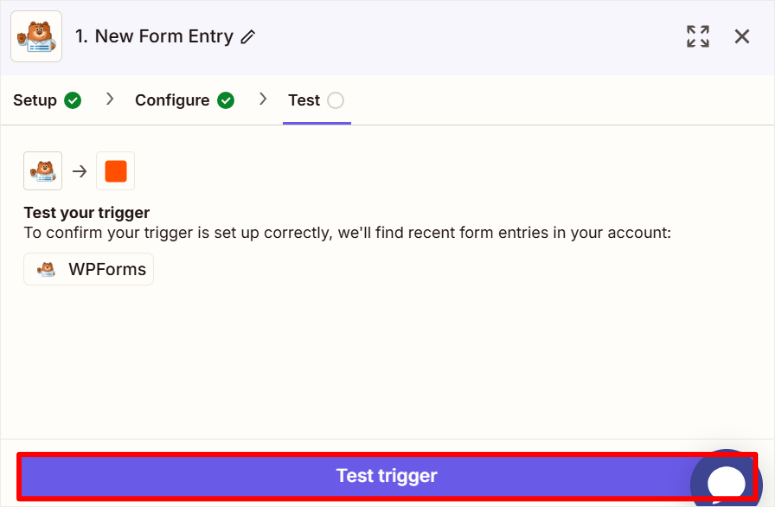
Now, if you’ve already submitted a test entry through your form, it’ll pick that up to confirm everything’s running smoothly. If it works, you’re in the clear!
And there you go! You have just connected WPForms and Zapier.
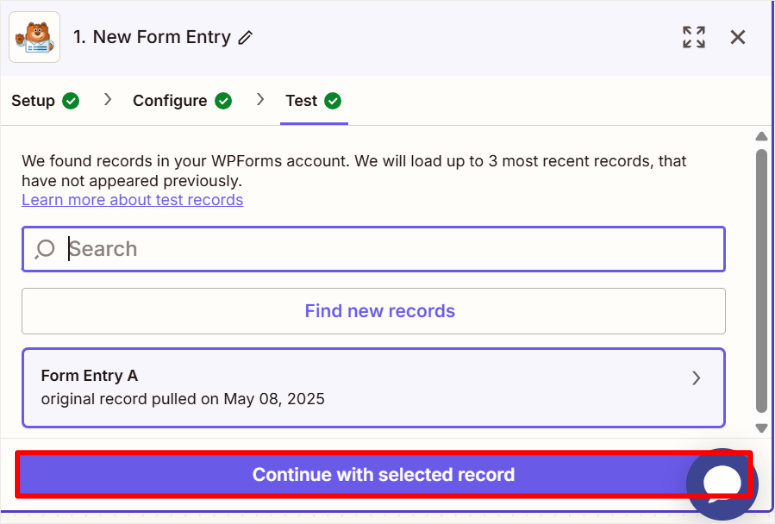
Step 6: Connect WPForms with Dropbox via Zapier
At this point, you should be in your Zapier account, with the WPForms trigger already set up from the previous step. That trigger tells Zapier to take ‘Action’ whenever someone submits your form.
Now, we need to define what ‘Action’ Zapier should take. That is, submit your upload forms to Dropbox.
To do this, still on the Zapier screen, you’ll see a section labeled “Action”. This is where you tell Zapier what to do with those form submissions.
So, select Choose App & Event, and a little search bar will pop up. Type in “Dropbox”, and when it shows up, select it. This lets Zapier know that Dropbox is the destination for our files.

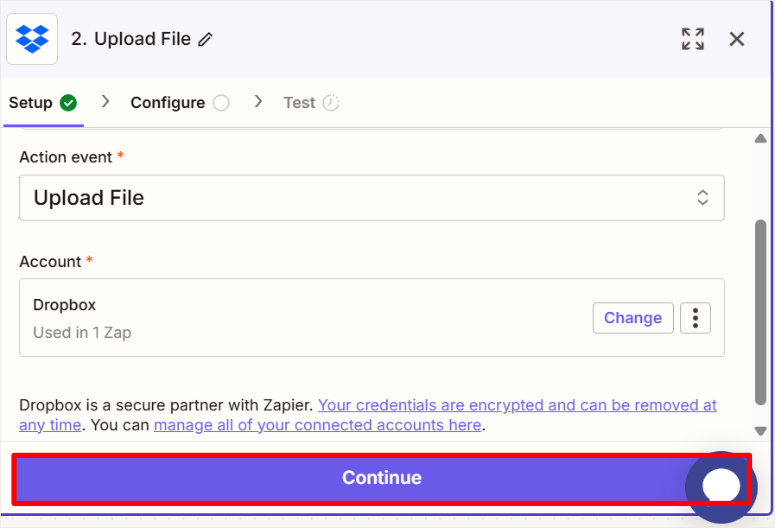
With Dropbox selected, you’ll need to specify exactly what you want it to do. So, on the next screen, select the Action Event dropdown and choose “Upload File.”
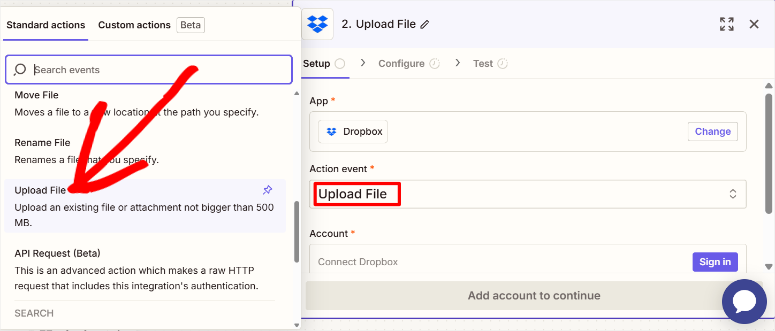
This allows Zapier to send a file from your WPForms submission straight to Dropbox. Once you’ve got that set, hit “Continue” to proceed.
Now, Zapier needs to connect to your Dropbox account.
You’ll see an “Account” tab on the next screen. Here, select “Sign In”, and a new window will open, asking for your Dropbox login details.
Go ahead and enter your email and password. If you are already logged into Dropbox, Zapier will just ask you to grant permissions.

After signing in, you’ll be brought back to Zapier, where you will select “Continue”. That’s it for the connection part.
Next, you’ll decide where those files should land in Dropbox by selecting “Folder.” This will simply select your Dropbox folder.
Remember that folder you created earlier, like “Form Uploads by WPForms”? This is what you will select. In the “File” field, select the name of that folder from the drop-down.
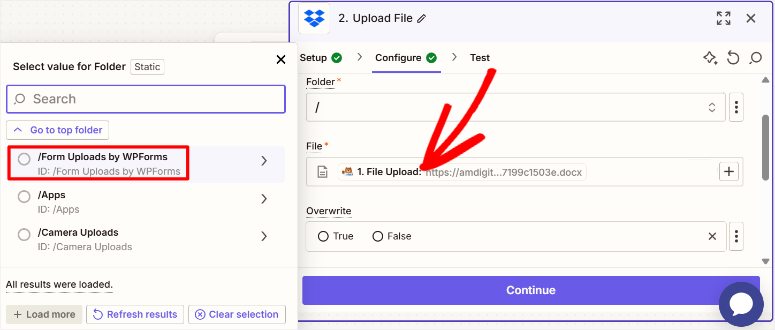
This step ensures all your uploaded files are neatly organized in that specific folder.
After setting the folder, it’s time to link the file from your WPForms submission to this Dropbox action.
Scroll down to the “File” field, and you’ll see a dropdown with options pulled from your test submission.
Here, select the “File Upload” field from your WPForms form.
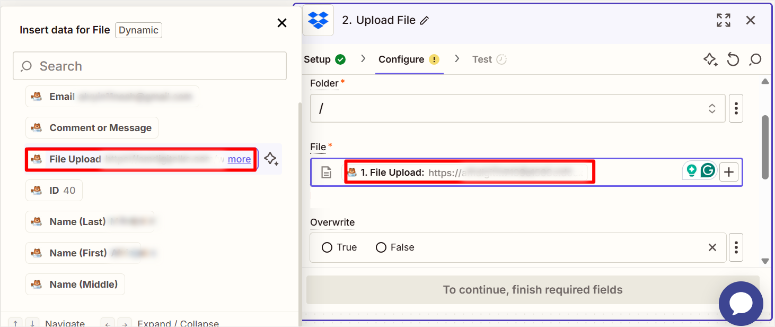
This tells Zapier exactly which file to grab from the form and send to Dropbox.
Once that’s done, select “Continue.”
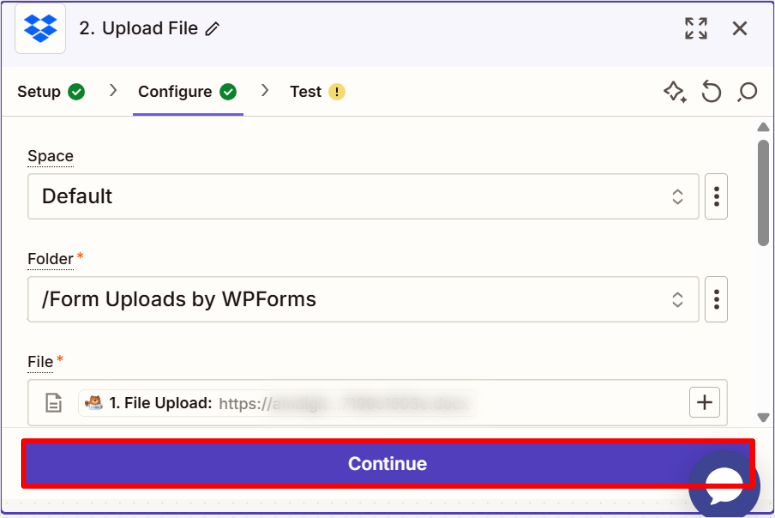
Now, on the next popup, test the setup to ensure it works. To do this, select “Test Setup”, and Zapier will use the test submission you made earlier to run a trial.
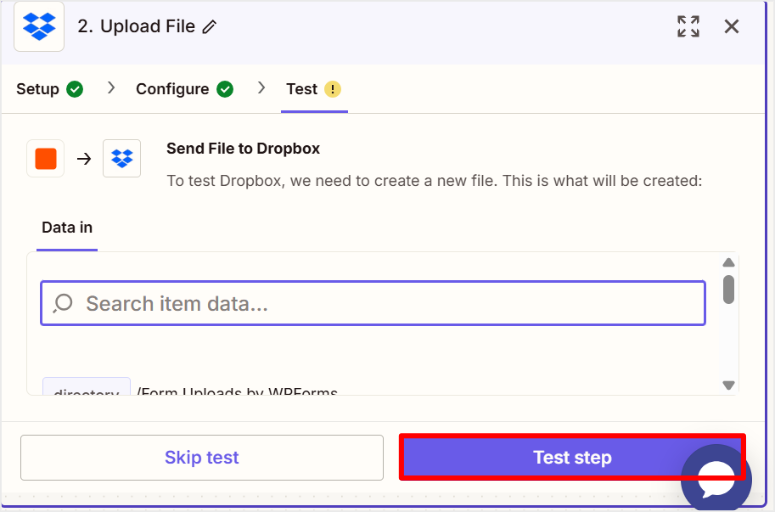
After it finishes, pop over to your Dropbox account and check the “Form Uploads by WPForms” folder. If your test file is sitting there waiting for you, congratulations—it’s working!

Finally, select “Publish.”
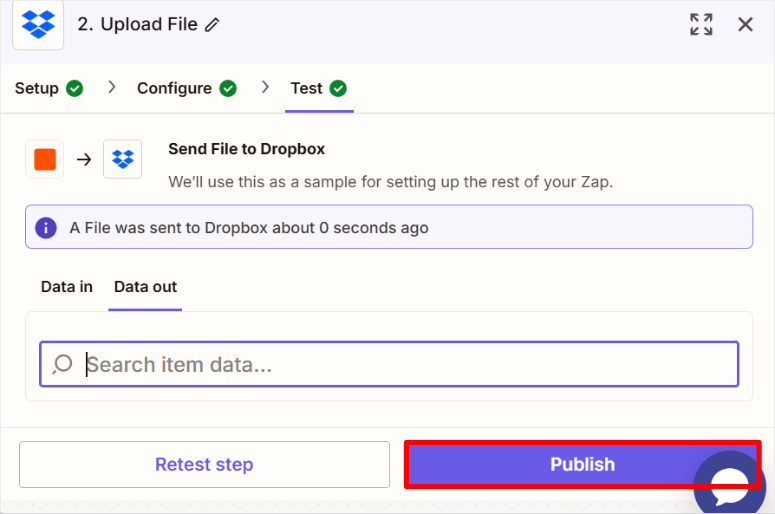
And just like that, your Zap is live!

From now on, every time someone submits your WPForms form with a file, Zapier will whisk it over to your Dropbox folder automatically. Now let’s get that form live on your site in the next step!
Step 7: Publish the File Upload Form
I like how WPForms gives you multiple simple options to publish your form.
Whether you want to use a WordPress block, one-click page creation, or prefer the flexibility of shortcodes, there’s a method for you.
Let’s walk through each so you can get your form out into the world in no time!
Upload Form with a WordPress Block
First up, let’s use the WPForms Block. It’s perfect if you already have a page or post in mind. But you can also use it on a new page.
To use this method, head to the page or post where you want your form to live. Then, select the “Plus +” button in the WordPress block editor to add a new block.
Type “WPForms” into the search bar and select the WPForms block when it appears. After this, drag and drop it where you want it to appear on the page.
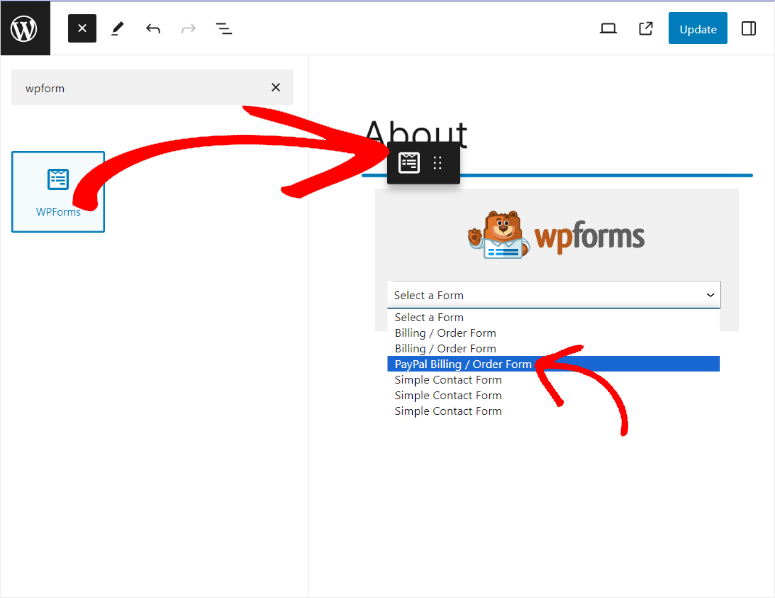
Once it’s added, you’ll see a dropdown menu, select it, and pick your form from the list.
All that’s left is to hit “Update” or “Publish,” and boom—your form is live!
Add on a New Page
Another way to do this is by letting WPForms create a shiny new page for you. This is ideal if you want a dedicated spot for users to upload files to Dropbox.
So, from your WordPress dashboard, go to WPForms » All Forms. Find your draft form, and hit “Edit.” Then, select the “Embed” button at the top of the visual form builder.
Next, a popup will show two options: “Select Existing Page” or “Create New Page.”
Here, hit“Create New Page,” then on the next screen type in a name of the page you want to create and then select “Let’s Go!”
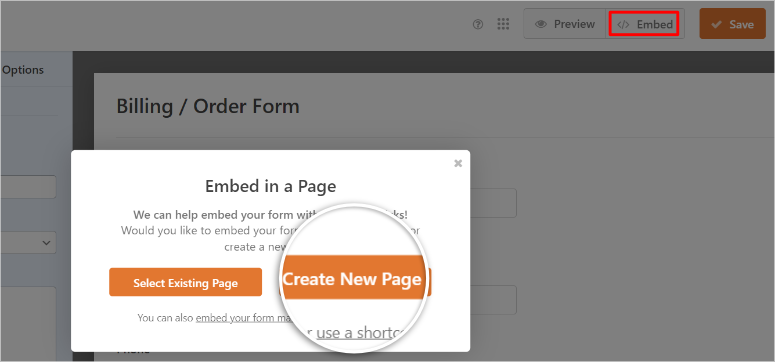
WPForms will take you straight to a new page with your form already in place. Give it a quick review, then select “Publish.”
Use a Shortcode
If you’re using a page builder like SeedProd or just enjoy the precision of shortcodes, this method’s got your name on it.
It’s a super convenient option for dropping your form anywhere you like on your WordPress website.
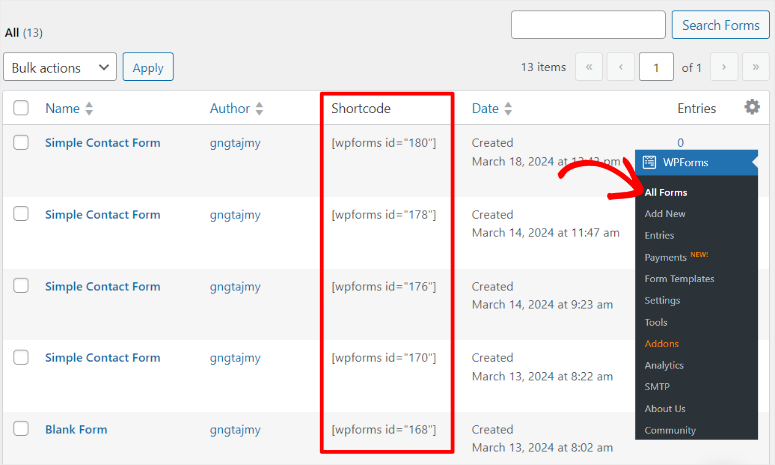
Start by heading to WPForms » All Forms. Locate your form, and in the “Shortcode” column, you’ll see a snippet like —click to copy it.
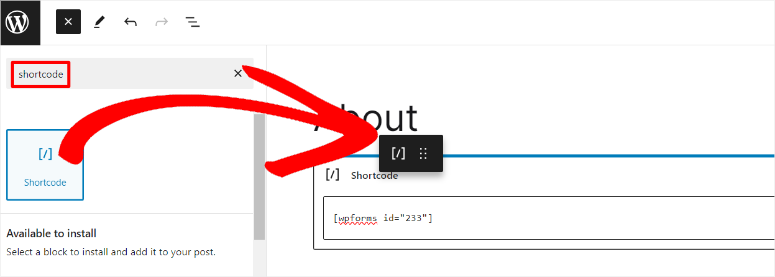
Now, go to the page or post where you want your Dropbox upload form to appear. Add a “Shortcode” block in the block editor and paste the code right in.
If you’re using a page builder, pop it into the shortcode module instead. Finally, hit “Publish” or “Update,” and you’re done!
There you go—Pick the most comfortable method for you, and take a moment to celebrate—you’ve just set up a slick, automated file collection system from scratch.
If anything is not clear, check out the commonly asked questions below.
FAQs: How to Create a Dropbox Upload Form in WordPress
Can I use WPForms free with Dropbox?
No, I wish it were that simple! The free version is awesome for basic forms, but to get that sweet Dropbox WPForms connection, you’ll need Pro or higher. I’ve seen the upgrade pay off with seamless file storage—it’s a game-changer for WordPress Dropbox fans. Stick with free for starters, but Pro’s where the magic happens.
How secure is a WPForms Dropbox upload form?
Super secure! Dropbox’s encryption is like a fortress, and WPForms handles uploads with kid gloves. I’ve trusted it for client files—sensitive stuff—and it’s rock-solid. Knowing your data’s safe feels amazing, right? With this combo, you can upload files to Dropbox worry-free. It’s peace of mind in a digital world.
What file types can I upload to Dropbox via WPForms?
Most common ones—PDFs, images, Word docs—work like a charm. I’ve tossed JPGs and resumes up there without a snag. It’s so flexible, you’ll wonder why you waited to try it! Need to upload files to Dropbox? WPForms has you covered. Just tweak restrictions if you’re picky—it’s all up to you.
Do I need a Dropbox Business account for WPForms?
Nope, not at all! A free Dropbox account does the trick—I use it myself, and it’s smooth sailing. No need to splash out on Business unless you crave extra bells and whistles.
How do I fix a WPForms Zapier connection error?
Start by eyeballing your API key—typos sneak in too easily. Still stuck? Resubmit a test form; it’s rebooted my connection before. I’ve been there—frustrating, but fixable! Zapier’s support is a lifeline if you need it. With a quick tweak, your Dropbox WPForms connection will hum again. You’ve got this!
Final Verdict: Is WPForms + Dropbox WordPress Connection Worth It?
After using this setup for a small business site, I can confidently say it’s worth every penny!
The convenience of automatic Dropbox uploads makes it feel like having a personal assistant who never sleeps.
WPForms’ drag-and-drop ease makes form creation a joy, not a chore, and Dropbox’s secure storage gives you peace of mind that your files are safe and sound.
It’s a match made in heaven for beginners—no tech headaches, just smooth sailing.
Sure, you’ll need the Pro plan for this Dropbox WPForms Integration, but the time you save is priceless.
Imagine never having to download and sort files again—pure bliss manually! If you’re looking for a reliable WordPress Dropbox plugin that just works, this is it.
I’ve seen it transform a client’s site from chaos to calm, and I’m betting it can do the same for you.
Now, if you are still unsure about WPForms, check out this article on WPForms or Formidable Forms? A Complete Comparison
Apart from that, here are other articles you might be interested in reading.
- Best WPForms Pro Alternatives
- How to Save Partial Form Data in WordPress (Step by Step)
- How to Add ‘Save and Continue Later’ Option to WordPress Forms
These articles highlight the best form builders other than WPForms. You will also learn different WPForms features that just make WordPress more efficient.

Comments Leave a Reply