
Want an easy way to create a professional-looking video membership site with WordPress?
Selling video content and courses on a subscription-based platform is a great way to monetize your site and earn a living.
But there’s a lot to take care of including exams/quizzes, fee payments, renewals, and certificates, to name a few aspects.
The best way to go about it is to use a membership plugin. This will let you set up a video membership site with all the bells and whistles, and you’ll never have to touch a line of code or hire a developer.
In this post, we’ll show you how to create a video membership platform in WordPress step by step.
Before that, let’s see if a video membership is the right fit for you and your goals.
Reasons to Create a Video Membership Site
You can monetize your video content through platforms like YouTube and Vimeo. Or you can set up an eCommerce store to sell your videos.
But if you want to draw a constant stream of revenue and have complete control over it, then a subscription-based membership site would be a better choice, and here’s why:
- Recurring revenue: With subscription levels, you can break down one-time payments into installments and renewals. This means you can generate consistent and predictable income from your premium content.
- Affordable Pricing: You can set up subscription-based pricing that costs lesser than a large upfront cost. So customers find your content more affordable.
- Long-Term Customer Engagement: Because members make recurring payments based on their subscriptions, you can engage with them in the long run. This adds value to your platform and helps you get more membership renewals.
- Loyal Customers: Subscription video memberships allow you to stay connected with your audience for a longer period. This gives you an opportunity to build strong relationships and grow your business.
- Understand Customer Preference: With a loyal community of members, you can get insights on what is working and what is not. So you can optimize your content and make it better in the future.
You can build a brand and have control over your marketing. Plus, you won’t have to constantly come up with new video content in a rush to please the algorithms.
You can make your existing videos work for you and take your time to craft valuable content that your audience will love.
With that said, we’ll walk you through the easiest method of creating a powerful video membership site with WordPress.
Creating a Video Membership Site in WordPress
There are many membership plugins on the market. Depending on the type of content you want to restrict, you can choose a plugin that fits your needs. See our list of the Best WordPress Membership Plugins.
The best plugin for selling video subscriptions and paid content is MemberPress.
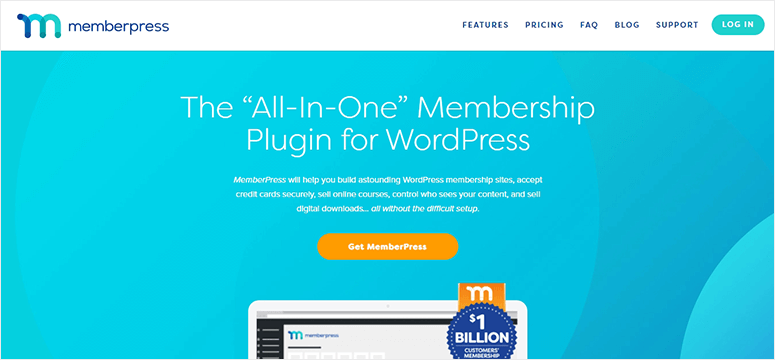
MemberPress is a powerful WordPress membership plugin that lets you create a fully-functional membership website without any coding.
With MemberPress, you can easily restrict access to your video content and set up different membership levels. To accept recurring payments for your video subscriptions, it allows you to integrate with popular payment gateways such as Stripe, PayPal, and Authorize.net.
Also, MemberPress allows you to create dynamic pricing pages which help your members make their purchase decisions quickly. You can even connect with email marketing services like AWeber, MailChimp, and Constant Contact to grow your email list.
Some of the notable features of MemberPress are:
- Unlimited membership levels
- Content drip option to release content in intervals of time
- Integrate with bbPress so you can create community forums
- Option to generate coupon codes to promote video subscription sales
- Built-in analytics and stats dashboard
- Build and sell online courses
…and more. It’s packed with features to give you a robust member management system. To learn more, you can check our complete MemberPress review.
Now that you know which membership plugin to use, let’s get started with the tutorial.
Step 1: Install and Activate the MemberPress Plugin
First, you’ll need to sign up for a MemberPress account. The plugin offers flexible pricing plans that are suitable for all types of businesses.
After you sign up for a plan, you can find the plugin file and license key from the Downloads tab.
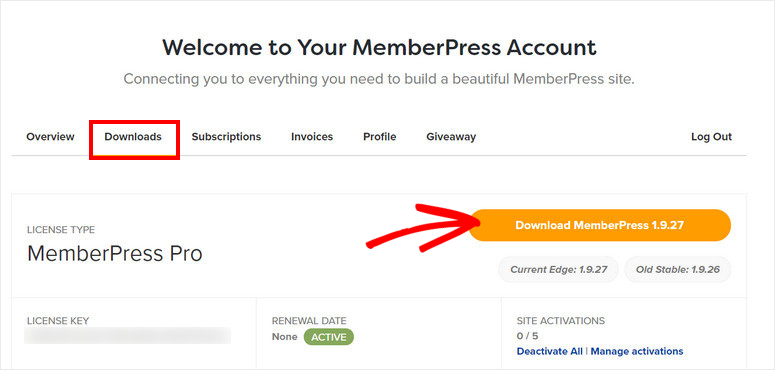
Then you need to install the plugin file on your WordPress dashboard. If you want help with this, you can check our guide on how to install a WordPress plugin.
Once you install and activate MemberPress on your site, go to MemberPress » Settings and enter your license key in the License tab.
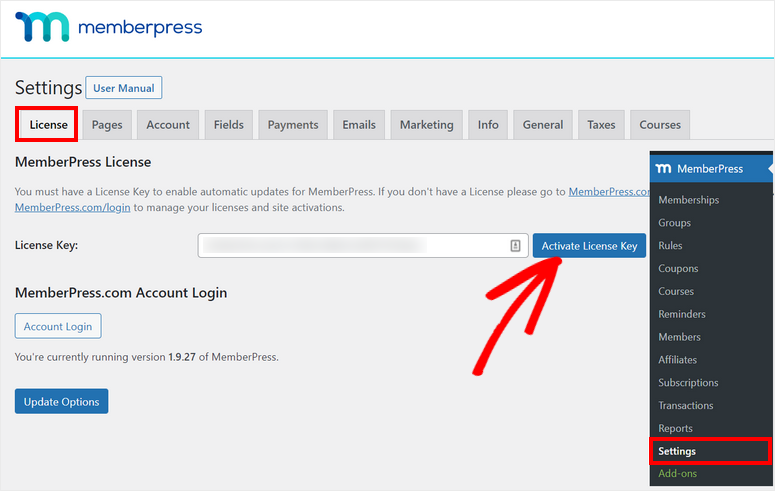
Click on the Activate License Key button to verify your account.
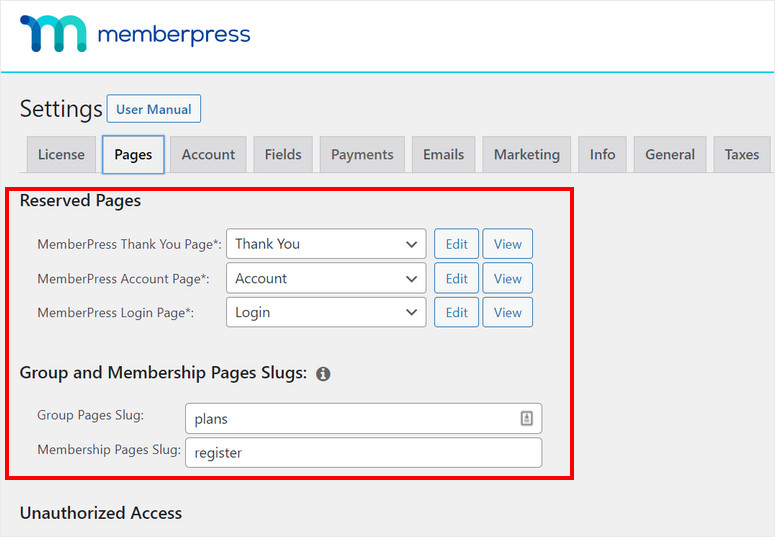
Next, you’ll need to set up the MemberPress plugin settings on your site. For this, open the Pages tab in the settings section.
Here, you can configure the thank you page, account page, login page, and more settings as per your requirements.
Now, you can set up payment options for your video membership website.
Step 2: Set Up Payment Methods
MemberPress lets you connect with major payment providers such as Stripe and PayPal so you can accept payments for your videos without any trouble.
On the MemberPress »Settings » Payments page, you can add a payment option and select the payment gateway of your choice. There are also options to add more than one payment method.
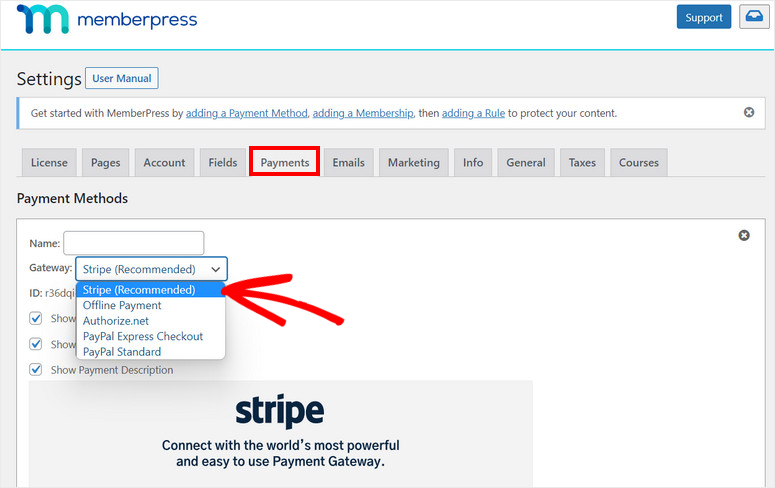
Most of these payment gateways allow your customers to pay using their preferred methods such as credit card, debit card, or net banking.
After you’re done setting up the payment methods, click on the Update Options button at the end of the page.
Step 3: Create Membership Levels
Next, you’ll need to create membership levels for your video membership site.
MemberPress allows you to add multiple membership levels with different pricing plans, features, and access. So your audience can purchase a suitable pricing plan to view your video content.
This is also a great option if you have a free plan, pro membership access, and addons.
To create a new membership level, navigate to the MemberPress » Memberships page from the admin panel and click on the Add New button.
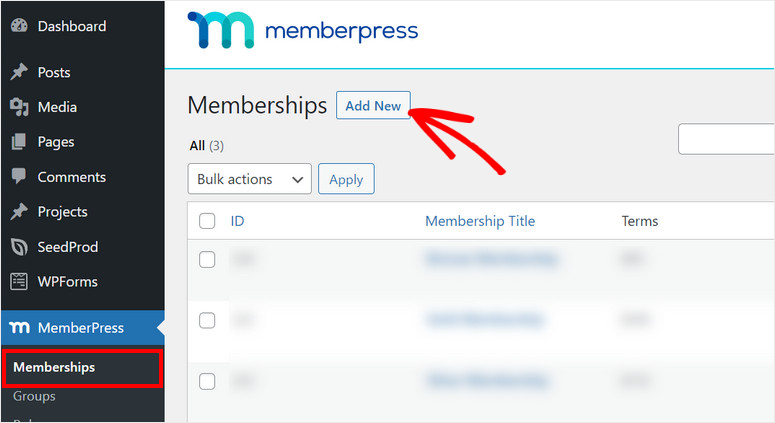
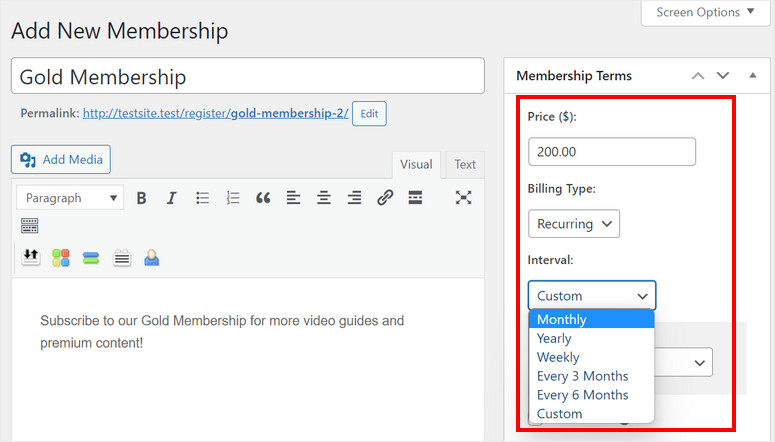
Then, you’ll see the editor that lets you add a title and more details for the membership level. On the right menu, there are options for setting up pricing, billing type, access options, and more.
You can set up the billing type as one-time or recurring depending on the type of video content you are selling on your website.
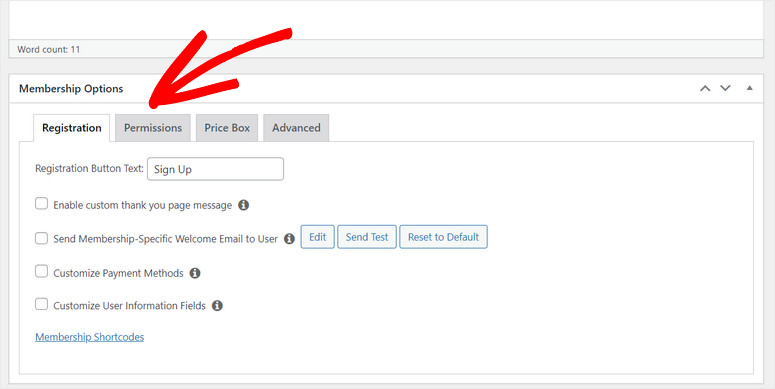
Scroll down on the content editor to see the Membership Options. Here, you can configure the registration options, permissions, and price box for that membership level.
Once you finish setting it up, click on the Publish button.
Like this, you can create as many membership levels as you prefer.
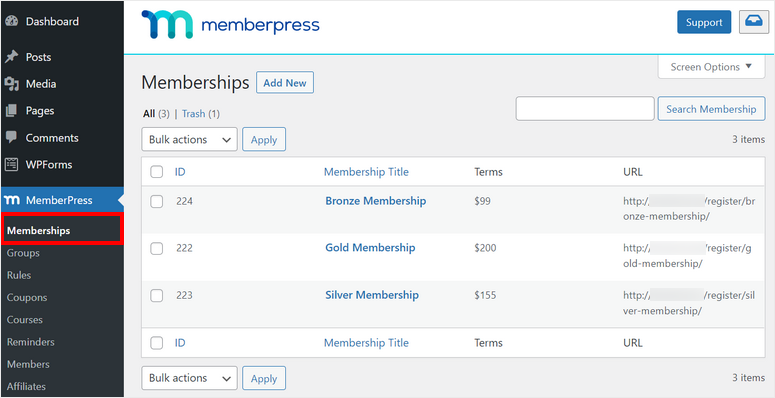
Now, you need to set up access rules for your membership levels.
Step 4: Set Up Access Rules
To restrict access to your video content based on the membership levels, you need to add access rules. This allows you to determine how your members can view different content on your site.
So go to the MemberPress » Rules and click on the Add New button to launch the rule editor.
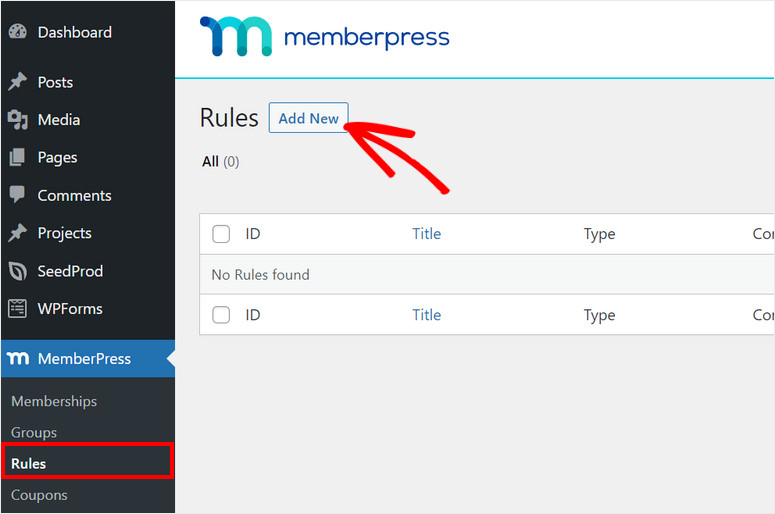
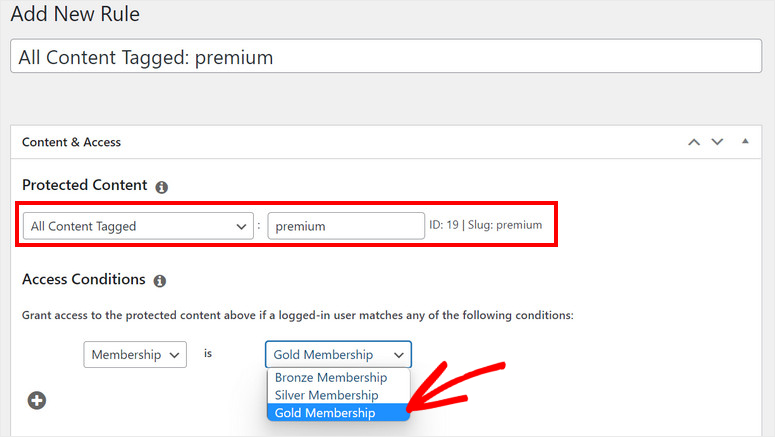
You can add rules by selecting different conditions and choosing the content that you want to restrict.
For this tutorial, we are going to add the access rule to all content that has the premium tag. Then, select a membership level that you want to associate the access rule with.
Next, you can set up the content drip and expiration options. With content drip, you can release content at different intervals.
You can also add an expiration date to make your video content unavailable after a certain time.
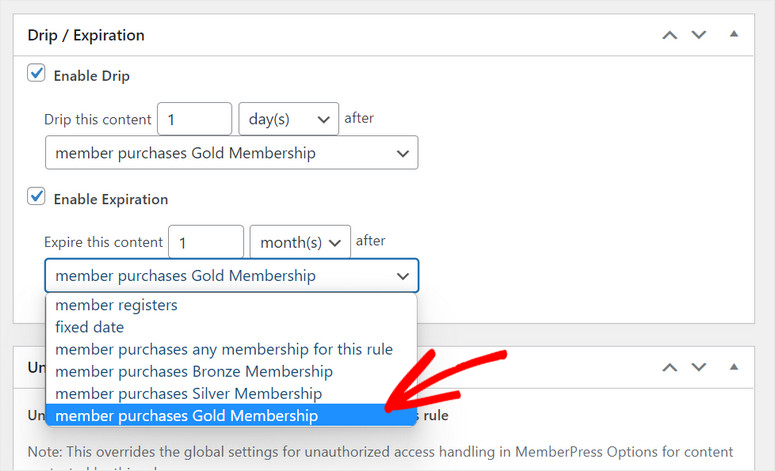
After you configure the settings, hit the Save Rule button. Follow the same process to create as many rules as you need.
Step 5: Create Members Only Video Content
Now that you’ve set up membership levels and access rules, you can add your video content for members.
To add a video to your WordPress website, create a new page or post on your WordPress site. In the post editor, search for the Video block.
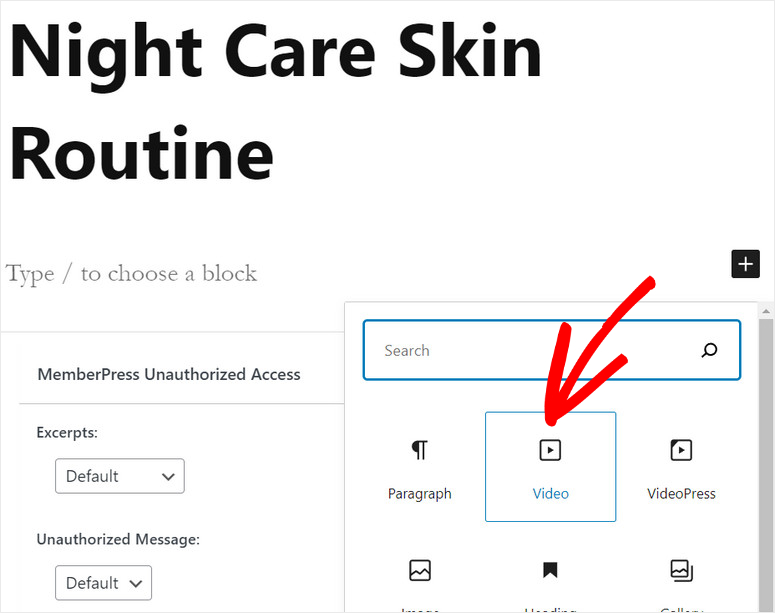
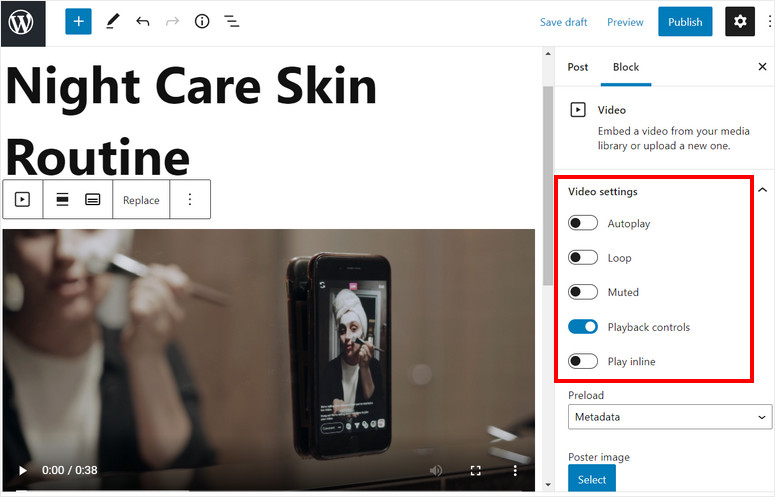
Then, add your video and configure video settings on the left menu. There are options to autoplay, loop, and mute your video. You can even choose to add the playback controls on the front end of the embedded video.
Now on the Post settings, you need to add the tag to restrict the video content.
As we added access rules for all the content with the premium tag, you’ll need to add the same tag to this post.
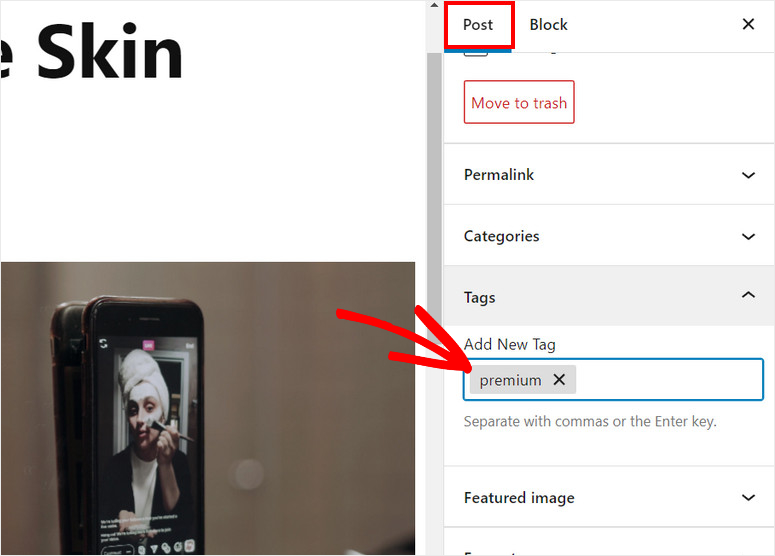
Now, only the members that sign up on that membership level will be able to access the video.
If you scroll down on the post editor, you’ll see the MemberPress Unauthorized Access section. Here, you can set up what the non-members will see when they try to access this post.
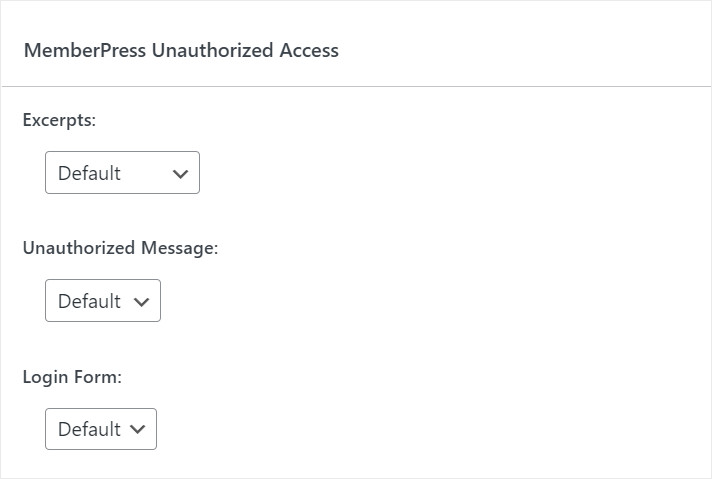
Leave the default settings as it is or add your custom settings. Then go ahead and publish the video content on your website.
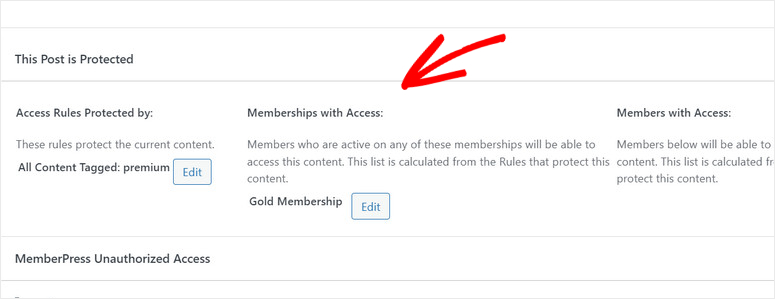
After the post is published, you’ll see the This Post is Protected message on the editor. There are options to see the access rule for that post and the membership levels along with the members.
Step 6: Create a Pricing Page
For the next step, you’ll need to build a pricing page so the visitors can explore the membership plans and sign up on your video membership site.
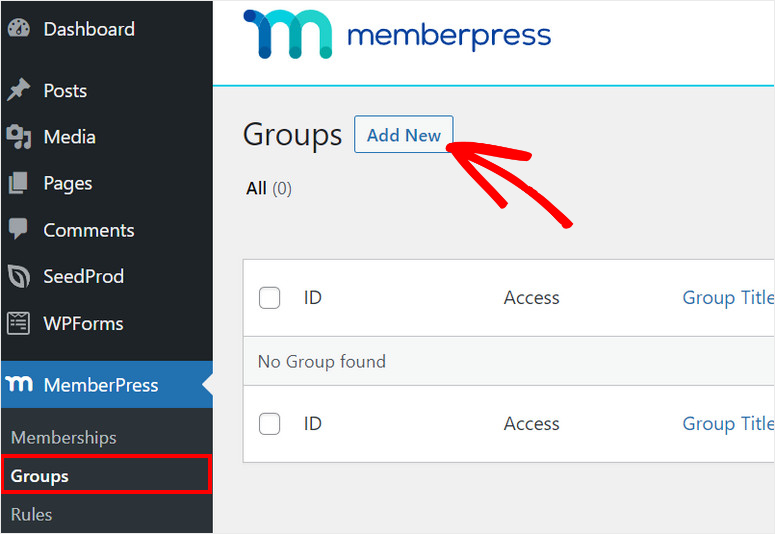
On the admin dashboard, select the MemberPress » Groups tab and click on the Add New button.
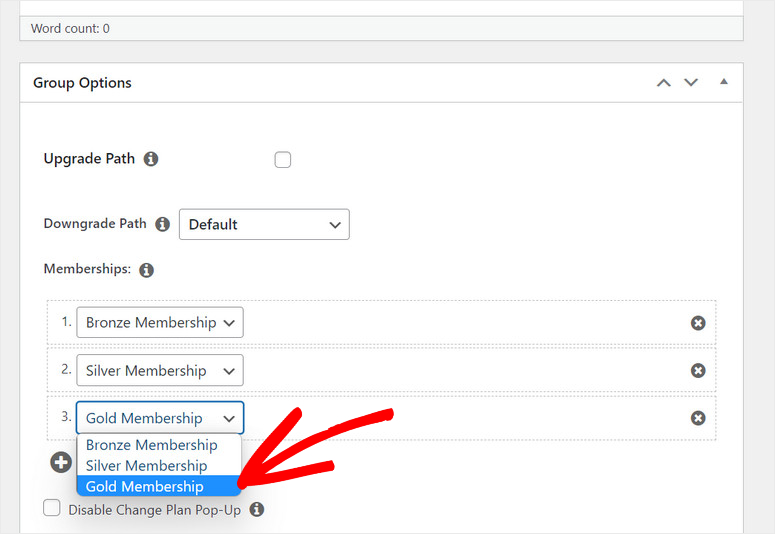
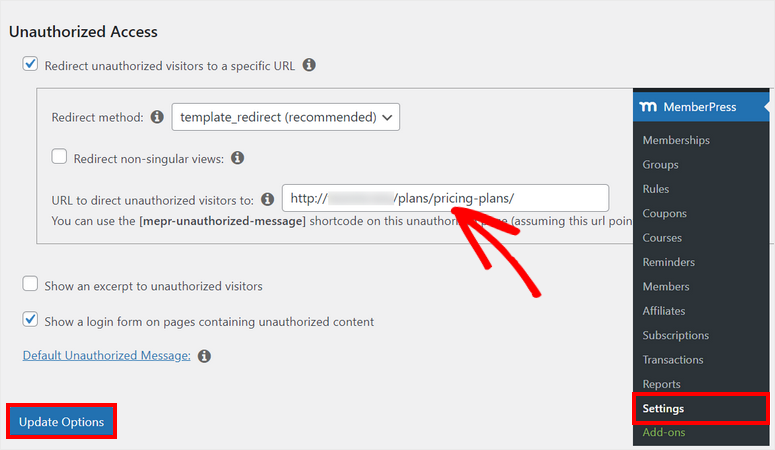
First, enter a name for your membership plans page. You can give it a name like Pricing Plans. At the bottom of the editor, you’ll see Group Options where you can group multiple membership levels.
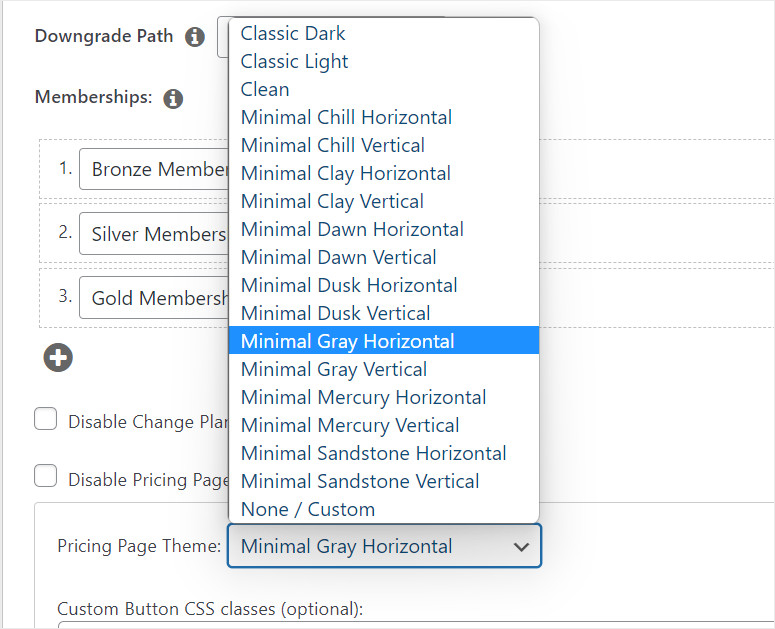
MemberPress offers many pre-built templates to display your pricing plans. This makes it easy to set up your pricing page in minutes!
You can preview the group to see how your pricing page looks on your site. When you’re done setting up your paid membership plans, click on the Publish button.
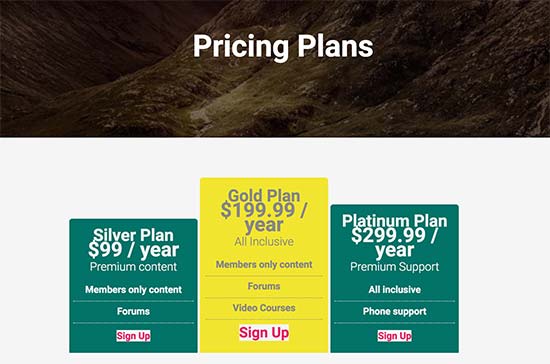
Now, you’ll need to redirect your unauthorized users to the pricing page so that they can select a plan and sign up. For this, go back to the MemberPress » Groups page and copy the URL for the pricing group you created.
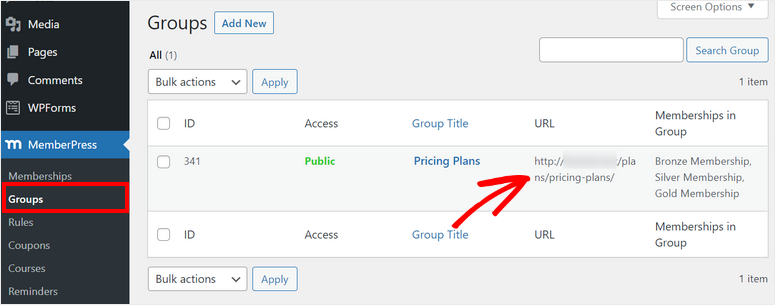
Next, open the MemberPress » Settings page and click on the Pages tab.
Scroll down to the Unauthorized Access section and check the Redirect unauthorized visitors to a specific URL option.
Then, paste the pricing group URL and click on the Update Options button there.
Now, visitors that haven’t signed up for your video content will be redirected to your pricing page.
Step 7: Add Signup and Login Forms
There’s one last thing you need to do to set up your video membership site with WordPress. To make your video content more accessible to the users on your site, you should add signup and login forms.
For starters, you can add the pricing page to the navigation menu.
To do that, go to Appearance » Menus and click on the Groups tab on the left-hand column. Next, select the pricing page you created in the previous step and click on the Add to Menu button.
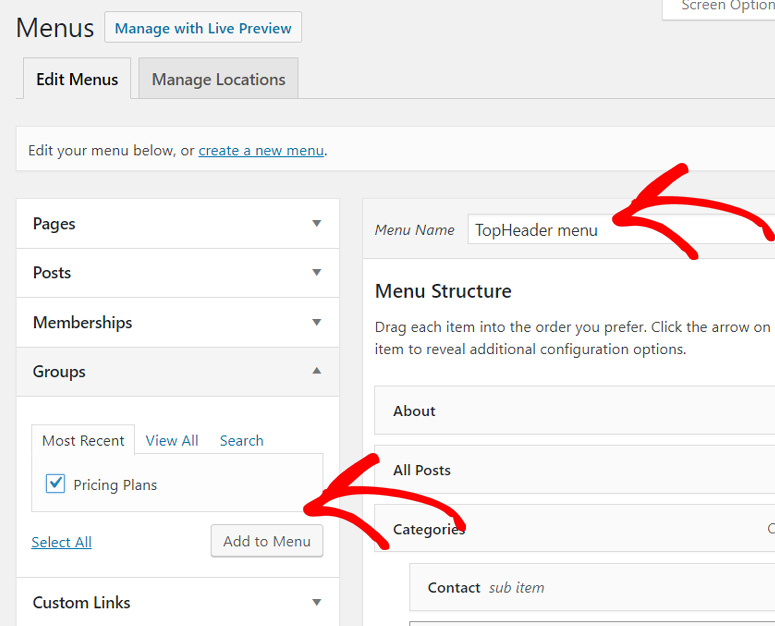
After the pricing page appears in the right column, you can change the menu order to your liking by dragging it up or down, then click on Save Menu.
Now, you need to add login forms for the members who already subscribed to your membership plans. For this, visit the Appearance » Widgets page on your WordPress dashboard.
Here, you can add the Membership Login widget to your website sidebar. With that, a member can sign into their account to get access to the members’ area.
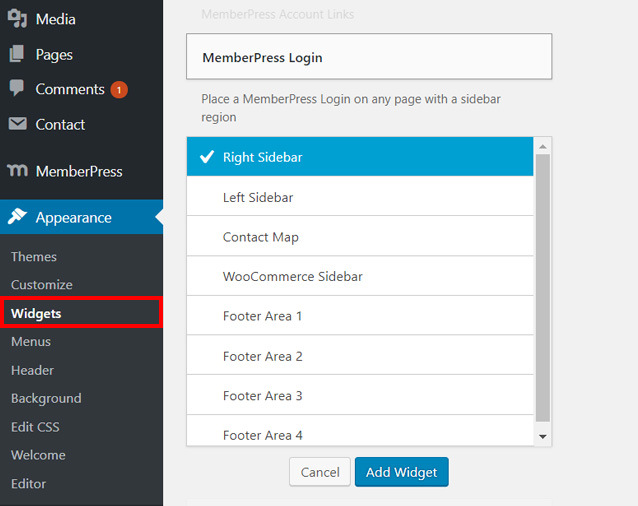
With that, you’ve successfully added the login page and pricing page to your website.
See how easy that was! With MemberPress, you’ll never need to embed shortcodes and customize with coding.
You can create a full-fledged video membership site with WordPress effortlessly. You also get full access to add unlimited membership levels and rules to restrict your premium video content.
Plus, the plugin allows you to set up a paywall that makes selling videos on your WordPress membership site a piece of cake.
You can also check our guide on MemberPress vs Ultimate Membership Pro to find out the membership plugin for your business.
Another great plugin for your video membership site is Thrive Architect that lets you set up online courses and gated content.
You may also want to check out OptinMonster. It is the best lead generation tool for WordPress sites.
OptinMonster comes with a content locker that lets you hide premium content and display a signup form. Once visitors subscribe, they’ll be granted access to your premium blog, news, or video content.
Added to that, OptinMonster lets you target site visitors with stunning optin campaigns to convert them into subscribers and customers. You can also create campaigns like popup notifications, floating bars, welcome mats, coupon wheels, and more.
That’s all for today, we hope this tutorial helped you learn how to easily build a video membership site with WordPress.
If you want to improve your video membership subscriptions on your website, check out these resources next:
- Powerful WordPress Lead Generation Plugins Compared
- Best Marketing Automation Tools for WordPress (Compared)
- Tools to Track Visitor Traffic on Your WordPress Site
These posts will help you automate your marketing campaigns and boost conversions on your video membership site. The last one will help you track the traffic on your site and get detailed reports.

Comments Leave a Reply