
Do you want to create an online course website with WordPress?
Creating an online course is one of the best ways to build an engaging community and make money online.
In this article, we’ll show you how to properly create an online course website with WordPress.
To make it easy to navigate, we listed down the exact steps that you need to follow to make an online course website.
- Install WordPress to Build an Online Course Site
- Install the MemberPress LMS plugin in WordPress
- Add a New Online Course
- Add Lessons and Sections to Your Course
- Create Course Memberships
- Set Up Access Control Rules
- Add Links to Course Signup Page
- Customize Your Couse
- View Your Couse
- Promote Your New Courses
Requirements to Create an Online Course
Before we start, you should know the basic requirements to make an online course website. Take a look:
- Domain name: You’ll need a domain name (like google.com or isitwp.com) that your users will type in their browsers to find your online course website.
- Web hosting: It’s the storage space on the internet where you’ll upload all your files, including images, audios, videos, etc. As users access your online course website, they’ll be directed to your web hosting server.
- WordPress theme: A theme is a layout design or skin for your website that’ll make your content presentable and professional to your users.
- LMS software: A learning management system (LMS) is a software that helps manage your online courses, assignments, quizzes, certifications, and more. It comes as a plugin or addon for your WordPress site.
With all these things, you can set up your online course quickly and easily.
Let’s take a look at our step by step guide on how to create an online course website in WordPress.
Step 1: Install WordPress to Build an Online Course Site
WordPress is the most popular website builder platform on the internet. Many top brands trust and use WordPress to build their site.
You’ll find 2 kinds of WordPress sites. WordPress.com, which is a hosted solution, and WordPress.org, which is a self-hosted and highly flexible platform. For more details, you can read our guide on WordPress.com vs WordPress.org.
For your online course website, you need WordPress.org that comes with unlimited custom options and a super-easy administration panel.
Now, you’ll need a domain name and web hosting to start with your WordPress site.
We recommend Bluehost. It’s an officially recommended hosting provider by WordPress.org.
For IsItWP users, they offer a free domain name, free SSL certificate, and upto 70% OFF on web hosting plans.
You can start your online course website for as low as $2.75 per month. Isn’t it a great offer?
Click Here to Claim This Exclusive Bluehost Offer »
After setting up your Bluehost account, you should follow our complete guide on how to install WordPress.
Next, you’ll need to select a theme for your website. You can take a look at our handpicked list of the best and most popular WordPress themes.
Not sure which theme to choose? We recommend using the ElegantThemes Divi.
We also recommend a few other themes that work with MemberPress smoothly.
- ThriveThemes: Thrive is an awesome conversion-optimized theme and theme builder. You get tons of templates and blocks that you can use to set up a unique site design
- Astra Pro: Astra is fast, lightweight, and a fully optimized WordPress theme for SEO. It’s a great option for creating and selling online courses on your site.
- OceanWP: It’s a free WordPress theme with tons of addons, extensions, and features to set up your online course website.
- Academy Pro: Built on top of the Genesis Framework by StudioPress, this theme is ideal to sell courses online.
If you need further assistance, check out our article on how to install a WordPress theme.
Next, you need to pick an LMS plugin.
Step 2: Install the MemberPress LMS Plugin in WordPress
After setting up your website, you need to get your hands on the best WordPress LMS plugin.
We recommend MemberPress. It’s a 1-stop solution to create and manage online courses.
With MemberPress, you can set up payment gateways, configure access controls, sell courses in a bundle, sell access to courses as an ongoing subscription, and more.
It’s an LMS plugin and membership plugin, all-in-one! You may also want to check out Thrive Apprentice and LearnDash.
Start by installing and activating the MemberPress plugin. If you need help in installation, check out our complete guide on how to install a WordPress plugin.
Next, you need to navigate to MemberPress » Settings from your WordPress admin panel. From there, go to the MemberPress License option to add your license details.
You can get your MemberPress LMS license from their website.
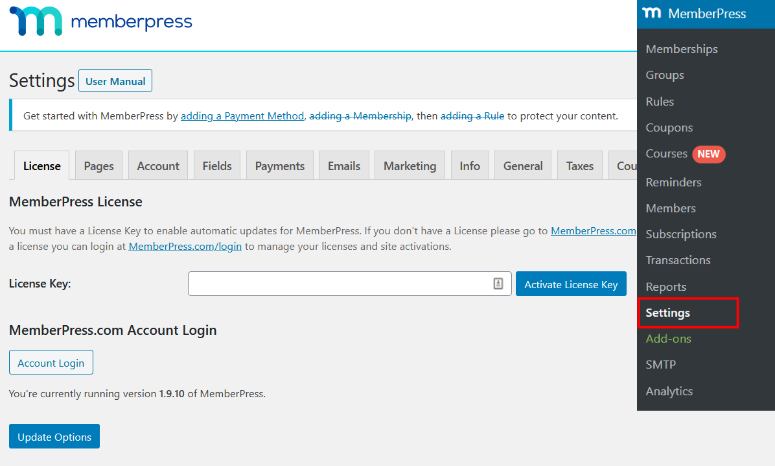
Hit Activate License Key to use all the features of the MemberPress LMS plugin.
Now visit the Payments option from the top menu. Click on the (+) add button to set up a payment gateway.
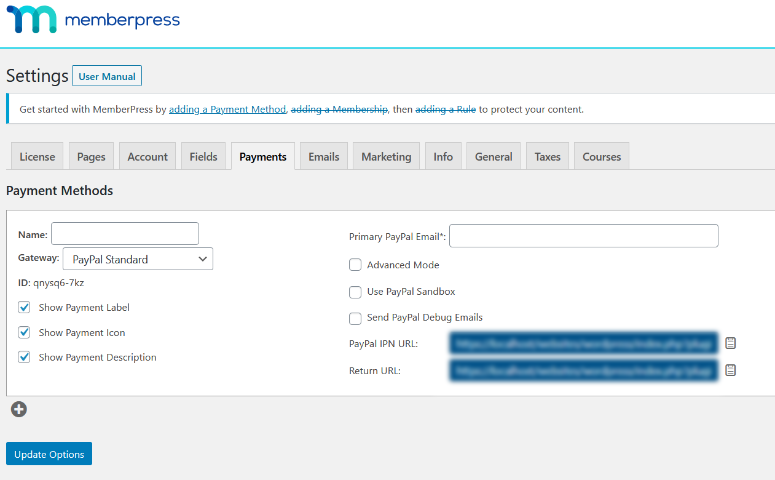
MemberPress supports PayPal and Stripe (Authorize.net is supported with the Pro or Plus plan).
Simply fill in the fields correctly to collect payments for your online courses in your PayPal account directly.
You can also set up multiple payment gateways by clicking the (+) button again and repeating the process.
Click Update Options to save.
Step 3: Add a New Online Course
Now that your MemberPress LMS is set up, you can start adding new online courses to your site.
Creating online courses is super easy with MemberPress. Using the visual course builder, you can simply drag and drop lessons, topics, categories, images, and more to build your course curriculum.
To create a new course, you need to go to MemberPress » Courses and click on the Install & Activate MemberPress Courses Add-On button.
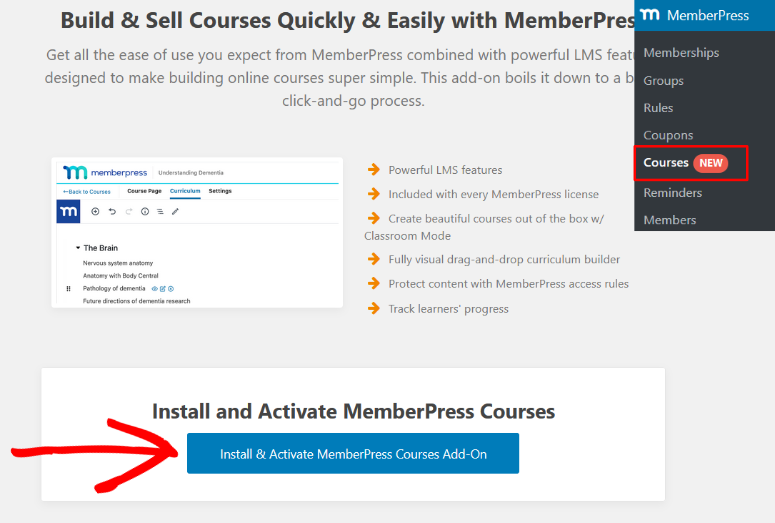
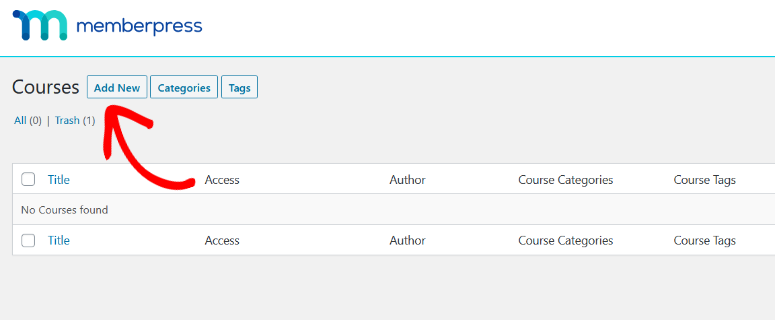
When the addon is installed, you’ll be redirected to the Courses page. Click on the Add New button to create your first course.
Now, the MemberPress builder will be launched. First, you’ll see the Course Page. Here you can add a title and description for your course.
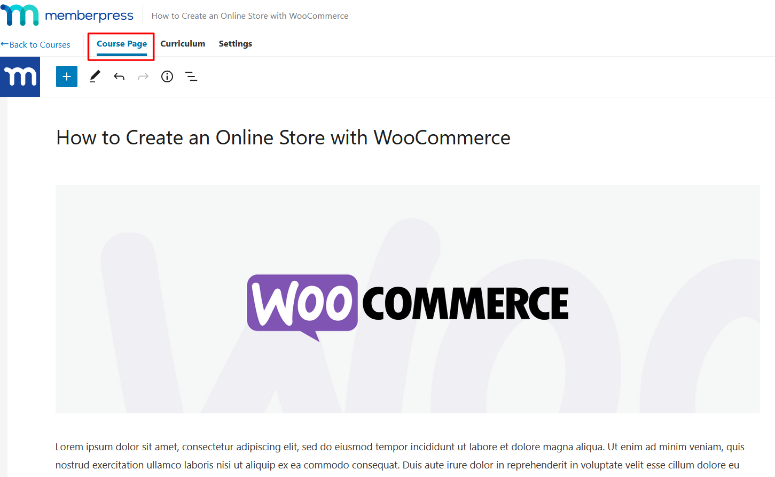
MemberPress is built on the WordPress block editor, so you can also add images, videos, headers, and much more, with the click of a button.
Get creative because this information will show up on the front-end as the course overview.
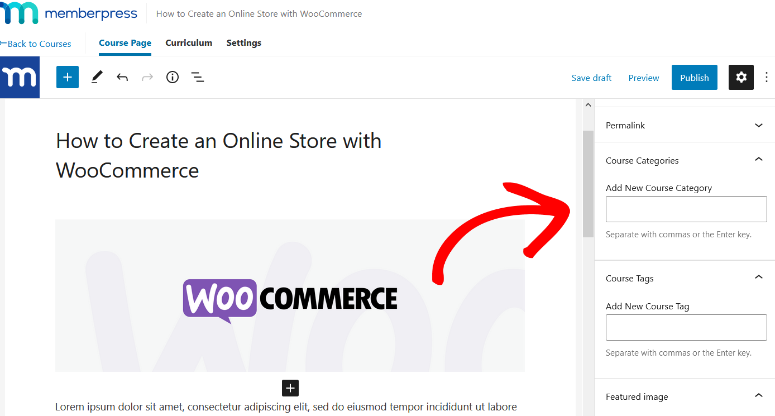
On the right side of the screen, you can add course categories and tags as well as set a featured image.
Step 4: Add Lessons and Sections to Your Course
After adding the course, the next thing you can do is add lessons and sections to your course.
For this, simply click on the Curriculum tab and click on the Add Section button to start building your course curriculum.
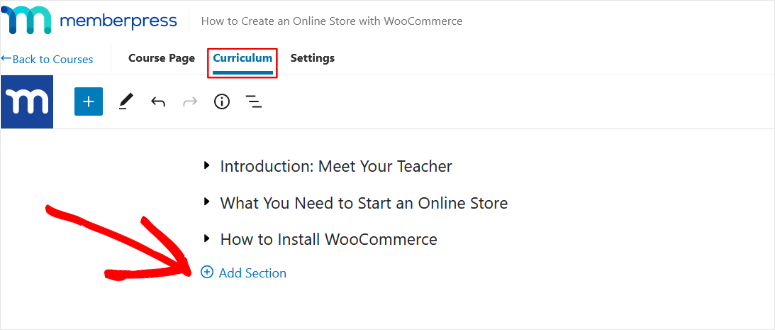
Provide a title for each section of your course and repeat the process until all of your sections are added. This will help you organize your course so it’s easy to follow.
Next, click on the Add Lesson button underneath the section to add lessons.
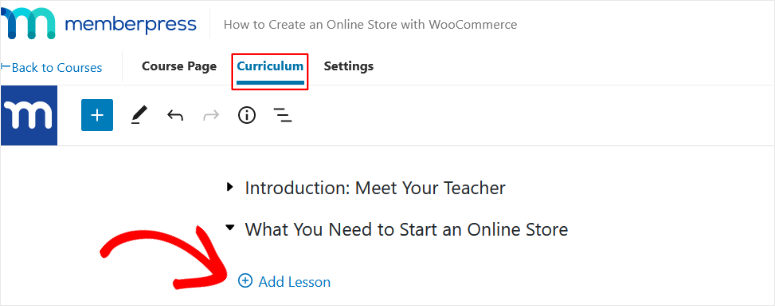
After creating a lesson, you can add content to it by clicking the edit button next to each lesson.
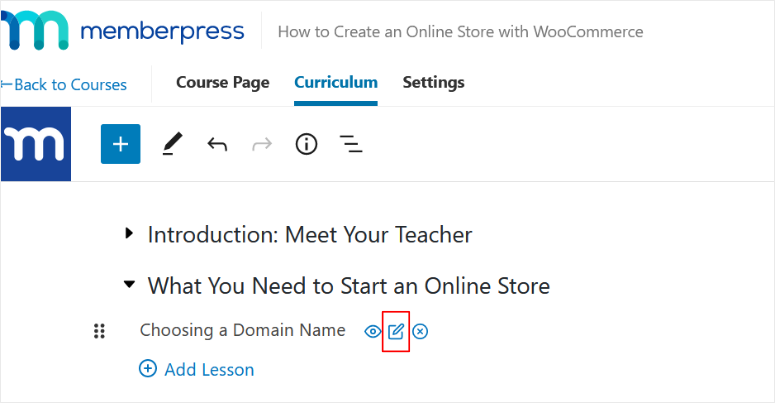
You’ll be prompted to save and exit the course editor. Then, you’ll be redirected to the course builder so you can add content to your lesson.
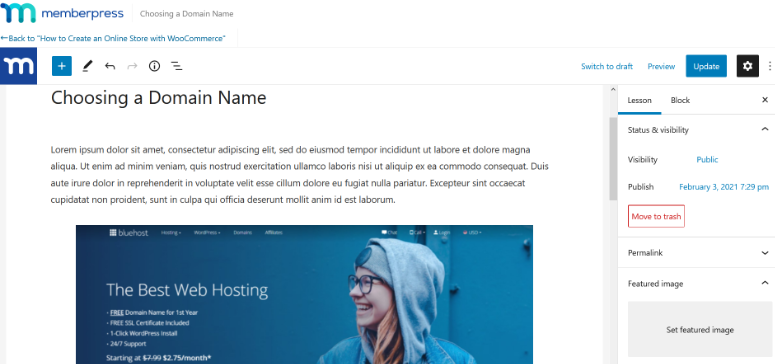
Again, adding a lesson is similar to adding a WordPress post, which means you can add photos, image galleries, videos, and other visual content to make a lesson interactive.
When you’re finished adding the lesson content, click Update to save your changes. You can return to your course by clicking the “Back to” button in the top left corner.
Repeat this process until all of your lessons are completed.
When your course is completed, hit the Publish button to make it live on your site.
Step 5: Create Course Memberships
With MemberPress, you can easily create course membership subscriptions to generate recurring revenue on your site.
This lets you hide your course from regular website visitors; only paying members will have access to it. You can create multiple courses with different subscription options or sell all of your courses under a single membership.
You can even offer free courses, which is a great way to grow your email list or generate qualified leads for your business.
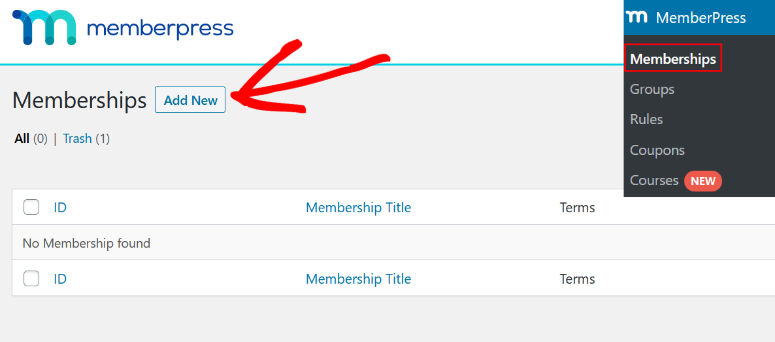
To create a membership, go to MemberPress » Memberships and click the Add New button at the top of the page.
Next, you’ll see a page where you can create your new membership. Choose a name for your membership and write a description of the membership below.
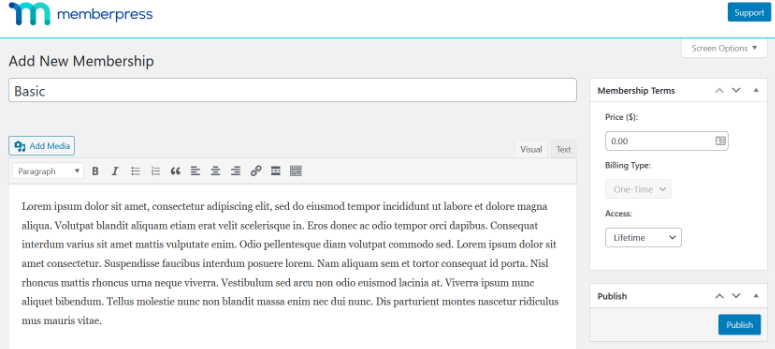
On the right side of the screen under Membership Terms, you can set the membership price, choose the billing type (one-time or recurring), and select the access (lifetime, expire (recurring), or fixed expire).
After that, scroll to the bottom of the page to the Membership Options section. Here you can configure other options such as the registration button text, price box, custom thank you page message, and more.
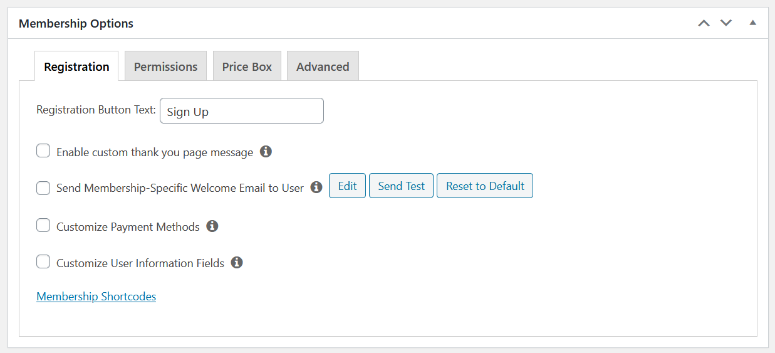
When you’re finished, hit to Publish button to save your changes.
You can repeat the process if you want to create multiple membership levels.
Step 6: Set Up Access Control Rules
Now you have to protect your courses so that only members have access to them. To do that, you need to set up an access control rule.
Go to MemberPress » Rules and click on the Add New Rule button.
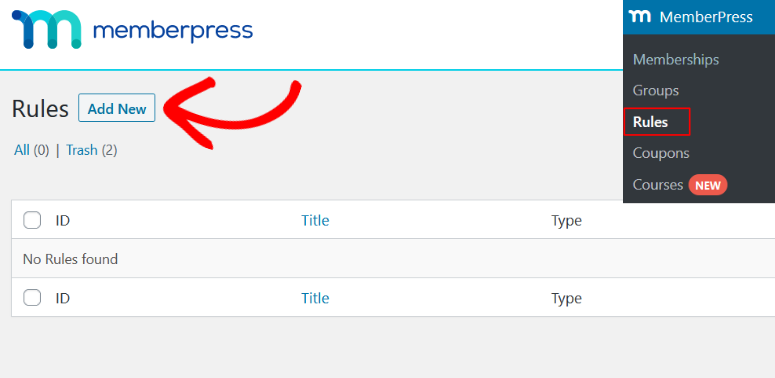
First, select the content you want to protect from under the Protected Content section. We chose “A Single Course.” Then, search for the course you created and select it.
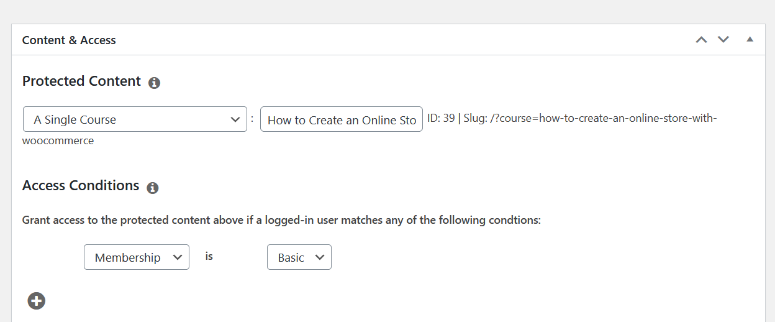
Then, under Access Conditions, choose the membership plan users need to have in order to access the course. We chose the “Basic” membership we created in the previous step.
Click the Save Rule button when you’re finished.
Now your course is protected!
Step 7: Add Links to Course Signup Page
The next step is to add the signup page for your members-only course to your site’s navigation menu. This will make it easier for visitors to find the page and become new members.
First, copy the URL of the membership page you created in step #5.

Then, go to Appearance » Menus in your WordPress dashboard.
On the left, under Custom Links, paste the membership page URL into the URL field. Then, choose link text like “Courses” and click Add to Menu.
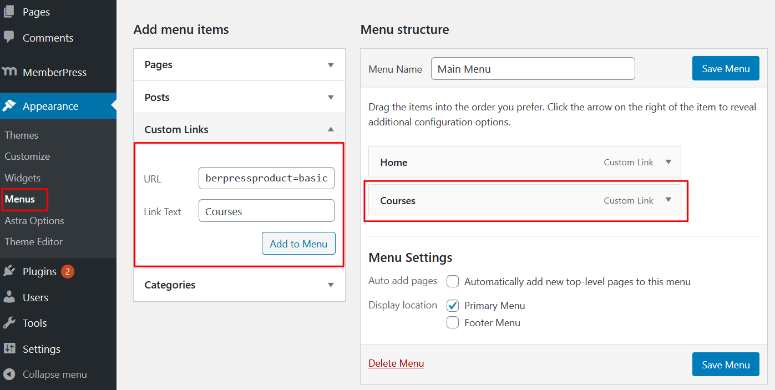
Now the page should appear on the right in the Menu Structure section. You can rearrange the order of the pages in your menu by dragging and dropping them into place.
When you’re finished, click the Save Menu button.
You can also copy the URL of your membership page and paste it into any page or post on your website. When visitors click on the link, they’ll be taken to the course registration page.
And try using Pretty Links to create a short, memorable version of your signup page link so that you can easily share it on social media.
Step 8: Customize Your Course
MemberPress offers a special Classroom Mode setting so you don’t have to worry about styling the course yourself. The plugin automatically handles it for you, ensuring that your course looks sleek and professional.
To enable Classroom Mode, go to MemberPress » Settings and click on the Courses tab.
Turn Classroom Mode on by toggling the button like in the example below.
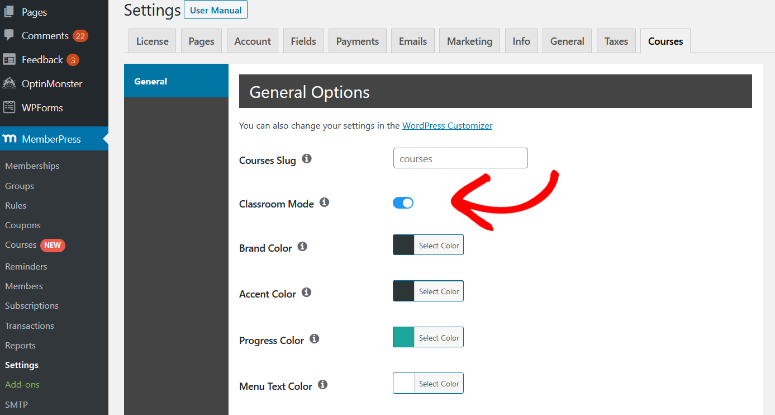
From this page, you can also customize your course so that it matches your brand. You can choose the brand color, progress color, upload your brand logo, and more.
When you’re done, click Update Options to save your changes.
Step 9: View Your Course
Now it’s time to check out your finished course!
To view your course, go to:
https://example.com/courses/
Remember to replace “example.com” with your own domain name.
On this page, you’ll see all of the courses you created. Users can search for a course by name using the search bar on the right. Or, they can view courses by category or author on the left.
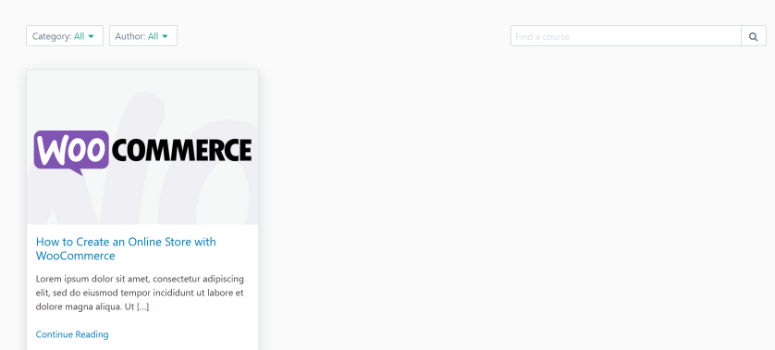
Clicking on a course opens it, and you’ll be able to see the course overview and all of the sections and lessons.
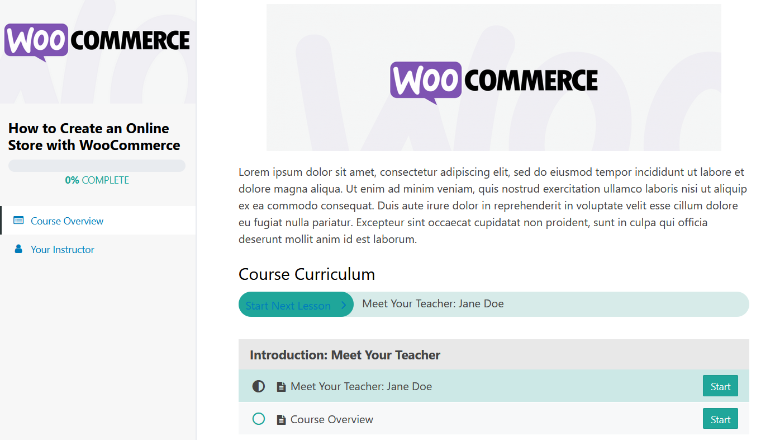
Users can click on the Start button next to a lesson to begin learning and it will automatically track their progress so they can continue where they left off.
Step 10: Promote Your New Courses
After your new courses are fully set up, you can introduce the course website to your users by creating beautiful and attractive landing pages.
For this, you can use the SeedProd plugin. It’s the most popular drag and drop page builder plugin that lets you design custom landing pages.
SeedProd also comes with hundreds of ready-made landing page templates that you can use on your online course website. These built-in landing page templates can give a kick-start to promote your courses to more users.
The next step for promotion is to optimize your online course website for search engines. You should check out our WordPress SEO tools to rank your site quickly.
You also need to track your visitors, so you can create the right courses that your users might be interested in on your site. We recommend using MonsterInsights, which is the most popular WordPress Google Analytics plugin.
It’ll help monitor the users’ activity on each page, so you can make necessary changes on your site and grow your business to the next level.
That’s all.
We hope this article helped you learn how to set up an online course website with WordPress. You may also want to check out our guide on best WordPress online courses and training providers.


Comments Leave a Reply