Are you planning to build a multisite network with WordPress? While WordPress can be used for multiple purposes like creating a blog, making an online store, or building a full-fledged website, it can also be used to set up a multisite network to manage all your sites from a single account.
In this article, we’ll show you how to install and set up a WordPress multisite network step-by-step. We’ve created a table of contents to make things easier for you. Take a look:
- What you need to know about WordPress multisite networks
- When and why you should use a multisite network
- Selecting a domain name and web hosting for your multisite network
- Enable and set up your WordPress multisite network
- Begin the multisite network setup
- Multisite network configuration settings
- Add and manage new sites to your WordPress multisite network
- Install themes and plugins on your multisite network
- Troubleshoot errors
Ready? Let’s get started!
What You Need to Know About WordPress Multisite Networks
WordPress is the most popular blogging platform on the market. It has a lot of features, including multisite network functionality. If you own multiple blogs or WordPress websites and you want to manage them from one account, then you can set up WordPress multisite network.
You can add new sites or blogs to your multisite network hassle-free. To access these sites, you’ll need to log into your master account. It’s also a perfect solution when you want your users to create new sites or blogs on your domain name.
Unlike an individual WordPress blog or site, a multisite network enables you to customize each website separately. The multisite settings are advanced and there’s a bit of a learning curve in order to understand all the options.
2. When and why you should use a multisite network
WordPress offers multiple plugins like ManageWP that can help you manage all your websites from one dashboard. These third-party plugins are easy to set up and require little training.
So why you should use a multisite network instead?
Below are a few examples of when you’d be better off using a WordPress multisite network:
- A news journal or magazine blog with multiple supervisors.
- A large business website with several separate sites for their branches.
- A membership website that allows users to create their own sites.
- A website for an educational institute that enables students to have their own sites or blogs.
These are the most common circumstances, but you may have a different scenario; so make sure to select the best and easiest option for your websites.
Pros
WordPress multisite networks are built to provide ease to users who want to manage all their sites from one domain. It creates a master environment where you have the top authority on all your sites as a network administrator.
Let’s take a look at the pros for using a multisite network:
- All your sites can be managed from one WordPress account.
- The WordPress roles and permissions feature allows you to manage all your sites as an administrator, while each individual site can have their own site admins who can’t access the main network.
- You don’t need to install themes and plugins on all your sites separately. Simply install them on the master account and activate them for all your sites.
- It saves time on WordPress updates. Even if you have more than 10 websites, you can quickly update the themes, plugins, and WordPress core from your main installation.
- You can change the general settings for all your sites from your multisite network account. It also allows the site admins to make changes on their own sites and override the master settings.
Cons
Even though there’re so many advantages to using the multisite network for WordPress, there are few downsides that you can’t avoid too.
Let’s take a look at some of the issues you may face with a WordPress multisite network:
- The multisite network has multiple sites but all the sites will be working under one main network. If the network is effected for any reason, it’ll impact all of your sites.
- If your main network is attacked by hackers or malware, then all of your sites on that network will be attacked too.
- Many plugins don’t work well with WordPress multisite networks, and you’ll need to work harder to find alternatives.
- You may find it difficult to manage traffic and bandwith across all the sites on your network. Generally, the bandwith should be equally divided between all your sites, but one vulnerability can affect all the other sites.
- Some web hosting companies don’t support WordPress multisite networks.
If you still plan on setting up a multisite network, then continue reading below.
3. Selecting a Domain Name and Web Hosting for Your Multisite Network
Now that you know a lot about WordPress multisite networks, we’ll walk you through the requirements to set one up.
The first thing you’ll need is a domain name and web hosting. In regard to hosting, you know that a multisite network has multiple sites, which means you’ll need a web hosting provider that can manage all your resources without trouble.
There’re different types of web hosting, including shared hosting, VPS hosting, dedicated server hosting, etc.
For a multisite network, it’s recommended you use either VPS hosting or dedicated servers. There’re many hosting companies that offer VPS / dedicated hosting servers. Some of them are:
These hosting providers are the industry’s best and all offer great web hosting to run a WordPress multisite network smoothly.
We recommend using Bluehost. They’re official WordPress partners and one of the best WordPress hosting companies in the world. Bluehost also offers a free domain name and SSL certificate with any hosting plan. You can also pay annually and save big on Bluehost.
All your sites on the multisite network will use the same domain name with subdomains (example: https://site.mydomain.com) or folders on the root (example: https://mydomain.com/site/).
Both the subdomains and sub-directories have their own individual requirements.
For subdomains, you’ll need to set up wildcard subdomain. Simply log into the cPanel of your hosting account. In the Domains area, you’ll need to click on the ‘Subdomains’ option.
It’ll take you to a new page. In the given field, you’ll need to enter * and make sure you have your domain name next to it in the dropdown.
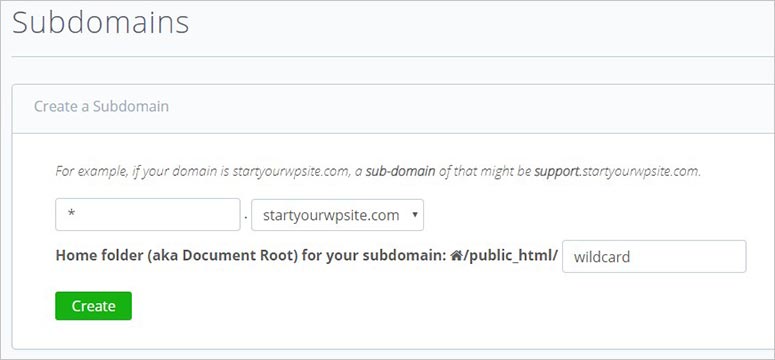
Click on the Create button to properly set up wildcard subdomain for your main domain.
For sub-directories or folders on the root, you’ll only need to enable pretty permalinks and your multisite network will work on them.
After the setup, you’ll need to make a WordPress website to continue.
If you’re finding it a challenge to get a good domain name, try our free Domain Name Generator.
4. Enable and Set Up a WordPress Multisite Network
Once you have your WordPress site ready, it’s the time to enable your multisite network. The multisite network is a ready-made feature in WordPress and you don’t need any further installations on your website.
Note: If you plan to enable multisite on an existing WordPress website, then we recommend you make a complete backup of your site using BackupBuddy or UpdraftPlus.
When you’re ready, go ahead and connect to an FTP client or log into cPanel with your username and password. You’ll need to edit the wp-config.php file of your WordPress installation.
In the wp-config.php file, you should look for /* That’s all, stop editing! Happy blogging. */ line and add this code above it:
/* Multisite */
define( 'WP_ALLOW_MULTISITE', true );
After that, you can save the file. If you’ve downloaded the wp-config.php file from an FTP client, then make sure to upload it back after editing. The above code will enable WordPress multisite functionality.
5. Begin the Multisite Network Setup
Once the multisite network is enabled, you’ll need to set up the network on your WordPress site.
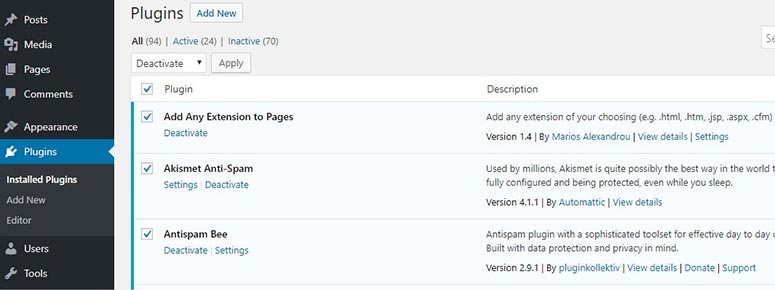
Start by deactivating all your plugins, so they don’t affect your multisite network. Go to the Plugins » Installed Plugins page and check all your plugins. Now, select the ‘Deactivate’ option in the dropdown above and hit the ‘Apply’ button to deactivate all your installed plugins.
Next, you need to go to the Tools » Network Setup page to set up the network.
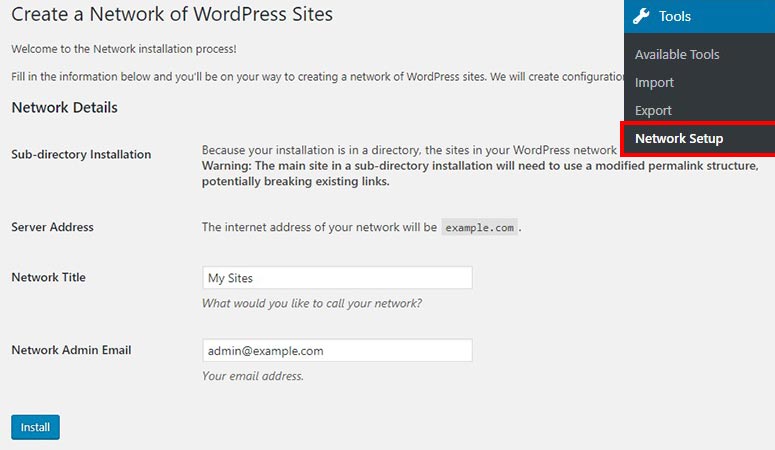
Add the network’s details like title and admin email address. After that, click on the ‘Install’ button.
You’ll now see the code that you’re required to add in your .htaccess and wp-config.php files to complete the set up.
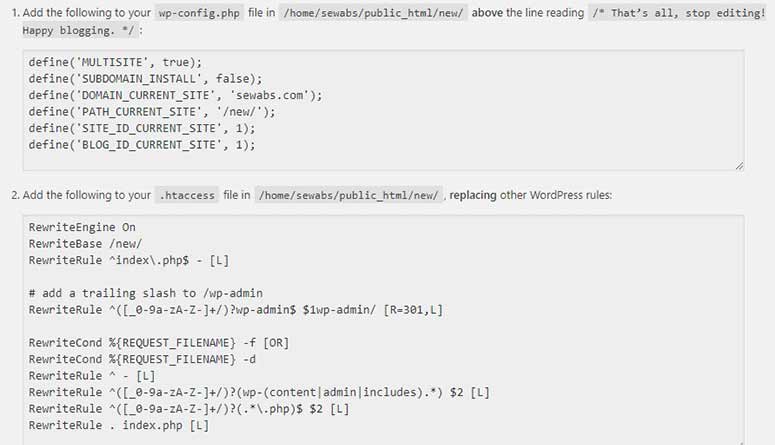
You can edit the files using an FTP client or login via cPanel. Update the files after adding the above code.
Now, go back to your WordPress admin page and login again to start using your multisite network properly.
6. Multisite Network Configuration Settings
Once logged in, you’ll need to go to My Sites » Network Admin » Dashboard from the top WordPress menu to configure your multisite network settings.
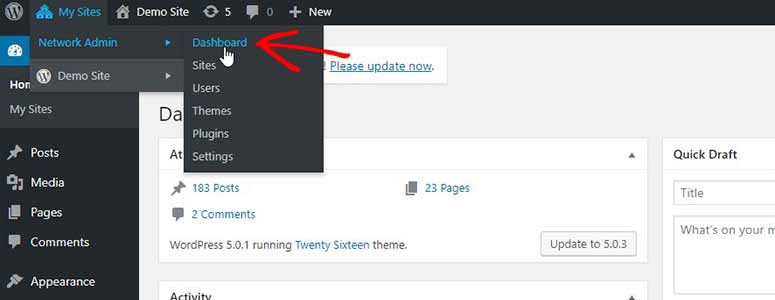
From there, you can administer your multisite network by adding new sites, creating new users, installing themes, and adding plugins. It’ll also show you the “Right Now” widget to instantly perform network tasks.
You need to go to the ‘Settings’ menu to change your network settings.

It’ll display the network title and network admin email fields. Since you entered those details when setting up your multisite network, you can leave it as is.
Enable New Registrations
One of the most important network settings included is enabling user and site registrations on your multisite network. This setting is disabled by default and you’ll need to configure it.
Simply go to ‘Registration Settings’ and you’ll find multiple options there.
You can either allow user account registrations or logged-in users can register new sites. It also gives you the option to enable both the settings altogether.

You can enable the ‘Registration Notification’ setting to get notified whenever a new user or new site is registered on your WordPress multisite network.
If you check the ‘Add New Users’ setting, then the site admins can create users.
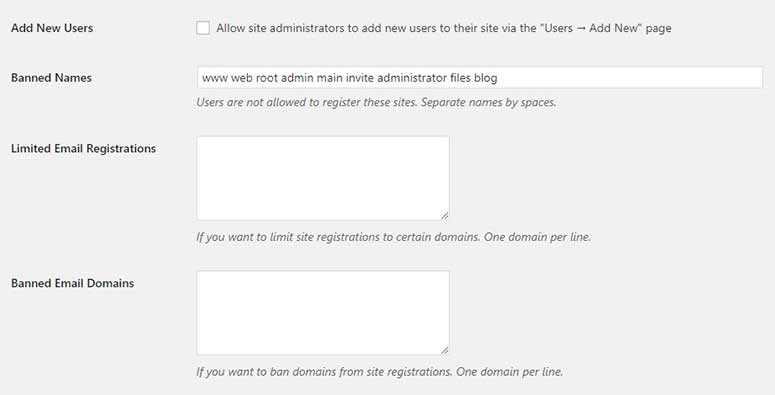
You can also restrict the new site registrations to specific domains by adding the domain names in the ‘Limited Email Registration’ text area. That way, you can limit the site registrations to your own domain name.
In the ‘Banned Email Domains’ text area, you should enter the domain names you want to ban from creating new sites.
Modify New Site Options
When a new site is registered, you’ll need to send a welcome email to the admin or user who created it. The new site will also have a post, page, and comment section just like the default WordPress installation.
In the ‘New Site Settings’, you can add the welcome content for all new site registrations on your WordPress multisite network.
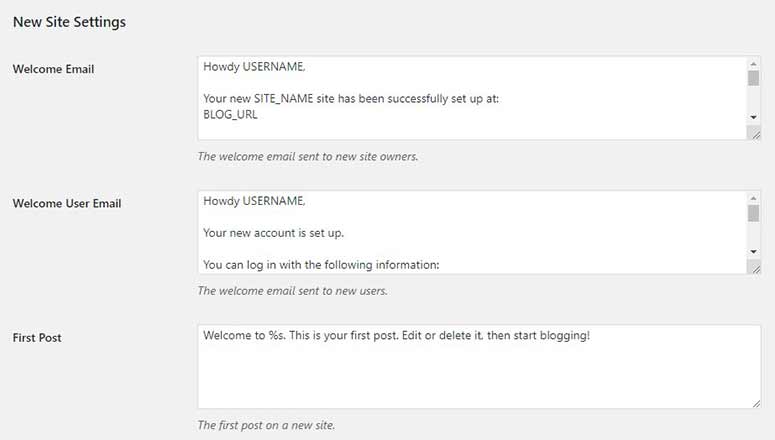
These settings can be updated later by the network administrator.
File Upload Settings
The new sites registered on your multisite network have default settings similar to a general WordPress installation. This also includes the file upload settings.
However, it’s important to control the total file upload size, so the server resources are equally divided among all your sites. Simply check the ‘Site upload space’ option to add a value to limit the total size of files. This value will create a limit for all the sites on your network.
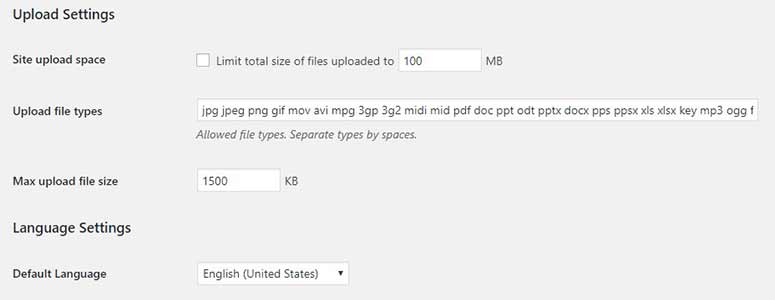
It also allows you to define the file formats and set a limit for each file upload on the sites.
Menu Settings
Now you can go to the ‘Menu Settings’ section and enable the administration menus for plugins. Once enabled, it’ll display the plugins menu to the site admins.

Site admins can activate or deactivate the plugins that’re installed on their sites. They won’t have the option to install or delete the plugins.
Click on the ‘Save Changes’ button to store these settings.
7. Add and Manage New Sites to Your WordPress Multisite Network
After finishing with the settings, you can add a new site from the Sites » Add New page from the left-hand menu in your multisite network.
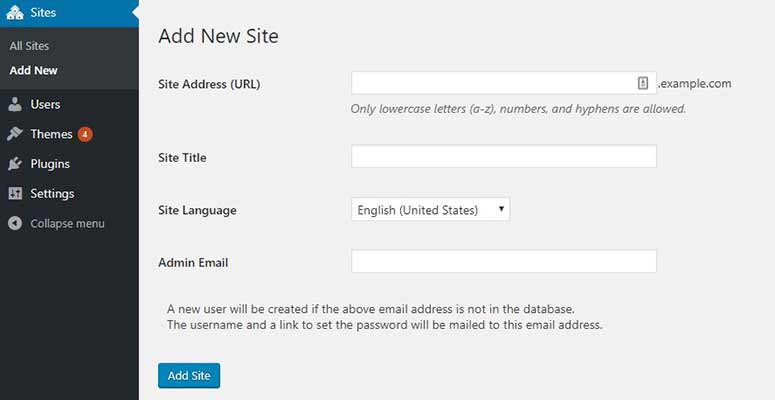
In the ‘Site Address (URL)’ field, you’ll need to enter the URL for your new site. In ‘Site Title’ field, you can add the site title and add the admin email. Make sure that this email is different from your network admin email.
All the notifications, including the username and password for this new site, will be sent to the email address that you entered.
Click on the ‘Add Site’ button to create the new site.
As per the instructions, a new user will be created if the email isn’t in the database previously and the details will be sent to your new user.
8. Install Themes and Plugins on Your Multisite Network
The best part of a multisite network is that you can install all the themes and plugins on the master installation and they’ll be available for all of your sites.
The site admins can only activate or deactivate the themes and plugins. They don’t have permission to install or delete resources on their sites.
Install and Activate a Theme
To install a theme, you’ll need to go to Themes » Add New from your multisite network. For more details, check out our article on how to install a WordPress theme.
Once installed, you can click on the ‘Network Enable’ link below the theme name to make it available for all the sites on your network.

If you want to hide a theme from your sites, then click on the ‘Network Disable’ link below it.
Install and Activate a Plugin
To install a plugin, you’ll need to go to Plugins » Add New from your network admin dashboard. For further assistance, you should check out our article on how to install a WordPress plugin.
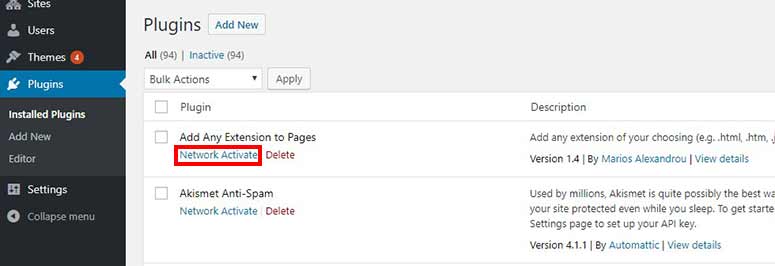
Unlike themes, you can click on the ‘Network Activate’ option below each plugin to make it available to the sites on your multisite network.
Make sure that you’ve enabled the plugins menu from the network menu settings previously.
9. Troubleshoot Errors
So far, you’ve learned how to set up a multisite network. It’s important to know that a simple mistake can cause a massive error to your network. Some of the common problems include a wildcard subdomains configuration error.
You’ll need to talk to the customer service team of your web hosting provider and ask them if they support wildcard subdomains.
If you’re using sub-directories and your users can’t login to their sites, then you’ll need to make a few changes in your wp-config.php file.
In the wp-config.php, search for:
define('SUBDOMAIN_INSTALL', false);
and replace it with:
define('SUBDOMAIN_INSTALL', 'false');
That should fix the login error.
In case your web host doesn’t support the WordPress multisite feature, you can easily switch to a new web host or check out this article on best plugins for WordPress multisite networks.
Some of these plugins include:
- WPForms: The Best WordPress Contact Form Builder
- MonsterInsights: The Best Google Analytics Plugin
- All in One SEO: The Best WordPress SEO Plugin and Toolkit
That’s all. We hope this guide helped you learn how to install and set up a WordPress multisite network.
In the future, if you want to migrate a multisite network or just one site within the network, you’ll want to make a note of the Duplicator plugin. It’s the best backup and migration solution for WordPress.
If you’re looking to use custom code on your site and want to be able to apply that to multiple websites, then check out WPCode. It’s the best WordPress custom code snippets plugin.

Thank you for such a detailed article! I took your advice and migrated my site to BlueHost prior to attempting to set up multisite. Unfortunately, it appears as though BlueHost no longer supports wildcard domains, and so I was never able to get the subdomain sites working. Just an fyi for anyone else attempting this!