
A few months ago, a reader emailed me about her recipe blog. She had over 400 recipes, but her search bar kept sending visitors to random comment threads instead of the recipes she’d written.
I tested it myself. I typed one basic ingredient, and her best recipes were buried under years-old posts that barely mentioned it.
The problem wasn’t her content. WordPress’s default search only matches exact words. It has no idea which pages actually matter to a visitor.
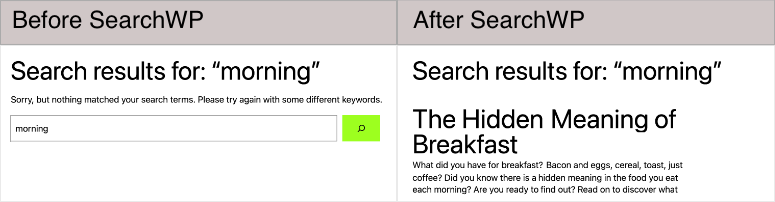
Once I found a plugin built to improve search relevance, her search bar started surfacing the right recipes first, every time.
In this guide, I’ll show you how to make your own WordPress search smarter and more relevant, step by step.
Key Takeaways
- WordPress’s default search is the problem, not your content. It only matches literal words, so it can’t tell your best pages from your least relevant ones.
- Fix relevance first with SearchWP. You control which fields matter most, and the algorithm learns from what visitors actually click.
- Stop Google from indexing your internal search pages with All in One SEO. Search results pages are thin content that shouldn’t be in Google’s index.
- See exactly what visitors search for with MonsterInsights. You’ll find content gaps you didn’t know existed.
- Hide content that shouldn’t show up in search with WPCode. A short snippet keeps things like media files out of your results.
- Let visitors filter results themselves with WPFilters. Useful once you have enough content that narrowing by category, price, or date actually helps.
What We’ll Accomplish in This Tutorial
By the end of this guide, your WordPress search bar will return your most useful content first, instead of whatever happens to contain a matching word. You’ll also know what people are actually searching for, and you’ll have control over what does and doesn’t show up in results.
What You’ll Need Before We Start
Skill level: Beginner/Intermediate
Time to complete: ~45 minutes total (each method below can also be done on its own)
Here’s what you’ll need:
- A self-hosted WordPress site with admin access (these plugins won’t work on a free WordPress.com plan)
- A SearchWP license, for Method 1
- All in One SEO installed and active, for Method 2
- MonsterInsights connected to a Google Analytics 4 property, for Method 3
- WPCode (the free version works fine), for Method 4
- A WPFilters license, for Method 5
You don’t need all five to get value here. Pick the methods that match your goals, and skip the rest for now.
To help you navigate, use the table of contents below.
- Quick Comparison: All Five Methods
- Method 1: Improve Search Relevance Using SearchWP
- Method 2: Stop Google From Indexing Your Search Pages Using All in One SEO
- Method 3: Track What Visitors Search For Using MonsterInsights
- Method 4: Hide Certain Content From Search Results Using WPCode
- Method 5: Let Visitors Filter Search Results Themselves Using WPFilters
- Which of These Do You Actually Need?
- How to Test Your Work
- Common Issues and Quick Fixes
- FAQs: WordPress Search
- Final Thoughts
- Resource Hub: WordPress Search
Quick Comparison: All Five Methods
| Goal | Best Tool | Time Needed |
| Fix irrelevant search results | SearchWP | ~15 minutes |
| Stop Google from indexing search pages | All in One SEO | ~5 minutes |
| See what visitors search for | MonsterInsights | ~10 minutes |
| Hide certain content from search | WPCode | ~10 minutes |
| Let visitors filter results themselves | WPFilters | ~15 minutes |
Method 1: Improve Search Relevance Using SearchWP
This is the method that fixes the actual problem: WordPress deciding your search results don’t matter based on relevance. I always start here, because every other method in this guide depends on your search results being useful in the first place.
Install SearchWP and Run the Setup Wizard
First, you need to purchase SearchWP and download the plugin ZIP file from your account. Once you have it, go to Plugins » Add New Plugin » Upload Plugin in your WordPress dashboard, select the file, and click Install Now.
After that, click Activate. SearchWP automatically launches a setup wizard.
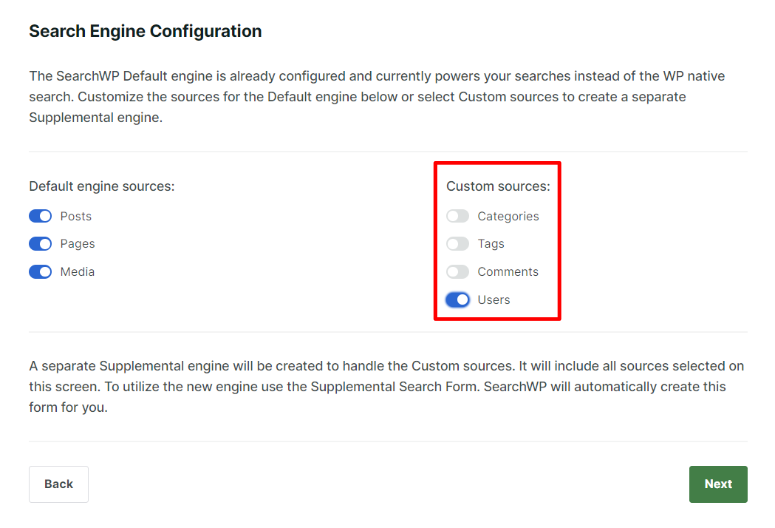
It’ll ask you to configure your search engine by choosing which content types to include, and then to add any custom sources like users or taxonomies. You can paste in your license key here, or skip it and add it later from SearchWP » Settings.
Choose What SearchWP Should Search (Sources and Attributes)
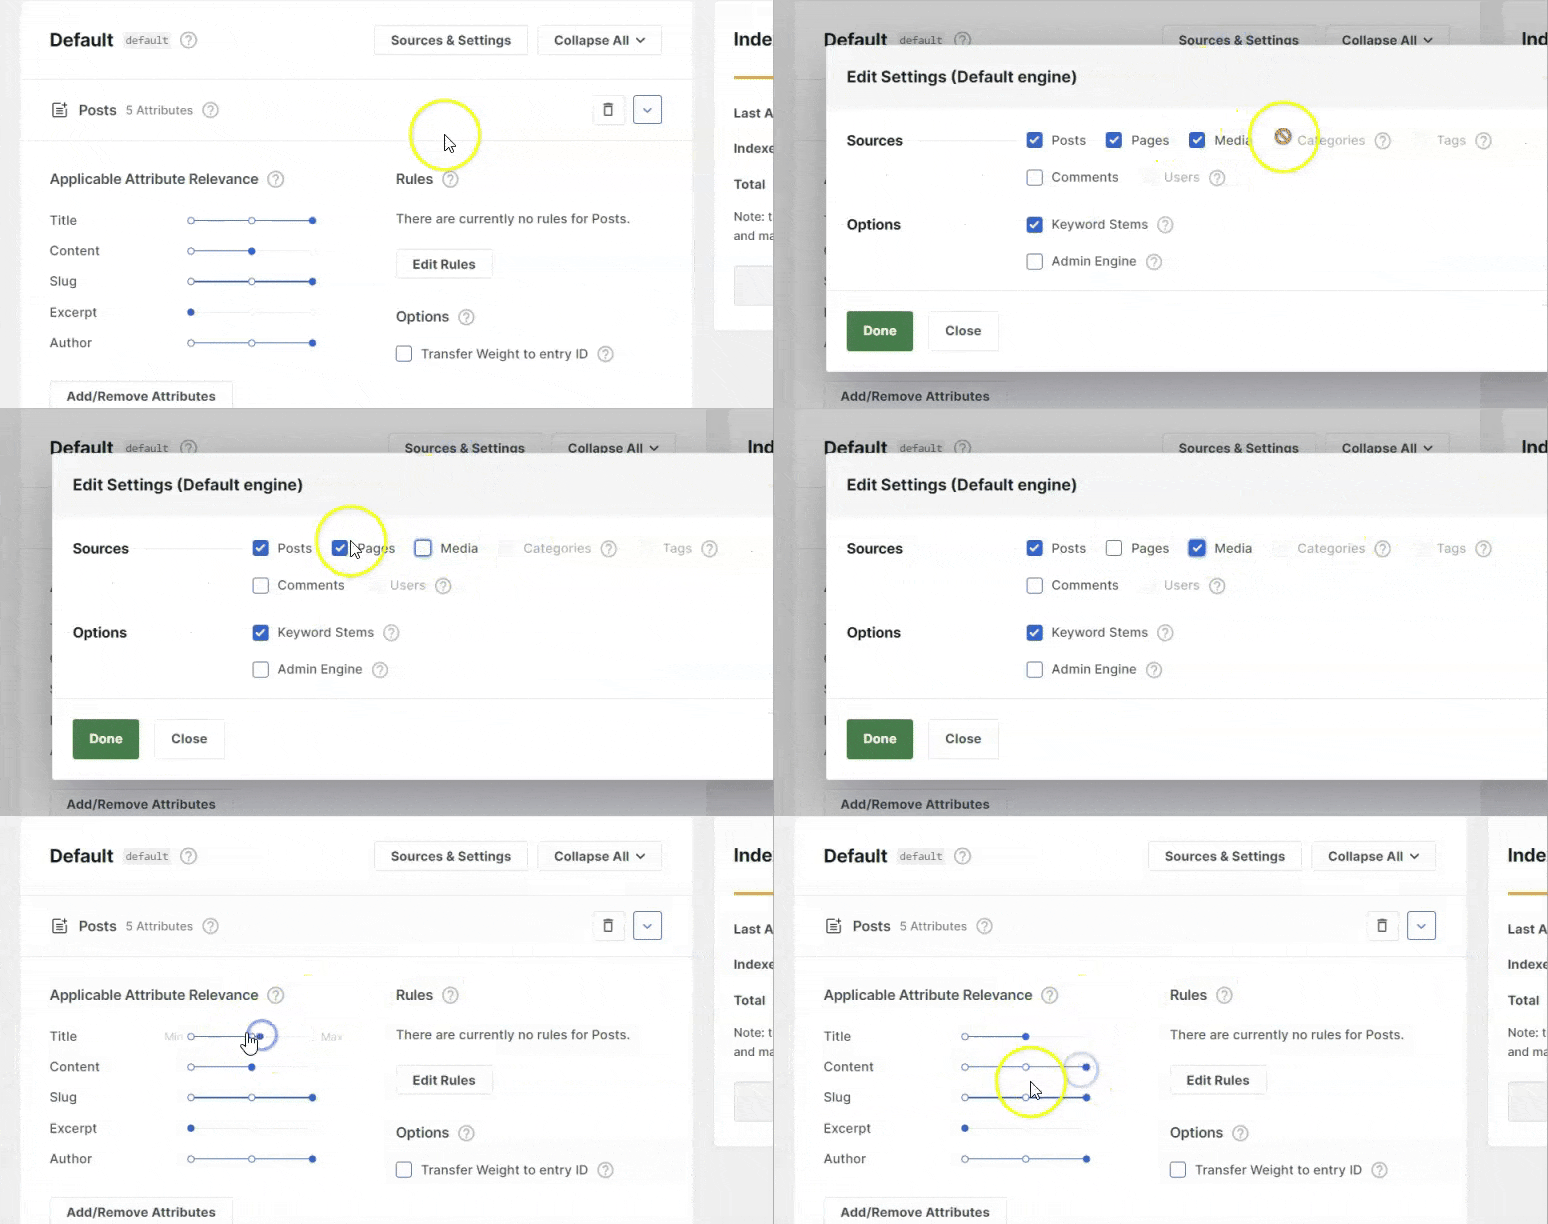
Next, go to the Engines tab. This is where you tell SearchWP what to search and what matters most.
Sources are the content types included in search, like posts, pages, or a custom post type such as recipes. Attributes are the specific fields within each source, like the title, the content, or a custom field.
Click Add/Remove Attributes to choose which fields to include. Each attribute has a weight slider next to it. Drag it to the right to make that field count for more in your results.
Don’t worry if this feels like a lot of settings at once. A good starting point is weighting the title highest, then any custom fields that describe the page, then the body content last. You don’t need to re-index your site after changing weights, SearchWP applies the change right away.
Turn On Self-Learning Search Results
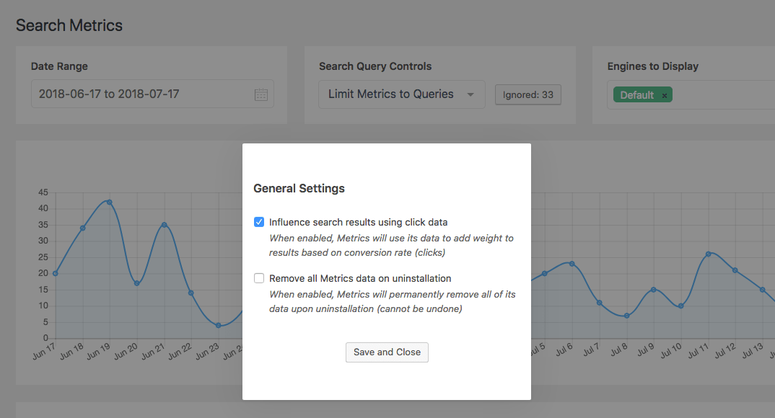
Once you’ve done that, go to SearchWP » Settings » General and turn on Influence Search Results Using Click Data. This is the closest thing SearchWP has to an “AI” feature, and it’s worth being precise about what it actually does.
It doesn’t understand language the way a chatbot does. It tracks which results visitors click on for a given search term, and gradually ranks those results higher over time. In my experience, this matters most on sites with steady search traffic, since the algorithm needs real clicks to learn from.
✅ Tip: While you’re in Settings, turn on partial matching and “Closest Match” too. It helps visitors find the right page even with a typo or a slightly different word.
⚠️ Note: SearchWP doesn’t have a free version. Plans start at $99 per year, and it comes with a 14-day money-back guarantee if it doesn’t work out for your site.
Method 2: Stop Google From Indexing Your Search Pages Using All in One SEO
Every WordPress search creates its own URL, like yoursite.com/?s=keyword. Google can crawl and index these pages, and they’re almost always thin, duplicate content that does nothing for your SEO. This method keeps them out of Google entirely.
Turn On Crawl Cleanup
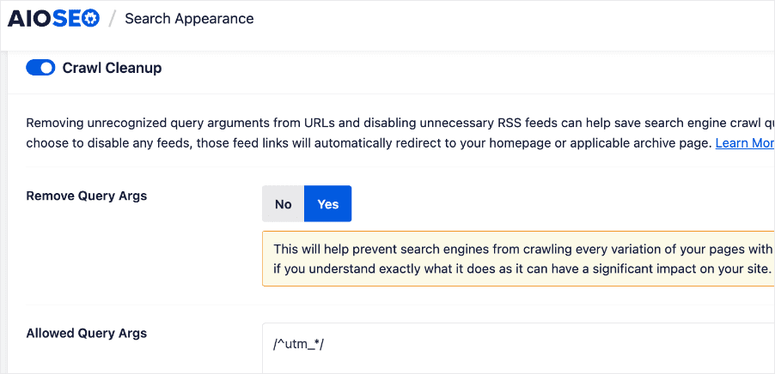
First, you need to go to All in One SEO » Search Appearance » Advanced. Scroll down until you see Crawl Cleanup, and toggle it on.
Block Search Pages From Search Engines
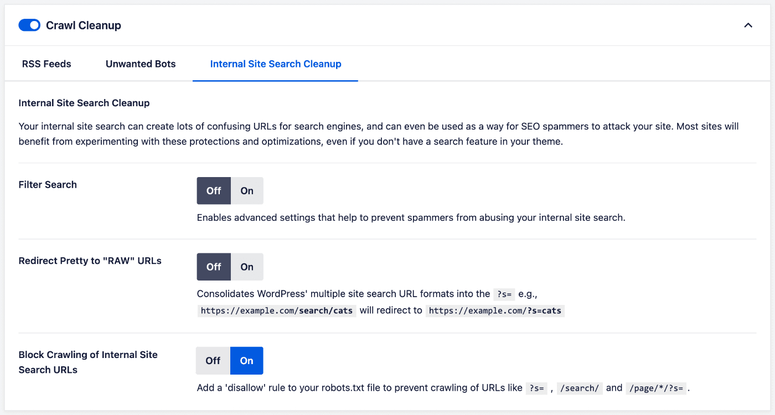
Turning on Crawl Cleanup reveals a new Internal Site Search Cleanup tab. Here, turn on Block Crawling of Internal Site Search URLs. This adds rules to your robots.txt file telling Google not to crawl your search results pages.
While you’re on this tab, it’s also worth turning on Redirect Pretty to “RAW” URLs. This keeps every version of your search URL consistent, so you’re not accidentally creating several different pages for the same search.
✅ Tip: Crawl Cleanup is available in the free version of All in One SEO, so you don’t need a paid plan for this method.
Method 3: Track What Visitors Search For Using MonsterInsights
Fixing your search results is only half the job. I also want to know what visitors are typing into that search bar in the first place, since it usually points straight at content I haven’t written yet.
This tracking actually comes from a native Google Analytics 4 feature called Site Search. MonsterInsights’ role here is making sure that feature stays switched on, since it normally turns off several overlapping GA4 options by default.
Turn On Site Search Tracking in GA4
To do this, log into Google Analytics and click the Admin gear icon. Next, go to Data Streams and select your website’s stream.
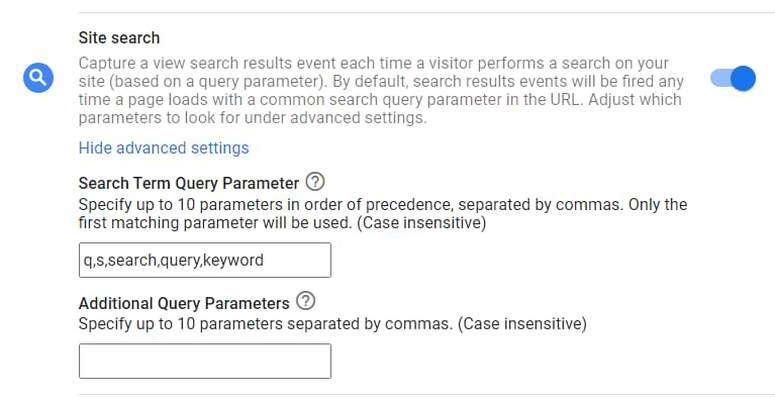
Once you’re there, click the Enhanced Measurement gear icon and make sure Site search is switched on. Click Save when you’re done.
See What People Are Searching For
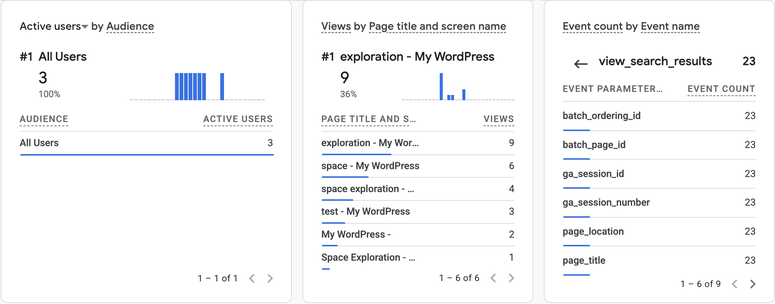
After someone searches your site, GA4 logs it as a view_search_results event. You can see these under Reports » Engagement » Events, then click into that event to see the actual search terms people used.
✅ Tip: Don’t confuse this with MonsterInsights’ separate Search Console addon. That one shows what people searched on Google to find your site. Site Search shows what they searched once they were already on it, which is a different signal.
Method 4: Hide Certain Content From Search Results Using WPCode
Sometimes the problem isn’t relevance. It’s that content you never wanted searchable is showing up anyway. Media attachment pages are the most common culprit I run into. This method lets you decide ahead of time what search should never return.
⚠️ Note: If you’re using SearchWP from Method 1, this snippet won’t do anything, since SearchWP manages its own search index separately from WordPress’s default query. Instead, go to your SearchWP Engine settings and uncheck Media as a Source.
Install WPCode and Add a New Snippet
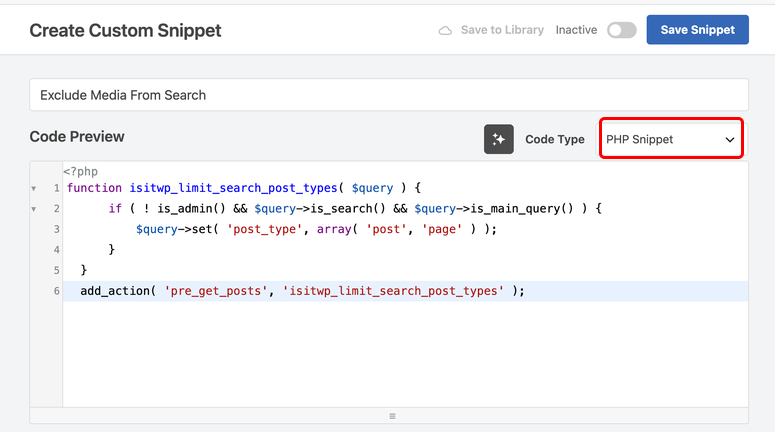
First, install and activate WPCode if you haven’t already. Then, go to Code Snippets » Add Snippet, give it a name like “Exclude Media From Search,” and set the Code Type dropdown to PHP Snippet.
Paste the Search Filter Code
Next, paste this code into the snippet editor. It tells WordPress to only include posts and pages in search results, which keeps attachments and any other post types out.
function isitwp_limit_search_post_types( $query ) {
    if ( ! is_admin() && $query->is_search() && $query->is_main_query() ) {
        $query->set( 'post_type', array( 'post', 'page' ) );
    }
}
add_action( 'pre_get_posts', 'isitwp_limit_search_post_types' );
You can adjust the post types in that array to match what you actually want searchable on your own site, like adding a custom post type such as ‘product’.
Set the Snippet to Run Everywhere
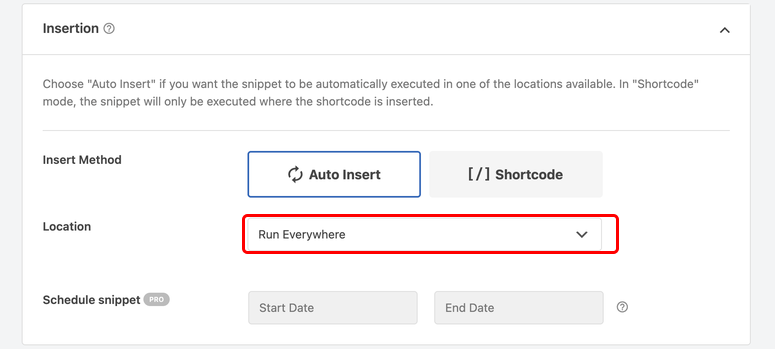
After that, set Insert Method to Auto Insert and Location to Run Everywhere. Toggle the snippet to Active, then click Save Snippet.
⚠️ Note: Always test custom code on a staging site first. A small typo in PHP can take down your entire site, and WPCode’s own safe mode will only catch some of those mistakes.
Method 5: Let Visitors Filter Search Results Themselves Using WPFilters
This one solves a different problem than the others. Even with perfect relevance, visitors browsing a large catalog or archive often want to narrow results themselves, by category, price, or date. WPFilters adds that as a drag-and-drop feature, no coding needed.
Install WPFilters and Run the Setup Wizard
First, go to your SearchWP account, open Downloads, and download WPFilters along with your license key. In WordPress, go to Plugins » Add New Plugin » Upload Plugin, select the file, then click Install Now and Activate.
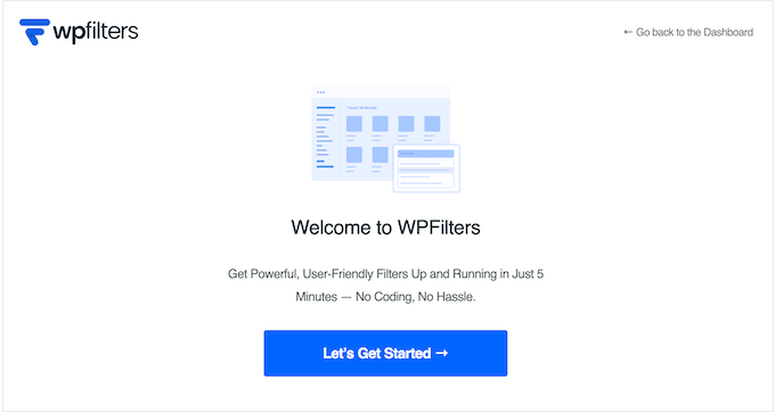
Activation launches a setup wizard. Click Let’s Get Started, paste in your license key, and choose any pre-configured filter elements that match your content.
Build a Filter Element
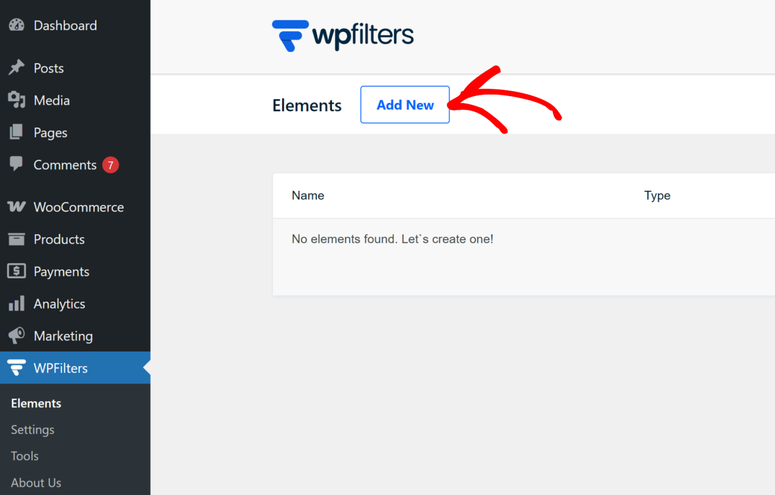
Next, go to WPFilters » Elements and click Add New. Give the filter a name, then choose a type such as checkboxes, a dropdown, or a slider.
Under Data Source, attach the filter to whatever it should filter by, like a category, a custom field, or a post type. Once you’ve done that, click Save.
Add the Filter to Your Search Results Page
Now you’re ready to place it. Click Embed on your filter and choose the Gutenberg block option. In the block editor, insert the WPFilters Element block next to a Query Loop block on your search results template or archive page.
Once it’s placed, any selection a visitor makes in that filter automatically narrows down the Query Loop results next to it. No extra setup needed.

⚠️ Note: WPFilters doesn’t have a free version either. It starts at $49 per year for the first year, and it comes with the same 14-day money-back guarantee as SearchWP.
Which of These Do You Actually Need?
You don’t need to set up all five methods on day one. Here’s how I’d decide where to start:
- “Do people complain that search never finds anything?” Start with Method 1 (SearchWP). Relevance is almost always the real complaint.
- “Do you care about SEO or crawl budget?” Add Method 2 (All in One SEO) once relevance is fixed.
- “Do you want data on what people search for?” Add Method 3 (MonsterInsights) any time. It doesn’t depend on the others.
- “Is content showing up in search that shouldn’t be there?” Add Method 4 (WPCode) as needed.
- “Do visitors browse a large catalog or archive?” Add Method 5 (WPFilters) for narrowing results.
If you only have time for one, start with SearchWP. Every other method here is additive, so you can layer in Methods 2 through 5 later without redoing any earlier work.
How to Test Your Work
Once you’ve set up a method or two, it’s worth confirming everything actually works before moving on.
Run a few real searches using terms your visitors would actually type, and check whether your best content now appears first. If you set up Method 4, search for something you excluded and confirm it’s gone.
For Method 2, search Google for site:yoursite.com inurl:?s= a few days after enabling Crawl Cleanup. That count should drop toward zero as Google recrawls your site.
For Method 3, open GA4’s Realtime report, then search something on your own site in another tab. Use an incognito or private window for that test search, since GA4 can filter out activity from a logged-in admin session. You should see a view_search_results event appear within a minute or two.
Common Issues and Quick Fixes
Problem: “SearchWP results still look wrong after I changed the weights”
This almost always means the content you expected to rank higher isn’t actually included as a Source yet. Double check your Engine includes the right post type, then confirm your attribute weights saved correctly. I’ve made this mistake myself more than once.
Problem: “Google is still showing my search pages weeks later”
Robots.txt changes don’t remove pages instantly. Google has to recrawl your site first. This can take a couple of weeks. If you need it gone faster, submit a removal request in Google Search Console.
Problem: “GA4 shows zero site search events”
Check that the Site Search toggle in Enhanced Measurement is actually still on. MonsterInsights can switch off overlapping GA4 options during setup, so it’s worth checking this again after any plugin update. Also make sure you’re testing in an incognito window, since GA4 often filters out admin activity, and check whether your theme rewrites search URLs into clean permalinks, since GA4’s Site Search only recognizes the query parameter version.
Problem: “My WPCode snippet broke the search page”
This is usually a small PHP typo. Go to Code Snippets » All Snippets and toggle the snippet off to undo the damage immediately. Then recheck the code carefully before turning it back on.
Problem: “WPFilters checkboxes show up, but nothing actually filters”
This usually means the filter element and the Query Loop block on the page aren’t connected to the same content. Confirm the Data Source in your filter matches the taxonomy or field used by the Query Loop next to it.
FAQs: WordPress Search
Do I need all five tools in this guide?
No. Start with SearchWP for relevance, since that solves the most common complaint. Add the other methods only when you actually have that specific problem.
Is SearchWP really AI-powered search?
Not in the way a chatbot understands language. SearchWP uses a customizable relevance algorithm that also learns from what visitors click over time. It’s smart and self-improving, but it doesn’t understand meaning the way true semantic search does.
Will hiding my search pages from Google hurt my SEO?
No, it usually helps. Search results pages are thin, duplicate content in Google’s eyes. Keeping them out of the index puts your crawl budget toward pages that can actually rank.
What’s the difference between MonsterInsights Site Search and its Search Console addon?
Site Search shows what people typed into your own site’s search bar. The Search Console addon shows what people typed into Google before clicking through to your site. They’re tracking two different moments in the visitor’s journey.
Do SearchWP and WPFilters work without WooCommerce?
Yes. Both work with any content type, including regular posts, pages, and custom post types. WooCommerce support is an option, not a requirement.
Can I write my own WPCode snippet to search custom fields instead?
Yes, though it takes a different filter than the one in this guide. If you find yourself needing that, SearchWP’s attribute settings in Method 1 handle it without any code at all.
Final Thoughts
A search bar that actually works changes how visitors experience your site. Instead of giving up after one bad result, they find what they came for and stick around.
Start with relevance, since that’s the fix most visitors will actually notice. Then layer in the other methods here as your site and your goals grow. SearchWP’s self-learning algorithm keeps improving as more visitors search and click, so this fix gets better with time instead of staying static.
If you’re still deciding between search plugins, take a look at our guide on the best WordPress search plugins to compare more options.
Resource Hub: WordPress Search
- How to Make a Custom Search Form in WordPress
- How to Make a Smart WooCommerce Product Search
- SearchWP Review: Is It the Best WordPress Search Plugin?
- 9 Practical Tips to Optimize and Dominate Voice Search SEO
- How to Extend Search to Include Custom Post Meta
- How to Highlight Search Results in WordPress

Comments Leave a Reply