Worried about the warning ‘This site is not secure’ showing up on your WordPress site?
This kind of warning will make visitors think your website is spam or fraudulent and they’ll be quick to leave. Thankfully, you can fix this warning easily in a few simple steps.
In this step-by-step guide, we’ll show you what’s causing the warning and how to fix ‘This site is not secure’ message on your site.
Why are you seeing the WordPress site not secure notice?
Your website transfers data between browsers and servers every time a visitor comes to your site. If you’re selling a product, you’ll be dealing with sensitive information like payment details, contact numbers, and shipping addresses.
Not too long ago, websites used HTTP (HyperText Transfer Protocol) to send and receive data. But this was unsafe as the data was sent in plain text. This means if someone intercepts that data, they can read it and misuse it.
Search engines like Google started displaying warnings like ‘This site is not secure’ on websites that use HTTP.
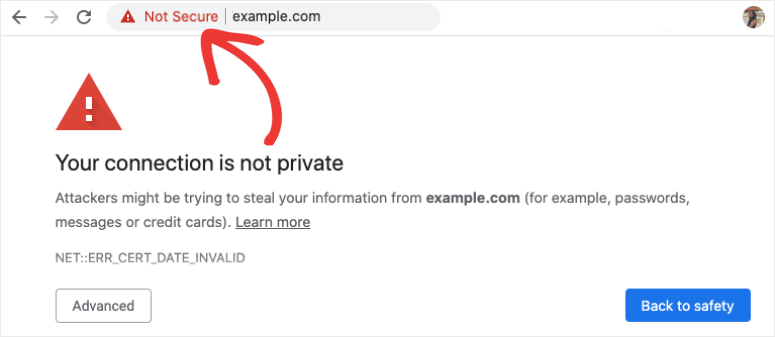
To fix it, you need to use HTTPS (HyperText Transfer Protocol Secure). This ensures your data is encrypted using an SSL certificate (Secure Socket Layer). Now if hackers manage to steal the data while it’s in transit, they can’t do anything with it because it will look like gibberish.
Now we’ll show you how to get an SSL certificate and transfer your website to HTTPS to get rid of the ‘This site is not secure’ warning. At the end of this tutorial, your website will be properly running on HTTPS and you’ll see a padlock in your address bar:

And don’t worry, there’s no coding involved. Everything can be done with the help of your web host or using a plugin.
If you already have an SSL certificate installed and can see the padlock in the address bar, skip ahead to the section where we resolve mixed content issues.
Now let’s get started.
How to Fix ‘This Site is Not Secure’ Warning?
Before we get started, it’s wise to take a backup of your website. Any time you’re making major changes to your site, take a quick backup with a plugin like Duplicator or UpdraftPlus. This will serve as a safety net, so in case you make a mistake, you can always restore your backup.
Step 1: Install an SSL certificate on your WordPress website
Not too long ago, installing an SSL certificate required quite a bit of technical skill but that’s all changed now. Most web hosts offer a free SSL certificate or you can buy one from them for a reasonable price. And if not, you can upload your own certificate or use a plugin to enable one.
We’ll show you how to get an SSL certificate using all three methods.
Feel free to skip ahead to the section that interests you the most.
1. Install an SSL certificate from your Web Host
Almost every web host offers SSL certificates. If it’s a free certificate, you’ll simply need to activate it. Or else you’ll need to first buy one from them and then activate it. Either way, it’s a really simple process.
To give you a few examples, Hostinger offers unlimited free SSL. SiteGround offers forever free certificates on all their sites, however, GoDaddy charges per month.
With Bluehost, you’ll get a free SSL certificate for your domain.
We’ll show you how to enable SSL in Bluehost although the steps will be similar for other web hosts or you’ll find guides on their website that you can follow.
In your Bluehost dashboard, go to the My Sites » Security section.
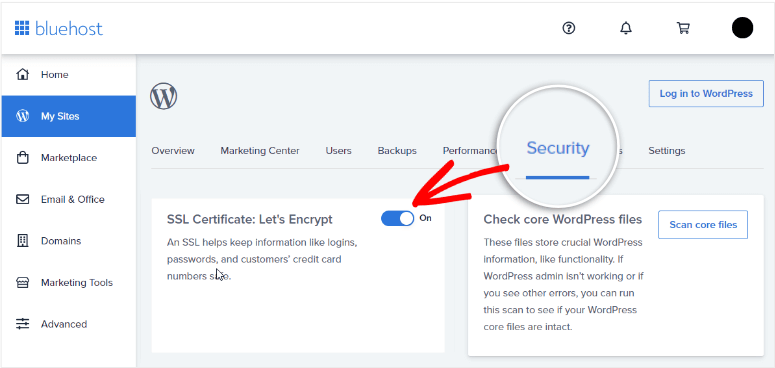
Then just turn on the toggle switch to enable SSL on your site. That’s it. If you face any trouble with installation, you can contact your web host customer care and they’ll help you with it.
2. Install an SSL certificate from a Third-party Vendor
If your web host doesn’t offer SSL or want to use third party options, you can get an SSL certificate from sources like:
- Lets Encrypt – Free and budget-friendly certificates
- SSL.com – Ample protection starting at $36.75 per year
- DigiCert – High security certificates at a wide range of prices
Once you buy or download your own certificate, you’ll need to upload it to your site using cPanel.
We’ll show you how to do this with Bluehost, but the steps remain the same for most hosts.
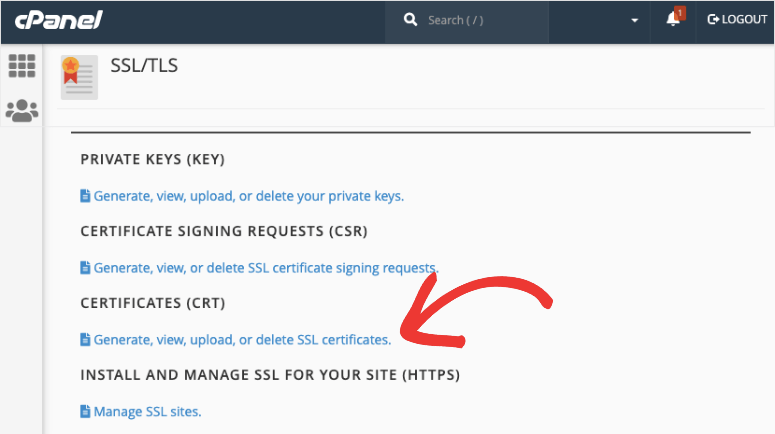
Inside your hosting account, open cPanel and navigate to SSL/TLS section.
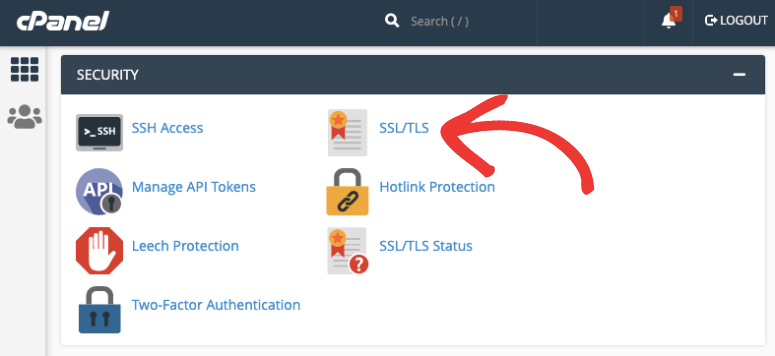
Click on Generate, view, upload, or delete SSL certificates. This will take you to a new page where you can upload the certificate.
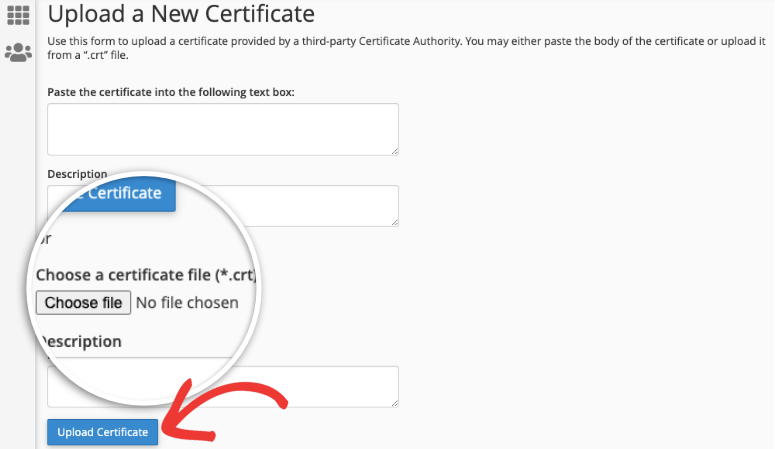
You’ll see an option to choose file from your computer. Select the SSL certificate you’ve downloaded from your provider.
Now head back to the SSL/TLS page and open Manage SSL Sites.
Here, click on Browse Certificates and you’ll see all the installed certificates here.
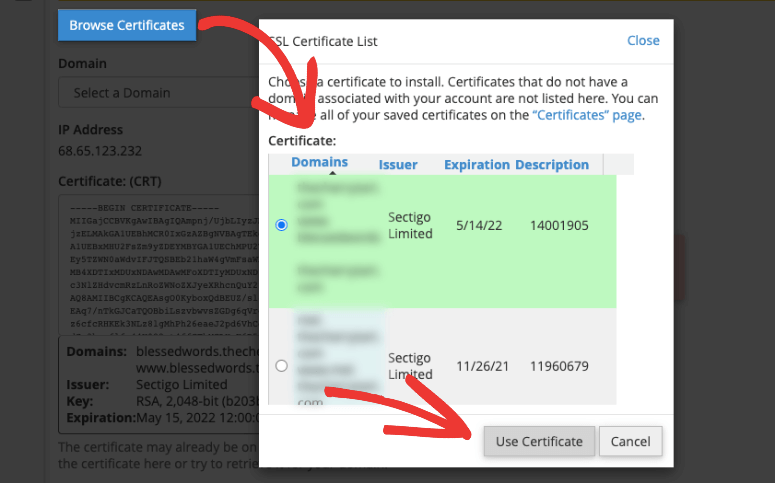
Select the one you just uploaded and hit the ‘Use Certificate’ button. This will autofill the given fields with the information from the certificate. At the bottom of this page, click the Install Certificate button and you’re done.
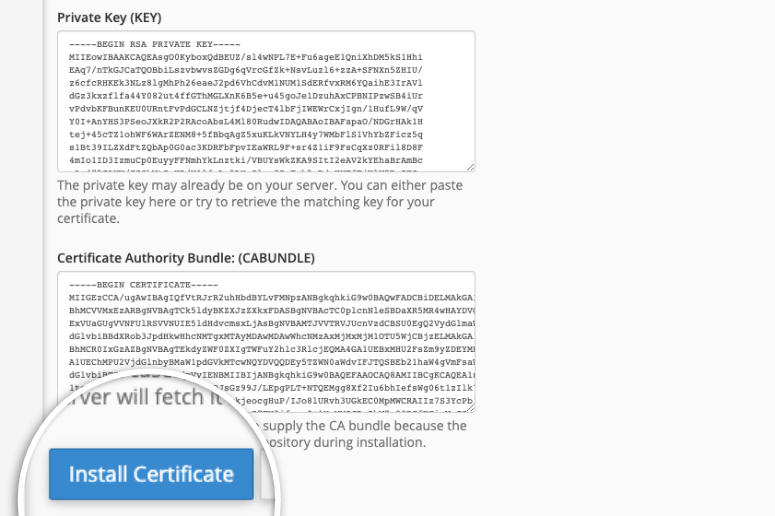
You’ll see a message that your certificate has been successfully installed.
3. Install an SSL certificate with a Plugin
Another simple option to install SSL is by using the Really Simple SSL plugin. It’s free to use but if you want auto-installation and high-end certificates, then. you can sign up for the pro version. You can use our Really Simple SSL coupon code to get 15% off.

The first thing you’ll need to do is install and activate the plugin on your site. Never installed a WordPress plugin before? No worries, see our guide on How to Install a WordPress Plugin.
Once done, visit the Really Simple SSL page and you’ll see an option to Activate SSL.
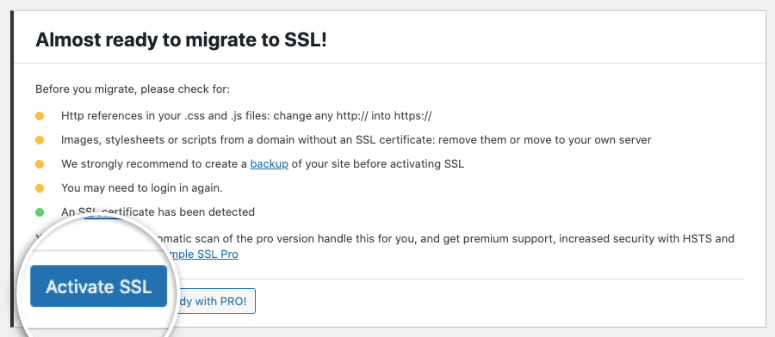
After it’s activated, the plugin will give you a list of tasks you need to carry out to make sure the certificate works correctly.
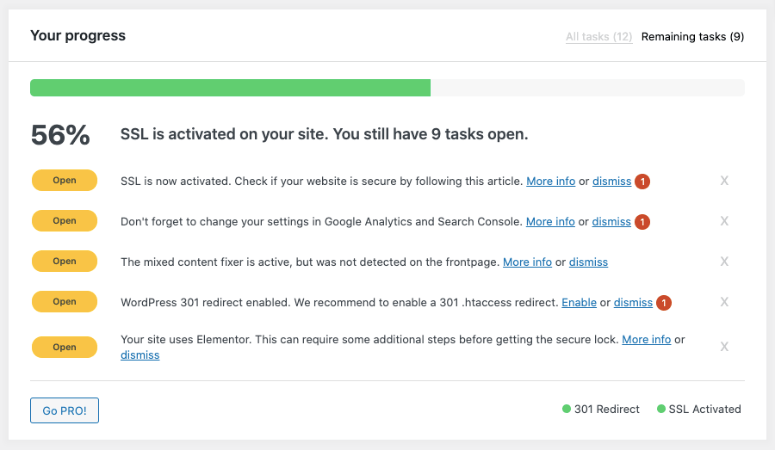
You can follow these onscreen instructions to fix errors and migrate your site from HTTP to HTTPs.
Step 2: Fixing Mixed Content Issues
When you migrate from HTTP to HTTPs, there are chances that a few pages, especially old ones remain on HTTP URLs.
You can fix these problems using the Really Simple SSL plugin or the SSL Insecure Content Fixer plugin.
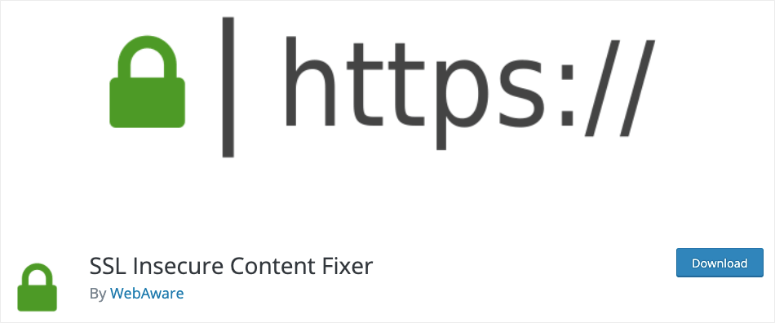
These plugins will take you through the necessary steps to resolve any issues. Then the warning ‘This site is not secure’ will be removed from your site. You’ll see the padlock and ‘https://’ in your address bar.
For more details on this, we recommend following this guide from WPBeginner to Fix Mixed Content Error in WordPress.
Step 3: Fixing Google WebMasters
When you install an SSL certificate, you’ll need to let Google know that you’ve made the change. If you skip this step, Google will continue to collect data from the HTTP version of your site and display the ‘not secure’ warning.
To update Google, you’ll need a Google Search Console account and a Google Analytics account. If you don’t have these, you’ll want to sign up for an account now and add your property to them.
If you need help with that, you can follow our step by step guide: How to Add Google Analytics to WordPress.
Then, inside the dashboard, navigate to Sitemaps and resubmit your sitemap with the updated HTTPs version.
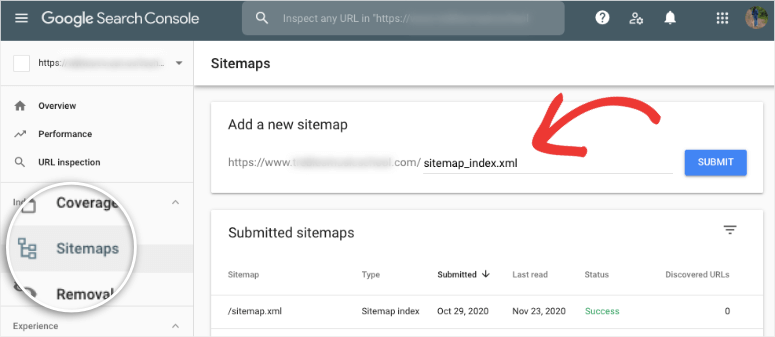
If you’ve added any disavow link files on Search Console, open the Google Disavow Tool and click on your HTTP version. You’ll need to download the file and upload it to the new profile.
Then delete the old profile permanently to avoid any conflicts.
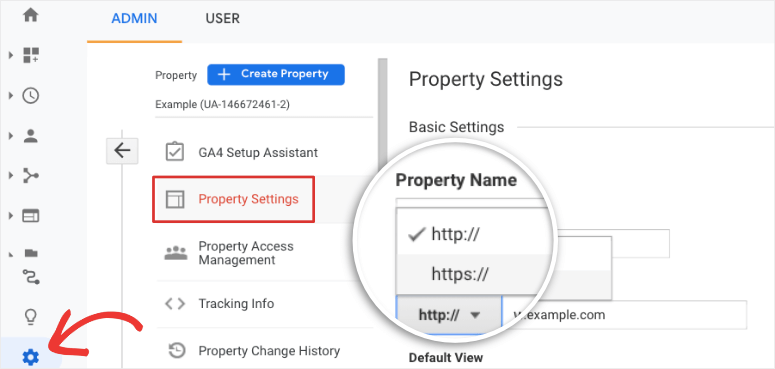
Now head over to your Google Analytics account, go to Admin » Property Settings » Property Name. Here, use the dropdown menu to select ‘https://’ here.
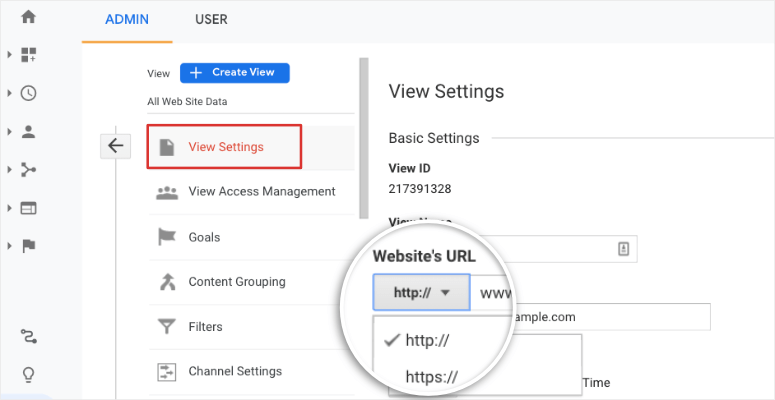
You’ll need to repeat this step under the View Settings tab. Go to the Website’s URL section and select ‘https://’.
If you’re looking for a tool to help you with this, check out AIOSEO.
With that, you’ve successfully moved your website from HTTP to HTTPS. This will resolve the ‘This site is not secure warning’. You should see a padlock next to your site’s URL in the address bar.

We hope this tutorial helped you make your website secure. Also, you may want to check our guide on how to fix the “Your account has been suspended” message on your website.
FAQs on How to Fix ‘This Site is Not Secure’ Warning?
Why am I seeing the ‘This Site is Not Secure’ warning?
The warning appears when your website lacks an SSL (Secure Sockets Layer) certificate, indicating that the connection between the user’s browser and your site is not encrypted.
How do I get an SSL certificate for my website?
You can get an SSL certificate through your web hosting provider, purchase one from a certificate authority, or use a free SSL provider like Let’s Encrypt. Follow the provider’s instructions to install and configure the certificate.
Can I get an SSL certificate for free?
Yes, many hosting providers offer free SSL certificates, and services like Let’s Encrypt provide free certificates as well. Check with your hosting provider or use a reputable SSL service to secure your site at no cost.
How do I install an SSL certificate on my website?
The process varies depending on your hosting provider. Many hosting platforms offer a simple one-click installation for SSL certificates. Alternatively, you can follow your provider’s documentation or seek assistance from their support team.
What should I do if my SSL certificate is expired?
Renew your SSL certificate immediately. Check with your hosting provider or SSL certificate issuer for renewal instructions. An expired certificate will trigger the ‘Not Secure’ warning and compromise user trust.
Does having an SSL certificate improve SEO?
Yes, having an SSL certificate is a ranking factor for search engines like Google. Secure sites are more likely to appear higher in search results, contributing to better SEO performance.
What happens if I ignore the ‘Not Secure’ warning?
Ignoring the warning can deter users from interacting with your site, especially if they need to input sensitive information. It’s crucial to address the issue promptly to maintain user trust and site credibility.
Can I fix the ‘Not Secure’ warning without an SSL certificate?
No, the most effective way to fix the warning is by installing an SSL certificate. This ensures that data transmitted between your site and users is encrypted, providing a secure browsing experience.
Will the warning appear on all browsers?
Yes, major web browsers, including Chrome, Firefox, Safari, and Edge, display the ‘Not Secure’ warning if a website lacks an SSL certificate. It’s a standard security indicator across most browsers.
For your next steps, you’ll want to ramp up your website security to make sure you never get hacked or blacklisted. These posts will help you do that:
- The Complete WordPress Security Guide (Beginner Friendly)
- 8 Best WordPress Firewall Plugins for Security & Protection
- How to Restore a WordPress Site From a Backup (5 Ways)
You’ll find tools and measures to tighten up your website security to make sure you don’t face such warnings on your site again.

Comments Leave a Reply