
Do you want to create WooCommerce “buy one get one” (BOGO) deals?
BOGO is the best deal you can set up on your website especially if you’re sitting on a lot of stock that you want to clear out. Without a doubt, “buy one get one” deals help maximize sales and revenue on your eCommerce store.
In this article, we’ll show you how to create WooCommerce BOGO “buy one get one” deals quickly and easily step by step.
Why Create WooCommerce BOGO “Buy One Get One” Deals?
There are many companies that run BOGO deals to get customers to buy more. When used and priced smartly, it can prompt customers to grab the deals while you generate the same revenue you would with a discount offer.
It also comes in handy with inventory management. Setting up BOGO deals is the best way to clear out stock especially during end of season when designs go out of style or a new version of our product is going to launch.. Plus, it helps you make more sales and revenue.
By default, WooCommerce doesn’t allow you to set up a BOGO deal. However, you can use a plugin like Advanced Coupons to add buy one get one offers to your site. Want to know more about this coupons plugin, see our full Advanced Coupons Review.
Let’s take a look at how to create WooCommerce BOGO “buy one get one” deals, step by step.
Step 1: Installing the Advanced Coupons WooCommerce Plugin
First, you need to install and activate the Advanced Coupons plugin. For more details, check out our article on how to install a WordPress plugin.
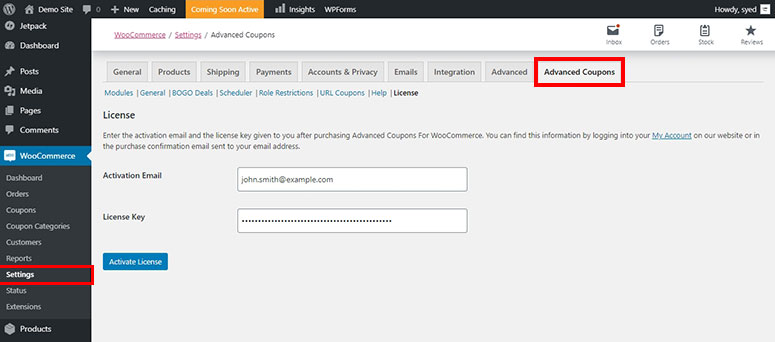
After activating the plugin, go to WooCommerce » Settings in your WordPress admin area. Under the Advanced Coupons tab, enter your license key.
You can get the license key from your account on the Advanced Coupons website. The license key will integrate the plugin with your WooCommerce store.
Step 2: Add a New Coupon and Create BOGO Deals
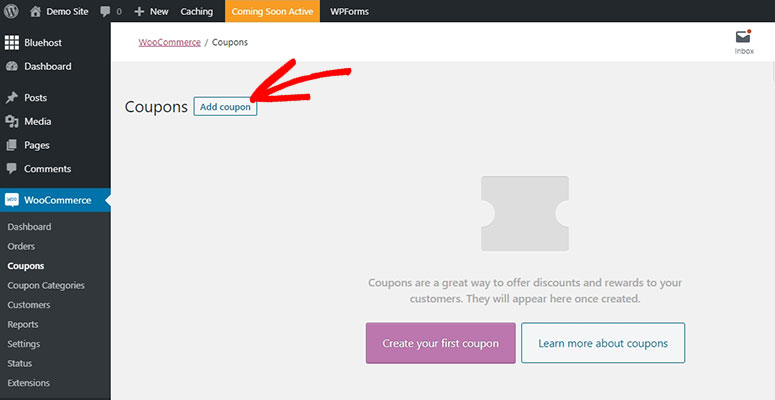
Now, go to WooCommerce » Coupon page in your WordPress admin. And, click on the Add Coupon button.
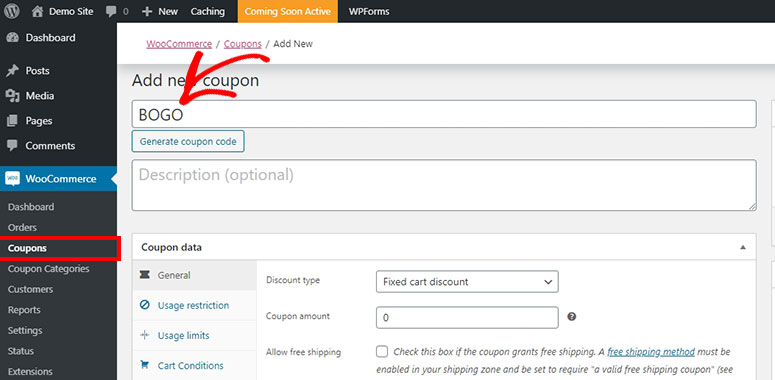
Enter the title for the new coupon. Customers need to type in this coupon to redeem the buy one get one deal during checkout.
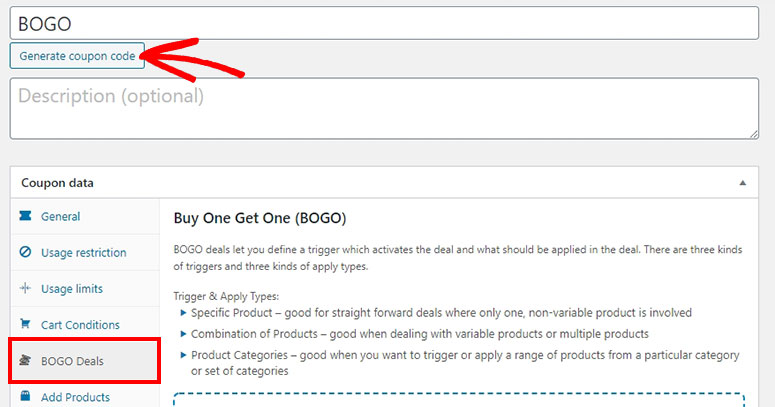
You can either automatically generate a coupon code by clicking on the Generate Coupon Code button. However, it’s recommended that you create a custom coupon code to make sure that the coupons are easy to remember for your users.
In the Coupon Data section, click on the BOGO Deals tab to create new buy one get one deals.
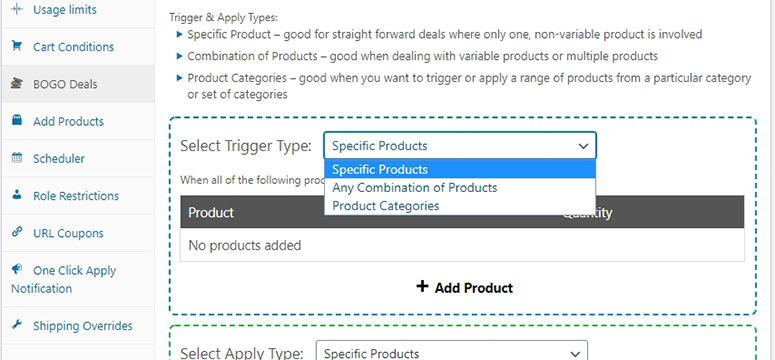
Here, you can define how you want to set up a BOGO deal. You can either choose a product and apply the trigger, choose any combination of products or a range of products from a specified category.
Start by selecting a trigger and choose products that you want to offer under this deal. Click on the Add Product option to choose products.
The best thing about Advanced Coupons is that it provides you with highly flexible options to create custom BOGO deals the way you want.
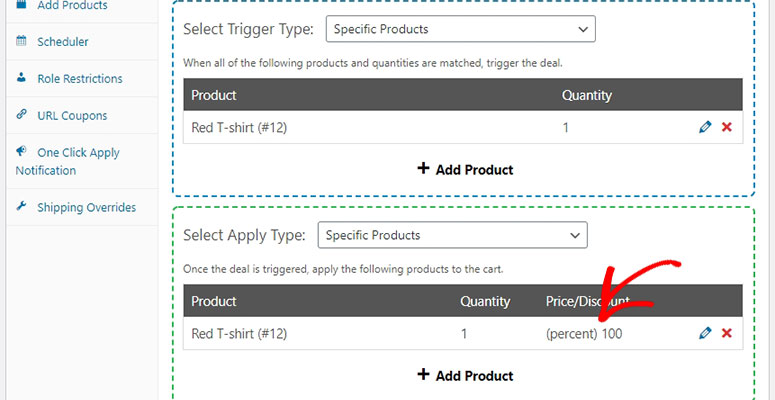
You can either give away a product for completely free when purchased as a bundle or offer a specific discount on the second product (like, buy one product and get 50% off on the second product).
Take a look at the below screenshot for example… Here, whenever someone purchases a T-shirt, another one is offered for free and will be automatically added to their cart during checkout.
If you choose to offer a different product or combination of products in the deal, then your customer will need to select the free or discounted product and add it to their shopping cart manually.
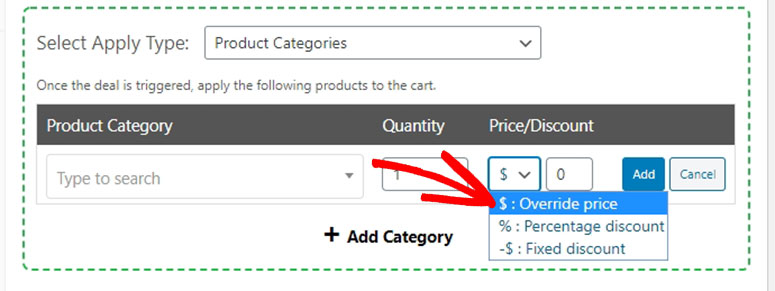
To set up a discounted price or percentage on the second product, you can click on the ‘$’ dropdown below the Price/Discount option.
Step 3: Set up Additional Settings for BOGO Deals
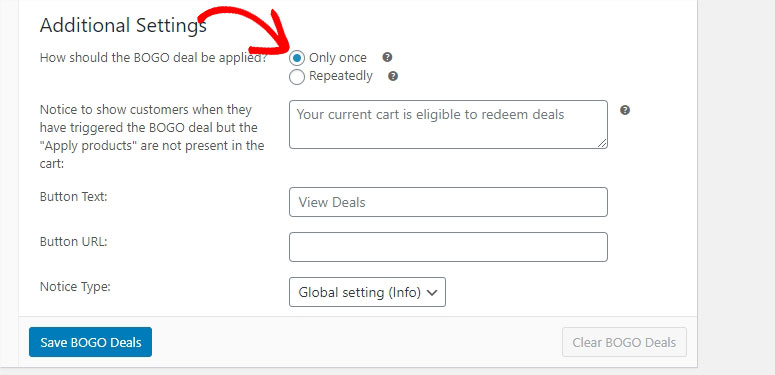
In the Additional Settings, you can select how often you want the BOGO deal to be applied, once or repeatedly.
For example, imagine that you offer one T-shirt free for every purchase of 2 T-shirts. If you choose Once, then your customers will get only 1 T-shirt regardless of how many shirts they’ve added to the cart.
Instead, if you choose Repeatedly, then the plugin will grant a free t-shirt for every 2 t-shirts your customers have in the cart.
You can also display a custom notice to your customers when they apply the deal.
Step 4: Test the BOGO Deal on Your Woocommerce Store
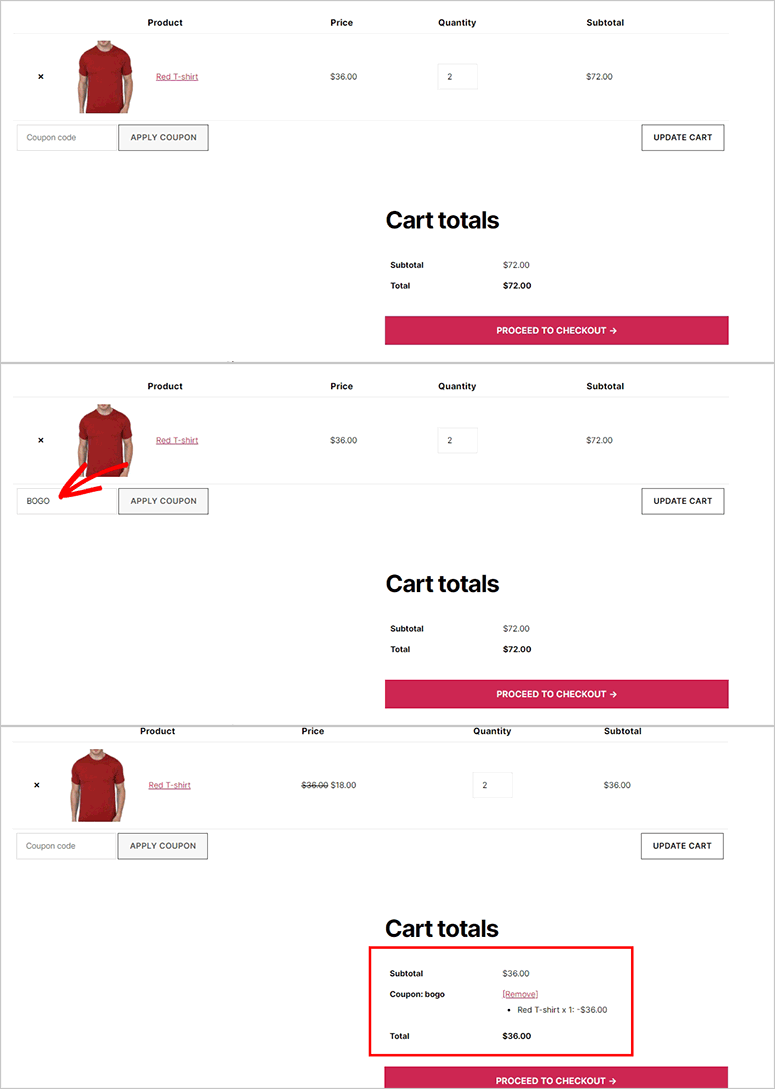
To test the deal on your WooCommerce store, go to the frontend of your WooCommerce store. Then add a product to the shopping cart and enter the BOGO deal coupon code. Click on the Apply Coupon button to continue.
The coupon will trigger the deal and give away the free offer.
The best part is that if the user selects the wrong product or product quantity that doesn’t match with your deal settings, then the coupon code will not work.
We hope this article helped you learn how to create WooCommerce BOGO “buy one get one” deals. You may also want to check out our guide on how to add a coupon code field to your WordPress order forms.
We also have this guide How to Create a Coupon That Discounts Shipping Cost in WooCommerce. This will help you add smart coupons for shipping discounts based on the customer’s cart value.

Comments Leave a Reply