Are you looking for a way to alert your customers about a discounted price in your WooCommerce store?
Price drop campaigns show popup notifications when your brand reduces the price of a product. Sending your visitors alerts allows you to improve engagement and maximize sales on your website.
In this tutorial, we’re going to show you how to alert your customers of a price drop in WooCommerce. But first, let’s go over why doing so is good for your business.
Why Alert Customers About a Price Drop?
There are many benefits of using a price drop alert for your eCommerce store. Here are the top 3:
1. Re-engage Visitors
When customers receive a web push notification informing them about a price drop, it helps re-engage them. The notification leads back to your website which helps you improve engagement and collect user data.
2. Increase Revenue
If customers feel intrigued enough by your offer that they click through to your site, they’re likely to make a purchase. This leads visitors through the sales funnel so your business increases its revenue.
3. Drive Traffic to Your Online Store
Visitors who receive an alert from your store have been waiting for a price drop. So when they finally receive a notification, they’ll be quick to navigate to your online store. This increases your site traffic and increases your overall conversions.
Now that we know the benefits of using a price drop alert for your eCommerce store, let’s look at how to make one for your WooCommerce site step-by-step.
How to Alert Your Customers of a Price Drop Using PushEngage
In this tutorial, we’re going to alert customers of a price drop using PushEngage.
PushEngage is the best web push notification plugin for WordPress. It makes it easy to create web push notifications that appear on visitors’ browsers and bring them back to your website.
With PushEngage’s Growth plan or Enterprise plan, you gain access to its Price Drop Alert feature.
Customers choose their desired price range for a specific product. If that item’s price drops, they receive a push notification alert that sends them back to that brand’s website.
It takes as little as 15 minutes to create a Price Drop Alert campaign from start to finish. It’s a quick and easy way to stay connected to your customers and encourage them to continue coming back to your website.
Learn more in our Complete PushEngage Review.
Let’s get started on how to set up a price drop campaign for your website using PushEngage.
Step 1: Create a PushEngage Account
Sign up for PushEngage by selecting the Growth or Enterprise plan. Once you’ve done that, you can log in to your PushEngage account to get started.
Step 2: Create an Alert
From the dashboard’s left menu, navigate to Campaign » Triggered Campaigns:
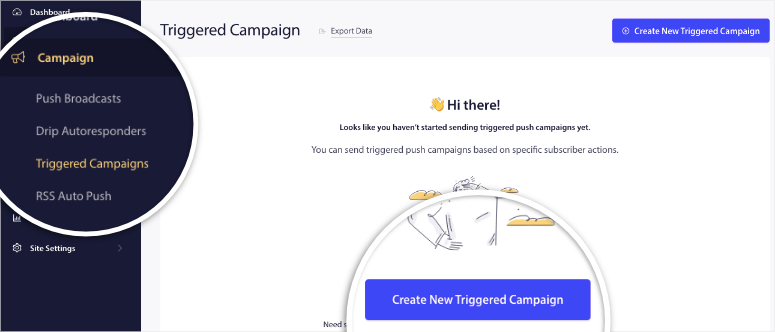
Here, you can click on the ‘Create New Triggered Campaign’ button to get access to all the campaign types available.
Here you’ll see a block menu with different campaigns you can set up including:
- Custom trigger campaigns
- Browse abandonment
- Cart abandonment
- Price drop
- Back in stock alert
We’re going to choose to create a new price drop campaign.
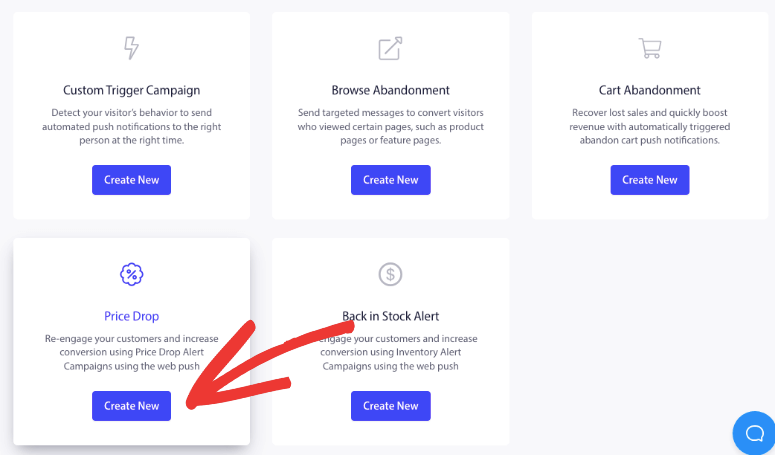
This will set up a campaign for you that you simply need to customize. You’ll be redirected to a page where you’ll see the new campaign.
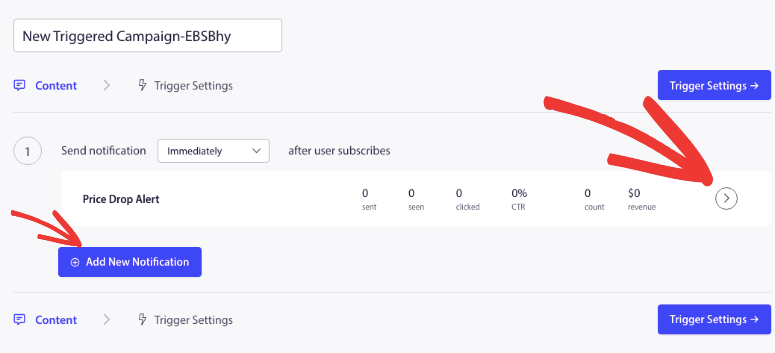
First, you can choose when this notification gets sent. You can choose to send it immediately after user subscribes, or wait a few days.
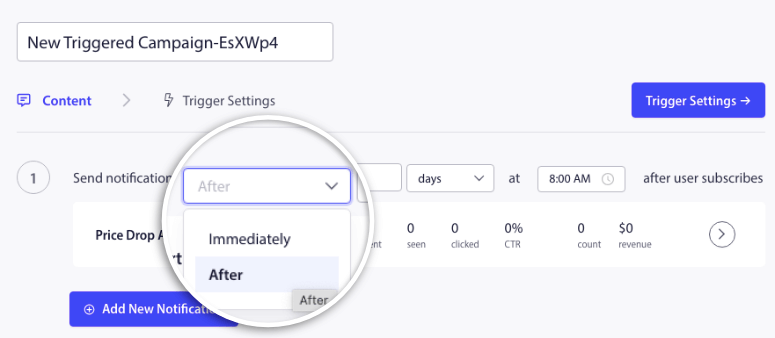
Next, you can click on the little arrow icon at the far right to edit the content of this campaign.
You can also set up new notifications here to target multiple products and URLs.
Now, when you edit the campaign, you’ll see a form that lets you add a notification title, message, URL, and image.
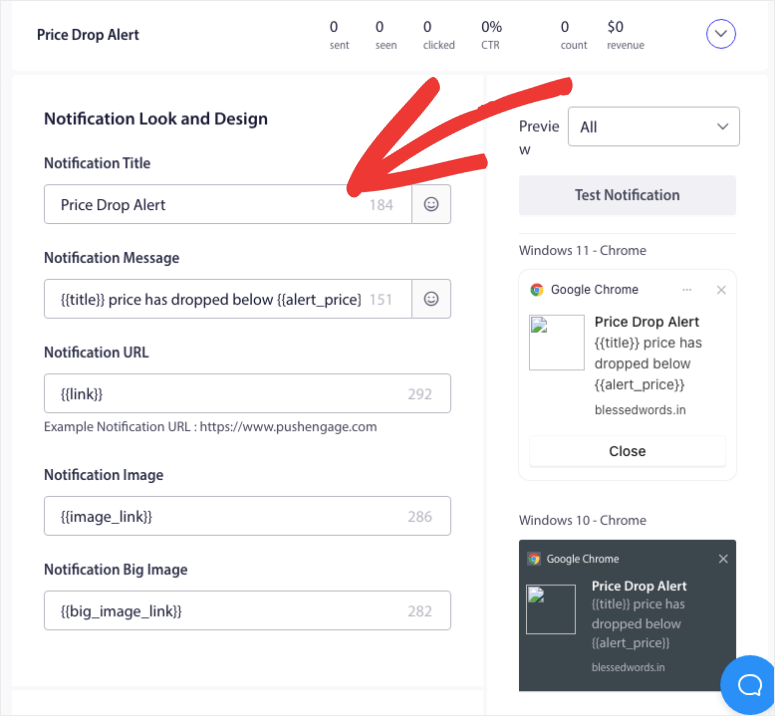
You’ll see a preview of your campaign on your right. You can also send test notifications to make sure your campaign looks great!
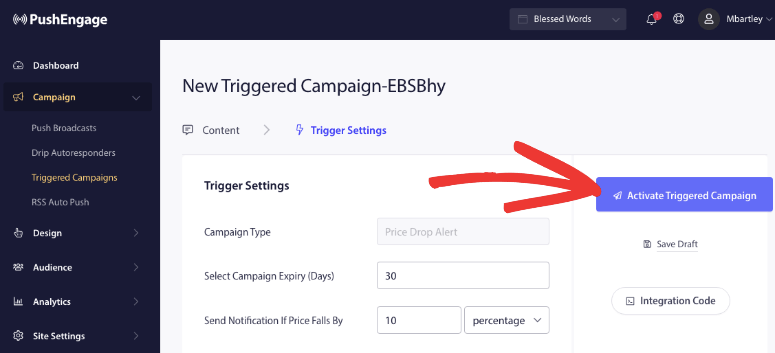
Once you’re done, click on the Trigger Settings button to head to the next step. Here, you’ll see options to change the campaign expiry. You can choose a set number of days or a specific time to run a sale. The default is set to 30 days but you can change this at any time.
This is also where you can control when the notification gets sent. So if the price falls by $10 or 10%, a push notification will automatically go out to your audience.
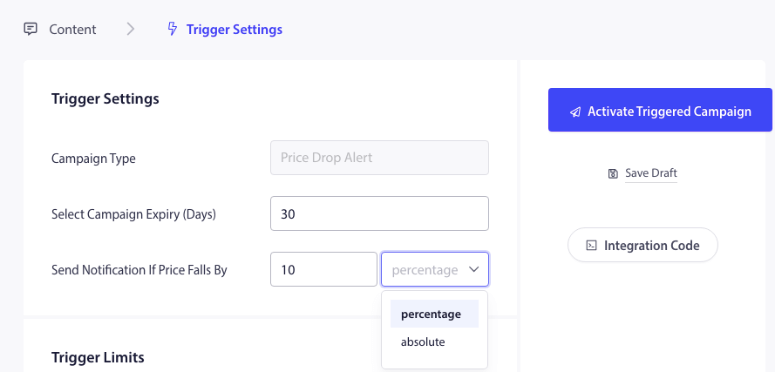
Below this, you can set the trigger limits.

The Daily Limit determines how many notifications users will receive in a day. The Weekly Limit determines how many notifications users will receive in a week.
In the next box, you can adjust the settings for the UTM parameters:
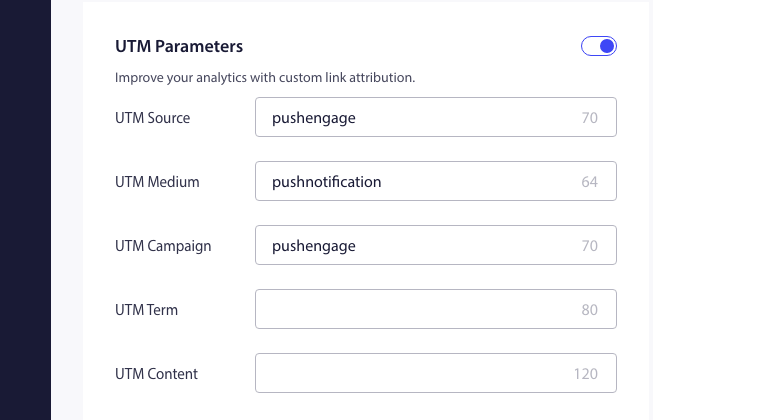
UTM parameters help you track your Price Drop campaign’s performance so you can stay on top of your conversions. They’re tags you add to your URL.
When a user clicks on that URL, those tags are sent back to Google Analytics for tracking. You can enable or disable this feature by checking or unchecking Add UTM Parameters.
Once you’re done configuring the settings, hit the Activate Triggered Campaign button.
Now, you’ll be redirected back to the campaign menu. Here, you can use the three vertical dots any time you want to edit this campaign. You can also export data, duplicate the campaign, get the campaign embedding code, or delete the campaign.
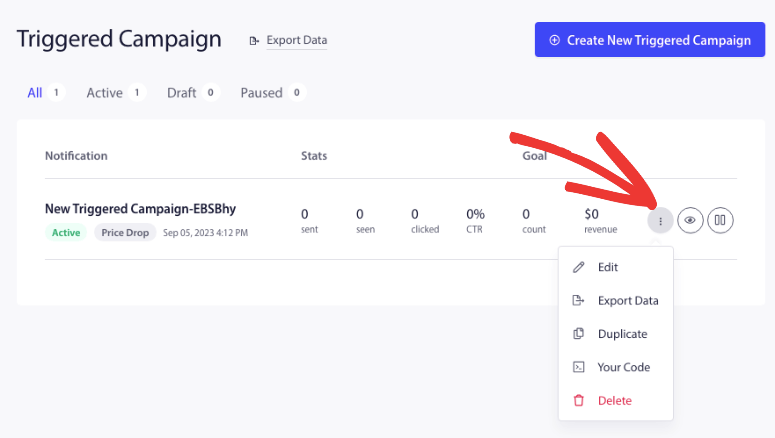
In the same section, you can also preview your campaign and pause/unpause it.
That’s it! You’ve learned how to send price drop alerts to your customers.
Step 3: Monitor Your Price Drop Campaign Analytics
Once your alert campaign goes live, it’s important to track its performance so you know what’s working and what isn’t. Simply click on the name of your campaign to view its analytics:

Here, you can view analytics for your campaign including view count, click count, unsubscribed count, revenue, and more.
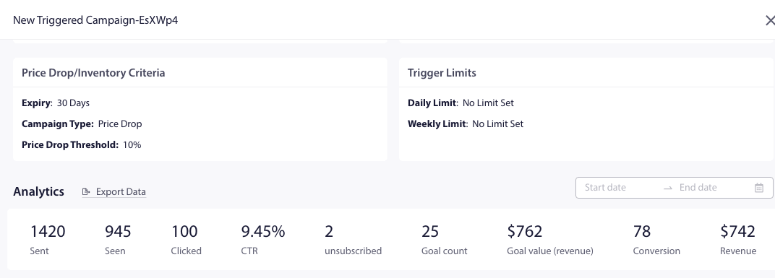
And that’s it! You’ve now successfully set up and launched a Price Drop Alert campaign designed to bring customers back to your site and increase your sales.
We hope you enjoyed this tutorial. Feel free to check out our post on the best plugins for WordPress.
It breaks down the most popular plugins available to enhance your WordPress website and make more revenue from your WooCommerce store. You may also want to see our other guides:
- How to Add Push Notifications to WordPress to Drive Traffic
- How to Add Social Proof Notifications in WordPress
- 6 Best ‘Out of Stock’ Plugins for WooCommerce Stores
These resources will help you drive more sales and conversions.

Comments Leave a Reply