
As a WordPress expert, one thing that drives me absolutely crazy is email delivery problems.
This leads to even well-set-up contact forms failing, and password reset emails never arriving. The worst part is that your well-thought-out newsletter emails can end up landing in spam folders.
This happened to me when I used to rely on WordPress’s default email system.
It’s like trying to send important mail without a return address. As a result, most email providers don’t trust WordPress’s default email system. Plus, it reflects poorly on your business when emails fail to reach clients.
I tried everything at first.
I tried manual email sending and switched to different email hosting providers. Nothing worked consistently.
Then I discovered that Simple Mail Transfer Protocol, or SMTP, could help me improve my email deliverability.
After further research, I settled on WP Mail SMTP as my solution.
It is easy to use, saves detailed email logs and reports. This allows you to track open rates, click-through rates, and email failures.
But what sold me was the ability to connect with different SMTP providers, such as Brevo, Gmail, SendLayer, and more, with just a few clicks.
Most importantly, it allows me to quickly connect Outlook to WordPress, enabling me to send emails more effectively.
As a result, I concluded that WP Mail SMTP is the perfect solution for connecting professional email services to WordPress.
In this article, I will show you exactly how I came to this conclusion. I will walk you through how you can use WP Mail SMTP with Outlook to send emails directly from WordPress.
Key Points Summary:
With that said, let us get into it.
What is SMTP and Why Your WordPress Site Needs It
SMTP stands for Simple Mail Transfer Protocol. Think of it as the postal service you have at home, but for websites. In simple terms, SMTP is the system that delivers your emails from one place to another.
As mentioned, WordPress has a built-in email function, but it’s quite basic. Most of the time, it doesn’t work well, and, sadly, your emails don’t get delivered.
This is because WordPress sends emails using your web server. But web servers aren’t built for email delivery and lack proper authentication.
And, as a final nail in the coffin, they lack a good sender reputation. What that means is most email providers see these emails as suspicious.
For example, Gmail blocks them, while Outlook sends them to the junk folder. Apart from that, there’s no way to track if emails get delivered.
How SMTP Solves These Problems
SMTP uses professional email servers, which provide proper authentication. Below are other reasons how SMTPs solve delivery problems.
- They maintain healthy relationships with major email providers, including Gmail, Outlook, and Yahoo.
- When you use SMTP, your emails look legitimate. They include proper headers and signatures.
- SMTP services offer delivery tracking and superior spam protection.
- Password resets will reach users instantly.
What is Microsoft Outlook, and Why Use It for WordPress Email
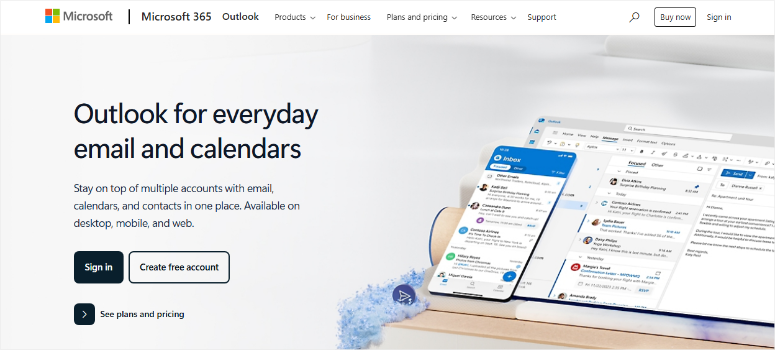
For most beginners, Microsoft Outlook is just an email app on your computer. While this is also true, Outlook is a complete email service that handles millions of emails.
It integrates perfectly with other Microsoft tools that businesses already use, so most businesses prefer to use its mailing services to fit into their ecosystem.
I’ve used Outlook for client projects because it offers affordable professional email addresses using your domain name.
Plus, if you want a free professional email address, Outlook allows you to set up one with an SMTP.
Why Connect Outlook to WordPress with WP Mail SMTP
After testing dozens of email combinations, I found that WP Mail SMTP and Outlook work together perfectly. Here’s why this setup became my go-to solution for every WordPress project:
- Unified Email Management – Outlook brings together multiple email accounts like Gmail, Yahoo, and business emails into one clean interface. No more switching between tabs or apps.
- Budget-Friendly Solution – It’s surprisingly affordable compared to other business email solutions. You get professional features without enterprise pricing.
- Simple Setup Process – WP Mail SMTP makes connecting Outlook to WordPress incredibly simple. It handles all the technical setup automatically.
- Trusted Server Network – Outlook’s trusted mail servers mean high deliverability and fewer spam issues. Your emails actually reach people’s inboxes.
- Bypasses ISP Restrictions – Some ISPs block direct email sending, but this setup routes email through trusted servers, avoiding blacklisting completely.
- Team-Friendly Scaling – You can connect multiple user emails through WP Mail SMTP using the same Outlook SMTP settings. Perfect for growing businesses.
- Enhanced Authentication – With proper authentication, your emails are much less likely to land in spam folders. Your professional reputation stays intact.
Check out my detailed WP Mail SMTP review to learn more.
Now I’ll show you exactly how to set up your emails using WP Mail SMTP to connect Outlook in WordPress. You’ll get reliable email delivery in about 15 minutes.
Plus, your emails will look professional and actually reach people’s inboxes without breaking your budget.
Step-by-Step: How to Connect WordPress with Outlook using WP Mail SMTP
Before we begin, ensure you have your Outlook email address and password ready. You’ll also need access to your WordPress admin dashboard.
I also recommend keeping your Outlook account and WordPress dashboard open in separate tabs to avoid the frustration of having to do it later.
With that said, let me guide you through setting up this Outlook WordPress connection using WP Mail SMTP step by step.
How to Connect Outlook Automatically and Manually

For the tutorial, we are using the WP Mail SMTP Pro version because it includes a One-Click SetUp for Office 365/Outlook integration.
The free version of WP Mail SMTP offers multiple integrations, such as Brevo and Mailgun, but you need to connect your Outlook account to WordPress manually.
To ensure you can set up Outlook automatically and manually, I will walk you through both processes.
- One-Click Outlook WordPress WP Mail SMTP connection
- Optional: Manually Set Up Outlook with WP Mail SMTP
One-Click Outlook WordPress WP Mail SMTP connection
Once you have purchased the Pro version of WP Mail SMTP, install and activate it just like you would any other plugin.
You can check out this guide on how to install and set up WP Mail SMTP if you face any issues.
Once done, go to your WordPress dashboard and locate WP Mail SMTP in the left menu. Here, select “Settings” to start the setup process.
Next, scroll down the “General” tab and find the Mailer section. Here, you’ll see several email service options like Amazon SES, Google, MailJet, Zoho, and more.
Then, on the list, select 365/Outlook using the checkbox.
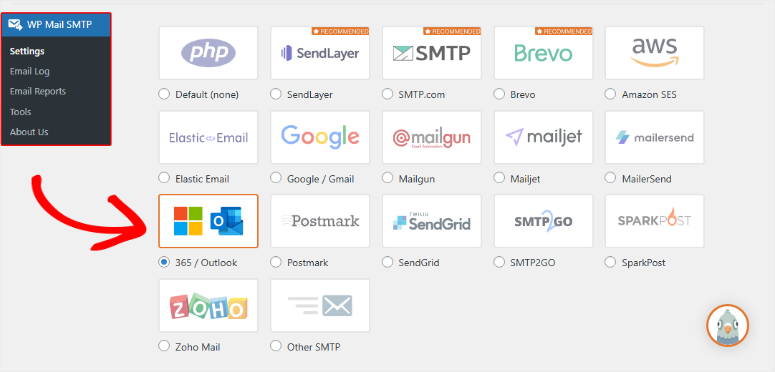
After this, the SMTP plugin will automatically fill in most of the technical settings for you. This saves you from having to remember server names and port numbers.
To proceed, simply ensure the One-Click Setup button is enabled with the toggled button, then scroll to the bottom and click “Save Settings.”

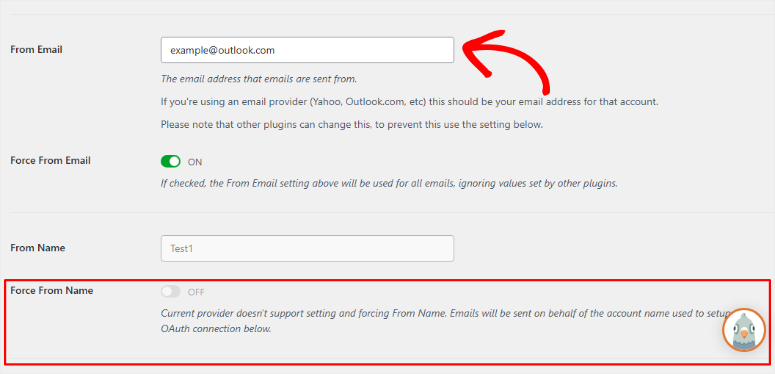
Next, on the same page, scroll to the “From Email” address text bar. Here, enter your full Outlook/Live/Hotmail email address.
Ensure that you double-check the email address is correct, as this will not work otherwise.
Next, enable the ‘From Email’ field to ensure maximum email deliverability and minimize conflicts with other plugins. Once done, you’ll notice you can’t add “Force from Name” as this is automatically disabled.
This is because Outlook doesn’t support this setting like many other email providers. Instead, emails will have the account name used to set up the connection.
Once done, Save Settings.
Next, scroll towards the bottom of the page and hit the Sign in with Microsoft button.
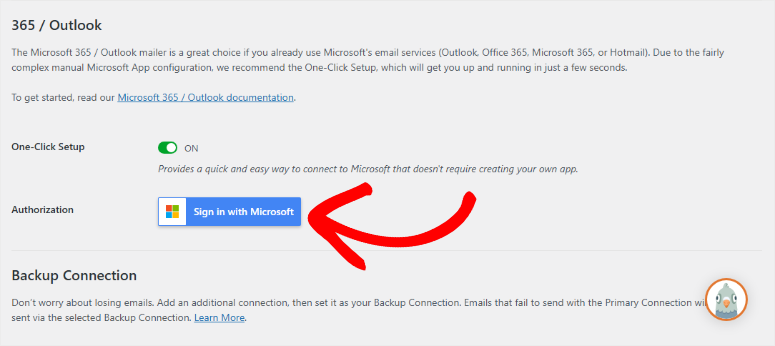
This will redirect you to the Outlook login page. On the popup screen, hit Accept to authorize the WP Mail SMTP app to connect with Microsoft Outlook.
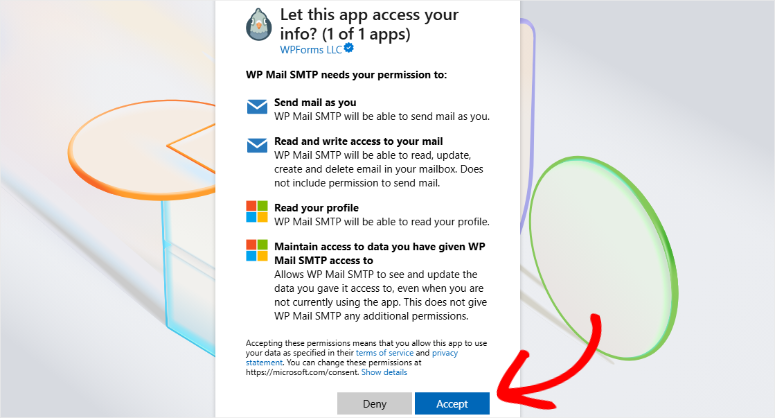
And that’s it. You have successfully connected your WordPress website with Outlook.

Once you hit Accept, you will be redirected back to your WordPress dashboard, where you will see the success message if the connection is complete.
Advanced Users: Manually Set Up Outlook with WP Mail SMTP
Sometimes you need more control over your email setup. If you prefer the traditional approach or require a custom setup, you can manually configure Outlook with WP Mail SMTP.
This method gives you complete control over your email settings. Plus, the manual process allows you to use the free version of WP Mail SMTP to connect Outlook to WordPress.
To generate the information needed for this section, you’ll need to set up a web application in your Microsoft Azure account.
This process doesn’t require any coding, and I’ll guide you through the next step. Be sure to keep these WP Mail SMTP settings open in a separate tab or window, as you’ll come back to them soon.
Step 1: Configuring a Microsoft Azure Account
First, you’ll need a Microsoft Azure account to move forward with the setup process. If you need to create a new account, you can sign up for a free Microsoft Azure account.
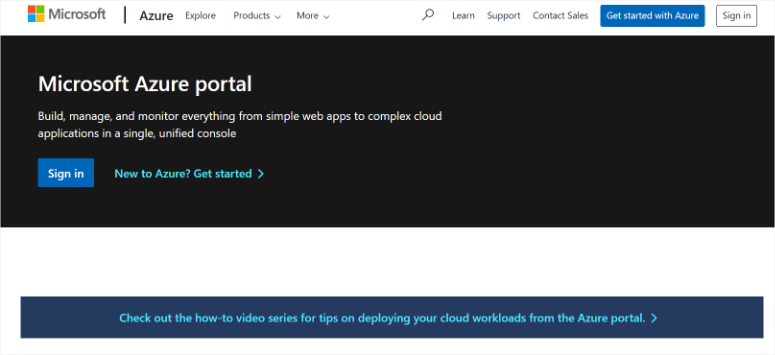
Although creating an account is free, you’ll need to enter your credit card details when signing up for a Microsoft account. This helps to prevent spam registrations.
Since you most likely already have a Microsoft email account (through Hotmail, Live, Outlook, Microsoft 365, etc), you can simply log into Microsoft Azure with your existing account credentials.
I should also point out that the email you use for your Azure account must be a Microsoft-based email address with permission to send emails.
Once you’ve created and verified your account, you’ll need to open the Azure Portal if you’re not automatically redirected.
Step 2: Create an Application ID
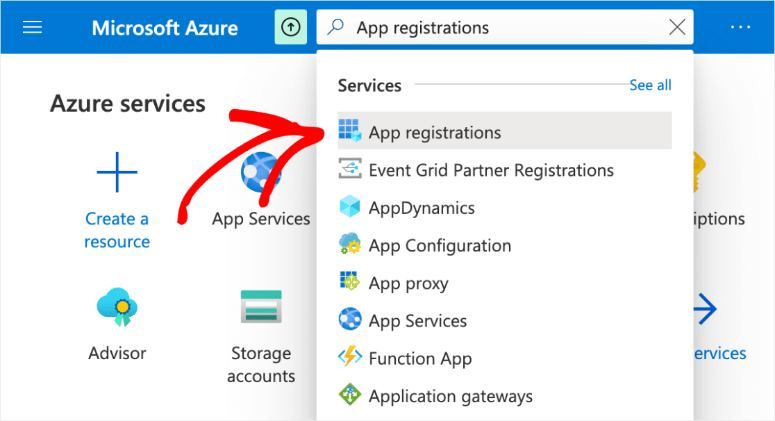
On the Azure Portal, type “App registrations” in the search bar at the top of the page. Next, you’ll see a dropdown menu with a list of services. Go ahead and select “App registrations.”
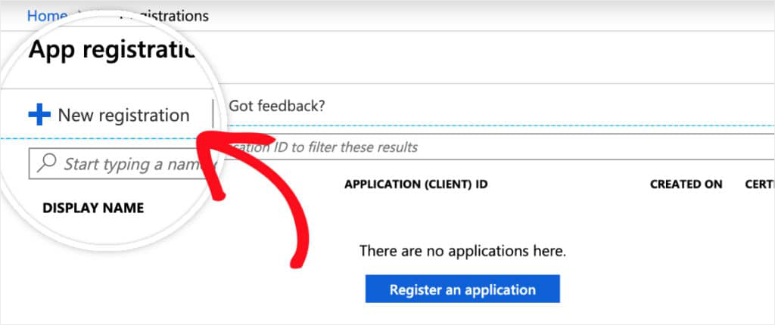
Then, at the top of the App Registrations page, you’ll need to select the “+ New registration” option.
Note: If you see the error message “The ability to create applications outside of a directory has been deprecated,” it means you have not yet signed up for an Azure account. You’ll need to register and verify your Azure account to register an application.
Then, in the app registration form, here are the details you’ll need to fill out:
- Name: This is only for your personal organization, so I recommend naming it something like “WP Mail SMTP: yourdomain.com”.
- Supported account types: Select “Accounts in any organizational directory and personal Microsoft accounts.”
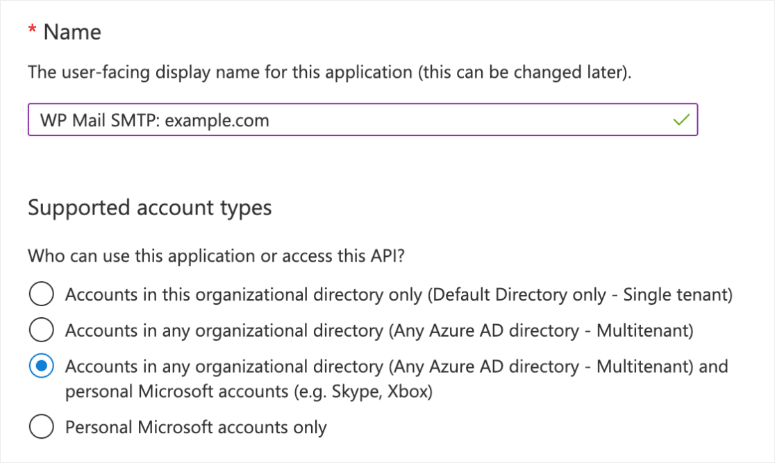
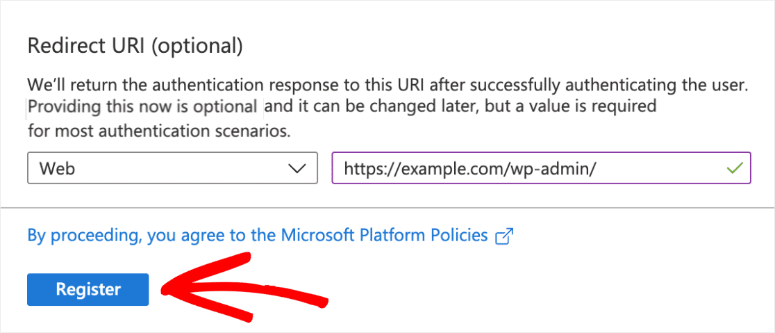
Next, you need to add the Redirect URL of the page on your site that you will be redirected to after authenticating with Microsoft.
To find the Redirect URI, switch back to the tab or window where you left your site’s WP Mail SMTP settings open. Then, under the Outlook / 365 section, you’ll see a field named “Redirect URI.”
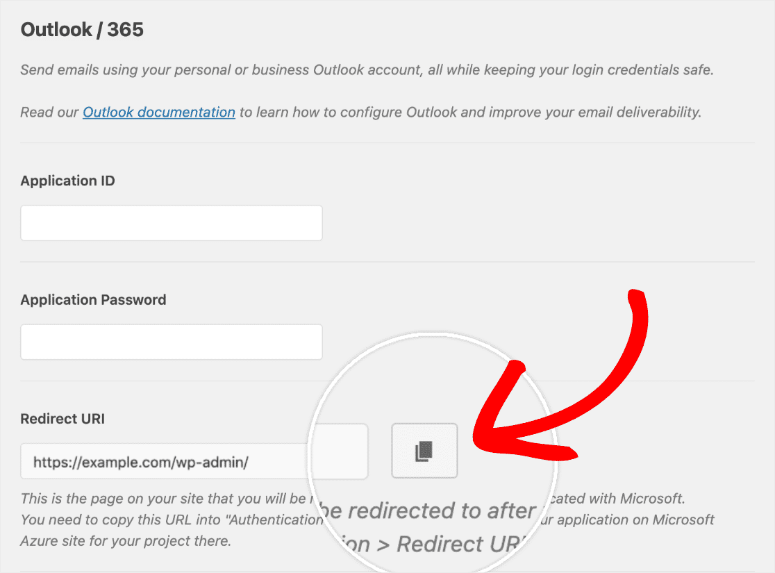
Copy this URL and then paste it into your Microsoft Azure app registration form. When you’re ready, hit the “Register” button to proceed.
As soon as this registration form is submitted, you’ll be redirected to the Overview page. Here, you’ll find your Application (client) ID. Go ahead and copy this value.
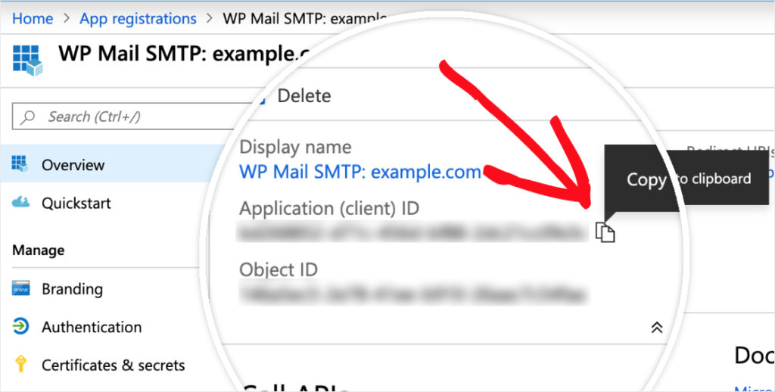
Once you have the Application (client) ID copied, you’ll need to paste this full value into your WP Mail SMTP settings, in the field labeled “Application ID.”
Step 3: Create an Application Password
Next, we’ll need to generate a password for this app. To do that, go to Manage » Certificates & secrets in the left sidebar within the app you registered in Microsoft Azure.
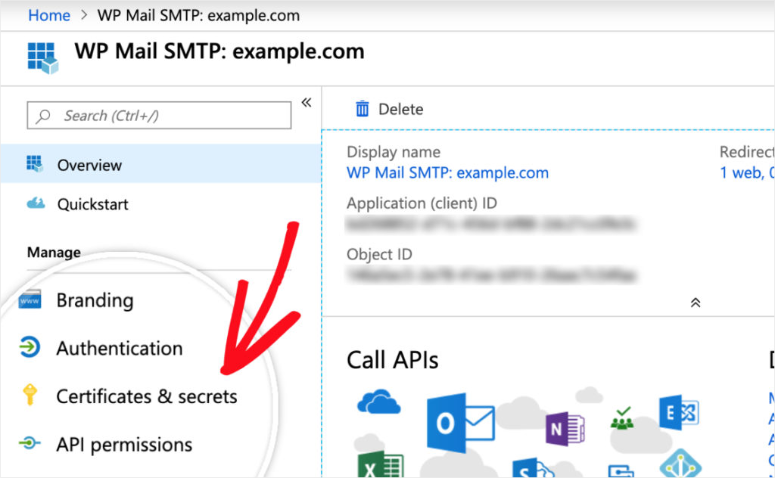
On this screen, hit the “+ New client secret” option. After this, fill out the “Add a Client Secret’ form with the following details.
- Description: Add “
app_password” or something similar, you can easily remember in this text bar. This name is intended for your use, so I recommend a logical and straightforward name. - Expires: 730 days (24 months).
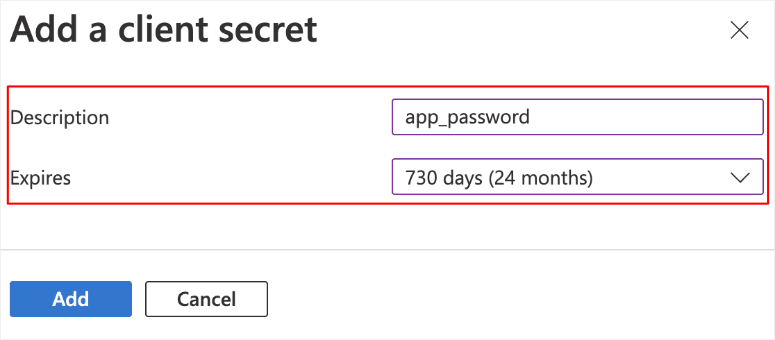
After you submit the client secret form, the Application Password will be generated. Go ahead and copy the password from the “Value” column, and then head back to your WP Mail SMTP settings.
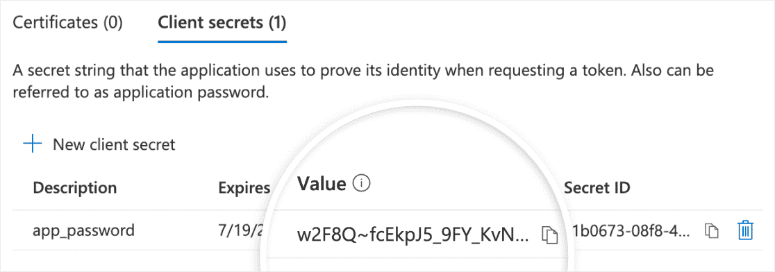
You won’t be able to access the Value after you exit this page, so I recommend storing the value in a secure location in case you need to access it again.
Once you’ve returned to the tab or window where your settings are still open, paste this value into the “Application Password” field. You should find this field right below where you pasted “Application ID.”

Once you’ve added your Application ID and Application Password, hit the “Save Settings” button at the bottom of the page.
After you’ve saved the settings, you’ll need to scroll down to the Authorization section. You should now see a button labeled “Allow plugin to send emails using your Microsoft account.” Go ahead and hit this button.

Once you’ve hit the button, you should be redirected to a Microsoft login page just like you did with the one-click set-up process.
That is it! You can now connect Outlook to WordPress with WP Mail SMTP, both manually and automatically.
Test Your Email Connection
Now comes the exciting part. You get to see if everything works. I always recommend testing your SMTP setup, as even a minor mistake can cause significant errors.
So, how do you test your SMTP connection?
First, in your WordPress dashboard, go to WP Mail SMTP » Tools and go to the “Email Test” tab.
Then, enter your email address in the “Send To” field and hit the Send Email button.
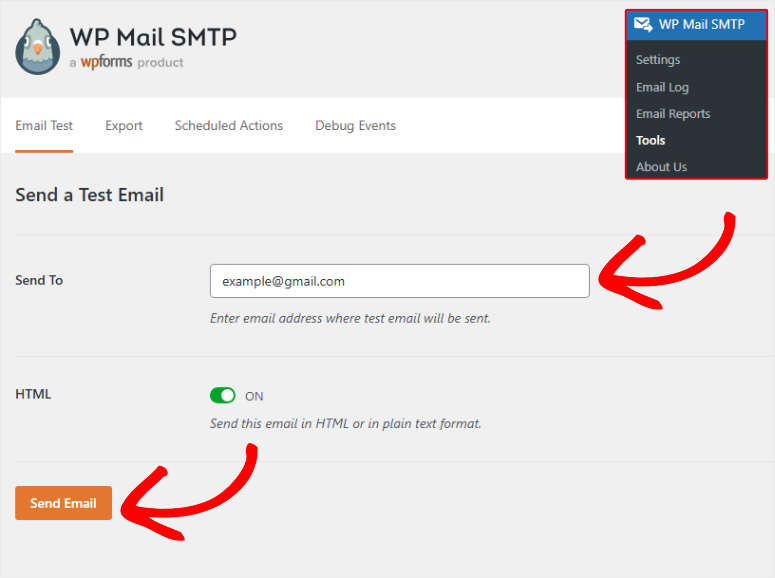
Once done, check your email inbox. Your test email should arrive in an instant, looking something like this:
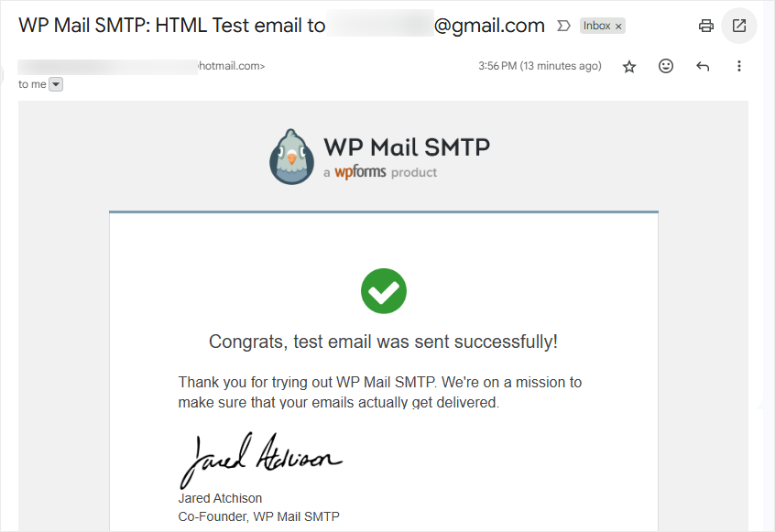
If the email arrives, congratulations! Your setup is working perfectly. On top of that, the email should show your Outlook name and email as the sender.
If the test email doesn’t arrive, don’t panic. I’ll show you how to fix the most common problems in the next step.
Troubleshoot Common Issues
Even with perfect setup instructions, sometimes things don’t work on the first try. I’ve helped hundreds of people fix these same problems. Plus, the solutions are usually simple once you know what to look for.
The most common problem is authentication failure. This occurs when WordPress is unable to log into your Outlook account.
You’ll see an error message, such as “Authentication failed” or “Invalid credentials,” apart from your test emails not being sent.
- First, double-check that you typed your email address correctly. Even one wrong letter will cause problems.
- Another frequent issue is port blocking. Some web hosting companies block the email ports that Outlook uses.
- If your test emails time out or fail to connect, contact your hosting support. Ask them to unblock port 587 for SMTP connections.
- I’ve also seen problems with “From” email addresses. Your “From Email” must match your Outlook email address exactly.
- You can’t use a different email address here, even if it’s another email you own. Plus, make sure there are no extra spaces before or after the email address.
- If emails reach your inbox but go to spam, check your domain reputation. New domains sometimes get flagged as suspicious.
- On top of that, ensure your website has proper SPF and DKIM records set up through your domain provider.
- Sometimes the plugin shows “Connection timed out” errors. This usually means your hosting provider has strict firewall rules.
Apart from that, it could be that your server is having temporary connection issues. Wait 10 minutes and try the test again.
These options should help you quickly troubleshoot your SMTP connection and get it running without any expert help.
Other Email Services You Can Connect with WP Mail SMTP
We’ve learned how to connect WordPress with Outlook using WP Mail SMTP.
But WP Mail SMTP doesn’t just work with Outlook.
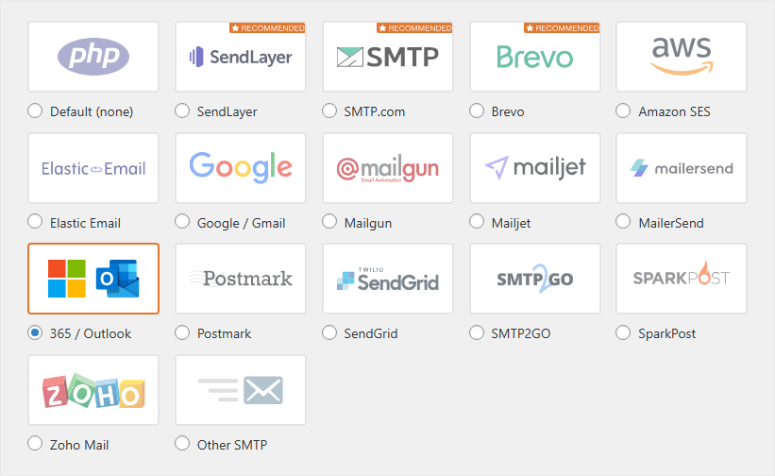
I’ve tested it with dozens of different email services over the years. Plus, each has unique benefits depending on what your website needs.
Some services work better for high-volume sending. Others are perfect for small businesses just getting started.
On top of that, a few offer special features like detailed analytics or marketing tools built right in.
SendLayer
SendLayer is hands down the best SMTP email delivery plugin. I’ve used it for the past year on several client projects, and it was surprising how easy it is to use.
The setup is straightforward, and their customer support team are all WordPress experts. On top of that, SendLayer offers competitive pricing for high-volume senders.
I particularly like their detailed delivery reports. You can see exactly which emails get delivered, opened, or bounced. Apart from that, they provide helpful suggestions for improving your email performance.
Brevo (formerly Sendinblue)
Brevo focuses specifically on business email and marketing. I recommend it for clients who want to send newsletters along with their WordPress transactional emails.
Like SendLayer, it offers detailed tracking and analytics. You can also integrate Brevo well with popular WordPress plugins like WooCommerce.
The free plan includes 300 emails per day, which works for most small websites. On top of that, Brevo has built-in spam testing that checks your emails before sending them.
What I like most about Brevo is the email template system. You can create professional-looking emails without any design skills.
Check out this detailed Brevo review for more information.
Gmail Integration
Gmail is probably the easiest email service to connect with WP Mail SMTP, but also has more limitations than other email providers when connecting with SMTPs.
The primary issue is the volume of messages sent. Gmail limits how many emails you can send per day. If your WordPress site sends lots of automated emails, you might hit these limits.
The good news is that most people already have a Gmail account, so it is more convenient. Plus, the setup process is almost identical to Outlook.
I use Gmail for personal projects and small client sites. It’s reliable and free for basic use. On top of that, Google’s servers have an excellent reputation with other email providers.
Apart from that, Gmail works perfectly for contact forms and user notifications.
Other Popular Options:
- Amazon SES: Works great if you’re comfortable with a more technical setup. It’s extremely affordable for high-volume sending. Plus, it integrates well with other Amazon web services.
- Mailgun: Is another developer-friendly option. I use it for clients who need advanced email features like A/B testing. On top of that, it handles bounce management automatically.
If you want to use any of these email delivery services, here is a guide on How to Set Up and Configure SMTP in WordPress to get you started.
That is it! I hope you enjoyed learning how to connect Outlook to WordPress with WP Mail SMTP. Now you can do this manually or automatically.
If anything is unclear, check out the commonly asked questions below.
FAQs: How to Connect WordPress with Outlook using WP Mail SMTP
Do I need a paid Outlook account to use SMTP?
No. You can use a free Outlook.com email address for basic WordPress emails. I’ve set this up for small personal websites many times. Plus, it works perfectly for contact forms and password resets.
But I recommend upgrading to Microsoft 365 if you’re running a business website. You get a professional email address with your domain name.
Will WP Mail SMTP work with my current WordPress theme?
Yes, WP Mail SMTP is compatible with every WordPress theme I’ve tested. The plugin handles email delivery at the WordPress core level, ensuring fewer connection issues.
Plus, it doesn’t change how your website looks or functions.
This means your contact forms and registration forms will work without issues. Apart from that, the plugin runs quietly in the background without affecting your site speed.
Can I use multiple email addresses for different purposes?
No. WP Mail SMTP uses one main email address for all outgoing emails. But you can create email aliases in your Outlook account for different purposes. Plus, you can set up separate WordPress sites with different email addresses if needed.
I often set up [email protected] for automated emails and [email protected] for contact forms. You can also create forwarding rules in Outlook to organize incoming emails properly.
How do I know if my emails are being delivered?
WP Mail SMTP includes basic delivery confirmation in the pro version. But I recommend checking your email reputation regularly, too. Also, ask customers to confirm they received important emails.
You can also use email testing tools to check if your emails land in spam folders or monitor your website analytics to see if email-driven traffic increases after setup.
Final Verdict: Should You Connect Outlook to WordPress?
Yes, Absolutely!
Setting up Microsoft Outlook with WP Mail SMTP is one of the best decisions you can make for your WordPress site.
I’ve seen it transform struggling websites into professional operations that communicate more effectively with their customers. The setup takes about 10 minutes but saves you countless hours of frustration later.
On top of that, the reliability improvements are worth the small time investment. Since the WP Mail SMTP plugin makes the whole process beginner-friendly, you don’t need coding skills or technical knowledge.
To ensure your delivery rate is good, here is a list of 10 Best Email Hosting Providers.
Apart from that, here are other articles you may be interested in reading.
- 7+ Best Email Automation Tools to Improve Your Email Marketing
- 11 Best Email Newsletter Plugins for WordPress
- 8 Best Email Marketing Services for Small Businesses
These articles will help you decide on which email tools to use and how to use them to improve your business.

Comments Leave a Reply