Starting with WordPress to create your website can feel like staring at a blank canvas with no paintbrush.
Years ago, I was in your shoes, itching to build my first WordPress site to share my ideas with the world. I’d heard WordPress was the platform to use, powering over 43% of the internet, no less.
In fact, you can use our free tool to see if your favorite site is built on WordPress, just to show you the scope of websites that have embraced this CMS.
But the thought of installing it made my stomach churn.
Would I pick the right hosting? Could I navigate those cryptic control panels?
After a few late nights and a lot of trial and error, I cracked the code, turning my vision into a live, breathing website.
That rush of seeing my site go live? It’s what drives me to help others skip the stress and get started with confidence.
Installing WordPress doesn’t have to be a headache, whether using a one-click setup or wrestling with a hosting panel.
In this beginner-friendly guide, I’ll walk you through the step-by-step process of setting up self-hosted WordPress.org if you are on WordPress.com.
From MOJO Marketplace to Softaculous, Fantastico, SimpleScripts, and beyond, I’ve got you covered with clear instructions for every major hosting platform. I will even cover the best WordPress hosting services.
To make it even easier, I’ve included a table of contents so you can jump straight to the method that matches your setup. Let’s turn your website dreams into reality—no tech overwhelm required.
WordPress Installation: Table of Contents
I. Installing WordPress: Pre-requisite
II. Installing WordPress on Various Web Hosting Providers
- How to Install WordPress in Bluehost
- How to Install WordPress in SiteGround
- How to Install WordPress in WPEngine
III. Installing WordPress With 1-Click Installers
- How to Install WordPress Using Fantastico
- How to Install WordPress Using Softaculous
- How to Install WordPress Using QuickInstall
- How to Install WordPress Using MOJO Marketplace
IV. More WordPress Installation Tutorials
- How to Install WordPress Using FTP
- How to Install WordPress in Your Language
- How to Install a WordPress Multisite Network
- How to Install WordPress in Your Computer
- Things to Do After Installing WordPress
Things to Do Before Installing WordPress
Before you can install WordPress, you’ll need to purchase a domain name and web hosting.
We recommend Bluehost for web hosting. It’s one of the most popular hosting companies in the world, and it’s also officially recommended by WordPress.
For our users, they’re offering a free domain name, free SSL certificate, and 65% OFF on web hosting.

Click Here to Claim This Exclusive Bluehost Offer »
Check out our latest Bluehost review here.
After purchasing your domain name and web hosting, you’re ready to install WordPress.
How to Install WordPress in Bluehost
Bluehost is one of the most popular names when it comes to hosting services. Installing WordPress with Bluehost is super quick and easy. In fact, you don’t have to do much because when you sign up for Bluehost, it will automatically install WordPress in your domain name.
So you can directly login to your account, go to the My Sites tab on your left and click on the Login to WordPress button on your right.
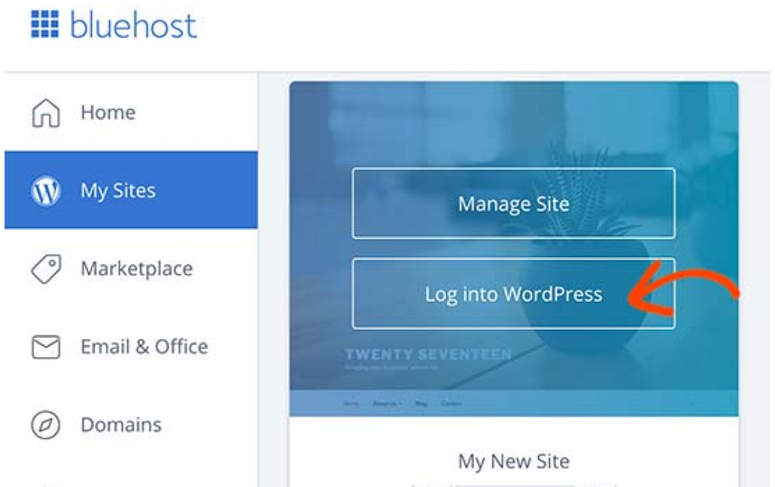
This will take you to the WordPress admin area where you can start using WordPress as you would normally do. If you want to install WordPress in more than one site, that’s possible too.
Bluehost lets you install WordPress in an unlimited number of sites for all its hosting plans except for the basic one. You can add more sites to your hosting by clicking on the Create Site button under the My Sites option.
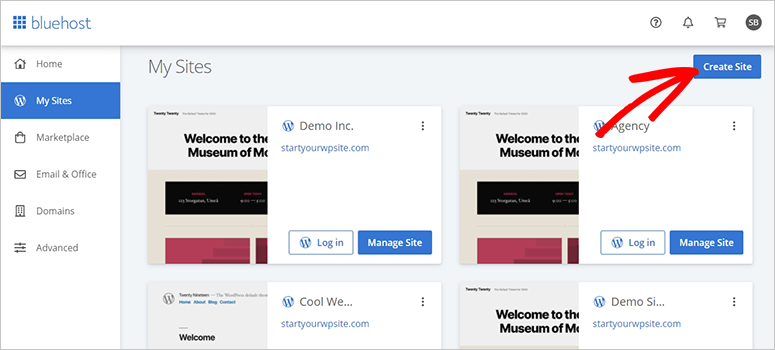
The Bluehost guided WordPress installation wizard will now launch. You can now create a new WordPress site by entering the site name and tagline. Once done click on the Next button.
In the next step, select the domain name that you’ve purchased. If you don’t have a domain name you can purchase one by going to the Domains page in the Bluehost dashboard.
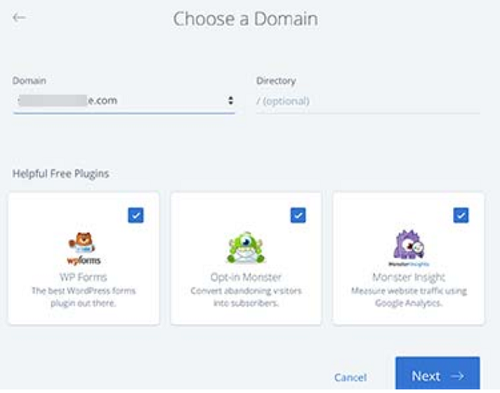
Now that your domain is added, leave the directory field blank. Bluehost will automatically add this field for you. The installer will display a few plugins that you can opt for.
Now hit the Next button. In a few minutes, WordPress will be set up by the Bluehost installer. You’ll see a success message once the setup is completed.
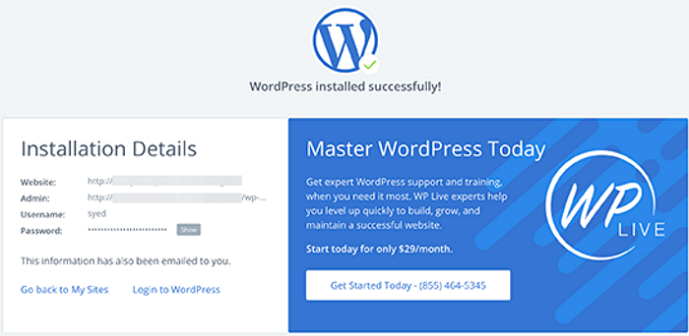
You will also receive these details via email. Now, click on the Login to WordPress button to enter your new site’s admin area. That’s easy, right?
How to Install WordPress in SiteGround
SiteGround is a popular hosting option for both beginners and advanced users. Their hosting is highly optimized for WordPress and installing it is super easy.
Check out our SiteGround review to learn more about this hosting service.
Once you sign up for SiteGround, you’ll see a popup screen with a welcome message. You will be asked if you want to set up your site now.
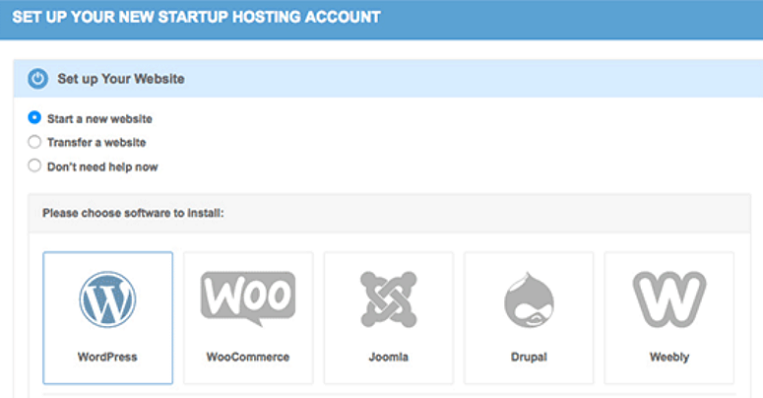
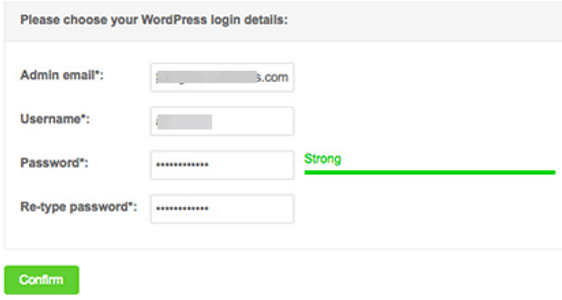
Select the Start a New Website option and select WordPress. You’ll now be redirected to a new screen where you have to enter your WordPress installation details. Enter your credentials and click on the Confirm button.
This will take you to a new screen. You can skip the settings on this page and click on the Complete Setup button.
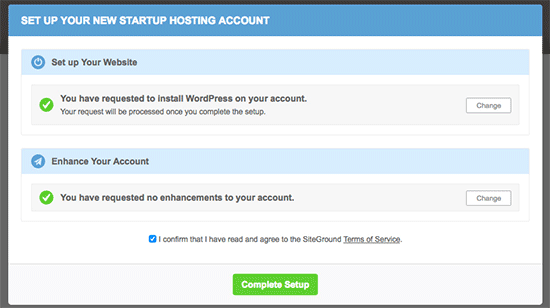
The installer will get into action and when it’s done, you’ll see a success message on your screen. You’ll also see an option saying Proceed to Customer Area button.
In the customer area click on the My Accounts tab. Here you’ll see an option called Go to Admin Panel. You can click on this tab to enter the WordPress admin panel.
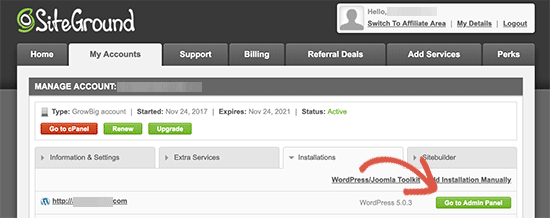
And that’s it. WordPress has been successfully installed on your SiteGround hosting account. For more details, check out this SiteGround review.
How to Install WordPress in WP Engine
WPEngine is a managed WordPress hosting provider that takes care of all your WordPress hosting needs. It will manage your WordPress site updates, installation, and performance optimization so you can easily grow your business. Learn more about WP Engine here in our review.
Because WPEngine is a managed WordPress hosting, it will automatically install WordPress for you when you sign up.
You can also add more websites if you want. For that start by logging in to your WP Engine dashboard and go to Sites.
You’ll see the names of all your sites appear on your screen. Now click on the Add Site button to add a new WordPress install.
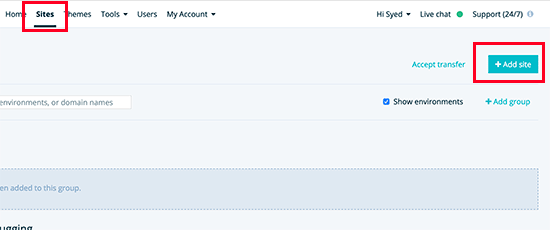
In the next screen, you can add the name of your production environment. Also, add the name of your preference and click on the Create Environment button.
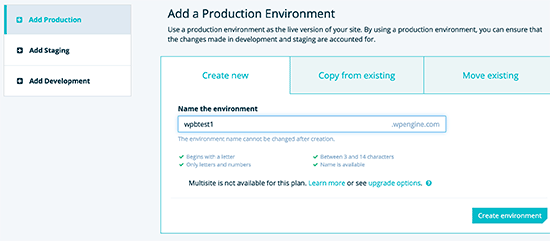
Now the action will begin. The DNS changes will obviously take some time to propagate. Once that’s done, you’ll be able to access the WordPress admin area by clicking on the link in the sidebar.
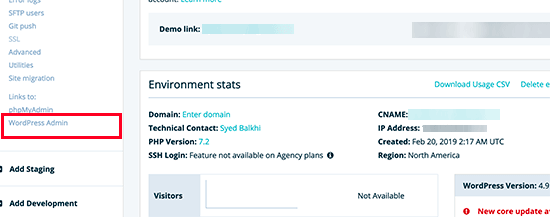
You can use the Add Domain link to add a domain to your website. But WP Engine doesn’t offer domain names. So you’ll have to buy a domain name from one of the domain registrars, where you’ll have to point your domain’s DNS settings to WP Engine.
This will need your site’s IP address and CNAME. This information is available on the overview page of your site. The basic setting is the same for all domain registrars.
Here we’ll show you how to use this information on Domain.com.
Adding DNS Information on Domain.com
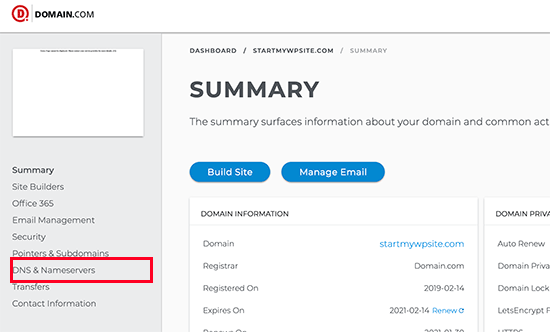
To begin with log in to the domain.com account dashboard and click on DNS and Nameservers.
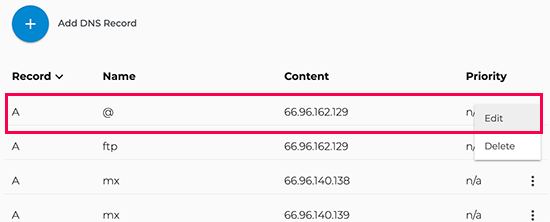
Now on the next screen click on the Edit button to add your IP address provided by WP Engine.
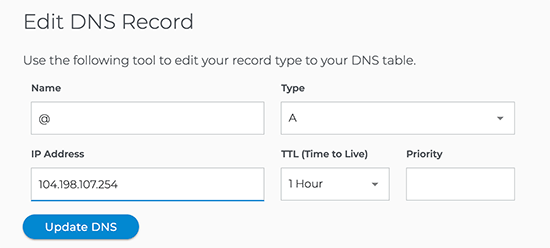
Once done, click on the Update DNS button.
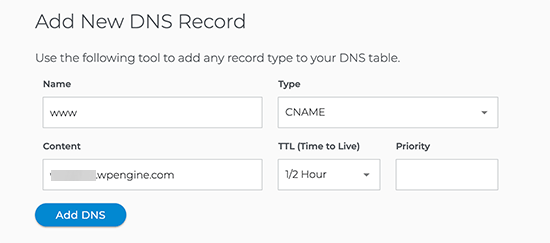
Next, you’ll have to check if you have a CNAME record with www as its name. If you do, then you will need to edit that CNAME record.
Otherwise, go ahead and click on the Add DNS Record button. Now in the Value field add the CNAME subdomain provided by WPEngine and then click on the Add DNS button.
And that’s pretty much it. Your domain name now has been successfully pointed to your WordPress site hosted by WP Engine.
You can now check the uptime of your WordPress website to see if WPEngine is holding up against your traffic. You can even calculate your downtime to see how it affects your bottom line.
How to Install WordPress Using Fantastico
Fantastico is available in multiple web hosting control panels. It’s an auto-installer that you can use to quickly install WordPress.
In your web hosting dashboard, you’ll need to look for the Software section to locate the Fantastico installer.

Click on the Fantastico icon, and it’ll open the auto-installer options.
Note: Different web hosting companies use different versions of Fantastico. Some are still using older versions, while others are updated to the latest auto-installer software. The difference will be in design and colors. However, the basic installation steps for WordPress are similar in all versions.
You’ll see a list of all applications, including WordPress, in the left-hand menu. Simply go to Blogs » WordPress.
Don’t miss the chance to read about popular CMS market share.
Next, you’ll see the overview for WordPress, and a big Install button that shows the WordPress version to be installed.
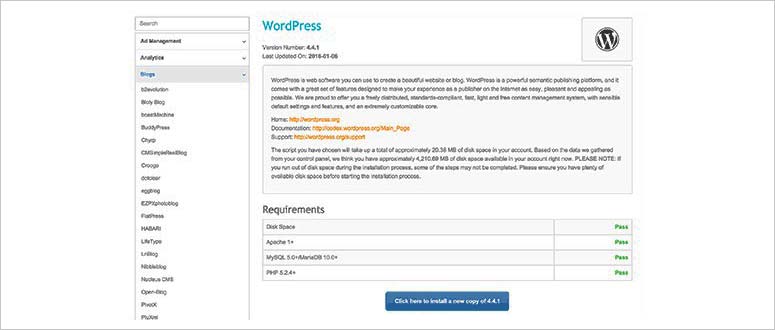
You’ll need to click on the Install WordPress button.
Next, you’ll be asked to select your domain name, sub-directory (add this information only if you want to install WordPress in a sub-directory; if not, you can leave this field blank), username, password, and email to continue.
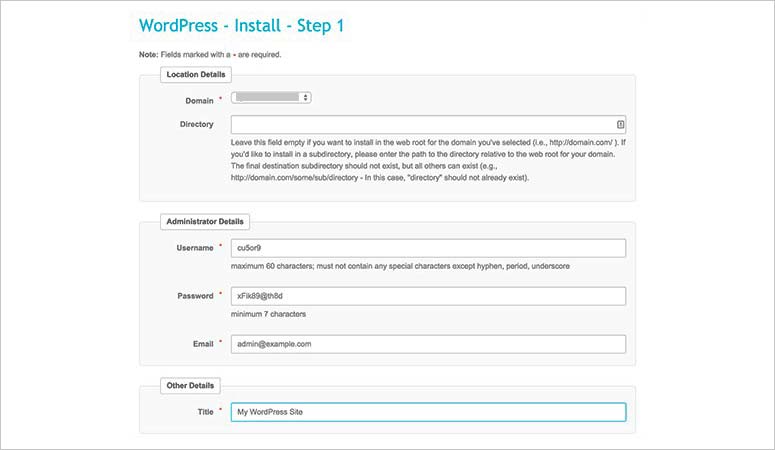
After adding the required information, you’ll need to click on the Submit button.
The installation process will begin, and a progress bar will appear on the same screen. Once the installation is done, you’ll see a success message.
Note: If the latest version of WordPress isn’t installed, then you don’t need to worry about it. Once you’ll log into your WordPress admin account, you’ll get the notification to update to the latest version.
How to Install WordPress Using Softaculous
Softaculous is another WordPress auto-installer script used by multiple web hosting companies. It works similarly to Fantastico and helps you install WordPress right away.
Many big hosting companies like SiteGround, InMotion Hosting, etc. offer Softaculous in their web hosting dashboards.
You’ll need to login into your web hosting control panel and search for Softaculous in the Software section.
In some control panels, you’ll also find a Softaculous Apps Installer section separately with all apps visible in your dashboard. It’ll allow you to directly click on WordPress and install it.
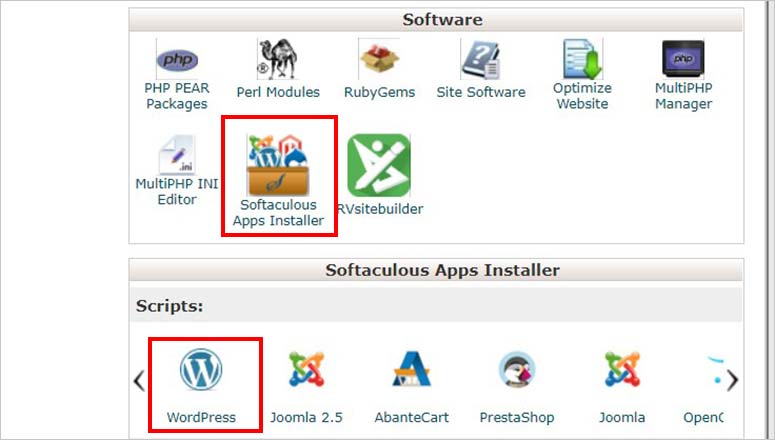
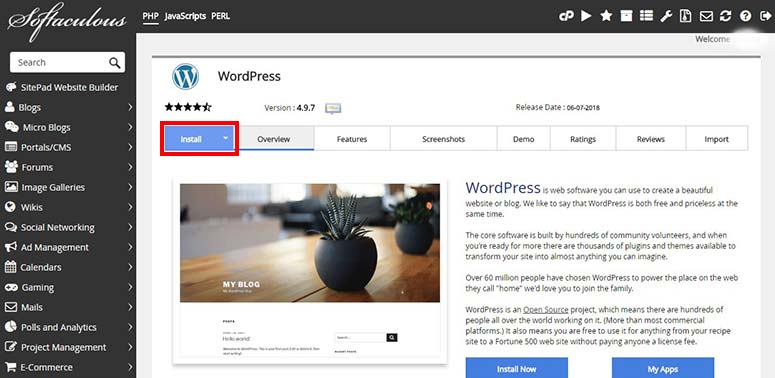
You can choose any option to install WordPress. If you click on the WordPress icon under Softaculous Apps Installer section, then it’ll show you an overview of WordPress.
There are other tabs like Install, Features, Screenshots, etc. Visit the Install tab to get started.
First, you’ll need to select Http:// or Http://www protocols. If you’re using SSL and HTTPS, then simply choose Https:// or Https://www from the protocol dropdown.
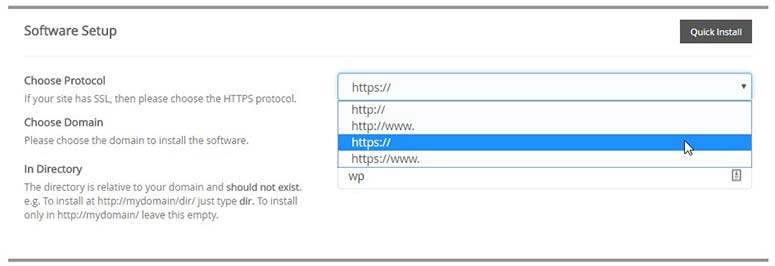
Next, you’ll need to select the domain name where you want to install WordPress.
After choosing the domain name, you’ll need to add a sub-directory (for example: mywebsite.com/wp) where you want WordPress to be installed.
A directory will automatically be created with the name you define and WordPress will be installed there.
However, if you’ll be installing WordPress on your root directory (for example: mywebsite.com), then leave the In Directory field blank.
Now that you’re done with the Software Setup, simply scroll down to Site Settings.
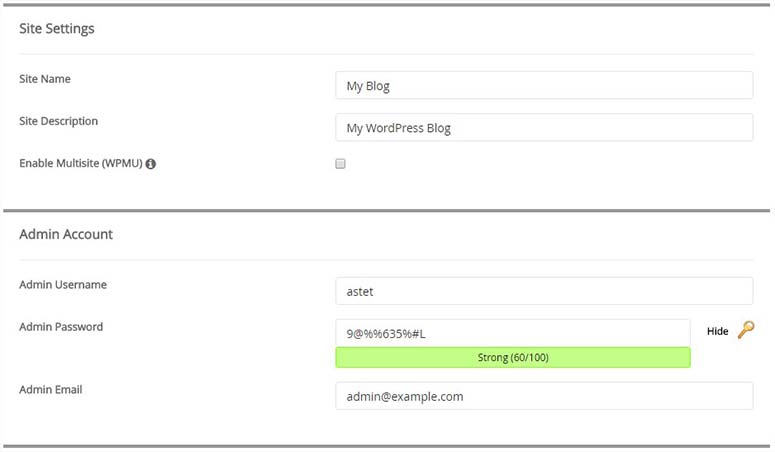
You’ll need to add the site name and site description. These details aren’t permanent and you can change them later from your WordPress admin dashboard.
After that, you’ll be asked to provide a username, password, and email address to create credentials for your WordPress admin area.
You can use the password generator by Softaculous to add a strong password or use our free strong password generator. Also, you’ll need to make sure that the username is a non-dictionary word.
However, there’s no given rule to set the username or password. You’re free to select a username of your choice and a password that you can easily remember.
We recommend you to keep a strong password, so your site will remain secured from hackers. You should check out this guide on how to manage passwords for more detailed information.
The email field is important because all the notifications will be sent to the email address you provide here. These notifications include update alerts, password reset, and more.
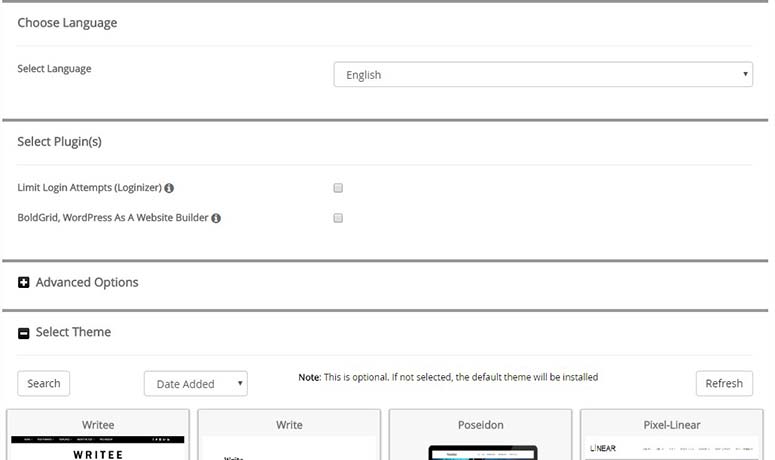
Once you’re done with the Site Settings, you can scroll further to select the plugins and theme. These are optional settings and you can also manage them from your WordPress admin dashboard after the installation.
Click on the Install button.
In few minutes, you’ll see a success message for WordPress installation. Until the progress bar shows 100%, it’s recommended to stay on the installation screen to avoid troubles.
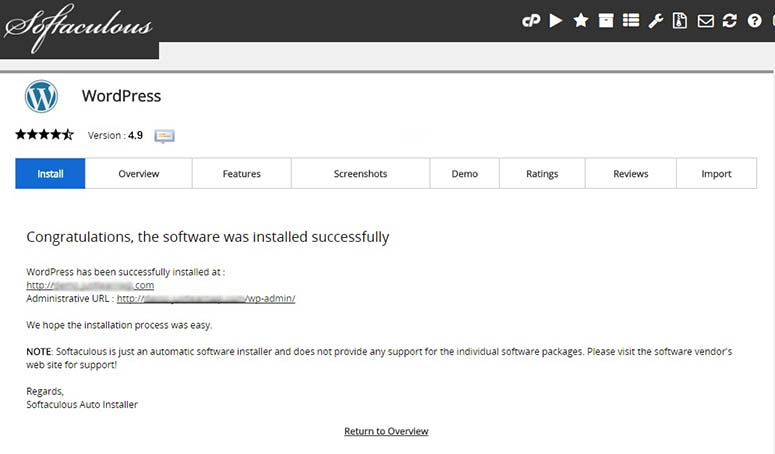
After successful installation, you’ll see details like your website URL and WordPress admin access URL.
How to Install WordPress Using QuickInstall
QuickInstall is an auto-installer for WordPress and many other apps. It’s available on multiple web hosting control panels including HostGator and others. Different hosting dashboards may have a different appearance for QuickInstall, but the features and process to install WordPress is almost same.
You’ll need to log into your web hosting dashboard, and search for the Software section. There you’ll find the QuickInstall icon. Click on QuickInstall to continue.

It’ll launch the QuickInstall page with all its apps, including WordPress, under the 1-Click Install section. Simply click on the WordPress link, to begin with it.
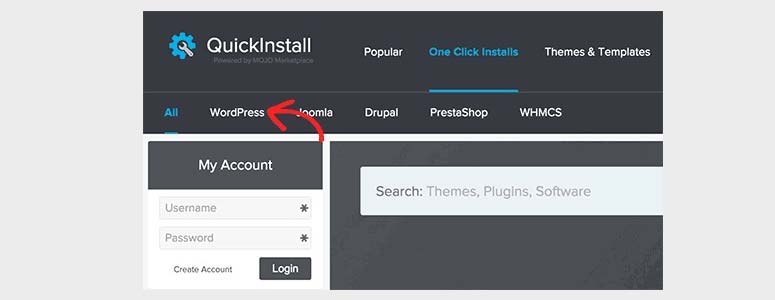
Like many other installation scripts, it’ll show you the WordPress overview and a button for installation. You’ll need to click on the Install WordPress button.

Next, you’ll need to add the required details for a WordPress installation.
Start by choosing the domain name where you want to install WordPress. In the next field, you’ll need to add a sub-directory. If you want to install WordPress on your root directory (example.com), then simply leave this field blank.
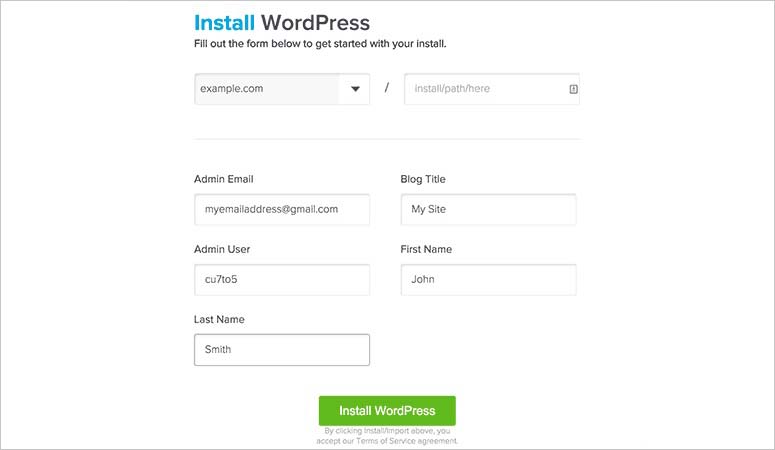
Moving ahead, you’ll need to enter the admin email address, blog title or site name, admin username, first name, and last name.
These details will be used to create an admin user for your WordPress installation.
After adding your user details, you’ll need to click on the Install WordPress button.
WordPress installation will begin, and it’ll take a few moments to complete the process. Once the installation has successfully finished, you’ll see the login details with URLs for your website and WordPress admin area.
How to Install WordPress Using MOJO Marketplace
MOJO Marketplace supports a 1-click installer tool used by multiple web hosting companies to quickly install apps like WordPress. It is available in the web hosting control panel.
If you are using Bluehost web hosting, then you’ll need to login to your hosting control panel and go to the website section.
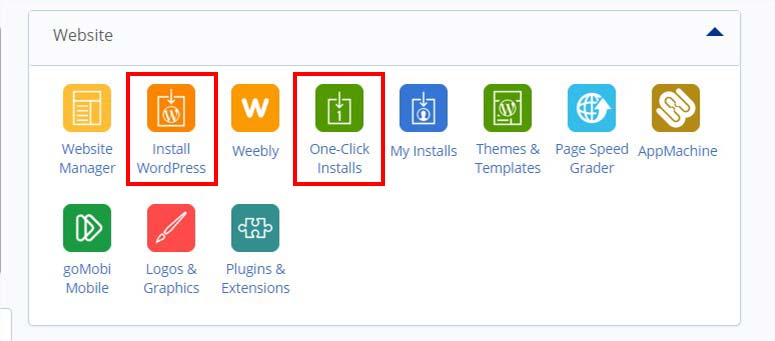
From there, you’ll need to click on the Install WordPress or 1-Click Install icon.
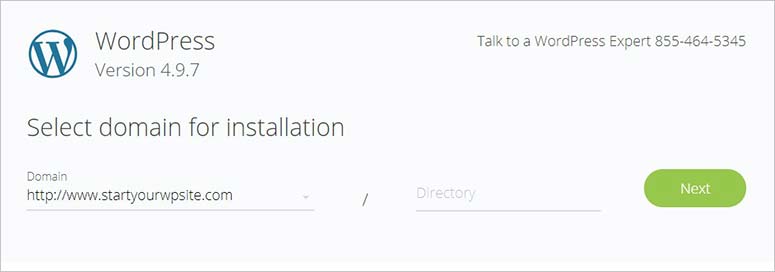
If you click on the Install WordPress icon, then you’ll be redirected to choose your domain name, and add a directory name (only if you want to install WordPress in a sub-directory like example.com/wp).
After that, click on the Next button.
Now, you’ll be asked to add admin information like Site title, admin username, admin password, and admin email address. Also, you’ll need to check mark the terms and conditions. Then, click on the Next button.
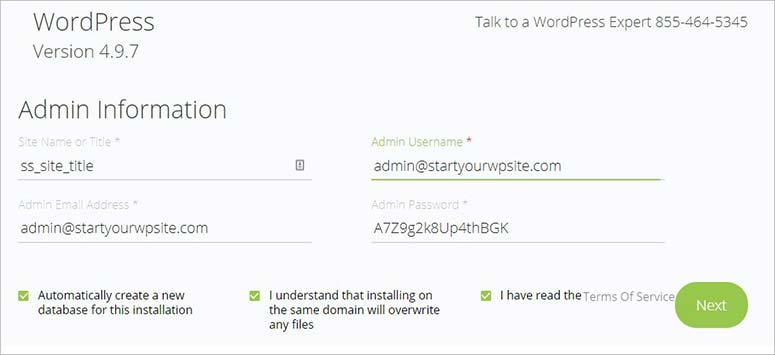
A progress bar will appear at the top of the screen, and you’ll be notified once WordPress is installed. You’ll need to click on the link to view your login credentials.

Once you click on the link, it’ll show you a success message and your WordPress admin access (username and password).

How to Install WordPress Using FTP
Do you want to install WordPress manually using an FTP client? It’ll add a few more steps to the installation process.
We recommend you take a look at this guide on how to use FTP to upload WordPress files for more detailed information.
Before we start, you’ll need to download the latest WordPress version from their official site.
Simply unzip the file and use an FTP client like FileZilla to upload the WordPress files into your root directory. Usually the root directory is called /public_html/.
If you want to install WordPress in a sub-directory (For example mywebsite.com/wp), then you can create a folder in your root directory with the respective name and upload your WordPress files there.
In this case, your extension in the FTP client will be /public_html/wp.

After uploading the WordPress files, you’ll need to login to your web hosting control panel to create a new database.
In your cPanel, you’ll need to search for the Databases section and click on the MySQL Databases icon.

In the New Database field, you’ll need to add the name of your database. After that, click on the Create Database button.

Once your database is created, you’ll need to enter your MySQL username and password. These credentials will belong to your database and they’ll be used in your WordPress configuration file.
Upon adding the username and password, you’ll need to click on the Create a user button.

Creating a user is not enough. You’ll need to give access to this new user to connect with your database. Simply add the user to your database with all permissions.
To do this, you’ll need to go to the Add User to a Database section on the same page. In the User dropdown, select the new user that you created, and select your database in the Database dropdown. After that, click on the Add button.

It’ll show you the user privileges page. You’ll need to check mark all privileges for this new user to make changes on your database.
After that, head over to the installation process. You’ll need to browse the WordPress URL to begin with the installation.
If you uploaded WordPress files on the main root directory, then your domain name will be the WordPress URL (for example: www.mywebsite.com)
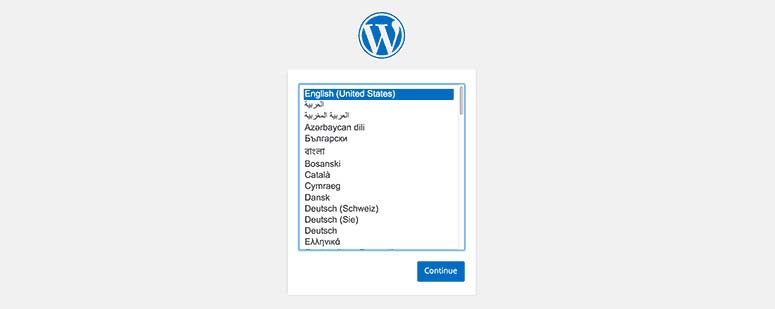
First, it’ll ask you to select a language. After selecting your language, click on the Continue button. Now, the complete WordPress installation process will be in this same language.
If you’re not satisfied with your language selection, you can change it later from your WordPress admin settings.
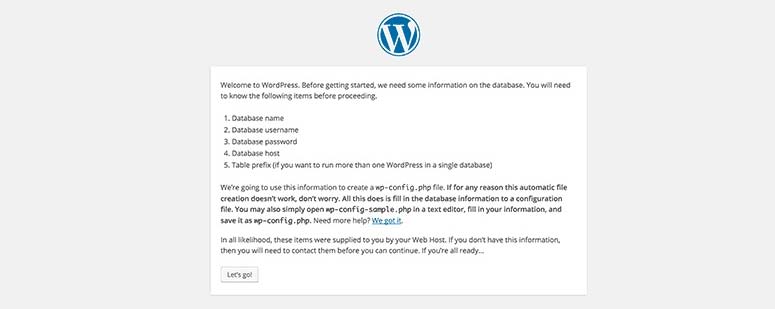
Next, it’ll display the welcome message and information about your new WordPress installation. Read this information as WordPress will access your database credentials to launch properly.
You’ll need to click on the Let’s go! button.
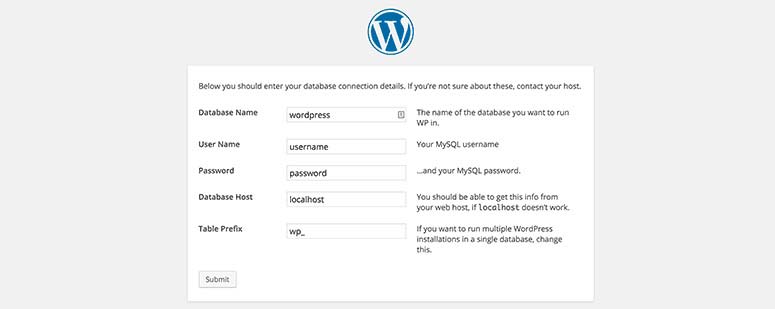
Now, you’ll see a form where you’ll need to add your database name, username, and password. After that, click on the Submit button.
Upon successful connection with the database, you’ll see a message from WordPress and you’ll need to click on Run the install button to continue.

WordPress will run its background process that includes creating tables in your database, and taking you to the next step.
You’ll need to enter your Site title, username, password, and email address to set up your WordPress site.
In the development phase, you may not want search engines to see your website, so you’ll need to checkmark on search engine visibility option. You can change this setting later from your WordPress admin account.
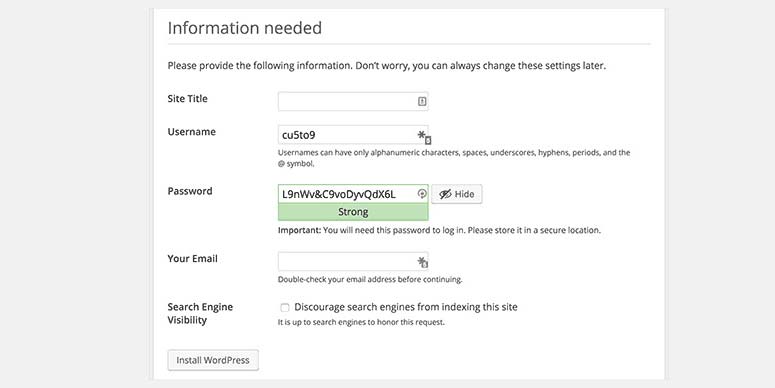
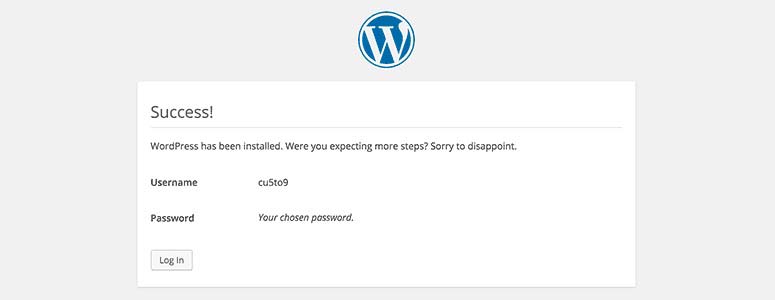
Once you click on the Install WordPress button, it’ll complete the installation process and display a success message. You’ll also see the login credentials to access your WordPress admin account.
How to Install WordPress in Your Language
WordPress is translated into almost all the languages in the world. You can easily install WordPress in your own language.
To name a few, WordPress includes languages such as English, French, Spanish, Chinese (Han), Japanese, Arabic, Korean, German, Hebrew, Hindi, and more.
While installing WordPress, it’ll ask you to select a language and then further installation will be done in the chosen language. However, if you select English at first and want to change the language later, then you’ll need to visit Settings » General page in your WordPress admin account.

You should also check out this guide on how to create a multilingual website in WordPress for more details.
How to Install a WordPress Multisite Network

By default, WordPress has multisite features. You can use the multisite network to create and manage more than one website under a single WordPress installation. The WordPress multisite network is strong, and it easily manages your new sites on sub-directories or sub-domains.
It’s helpful for large businesses, government organizations, membership websites, educational institutes, travel companies, and more.
You should follow this complete guide on how to install and setup WordPress multisite network for detailed instructions.
How to Install WordPress on Your Computer
Do you want to install WordPress on your computer step by step from scratch? Many beginners want to create their websites in a local server environment before showing it to other people. However, you can also build your website on a live environment by simply discouraging search engines to see your site.
Other than that, there’re many people who want to install WordPress on their computer to develop themes, plugins, or test the code.
Installing WordPress on your computer will not be visible to all until you take it live on your domain.
For Windows users, you’ll need to download and set up WAMP to install WordPress. However, Mac users will need to setup Mamp on their computers for local WordPress installation.
You should also check out our guide on how to transfer WordPress from local server to a live site for step-by-step instructions.
Things to Do After Installing WordPress
After the successful installation of WordPress, you’ll need to select your theme and plugins to launch your website properly.
Selecting a WordPress Theme
A theme, or website template, will be the design / style of your WordPress site. You will find hundreds of thousands of WordPress themes on the internet and WordPress repository. However, it’s difficult to select a theme when you have these many choices. We recommend you sort WordPress themes according to your business niche and then check out our expert pick of the best WordPress themes.
We keep this list updated, so you’ll find the latest and most amazing WordPress themes for your website.
Choosing the Best WordPress Plugins
WordPress is flexible and easy to set up. It allows you to add any feature you desire on your website using WordPress plugins. Whether you want to add a contact form, optimize your website for search engines, secure your website from hackers, or any other functionality on your site, there’s a fair chance that you’ll find a plugin in the WordPress directory.
Other than the WordPress repository, you can find premium plugins that are available as third-party tools on the internet to extend functionalities on your website.
If you ever plan to switch domains, then check out this interesting step by step article on how to move your WordPress site to a new domain name. And if you ever think to change your CMS then read on our WordPress alternatives article, listing the top WordPress competitors.
We hope this article helped you learn how to install WordPress. You may also want to see our guide on how to start a WordPress website from scratch (step by step).

Your blog posts on email marketing trends are informative.