Do you want to enhance the performance of your WordPress website?
Caching makes your site load quickly. So by enabling caching on your WordPress site, you can offer a better browsing experience to your visitors.
However, it’s important that you occasionally clear your cache to ensure your site functions as smoothly as possible.
In this guide, we’ll show you exactly how to clear your cache in WordPress. But before that, let’s look at how caching works and why you should clear your cache from time to time.
What Is Caching and Why Is It Important
Caching is the process of storing data in a temporary storage area called cache. It creates and saves a static version of frequently requested information so that it can serve future requests faster.
When you’re looking for a piece of information in WordPress, rendering and fetching the information requires queries to be sent to the database. Then the responses need to be sent back.
This increases your server load and reduces downtime on your site.
But by enabling caching, you can skip these steps because it will create and present a static copy of the requested information. This reduces the server load and really enhances your page’s loading speed.
Why Clear Your WordPress Site Cache
Sometimes the cache fails to detect any new changes that have taken place on a website because it’s still using the downloaded static content to load the results.
So instead of loading the new version, it continues to load the old version. This might prevent users from seeing the latest changes and the updated version of your site.
Clearing your cache can stop this from happening. Apart from that, it has several other benefits as well. Here are some of the reasons why WordPress caching is important.
- It optimizes your website for speed and performance.
- It reduces the load on your hosting server, which saves server memory and I/O operations. This can be a great advantage for users with limited hosting plans.
- It enhances loading speeds, which is an important ranking factor in Google. Since caching increases your loading speeds, your site will potentially rank higher with Google (provided you have good content and follow other SEO parameters).
Now let’s look step-by-step at how to clear your cache in WordPress.
Step 1: Clearing Your Browser Cache
The first step to clearing your WordPress cache is to clear your browser cache. Today, we’ll be using Google Chrome as our browser. Simply click on the 3 vertical dots Menu icon on the top right hand corner of the screen. Here you’ll see the Settings tab. Now on this page, in the left menu, open Privacy and Security » Clear Browsing Data.
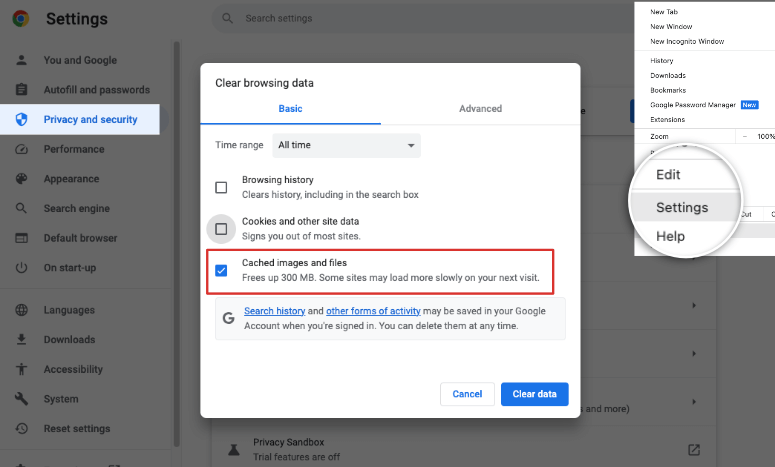
You’ll see a popup appear on your screen. Here you can select the content you want to remove or delete from your browsing history. Don’t forget to select the cached images and files option. When you’re done, click on the Clear data button.
That’s it. Your browser data will now be cleared. The time needed to clear your browsing history may vary depending on the amount of stored data.
Step 2: Clearing Cache With Your Web Host
Let’s now look at how to clear your cache in some of the popular managed WordPress hosting options.
1. Clearing Cache in WP Engine

WP Engine is one of the most popular managed WordPress hosting service providers. If you host your website with WP Engine, you don’t have to install a caching plugin separately because they run their own caching solution.
You can clear your WP Engine cache right from your WordPress admin area. For that, you need to click on the WP Engine menu item in the admin bar and then under the General settings option click on the Purge all caches button.
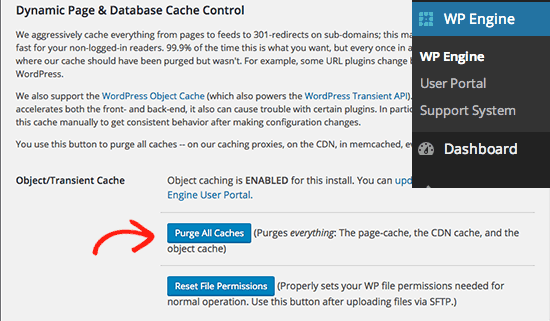
Your cache will now automatically be cleared out.
2. Clearing Cache in Bluehost
Bluehost is one of the most popular hosting service providers that offer a free domain name, free SSL, and awesome security.
Clearing your cache in Bluehost is super easy. Just go to your WordPress dashboard and click on the Caching button in the admin toolbar. Hover your mouse over this option. You’ll see an option called Purge All.
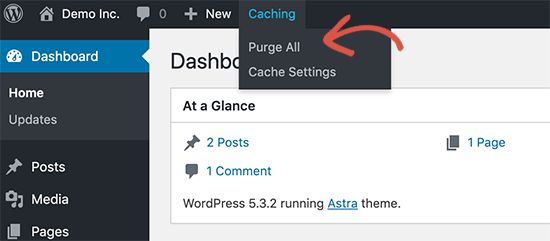
Just click on it, and Bluehost will make sure that all your WordPress cache files have been cleared. Click here to learn more about Bluehost.
3. Clearing Cache in SiteGround

Just like Bluehost, SiteGround is a popular name when it comes to the web hosting business. If your site is hosted in SiteGround, it’s easy to clear your cache.
You can do it directly from your WordPress admin dashboard. But for that, you have to install the SG Optimizer plugin by SiteGround. Then you’ll see a new button on your dashboard toolbar labeled Purge SG Cache.
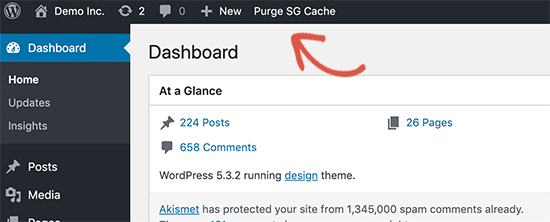
Click on this button for your cache to be cleared.
If you don’t want to install another plugin, that’s totally fine, too. Just log into your SiteGround account and go to Site Tools » Speed » Caching page.
Now switch to the Dynamic cache tab. Click on the menu icon next to your domain name and then select the Flush cache option.
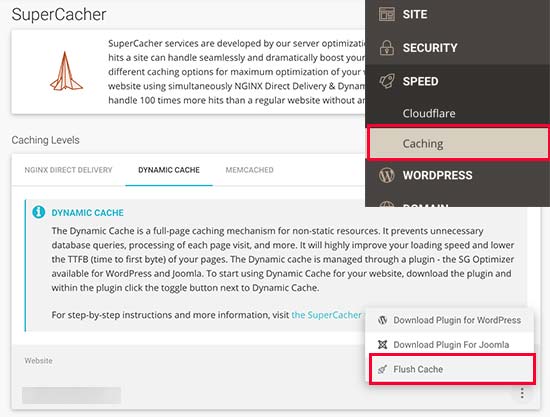
And that’s it. Your cache will now be cleared.
Step 3: Clearing Cache in your WordPress Caching Plugins
This step is for those who have a WordPress caching plugin installed on their website. Most caching plugins let you clear the cache in the settings page itself. Here we’ll show you how to do that for some of the most popular caching plugins.
1. Clearing Cache in WP Rocket
WP Rocket is one of the most powerful caching plugins that constantly works on creating a cached version of your website. That way, you can offer the best user experience possible to your visitors.
If you’ve been using WP Rocket on your website, here’s how you can clear its cache. Just go to Settings » WP Rocket. Now click on the Clear Cache button under Quick Actions.
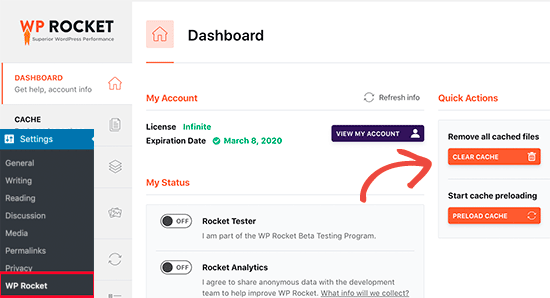
And that’s it. The plugin will automatically clear all your website’s cached files.
2. Clearing Cache in W3 Total Cache

With W3 Total Cache clearing your browsing history can be done in minutes with just a single click. All you need to do is visit your WordPress dashboard and click on Performance on the left side of your dashboard. Now click on Empty all caches.
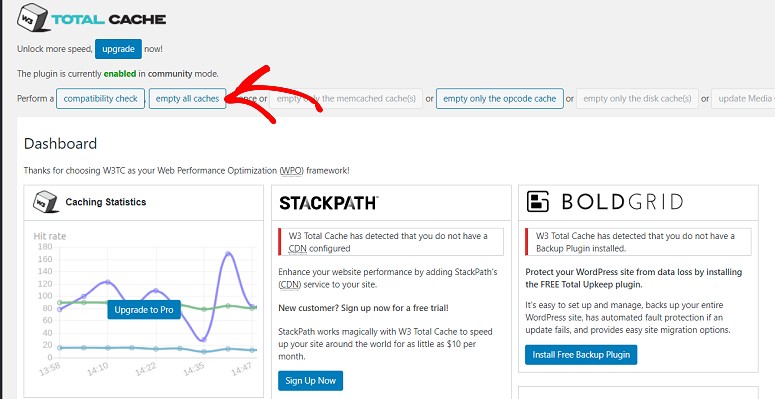
After a few minutes, all your cache will be automatically removed.
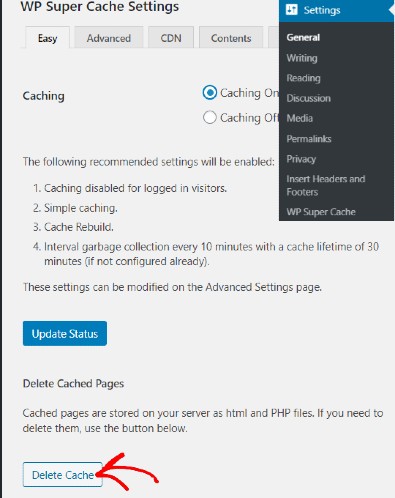
3. Clearing Cache in WP Super Cache Plugin

WP Super Cache is one of the most popular WordPress plugins that lets you download static HTML files for your WordPress website. Clearing your cache with this plugin is quick and easy.
Just go to your WordPress website and click on Settings » WP Super Cache. Now click on the Delete Cache option.
And your cache will be cleared.
Step 4: Clearing Cache in Web Application Firewall
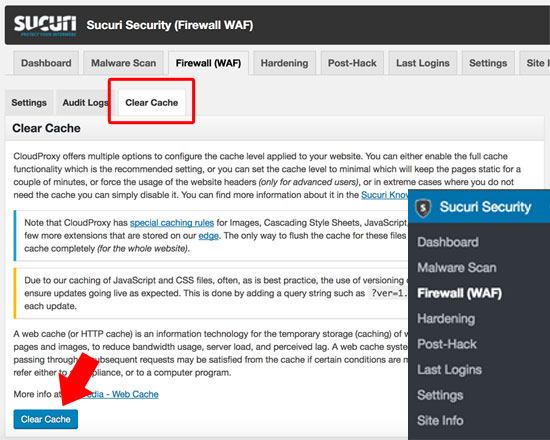
Many people use a WordPress firewall to protect their site from security threats. Sucuri Security is a popular firewall plugin.
If you use Sucuri Security, you can use the following method to clear your cache. On your WordPress dashboard, go to Sucuri » Firewall (WAF) menu. Now hit the Clear Cache.
Your firewall cache should now be empty.
That’s it! We hope this article will help you clear your site’s cache and improve your users’ experience.
And even though caching plugins will make your site fast, running a security audit will make sure your website stays safe. So if you liked this article, you might also want to learn more:
- The Complete WordPress Security Guide (Beginner Friendly)
- How to Harden Your WordPress Site to Keep Hackers Out
- Best WordPress Firewall Plugins for Security & Protection
That resource will have everything you need to make sure your website is totally secure.

