
Want to move your domain name from one host to another?
Switching your domain name registrar requires you to follow a specific procedure. While the process isn’t very complicated, many beginners may not be familiar with how to go about it. At the start, it can be intimidating.
If you can relate, then this article is for you. And the good news is that the process is actually quite simple!
In this tutorial, we’ll tell you step-by-step how to transfer a domain name from one host to another.
But before getting started, you should know that you don’t have to do it by yourself if you don’t want to.
There are web hosting services that offer free domain name transfers as well. In this article, we’ll list the best web hosting companies that offer free domain transfers with their hosting plans.
After that, we’ll tell you how you can do it yourself.
Let’s dive in.
Web Hosts That Will Transfer a Domain Name for Free
Below are some of the best web hosting services to help you transfer your domain name for free. But remember that they’ll only transfer your domain name if you host your website.
Let’s check out the options.
1. Bluehost

Bluehost is one of the best web hosting services that offers free domain transfers to their customers. Apart from that, you can also have a free domain name, free SSL, and great support.
You’ll love its performance and top-notch customer service. Check out the following review if you want to know more about Bluehost.
2. Hostinger

Hostinger is another great option for anyone who wants to transfer their domain names for free. If you have an active hosting plan with them, you can request a domain transfer whenever you want.
Read this review if you want to learn more about Hostinger.
3. iPage

iPage is an excellent option for hosting your websites. It offers a free domain name, free domain transfer, free SSL, free website builder, and several templates. You can host unlimited domain names and ask them to transfer your domains, too.
Here’s more information about iPage.
4. InMotion

InMotion is a great web hosting service provider that lets you transfer your domain name from its Account Management Panel. It offers detailed documentation on how to transfer your domain name that you can easily follow to get the job done.
Want to learn more? Check out this review of InMotion.
Now, let’s get into our step-by-step guide on how to transfer your domain. The process for domain transfers may vary from one web host to another. In this post, we’ll specifically look into transferring a domain name registered with Bluehost.
Step 1: Ensure That Your Domain Name Is Eligible for a Transfer
The first step to transferring your domain name is to ensure that your domain name is eligible for the transfer. According to ICANN’s policy, a domain name that has been transferred between two different registrars within the last 60 days cannot be transferred. Your domain name also needs to be at least 60 days old to be eligible for this transfer.
To ensure that it meets these guidelines, you can simply sign in to your current registrar and check for the details. You also need to ensure that your domain isn’t on hold with the current registrar.
To check that, log in to your Bluehost account. Click on Domains on the left side of your screen and select the domain you want to transfer.
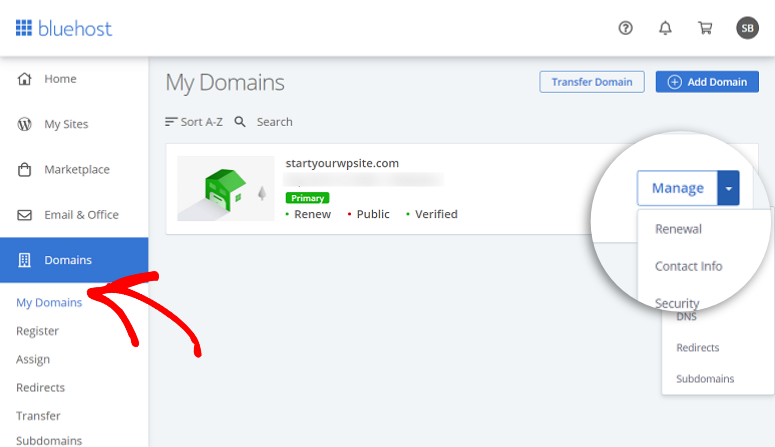
Now click on the drop-down arrow next to the Manage tab of the domain you want to transfer.
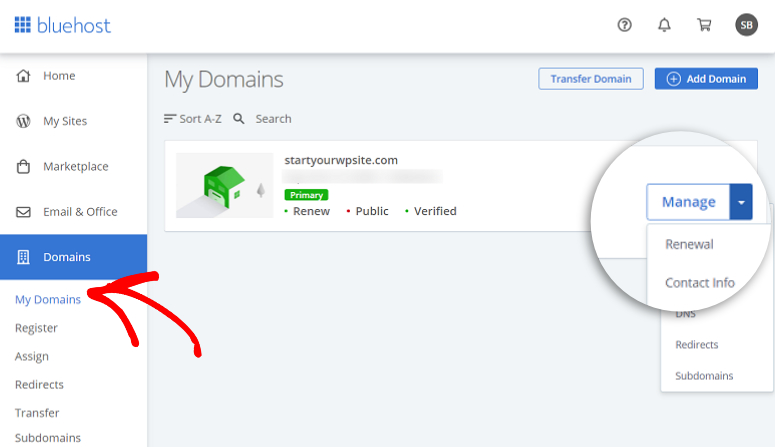
You’ll see various options here like:
- Renewal
- Contact Info
- Security
- DNS
- Redirects
- Subdomains
If you see all of these tabs, then your domain can be transferred. If you only see three tabs, then the domain has already been transferred once within the last 60 days and is currently not eligible for another transfer. You can view the domain’s current registrar in the Main tab.
Step 2: Checking Your Contact Details
The next step is to check the contact information. The email address registered here will be used by your new web host to send information regarding the transfer. So make sure that the information is correct.
To check your email address, click on the Contact Info tab under manage.
You can now see the email address registered. If you want to edit the address, just click on the Edit button and change it.
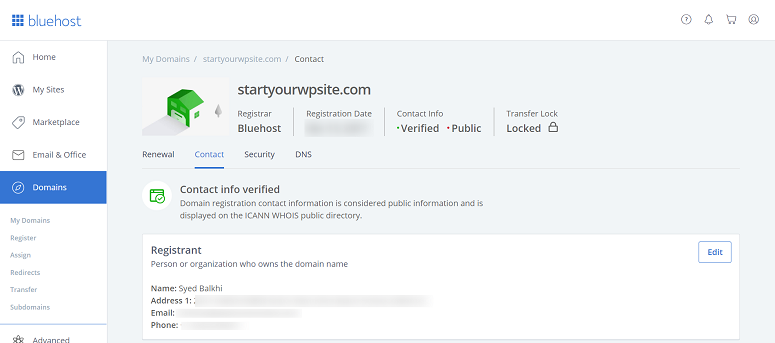
Scrolling further down the screen, you’ll see other details like who’s the admin, who the bill gets sent to, and so on.

Step 3: Updating Your Name Server
The next step is to update your name server. To update your name server, you need to go to Domains » DNS.

Here you can add the details of your new registrar by clicking on the Edit button under Name Servers. It will take a few hours to update. Once added, click on the Save button to save your settings.
You should know that during this updating period, your emails will be down, and your web traffic will be directed either to the old or new host, depending on the visitor’s ISP.
Step 4: Remove Your Domain Lock
Many web hosts implement the domain lock feature which ties your domain to their service. This is a great way of protecting your domain from unauthorized transfer attempts.
But to transfer your domain name, you need to unlock your domain. For that, go to Domains » Security under the Manage tab.
Now swap the toggle bar to unlock the domain name.

Step 5: Getting Your EPP/Auth Code
The next step is to obtain your EPP code. Your new web host will require this code to authenticate the transfer. To get the code, go to the Domains » Security tab.
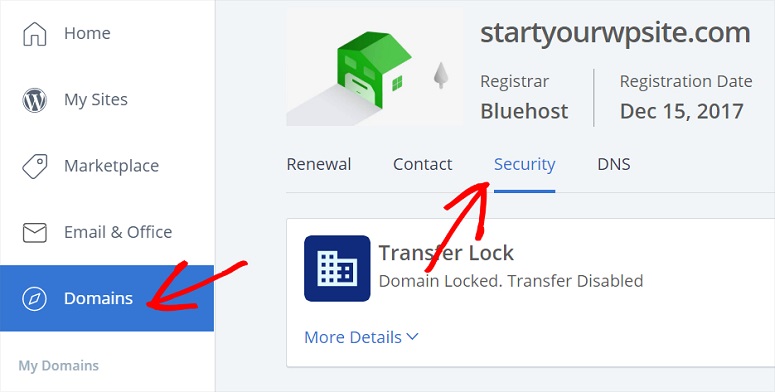
Scroll down to find the Transfer Authorization / EPP Code section. Here click on the send button. Your code will be sent to the registered email address.
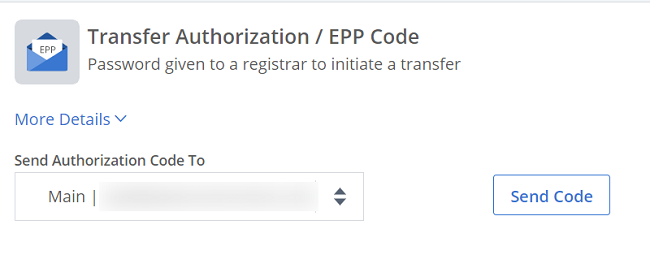
Keep your code safe. You’ll need it in the following steps.
Step 6: Initiating Your Domain Transfer
Now since your domain is ready to be transferred, you can initiate the transfer. To start the process, log into your new web host account. You can then begin as instructed by your new web host.
You might need to provide them with your EEP/Auth/Authorization code. Once all the necessary information is provided to your new host, the transfer process begins. It might take up to 5 days for the process to be completed.
If it takes longer than the mentioned period, then follow the next step.
Step 7: Approve Your Transfer
Sometimes you may need to approve your transfer from your Bluehost dashboard. For that, log into your Bluehost account. Now go to Domains » Transfer.
Scroll down to the Current Transfer Progress section. You’ll see a Pending transfer option. Click on the Approve button next to it.
Your transfer should now be complete. However, the process might take anywhere from a few minutes up to several hours, depending on the time needed for your current registrar to detect the change.
And that’s how easy it is to transfer a domain name with Bluehost. We hope you found this post helpful.
FAQs on Transferring a Domain Name
Why would I want to transfer my domain?
You might want to switch to a different registrar for better prices, customer service, or features. It’s a bit like choosing a new and improved neighborhood for your website.
How do I start the domain transfer process?
- Unlock your domain at your current registrar
- Get an authorization code (EPP code)
- Provide these details to your new registrar while placing the transfer order
What is an authorization code, and where do I find it?
An authorization code is like a secret password for your domain. You can get it from your current registrar’s dashboard. It’s usually in the domain settings or transfer section. Your domain registrar may email it to you upon transfer request.
Can I transfer my domain anytime, or is there a waiting period?
You can transfer your domain anytime, but some registrars have a 60-day lock after you buy or transfer a domain. This is to prevent unauthorized transfers.
How long does the domain transfer process take?
It typically takes 5 to 7 days, but it can vary. The actual transfer time depends on your old and new registrars working together to ensure everything goes smoothly.
Do I have to pay to transfer my domain?
Yes, there’s usually a fee for transferring a domain. Check with your new registrar for their specific charges.
What happens if the domain transfer fails?
If the transfer fails, your domain stays with the current registrar. You might need to check and fix any issues like an incorrect authorization code or an expired domain.
Can I transfer a domain if it’s about to expire?
You can but it’s not recommended. It’s better to renew your domain with the current registrar first and then initiate the transfer. This ensures a smooth transfer without risking losing your domain.
Once your domain transfer process is completed, you might want to use it on a website that already exists.
For that, you’ll have to move your WordPress site to the new domain name that you’ve just transferred. This might affect your SEO if you don’t do it right.
But don’t worry. We have this post that will teach you how to properly move WordPress to a new domain name.

some registrars also require email verification for transfer domain. is hostinger one of them?
Thank you for this post because in this you mentioned a step by step procedure for transfer of a domain name free of cost.