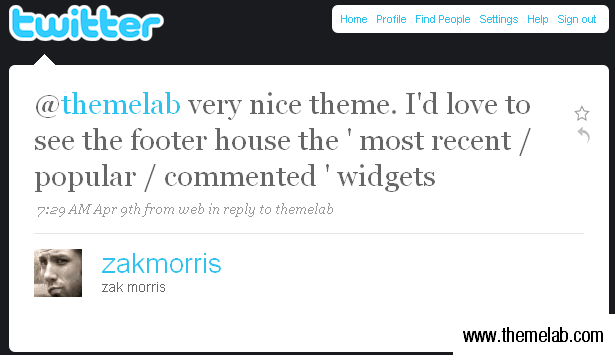
La inspiración para este tutorial proviene de un tweet que recibí con comentarios para el tema RS12, que pronto será lanzado.
Aunque el pie de página con widgets finalmente no se incluyó en el lanzamiento del tema RS12, decidí escribir este tutorial para mostrar cómo agregar un pie de página con widgets en tu tema. En esta guía, aprenderás:
- El código HTML y CSS necesario para producir el pie de página con widgets
- Cómo agregar etiquetas de plantilla de WordPress de uso común como marcadores de posición
- Cómo convertir el pie de página en un área de widgets y colocar widgets dentro de él
Habrá mucho código en esta publicación, así que si estás listo, sigue leyendo...
Usaré el tema de WordPress Green Rays como mi ejemplo en este tutorial. Por el momento, el pie de página solo tiene un mensaje estándar de "copyright" y créditos.
El HTML
El primer paso es agregar el marcado HTML. Digamos que tendremos tres secciones diferentes en el pie de página con widgets para listas de Publicaciones Recientes, Archivos Mensuales y Archivos Diarios. Colocaremos este código HTML encima de la línea actual de "derechos de autor".
<div class="footer-item">

<h3>Entradas Recientes</h3>

<ul>

<li><a href='#' title='Entrada destacada'>Entrada destacada</a></li>

<li><a href='#' title='Citas en bloque'>Citas en bloque</a></li>

<li><a href='#' title='Cómo funciona la etiqueta ‘more’'>Cómo funciona la etiqueta ‘more’</a></li>

<li><a href='#' title='Ordenar o Desordenar'>Ordenar o Desordenar</a></li>

</ul>

</div>

<div class="footer-item">

<h3>Archivos Mensuales</h3>

<ul>

<li><a href='#' title='Marzo 2008'>Marzo 2008</a></li>

<li><a href='#' title='Febrero 2008'>Febrero 2008</a></li>

<li><a href='#' title='Enero 2008'>Enero 2008</a></li>

<li><a href='#' title='Diciembre 2007'>Diciembre 2007</a></li>

</ul>

</div>

<div class="footer-item">

<h3>Archivos Diarios</h3>

<ul>

<li><a href='#' title='7 de marzo de 2008'>7 de marzo de 2008</a></li>

<li><a href='#' title='9 de febrero de 2008'>9 de febrero de 2008</a></li>

<li><a href='#' title='4 de enero de 2008'>4 de enero de 2008</a></li>

<li><a href='#' title='22 de diciembre de 2007'>22 de diciembre de 2007</a></li>

</ul>

</div>

<div class="clear"></div>
Básicamente, este código coloca cada “widget” en un div. Dentro de cada widget hay un encabezado y una lista desordenada con enlaces. Sí, sé que los enlaces no van a ninguna parte. Más tarde, reemplazaremos esto con etiquetas de plantilla de WordPress. Aquí está lo que tenemos hasta ahora:

El CSS
Como puedes ver, esto no se ve muy bien sin ningún estilo CSS. Agrega el siguiente código a tu hoja de estilos.
.footer-item {
 float: left;
 width: 33%;
 padding-bottom: 10px;
}
.footer-item ul {
 padding-left: 15px;
}
Lo que hace este código es flotar cada elemento del pie de página a la izquierda, lo que básicamente significa que pueden estar uno al lado del otro. El ancho se establece en 33%, lo que da suficiente espacio para tres elementos del pie de página en una sola fila. También se agrega un poco de relleno debajo de cada elemento del pie de página. La segunda parte es simplemente agregar un relleno de 15 píxeles a la izquierda de las listas.
Ahora puedes ver que el HTML y el CSS están empezando a unirse. Esto es lo que deberías tener hasta ahora:

Código de WordPress
Por el momento, tenemos un montón de enlaces HTML vacíos, sin código real de WordPress. Reemplacemos las listas debajo de Entradas Recientes, Archivos Mensuales y Archivos Diarios con los equivalentes de etiquetas de plantilla de WordPress. Reemplaza lo que tienes actualmente con lo siguiente:
<div class="footer-item"><h3>Entradas Recientes</h3><ul><?php wp_get_archives('type=postbypost&limit=4'); ?></ul></div><div class="footer-item"><h3>Archivos Mensuales</h3><ul><?php wp_get_archives('limit=4'); ?></ul></div><div class="footer-item"><h3>Archivos Diarios</h3><ul><?php wp_get_archives('type=daily&limit=4'); ?></ul></div>
Los parámetros deberían ser bastante autoexplicativos, pero si no estás seguro de alguno de ellos, intenta buscar wp_get_archives en la Herramienta de Búsqueda de Etiquetas de Plantilla de WordPress. Recuerda, solo estoy usando las etiquetas de plantilla wp_get_archives() como marcador de posición. Las cambiaremos por otros widgets de WordPress más tarde, después de que hagamos el pie de página con widgets.
Hazlo "Widgetizable"
Para esta sección del tutorial, tomaré prestadas partes de mi tutorial anterior sobre temas con widgets.
El primer paso es registrar las "barras laterales". Para hacer esto, simplemente reemplace el contenido actual del archivo functions.php con lo siguiente:
'Barra lateral',
'before_widget' => '',
'before_title' => '',
'after_title' => '
',
));
if ( function_exists('register_sidebar') )
register_sidebar(array(
'name' => 'Pie de página',
'before_widget' => '',
'before_title' => '',
'after_title' => '
',
));
?>
Ahora iremos a sidebar.php y reemplazaremos la etiqueta condicional de barra lateral dinámica actual con esto:
Con esto:
Ahora iremos a nuestro archivo footer.php y envolveremos los elementos del pie de página en su propia etiqueta condicional de barra lateral respectiva. Justo antes del primer div de “sidebar-item”, agregue lo siguiente.
Justo después del último div de cierre “footer-item” (y encima del div “clear” que agregamos anteriormente) agregaremos lo siguiente:
<?php endif; ?>
Bien, ahora nuestra barra lateral y el pie de página deberían ser "widgetizados". Probémoslo agregando algunos widgets en el pie de página. Agregaré un widget de "Blogroll", un widget de "Comentarios recientes" y un widget de texto. Así es como debería verse:

Conclusión
Bueno, esos son los conceptos básicos para agregar un pie de página "widgetizado" a tu tema. Es posible que desees agregar reglas de estilo separadas para otros tipos de widgets, como el calendario o el cuadro de búsqueda. Esto probablemente no funcionará con todos los temas, como el tema RS12, por ejemplo, ya que tenía un pie de página no expandible.
Si alguien quiere el tema actualizado Green Rays, por casualidad, puede descargarlo aquí. De esta manera, podrá ver dónde agregué exactamente el código. También puede compararlo con el tema original.
Espero que les haya gustado el tutorial. ¿Agregarán un pie de página con widgets a su tema? ¿Hay algo en el código que usé anteriormente que harían de manera diferente? Preguntas, comentarios, sugerencias y críticas son bienvenidos, así que siéntanse libres de expresarse en los comentarios.

Leland,
Aquí está el enlace de pastebin para mi archivo functions.php. Lo publiqué sin tu alteración. Tu ayuda es apreciada.
http://pastebin.com/m40073591
“Yo también estoy intentando añadir widgets a mi pie de página usando tu paso, pero cuando agrego el código a functions.php, sigo recibiendo el mismo mensaje de error:
Error de análisis: error de sintaxis, se encontró ‘}’ inesperado en /home/………..redacted………/functions.php en la línea 230
Estoy seguro de que esto significa que solo tengo una ‘}’ fuera de lugar, pero eliminarla no parece funcionar. ¿Ayuda?”
Estoy experimentando los mismos problemas. ¿Podrías ofrecer algún consejo?
Gracias,
Dave
¿alguna vez lo resolviste? Yo también tengo el mismo problema, pero sucedió cuando cambié el código de mi sidebar.php.
¿cómo lo arreglaste?
Estoy ejecutando 2 barras laterales, por lo tanto, tengo 2 archivos sidebar.php. Intenté revertir el código a su estado original pero no funcionó. Supongo que tendré que subir mi archivo php de respaldo, pero eso no resolverá el problema, solo me permitirá continuar trabajando en mi sitio.
Si hay algún consejo, lo agradecería.
gracias
Me encontré con esto por accidente – gran tutorial tanto en contenido como en estilo de escritura – bien hecho.
¡Este tutorial me cambia la vida! No he visto una explicación tan completa de cómo hacer esto. Estoy en proceso de crear un nuevo look para mi blog y wow… esto es totalmente lo que necesitaba. ¡¡Muchas gracias!!
[…] Añadir un pie de página con widgets a tu tema de WordPress | Theme Lab (etiquetas: tutorial wordpress pie de página CSS) […]
@Lance: Dependería del tema, pero estaría en algún lugar dentro del div “footer” (como sea que se llame).
Parece que el pie de página de tu sitio tiene una altura fija, así que probablemente tendrías que arreglar eso antes de usar este código.
Hola – Gracias por este tutorial pero estoy confundido. ¿Dónde pongo el código HTML que tienes al principio?
Tengo el CSS y los archivos del pie de página y sé que puedo poner el código ahí. ¿Pero dónde va el código HTML real?
[…] caja, plantillas personalizadas de archivo y búsqueda, una página de opciones y cuatro áreas con widgets (incluyendo un pie de página con widgets). Estas características se revisarán […]
@Terri: ¡De nada! Por cierto, bonito pie de página con widgets. 🙂
¡Siiiií! ¡Gracias!
@Hannah: Sí, eso es lo que significa. Aunque me resulta un poco difícil diagnosticar el problema si no puedo ver el código exacto. ¿Podrías pegar el código de tu archivo functions.php actual en algún pastebin? Algo como http://pastebin.com – ¡gracias!
¡Gran tutorial! Estoy intentando añadir widgets a mi pie de página usando tu paso, pero cuando añado el código a functions.php, sigo recibiendo el mensaje de error:
Error de análisis: error de sintaxis, se encontró ‘}’ inesperado en /home/………..redacted………/functions.php en la línea 230
Estoy seguro de que esto significa que solo tengo una ‘}’ fuera de lugar, pero quitarla no parece funcionar. ¿Ayuda?
[…] encontré un buen tutorial sobre cómo añadir widgets al pie de página de un tema. Los widgets no son solo para la barra lateral […]
@ezg: Ah… bueno, me alegro de que te haya funcionado.
@Jeffro: Gracias, aprecio el stumble, y me alegra que te haya gustado el tutorial.
He estado esperando una publicación como esta durante mucho tiempo. Lo descubrí por mi cuenta, pero siempre es bueno tener una referencia a la que recurrir. ¡Envié esta joya a StumbleUpon! 🙂
[…] Añadir un pie de página con widgets a tu tema de WordPress | Theme Lab (etiquetas: wordpress) […]
[…] dominio ), subí el nuevo tema y empecé a hacer mis ajustes. Lo más importante que hice fue agregar un pie de página con widgets. Puedes hacer lo mismo usando el tutorial enlazado de Leland en Theme Lab. Principalmente quería hacer […]
[…] Agrega un pie de página con widgets a tu tema de WordPress – ¿quién dice que los widgets son solo para las barras laterales? Los he visto usados en muchos otros lugares, incluyendo los pies de página, que es exactamente lo que aprenderás a hacer en este tutorial. [Enlace] […]
[…] http://www.themelab.com/2009/04/25/add-a-widgetized-footer-to-your-wordpress-theme/ […]
No lo viste, porque no lo estoy usando ahora. Pero cuando lo activé, realmente se veía genial. Más tarde, cuando piense en qué widgets usar, lo activaré.
@ezg: ¡Genial! Solo me pregunto, ¿en qué blog lo usaste? Revisé la URL que usaste para comentar aquí, pero no vi el pie de página con widgets.
Usé tu tutorial en mi blog. Se ve muy bien.
Gracias por tu lección. 🙂
@sriganesh: Suena bien, hazme saber cómo te funciona.
gracias. estoy usando ahora elegant theme. que gané en un concurso. mira el pie de página de mi tema.. muchas gracias. , tengo un pequeño problema-agregué mis fotos de flickr. pero están dispuestas de forma irregular. como otros sitios profesionales con borde, no puedo alinearlas. ¿puedes ayudarme con esto? los últimos tres meses lo intenté por mi cuenta y agregué códigos pero nada sucedió.
[…] ¿HTML o para un sistema de gestión de contenido (CMS)? Dependiendo de tu habilidad. Agrega un pie de página con widgets a tu tema de WordPress – themelab.com 04/25/2009 La inspiración para este tutorial proviene de un tuit que recibí con […]
buen tutorial, lo intentaré, porque necesito algo así. visita mi sitio. me gustaría tener lo mismo que se menciona aquí.
No me malinterpretes, me encanta el tutorial y todo... pero para ser completamente honesto, siento que nos dejaste un poco a deber... como que queremos saber cómo HICISTE TU encabezado, ¿sabes? Esto no es un ataque personal, pero me siento un poco estafado al recibir un pie de página de texto aburrido y miserable...
Si pudieras, por favor, decirnos cómo HICISTE EL TUYO, sería genial. Y no solo decir "pon tu imagen detrás de él..." Me refiero a cómo lo hiciste de verdad. Gracias...
Hice todo lo que dijiste y no sé cómo "arrastrar" los widgets... No veo dónde arrastrarlos....
Eso lo haces en tu panel de administración de WordPress en la página de widgets. Con "arrastrar" solo me refiero a colocar los widgets en las diversas áreas con widgets.
Lamento que te sientas "dejado a deber", pero quería escribir un tutorial que pudiera aplicarse a casi cualquier tipo de tema.
Para tu información, ni siquiera uso widgets de WordPress en el pie de página y encabezado de este sitio, están codificados directamente.
No estoy seguro de cuán más detallado podría haber sido. Si eres un diseñador web y tienes una idea de qué es WordPress, entonces sabrías cómo lograr el resto. Su tutorial fue perfecto.